Event Streams Connectors for IBM MQ
In this lab exercise you will connect IBM MQ to IBM Event Streams using the Kafka source and sink connectors for MQ.
Introduction
You can use the Kafka Connect source connector for IBM MQ to copy data from IBM MQ into IBM Event Streams or Apache Kafka. The connector copies messages from a source MQ queue to a target Kafka topic. There is also an MQ sink connector that takes messages from a Kafka topic and transfers them to an MQ queue. Running it is very similar to the source connector. In this lab we will cover both the source and sink connectors.
An IBM MQ instance has been preconfigured on IBM Cloud Pak for Integration (ICP4i) on Red Hat OpenShift. To begin with you will define a pair of queues on this MQ instance for our MQ messages. You will also define a pair of topics in Event Streams. You will then configure the source connector to run some tests to a local stand-alone worker. You will then configure a sink connector, adjust your configuration to send the messages to a topic in Event Streams, and run a standalone worker to consume the messages.
At the end of this lab you should be able to configure MQ on ICP4i and configure and test sending messages from MQ to Event Streams and Event Streams to MQ.
What is Kafka Connect?
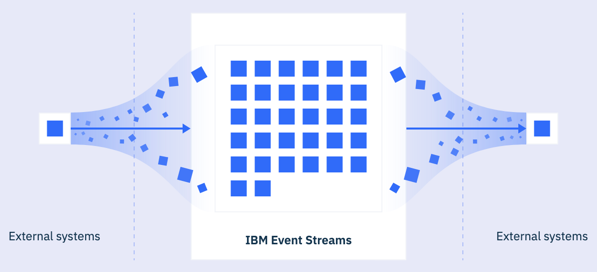
Kafka Connect is a framework for connecting Kafka to external systems. It provides a standard way of writing and running connectors.
Use Kafka Connect to reliably move large amounts of data between your Kafka cluster and external systems. For example, it can ingest data from sources such as databases and make the data available for stream processing.
Source and sink connectors
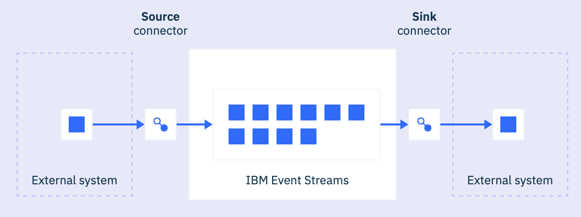
Kafka Connect has two kinds of connectors: source connectors to import data from external systems, and sink connectors to export data to external systems.
A wide range of connectors exist, created by individuals and organisations. In addition, you can write your own connectors.
Workers
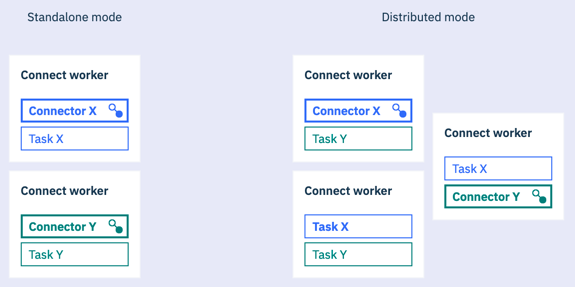
Kafka Connect connectors run inside Java processes called workers. Kafka Connect can run in either standalone or distributed mode.
Standalone mode is intended for testing and temporary connections between systems, and all work is performed in a single process. Distributed mode is more appropriate for production use, as it benefits from additional features such as automatic balancing of work, dynamic scaling up or down, and fault tolerance.
These instructions focus on standalone mode because it’s easier to see what’s going on. When you run Kafka Connect with a standalone worker, there are two configuration files. The worker configuration file contains the properties needed to connect to Kafka. The connector configuration file contains the properties needed for the connector. So, configuration to connect to Kafka goes into the worker configuration file, while the MQ configuration goes into the connector configuration file.
It’s simplest to run just one connector in each standalone worker. Kafka Connect workers throw out a lot of messages and it’s much simpler to read them if the messages from multiple connectors are not interleaved.
Connector catalog
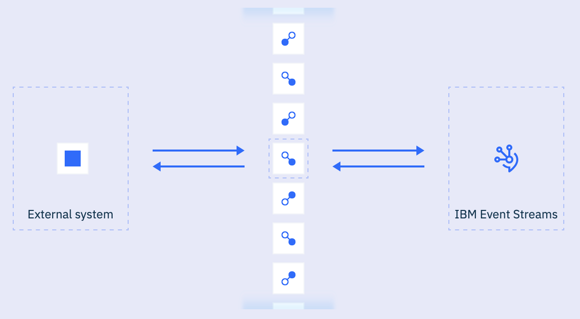
The Event Streams Connector catalog contains a list of tried and tested connectors from both the community and IBM.
Support for community connectors is provided by the people that created them. If you have support for Event Streams this includes support for IBM supported connectors.
Connectors for IBM MQ
Connectors are available for copying data between IBM MQ and Event Streams. There is a MQ source connector for copying data from IBM MQ into Event Streams or Apache Kafka, and a MQ sink connector for copying data from Event Streams or Apache Kafka into IBM MQ.
Event Streams provides help with setting up your Kafka Connect environment, adding connectors to that environment, and starting the connectors.
If you have IBM MQ or another service running on ICP4i, you can use Kafka Connect and one or more connectors to flow data between your instance of IBM Event Streams and the service on ICP4i. In this scenario it makes sense to run Kafka Connect in ICP4i as well.
Setting up and running connectors
IBM Event Streams helps you set up a Kafka Connect environment, prepare the connection to other systems by adding connectors to the environment, and start Kafka Connect with the connectors to help integrate external systems. Let’s first configure MQ for connecting to Event Streams.
Configure MQ
-
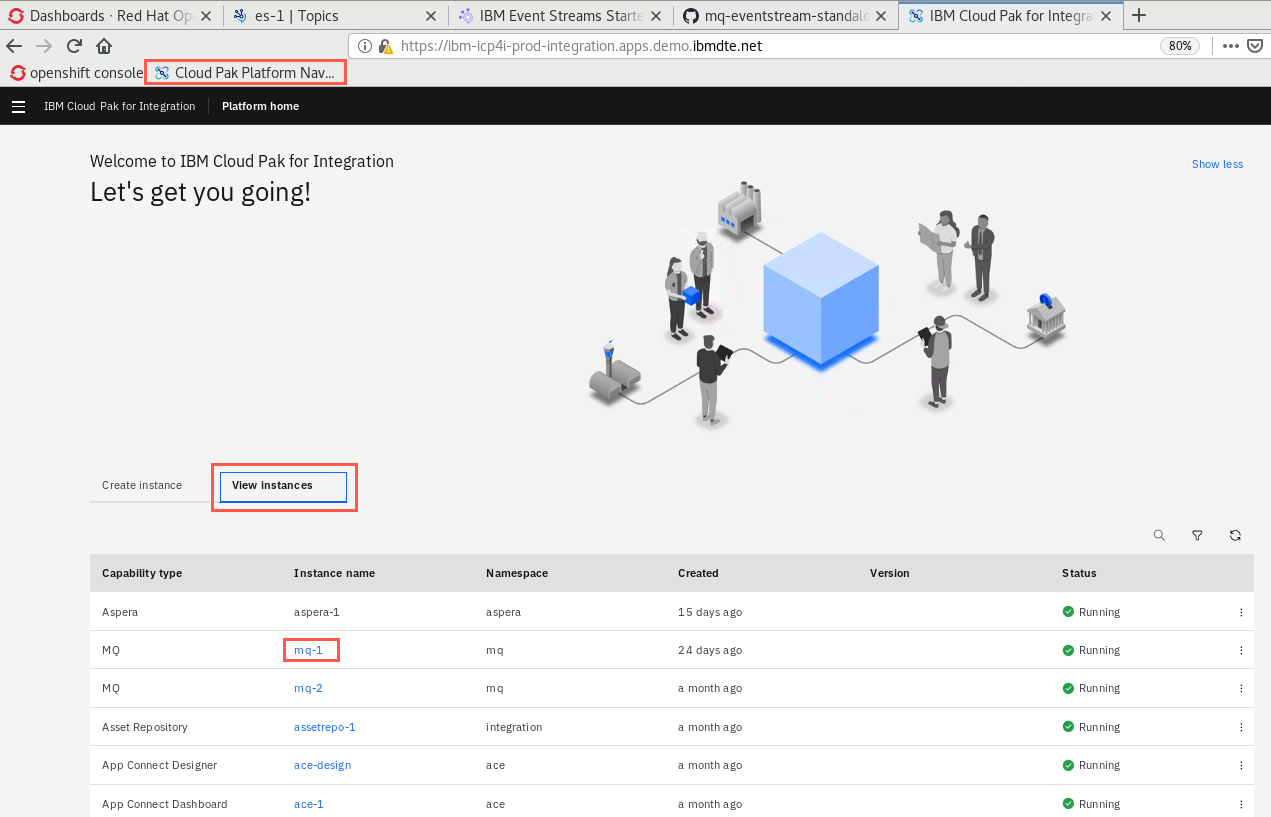
Open a new browser tab and click the Cloud Pak Navigator bookmark. Click View instances then click mq-1 to open the MQ console.
-
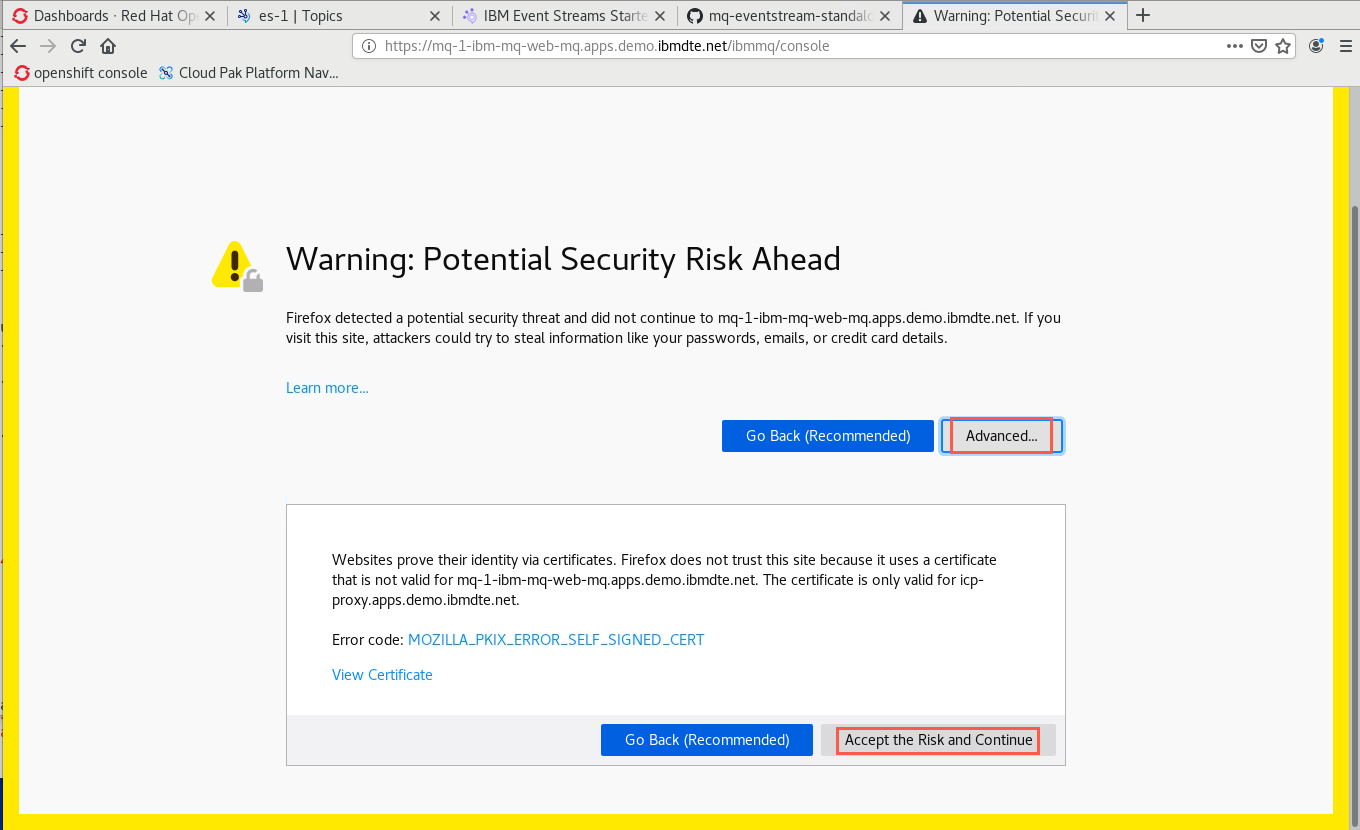
Firefox will warn you about a potential security risk. Click Advanced then Accept the Risk and Continue.
-
Since this is the first time to open the mq-1 instance, you may need to log in. Click Log in.
-
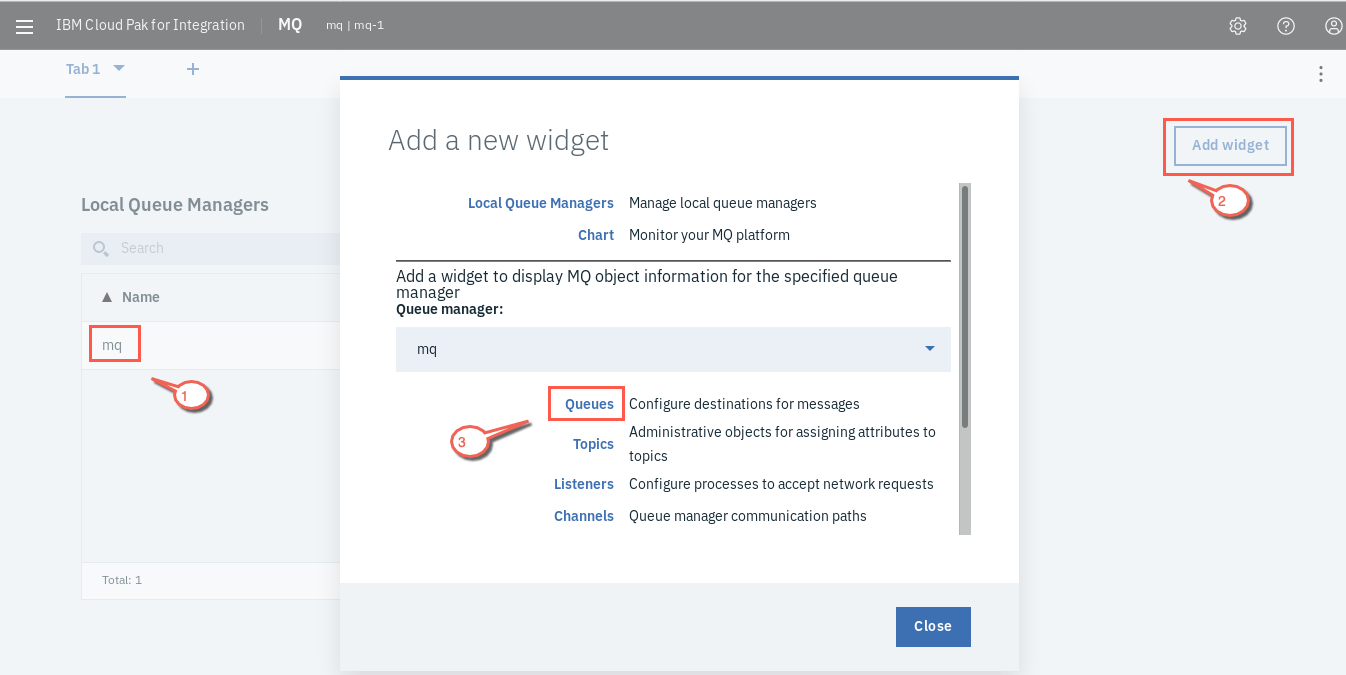
The MQ Console opens and you see the queue manager mq running. Click Add widget then click Queues to display the queues.
-
Click Create + and enter the name MQTOEVENT. Accept the default queue type as Local and click Create.
Queue Name Purpose Queue Type MQTOEVENT Source of messages to send to Event Streams Local EVENTTOMQ Destination of messages from Event Streams Local 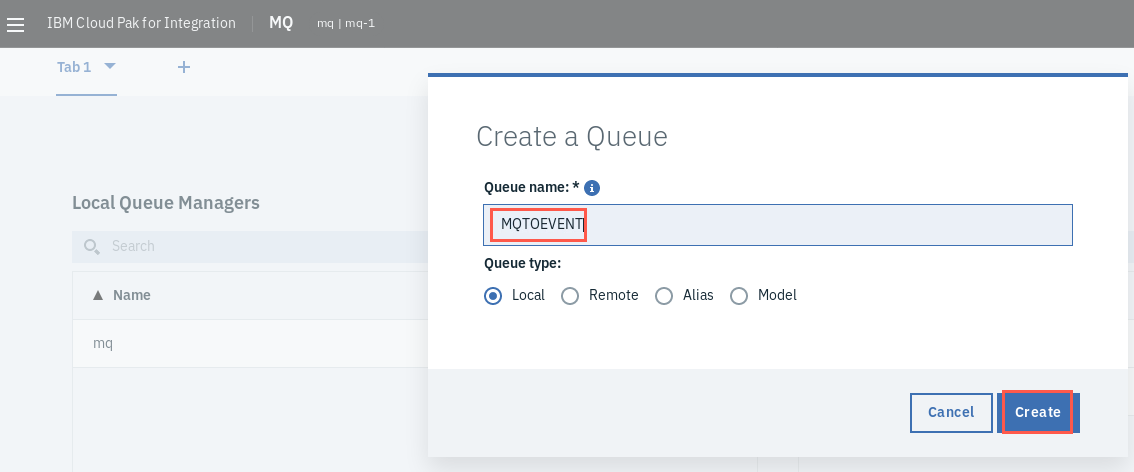
Repeat the create process to add a queue EVENTTOMQ.
-
Click Add widget again. This time select Channels.
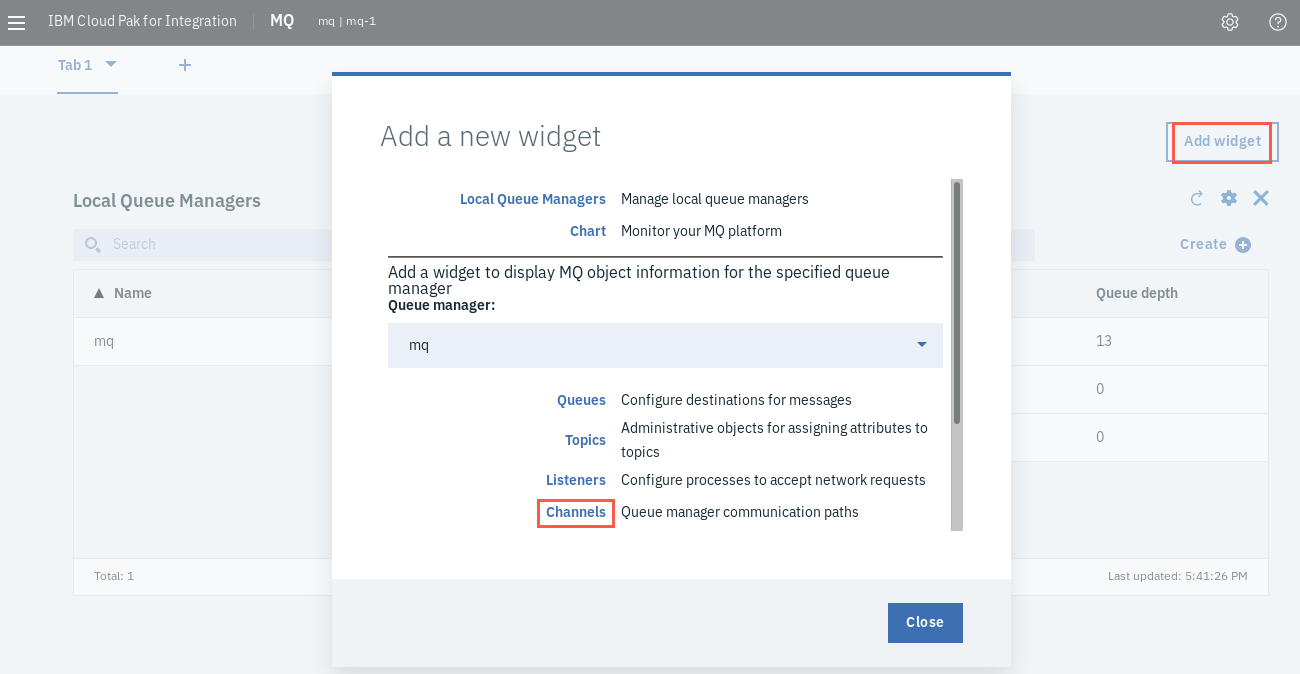
Notice that there is already a predefined channel DEF.SVRCONN of type server-connection that has been preconfigured for connecting MQ clients to the MQ queue manager mq. The channel is supposed to be in Inactive status. It will become Active when clients connect.
Create topics
For this lab you will running Kafka Connect in standalone mode. When running in standalone mode Kafka Connect uses a local file to store configuration, current offsets, and status.
Now that you are familiar with topics and creating them from the previous labs, you need to create a new topic for running the MQ source connector.
-
In the Event Streams UI, click the Topics icon on the menu bar.
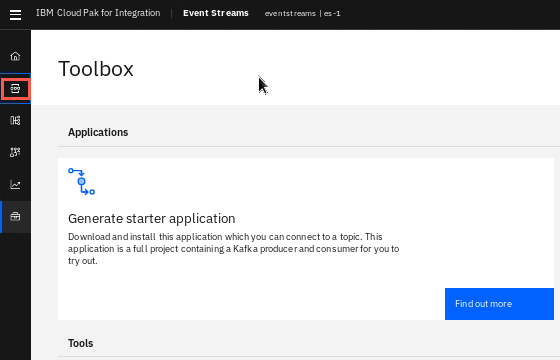
-
Click Create topic. Turn Show all available options to On. Enter mqtoevent for the topic name. Use the following values when creating the topics. Create the following topics:
Use the following values when creating the topics.
Topic Name Purpose Partitions Replicas Cleanup Policy mqtoevent Topic to receive messages from IBM MQ queue 1 3 compact eventtomq Topic to send messages to IBM MQ queue 1 3 compact 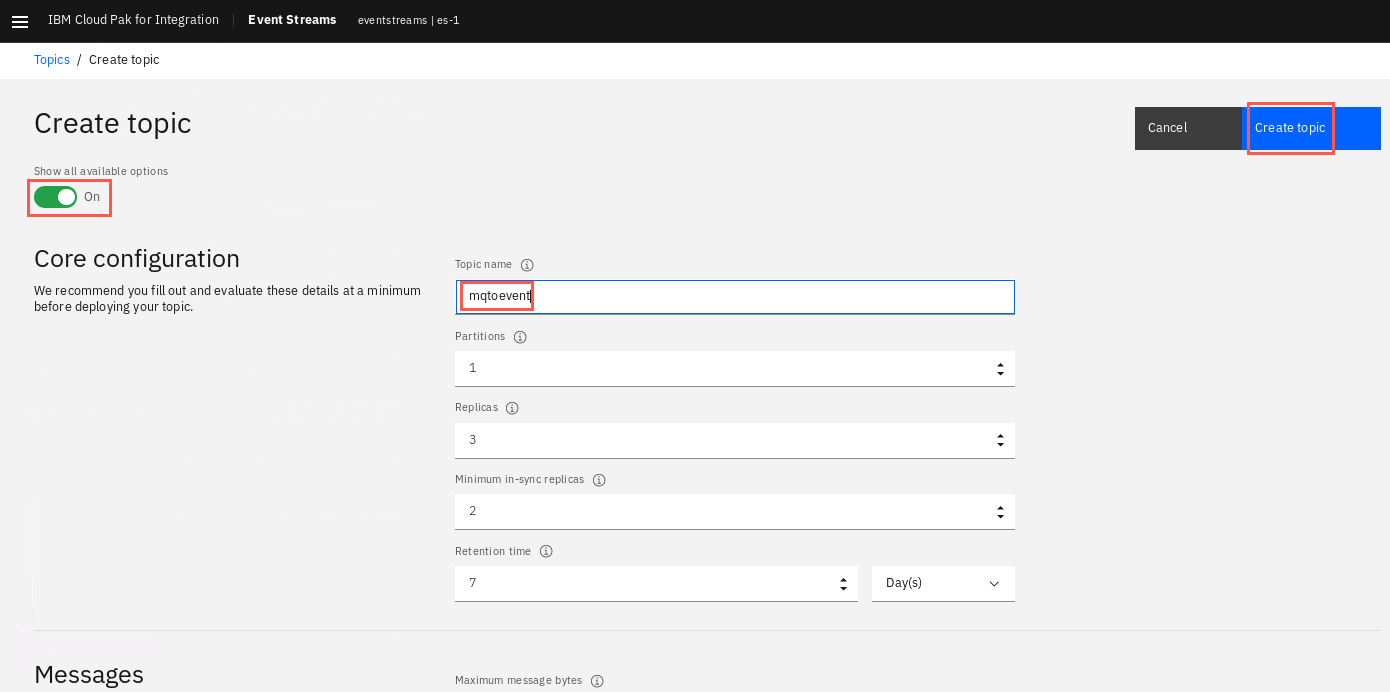 Note:
Note:
When all available options is On you will see a great amount of detail for each topic. You only need to edit the Core configuration section. If you turn the switch to Off you will need to click Next three times before the final pane where you click Create topic.The topic mqtoevent is the topic used by the IBM MQ source connector to get messages from the queue in IBM MQ and send to IBM Event Streams.
-
Since you may also want test the IBM Event Streams sink connector, you can define the topic it will use to get messages from IBM Event Event Streams and put to a queue in IBM MQ.
Create the topic eventtomq now.
Provide or generate an API Key
This API key must provide permission to produce and consume messages for all topics, and also to create topics. This will enable Kafka Connect to securely connect to your IBM Event Streams cluster.
-
Still in the Event Streams UI, click Toolbox in the primary navigation. Scroll to the Connectors section.
-
Go to the Set up a Kafka Connect environment tile, and click Set up.
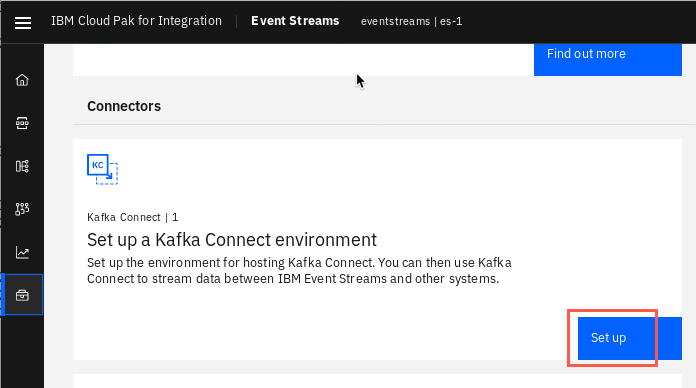
-
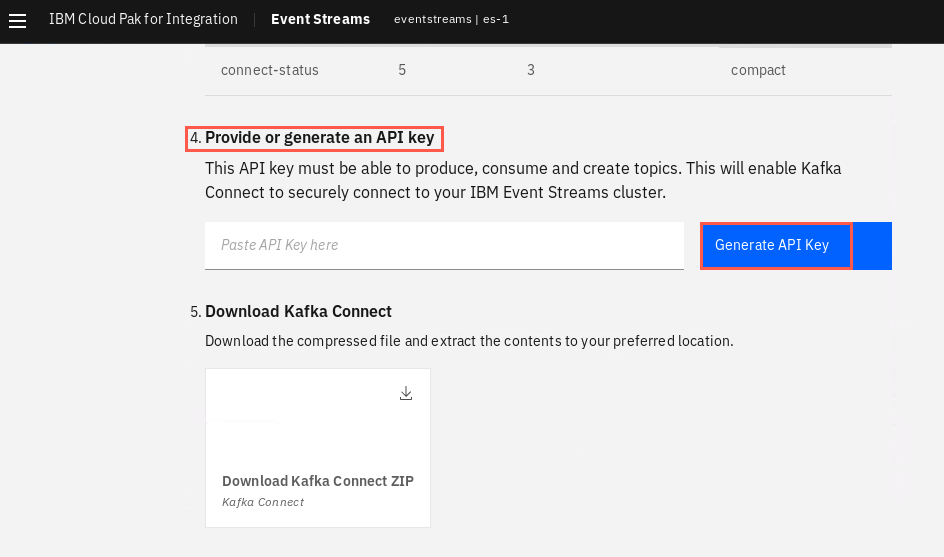
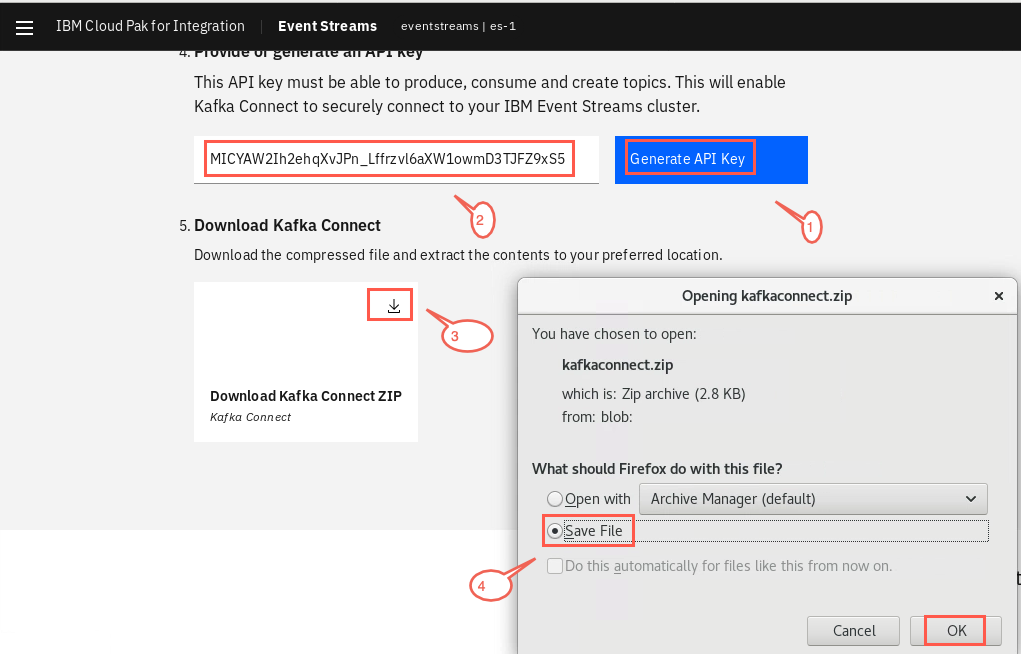
Go to step 4 and click Generate API Key. This API key provides permission to produce and consume messages, and also to create topics. Wait for the key to be generated. In the next step, the API key will be included in the downloaded zip. But it is still a good idea to copy and save the API Key in your creds.txt file.
-
On step 5 click Download Kafka Connect ZIP to download the compressed file. Click Save file which will store the kafkaconnect.zip file in your Downloads directory.
Setting up a Kafka Connect environment
You can now use Kafka Connect to stream data between Event Streams and other systems.
-
Open a terminal and create a directory for Kafak Connect in your preferred location. Then abstract the downloaded kafkaconnect.zip. Use the following commands:
 cd ~
 mkdir kafkaconnect
 cd kafkaconnect
 unzip ~/Downloads/kafkaconnect.zip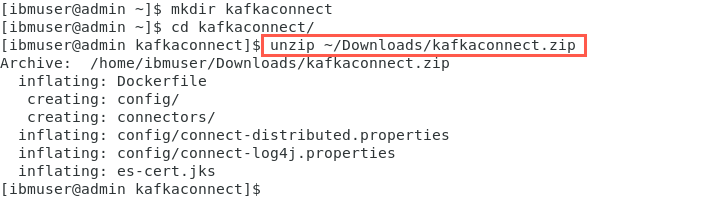
Adding connectors to your Kafka Connect environment
You will now prepare Kafka Connect for connections to other systems by adding the required connectors.
To run a particular connector, Kafka Connect must have access to a JAR file or set of JAR files for the connector. The quickest way to do this is by adding the JAR file(s) to the classpath of Kafka Connect.
-
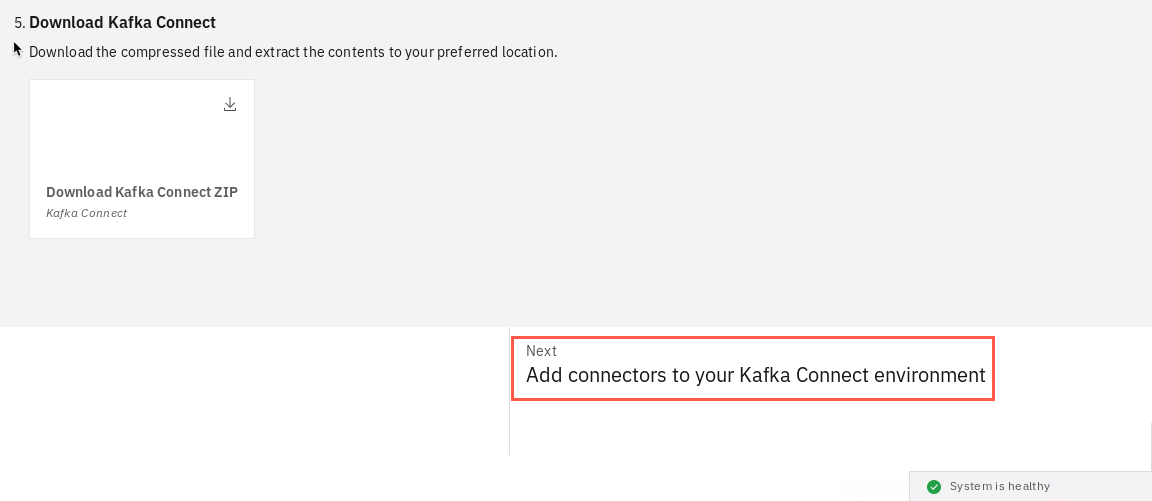
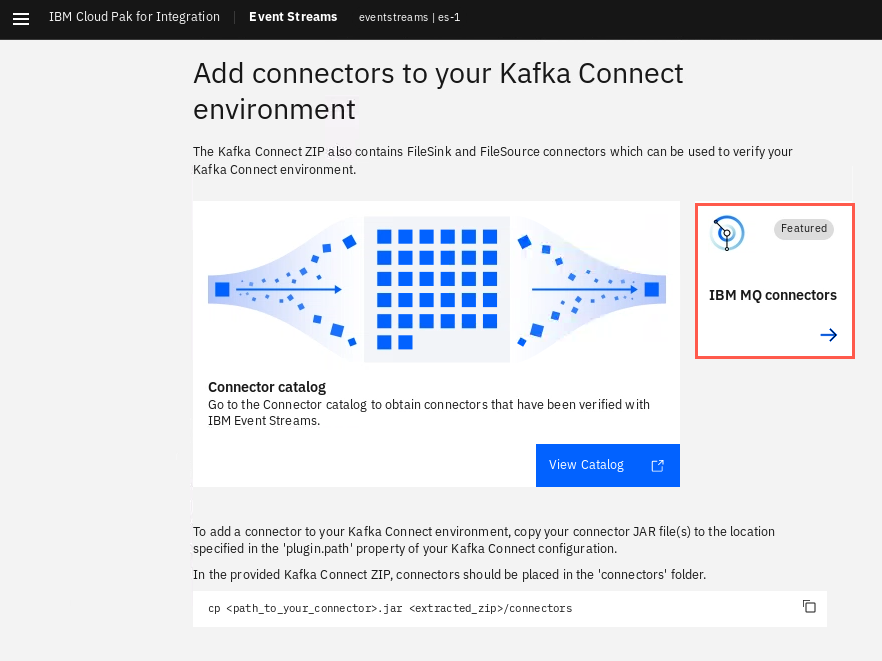
Return to the Event Streams browser. Click Next Add connectors to your Kafka Connect environment at the bottom of the page. You can also access this page by clicking Toolbox in the primary navigation, scrolling to the Connectors section, and clicking Add connectors on the Add connectors to your Kafka Connect environment tile.
-
To create an MQ source connector, click IBM MQ connectors.
 Note:
Note:
The connector is also available in GitHub if you wish to build it yourself. https://github.com/ibm-messaging/kafka-connect-mq-sink -
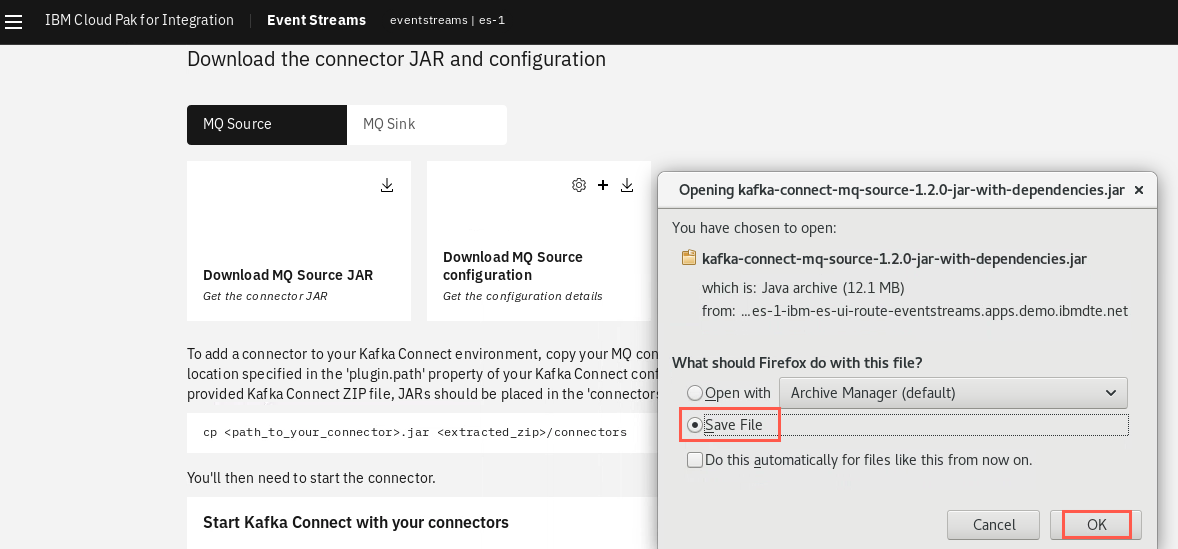
Under Download the connector JAR and configuration, make sure MQ Source is highlighted and click the Download MQ Soure JAR button. Then click Save File.
-
The jar is stored in your Downloads directory. The MQ connector jar files need to be stored in the connectors subdirectory. You must copy the jar to the connectors subdirectory of kafkaconnect.
-
Copy the MQ Source JAR file to /home/ibmuser/kafkaconnect/connectors.
cp ~/Downloads/kafka-connect-mq-source-1.2.0-jar-with-dependencies.jar ~/kafkaconnect/connectors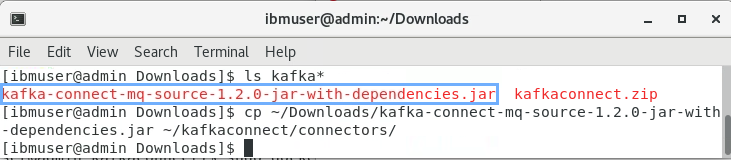
-
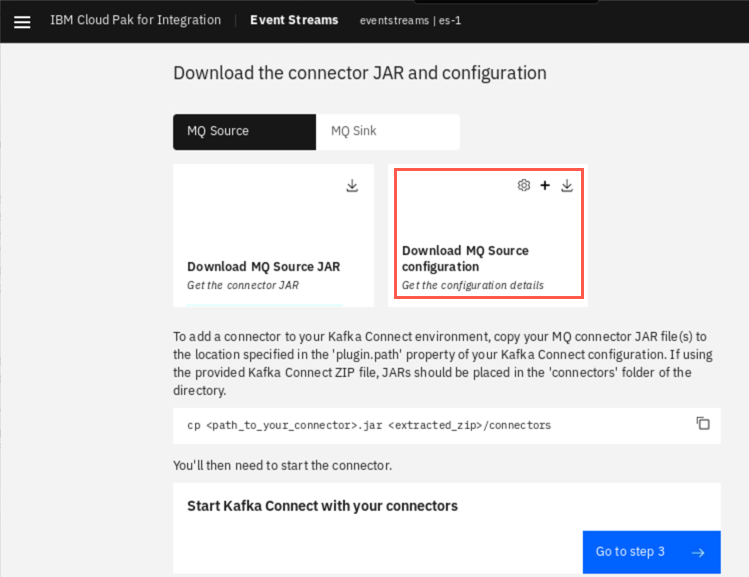
Now that the connector jar is available, you need to configure MQ. Return to the web browser and click Download MQ Source configuration.
-
This will bring up a configuration properties panel. Use this table to enter the properties:
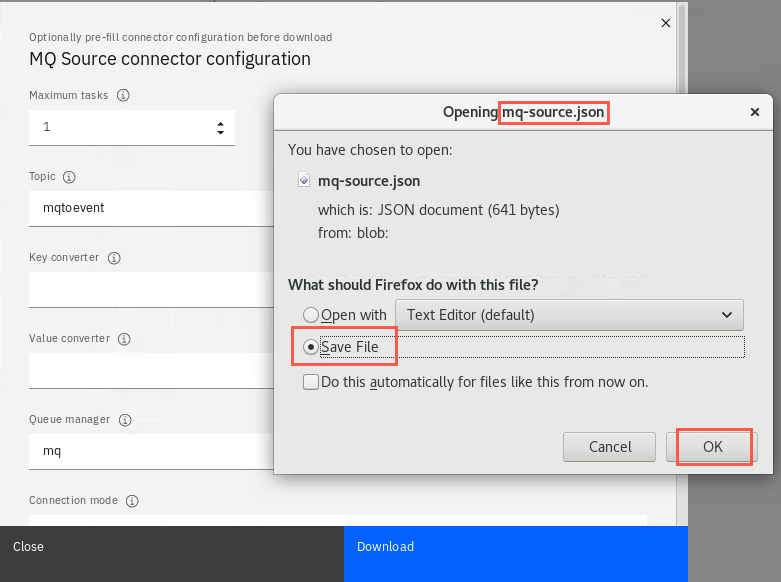
Property Value Topic mqtoevent Queue manager mq Connection mode client Connection name list mq-1-ibm-mq-qm-mq.apps.demo.ibmdte.net(443) Channel DEF.SVRCONN Queue MQTOEVENT JMS message handling true SSL cipher suite TLS_RSA_WITH_AES_256_CBC_SHA256 When complete click Download, then Save File. The downloaded file is named mq-source.json and is stored in /home/ibmuser/Downloads directory.
 Note:
Note:
The Connection name list value is the route that is exposed in the OpenShift mq project. Since connecting outside of OpenShift, SSL is required, so port 443 is used. -
Click the X to close the configuration window.
Install local Kafka
You need the Kafka Connect environment to run the MQ connectors in standalone mode. This can be downloaded from the Kafka project, but it has already been downloaded onto this image. It is stored in /home/ibmuser/esconfig/kafka_2.13-2.5.0.tgz.
-
In the command terminal, change to your home directory and unpack the tar file (to your home directory) with the following command.
 cd ~
 tar -zxvf ~/esconfig/kafka_2.13-2.5.0.tgz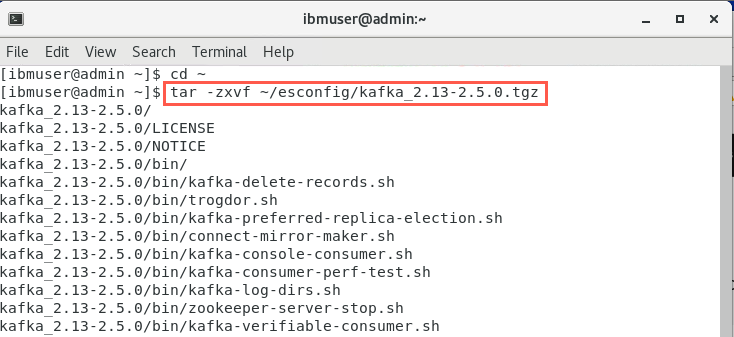
The top-level directory of the unpacked .tgz file is referred to as the Kafka root directory. It contains several directories including bin for the Kafka executables and config for the configuration files. Kafka is now installed and the Kafka root directory is /home/ibmuser/kafka_2.13-2.5.0.
Note:
For this lab, we are going to use the latest connector code from IBM. The jar files are located in /home/ibmuser/esconfig/connectors.
Configure Kafka standalone properties
Since the connectors communicate with Event Streams and MQ, you need a properties file for the Event Streams connection and a properties file for the MQ connection. You have already downloaded the MQ source properties file. You downloaded the mq-source.json file, but Kafka standalone requires property files to be in plain text. On this image, there is an MQ source properties file in /home/ibmuser/connect-standalone-source.properties. You will need to update this file with the values in the json file.
The connector properties file for the Event Streams side has been also been provided on the image with the correct values except the password for connecting to Event Streams. It is located in the /home/ibmuser/esconfig/connect-standalone-source.properties. You will copy the API key that you downloaded as the api-key.json file. This properties file must be in the Kafka root config subdirectory as Event Streams is running open source Kafka.
-
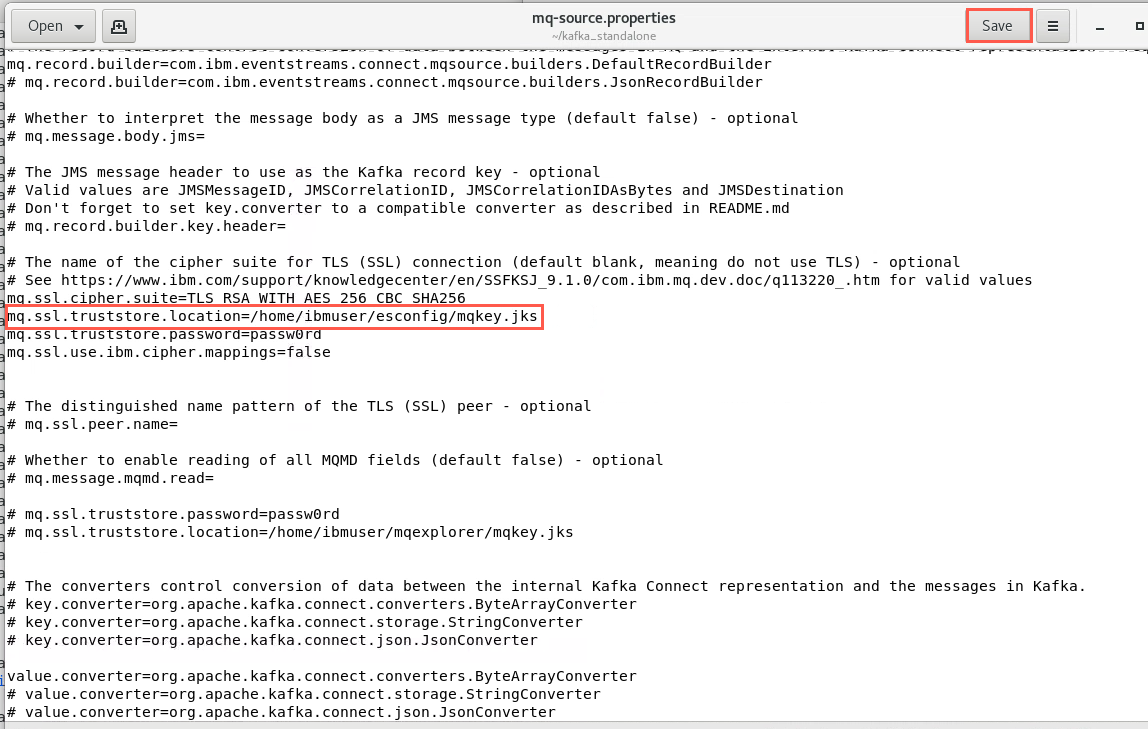
Edit the /home/ibmuser/kafka_standalone/mq-source.properties file with the following command:
gedit ~/kafka_standalone/mq-source.properties -
In another terminal window, print the values in the downloaded mq-source.json file. Edit the equivalent properties in the mq-source.properties with the values in the json file.
cat ~/Downloads/mq-source.json
-
All the values must match.
-
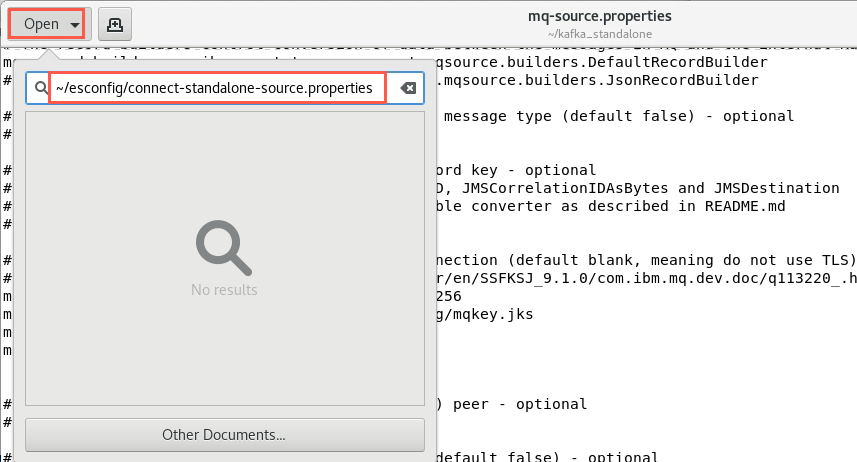
The MQ source connector needs a stand-alone properties file for connecting to Event Streams. A preconfigured source connector properties file has been stored in /home/ibmuser/esconfig/connect-standalone-source.properties file.
In an editor window open this file.
-
Review this file. Pay particular attention to the bootstrap.servers field. This is the route exposed by OpenShift for the es-1 instance of Event Streams.
-
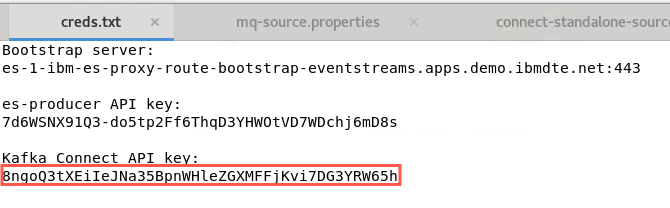
In another terminal window, retrieve the Kafka Connect API key you stored in the creds.txt file.
cat ~/creds.txt. -
Copy the key and return to the editor (connect-standalone-source.properties). Paste the key into password field for username token of sasl.jaas.config. Make sure it is between the quotations overlaying the value already stored there.
-
Repeat the paste for the producer.sasl.jaas.config field.
-
Change the path for ssl.truststore.location and producer.ssl.truststore.location to /home/ibmuser/kafkaconnect/es-cert.jks.
Notice the producer.ssl. properties. The MQ source connector is a Kafka producer since it is getting messages from an MQ queue and publishing to an Event Streams topic.
-
The default REST port for the connectors is 8083. When you run two connectors, each must use a unique port. So the MQ source connector will use port 8084 defined by the following lines after the consumer.ssl… lines.
 #Run 2 connectors
 rest.port=8084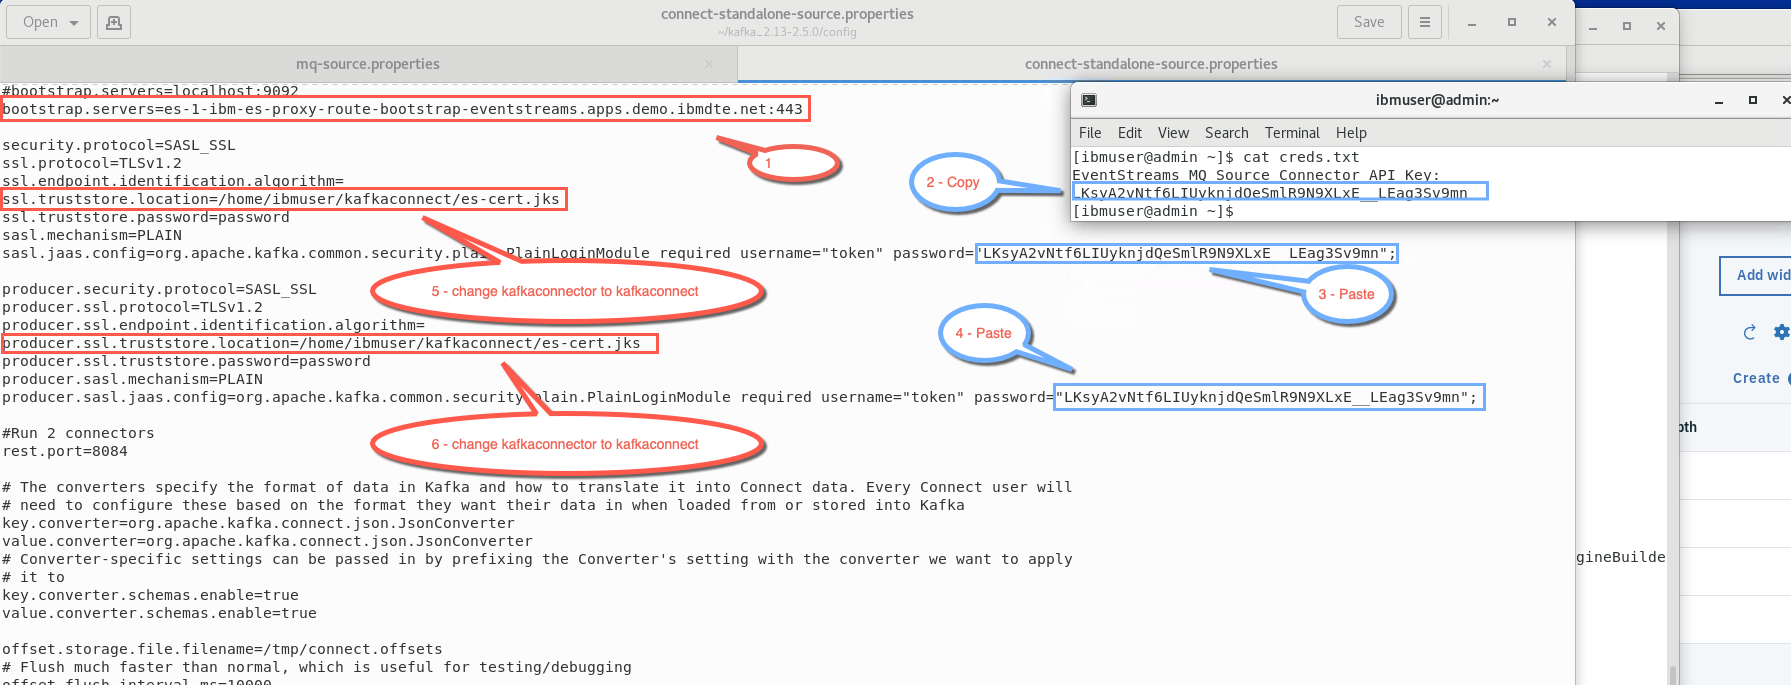
-
Click Save.
-
The stand-alone properties file must be in the Kafka root directory when starting the connector. Copy the file with the following commnand.
cp ~/esconfig/connect-standalone-source.properties ~/kafka_2.13-2.5.0/config/
Start the connector
You are now ready to run the MQ source connector. This image includes a a sample shell script to run the connector.
-
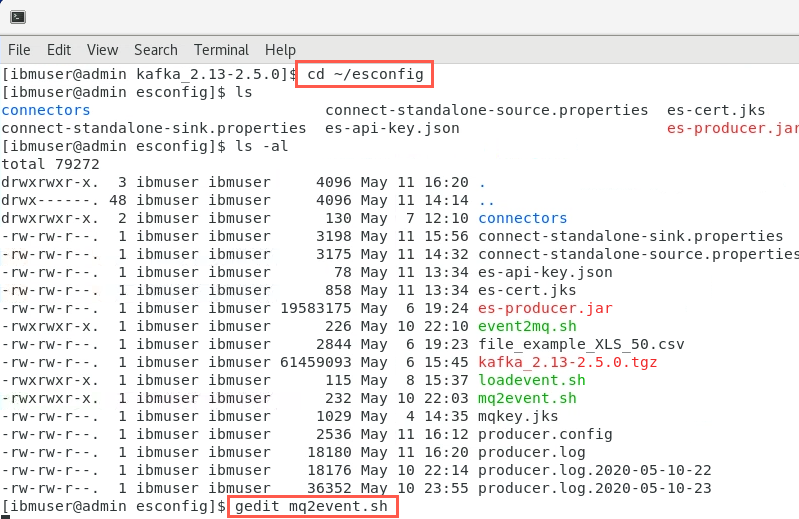
Open a new terminal window and change to the /home/ibmuser/esconfig directory.
cd ~/esconfig -
Open the shell script file mq2event.sh in gedit.
-
In the editor, review the script to see how it will execute the connector.
The script must be run from the Kafka root directory, so the bin and config directories are relative to /kafka_2.13-2.5.0. The CLASSPATH is specifying where the connector jar is located and you can see where the two property files are stored. There is nothing to change here, so close the editor.

-
You can now start the connnetor by entering the script name. You need to be in the Kafka root directory to run the connector in the standalone mode. Change to the /home/ibmuser/kafka_2.13-2.5.0 directory and run the script with following commands.
cd ~/kafka_2.13-2.5.0 . /home/ibmuser/esconfig/mq2event.sh -
If the connector is running correctly you will see two messages. The first indicates that the connector has successfully connected to the queue manager. The second will indicate that the connector is now polling for messages.

Test the source connector
-
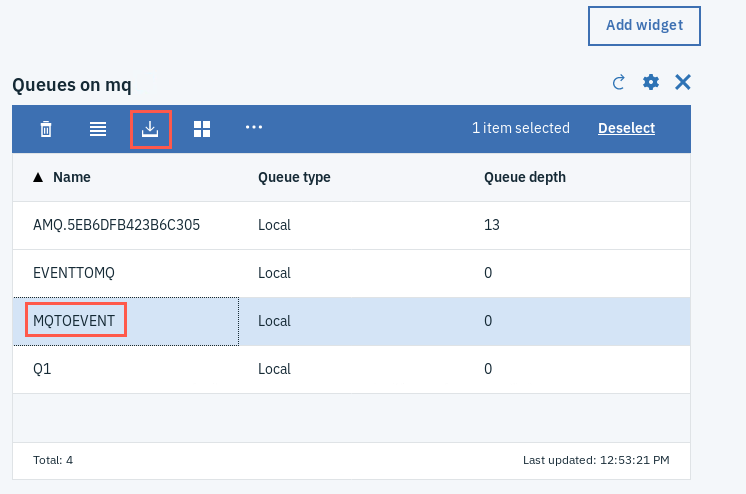
In the MQ Console browser tab, highlight the MQTOEVENT queue in the Queues on mq widget. Click the put test message icon.
-
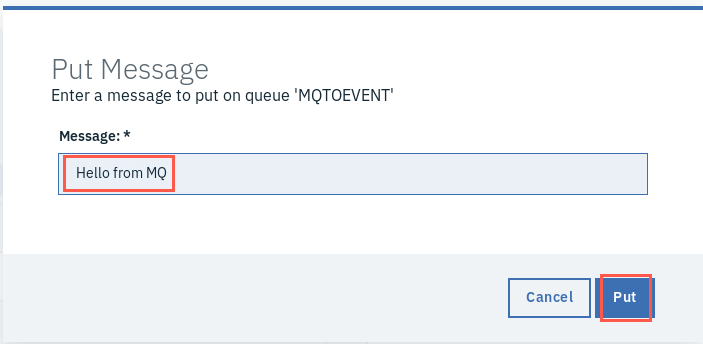
Type a message of your choice. Click Put.
-
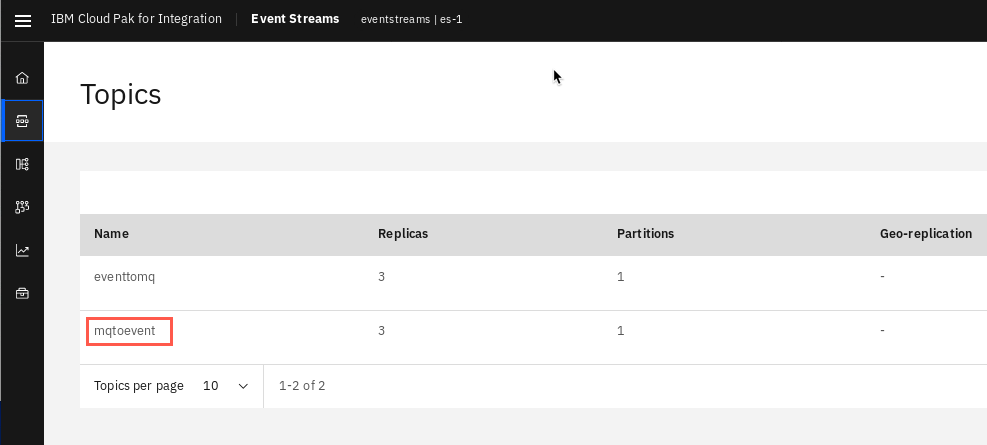
In the Event Streams UI browser tab, click the Topics icon on the toolbar, then click the mqtoevent topic.
-
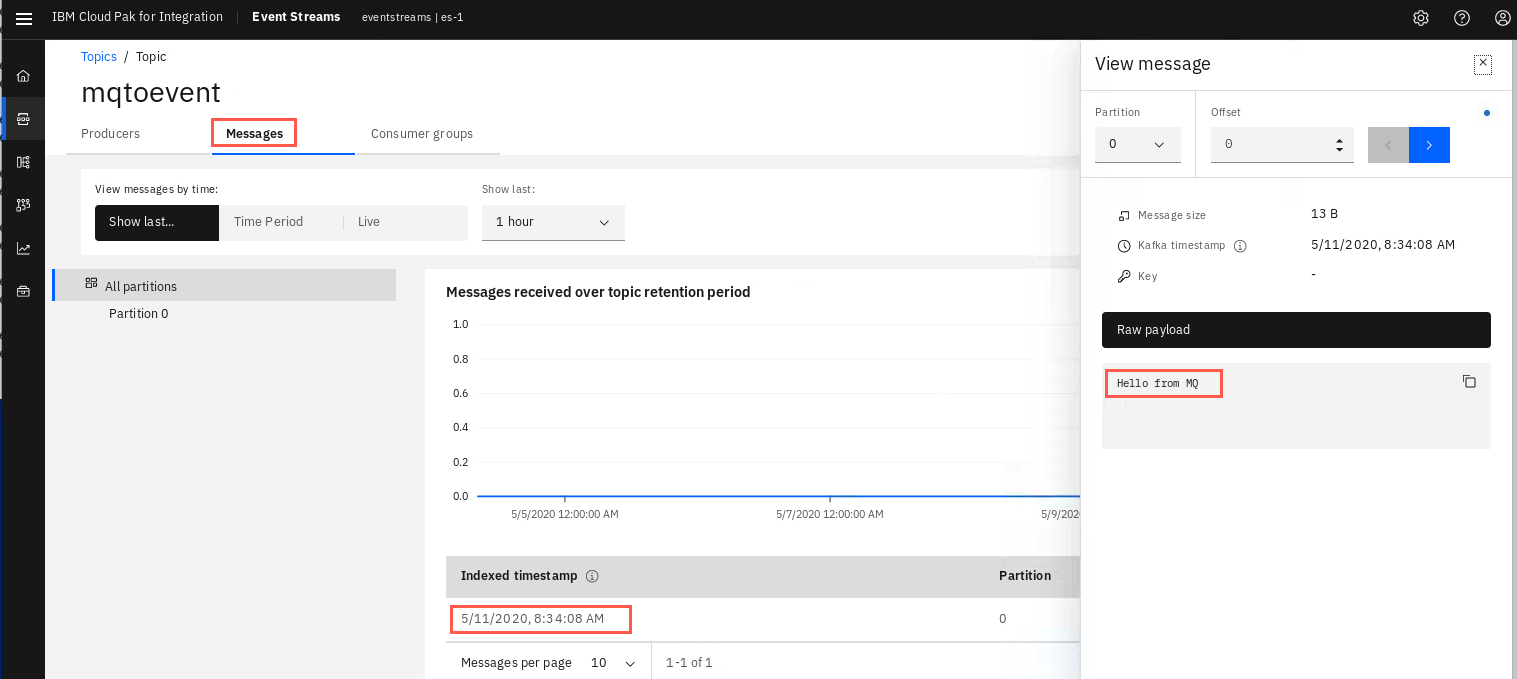
Click Messages then locate the message you put on the MQTOEVENT queue. Click the message and check the payload to make sure it was your message.
-
Close the View message pop-up.
MQ sink Connector
In the previous section of this lab you configured the MQ instance in Red Hat OpenShift then configured the source connector which takes messages from an MQ queue and transfers them to a Kafka topic. Running the MQ sink connect is very similar to the source connector. You will use the same MQ queue manager as we did for the MQ source connector.
In this section of the lab exercise you will connect IBM Event Streams to IBM MQ using the Kafka sink connector for MQ. You can use the MQ sink connector to copy data from IBM Event Streams or Apache Kafka into IBM MQ. The connector copies messages from a Kafka topic into a target MQ queue.
There are two configuration files. The worker configuration file contains the properties needed to connect to Kafka. The connector configuration file contains the properties needed for connecting to MQ. So configuration to connect to Kafka goes into the worker configuration file while the MQ configuration goes into the connector configuration file.
At the end of this part of the lab you should be able to install and configure the sink connector for MQ and test sending messages from Event Streams to MQ.
Download the sink connector for IBM MQ
-
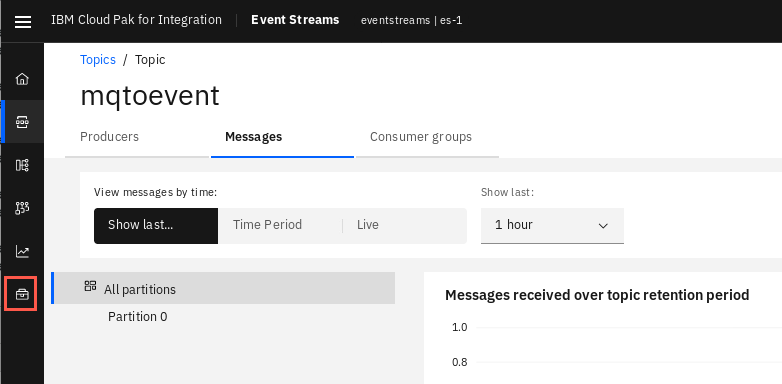
Return to the IBM Event Streams Toolbox UI.
-
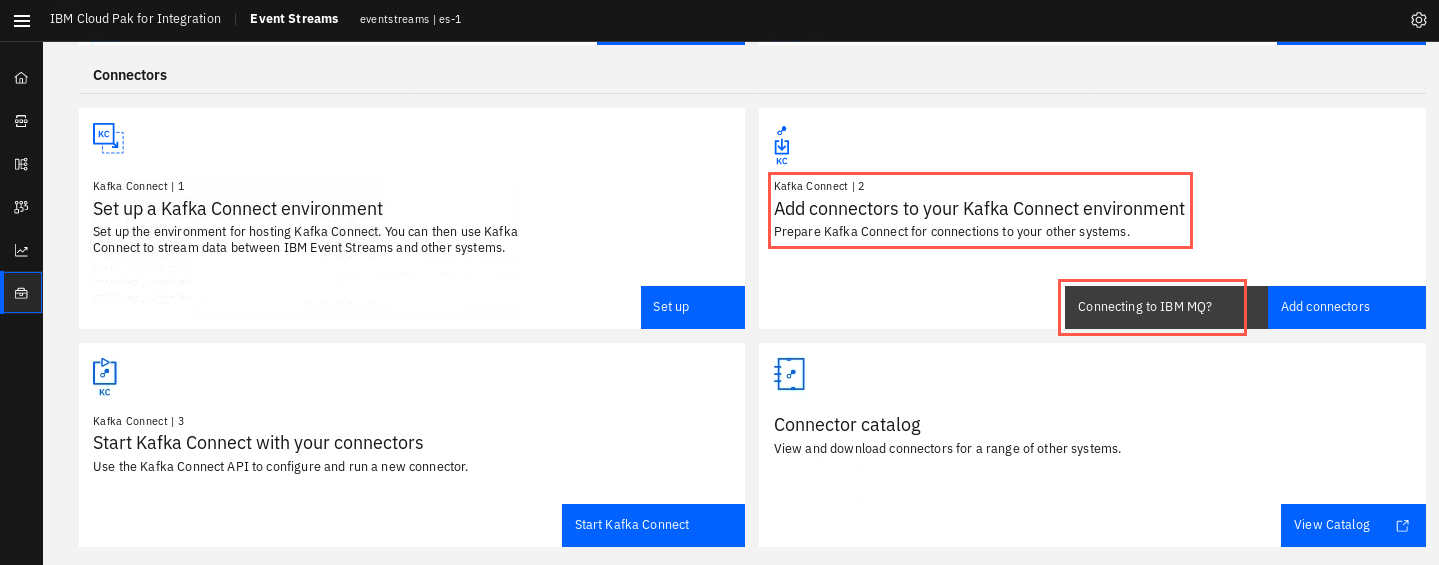
Click the Toolbox tab. Scroll down and click “Connecting to IBM MQ?” under Add connectors to your Kafka Connect environment.
-
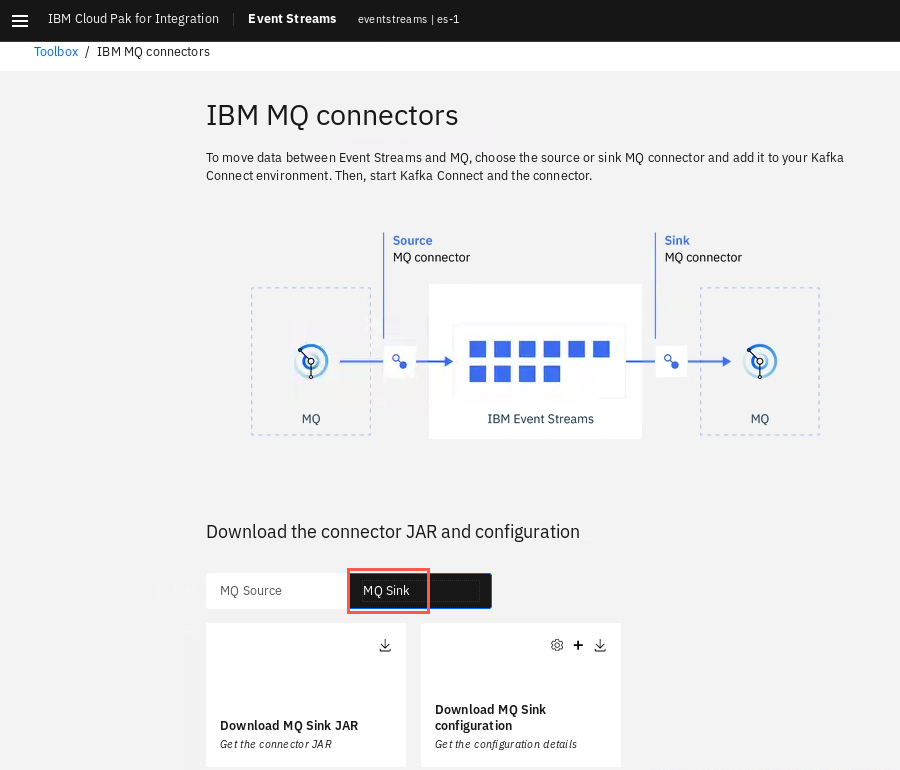
The IBM MQ connectors window appears. This window will look familiar as this is where you downloaded the jar and configuration for the MQ source connector. Here you will find downloads for both the sink Connector JAR and a sample connector properties file. Click MQ Sink.
-
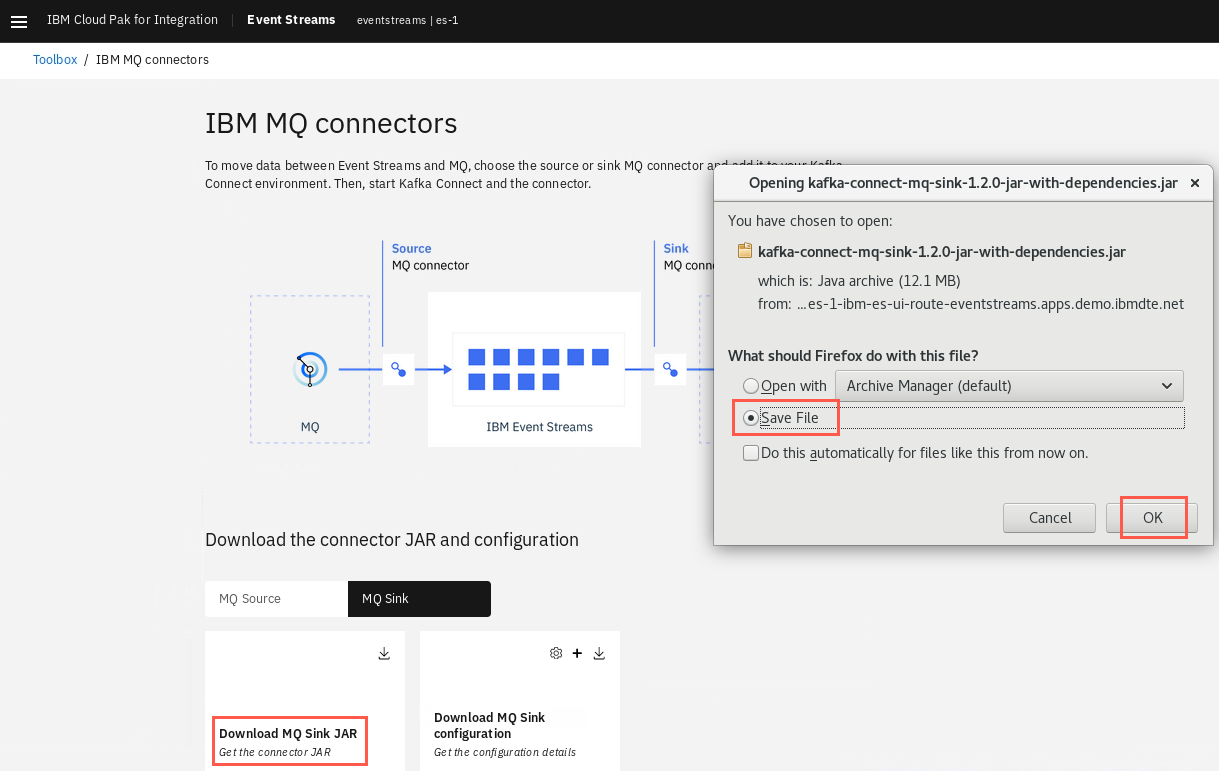
Click Download MQ Sink Jar and save the file to your Downloads directory.
Configure the sink connector for IBM MQ
-
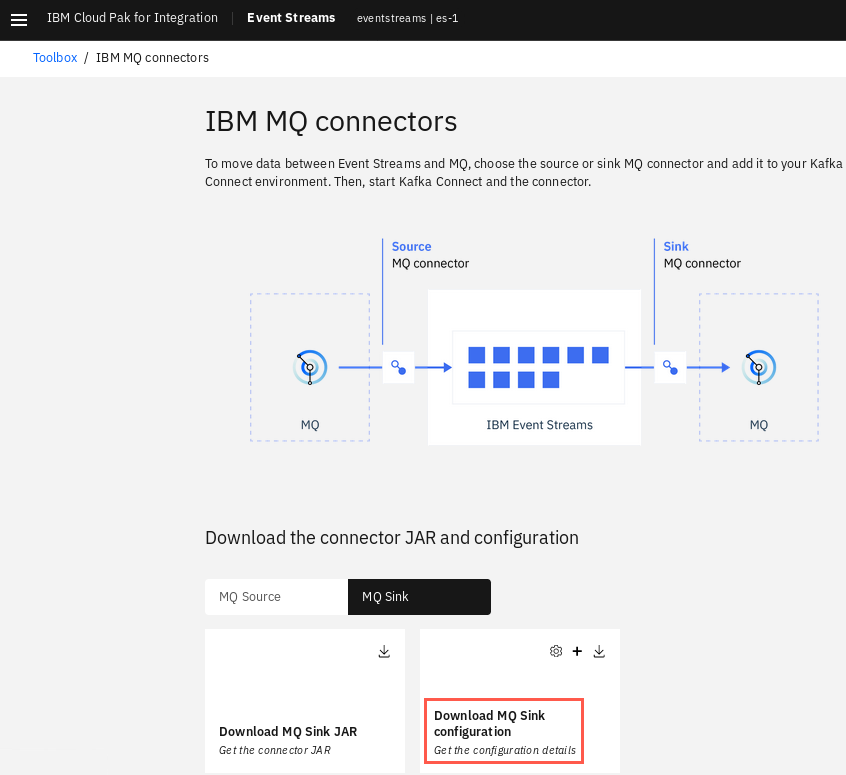
Click Download MQ Sink configuration.
-
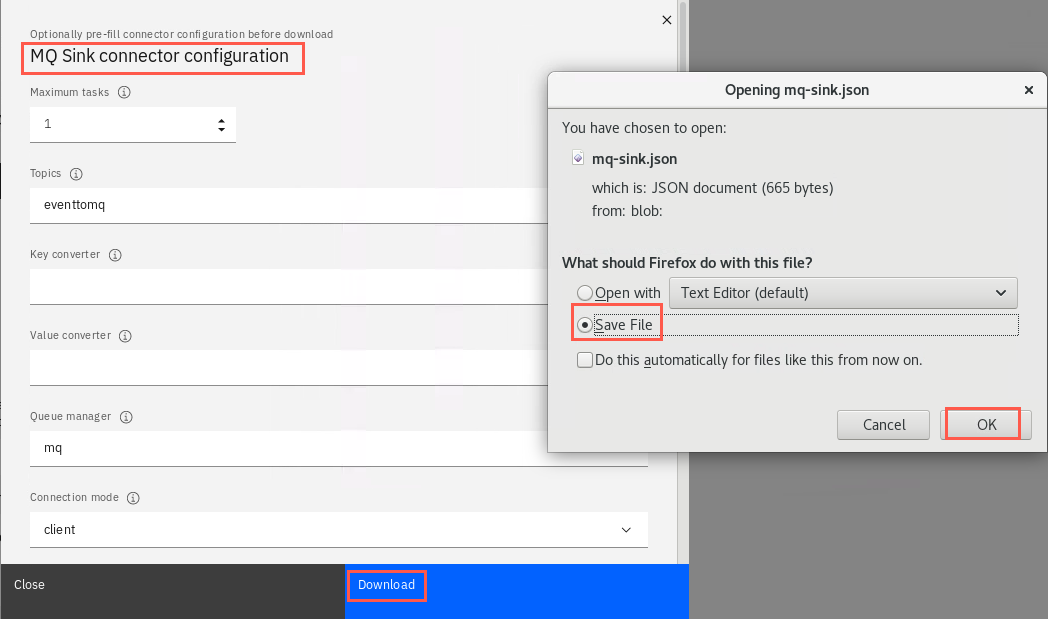
The MQ Sink connector configuration appears where you can fill in the properties. Use the values in this table to fill in the properties.
Property Value Topics eventtomq Queue manager mq Connection mode client Connection name list mq-1-ibm-mq-qm-mq.apps.demo.ibmdte.net(443) Channel DEF.SVRCONN Queue EVENTTOMQ JMS message handling true SSL cipher suite TLS_RSA_WITH_AES_256_CBC_SHA256 -
Click Download and save the file buy clicking OK.
-
Click Close to dimiss the configuration panel.
Alternatively, you can clone the project from GitHub. However, if you clone from GitHub, you have to build the connector yourself as described in the README.
Note:
The connector is also available in GitHub if you wish to build it yourself. [https://github.com/ibm-messaging/kafka-connect-mq-sink] (https://github.com/ibm-messaging/kafka-connect-mq-sink)
Configure the sink standalone properties
-
Edit the /home/ibmuser/kafka_standalone/mq-sink.properties file with the following command:
gedit ~/kafka_standalone/mq-sink.properties -
In another terminal window, print the values in the downloaded mq-source.json file. Edit the equivalent properties in the mq-source.properties with the values in the json file.
cat ~/Downloads/mq-sink.json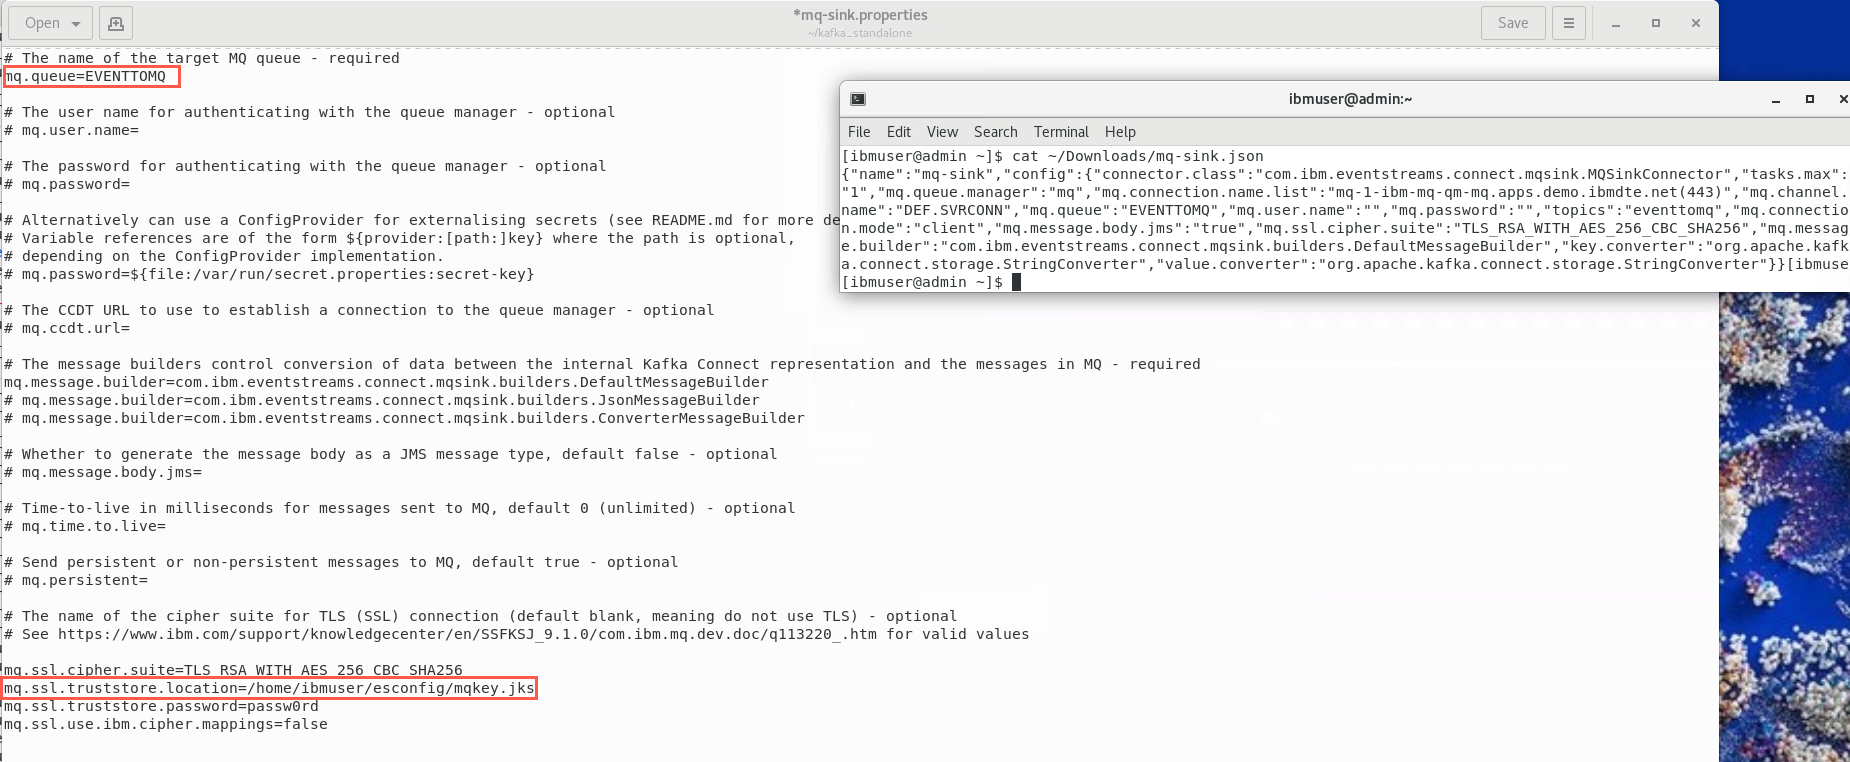
Verify that you have the correct values. Make sure that the queue name is EVENTTOMQ and the mq.ssl.truststore.location has been changed to /home/ibmuser/esconfig/mqkey.jks.
Click Save and close the editor.
-
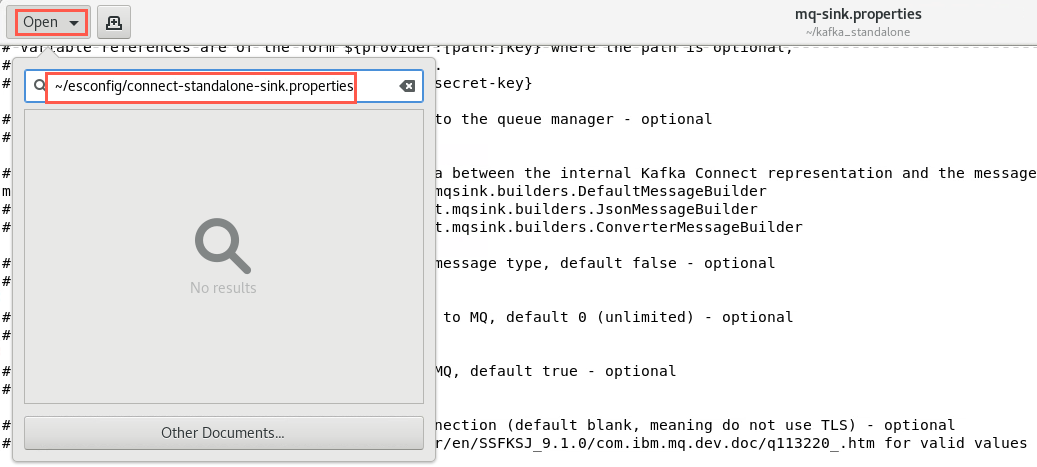
Still in the editor, click Open and enter ~/esconfig/connect-standalone-sink.properties and hit enter.
-
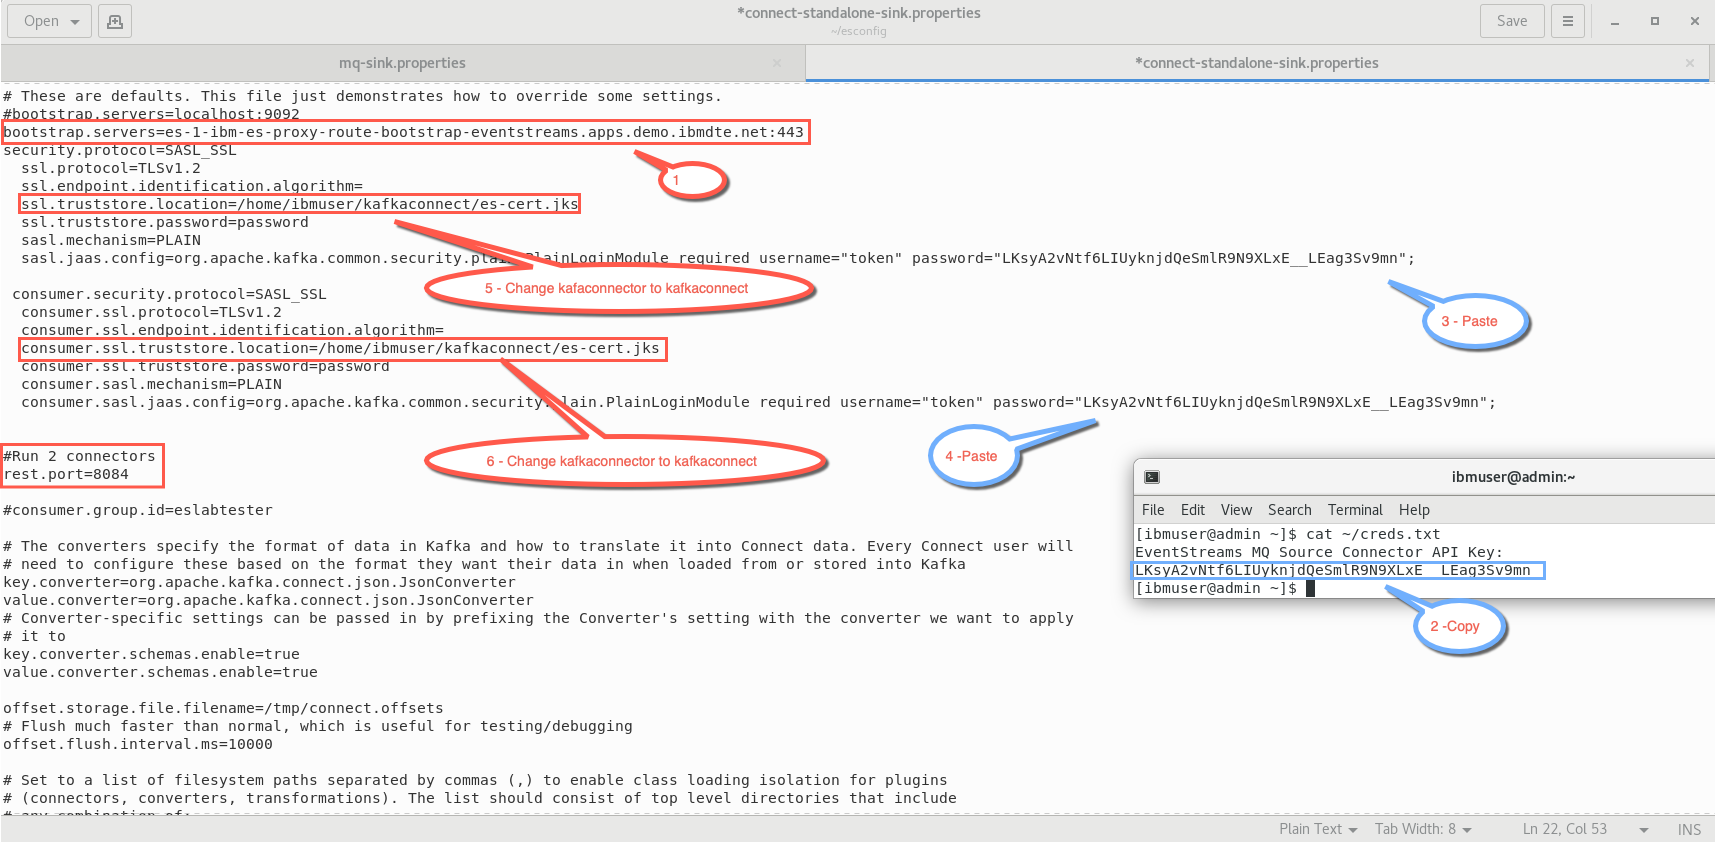
Review this file. Pay particular attention to the bootstrap.servers field. This is the route exposed by OpenShift for the es-1 instance of Event Streams.
-
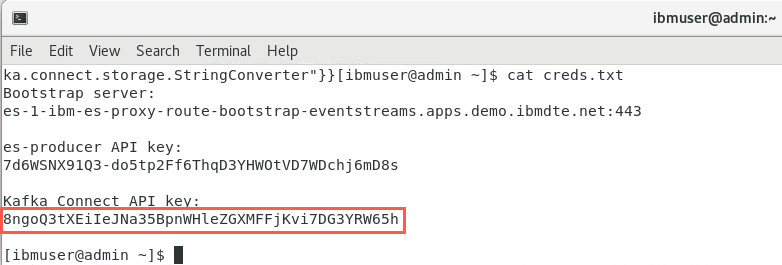
In another terminal window, retrieve the API key you stored in the creds.txt file.
cat ~/creds.txt. -
Copy the API key you stored earlier for the Kafa Connect API key.
-
Return to the editor (connect-standalone-sink.properties). Paste the key into password field for username token of sasl.jaas.config. Make sure it is between the quotations overlaying the value already stored there.
-
Repeat the paste for the consumer.sasl.jaas.config field.
-
Change the path for ssl.truststore.location and consumer.ssl.truststore.location to /home/ibmuser/kafkaconnect/es-cert.jks.
-
Click Save then close the editor.
Start the MQ sink connector
-
Open a new terminal window and change to the /home/ibmuser/esconfig directory. Copy the properties file to ~/kafka_2.13-2.5.0/config.
cp connect-standalone-sink.properties ~/kafka_2.13-2.5.0/config
-
You are now ready to run the MQ sink connector. This image includes a a sample shell script to run the connector.
-
Open the event2mq.sh shell script in the editor to review how it will run. There are no changes needed. You may close the editor.

-
You can now start the connector by entering the script name. You need to be in the Kafka root directory to run the connector in the standalone mode. Change to the /home/ibmuser/kafka_2.13-2.5.0 directory and run the script with following commands.
cd ~/kafka_2.13-2.5.0 . /home/ibmuser/esconfig/event2mq.sh -
If the connector is running correctly you will see two messages. The first indicates that the connector has successfully connected to the queue manager. The second will indicate that the connector is now subscribed to topic eventtomq.

Test the MQ sink connector
You will use the producer.jar file to load messages into Event Streams just as you did in the toolbox lab.
-
Change to your home directory and edit the producer.config file.
 cd ~
 gedit esconfig/producer.config
-
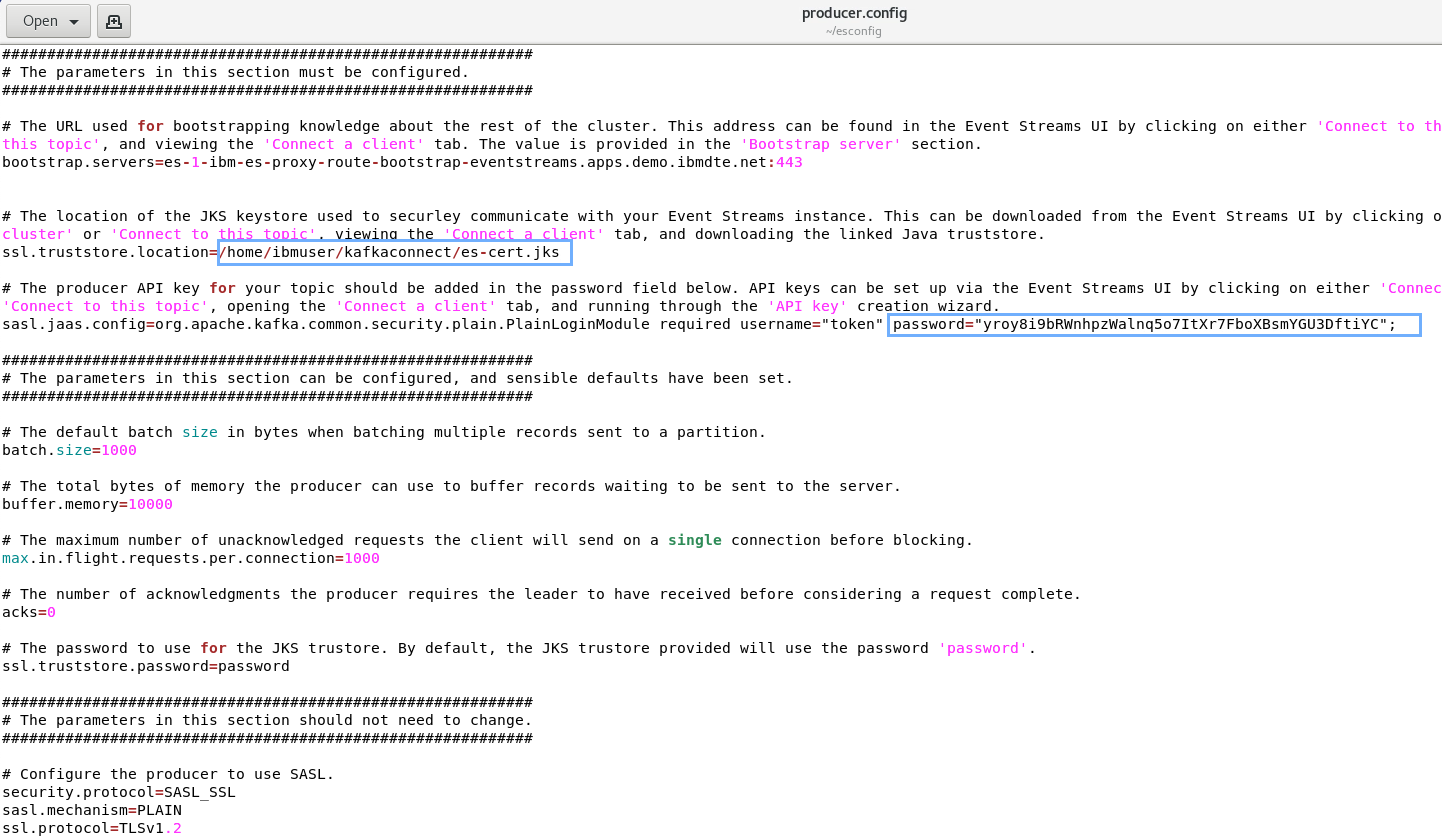
By now you are familiar with the config files. You need to make changes to this file.
Verify the bootstrap-server address. It has been preloaded for you. Remember to copy the API key from your creds.txt file and paste into the password value. Use the API key for Kafka Connect that you saved previously.
Change the path of the ssl.truststore.location to /home/ibmuser/kafkaconnect/es-cert.jks.
Notice consumer.ssl. properties. The MQ sink connect is a Kafka consumer since it is reading Event Streams messages and putting them on an MQ queue.
Click Save and close the editor.
 Important:
Make sure that the rest.port=8084 is not present in this file as the MQ source connector is using that port. This MQ sink connector will use the default port. -
In the terminal window, change to the esconfig and enter the following command:
 cd ~/esconfig
 ./loadevent.sh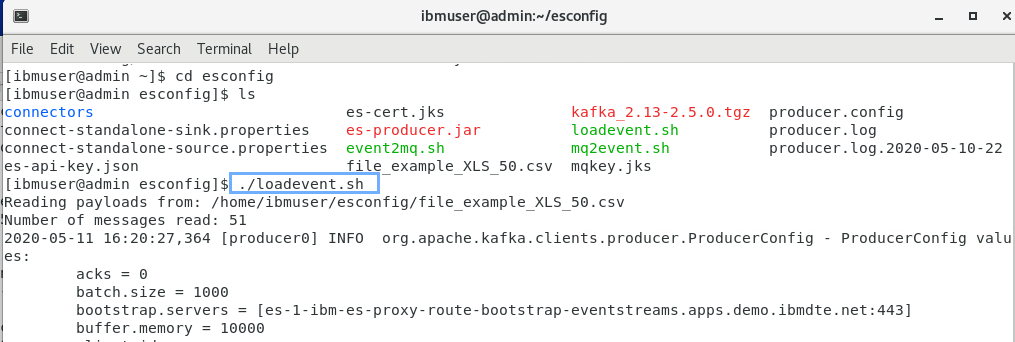
Verify that the sink connector for IBM MQ is putting messages on the specified queue
-
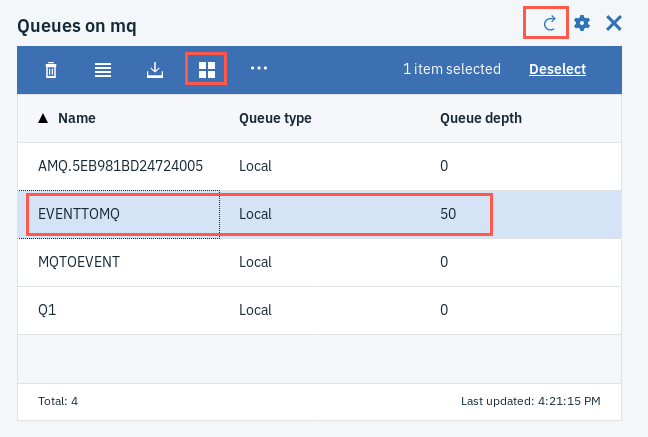
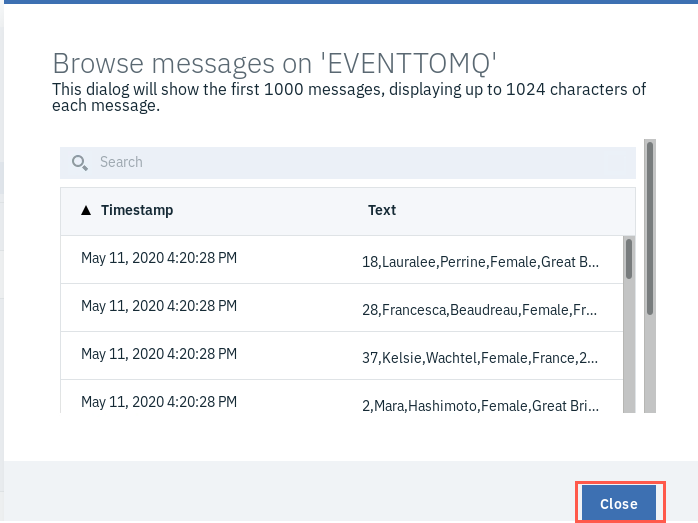
Return to the MQ Console and refresh the Queues on mq widget. If you are presented There should now be 50 messages on the EVENTTOMQ queue.
-
You can click Browse messgages to view the messages sent from the Event Streams topic to the MQ queue.
Congratulations
You’ve successfully completed the tutorial. You were able to add a layer of secure, reliable, eventdriven, and real-time data which can be re-used across applications in your enterprise. You learned how to:
- Configure message queues
- Create event streams topics
- Configure message queue connectors (sink and source)
- Execute a test run of the flow and view the data
You have successfully configured the MQ source and sink connector and moved messages from Event Streams to MQ and from Event Streams to MQ. You have completed Lab 12 of the Event Streams PoT.
END OF LAB EXERCISES