Introducing IBM MQ Replicated Data Queue Manager
IBM MQ High Availability Options
For many years there has been two well established options for IBM MQ single site high availability:
-
Multi-Instance Queue Managers: An out of the box technology that requires a shared disk (such as NFS) for storing the Queue Manager data, and two severs in an active / standby configuration. If the active instance was to fail, the lock on the shared disk would be released, and the passive instance promoted to the active instance.
-
Operating System High Availability technologies: IBM MQ explicitly supports a number of well-established operating system high availability technologies, such as Microsoft Cluster Service, PowerHA for AIX, Veritas Cluster Server, HP Serviceguard, or a Red Hat Enterprise Linux cluster with Red Hat Cluster Suite.
Each of the above have technical considerations and dependencies; for instance, the multi-instance queue manager is dependent on a shared disk, which must be redundant to provide effective high availability; while the operating system approach requires deep knowledge of the operating system, and in certain cases additional license entitlement for the operating system.
IBM MQ V9.0.4 Continuous Delivery Release provided a new option to complement the existing two, called MQ Replicated Data Queue Manager (RDQM). This technology is based on the MQ Appliance high availability capabilities, and is available on the Linux operating system. In the simplest of situations, it will include three standard RedHat Linux servers, one being active handling requests, with the other two replicating the data and waiting to become active in a similar logical manner to the standby instance within a Multi-Instance Queue Manager. When comparing to multi-instance, there are three key differences:
-
No shared disk: Each individual server includes a complete replica of the Queue Manager data, removing the need for a shared disk, which simplifies the configuration, and potentially improves the performance of the overall solution.
-
Quorum based promotion: Due to each server including a complete replica, in the case of a network failure between the servers, all could be promoted to be active, and a condition called “split brain” could occur. To avoid this from happening, three servers are part of the RDQM HA group, and a server will only continue to be active or promoted to the active instance if a quorum of the servers within the RDQM HA group are contactable.
-
Floating IP: With Multi-Instance Queue Managers, two servers, with separate IP addresses could be hosting and running the active instance of the Queue Manager. This means that the client needs to be explicitly aware of the two IP addresses. With the new RDQM, a floating IP address is used, and associated with the server that is running the active queue manager. This means that clients only need to be aware of the floating IP address, simplifying the logic on the client.
Although the above are all drivers of why to consider the new capability, there are some points to consider when evaluating if this new HA model is suitable for a client:
-
Restricted to a single Data Center: The replication between instances within a RDQM HA group is synchronous, and therefore if the servers are not co-located within the same data center, this can affect the performance of the solution. Also, since a floating IP address is used, this normally is limited to a single data centre.
- Distributed Writes: As mentioned above, the writing is completed using a synchronous write, and therefore involves writing to multiple disks across multiple servers. The performance characteristics of this approach, compared to the other options, need to be evaluated.
- Dedicated Logical Volume Group: Each RedHat Linux server requires a dedicated logical volume for the RDQM data. This normally means a separate disk associated with the VM or bare metal machine dedicated to the RDQM data. If the server is being specially provisioned for IBM MQ, this is unlikely to be a major issue.
- Split Brain: The quorum based approach to electing primaries greatly reduces the chances of a split brain situation occurring, but does not completely remove all edge cases.
- RedHat Enterprise Linux x86-64: The RDQM capability is currently supported on RedHat Enterprise Linux x86-64 7.3 or higher, 8, and 9.
To assist with the setup of RDQM, we’ve created a number of scripts and helper files. The following is based on the process required for a base RedHat Enterprise Linux 7.7 install.
Lab Introduction
This lab provides a demonstration of a new approach to High Availability in MQ on Linux, with the following key features:
- Use of Distributed Replicated Block Device (DRBD) storage rather than network shared storage
- Use of a cluster resource manager (Pacemaker) to manage a cluster of three nodes
- A new kind of queue manager called a Replicated Data Queue Manager (RDQM):
- an RDQM is active on only one node at any one time
- each node can run different active RDQMs
- each RDQM has a preferred location (node) in normal operation
- a quorum prevents an RDQM from running on more than one node at the same time
- an RDQM can have a floating IP address associated with it to simplify configuration of clients and other queue managers that need to communicate with the RDQM
Lab environment
-
Seven virtual machines running in IBM TechZone - six RHEL 7.7 x86_64 systems and one Windows desktop:
- rdqm1 - This will be our primary node.
- rdqm2 - This will be a secondary node.
- rdqm3 - This will be another secondary node.
- dr1 - DR Fail over primary node.
- dr2 - DR Fail over secondary node.
- dr3 - DR Fail over other secondary node.
- mq-pot - Windows desktop for connecting to the six RHEL machines.
-
VMWare virtual networks:
Name Type TechZone Network Subnet DHCP ens34 Administration ens34 10.0.0.0 no ens35 HA Replication ens35 10.0.1.0 no ens36 DR Replication ens36 10.0.2.0 no ens37 Pacemaker primary ens37 10.0.3.0 no ens38 Pacemaker secondary ens38 10.0.4.0 no -
Network interfaces:
Interface Purpose Interface Name rdqm1 (Primary node) rdqm2 (Secondary node) rdqm3 (Secondary node) MQ Fixed IP ens35 10.0.1.1 10.0.1.2 10.0.1.3 MQ Floating IP 10.0.1.10 10.0.1.10 10.0.1.10 HA interfaces are used as follows:
- HA Primary - to monitor the nodes in the cluster
- HA Alternate - backup for monitoring the cluster if the HA Primary network fails
- HA Replication - for synchronous data replication (the higher the bandwidth the better and the lower the latency the better)
Note: Hosts rdqm1, rdqm2, rdqm3 are tied to the Administration IP addresses above.
-
Dedicated volume group “drbdpool” containing a single physical volume on each node for RDQM, but please note, you will not see any further reference to this in this document.
-
The following groups configured:
- mqm to allow user to run specific MQ commands
- haclient to allow user to run HA-specific commands
-
A normal user “ibmuser” has been defined for running applications and MQ commands.
Name Password Purpose Group root IBMDem0s! superuser ibmuser engageibm host vm user - MQ user mqm -
Firewall (firewalld) enabled, and ports 1500 & 1501 will be defined during the lab.
-
The following Pacemaker dependencies have already been installed. This list should be sufficient for a standard installation of MQ 9.3.1 on RHEL 7.7 Server or Workstation. For your own environment setup, or if you are using some other installation, additional packages may be needed:
- cifs-utils
- libcgroup
- libtool-ltdl
- lm_sensors-libs
- lvm2
- net-snmp-agent-libs
- net-snmp-libs
- nfs-utils
- perl-TimeDate
- psmisc
- redhat-lsb-core
Depending on your security configuration, there are three different ways to configure the RDQM feature:
-
The simplest way is if the mqm user can ssh between the three nodes of the cluster without a password and can sudo to run the necessary commands.
-
The intermediate option is if the mqm user can sudo but not ssh. It is preferable if the actual users are also in the haclient group.
-
The default is that the mqm user cannot ssh or sudo.
In this lab, instructions are provided to setup and test using the intermediate method.
Setup the environment (pre-configured on IBM TechZone):
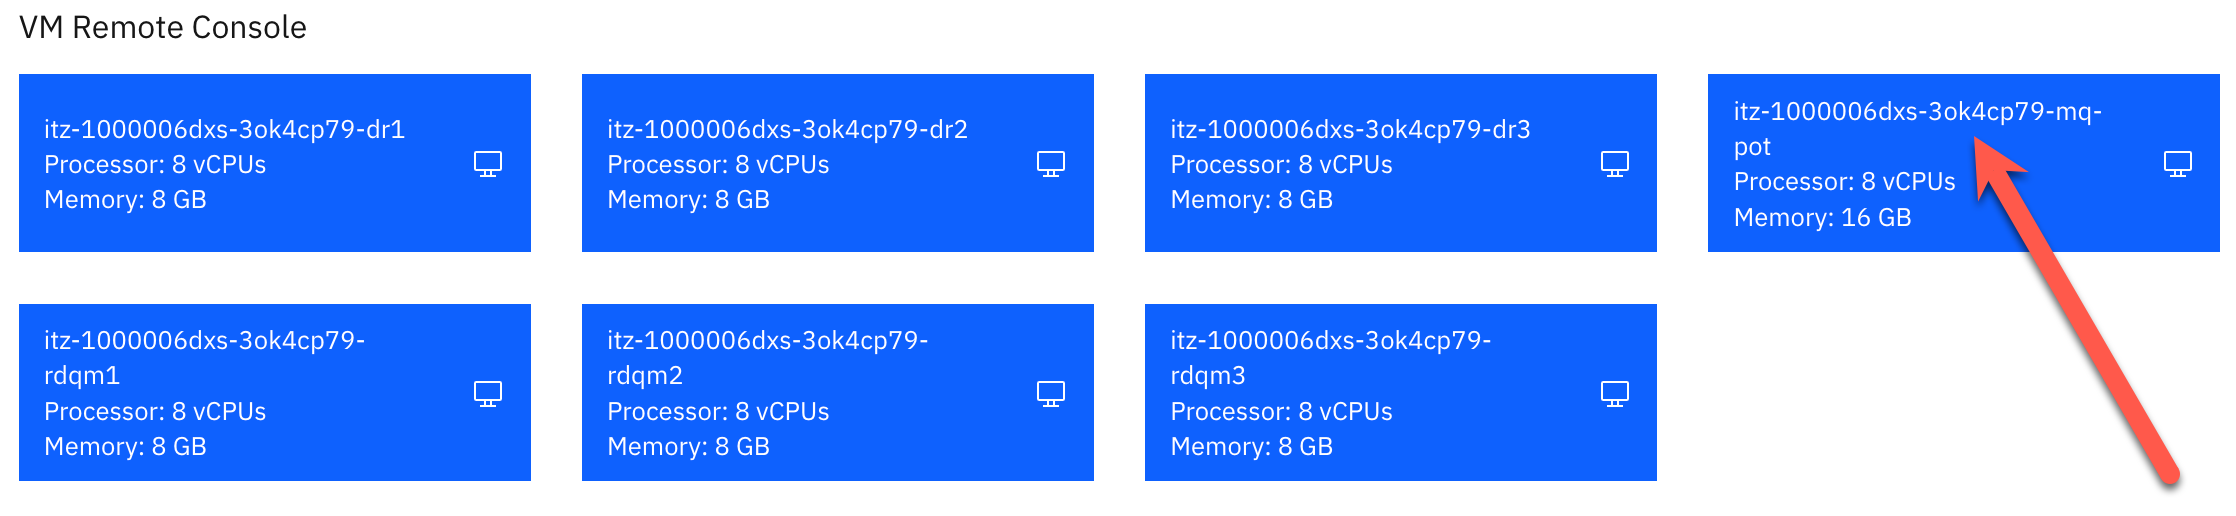
In the TechZone environment, there are seven virtual machines: rdqm1, rdqm2, rdqm3, dr1, dr2, dr3, and mq-pot which currently should be in a powered on state. dr1, dr2, and dr3 will not be used in this lab, so you can ignore them for now.
-
Click the VM Remote Console button for mq-pot.
-
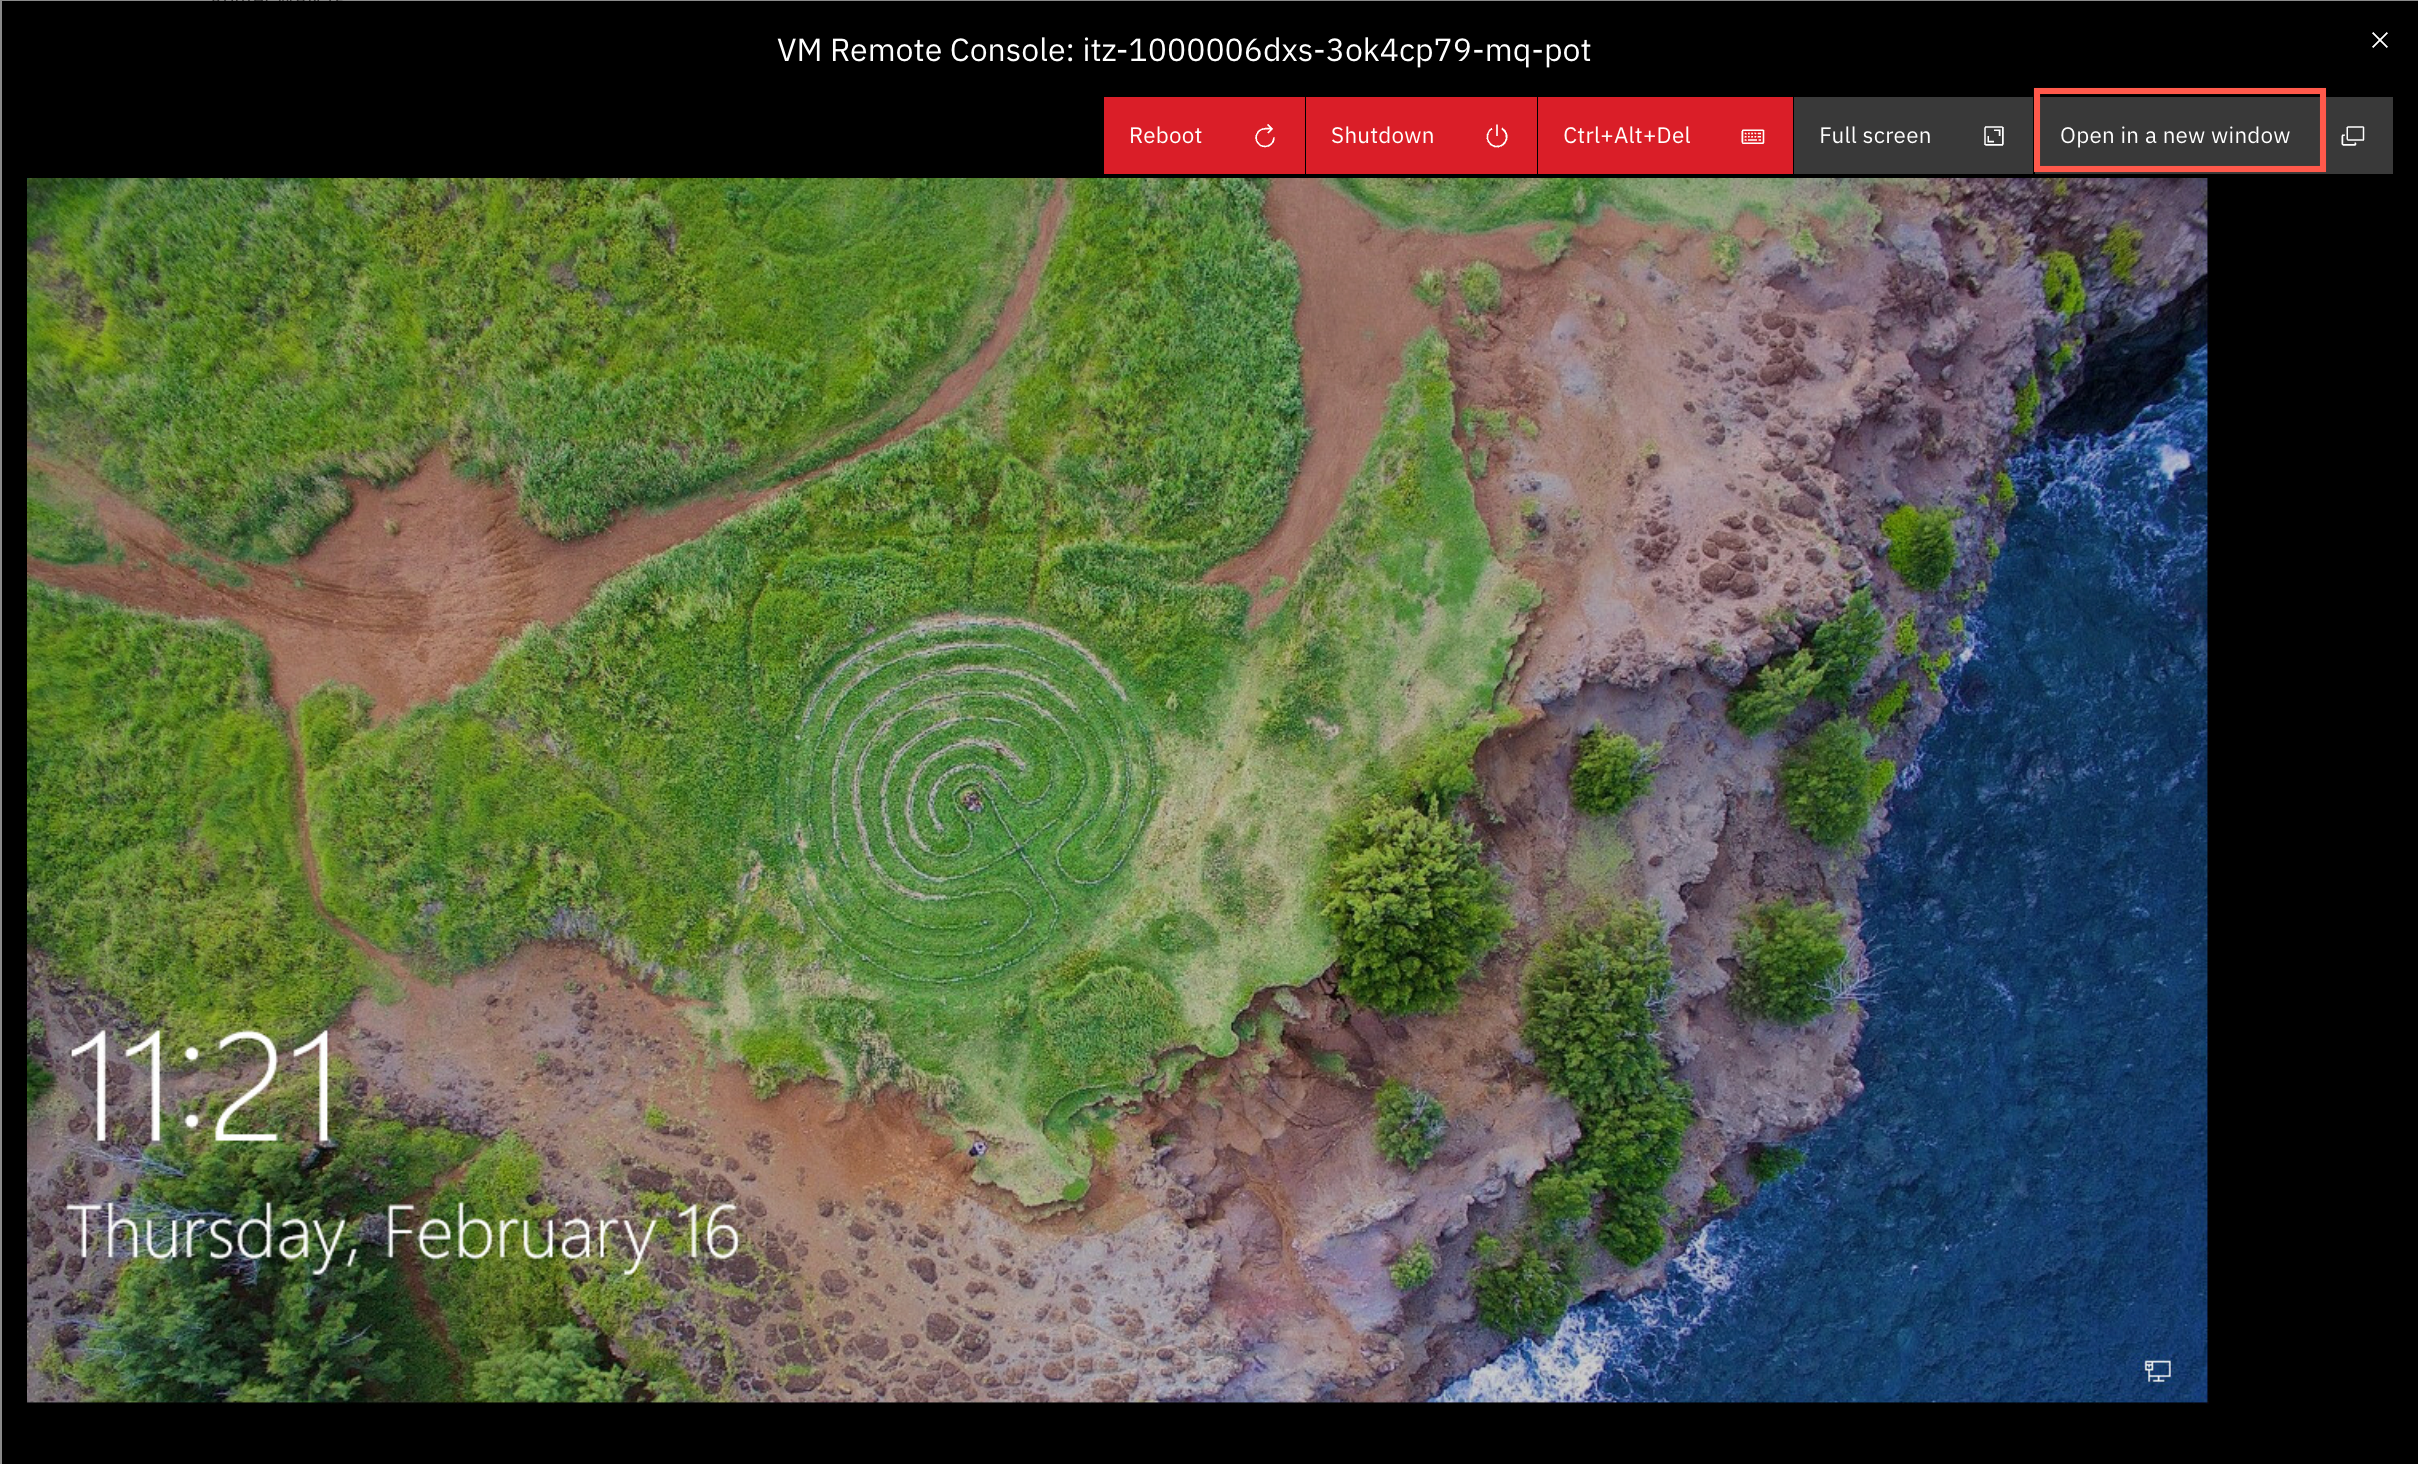
When the desktop appears, click the Open in a new window button.
-
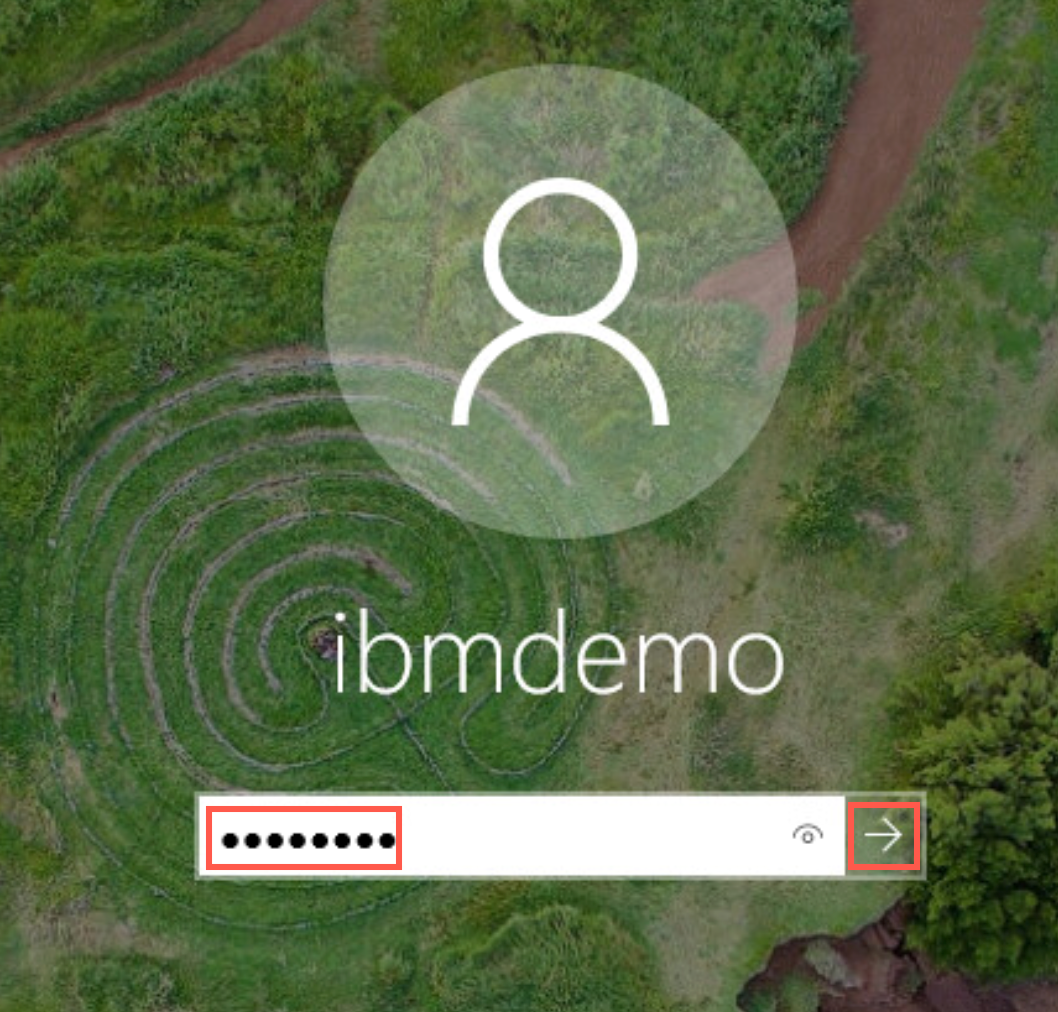
A new browser tab is opened. Click the desktop, enter passw0rd for ibmdemo’s password and hit enter.
-
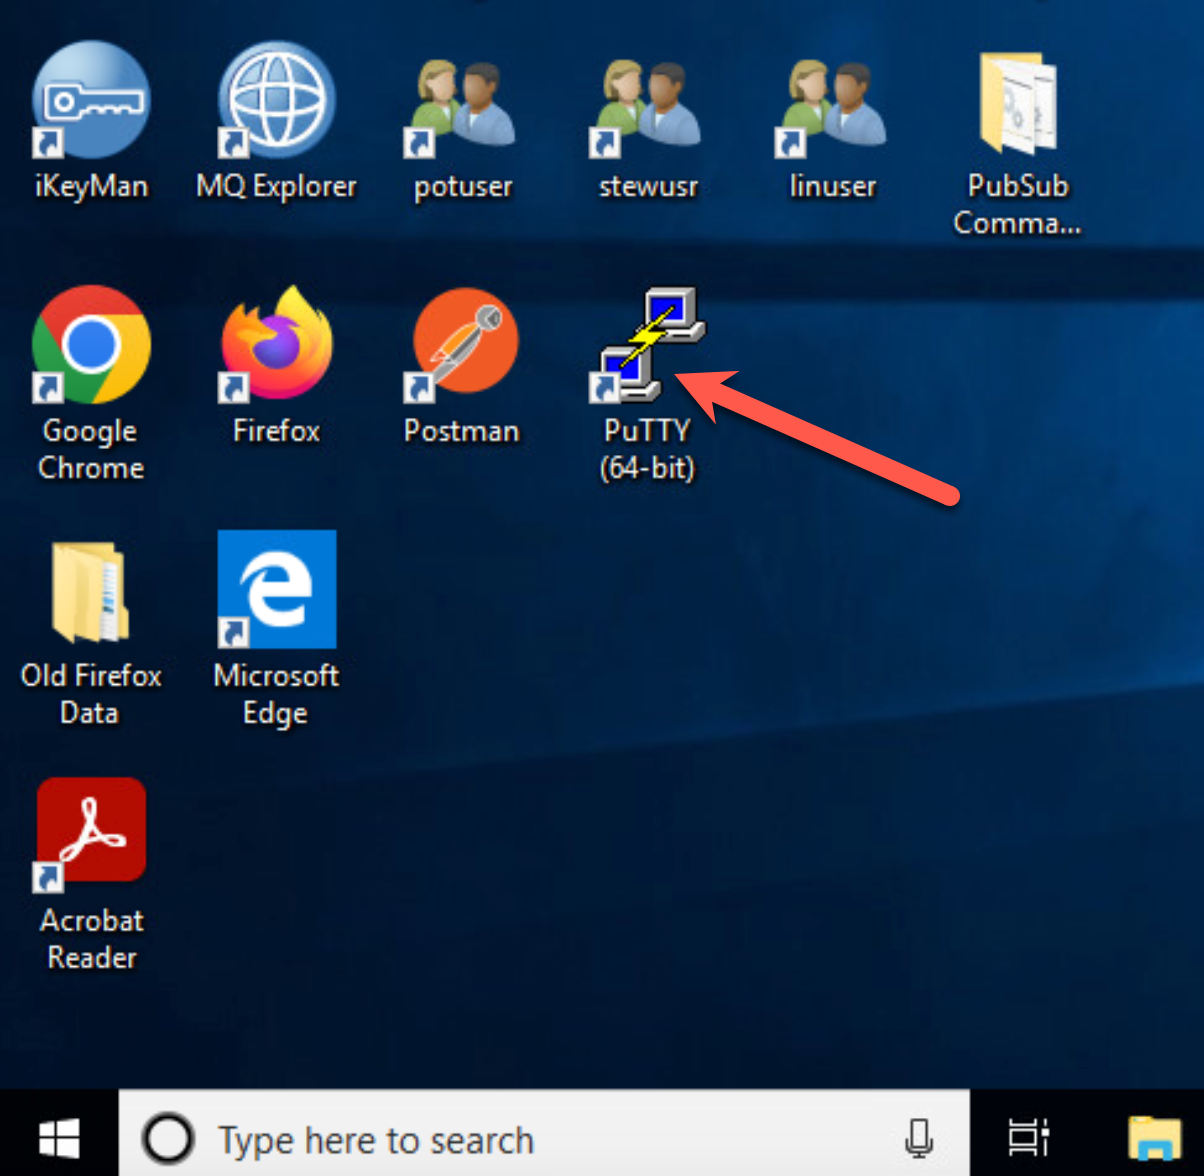
You will use putty to connect to each of the RHEL VMs. Double click the putty icon on the desktop.
-
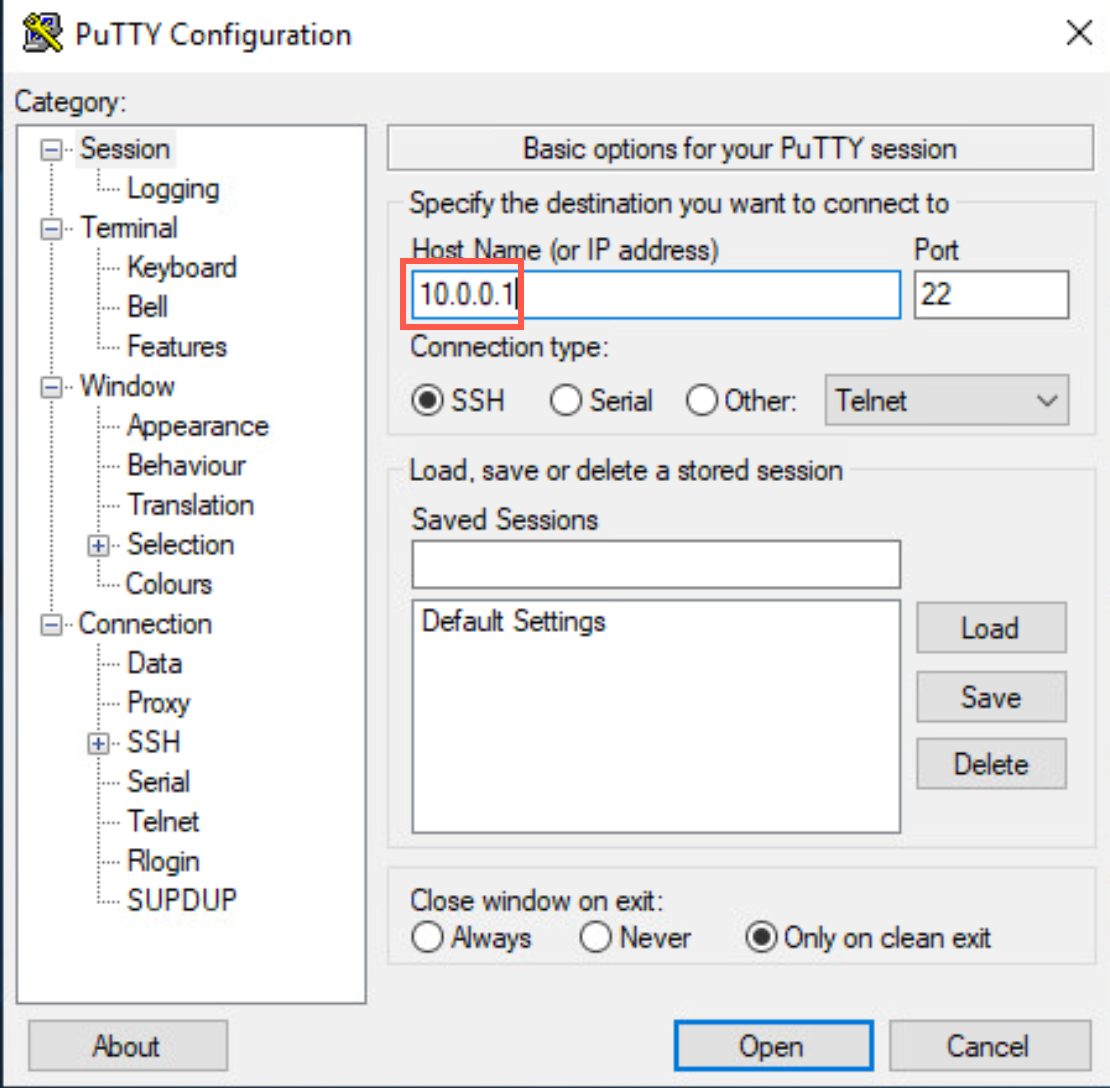
The IP address for rdqm1 is 10.0.0.1. Enter that address in the Host Name field and click Open.
-
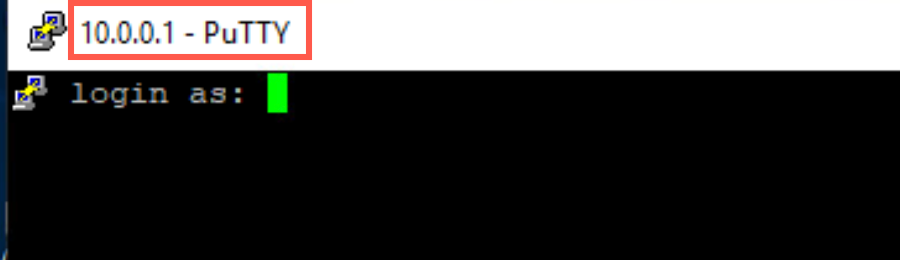
A new terminal window appears:
-
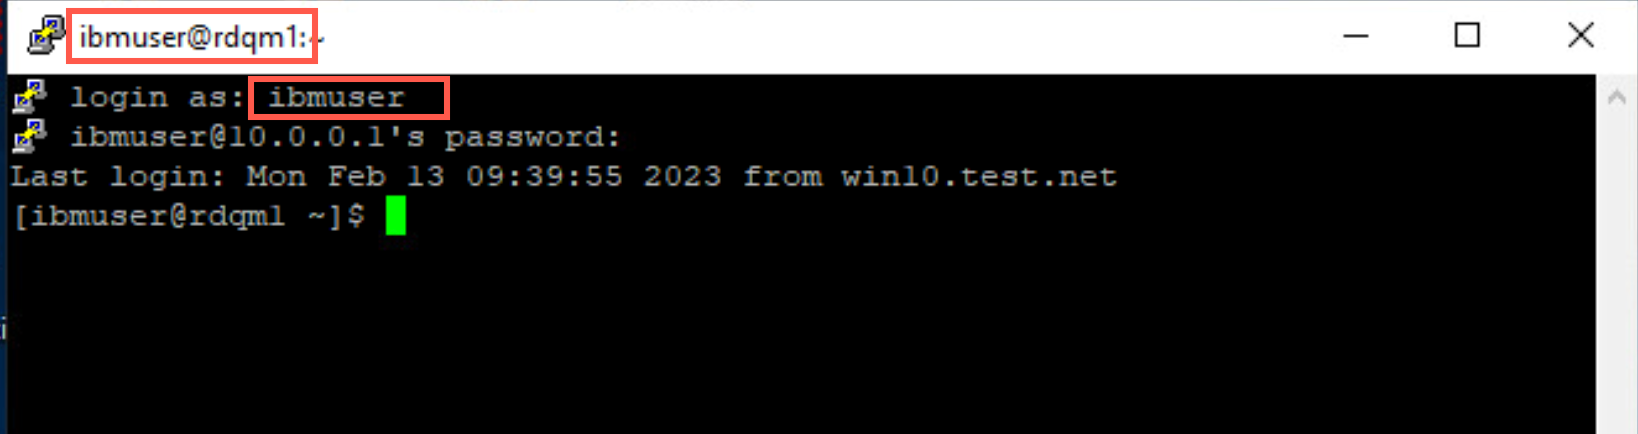
Log on to the VM as user ibmuser, using password engageibm.
-
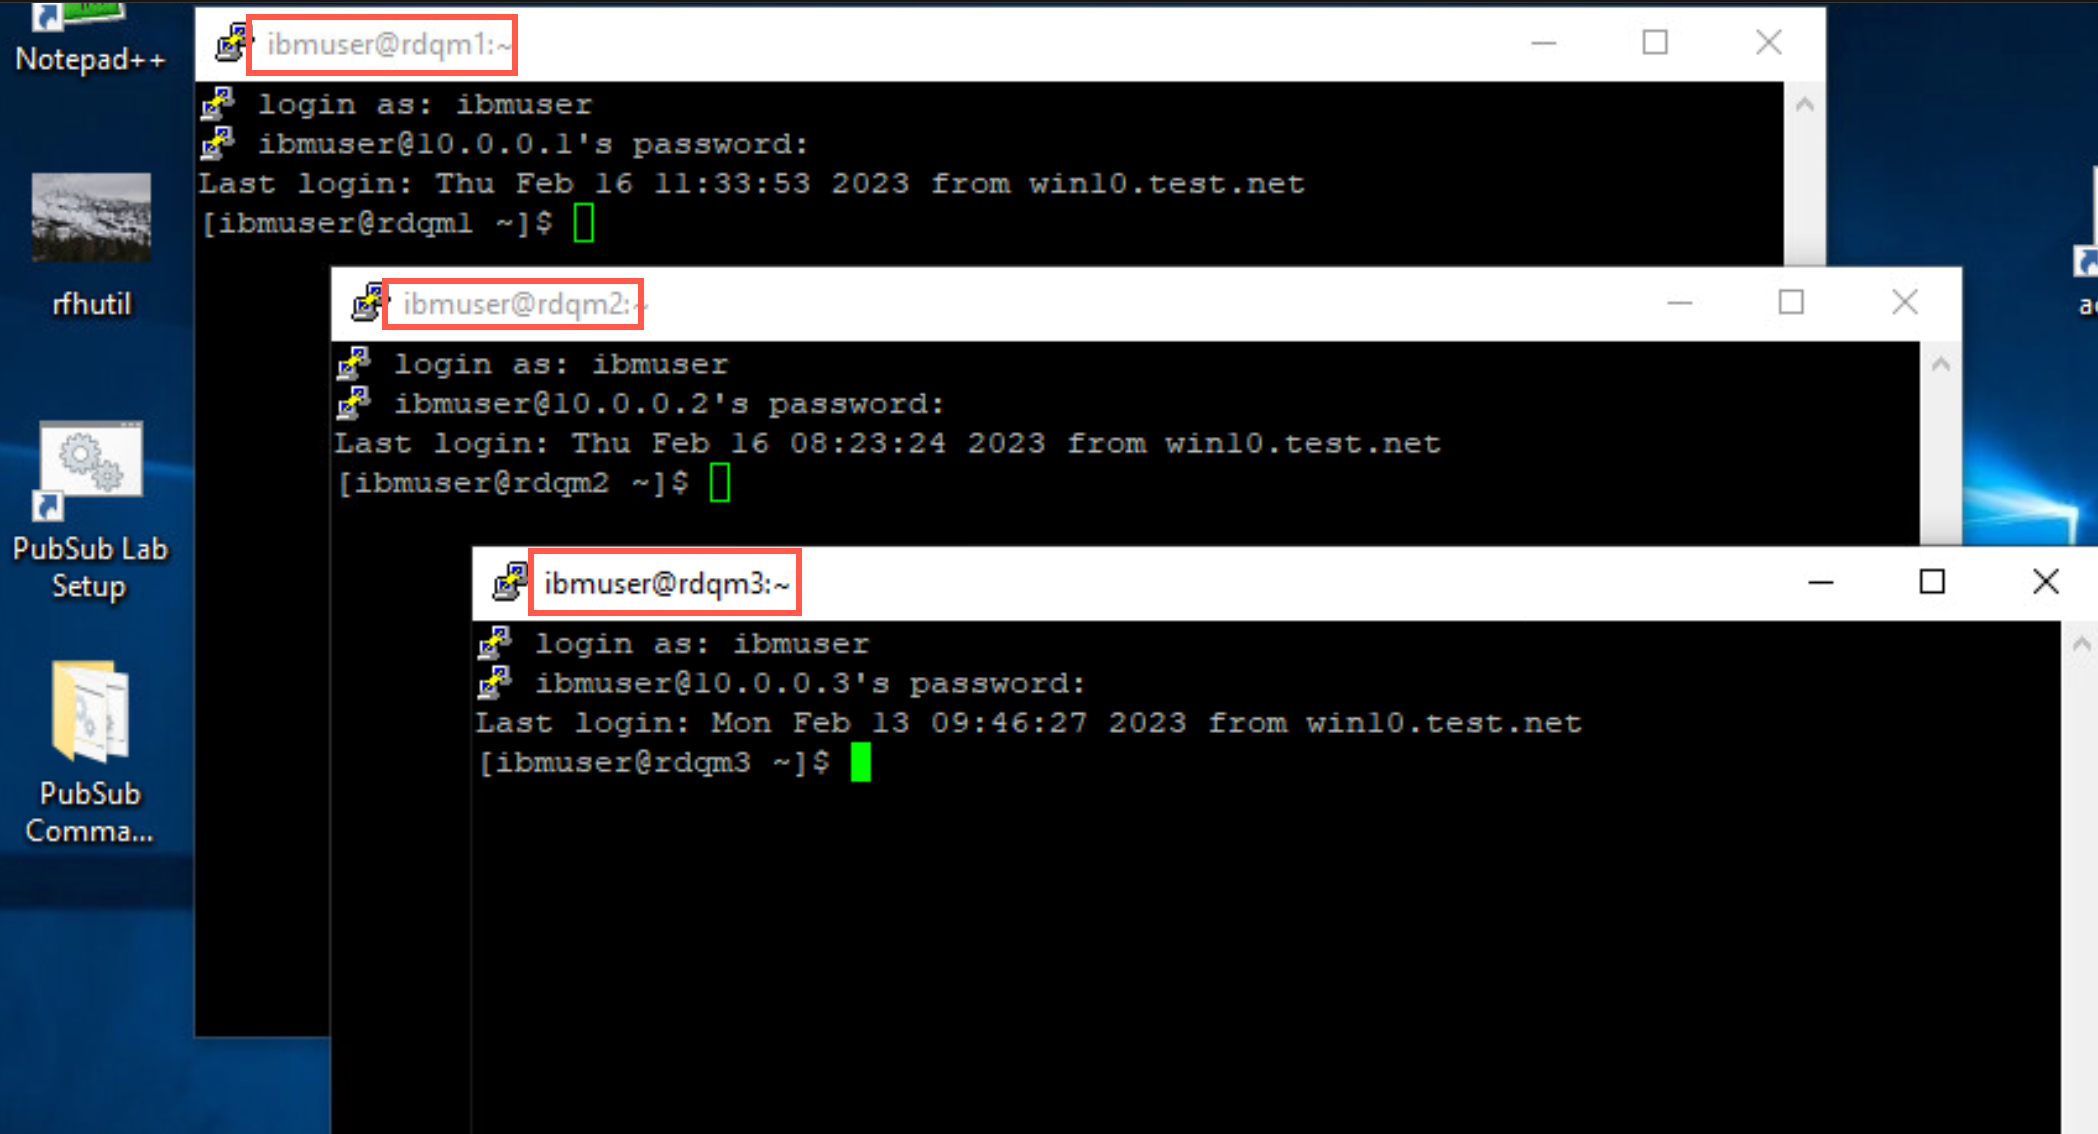
Open new putty windows rdqm2 and rdqm3 using 10.0.0.2 for rdqm2 and 10.0.0.3 for rdqm3.
-
You will use the putty terminal windows for interactions with the RHEL VMs. When instructed to open a additional terminals for a VM, just open another putty window for that VM.
Pre-configuration steps
The following steps are necessary for configuring RDQM, and are shown for your reference. They have already been completed on the VMs.
-
Extract and Install MQ
The code is provided as a compressed tar file in the directory /home/ibmuser/.
-
Install the MQ and RDQM code
RDQM is a single feature which now supports HA and DR and DR for the HA group. The RDQM support requires the Server and Runtime packages.
-
Configure the RedHat firewall
If there is a firewall between the nodes in the HA group, then the firewall must allow traffic between the nodes on a range of ports. Open another terminal, switch to user root, and run the sample file.
-
Configure the OS storage settings
If the system uses SELinux in a mode other than permissive, you must run the following command:
``` semanage permissive -a drbd_t ``` -
Configure groups
To create, delete, or configure replicated data queue managers (RDQMs), you must use a user ID that belongs to both the mqm and haclient groups.
If you want to allow a normal user in the mqm group to create RDQM instances etc., you need to grant the user access to certain commands via sudo. You will add the mqm user to the root and haclient group. Then add root and ibmuser to the mqm and haclient groups.
-
Create the Logical Group for the QM data
Each node requires a volume group named drbdpool. The storage for each replicated data queue manager is allocated as a separate logical volume per queue manager from this volume group. For the best performance, this volume group should be made up of one or more physical volumes that correspond to internal disk drives (preferably SSDs).
The above steps were completed on each node so at this point you are ready to begin RDQM configuration.
Configure RDQM
Install RDQM support
As previously stated, MQ has already been installed on all VMs except rdqm1. The advanced feature RDQM support has also been installed on all the VMs except on rdqm1. You will need to install RDQM support on rdqm1 so you can see how easy it is to install. You will review the requirements for RDQM and scripts for installation and configuration.
-
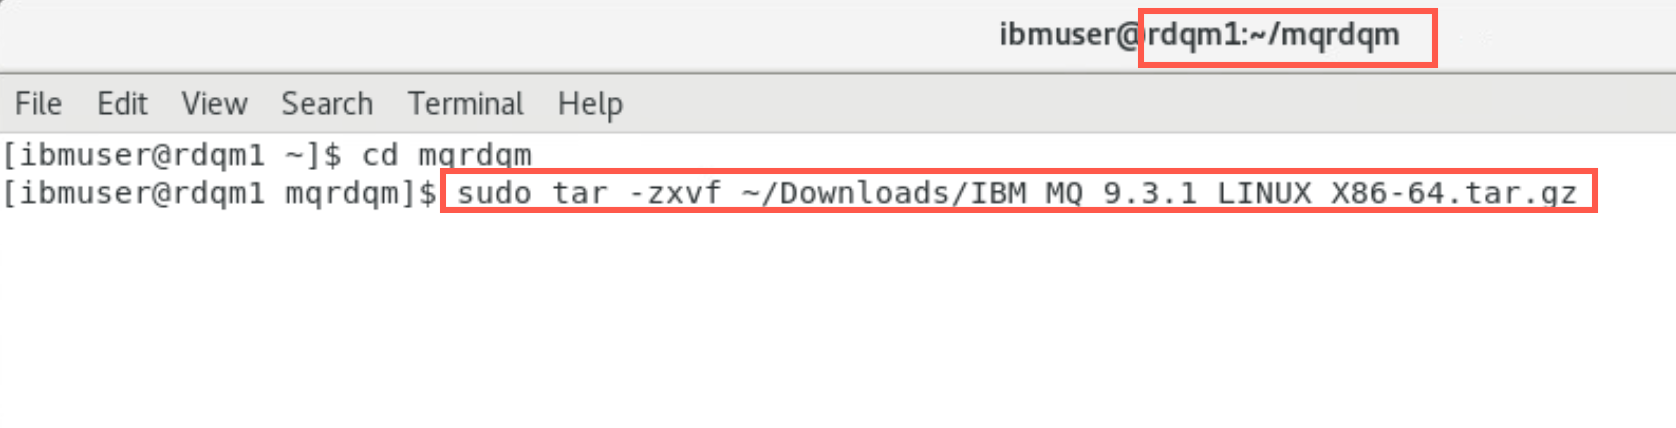
On rdqm1 change the directory to the preconfigured directory mqrdqm.
cd mqrdqm -
The MQ install media has been previously downloaded to /home/ibmuser/Download directory. Enter the following command to extract the installation media.
sudo tar -zxvf ~/Downloads/IBM_MQ_9.3.1_LINUX_X86-64.tar.gzWhen prompted, enter root’s password IBMDem0s!.
-
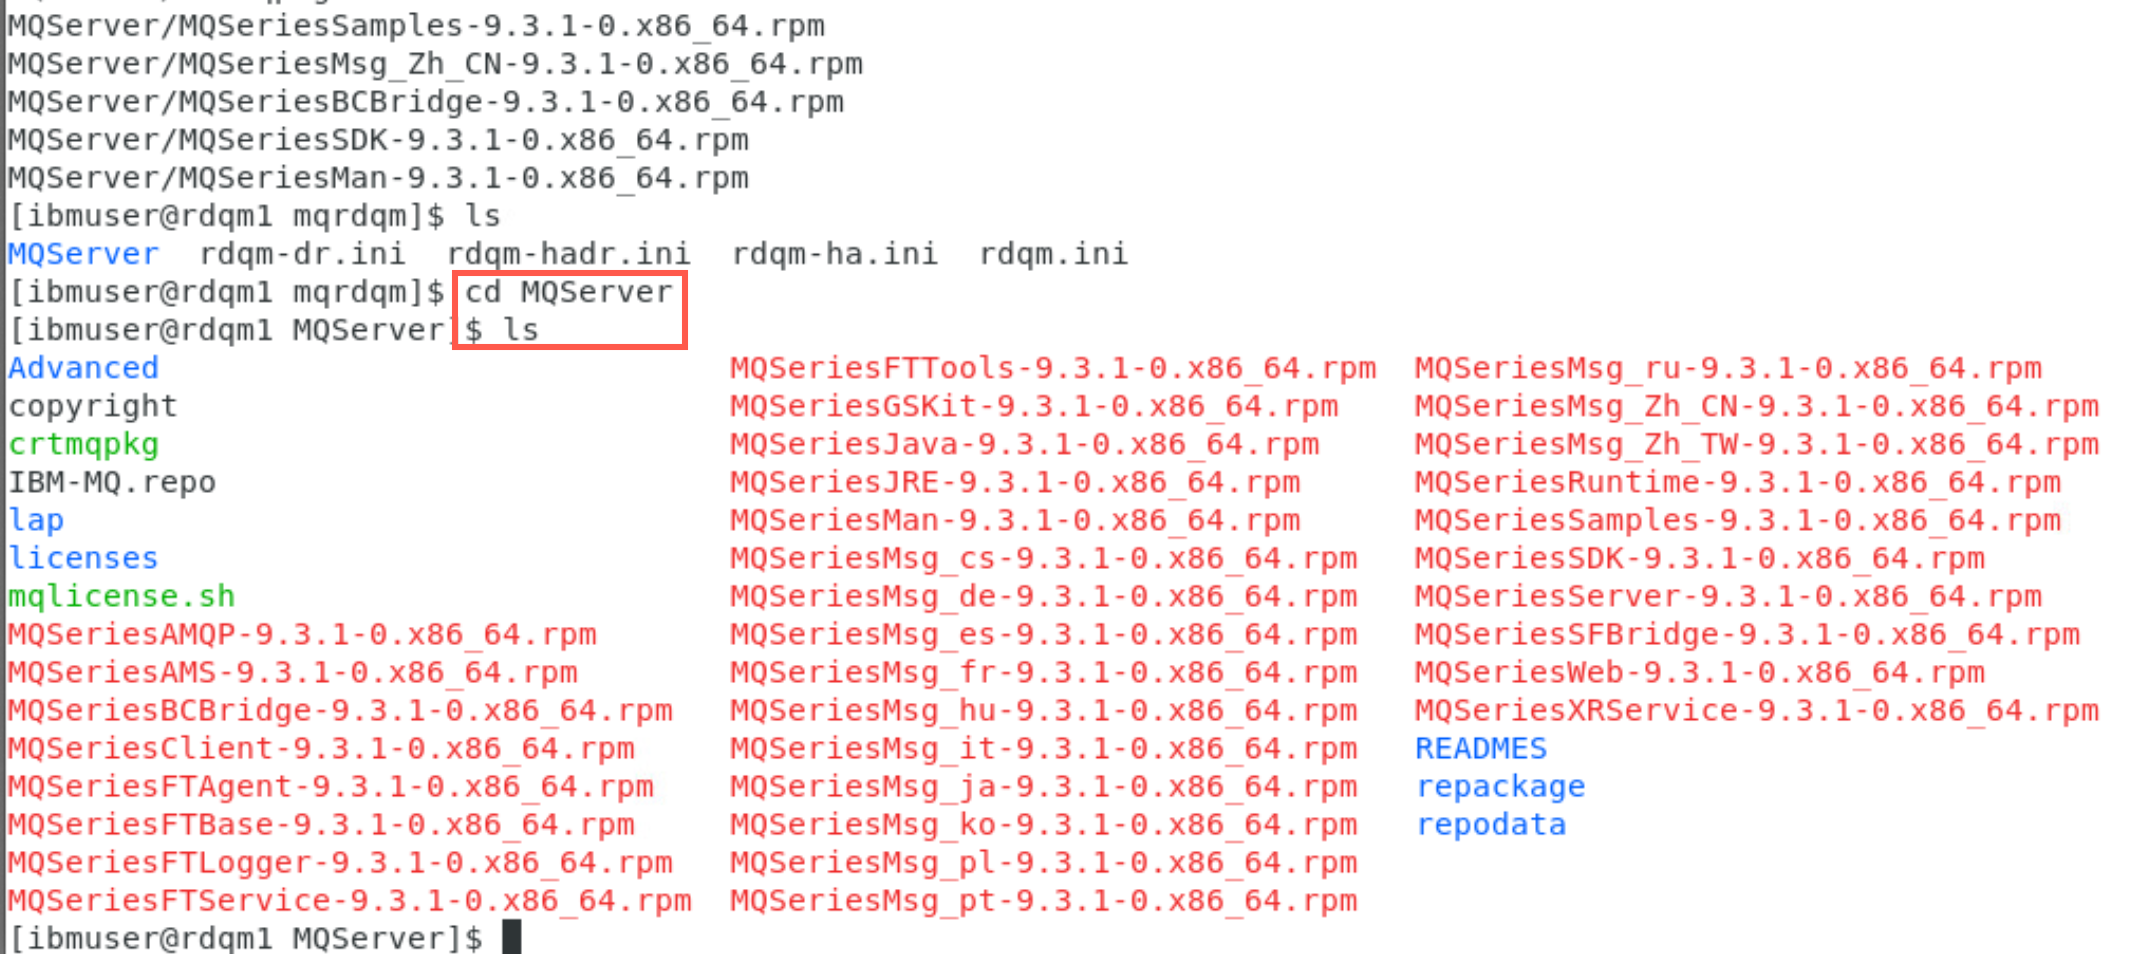
As a result, a new subdirectory MQServer has been created in the mqrdqm directory. Change to the MQServer directory and list the contents. You will find all the MQ RPM files for installing.
To install support for RDQM (replicated data queue managers), you complete the following tasks:
- Install DRBD on each node.
- Install Pacemaker on each node.
- Install IBM MQ on each node.
- Install RDQM on each node.
Install RDQM prereqs
The DRBD and Pacemaker RPM packages are supplied on the IBM MQ media. You should install the versions supplied with IBM MQ. Do not download your own versions.
-
The DRBD and Pacemaker packages are signed with the LINBIT GPG key. Use the following command to import the public LINBIT GPG key:
sudo rpm --import https://packages.linbit.com/package-signing-pubkey.asc
For supported levels of RHEL 7, the components are found under the Advanced/RDQM/PreReqs/el7/ directory. For supported levels of RHEL 8, components are found under the Advanced/RDQM/PreReqs/el8/ directory. For supported levels of RHEL 9, components are found under the Advanced/RDQM/PreReqs/el9/ directory. We are using RHEL 7.7 VMs for this lab.
-
Change to the Advanced/RDQM/Prereqs/el7 and list the members of directory el7 to see the important prerequisites of RDQM.
 cd Advanced/RDQM/PreReqs/el7
 ls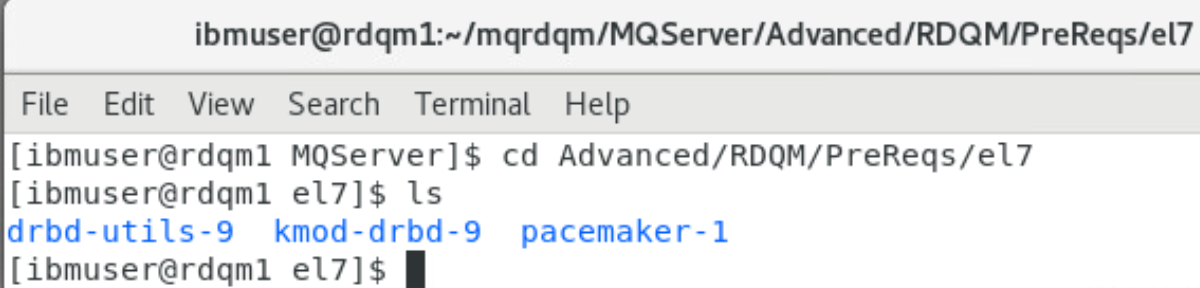
Here you see Pacemaker and DRBD. If you drill into those subdirectories, you will see the RPM packages for installing these prerequisites.
-
Determine which DRBD kernel module is needed for the system on which RDQM is being installed. For example, on a RHEL 7 system, running the helper script Advanced/RDQM/PreReqs/el7/kmod-drbd-9/modver returns the kernel module that you need to install. Run the following command to identify the module:
./kmod-drbd-9/modver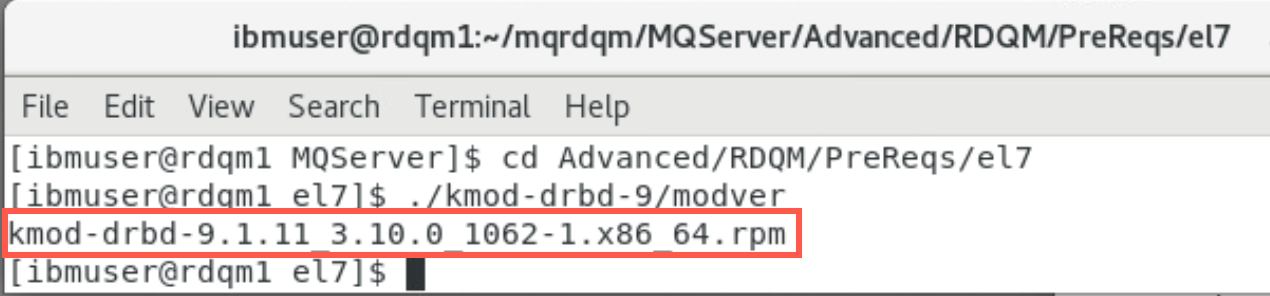
Verify that the module for RHEL 7 is kmod-drbd-9.1.11_3.10.0_1062-1.x86_64.rpm. Copy the value returned to be used for the first installation command.
-
Change back to the MQServer directory with the following command:
cd ~/mqrdqm/MQServer -
Install the appropriate DRBD kernel module that you identified in run the following command:
sudo yum install Advanced/RDQM/PreReqs/el7/kmod-drbd-9/kmod-drbd-9.1.11_3.10.0_1062-1.x86_64.rpm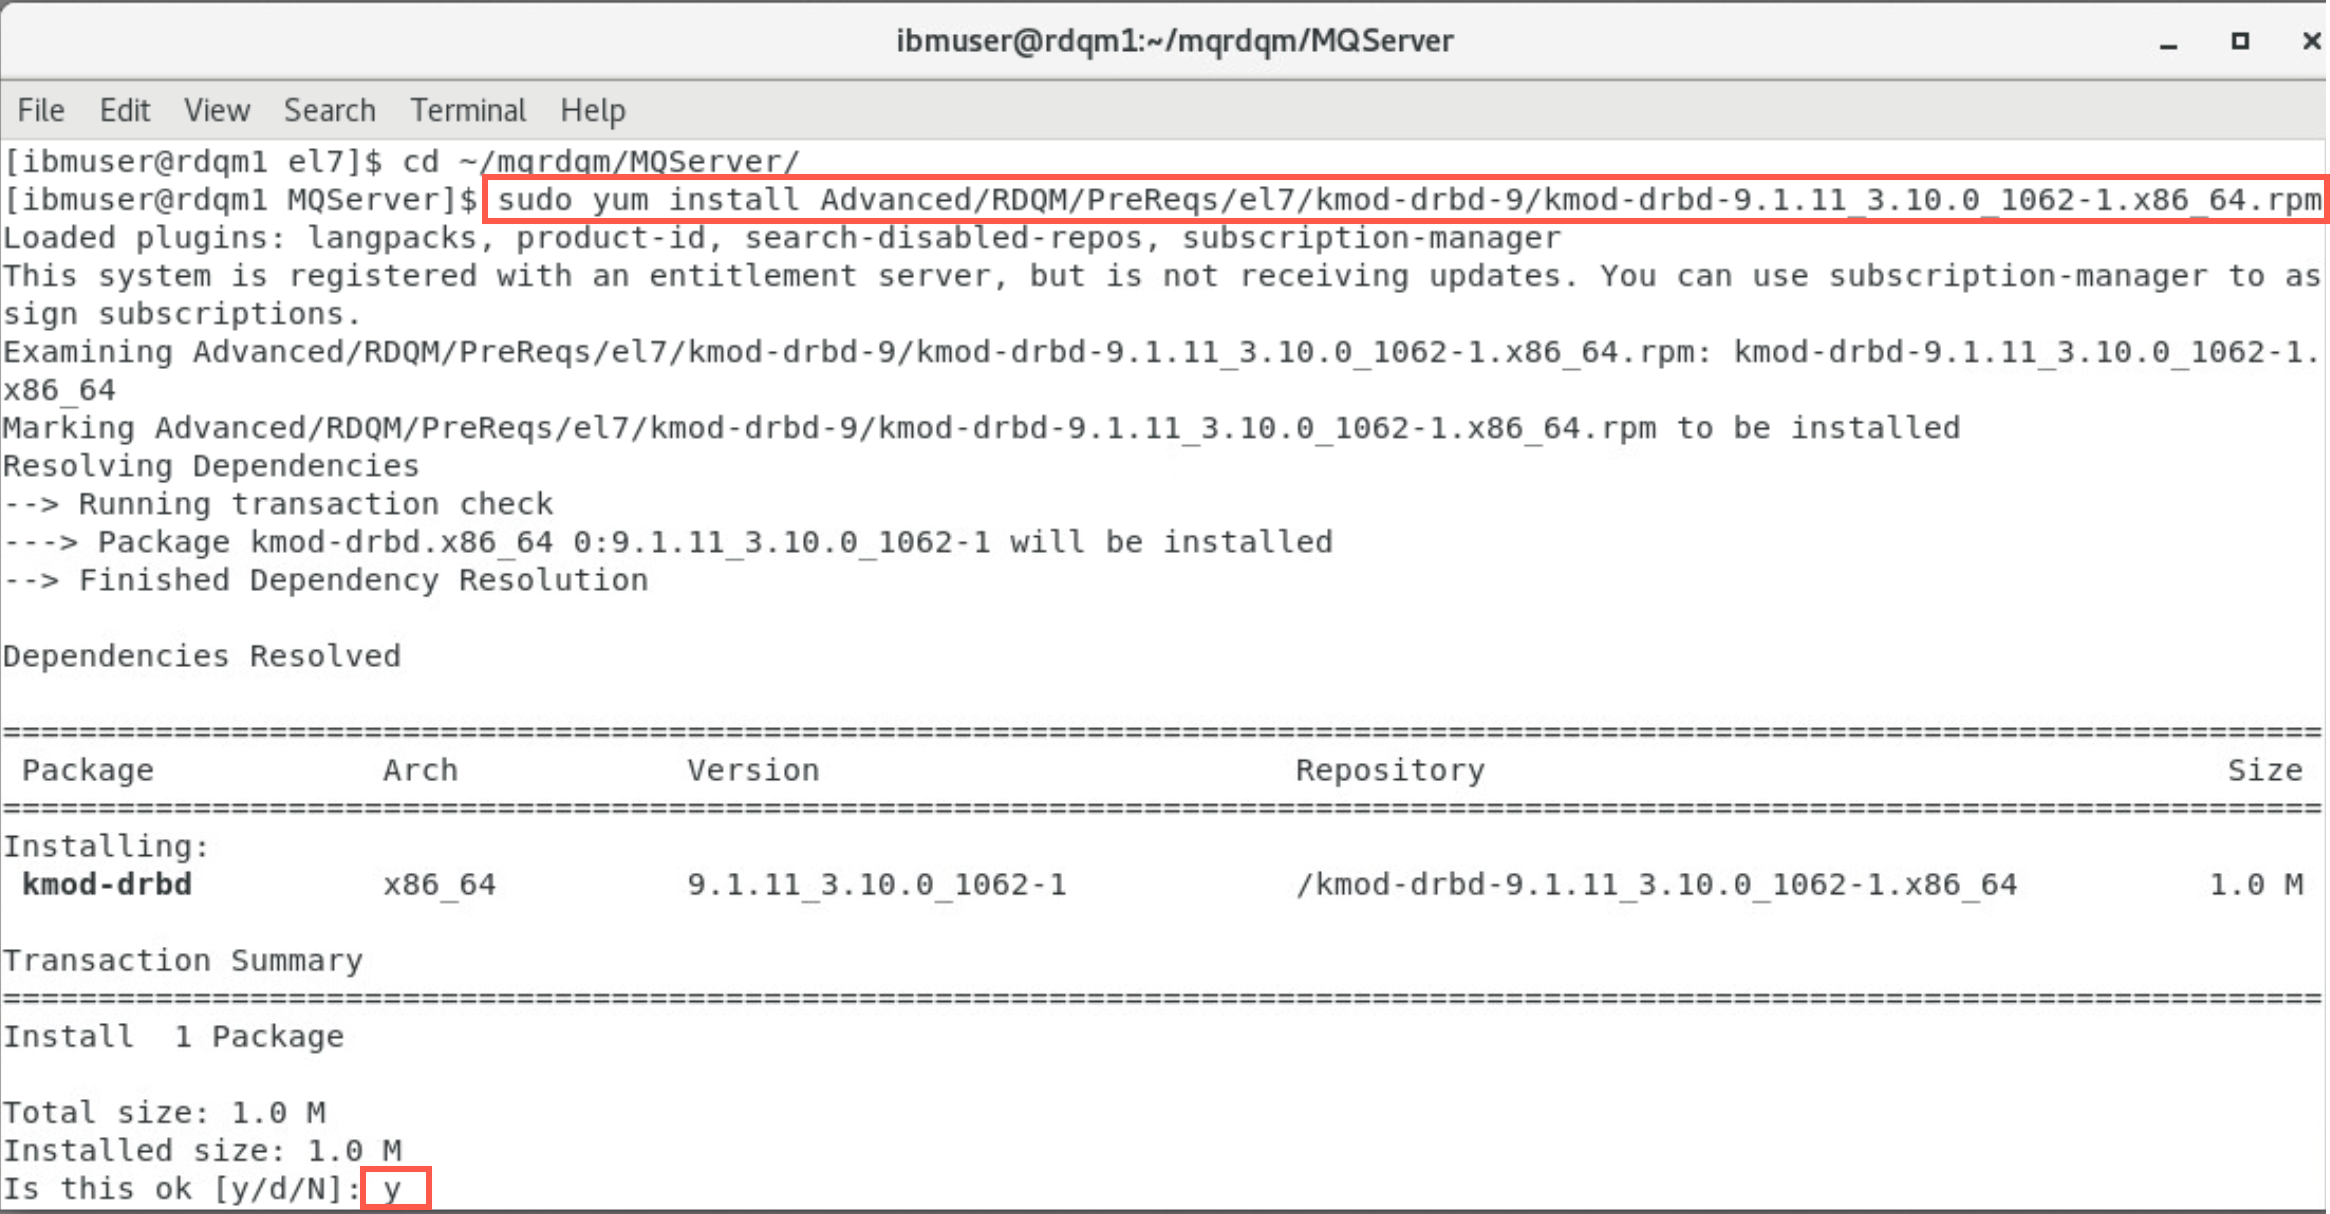
Reply y to confirm the installation. After a few minutes and numerous messages, the script will show Complete!.

-
In the same terminal window, install the required DRBD utilities for RHEL 7 with the following command:
sudo yum install Advanced/RDQM/PreReqs/el7/drbd-utils-9/*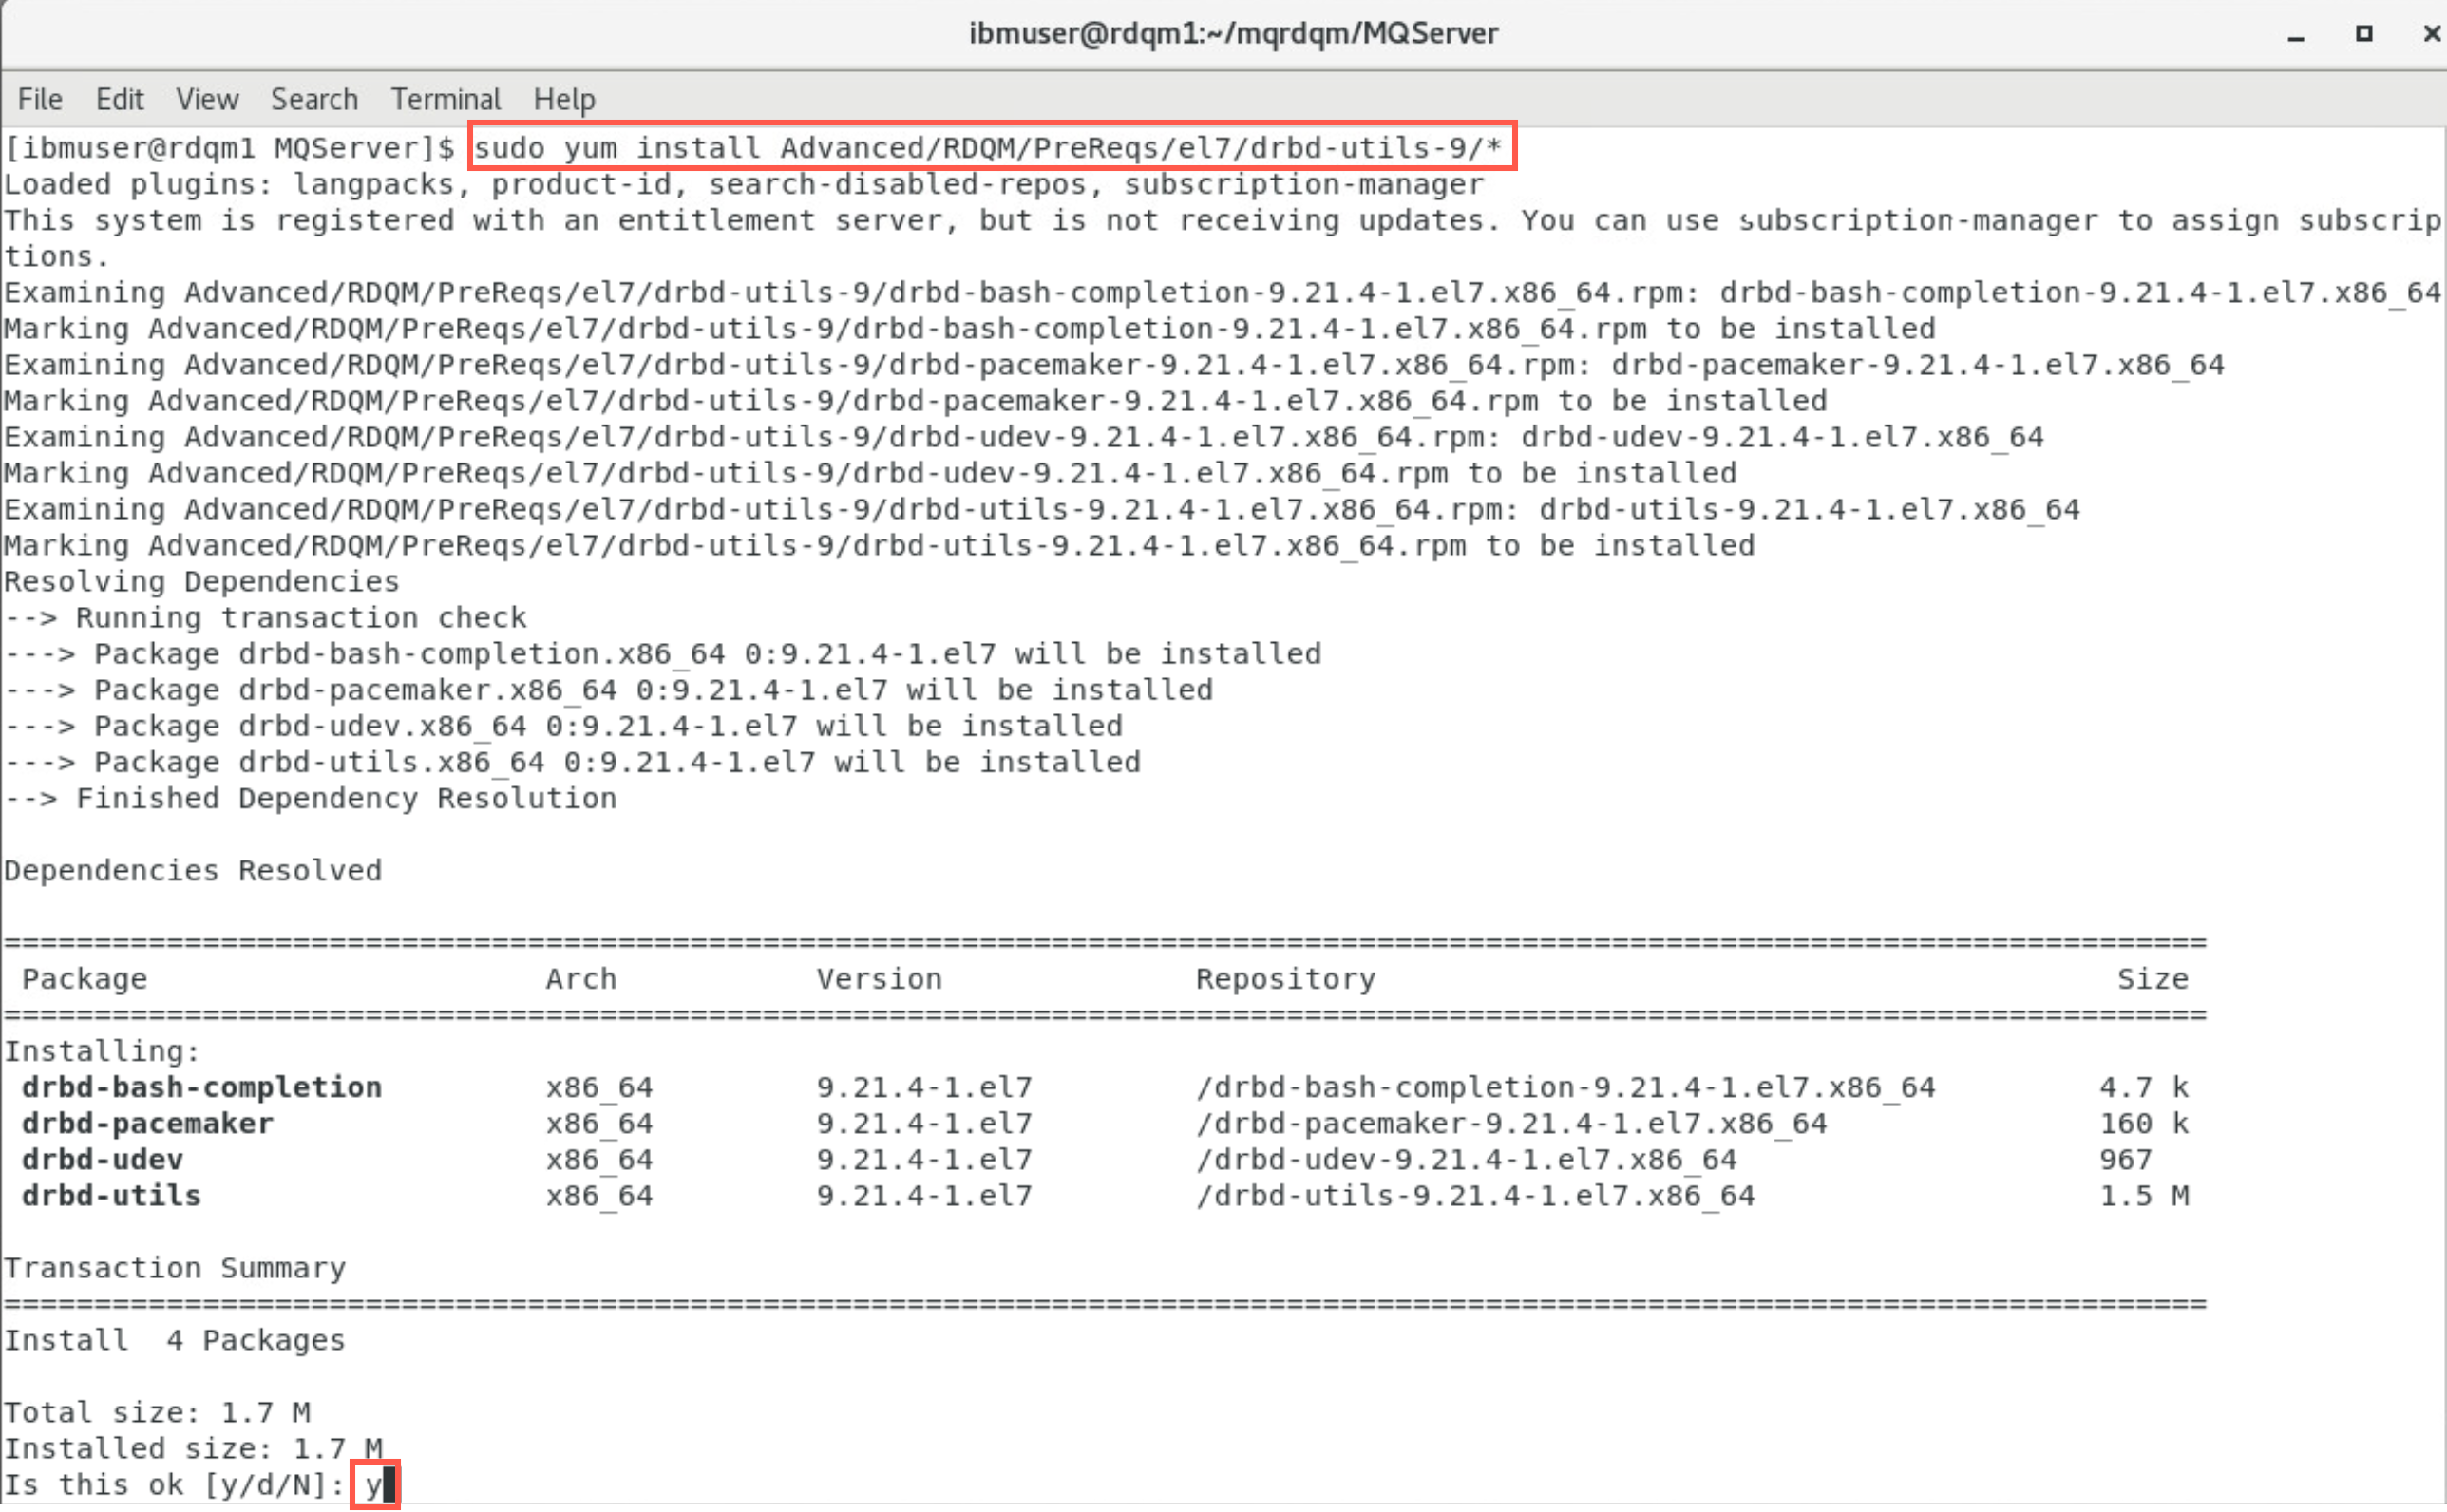
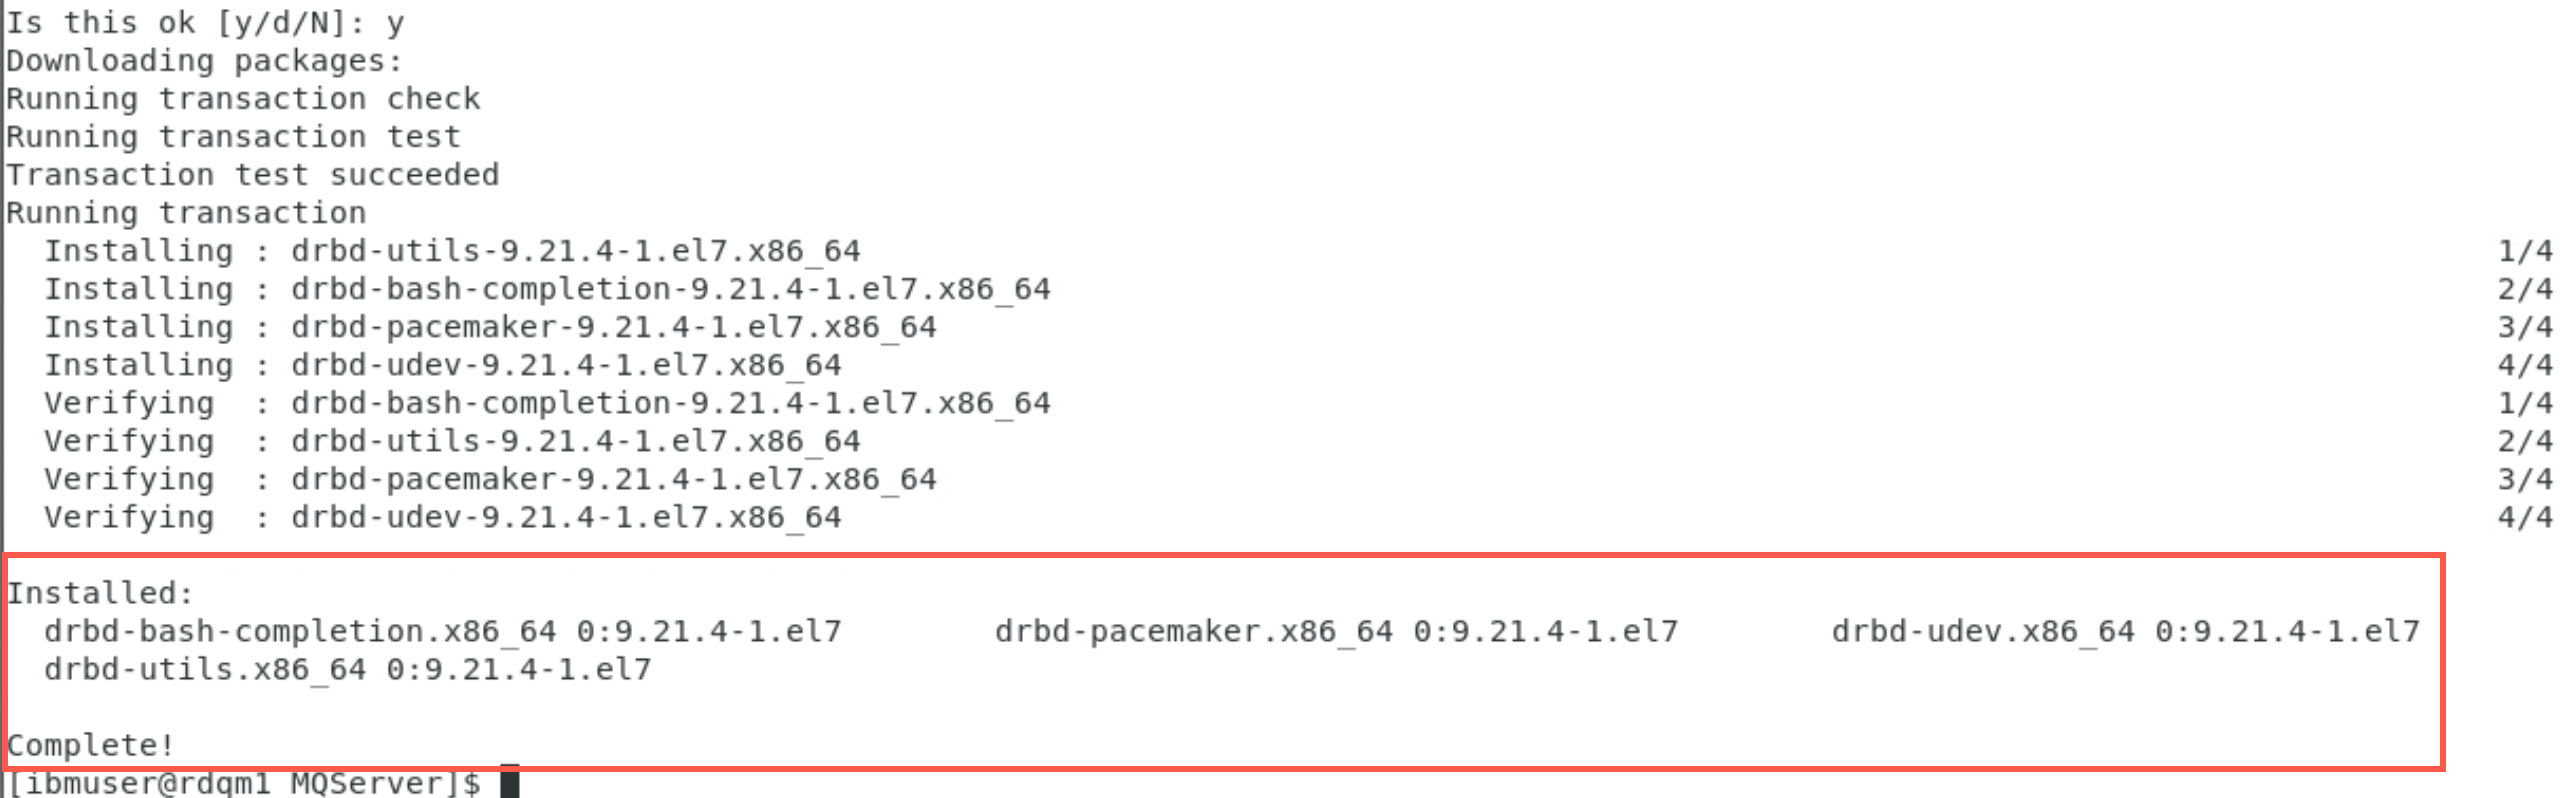
Reply y to confirm the installation. This command runs faster with fewer messages, the script will show Complete!.
-
Install Pacemaker for RHEL 7 with the following command:
sudo yum install Advanced/RDQM/PreReqs/el7/pacemaker-1/*
Reply y to confirm the installation. The script will show Complete!.
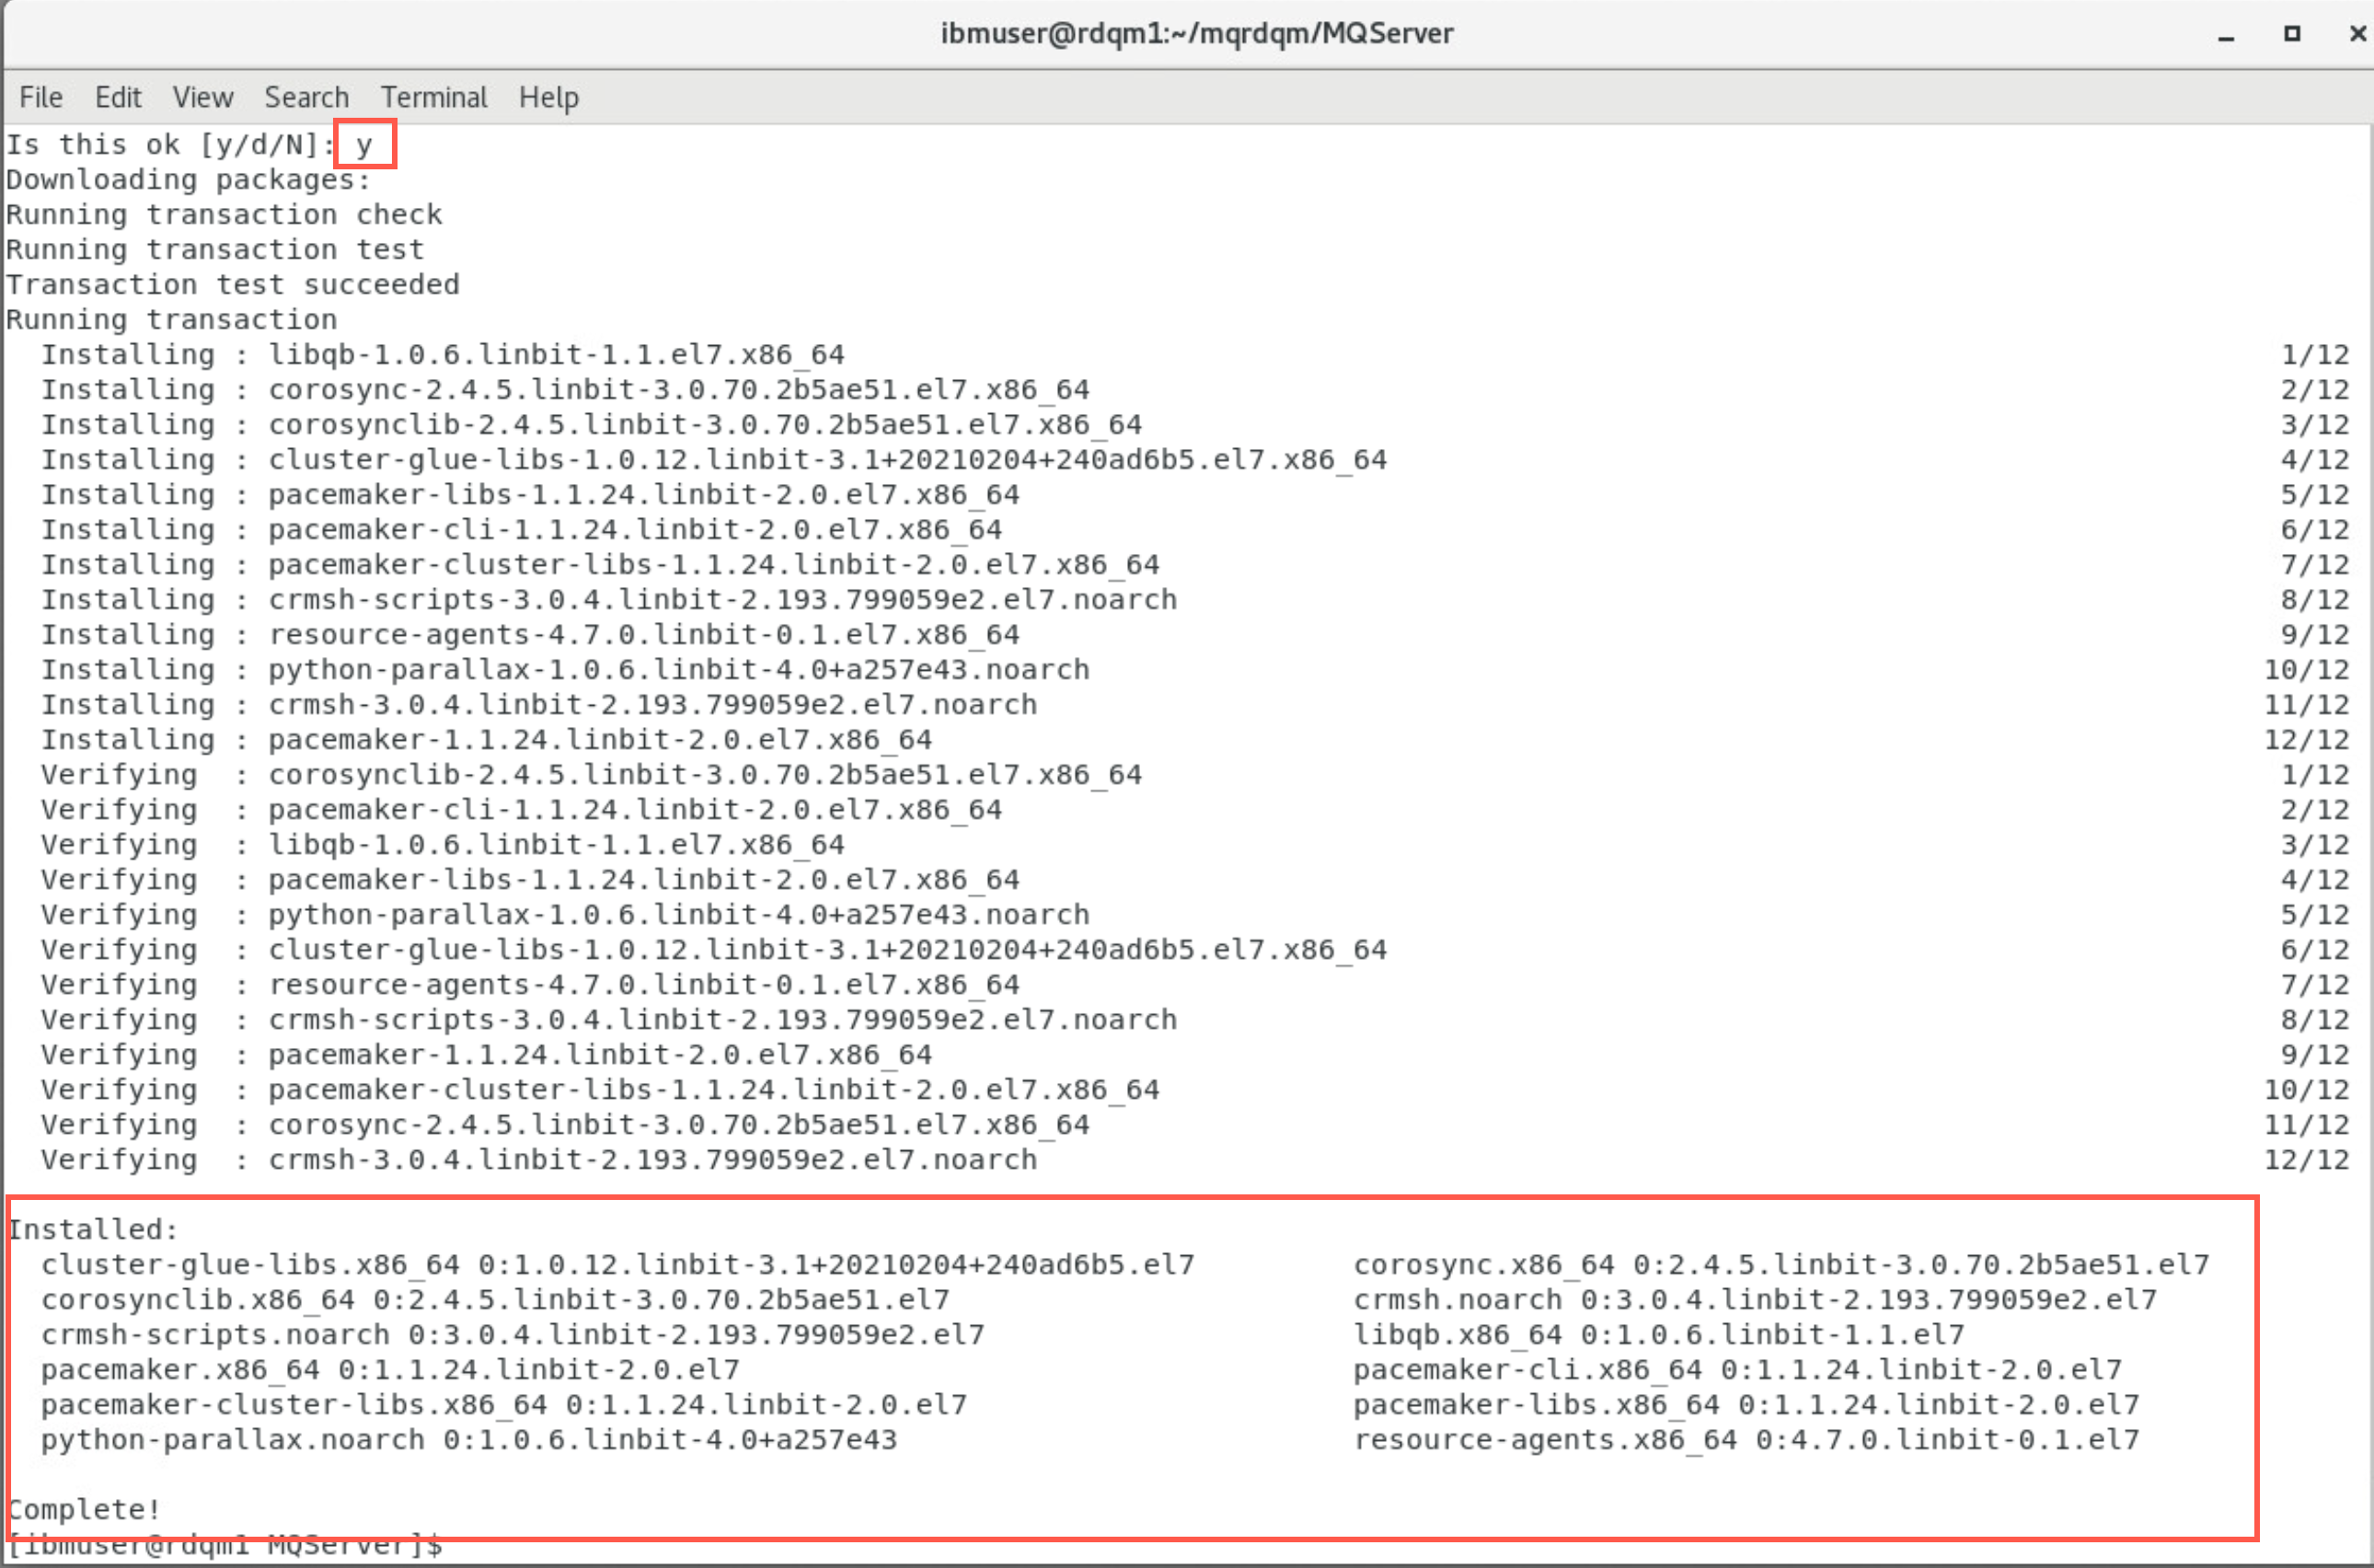
The Pacemaker installer will report any missing packages that also need to be installed before the install can complete successfully.
Install MQ
-
In the same terminal window in the MQServer directory, you will continue with the normal installation of MQ on RHEL. First you need to accept the IBM MQ license. Enter the following command:
sudo ./mqlicense.shWhen prompted, enter 1 to accept the MQ license.
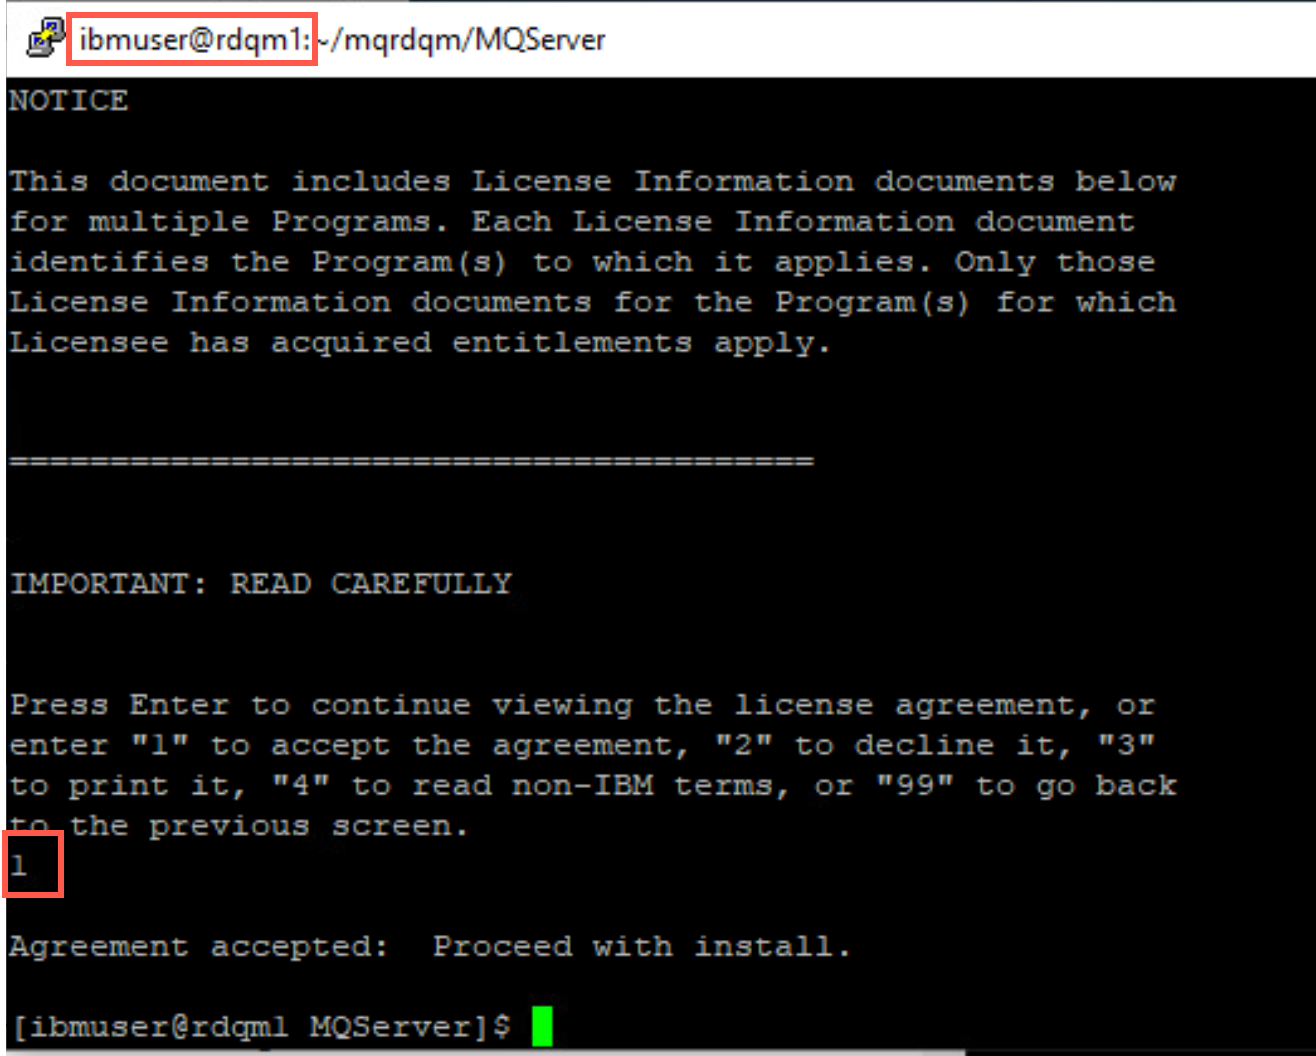
You are then returned to the command prompt.
-
Install IBM MQ. This is like a standard IBM MQ install. Enter the following:
sudo yum install MQSeries*
This command will install all of the MQ RPMs in the required order. Reply y to confirm the installation when prompted. The script will show Complete!.
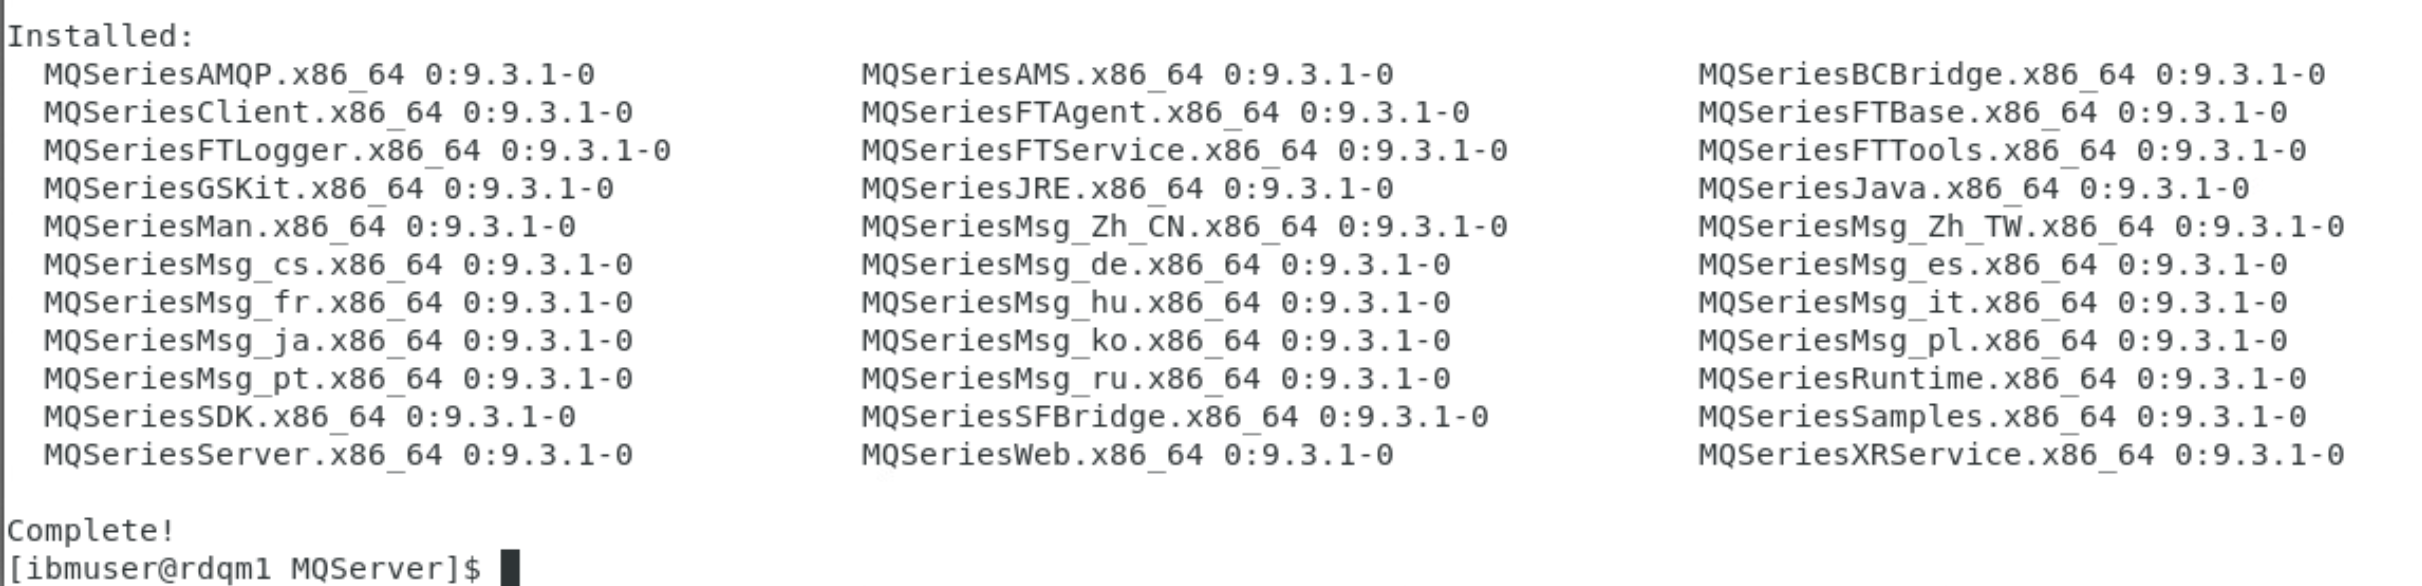
-
Once MQ is installed, it is a good idea to set the path for the MQ installation. Enter the following command:
sudo /opt/mqm/bin/setmqinst -i -p /opt/mqm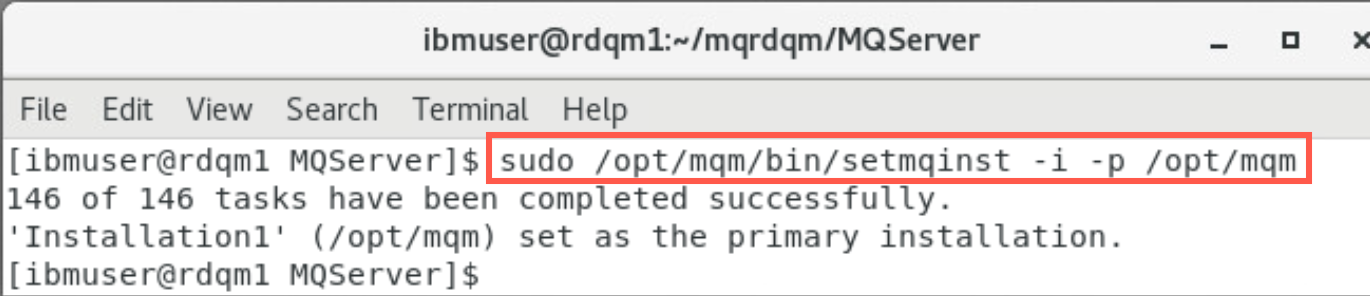
-
Now you can finish the installation of IBM RDQM. Enter the following command:
sudo yum install Advanced/RDQM/MQSeriesRDQM*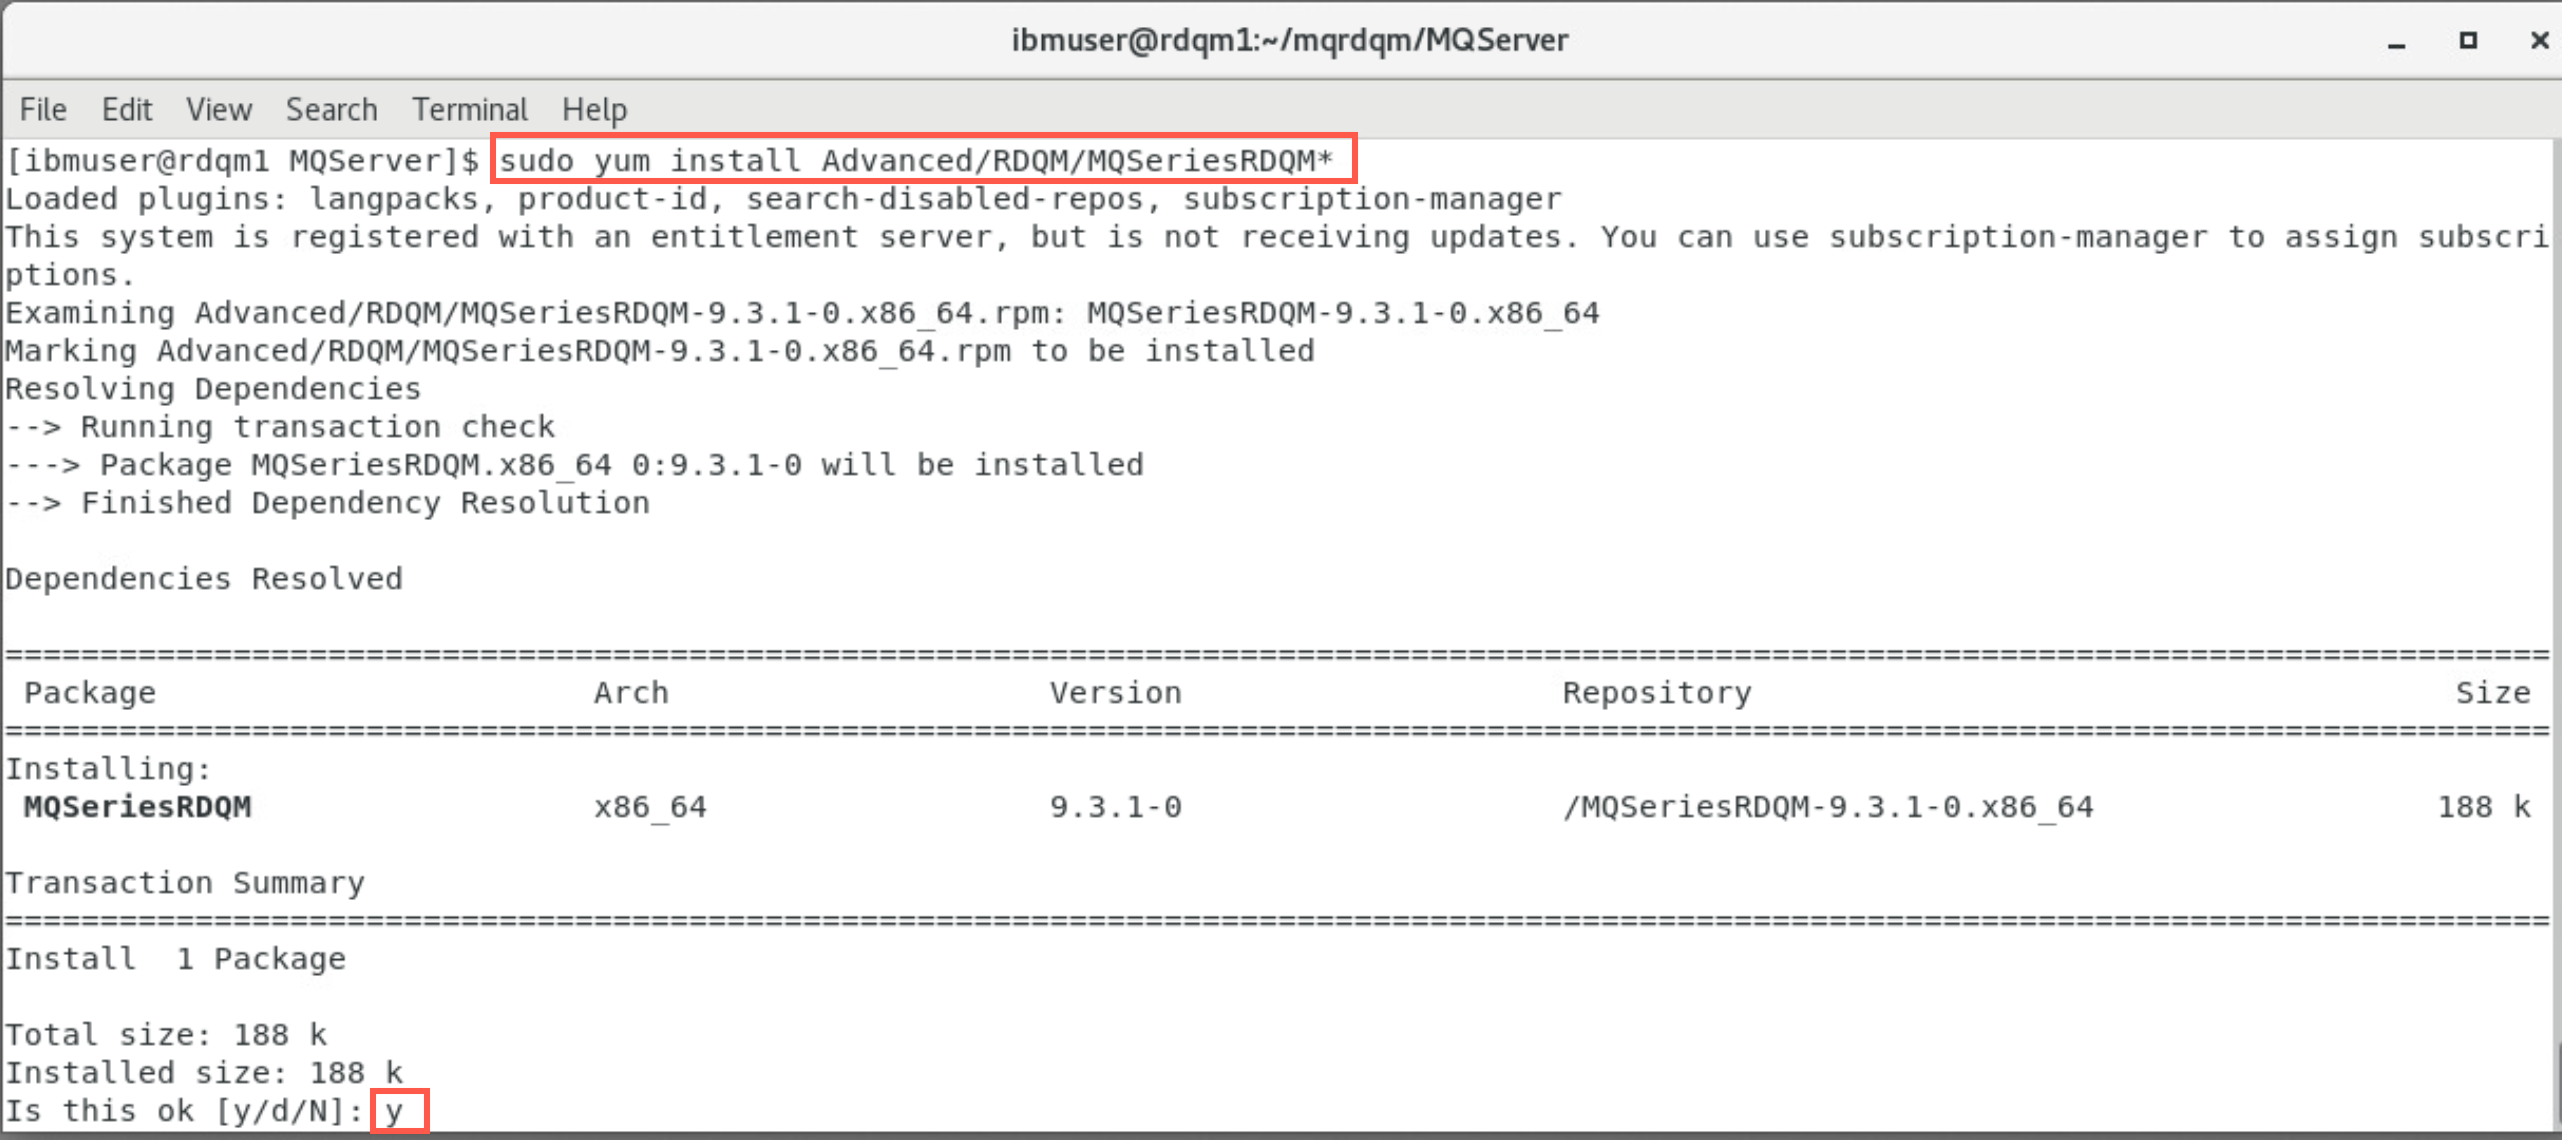
This command will install all of the RDQM. Reply y to confirm the installation when prompted. The script will show Complete!.
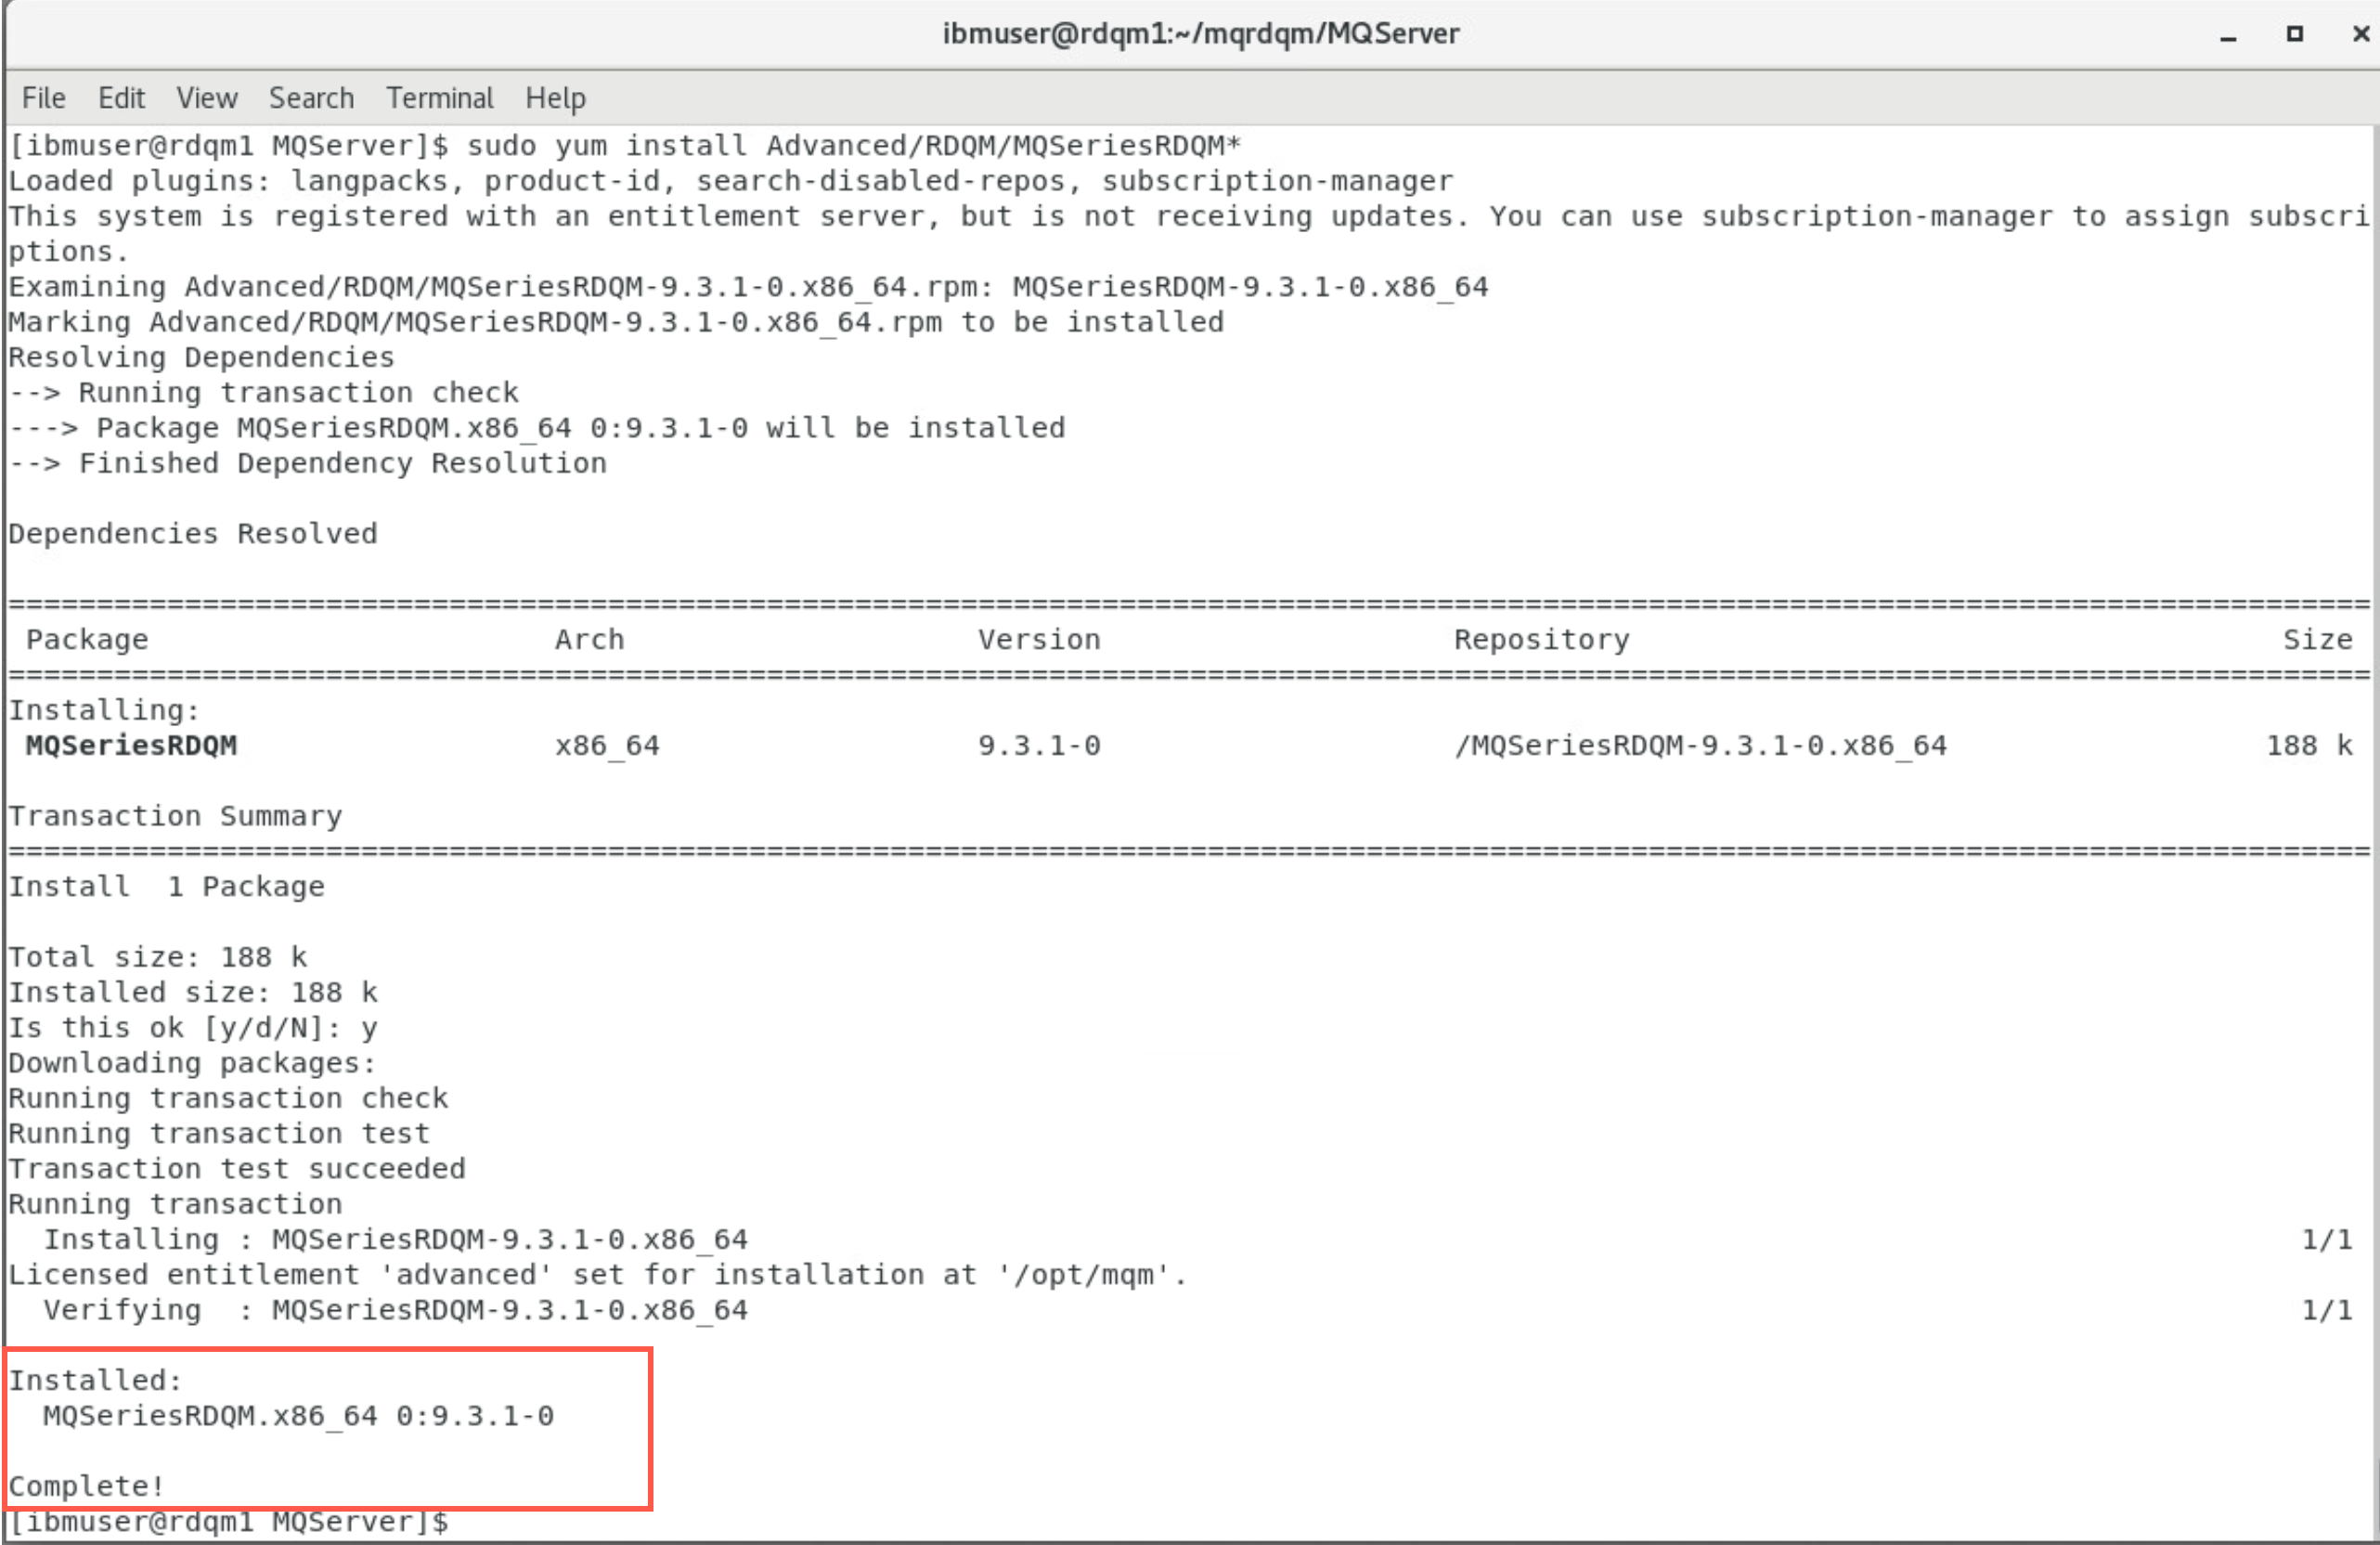
RDQM is now ready as it has been installed with the prereqs on all of the VMs.
Configure the firewall
Normally, the firewall is configured during the pre-req installations.
-
As root on rdqm1 start the firewall with following command:
sudo systemctl start firewalld -
To verify that the MQ, DRDB, and Pacemaker ports are opened in the firewall, run the following commands:
cd /usr/lib/firewalld/services/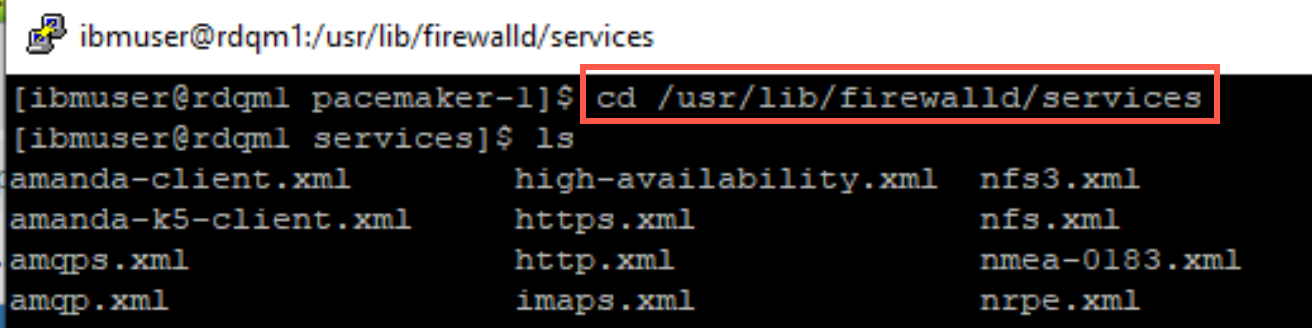
 cat rdqm-mq.xml
 cat rdqm-drbd.xml
 cat rdqm-pacemaker.xml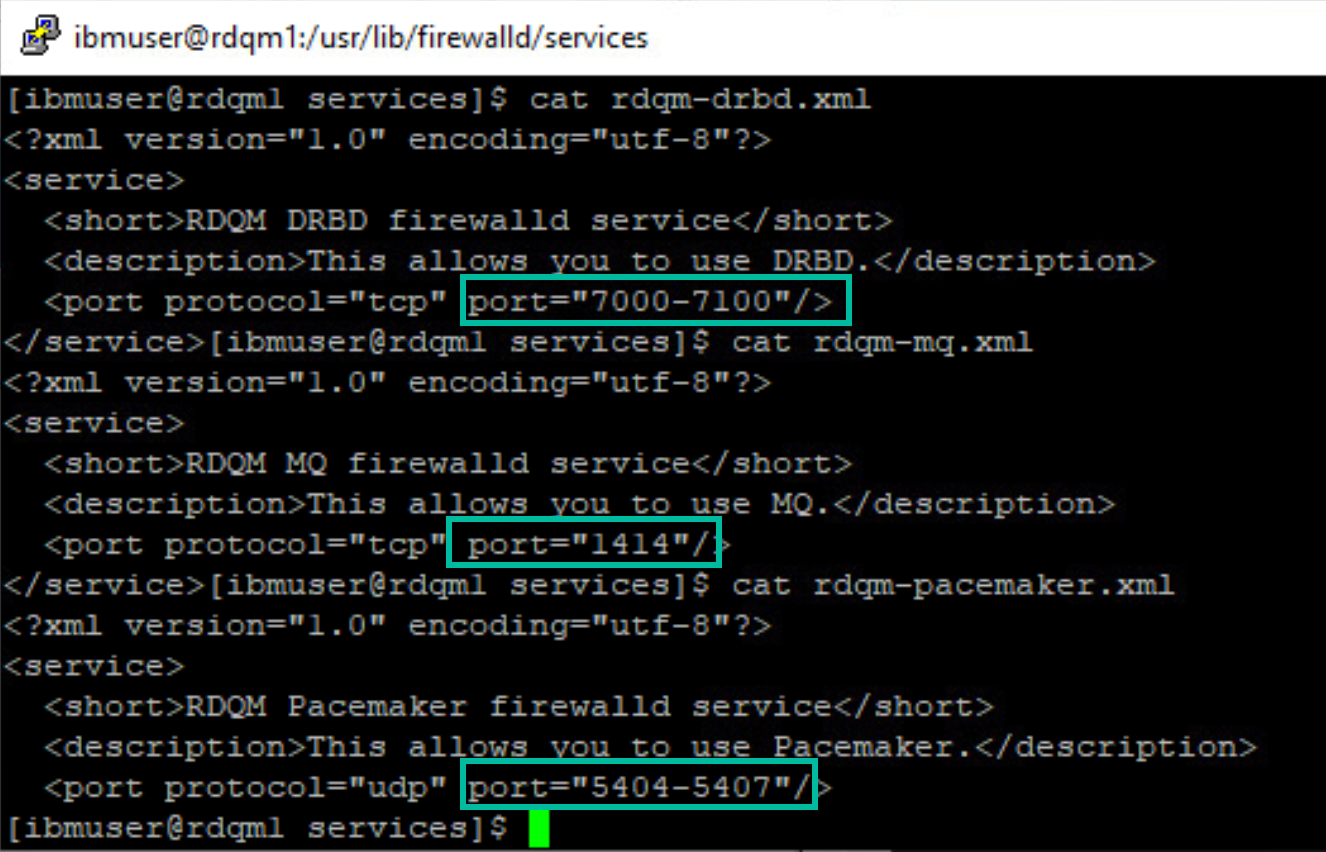
Configure the cluster
The cluster must first be created, and then an RDQM instance defined containing one or more queue managers. The RDQM code expects the rdqm.ini file to be in the /var/mqm directory.
The cluster is defined using the rdqm.ini file. The /home/ibmuser/ directory contains the rdqm.ini file we will use.
-
Return to rdqm1 putty window. Review this file with command:
 cd ~/mqrdqm
 cat rdqm-ha.ini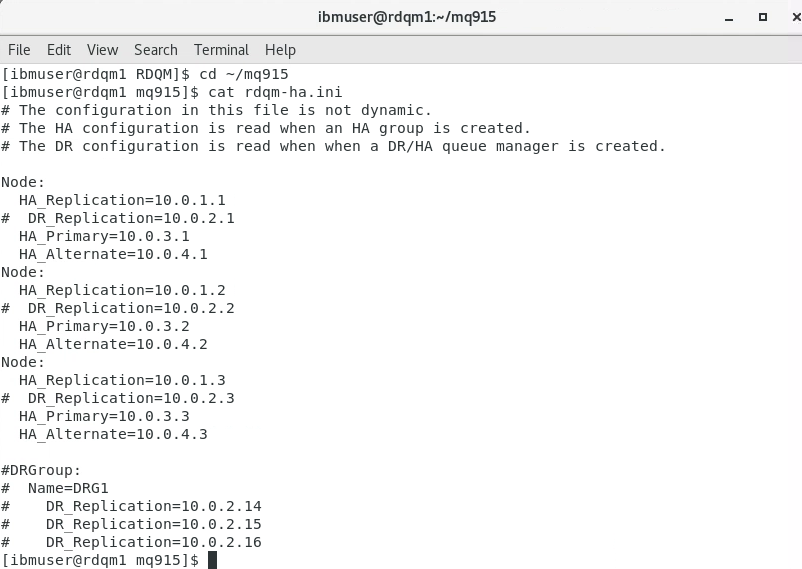
-
On node rdqm1, in a terminal window (as ibmuser), navigate to /var/mqm. Copy the provided rdqm-ha.ini file to the /var/mqm directory with the following command:
 cd /var/mqm
 cp ~/mqrdqm/rdqm-ha.ini rdqm.ini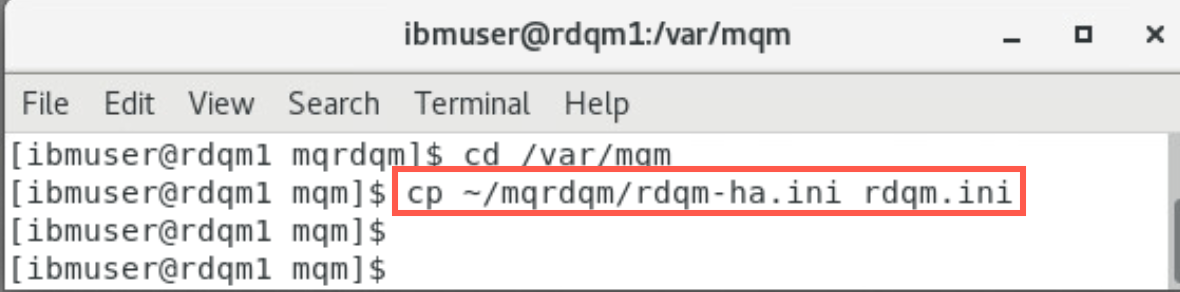
-
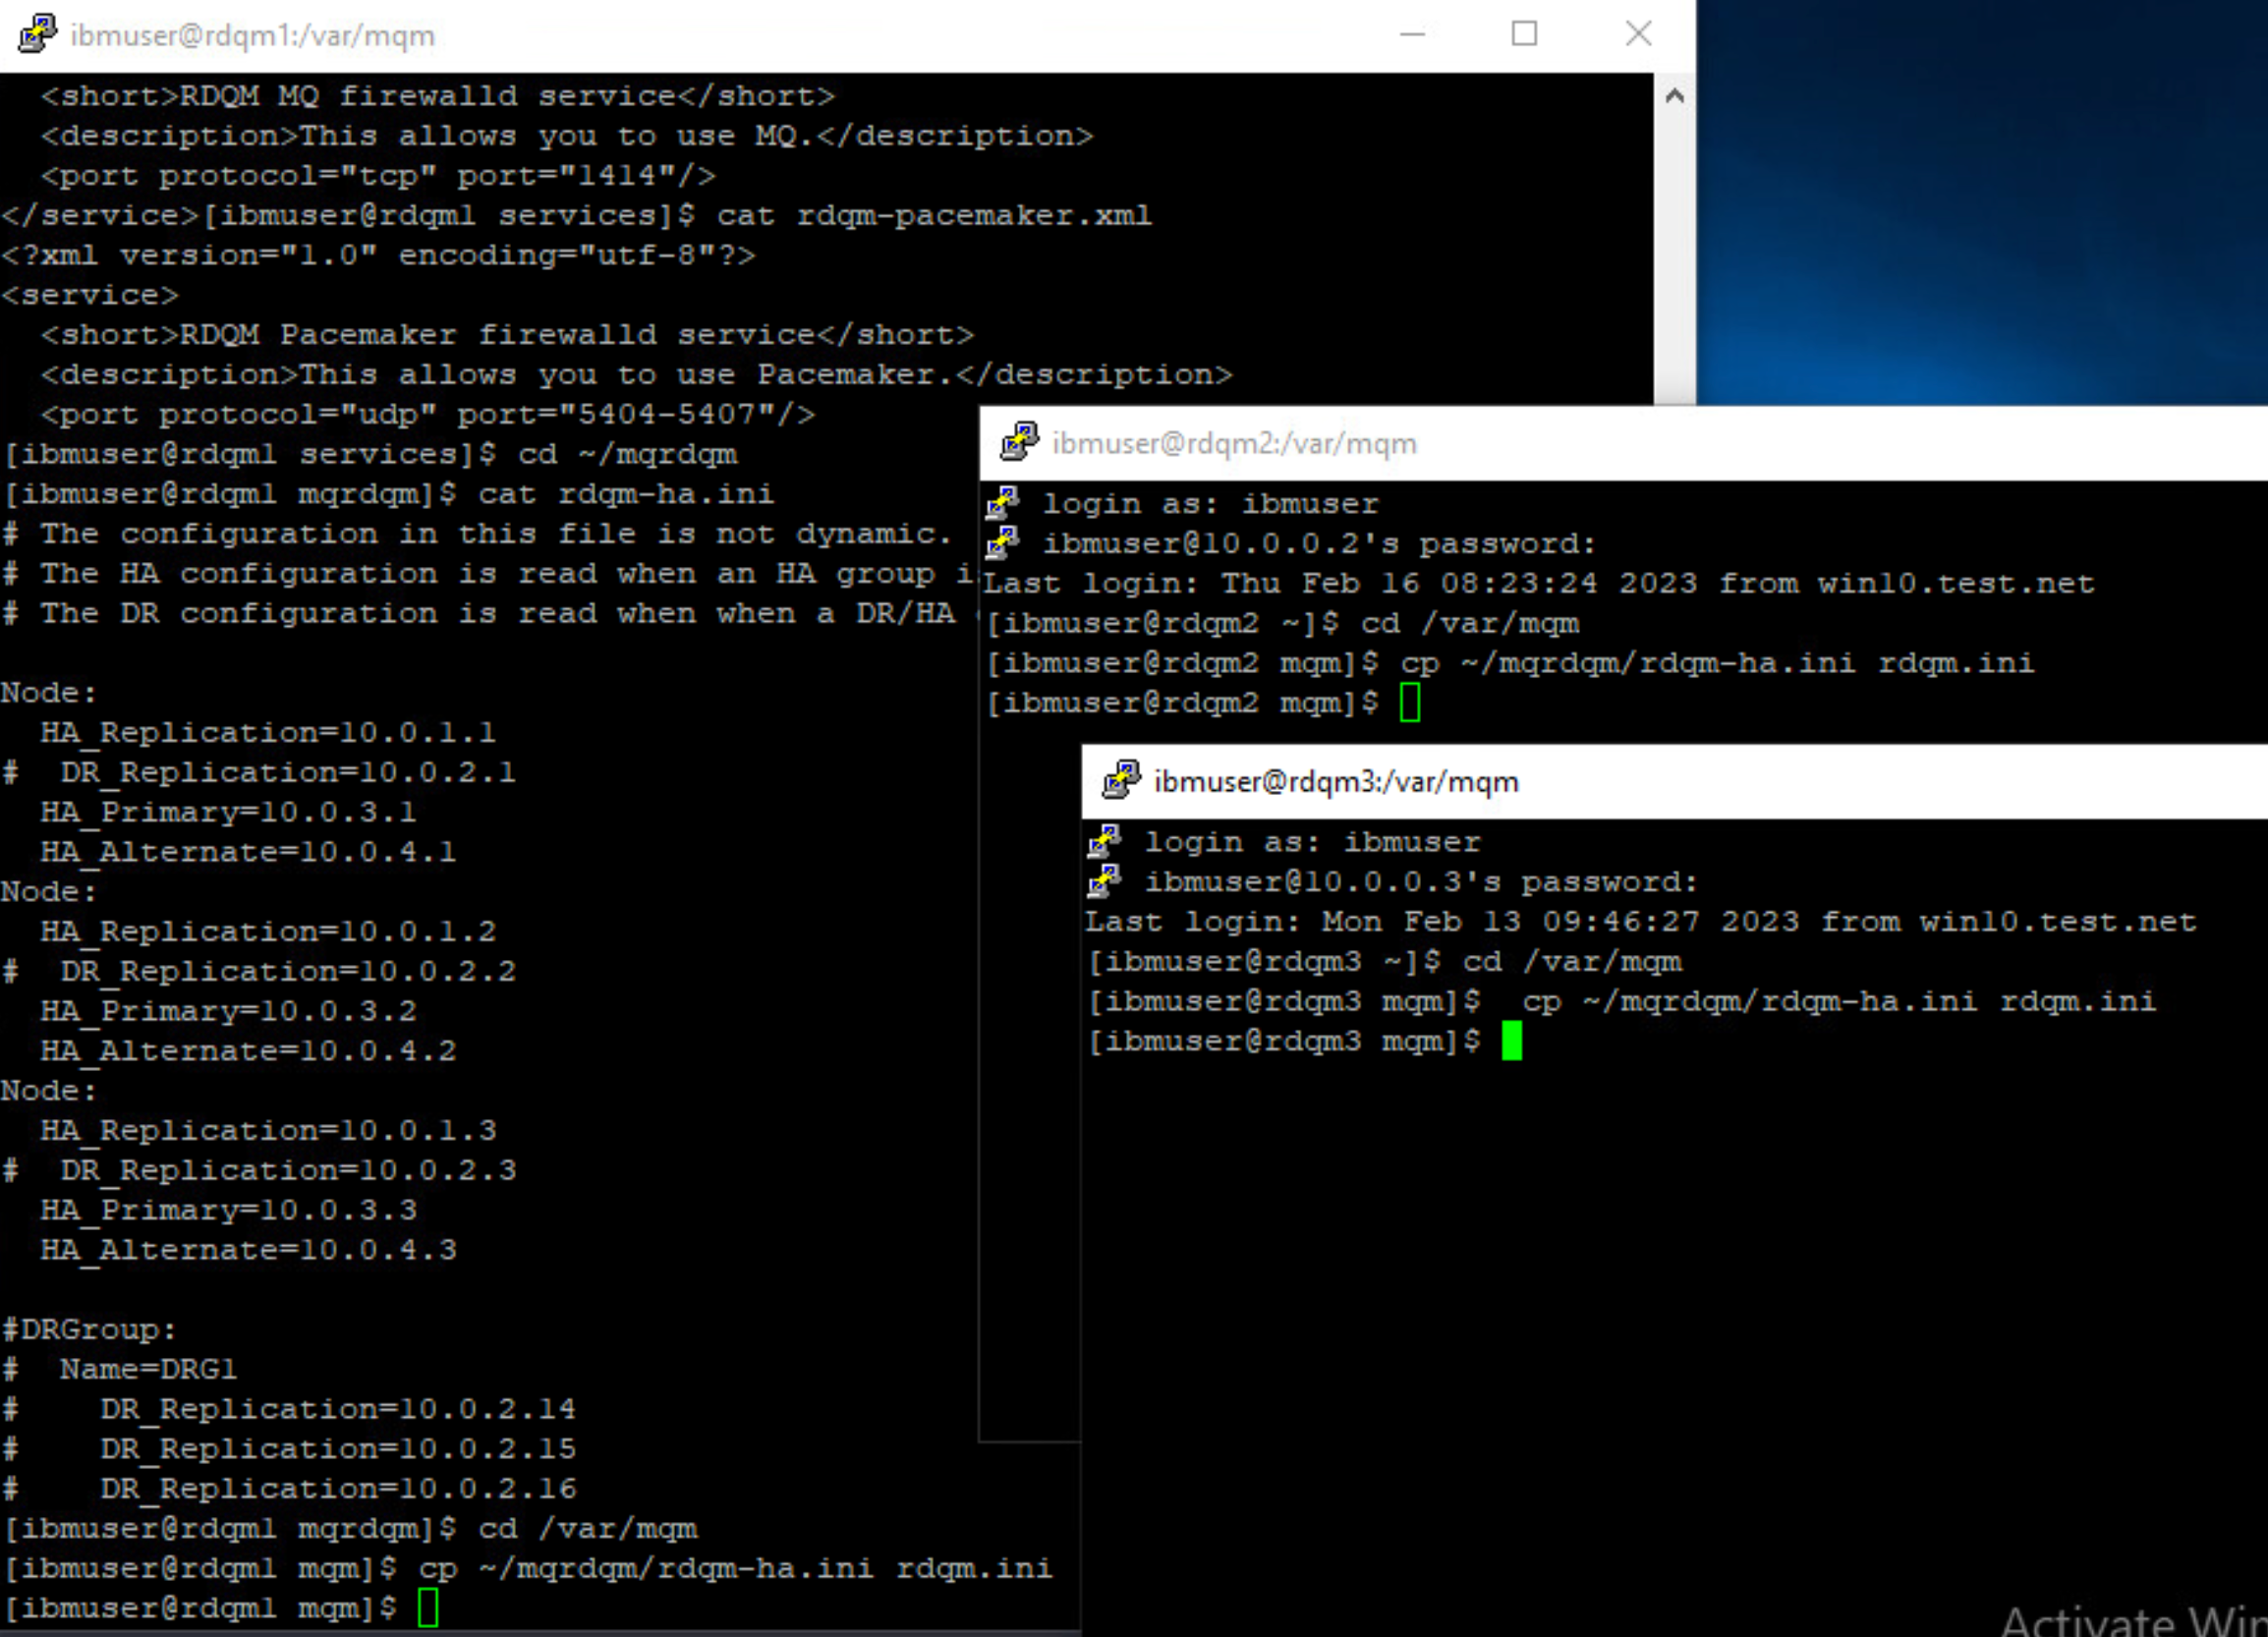
IMPORTANT: Repeat these commands on rdqm2 and rdqm3 before continuing.
Hint: Use the putty windows for rdqm2 and rdqm3. You should have logged onto those VMs at the beginning of this lab.
-
Return to the primary node rdqm1. Enter the following command to see the options for the rdqmadm command:
sudo rdqmadm --help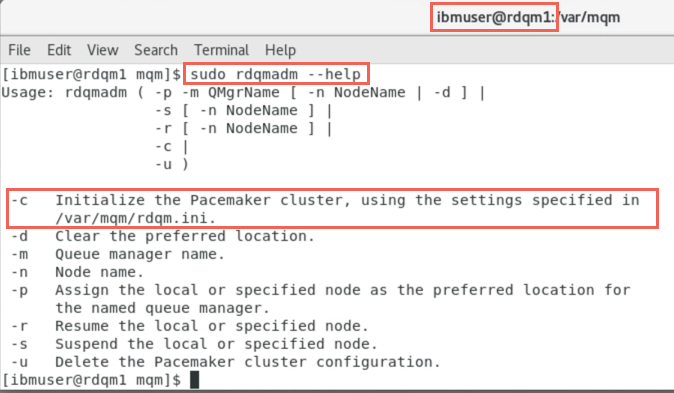
The “-c” parameter is used to configure the Pacemaker cluster
-
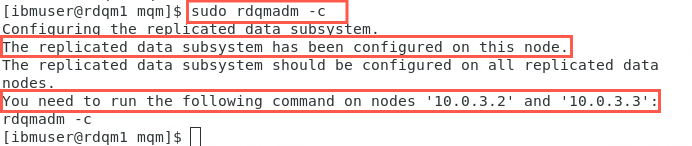
Enter the command to configure RDQM Pacemaker HA cluster:
sudo rdqmadm -cWarning:
If you are copying the command snippets from this lab guide and pasting them in the terminal windows: Beware that if the command does not work it may be that the copy assumes a long or double hyphen instead of a single hyphen. Just try overtyping the hyphen with the regular hyphen. -
You have received the message that the replicated data system has been completed on this node (10.0.3.1 - rdqm1). You are also told that you need to run the same command on 10.0.3.2 (rdqm2) and 10.0.3.3 (rdqm3).
-
Do as instructed and run the command on rdqm2 and rdqm3. Make sure to use root access (sudo). After running the command on rdqm3, you will see that the RDQM subsystem configuration has been completed.
sudo rdqmadm -c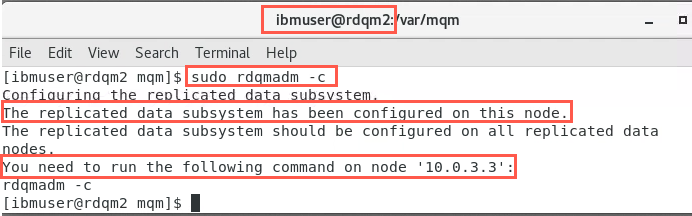
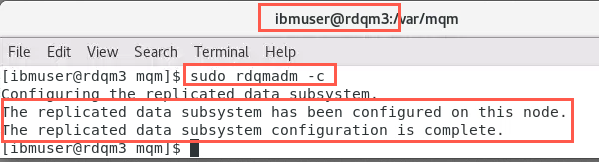
Configure the HA RDQM
The high availability replicated data queue manager (RDQM) now needs to be created. The crtmqm command includes a -sx parameter for a replicated data queue manager.
The secondary RDQMs need to be created first on two of the nodes with the -sxs parameter. This parameter indicates that the primary node’s data will be replicated to this node and required disk space gets allocated.
-
Run the following command on rdqm2 and rdqm3
sudo crtmqm -sxs -fs 3 QMHA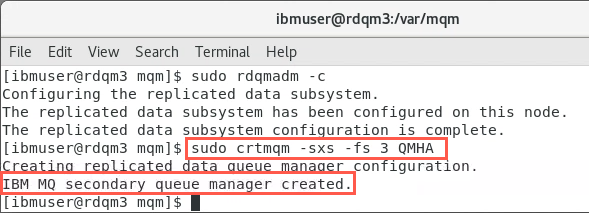 Note:
Note:
When running RDQM commands, you should run with root access. So precede the commands with sudo. You may notice that as a member of the mqm group ibmuser’s commands complete even though not using root access. But when the command is complete you are reminded to run with sudo. You may notice this in the screen shots. -
Now that the secondary queue managers have been created, the primary RDQM is created on the node where the command is run. This node becomes the RDQM’s preferred location by default.
You will now create the primary RDQM on rdqm1. Return to rdqm1. Create the primary RDQM, which will listen on port 1500 with the following command:
sudo crtmqm -p 1500 -sx -fs 3 QMHA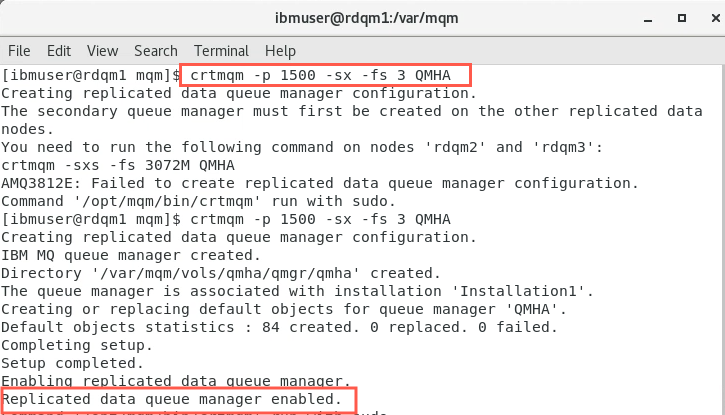
The primary queue manager is now created and running.
Note:
In order to create RDQMs and issue commands, ibmuser must be in the mqm and haclient groups. haclient group is created as part of the RDQM installation. This was done as setup for this lab.. -
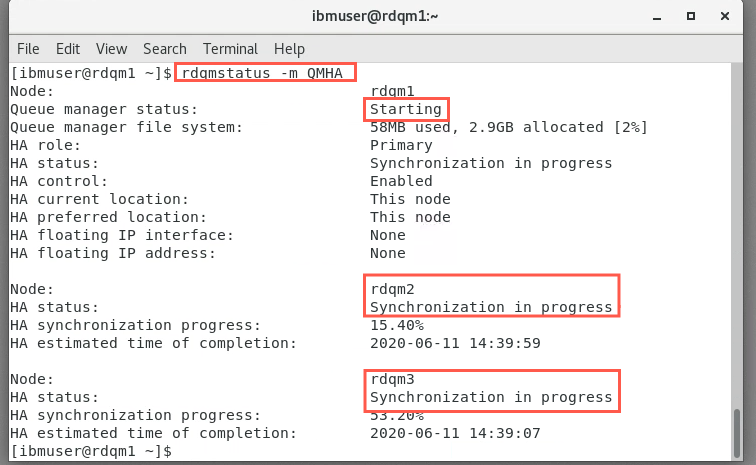
Check the status of the queue manager:
sudo rdqmstatus -m QMHAInitially, the output should look similar to the following. Synchronization is in progress.
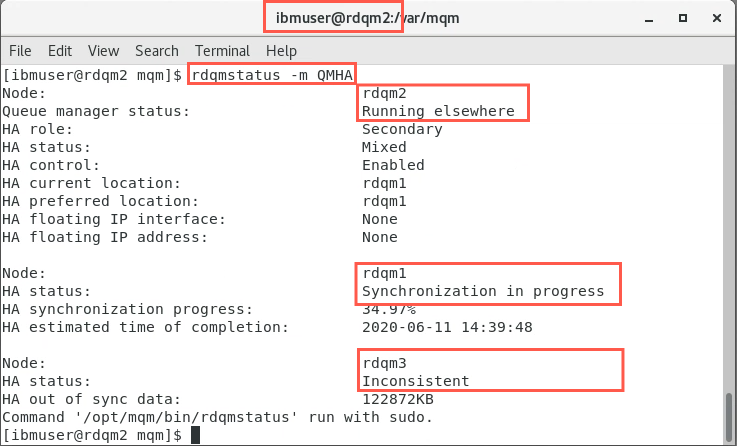
You can run the same command on the other nodes and get similar output.

-
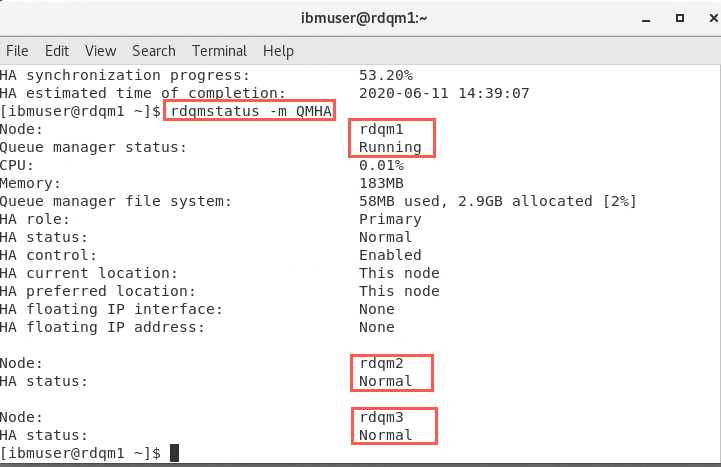
When the nodes have completed synchronising, the HA Status field on all nodes should change to ‘Normal’. This may take a few minutes.
Repeat the sudo rdqmstatus command again until you see the normal HA status (as shown on rdqm1).
 Note:
Note:
RHEL default time before the screen locks is very short. If you need longer, you can turn off the screen lock in settings. Applications > System Tools > Settings > Power > Power Saving > Blank screen > Never.
Simple testing of RDQM
Once all nodes have an HA status of Normal, you can commence testing. You will perform some tests, which will show different use cases.
Failing over an RDQM instance to another node
The easiest way to force an RDQM instance to fail over to another node is to change its preferred location.
The default location for RDQM is rdqm1. You will fail the RDQM instance to node 2, rdqm2.
-
Switch to rdqm2.
-
Open a new terminal window, and as the user ibmuser, issue the command to set the MQ environment. Make this node the primary instance with the following command:
sudo rdqmadm -m QMHA -p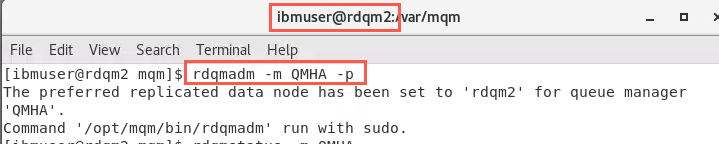
-
Confirm that rdqm2 is now the primary node:
sudo rdqmstatus -m QMHA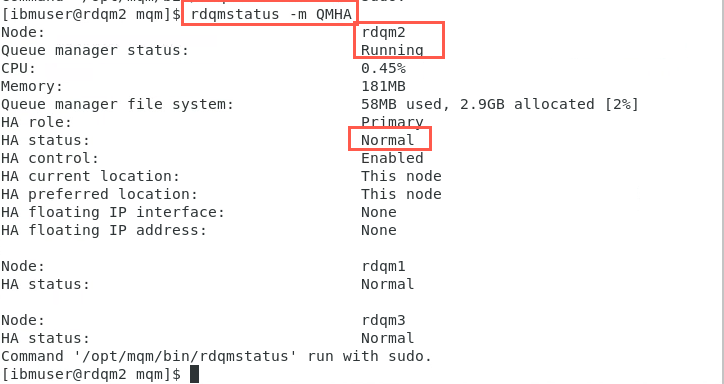
-
Now you can move the queue manager back to rdqm1. Return to rdqm1 and run the sudo rdqmadm command again.
sudo rdqmadm -m QMHA -p
Check the status again to see it is now running on rdqm1.
sudo rdqmstatus -m QMHA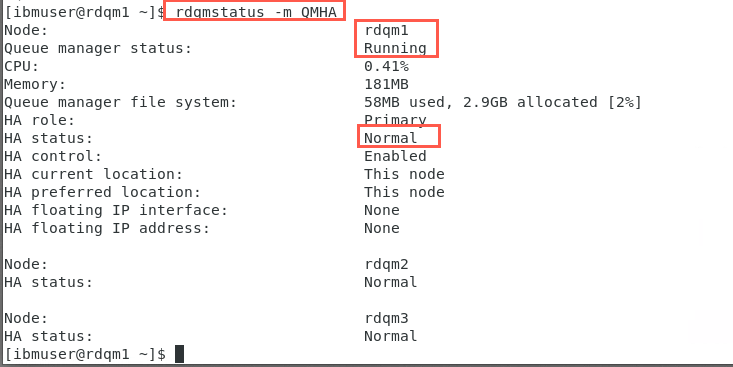
Move the RDQM by suspending a node
Another test is to move a RDQM by suspending the node on which it is running, as you may want to do when applying a Fix Pack.
-
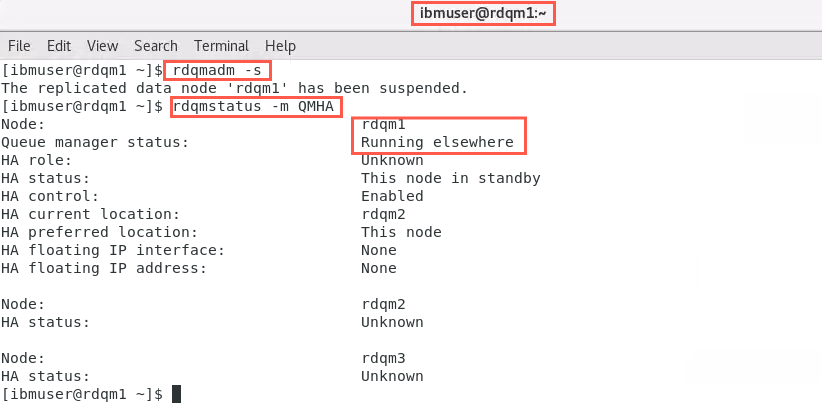
On the node where QMHA is running (rdqm1), return to ibmuser’s terminal window. As the user ibmuser (not as root), issue the command to suspend the queue manager:
rdqmadm –s -
As shown in the display, the replicated data node is suspended and goes into standby.
-
Switch to rdqm2 and issue the command to display the status of QMHA and you see that it is now running on rdqm2.
sudo rdqmstatus -m QMHA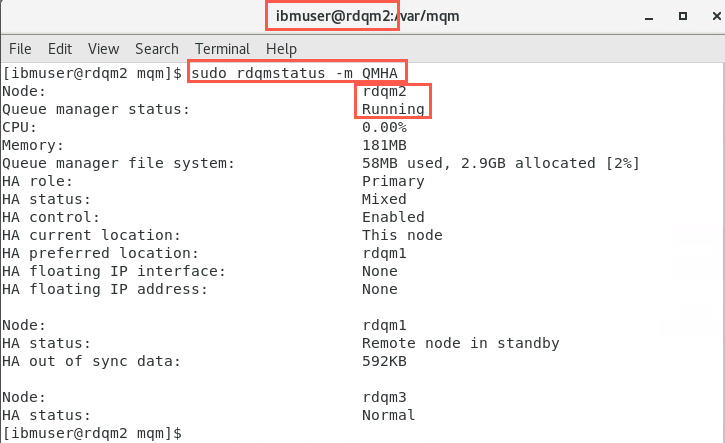
-
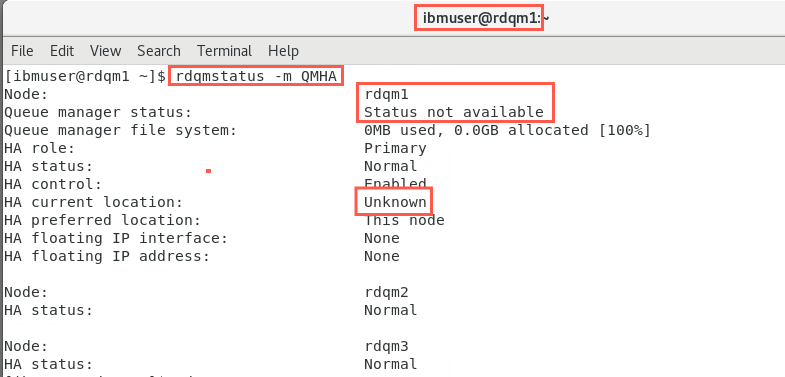
Return to rdqm1, issue the command to resume the replicated data node in the cluster.
sudo rdqmadm -rQuickly run the status command again. QMHA will initially run in a secondary role on this node. If you aren’t quick enough, you may not catch this transitory state.
-
After the node has fully resumed, QMHA will run in a primary role on this node, as it was prior to being suspending. Issue the status command again to confirm that this has indeed happened.
sudo rdqmstatus -m QMHA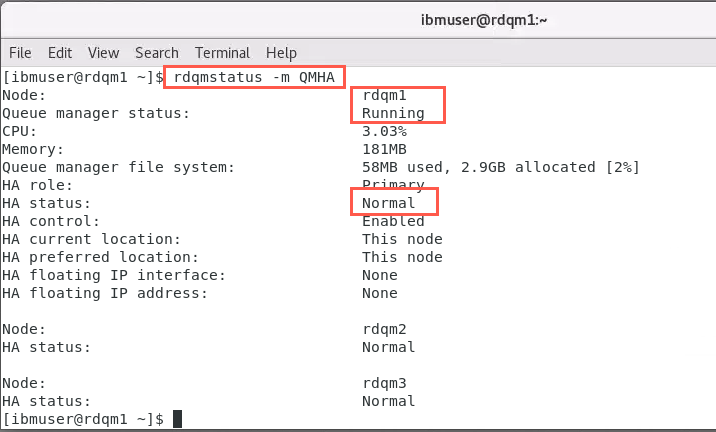
Testing RDQM using HA sample programs
Some High Availability sample programs are provided with MQ, which are a good visible demonstration for testing failovers. You will use these for testing:
- amqsphac - puts a sequence of messages to a queue with a two second delay between each message and displays events sent to its event handler. This will run on rdqm3.
- amqsmhac - copies messages from one queue to another with a default wait interval of 15 minutes after the last message that is received before the program finishes. This will run on rdqm2.
- amqsghac - gets messages from a queue and displays events sent to its event handler. This will run on rdqm1.
Create MQ resources
To run these samples, you will define two queues: for SOURCE and TARGET. You will also create a new channel using the ‘MQ’ IP address for each of the three nodes in our cluster (as the queue manager could run on any one of them) and the listener port for the queue manager. You will turn off CHLAUTH and CONNAUTH completely to keep things simple.
-
On rdqm1 where the QMHA queue manager is running, in ibmuser’s terminal window, run the command:
runmqsc QMHARun the following MQSC commands (remember that MQ objects are case sensitive):
ALTER QMGR CHLAUTH(DISABLED) CONNAUTH(' ')REFRESH SECURITY TYPE(CONNAUTH)DEFINE QLOCAL(SOURCE) DEFPSIST(YES)DEFINE QLOCAL(TARGET) DEFPSIST(YES)DEFINE CHANNEL(CHANNEL1) CHLTYPE(SVRCONN) TRPTYPE(TCP)DEFINE CHANNEL(CHANNEL1) CHLTYPE(CLNTCONN) TRPTYPE(TCP) CONNAME('10.0.1.1(1500),10.0.1.2(1500),10.0.1.3(1500)') QMNAME(QMHA)END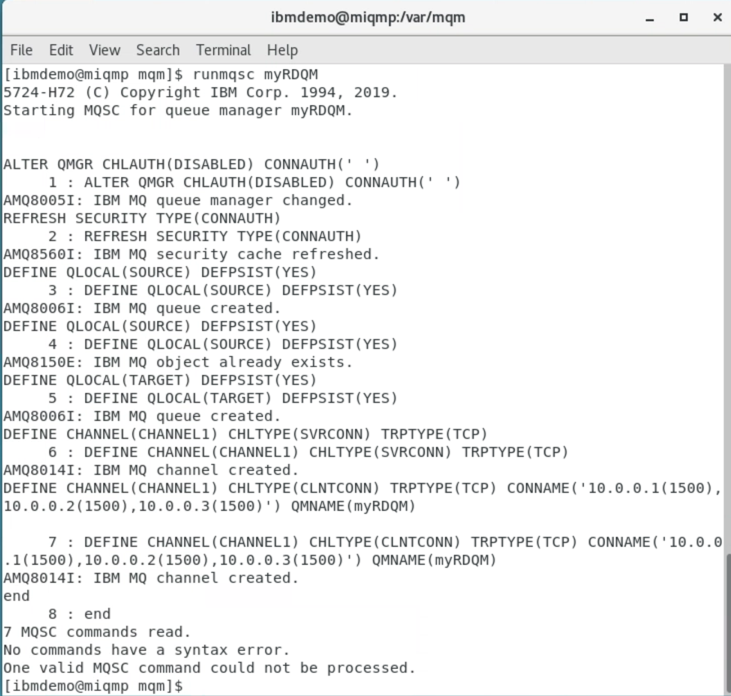
Update firewall rules
-
On each of the nodes, open the firewall port defined (1500) for the queue manager.
sudo firewall-cmd --add-port=1500/tcpAlso open port 1501 as you will need it later.
sudo firewall-cmd --add-port=1501/tcp
-
To verify the ports are now open, enter the following command:
sudo firewall-cmd --list-portsResults should look like this:

-
Don’t forget, each node must have these ports opened in the firewall.
Start the HA sample programs
The easiest way to configure access to the queue manager from the sample programs is to use the MQSERVER environment variable. Again, as there are 3 possible nodes where our queue manager could run, each needs to be specified, along with the listener port for the queue manager.
-
On rdqm1, in the user ibmuser terminal window, enter:
export MQSERVER='CHANNEL1/TCP/10.0.1.1(1500),10.0.1.2(1500),10.0.1.3(1500)' -
Change to the /opt/mqm/samp/bin directory, and run the command: amqsghac TARGET QMHA
 cd /opt/mqm/samp/bin
 ./amqsghac TARGET QMHA
Later, this will display the messages generated by amqsphac on rdqm3.
Leave this command to run!
-
Now switch to rdqm2. In the user ibmuser terminal window, enter:
export MQSERVER='CHANNEL1/TCP/10.0.1.1(1500),10.0.1.2(1500),10.0.1.3(1500)' -
Change directory to /opt/mqm/samp/bin and run the command: amqsmhac -s SOURCE -t TARGET -m QMHA
 cd /opt/mqm/samp/bin
 ./amqsmhac -s SOURCE -t TARGET -m QMHA
Leave this command to run!
Warning:
If you are copying the command snippets from this lab guide and pasting them in the terminal windows: Beware that if the command does not work it may be that the copy assumes a long or double hyphen instead of a single hyphen. Just try overtyping the hyphen with the regular hyphen. -
Now switch to rdqm3. As before open a new terminal window. As the user ibmuser enter:
export MQSERVER='CHANNEL1/TCP/10.0.1.1(1500),10.0.1.2(1500),10.0.1.3(1500)' -
Change directory to /opt/mqm/samp/bin and run the command: amqsphac SOURCE QMHA
cd /opt/mqm/samp/bin
./amqsphac SOURCE QMHA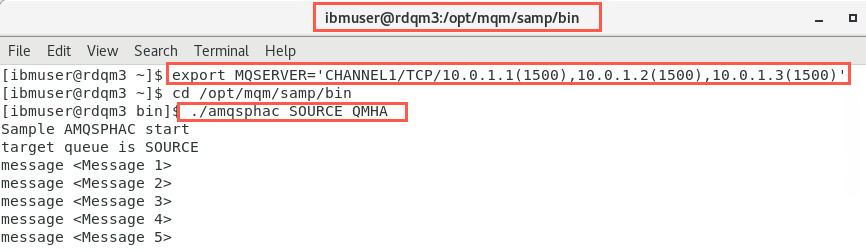
Leave this command to run!
-
Confirm that these messages are also being displayed on rdqm1.
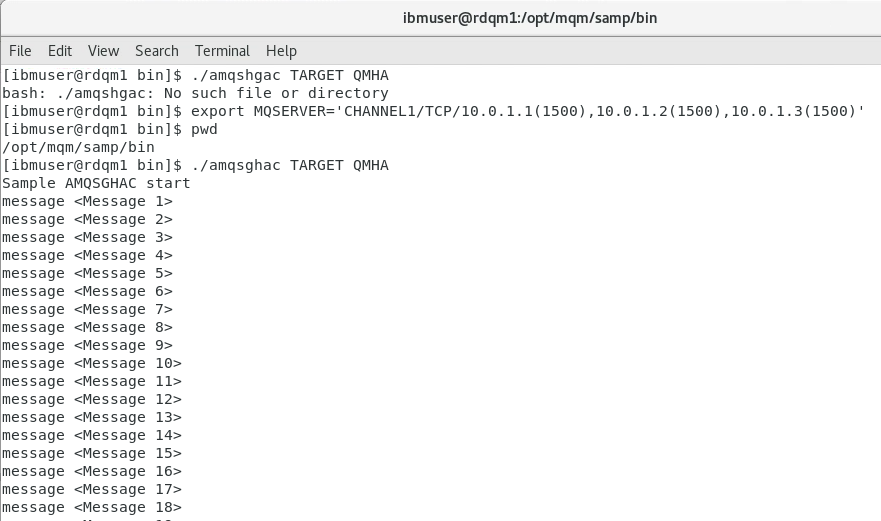
Note: At this stage, the queue manager is running on the primary node (rdqm1) and each sample program is able to communicate with it, using the first location specified in the MQSERVER environment variable:
CHANNEL1/TCP/10.0.1.1(1500),10.0.1.2(1500),10.0.1.3(1500)
Move the RDQM
You will now use the approach of controlling where the RDQM runs by changing its preferred location, in this case to rdqm2.
-
Open a new putty window for rdqm2 (10.0.0.2). In a new terminal window, run the following command as ibmuser:
sudo rdqmadm –m QMHA –p -
Check that the queue manager is indeed running on rdqm2, by running:
sudo rdqmstatus –m QMHA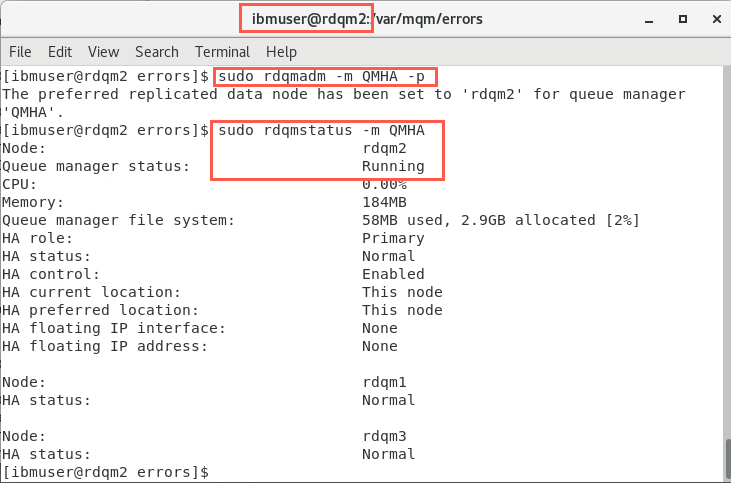
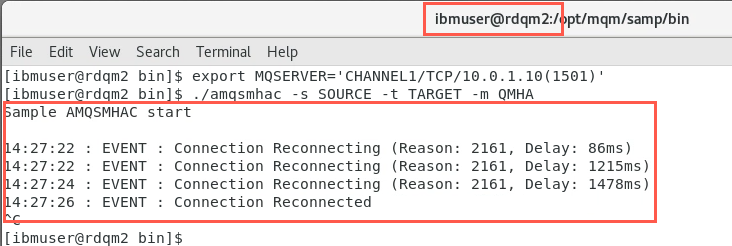
The output from the amqsmhac command, running in another window, should now be like this:
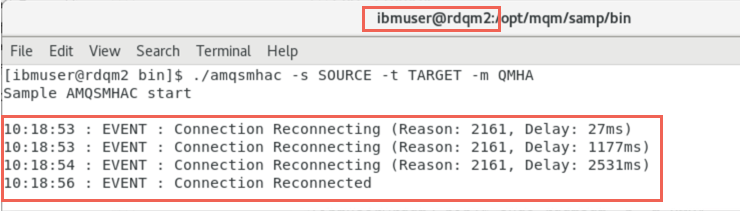
-
Now switch to rdqm1.
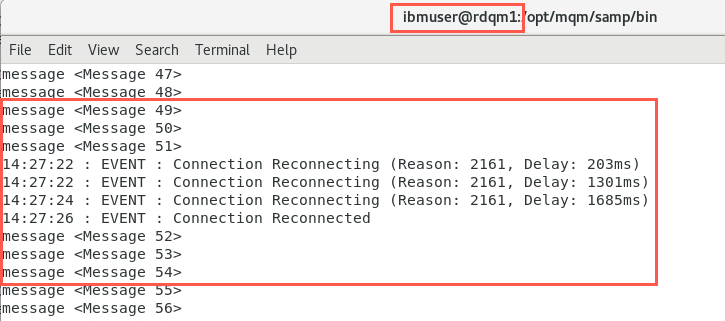
Messages should continue to be received without loss, by amqsghac, after it connects with the queue manager at the new location:
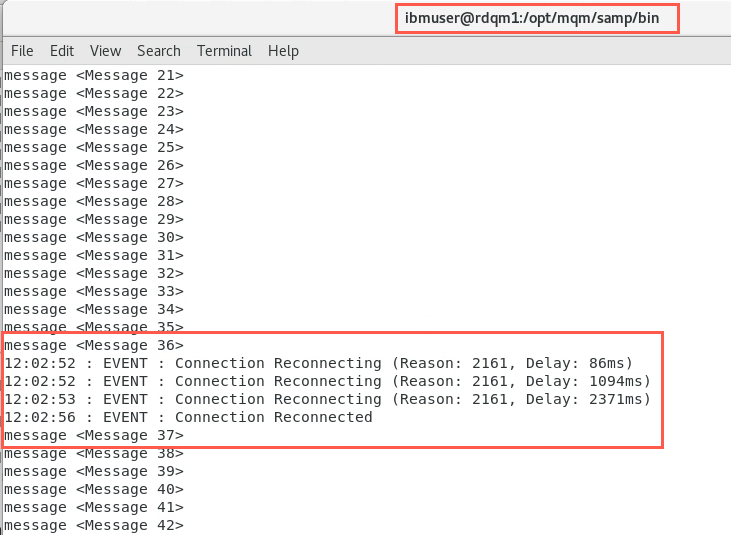
-
Now switch to rdqm3.
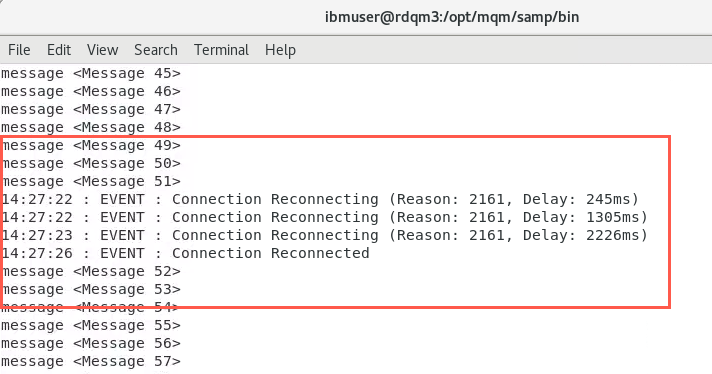
The output from the amqsphac command, running on rdqm3, should similarly show messages continuing to be sent without loss:
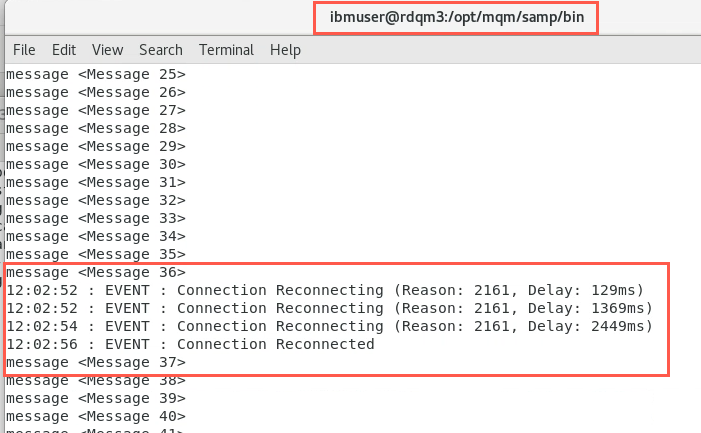
Note: Now the queue manager is running on rdqm2, but each sample program is still able to communicate with it, this time using the second location specified in the MQSERVER environment variable:
CHANNEL1/TCP/10.0.1.1(1500),10.0.1.2(1500),10.0.1.3(1500)
HA Sample programs with RDQM & Floating IP address
It is possible to associate a floating IP address with an RDQM so that it is not necessary to reconfigure clients, etc. with three IP addresses for the same queue manager. In this case, you will assign the floating address 10.0.1.10 to virtual adapter ens35, where currently you already have a fixed IP address configured on each virtual machine.
-
Stop (with ctrl-C) the HA sample programs that are currently running on each of the nodes.
Do not close the terminal windows just yet as you will be running these programs again!
-
Switch to rdqm2. As this is currently the primary node for the QMHA queue manager, add the floating IP address, by running the command (as ibmuser):
sudo rdqmint -m QMHA -a -f 10.0.1.10 -l ens35
-
It is recommended to add another listener specifically for this floating IP address. By default, the standard listener will listen on the same port on every IP address, so a different port needs to be chosen for the additional listener. In a terminal window, create a listener by entering the runmqsc commands as follows:
runmqsc QMHADEFINE LISTENER(FLOATING.LISTENER) TRPTYPE(TCP) CONTROL(QMGR) IPADDR(10.0.1.10) PORT(1501)end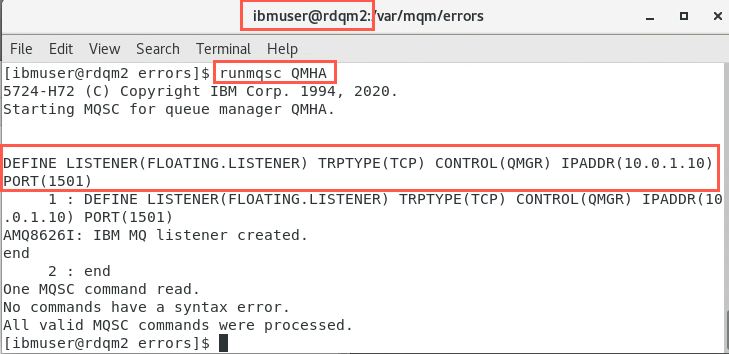
-
Switch to rdqm1. The new listener will not be started until the queue manager is restarted, so move the queue manager back to its original node by running the following command on node rdqm1 in a terminal window, as user ibmuser:
sudo rdqmadm –m QMHA –p
You can check that both listeners are running by running the following command:
netstat –ant | grep 150
The first listener is the one created because -p 1500 was specified on the crtmqm command. This listener is listening on port 1500 on every IP address. The second listener, however, is listening on port 1501 on the floating IP address only.
-
Now that you have a floating IP address associated with QMHA, you can change the MQSERVER environment variable to CHANNEL1/TCP/10.0.1.10(1501).
Locate the window where the amqsghac program was running (on rdqm1) and enter:
export MQSERVER='CHANNEL1/TCP/10.0.1.10(1501)' -
Now re-run the command: amqsghac TARGET QMHA.
./amqsghac TARGET QMHA
Leave this command to run!
-
Switch to rdqm2. Locate the window where the amqsmhac program was running and enter:
export MQSERVER='CHANNEL1/TCP/10.0.1.10(1501)' -
Now re-run the command: amqsmhac -s SOURCE -t TARGET -m QMHA
./amqsmhac -s SOURCE -t TARGET -m QMHA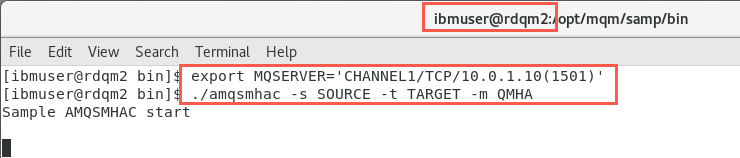
Leave this command to run!
-
Switch to rdqm3. Locate the window where the amqsphac program was running and enter:
export MQSERVER='CHANNEL1/TCP/10.0.1.10(1501)' -
Now re-run the command: amqsphac SOURCE QMHA
./amqsphac SOURCE QMHA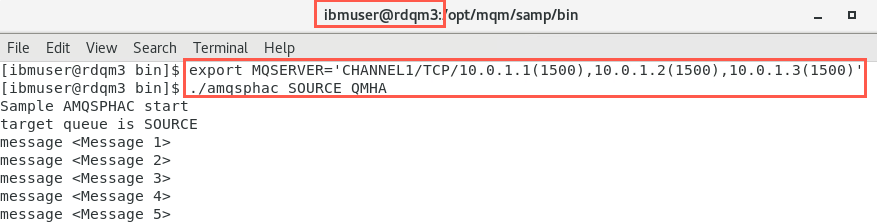
Leave this command to run!
-
Now repeat the test. This time move it to rdqm3.
a. On rdqm3, in the another terminal window as user ibmuser.
b. Issue the command to move the RDQM to rdqm3.
sudo rdqmadm -p -m QMHA
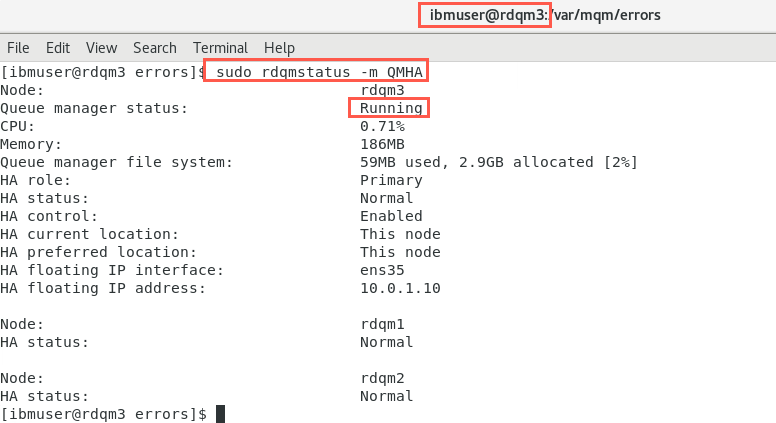
c. Check the status of the queue manager to make sure it is running on rdqm3.
d. Confirm that messages continue to be sent and received without loss after the queue manager has been moved.
-
When completed testing, stop (with ctrl-C) the HA sample programs that are currently running on each of the nodes.
Cleanup environment
Stop and remove RDQMs
-
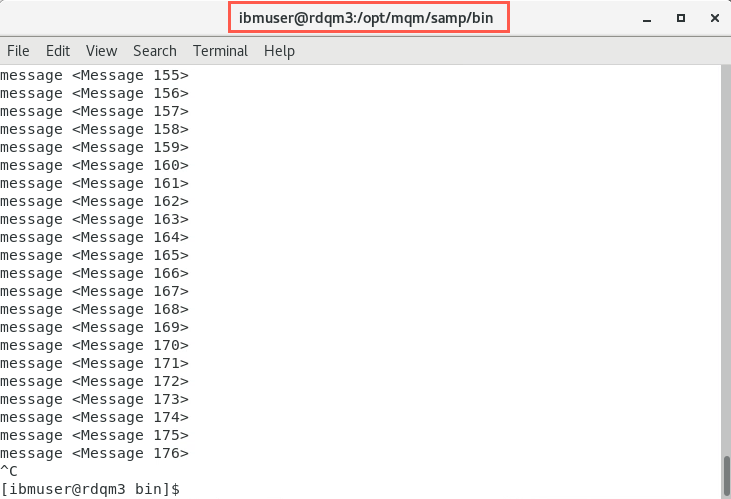
Stop the sample program on each node by entering ctrl-c in the terminal window.
-
On rdqm3, open a terminal window and stop running queue managers. Issue the following commands. Your displays and queue managers may not match the screenshots. Substitute your queue managers.
dspmq -o allendmqm QMHA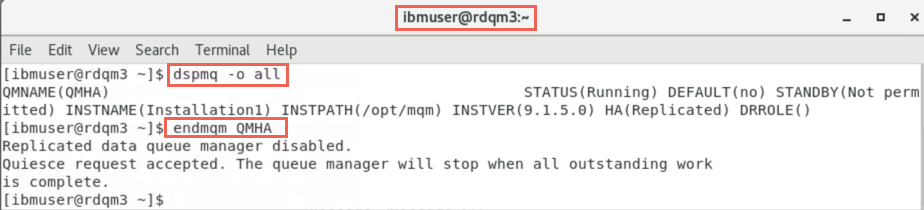
-
Delete the queue manager QMHA on the primary node rdqm3.
sudo dltmqm QMHA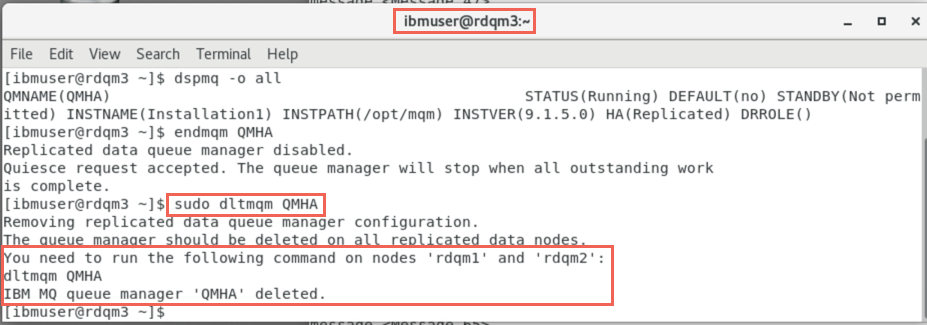
-
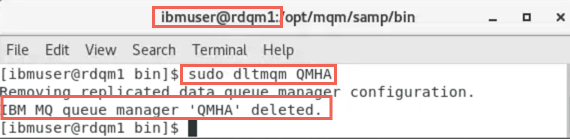
Delete the secondary queue managers on rdqm2 and rdqm1 per instructions in the output messages from previous commands.
On rdqm2 and rdqm1, delete the secondary queue manager QMHA with the following command:
sudo dltmqm QMHA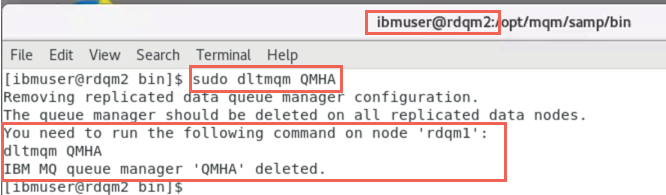
Delete HA Cluster
-
Still on rdqm1 unconfigure (delete) the Pacemaker HA cluster.
sudo rdqmadm -u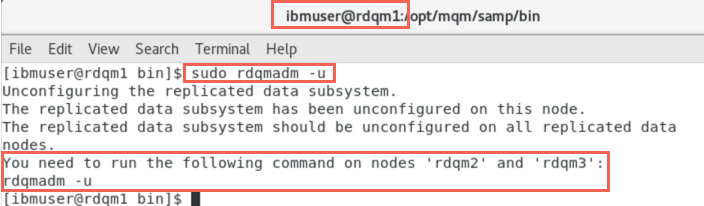
-
Delete the pacemaker HA cluster on the secondary nodes rdqm2 and rdqm3 per instructions in the output messages from previous commands.
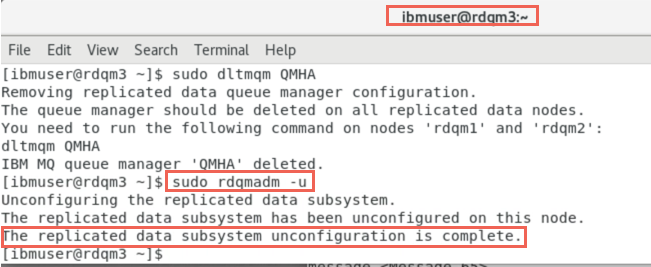
On rdqm2 and rdqm3, unconfigure the HA cluster.
sudo rdqmadm -u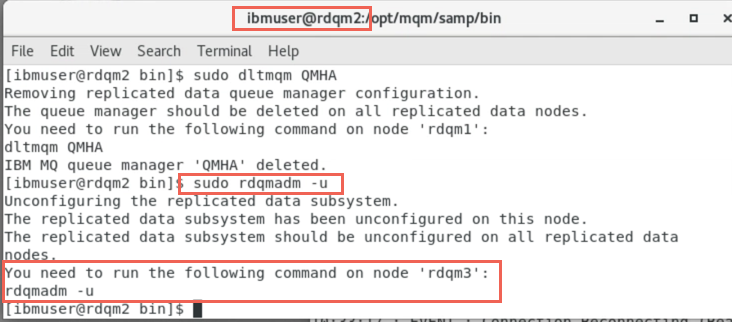
CONGRATULATIONS!
You have completed this hands-on lab.
You have created replicated data queue managers to provide high availability for IBM MQ, and you have tested failing over.