Lab 5 - Using the IBM MQ Console and REST Interfaces
Overview
View an overview of using IBM MQ Web
This lab utilizes the Windows 10 x64 Skytap image. Start this image and then login with the userid of iibdemo and a password of passw0rd before you begin this lab.
You may use the same demo environment that you used for Lab 1. If you are doing this lab consecutively following Lab 1, you can continue with that environment. If you are doing this lab independent of Lab 1, you may need to create a new demo environment. In that case click the link below.
See the Environment Setup section
IBM MQ version 9.2 introduced new Web Console for managing your IBM MQ queue managers that is different than the MQ v9.1 Web Console. These interfaces include a browser-based Web UI as well as a set of REST APIs. The Web UI, referred to as the IBM MQ Console, supplies a user-friendly alternative to the IBM MQ Explorer and runmqsc command shell interfaces.
These interfaces are supported by a WebSphere Liberty Profile application server instance referred to as the MQWeb Server. The MQWeb Server component is packaged along with the other IBM MQ components and may be installed on any server that hosts a queue manager. The MQWeb Server is configured and started separately from your IBM MQ queue managers.
As a browser-based tool the IBM MQ Console offers certain advantages over command shell or eclipse-based tools like the IBM MQ Explorer. Advantages include avoiding the overhead of installing and maintaining software remotely as well as being available across a much wider variety of platforms and devices.
The MQWeb Server also supports REST APIs that may be used to interact with IBM MQ objects such as queue managers and queues. Information is sent to, and received from, the administrative REST API in JSON format. The IBM MQ REST APIs are integrated with IBM MQ security which is enabled by default. You must configure security before you can use the REST APIs.
Configuring the MQWeb Server
In order to configure the MQWeb Server component you must first determine how you intend to configure security for the IBM MQ Console and the IBM MQ REST API interfaces. Security for the Console and the REST API is configured by editing the MQWeb Server configuration file named mqwebuser.xml.
The MQWeb Server supports the following authentication mechanisms:
- Basic registry
- LDAP registry
- Local O/S registry
- System Authorization Facility for z/OS
Roles can be assigned to IBM MQ Console users to determine what level of access they are granted to the widgets that are provided with the IBM MQ Console.
It is important to understand that the IBM MQ Object Authority Manager still controls authorizations to work with MQ objects. You will have an opportunity to explore this point later in this lab.
After a user is assigned a role there are a number of methods that can be used to authenticate the user. With the IBM MQ Console users can log in with a user name and password, or they can use client certificate authentication. With the IBM MQ REST APIs users can use basic HTTP authentication, token based authentication, or client certificate authentication.
Configure Security
For this lab you will configure security using the Basic registry. Refer to the IBM Knowledge Center for IBM MQ for information on how to configure security using the other options that are available. Note that the use of the Basic registry is not recommended for a production environment.
Complete the following steps to configure a Basic registry.
-
A default mqwebuser.xml file is provided when IBM MQ is first installed. Enter the following commands to create a backup copy of that file.
cd C:\ProgramData\IBM\MQ\web\installations\Installation1\servers\mqweb rename mqwebuser.xml mqwebuser-backup.xml -
Enter the following command to copy the Basic registry template to the MQWeb Server directory.
copy "C:\Program Files\IBM\MQ\web\mq\samp\configuration\basic_registry.xml" "C:\ProgramData\IBM\MQ\web\installations\Installation1\servers\mqweb\"\mqwebuser.xmlNote:
Ensure that you include the the double quotes when entering this command. Also, respond Yes when asked if you want to overwrite the existing mqwebuser.xml file.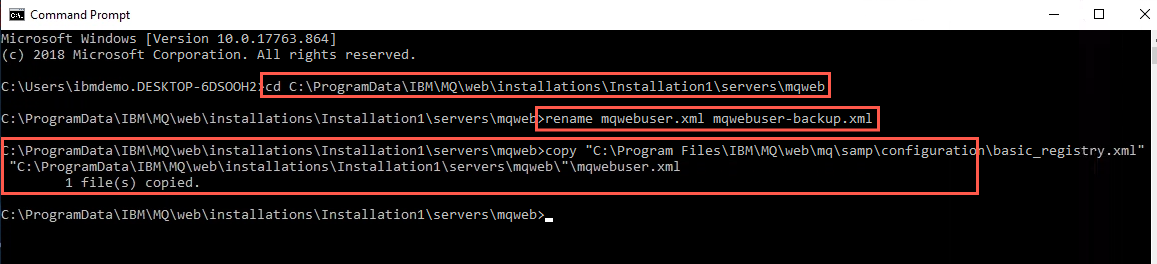
-
Use Notepad++ to open and review the mqwebuser.xml file.
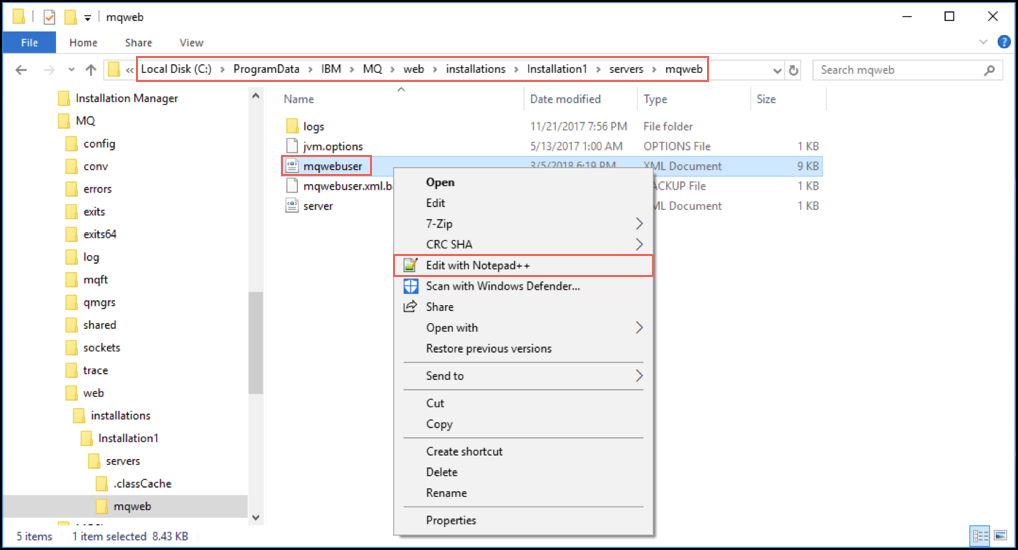
-
Note the following:
-
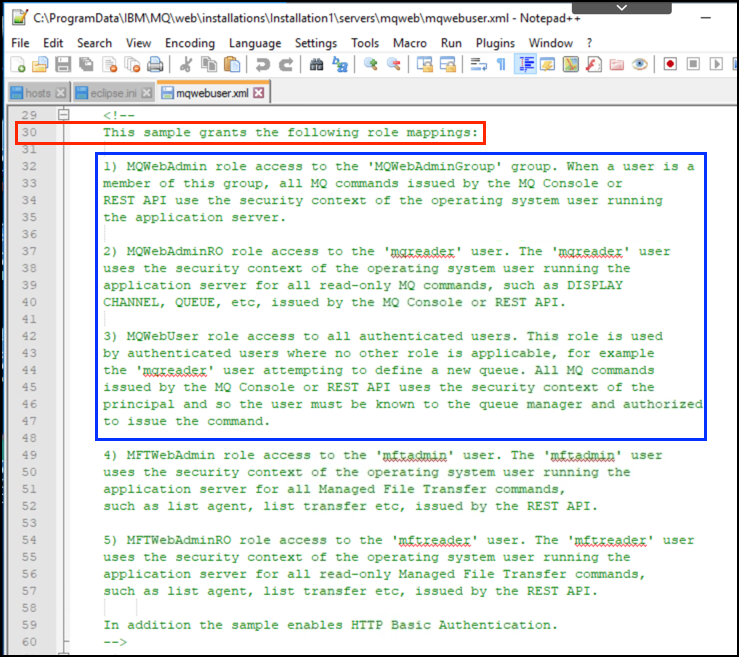
On line 30 you will find a description of the sample roles that are provided with the Basic registry. Pay close attention to the differences in how authorization is determined between the MQWebAdmin and MQAdminRO roles as compared to the MQWebUser role.
-
On line 70 you will find where the default roles for users of the IBM MQ Console are defined.
Note:
By default the members of the MQWebAdminGroup group are assigned to the MQWebAdmin role.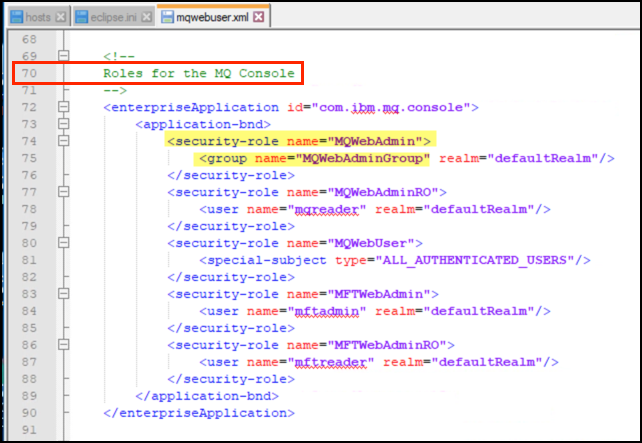
-
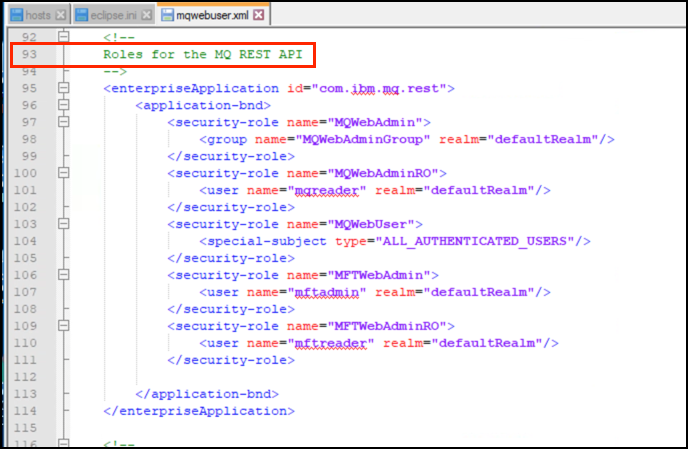
On line 93 you will find where the default roles for users of the Administrative APIs are defined.
-
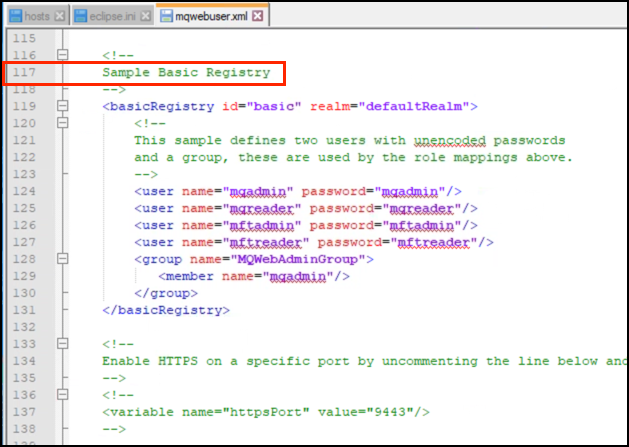
On line 117 you will find where you can define userids, passwords and group membership for the Basic registry.
-
-
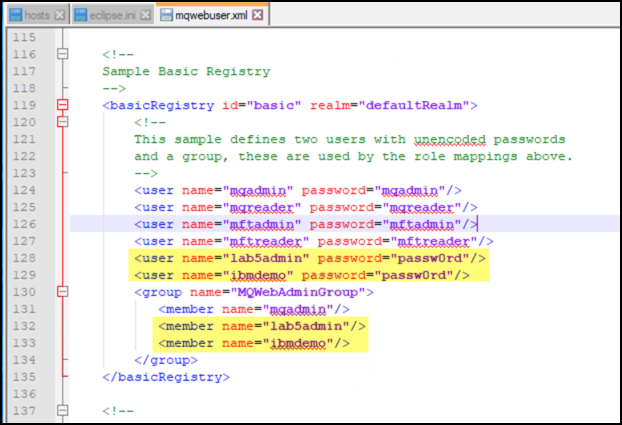
Create two userids named lab5admin and ibmdemo and set both of their passwords to passw0rd. Add both userids to the MQWebAdminGroup group.
- Save your changes to the file.
- Review the remaining entries in the file to become familiar with the additional capabilities that you can configure with the Basic registry.
-
You have now completed the necessary steps to configure access to the MQWeb Server. Open a command prompt and enter the following command to start the server:
strmqweb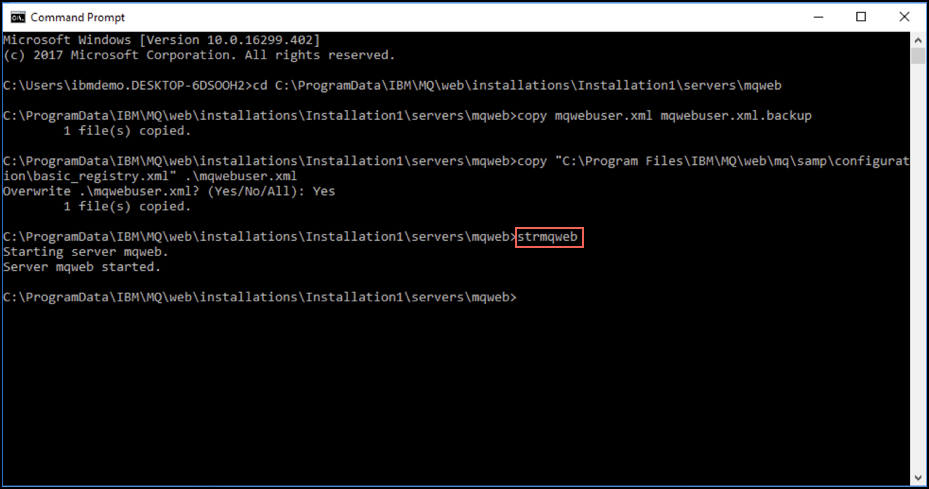 Note:
Note:
A Windows Security Alert popup may appear. Click on Allow access to continue.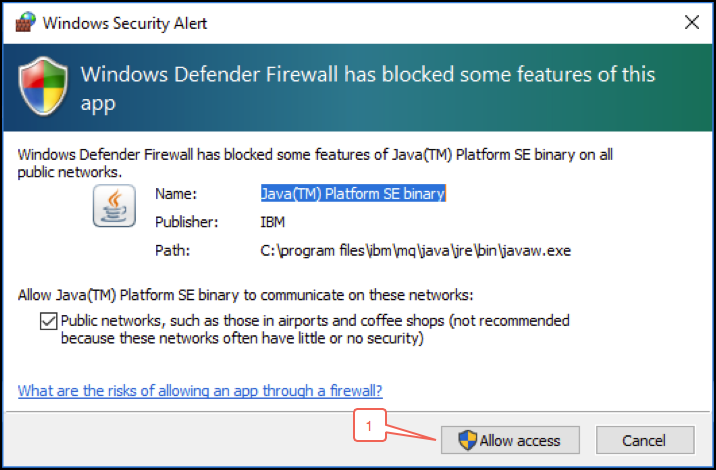 Note:
Note:
By default the MQWeb Server does not start automatically when the server boots. Using the strmqweb from the command line will keep the MQWeb Server running for as long as you are logged in to the O/S. Also, for IBM MQ Console users that are assigned to the MQWebAdmin and MQAdminRO roles, the security context for any MQ actions will be based on the userid that invoked the strmqweb command from the command line. Follow normal O/S configuration steps to call the strmqweb batch file / shell script upon boot up in order to run it as a Windows service or as a Unix/Linux daemon.
Using the IBM MQ Console
The first MQWeb Server component that you will review is the IBM MQ Console for MQ v9.2. The Console is a browser-based Web UI that provides a user-friendly alternative to the IBM MQ Explorer and the runmqsc command shell for queue manager administration. It also enables users to administer queue managers from any workstation without the overhead of installing the Explorer.
Note that the IBM MQ Console does not currently offer all of the configuration options that the runmqsc or IBM MQ Explorer provide.
The MQ v9.2 Knowledge Center provides a Quick Tour of the MQ Web Console.
MQ v9.2 supports both the old MQ Web Console (Dashboard and widgets) and the new 9.2 MQ Console. You can switch between console types.
Complete the following steps to explore the various features of the IBM MQ Console.
-
Open the Firefox web browser and navigate to the IBM MQ Console home page using the following URL:
https://localhost:9443Tip:
If you need to recall the URL for the IBM MQ Console you can display it by opening a command prompt and entering the dspmqweb command.If this is the first time that you’ve accessed the IBM MQ Console you will receive a warning (similar to the following) regarding an untrusted certificate. Since the Console ships with a self-signed certificate this is normal behavior. Take the appropriate steps to continue to the website.
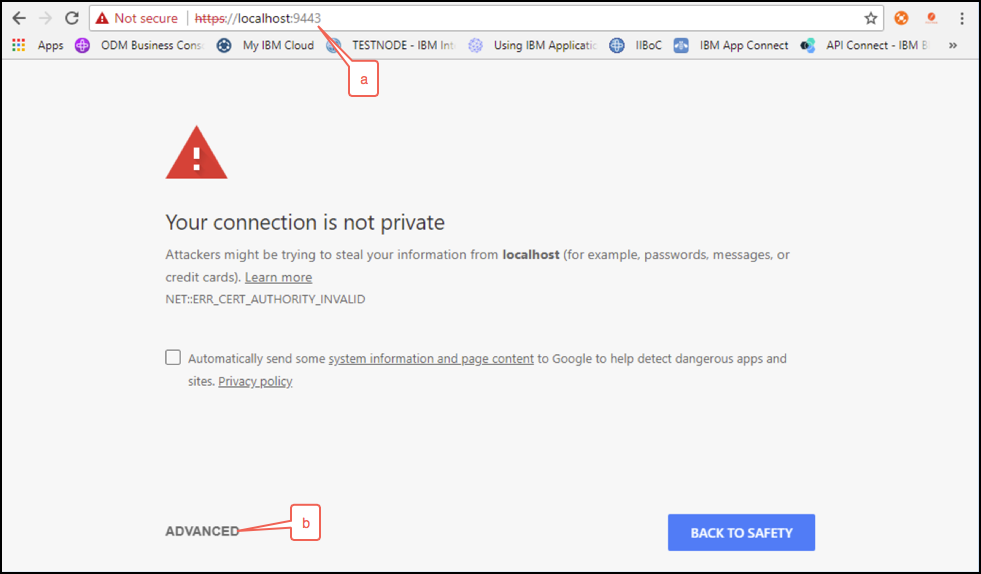
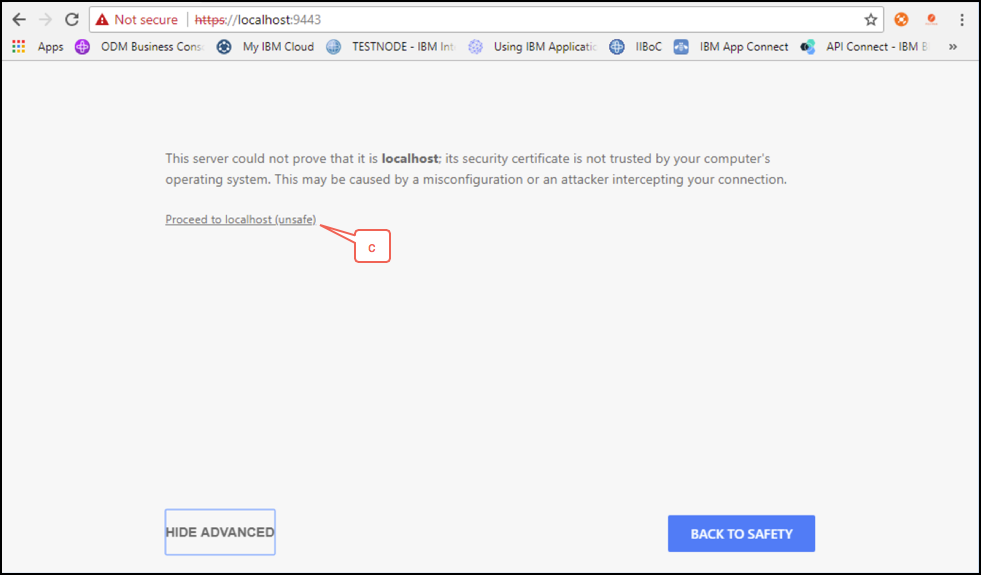
-
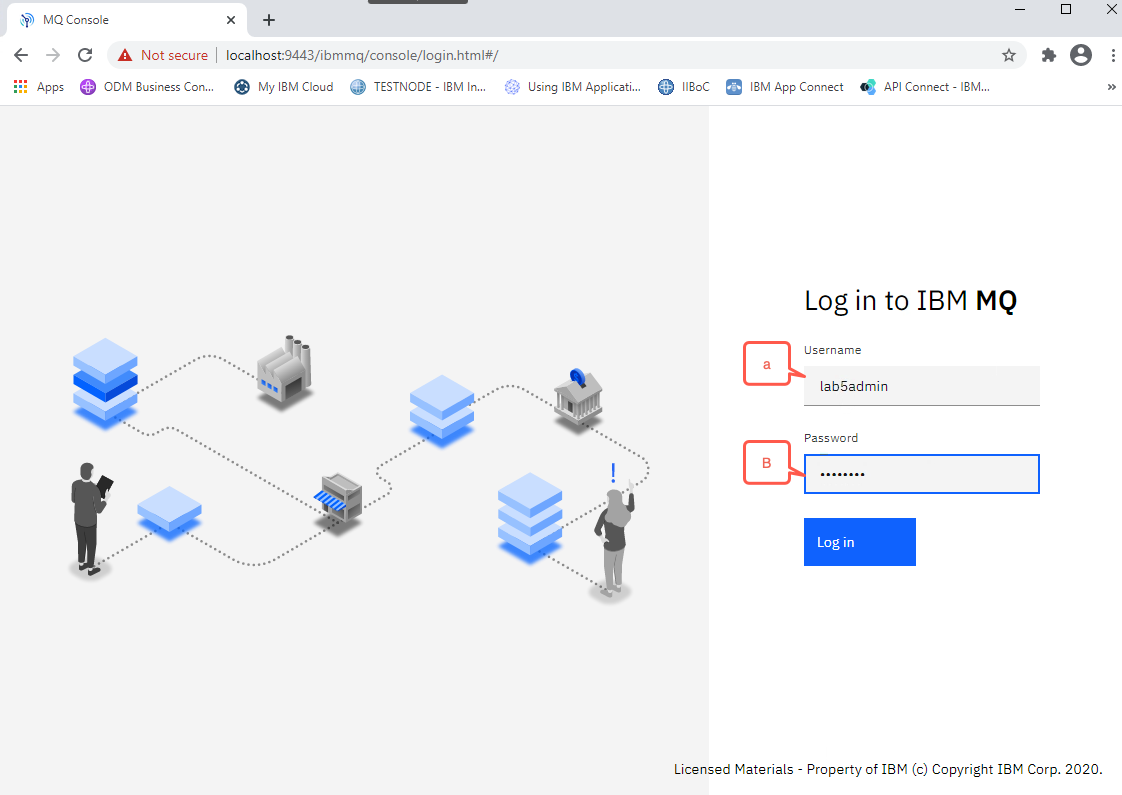
Once you reach the login page enter lab5admin as the User Name and passw0rd as the Password and then click on the Login button to continue.
-
Once you logged into the Web Console, follow the instruction from the following link:
to explore the capabilities of the new MQ v9.2 Web Console to configure, manage, administer, and operate the following MQ objects:
- Queues
- Topics
- Subscriptions
- Communication objects:
- Listeners
- Queue manager channels
- App channels
Summary of using the IBM MQ Console
You have now explored a number of features of the IBM MQ Console. Some of these features include:
- Configuring the MQWeb Server and starting it
- Security options when using the Basic registry
- Web Console capabilities
Next you will review the new functions that may be accessed via the IBM MQ REST API interfaces.
Using the IBM MQ REST API Interfaces
IBM MQ Version 9 introduced new capabilities in the form of REST API interfaces to enable administration of queue managers as well as to support messaging based applications. The REST API interfaces are being enhanced on an ongoing basis, so you should refer to the IBM MQ Version 9 Knowledge Center for the most up to date information on using the REST APIs.
In this section of the lab you will discover how to use administrative APIs to query information about a queue manager and create and subsequently delete a local queue.
As mentioned earlier, security for the IBM MQ REST APIs is configured in the mqwebuser.xml file. For this lab you will use the Basic registry and use HTTP Basic Authentication. When using the REST APIs you must first submit a “Login” request using Basic Authentication.
MQ version 9.0.4 and earlier required that the user extract a Cross-Site Request Forgery (CSRF) token from a cookie that is returned from the Login request for use with subsequent REST API calls. MQ version 9.0.5 has changed the method of protecting from CSRF attacks. Thus, extracting a CSRF token from the cookie returned from the Login request is no longer needed.
In order to enable CSRF protection with the MQ REST API calls you will need to include an HTTP header named ibm-mq-rest-csrf-token for each HTTP POST, PATCH and DELETE request. The content of the header is not significant. It is the presence of the header that is required.
Additional options for securing the REST APIs include using LTPA tokens or client certificates. Refer to the IBM MQ Version 9 Knowledge Center for further information.
Fundamentals of Using IBM MQ REST API Interfaces
-
CORS
By default, you cannot access the REST API from web resources that are not hosted on the same domain as the REST API. That is, cross-origin requests are not enabled. You can configure the mqwebuser.xml file to support Cross Origin Resource Sharing (CORS), which will then allow cross-origin requests from specified URLs.
-
Endpoint URL construction
Note:
If the host or port is changed from the default, or if HTTP is enabled, you can determine the URL by opening a command prompt and entering the dspmqweb command.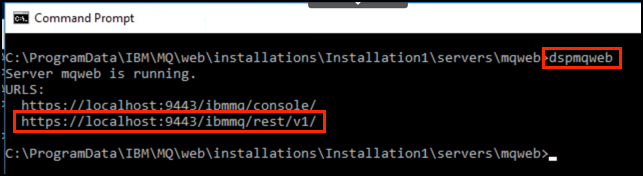
The default URL prefix to access administrative REST APIs is:
https://localhost:9443/ibmmq/rest/v1/admin
The default URL prefix to access messaging REST APIs is:
https://localhost:9443/ibmmq/rest/v1/messaging
-
Formatting REST requests
In order to use the REST APIs to perform an action on an object, you need to construct a URL to represent that object. Each URL starts with one of the prefixes listed above, and the rest of the URL describes the object, or set of objects, known as a resource. Resources may include:
- installation
- mqsc
- qmgr
- channel
- queue
- subscription
For example, to interact with queue managers add /qmgr to the prefix URL:
https://localhost:9443/ibmmq/rest/v1/admin/qmgr
The action that is to be performed on the resource defines whether the URL needs query parameters or not. It also defines the HTTP method that is used, and whether additional information is sent to the URL, or returned from it, in JSON form. The additional information might form part of the HTTP request, or be returned as part of the HTTP response.
After you construct the URL, and create an optional JSON payload for sending in the HTTP request, you send the HTTP request to the MQWeb Server. During development you can test your requests by using tools such as cURL or Postman. When you’re ready you can use an appropriate programming language that supports the HTTP/HTTPS protocols.
-
Timestamps
When date and time information is returned by the administrative REST API, it is returned in Coordinated Universal Time (UTC), and in a set format. The date and time is returned in the following time stamp format:
YYYY-MM-DDTHH:mm:ss:sssZ
-
Error handling
The REST API reports errors by returning an appropriate HTTP response code, for example 404 (Not Found), and a JSON response. Any HTTP response code that is not in the range 200 - 299 is considered an error. Note that the error response may contain nested JSON objects.
Using Administrative APIs
You can perform several administrative tasks using the IBM MQ REST APIs. For this lab you will try out just a few of the APIs that are available. You should refer to the IBM MQ Version 9.2 Knowledge Center for information on how to perform the full range of administrative tasks that are available using the APIs. Perform the following steps to start exploring some of the functions that are available:
- Create a queue
- Put a message on a queue
- Execute an MQSC command to get a full list of queue attributes
- Retrieve a message in the queue
Administrative REST API Examples
These examples use cURL to send Admin REST API requests to create a queue, put and get messages from a queue, retrieve queue attributes, etc. Therefore, to complete this task you need cURL installed on the system.
The REST ADMIN API request has the following format:

The following IBM MQ resources are available:
- /admin/installation
- /admin/qmgr
- /admin/queue
- /admin/subscription
- /admin/channel
- /action/qmgr/{qmgrname}/mqsc
The following Managed File Transfer resources are available:
- /admin/agent
- /admin/transfer
- /admin/monitor
Additional REST API Resources are provided in the following link:
Create the examples
-
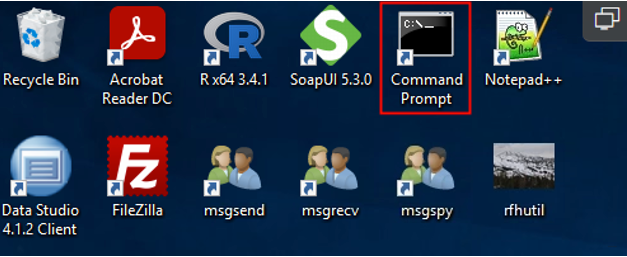
Click on the Command Prompt on the desktop to enter the cURL command to invoke the REST API interface:
-
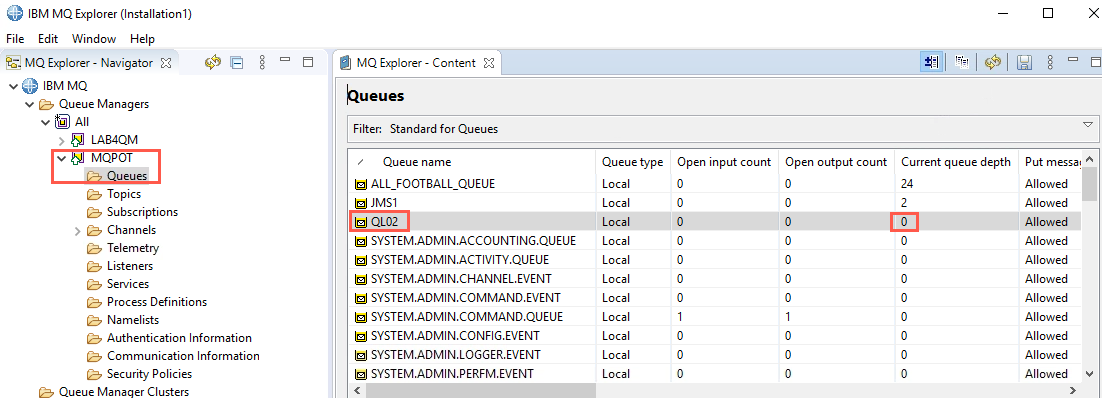
Create a queue, QL02, on queue manager MQPOT, use a POST request on the queue resource of the administrative REST API, authenticating as the ibmdemo user and passw0rd. Enter the following command noting the flags used:
curl -k https://localhost:9443/ibmmq/rest/v1/admin/qmgr/MQPOT/queue -X POST -u ibmdemo:passw0rd -H "ibm-mq-rest-csrf-token: value" -H "Content-Type: application/json" --data "{\"name\":\"QL02\"}"-
-H flag specifies the Header - The ibm-mq-rest-csrf-token header is used to enable CRSF protection for the MQ Web REST API. Note that it is not necessary to set a value for this header.
-
-k flag tells it to ignore the fact that a self-signed certificate is being used on the mqwebserver, you don’t want to be doing this in production!
-
-
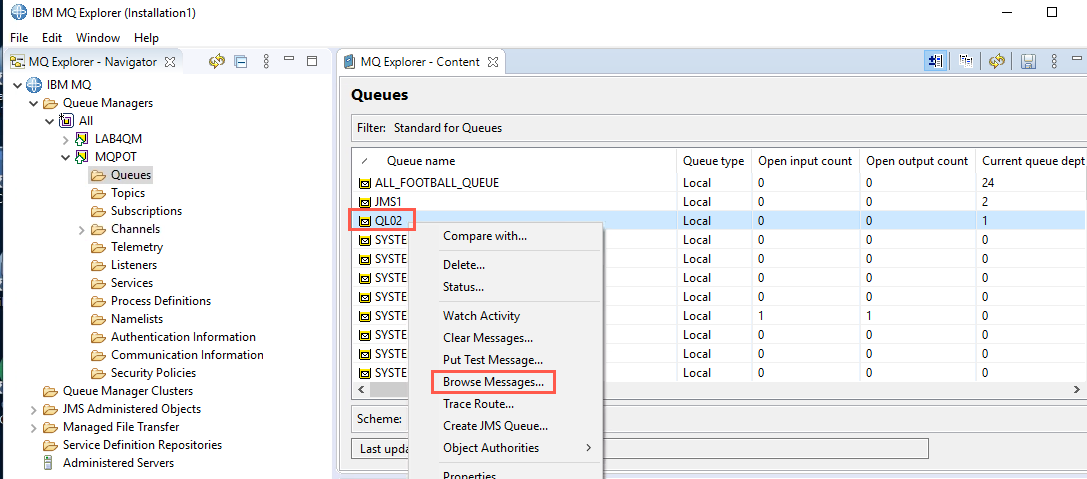
Use MQ Explorer to verify that the queue QL02 was created.
-
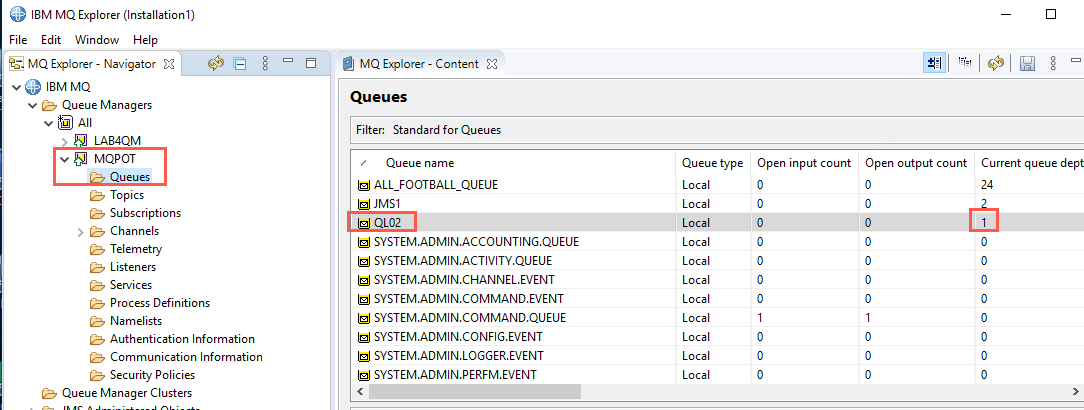
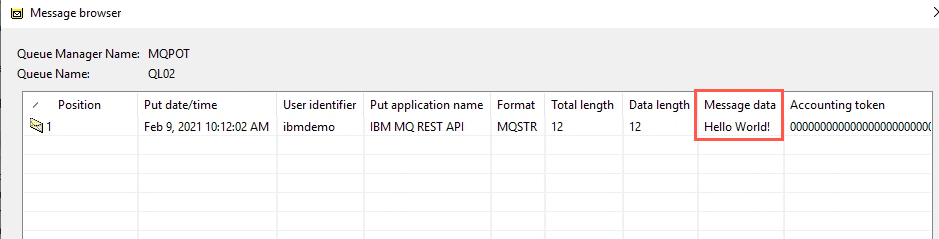
Put a message in the queue QL02 on queue manager MQPOT using the userid/password of ibmdemo/passw0rd. Enter the following curl command:
curl -k https://localhost:9443/ibmmq/rest/v1/messaging/qmgr/MQPOT/queue/QL02/message -X POST -u ibmdemo:passw0rd -H "ibm-mq-rest-csrf-token: value" -H "Content-Type: text/plain;charset=utf-8" --data "Hello World!” -
Use MQ Explorer to verify that a message was put in the queue QL02.
-
Destructively get the message “Hello World!” from queue QL02 on queue manager MQPOT, by using a DELETE request on the message resource. Use the following curl command:
curl -k https://localhost:9443/ibmmq/rest/v1/messaging/qmgr/MQPOT/queue/QL02/message -X DELETE -u ibmdemo:passw0rd -H "ibm-mq-rest-csrf-token: value"
The message Hello World! is returned.
-
Display the queue QL02 attributes using mqsc command with the following curl command:
curl -k https://localhost:9443/ibmmq/rest/v1/admin/action/qmgr/MQPOT/mqsc -X POST -u ibmdemo:passw0rd -H "ibm-mq-rest-csrf-token: value" -H "Content-Type: application/json" --data "{\"type\": \"runCommandJSON\", \"command\": \"display\", \"qualifier\": \"qlocal\", \"name\": \"QL02\"}"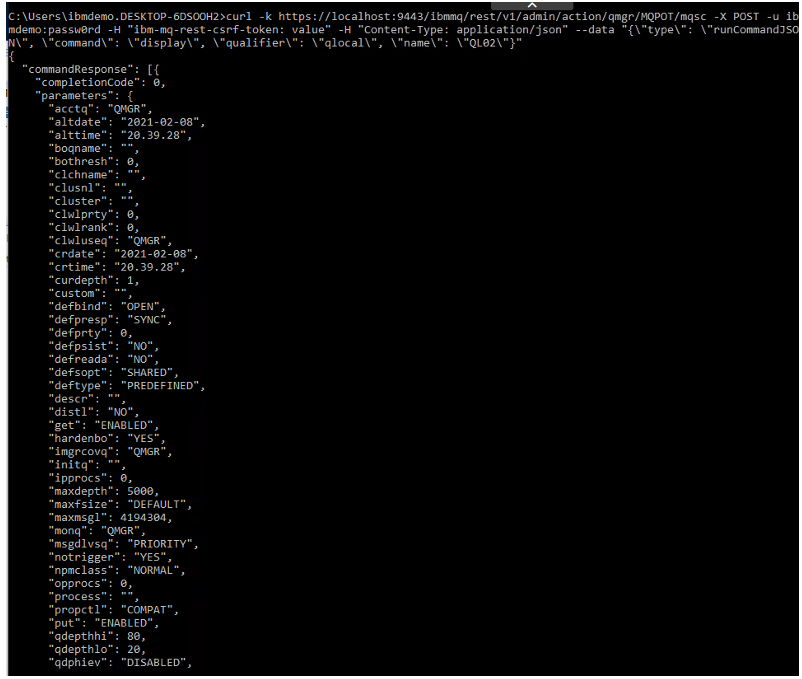
Summary of using the IBM MQ REST API Interfaces
You have now explored a number of features of the IBM MQ REST API Interfaces. Some of these features include:
- Using an HTTP GET request to get attributes of an IBM MQ queue manager.
- Using an HTTP POST request to send an MQSC message to an IBM MQ queue manager.
- Using an HTTP POST request to create a new queue on an IBM MQ queue manager.
- Using an HTTP POST request to PUT a message to an IBM MQ message queue.
- Using an HTTP DELETE request to GET a message from an IBM MQ message queue.
This concludes Lab 5.