Lab 2 - Protecting message data with MQ Advanced Message Security
This lab introduces the student to the components of IBM MQ Advanced Message Security (MQ AMS). Students will learn about:
- Protection policies
- Levels of protection
- MQ AMS interceptors
- Administrative tools
- Architecture and deployment
The student will exercise MQ AMS message protection in numerous scenarios including:
- Protecting messages on a local queue
- Protecting messages on a remote queue
- Protecting messages on a cluster queue
- Removing rogue messages from the MQ network
Key Concepts
MQ AMS augments IBM MQ security by providing data protection of messages. Three “Qualities of Protection” (QOP) are provided:
-
Integrity (signed)
IBM MQ messages are signed when put on a queue and the signature embedded into the message is verified when the message is retrieved. The signature identifies the sender of the message and ensures that the content of the message has not been changed.
MQ AMS uses PKCS #7 data-envelope to envelop a message in a digital signature.
-
Privacy (sealed)
IBM MQ messages are signed as above but the content of the message is also encrypted. The key used to encrypt messages is itself encrypted for each potential recipient so that the messages can be retrieved by one or more recipients.
MQ AMS uses PKCS #7 data-envelope to envelop a message in a digital signature.
-
Confidentiality (encrypted only)
IBM MQ messages are encrypted end-to-end using a symmetric key and are not digitally signed. This reduces the amount of asymmetric key operations by half and improves performance.
Optionally the encryption keys can be reused for multiple messages going to the same recipient. The second and subsequent messages incur no asymmetric key operations which keeps performance similar to plaintext/unprotected message throughput.
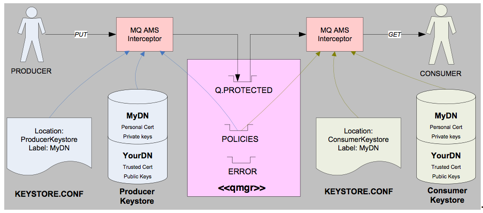
Data protection is provided by various interceptors relying on configuration files, PKI keystores, and certificates. This is in addition to the standard protection available for IBM MQ objects using the IBM MQ Object Authority Manager (OAM) or SAF (via a product such as IBM’s RACF) on z/OS. The diagram below depicts the overall architecture:
Interceptors
MQ AMS implements security by intercepting IBM MQ API calls. The following APIs are supported:
- Message Queue Interface (MQI)
- Java Message Service (JMS)
- IBM MQ Java Service (JMS)
- IBM MQ Java Classes
Three interceptors are provided:
-
IBM MQ server interceptor
To protect messages put or get by applications using the mqm library and using the interprocess communication (IPC), also called bindings mode.
This interceptor will also protect messages for Java applications (either using the MQ Java API or JMS) connecting in MQ bindings mode.
-
IBM MQ C client interceptor
To protect messages put or get by applications using the mqm client library and therefore connecting using a (non-Java) MQ client connection.
-
IBM MQ Java interceptor (JMS and MQ Java)
To protect messages put or get by Java applications (MQ Java API or JMS) using either client connections or bindings mode.
Note that if you use this interceptor for applications using Java bindings mode, you should consider disabling the server interceptor to avoid signing/encrypting messages twice.
Public Key Infrastructure (PKI) and Certificates
MQ AMS uses Public Key Infrastructure (PKI) identities to represent users or applications. The identities are used to sign and encrypt messages.
An identity is represented by the distinguished name (DN) of a personal X.509 (v2/v3) certificate associated with the signed and/or encrypted message. To authenticate this authority, the user or application must have access to a keystore containing a public certificate and an associated private key.
A mechanism is provided to map the OS identity of the user or application to the specific keystore file.
Object Authority Manager (OAM)
MQ AMS provides message security. It does not provide authorization services for IBM MQ objects. The task to authorize access to IBM MQ resources (queue manager, queues and other objects) remains the responsibility of the IBM MQ Object Authority Manager (OAM) or RACF (or other SAF) on z/OS. When an interceptor intercepts the MQ API calls from an application, it delegates the authorization request to the IBM MQ authority service.
Error Handling
MQ AMS defines an error handling queue (SYSTEM.PROTECTION.ERROR.QUEUE) to manage messages that contain errors or messages that cannot be decrypted. If a received message does not meet the security requirements for the queue it is on, then the message is moved to the error handling queue.
The following is a non-exclusive list of possible reasons why a message might be sent to the error handling queue:
- Quality of protection mismatch
- Decryption error
- PDMQ header error
- Size mismatch
- Encryption algorithm strength mismatch
- Unknown error
The system error handling queue can optionally be defined as an alias queue pointing to another queue.
Supported Platforms
For the latest and complete list of supported platforms refer to the link below:
MQ 9 Advanced Message Security supported platforms
MQ 9 Knowledge Center – Advanced Message Security
Lab Environment
The lab environment for this Proof of Technology is shown below.

QMAMS and IIBQMGR are the only queue managers used in this Lab.
Table 1: Names used in this lab
| Host Name | IP | Purpose |
|---|---|---|
| win10 | 10.0.0.2 | Windows 10 |
| Queue Manager Name | Host Address | Port |
|---|---|---|
| QMAMS | 10.0.0.2 | 1414 |
| IIBQMGR | 10.0.0.2 | 1424 |
| Queue Name | Queue Manager | Queue Type |
|---|---|---|
| ORDERQ | QMAMS | LOCAL |
| REMOTE_ORDERQ | IIBQMGR | REMOTE |
Table 2: useridS used in this lab
| userid | Group | Purpose |
|---|---|---|
| ibmdemo | mqm | Windows and MQ ibmdemo |
| msgsend | mqusers | IBM MQ application userid |
| msgrecv | mqusers | IBM MQ application userid |
| msgspy | mqusers | IBM MQ application userid |
Important Points
- To login to the Windows image use the ibmdemo userid
- The password for ibmdemo is passw0rd
- The password for all other users is password
- The password for all CMS key databases and JKS keystores is password
- userids msgsend, msgrecv and msgspy each have a CMS key database and a JKS keystore already setup in their respective directories. (You created these in the previous lab.)
MQ environment used in this lab
The IBM MQ environment compromises the following:
- IBM MQ v9.1.2.0 (all components installed)
- IBM MQ Explorer on the desktop (icon)
- Two queue managers:
- QMAMS (port 1414)
- IIBQMGR (port 1424)
- Various other MQ objects to be used for the user scenarios
Programs used in this lab
To test various scenarios with MQ AMS, the following sample applications are available:
- amqsput (IBM MQ C sample – server)
- amqsget (IBM MQ C sample – server)
These samples come with the IBM MQ product and are located in C:\Program Files\IBM\MQ\tools\c\Samples\Bin.
Installation and Configuration
IBM MQ AMS is included in the IBM MQ Advanced V9 package and is another option on the IBM MQ installer.
Installation
MQ AMS has been pre-installed on the VMWare image. You can view the MQ 9 Knowledge Center for installation instructions, if interested.
For this lab, we will begin with the configuration steps.
Procedures
Configuring MQ AMS requires that you do the following:
- Create IBM MQ queues required by MQ AMS
- Update IBM MQ configuration files (server interceptor)
You will now configure MQ AMS on the Windows VMware image by following the steps outlined below:
- You should be logged on as ibmdemo.
-
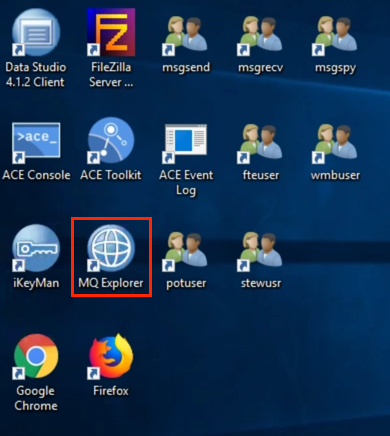
Start the MQ Explorer by double-clicking the icon on the desktop.
-
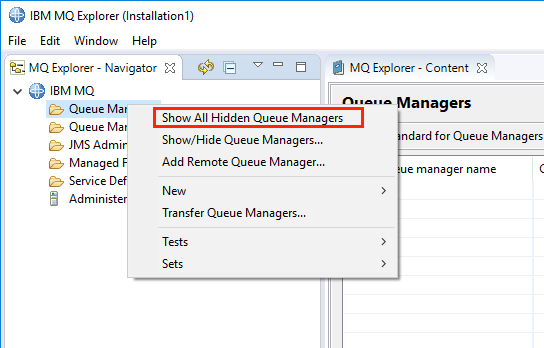
Expand the Queue Managers folder. If no queue managers are displayed then right click on the folder and select the Show All Hidden Queue Managers menu item.
-
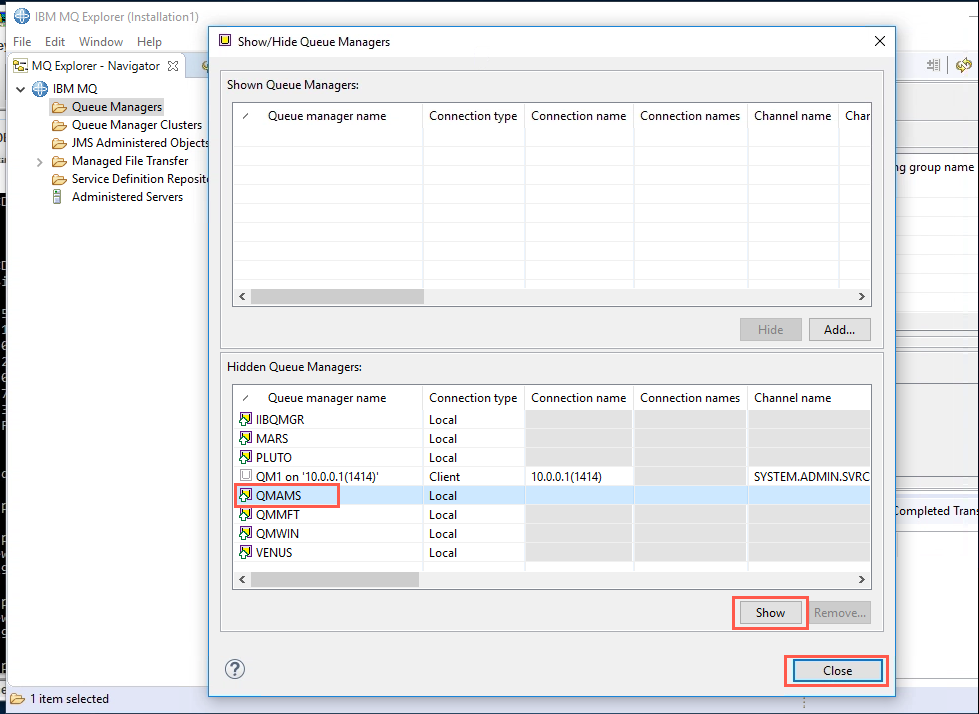
Select QMAMS and click Show. Then click Close to return to the queue manager list.
-
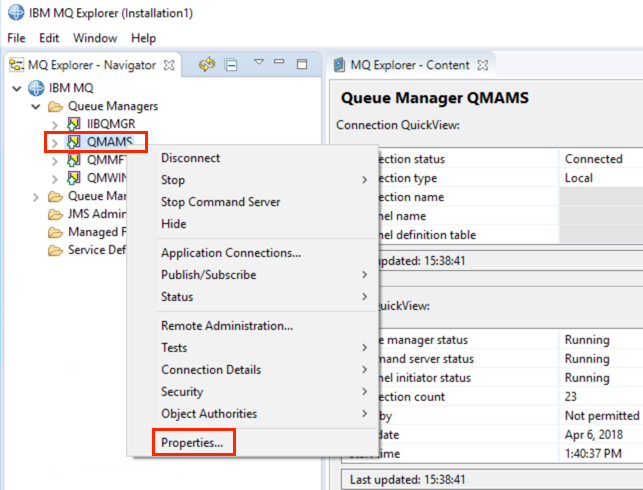
Right click on the Queue Manager QMAMS entry and then select the Properties… menu item.
-
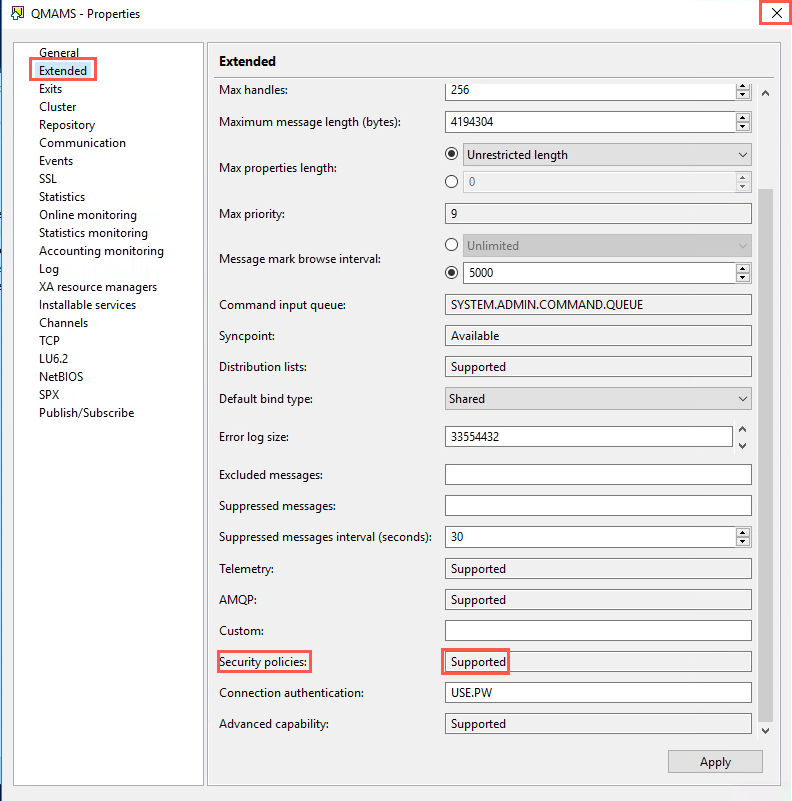
Click on the Extended category. Scroll to the bottom to verify that the Security Policies attribute is set to Supported.
Click on the X button to close the Properties window.
-
Expand the QMAMS queue manager entry.
-
Click on the Queues folder under Queue Manager QMAMS.
-
Ensure that the Show System Objects toggle icon is selected, and then scroll down until you find the SYSTEM.PROTECTION.* queue entries.
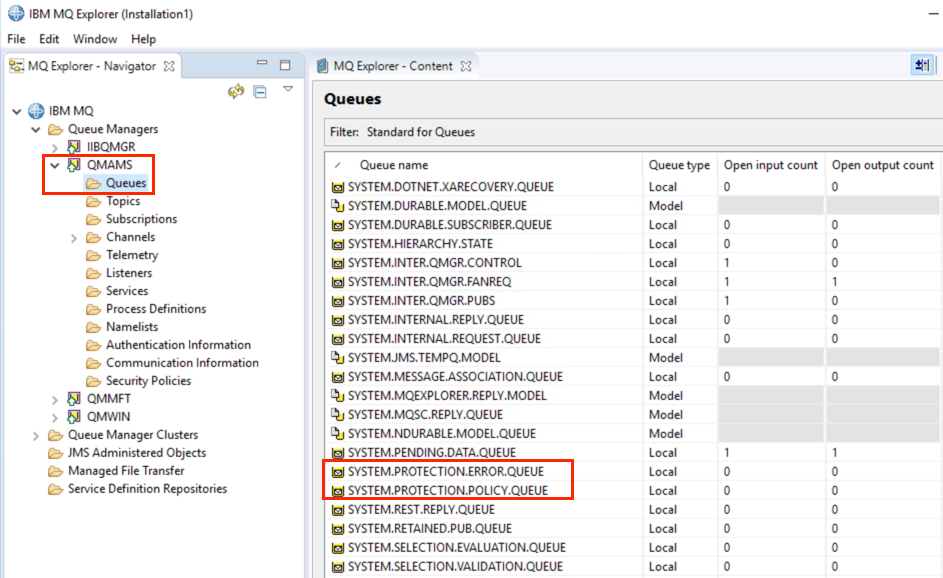
When AMS is selected as part of the installation, the Security Policies “Supported” attribute is set and the following two queues are defined:
- SYSTEM.PROTECTION.POLICY.QUEUE
This queue stores security policy definitions. - SYSTEM.PROTECTION.ERROR.QUEUE
This queue is used as the error handling queue.
- SYSTEM.PROTECTION.POLICY.QUEUE
- You should repeat steps 4 - 9 for the IIBQMGR queue manager.
Configuring the keystore.conf File
When the interceptor is to encrypt the message, it requires the private key of the sending user. Thus, a mapping of the key database user identities to public and private keys needs to be created. In the real system, where users and applications are dispersed over several machines, each user would have their own private keystore. Similarly, in the previous lab, we created separate keystores and certificates for the users msgsend, msgrecv, and msgspy. For the scenario where the user msgsend sends an encrypted message to msgrecv, this appears as follows:
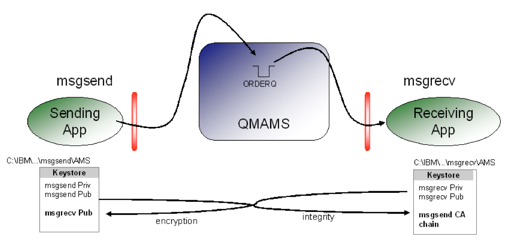
Once the key databases and certificates are created (Lab 1), you must point MQ AMS interceptors to the directory where they are located. This is done via the keystore.conf file, which holds that information in the plain text form. For this lab you will create separate keystore.conf files for each user. The keystore.conf files have been pre-configured for users msgsend, msgrecv, and msgspy. You will find them in C:\Users\<userid>\.mqs.
The content of keystore.conf is of the form:
cms.keystore = <dir>/keystore_file
cms.certificate = certificate_label
In this lab, the content of the keystore.conf for the msgsend userid is as follows:
cms.keystore = C:/PoT-messaging/IBM/WMQAMS/msgsend/AMS/msgsend
cms.certificate = msgsend_cert
JKS.keystore = C:\\PoT-messaging\\IBM\\WMQAMS\\msgsend\\AMS\\msgsend
JKS.certificate = msgsend_cert
JKS.encrypted = no
JKS.keystore_pass = password
JKS.key_pass = password
JKS.provider = IBMJCE
▪ The Path to the keystore file must be provided with no file extension. ▪ The password is retrieved from the stash file in the .CMS format. If you choose to use the Java keystore file formats (.JKS, .JCEKS), additional lines must be added to the keystore.conf file. ▪ ~/.mqs/keystore.conf or C:\Users\<userid>\.mqs\keystore.conf are the default locations where MQ AMS searches for the keystore.conf file. However, users can modify it by providing an environment variable MQS_KEYSTORE_CONF=<config_file_path> or by specifying a system property using the -DMQS_KEYSTORE_CONF=<config_file_path> command for Java. We are using the environment variables in this lab.
Procedures
As described above, to setup an application to run with MQ AMS, a configuration file (keystore.conf) must be created in the .mqs sub-directory of the users home directory.
Alternatively, environment variable MQS_KEYSTORE_CONF may be defined to point to the location of keystore.conf. In this lab, the environment variable method is used. That environment variable has been set for users msgsend, msgrecv, and msgspy with the default path C:\Users\<userid>\.mqs\keystore.conf.
The keystore.conf configuration file is used by the interceptors to locate and access the user’s keystore(s). These files have already been setup for userids msgsend, msgrecv, and msgspy. Complete the following steps to review the file used for the msgsend user.
-
Open a command prompt for msgsend by double-clicking its user icon on the desktop.
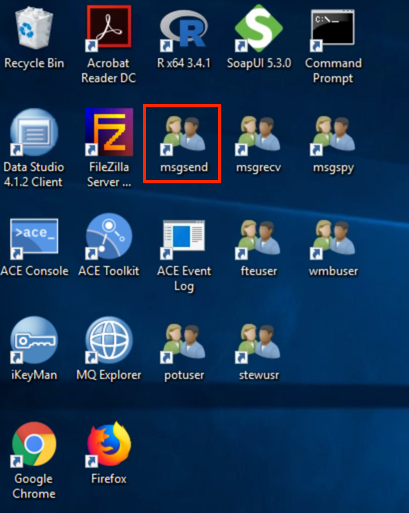
If you are prompted for a password, you will need to enter the “password” for msgsend.
-
Enter the set command to display msgsend’s environment variables.
-
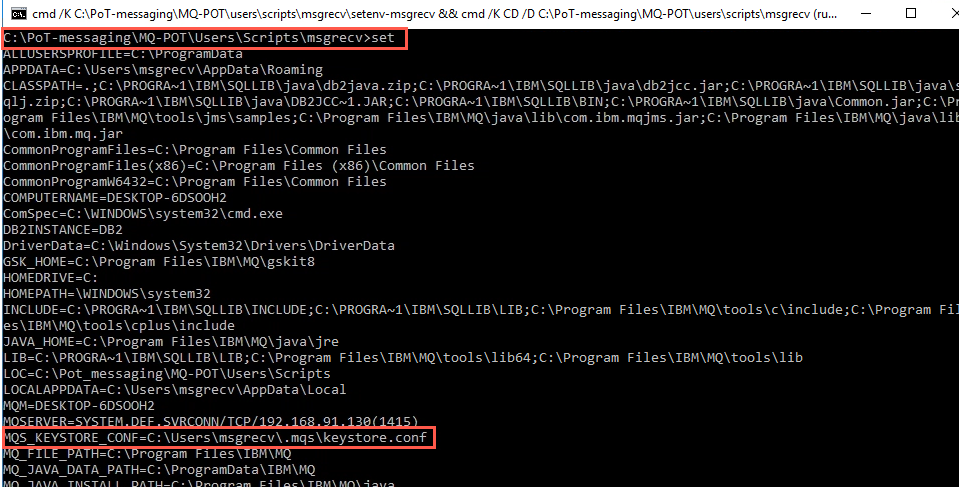
Locate the environment variable MQS_KEYSTORE_CONF and note its value.
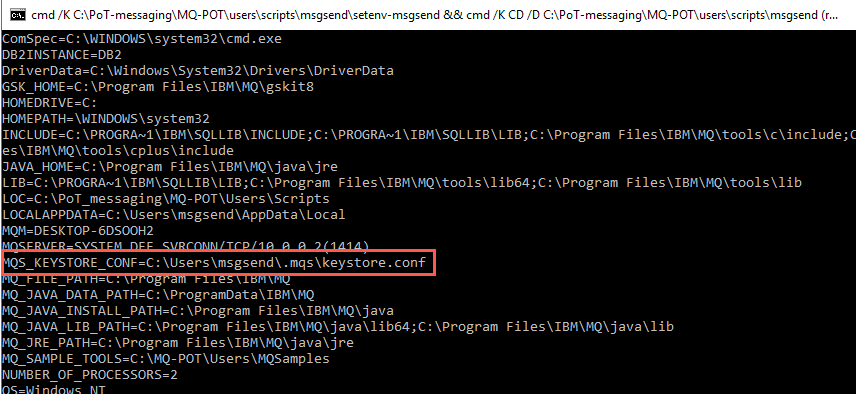
-
Use Windows Explorer to navigate to C:\Users\msgsend\.mqs and then right-click keystore.conf file and select “Edit with Notepad++”.
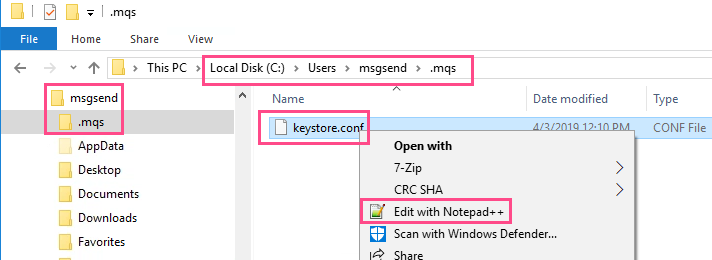
-
You can see that the path to the msgsend’s keystore is specified as well as the certificate name.
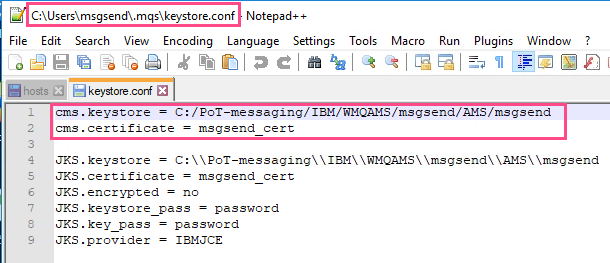
No changes are needed, so you may close Notepad++.
-
You may repeat steps 1 - 5 for the other users msgrecv and msgspy to view their keystore.conf files.
The configuration file points to two different keystores. The first one is a CMS keystore used by non-Java interceptors (server and compiled MQ client). The second keystore is a JKS and is used by the Java interceptors. Notice the forward slashes in the CMS.keystore path and double back slashes in the JKS.keystore path. These are standard ways to define paths for Java programs on Windows.
Notice that the JKS passwords are in the clear. Passwords in the configuration file may be encrypted by using class com.ibm.mq.ese.config.KeyStoreConfigProtector as described in the documentation. If you are interested in this option, see the URL:
JKS and JCEKS are also supported keystore database formats.
Your system is now fully configured and interceptors for all server and Java environments are enabled. Note that by default MQ AMS will not sign or encrypt any messages until a policy is defined for a queue.
Setting Protection Policies
With the queue manager created and interceptors prepared to intercept messages and access encryption keys, we can start defining protection policies for our queues.
MQ AMS will not sign or encrypt any messages until an actual policy is defined for a queue. This means that, by default, message protection is not in force even though interceptors may be enabled. To define, modify or delete policies, you can use either command line tools or IBM MQ Explorer (on Windows and Linux) providing that you have installed the MQ AMS plugin.
When defining a policy, the following information needs to be specified:
-
The name of the policy which is the name of the queue your application(s) will put or get messages to/from. A policy name is the same as its protected queue name.
-
The quality of protection required:
- NONE, if no protection is needed
- INTEGRITY, if messages on the queue should be signed
- PRIVACY, if messages on the queue should be signed and encrypted
- CONFIDENTIALITY, if messages on the queue should be encrypted without signing
-
The signature algorithm to use to sign the messages if quality of protection INTEGRITY or PRIVACY is selected:
- NONE
- MD5
- SHA1
- SHA256
- SHA384
- SHA512
- The encryption algorithm used to encrypt messages if quality of protection PRIVACY or CONFIDENTIALITY is selected:
*
- NONE
- RC2
- DES
- Triple DES
- AES128
- AES256
-
The recipient list, which is the list of certificate distinguished names (DN) of potential receivers of the messages.
-
The signature DN checklist, which is the list of distinguished names (DN) to be validated during message retrieval. This is the DN of the sender.
- Toleration which specifies whether a policy can be ignored or must be enforced. Toleration is optional and facilitates staged roll-out, where policies were applied to queues but those queues may already contain messages that have no policy, or still receive messages from remote systems that do not have a security policy.
Policies are stored in IBM MQ queue SYSTEM.PROTECTION.POLICY.QUEUE.
An application’s userid needs to have browse authority on the above queue so that the interceptor is able to query the queue and retrieve any policy defined for the queue the application is trying to access.
Administration using command line tools
This section is included as documentation. There are no exercises to be performed here. Do not issue the commands here. They will be exercised in the User Scenarios section.
Two command line tools are provided to display and to create, modify or delete policies. These commands have names and syntax based upon standard MQ line commands. They are located in C:\Program Files\IBM\MQ\bin:
-
dspmqspl
To display and dump policies
Usage:dspmqspl -m \<QMGR> \[-p \<Policy Name>] \[-export]Note:
The -export option will generate the policies in the setmqspl format. -
setmqspl
To define, change and delete policies
Usage:setmqspl -m \<QMGR> -p \<Policy Name> (-remove | -s \<signing algorithm> [-a \<signer DN>]\* [-e \<encryption algorithm> [-r \<receiver DN>]+][-t <0|1>])
The parameters surrounded by <> are mandatory, while those surrounded by [] are optional. Each policy name must be the same as the queue name it is to be applied to.
The following is an example of policy defined on the ORDERQ queue, signed by the user msgsend using the SHA1 algorithm, and encrypted using the 256-bit AES algorithm for the user msgrecv:
setmqspl -m QMAMS -p ORDERQ -s SHA1 -a "CN=msgsend,O=ibm,C=US" -e AES256 -r "CN=msgrecv,O=ibm,C=US"
The DNs must match exactly those specified in the receptive user’s certificate from the key database.
Administration using MQ Explorer
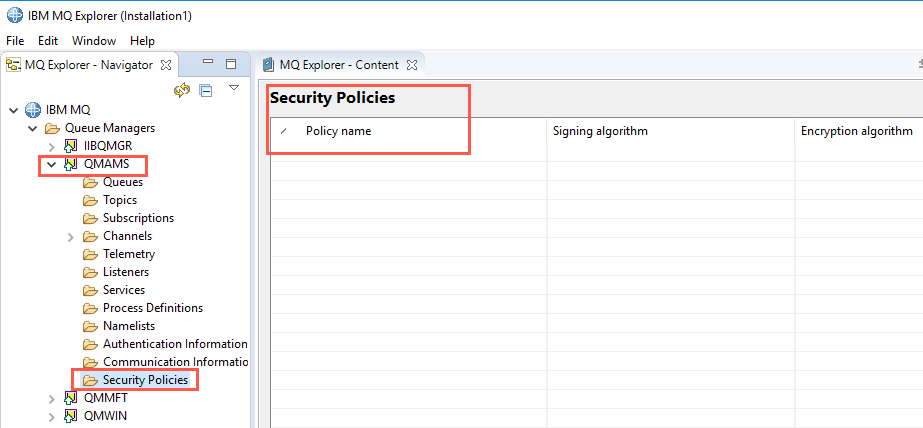
IBM MQ Explorer provides a new option under the Queue Manager’s Security Policies folder. This can be used to display or modify Security Policies for AMS on all platforms. Clicking on the Security Policies folder will display the list of policies currently defined.
- Bring the MQ Explorer into focus.
-
Locate Security Policies in the object list under QMAMS. As you can see, there are no policies defined at this time
-
To define a new policy, right-click on the Security Policies folder and then select the New -> Security Policy… menu item.
-
To modify an existing policy, right click on the existing policy and then select the Properties… menu item.
-
To delete a policy, right-click on the policy and select the Delete… menu item.
User Scenarios
Signed messages on local queue (No signature DN checklist)
In this first scenario, the userid msgsend puts a message on queue ORDERQ and the userid msgrecv receives that message. A policy is defined to use quality of protection Integrity (messages are signed) but no signature DN checklist is provided. Then msgrecv puts its own message on queue ORDERQ and msgsnd receives the message as well. This scenario is quite simple, and probably not representative of most “real world” environments, because both userids are on the same physical machine, and using the same MQ queue manager. However, it introduces you to the basic commands and architecture.
-
Sign-on each user.
There are a number of shortcuts on the desktop for logging in as a specific user and opening a command prompt. Double-click each of the three shortcuts for msgsend, msgrecv, and msgspy. The first time, you may need to enter the password (password) for each user.
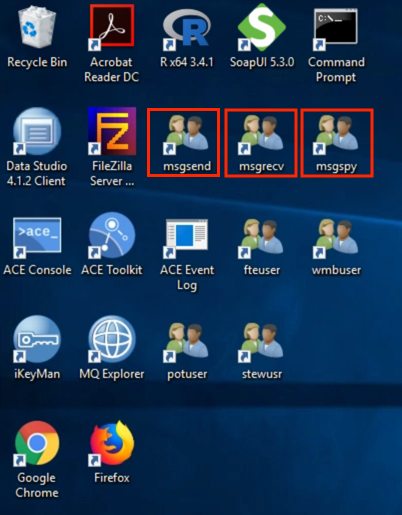
a. Arrange the windows as shown in the screen capture below:
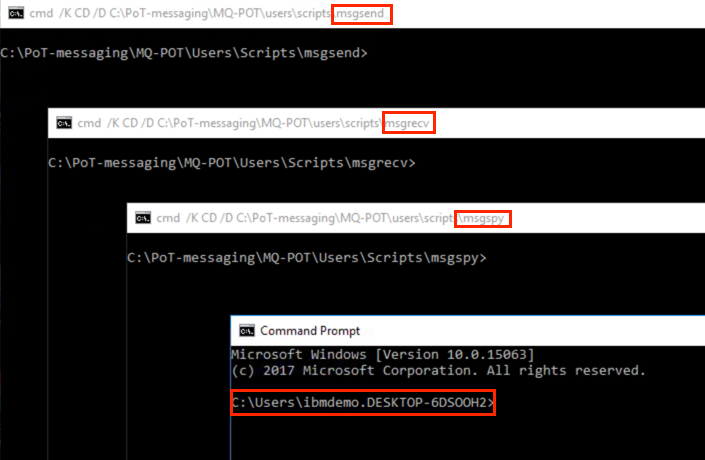
b. The shortcuts you have just clicked for each user also sets up the environment for users of MQ and MQ AMS and their personal keystores. Command files have been created for each user. The commands are in the directory C:\PoT-messaging\MQ-POT\users\scripts. The commands follow the pattern:
setenv-<userid>
example: setenv-msgsendc. The appropriate environment command for each user has been defined on the shortcut and was executed when you clicked the shortcut. Enter the set command at the command prompt to show the environment variable settings for each user.
-
Authorize users to MQ objects.
As mentioned earlier, MQ AMS is fully complementary to IBM MQ and it delegates access authorization to the IBM MQ Object Authority Manager. This means AMS is only protecting the message contents, and it assumes the MQ ibmdemo has taken the necessary steps to protect access to the queue manager itself and the QM objects such as queues, channels, etc.
Therefore, the first step is to MQ authorize the userids to connect to the queue manager and be able to open queue ORDERQ for PUT/GET.
a. Return to the Command-line prompt for ibmdemo. from the desktop and enter the following commmands.
The following standard MQ ibmdemo command allows access to the queue manager for a few selected userids:
setmqaut -m QMAMS -t qmgr -p msgsend -p msgrecv -p msgspy +connect +inqThe next command gives specific MQGET and MQPUT authorization to the queue that you’ll be using:
setmqaut -m QMAMS -t q -n ORDERQ -p msgsend -p msgrecv –p msgspy +get +put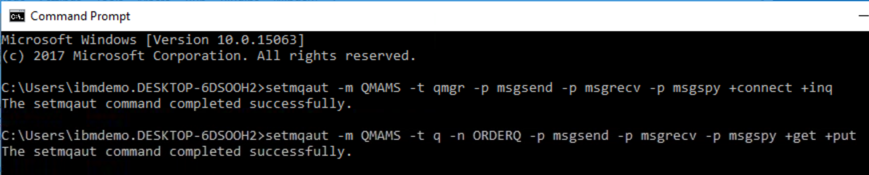 Note:
Note:
You’ll note above that you are giving the msgsend and msgrecv userids as well as the msgspy userid access to MQ and ORDERQ. Clearly in a protected environment, you would not give a non-trusted ID such as “msgspy” any access to an MQ object, but we are providing the MQ access here so that you’ll be able to test the AMS level of access later on.b. Additionally, an application’s userid via the interceptor will need to gain access to queue SYSTEM.PROTECTION.POLICY.QUEUE to retrieve the policy information and to queue SYSTEM.PROTECTION.ERROR.QUEUE which provides error handling.
Still using the ibmdemo userid, issue the following commands:
setmqaut -m QMAMS -t q -n SYSTEM.PROTECTION.POLICY.QUEUE -g mqusers +browsesetmqaut -m QMAMS -t q -n SYSTEM.PROTECTION.ERROR.QUEUE -g mqusers +put Note:
Note:
Note that in the above command, you are giving access to the Windows user group “mqusers” which includes the three userids msgsend, msgrecv and msgspy. -
Define an MQ AMS policy.
The commands above established MQ authorization to the MQ objects. You’ll now define additional AMS protection above and beyond the MQ protection.
a. Define the policy for queue ORDERQ. To define a policy, you need to use a userid which is part of the mqm group. Use userid ibmdemo to define a policy for queue ORDERQ using the SHA1 signing algorithm.
setmqspl -m QMAMS -p ORDERQ -s SHA1
b. Using the ibmdemo userid, display the policy you just created.
dspmqspl -m QMAMS -p ORDERQ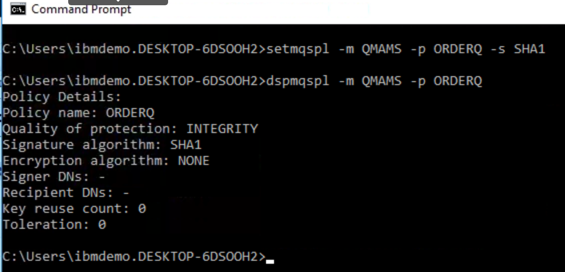
-
Using the userid msgsend (in other words, from the Windows command prompt window opened with this userid), verify that the MQS_KEYSTORE_CONF environment variable for msgsend’s keystore is correctly set by typing the following command:
setIt should have been set by the setenv-msgsend command when logging on. If the variable is not set, set it with this command:
set MQS_KEYSTORE_CONF=C:\Users\msgsend\.mqs\keystore.conf -
Still using userid msgsend’s command prompt, use the sample C program amqsput as follows to put a message on the ORDERQ queue:
amqsput ORDERQ QMAMSEnter a test message (example shown below) and hit Enter.
This is a test message for AMS policy on ORDERQ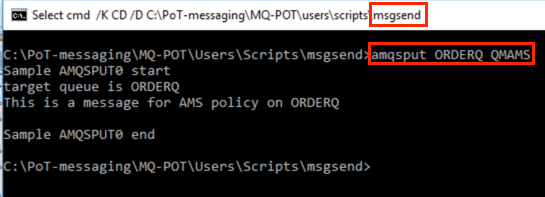
Hit enter again to end the program and commit the message onto the queue.
-
Verify that the message put to the queue has actually been signed.
An alias queue has been defined for ORDERQ called ORDERQ_AL. We did not give any authorities to users to access the alias queue, but it can be accessed by the mqm group. Since the MQ Explorer is running under the logged in userid of ibmdemo, and ibmdemo is in the mqm group, we will be able to browse the ORDERQ queue by using the ORDERQ_AL queue.
a. In MQ Explorer, right-click the queue ORDERQ_AL and select Browse Message.
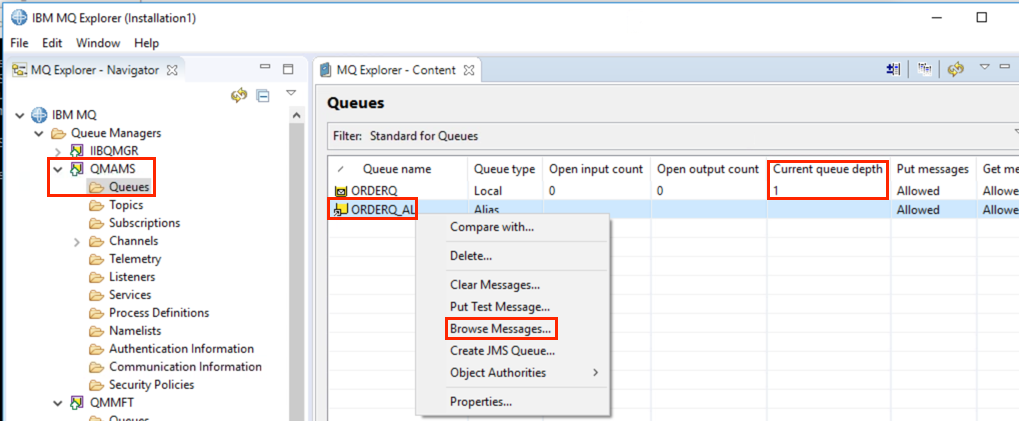
b. Double-click the message and select Data to view the message and verify that it is, in fact, signed. The beginning of the message data should start with the PDMQ header and embedded in the PDMQ header which contains the signature you should see the message (unencrypted) put on the queue by the msgsend user: (‘This is a test message’).
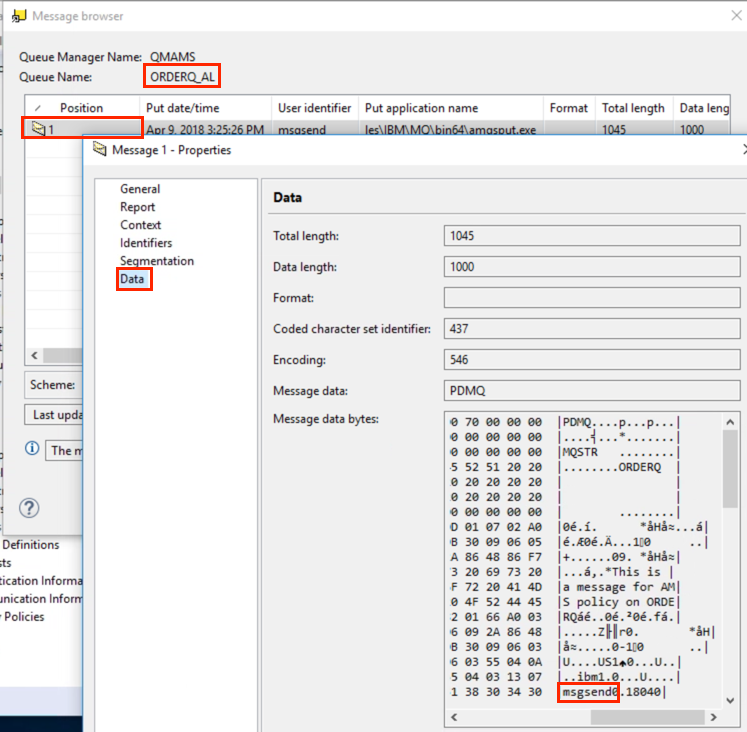
Click Close to dismiss the display window. We can see more of the message if we use RFHutil to view the message.
c. Start RFHutil by double-clicking the the shortcut on the desktop.
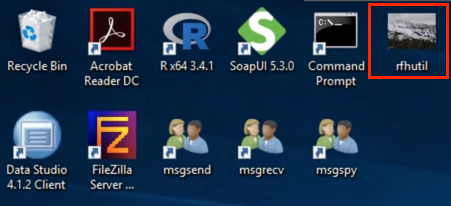
d. Select the QMAMS queue manager and ORDERQ_AL queue from the drop-down menus, and then click the Browse Q button.
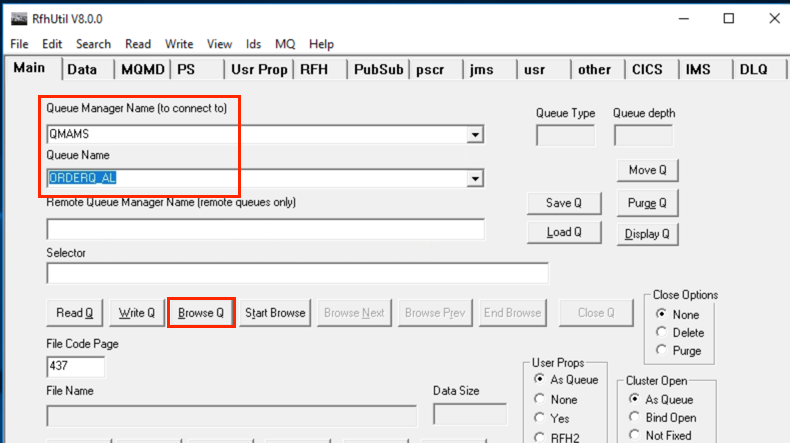
(Note the “Msg browse from ORDERQ_AL length=xxx” at the bottom of the window).
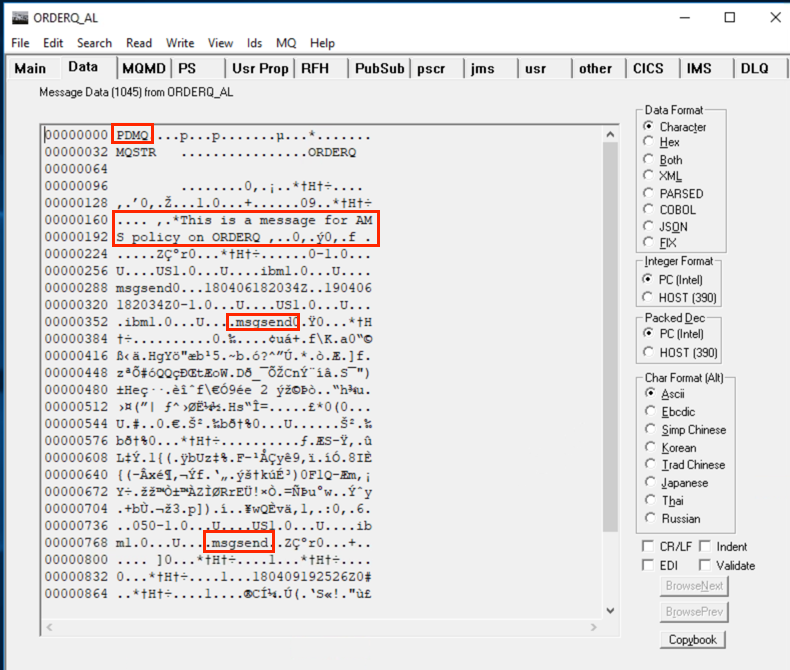
e. Then click the Data tab at the top of the window to view the message and verify that it is, in fact, signed. The beginning of the message data should start with the PDMQ header and embedded in the PDMQ header which contains the signature you should see the message put on the queue by the msgsend user: (‘This is a test message’). Notice that the message is signed by observing the “garbage” characters.
-
Running amqsget under userid msgrecv should retrieve the message. The integrity of the message will be verified.
a. Start up the userid msgrecv user session using the shortcut on the desktop for msgrecv. (There should be an open command prompt for msgrecv). This sets the environment variable for msgrecv’s keystore with the setenv-msgrecv command.
b. Still using userid msgrecv command prompt and sample C program amqsget, get a message from the ORDERQ queue.
amqsget ORDERQ QMAMS Note:
Note:
amqsget will exit automatically after 30 seconds, if no messages are available. -
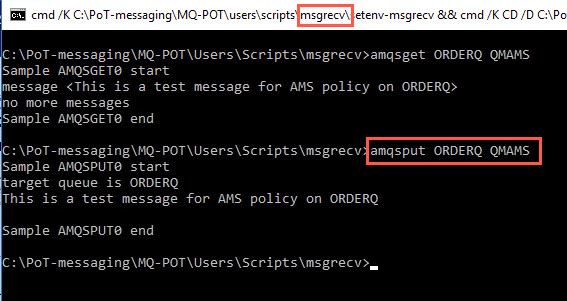
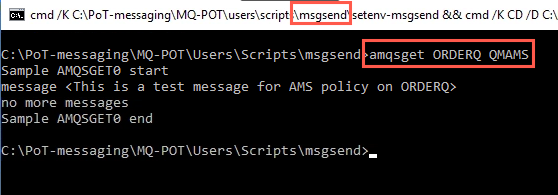
Now repeat steps 5 thru 6 with the userids reversed. In other words try to put the message using msgrecv and get the message using msgsend. You will notice that user msgrecv can put to the ORDERQ queue and user msgsend can still retrieve the message. Does this surprise you? Think about the protections that you’ve defined thus far.
-
The reason the reverse (“wrong way round”) worked is:
a. The security policy ORDERQ specifies “Accept signed messages from any originator”. This means that all messages must be signed, but that no selection/rejection is made based on the originator.
b. The security policy ORDERQ does not sign the message, meaning that any recipient can accept the message.
-
Let’s assume a message is put to queue ORDERQ but arrives from another queue manager IIBQMGR. You can use the remote queue REMOTE_ORDERQ on IIBQMGR to send the message to queue ORDERQ on QMAMS. This is illustrated below:
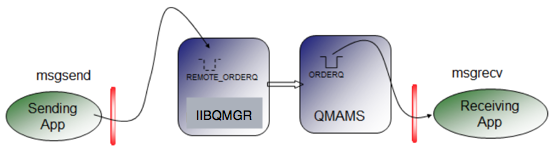
The server interceptor is not enabled on queue manager IIBQMGR so the message put on queue ORDERQ on QMAMS is not signed. When user msgrecv attempts to get the message from queue ORDERQ it will fail because the message is not signed. The message will be sent to the MQ AMS error queue SYSTEM.PROTECTION.ERROR.QUEUE.
In order for this to work, you would also need to set a policy on the remote queue REMOTE_ORDERQ on the IIBQMGR queue manager.
This is because remote queues are only fully protected when the same policy has been configured on the remote queue and the local queue to which it points. Here is the explanation from the Information Center:
When a message is put into a remote queue, MQ AMS intercepts the operation and processes the message according to a policy set for the remote queue. For example, for an encryption policy, the message is encrypted before it is passed to MQ to handle it. After MQ AMS processes the message put into a remote queue, MQ puts it into associated transmission queue and forwards it to the target queue manager and target queue.
When a GET operation is performed on the local queue, MQ AMS tries to decode the message according to a policy set on the local queue. In order for the GET operation to succeed, the policy used to decrypt the message must be identical to the one used to encrypt it. Any discrepancy will cause the message to be rejected.
-
As ibmdemo, run the following command to set the MQ AMS policy on the remote queue to match that on ORDERQ:
setmqspl -m IIBQMGR -p REMOTE_ORDERQ -s SHA1
-
Run the following commands to authorize and then put/get some messages:
-
From userid ibmdemo, authorize the msgspy userid for MQ access to the IIBQMGR.
setmqaut -m IIBQMGR -t qmgr -p msgspy +connect +inqsetmqaut -m IIBQMGR -t q -n REMOTE_ORDERQ -p msgspy +put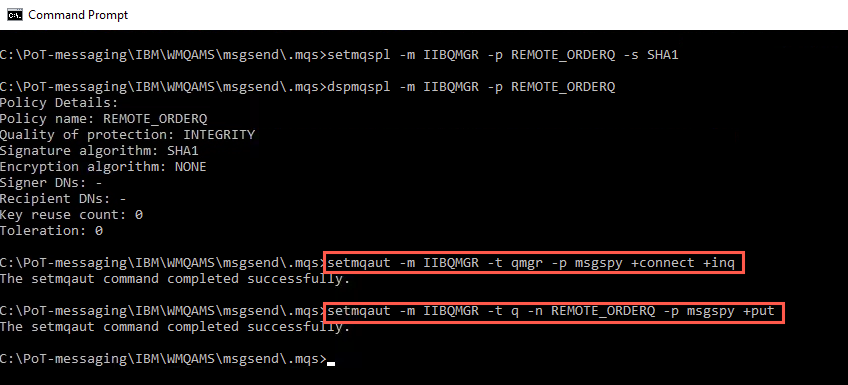
-
From userid msgspy, put message on REMOTE_ORDERQ:
amqsput REMOTE_ORDERQ IIBQMGRThis is a test message from msgspy on IIBQMGR to remote queue ORDERQ on QMAMS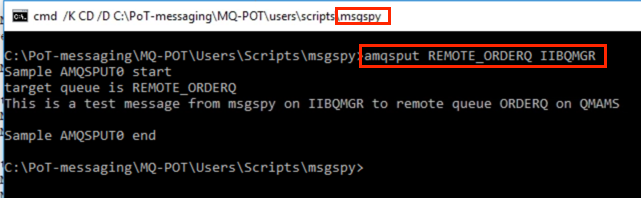
-
Now from userid msgrecv, try to receive the message from this AMS protected queue.
amqsget ORDERQ QMAMS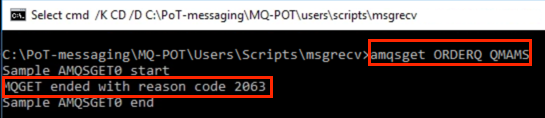 Note:
Note:
If there is no message on the queue, make sure the IIBQMGR.TO.QMAMS channel is started. It may have timed out and gone inactive. Check the screenshot below to see how to start it.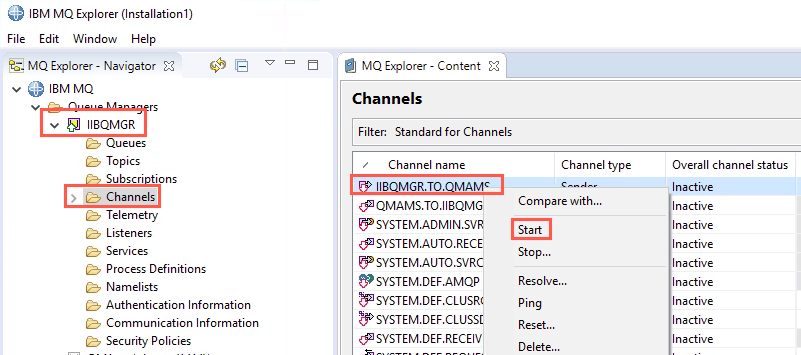
What does the 2063 reason code indicate? You might want to type “mqrc 2063” to get a quick interpretation of the error code. For further details, you could search in the InfoCenter.
Now use the MQ Explorer to check the status of this queue. How many messages are in the ORDERQ now?
-
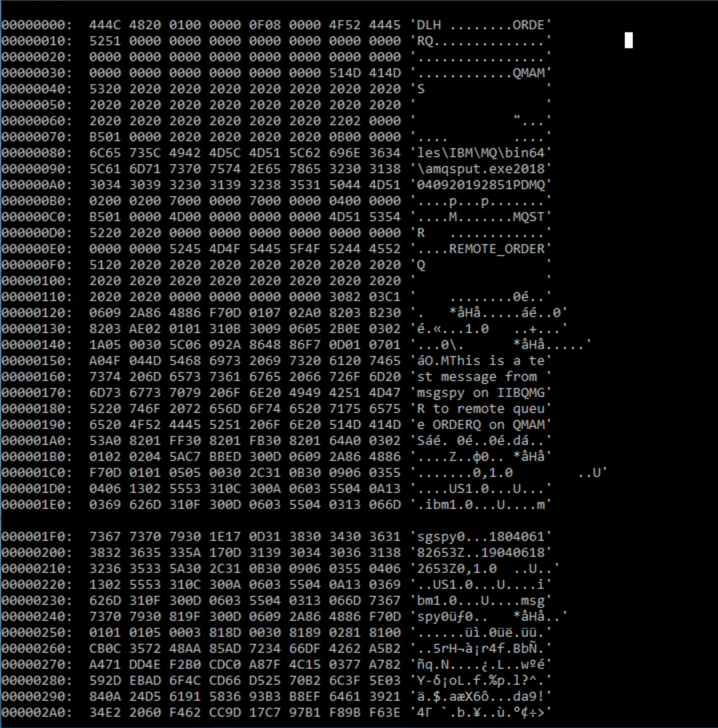
Browse the SYSTEM.PROTECTION.ERROR.QUEUE queue to see the message.
From userid ibmdemo:
amqsbcg SYSTEM.PROTECTION.ERROR.QUEUE QMAMS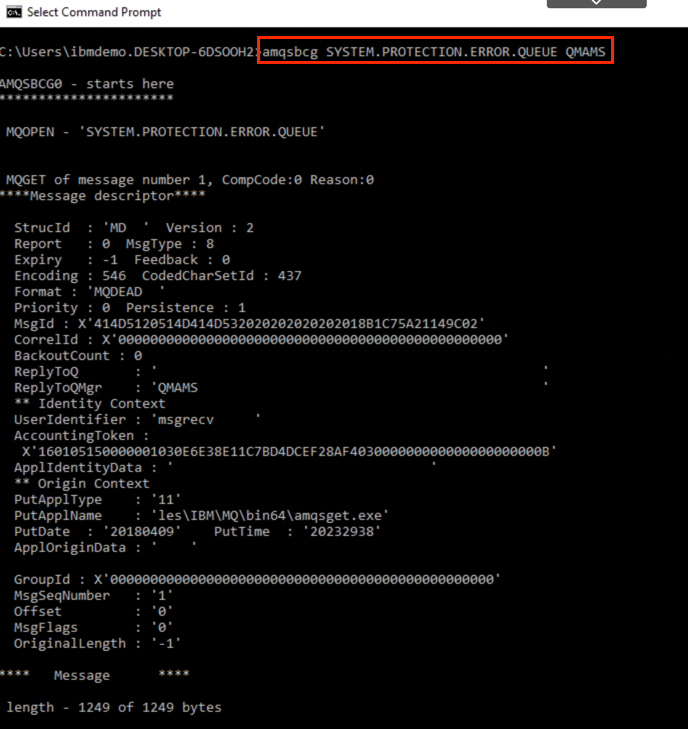
-
Using Windows Explorer, navigate to the following directory. C:\ProgramData\IBM\MQ\Qmgrs\QMAMS\errors*
MQ AMS errors are written to the queue manager error logs. Locate the most current error file: AMQERR01. Scroll to the bottom to find the error.
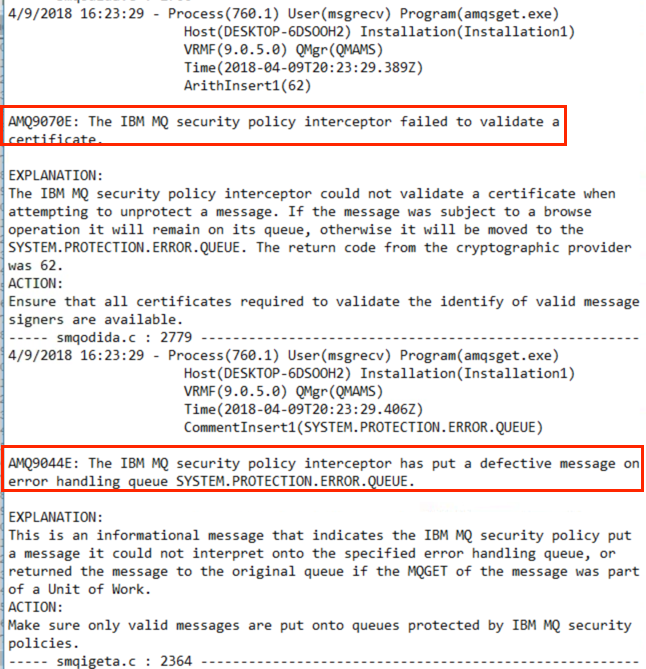
MQ AMS intercepted the message on the MQGET and did not find the certificate for msgspy in msgrecv’s keystore. MQ AMS rejects the message and writes it to the SYSTEM.PROTECTION.ERROR.QUEUE. MQ AMS has prevented a rogue or unauthorized message from entering the network.
Signed messages on local queue (with signature DN checklist)
This scenario is similar to the previous one. msgsend puts a message on queue ORDERQ and msgrecv receives that message. A policy is defined to use quality of protection Integrity (messages are signed). But in this case, a signature DN checklist is also provided which includes the DN of msgsend only. The userid msgsend then puts its own message on queue ORDERQ and subsequently msgrecv attempts to retrieve msgsend’s message.
The policy for queue ORDERQ must be modified to add the signature DN checklist. Only user msgsend is allowed to sign messages.
-
Modify the protection policy for queue ORDERQ to add the signature DN checklist.
a. From userid ibmdemo, enter the setmqspl command.
setmqspl -m QMAMS -p ORDERQ -s SHA1 -a “CN=msgsend,O=ibm,C=US”
b. Display the policy you just modified. From userid ibmdemo:
dspmqspl -m QMAMS -p ORDERQ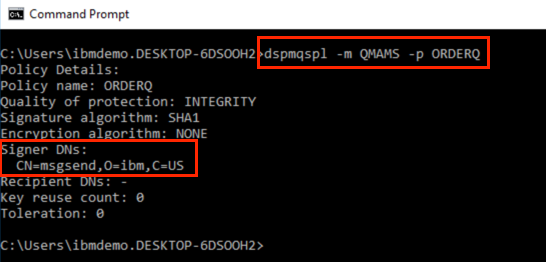
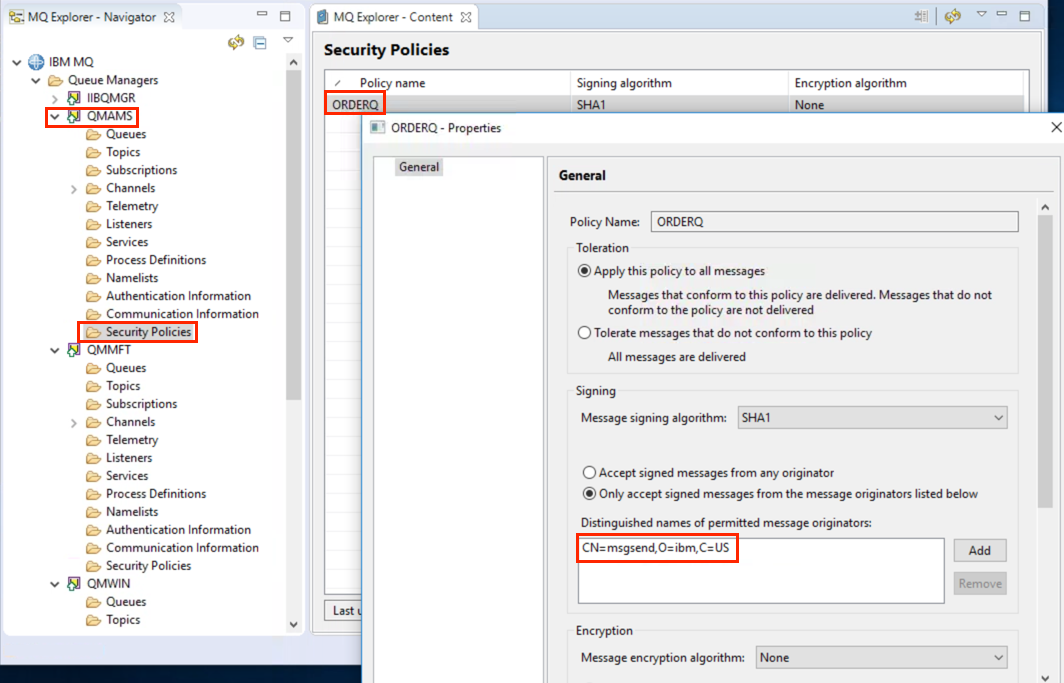
You can also use the MQ Explorer, and display (or modify) the Protection Policies for the ORDERQ. This extension was added to your MQ Explorer with the installation of WMQ-AMS, and can be seen under the Advanced folder within any AMS-enabled queue manager.
-
User msgsend puts a message on queue ORDERQ.
a. Change to the msgsend command window. b. As msgsend, use the sample program amqsput to put a message on ORDERQ.
amqsput ORDERQ QMAMSThis is another test message from msgsend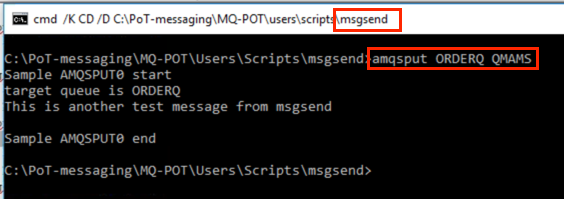
-
User msgrecv retrieves the message with no problem.
a. Change to the msgrecv command window. b. As msgrecv, use the sample program amqsget to get a message from ORDERQ.
amqsget ORDERQ QMAMS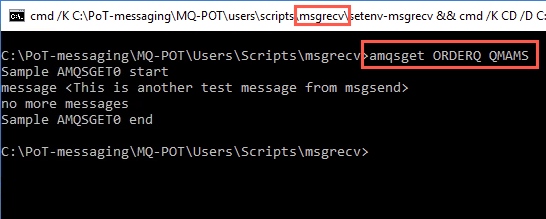
-
Now try sending from a userid that isn’t AMS authorized. User msgspy puts a message on queue ORDERQ.
a. Change to the msgspy command window. b. As msgspy, use the sample program *amqsput
- to put a message on ORDERQ.
amqsput ORDERQ QMAMSThis is a test message from msgspy on ORDERQ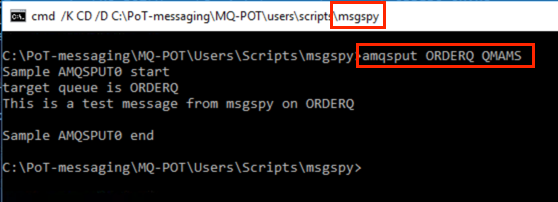
-
User msgrecv attempts to get the message from queue ORDERQ.
a. Return to msgrecv’s command window. b. Use the sample program amqsget to get a message from ORDERQ.
amqsget ORDERQ QMAMSmsgrecv is unable to retrieve msgspy’s message because, based on the policy defined, only msgsend’s message can be signed. msgspy’s message is sent to the error queue.
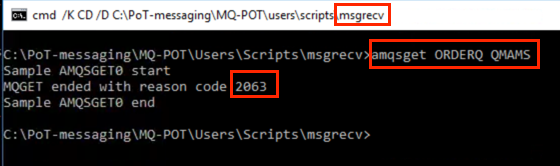
-
You may browse the SYSTEM.PROTECTION.ERROR.QUEUE queue to see the message.
a. Return to ibmdemo’s command window.
b. Use the sample program amqsbcg to browse the last message on the SYSTEM.PROTECTION.ERROR.QUEUE.
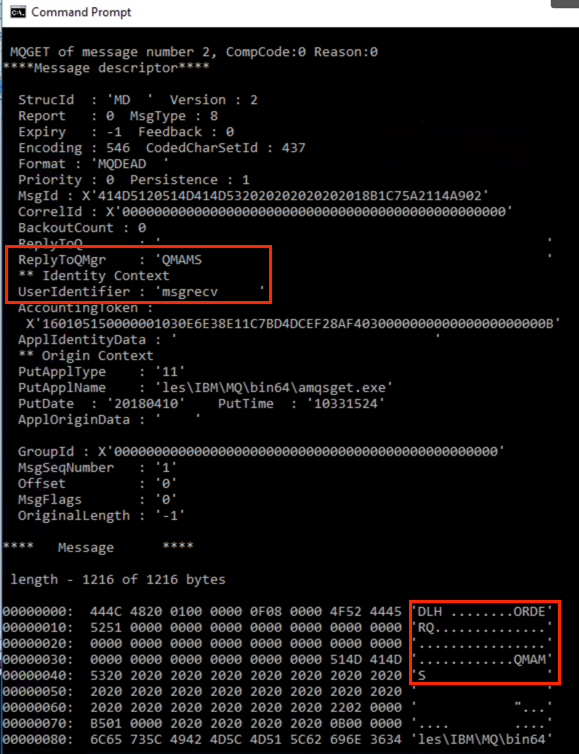
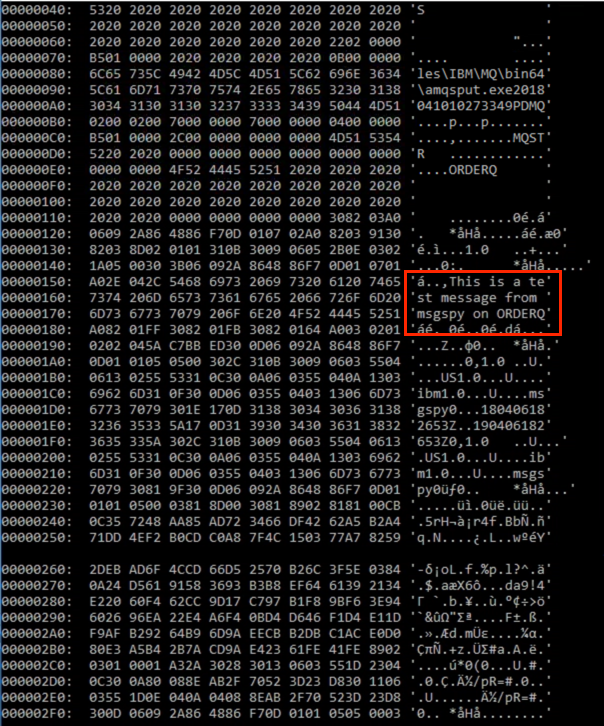
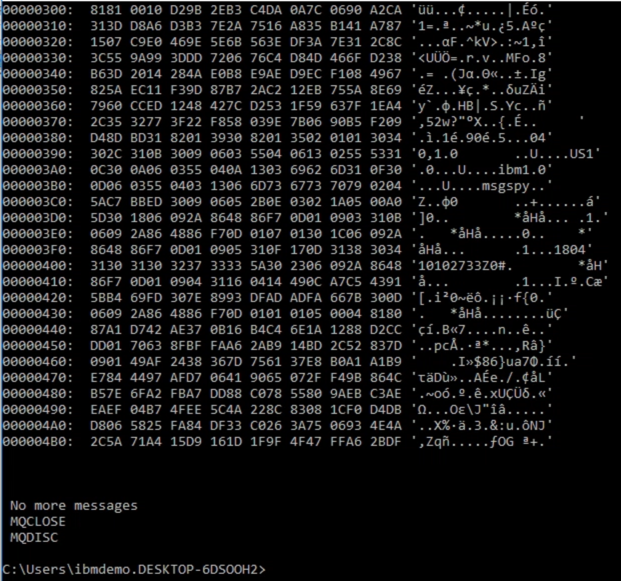
amqsbcg SYSTEM.PROTECTION.ERROR.QUEUE QMAMSc. Review the message beginning with the header. Notice the format of MQDEAD and useridentifier. Continue to browse the rest of the message.
-
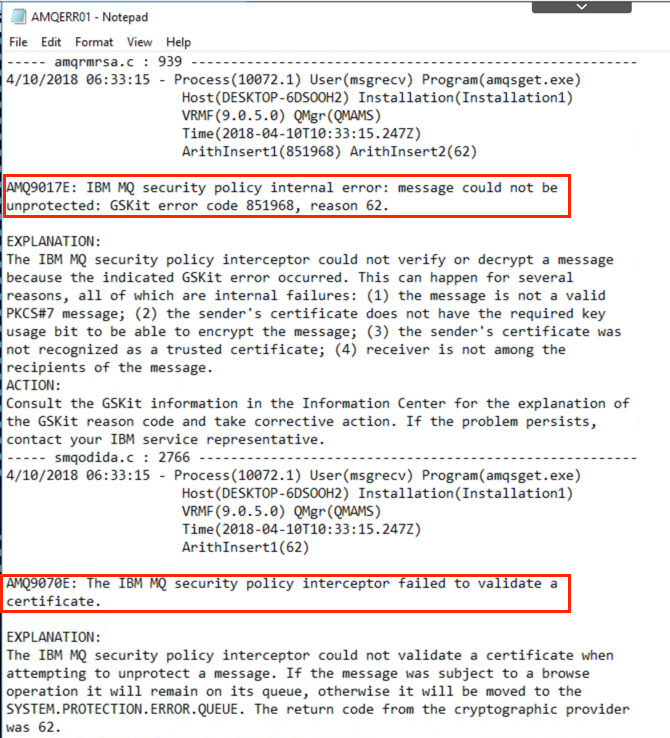
When WMQ-AMS detects a security issue with messages, it logs error and warning messages in the standard WMQ queue manager error logs. You will now go and look at QMAMS’s error log to see some of those messages.
a. Using the Windows Explorer, navigate to directory C:\ProgramData\MQ\Qmgrs\QMAMS\errors and Check the log file.
b. Open the first error log file check the error in the error log file - AMQERR01.
Signed and encrypted messages on local queue
In this scenario, msgsend puts a message on queue ORDERQ. The message is signed and encrypted for user msgrecv. A policy of type Privacy is created with msgrecv being the only recipient. Only msgrecv can retrieve and decrypt the message. Any other users attempting to get the message from the queue will fail and the message will be placed on the error queue.
-
Modify the existing policy for queue ORDERQ to add encryption. The signer checklist is removed for this scenario. msgrecv is added as the only recipient. Note that at least one recipient must be specified when encryption is requested.
a. As user ibmdemo, issue the following command:
setmqspl -m QMAMS -p ORDERQ -s SHA1 -e 3DES -r CN=msgrecv,O=ibm,C=USb. Display the policy you just updated.
dspmqspl -m QMAMS -p ORDERQ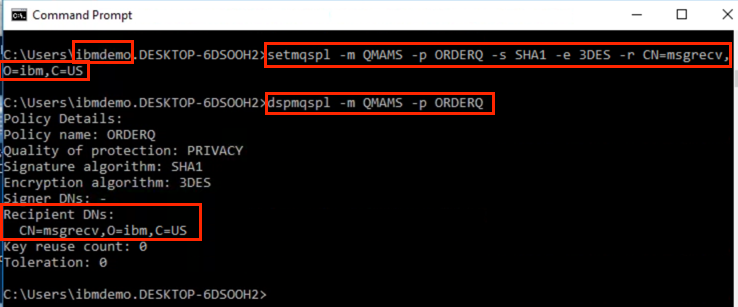
Alternatively, you can also display (or modify) the Protection Policy using the MQ Explorer plugin.
-
When encryption is requested, the symmetric key generated is encrypted with the public key of the recipient (user msgrecv in this example). This requires user msgsend to have user msgrecv’s public certificate in his keystore. Because the AMS encryption option also implies integrity checking, user msgsend’s public key must also be accessible in user msgrecv’s keystores (CMS and JKS). This was done as part of the lab set-up. The public key of each user has previously been added to each other’s key-store.
a. Change to the msgsend command window.
b. As msgsend, use the sample program amqsput to put a message on ORDERQ:
amqsput ORDERQ QMAMSThis is a signed and encrypted test message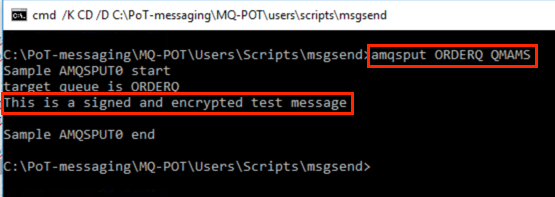
-
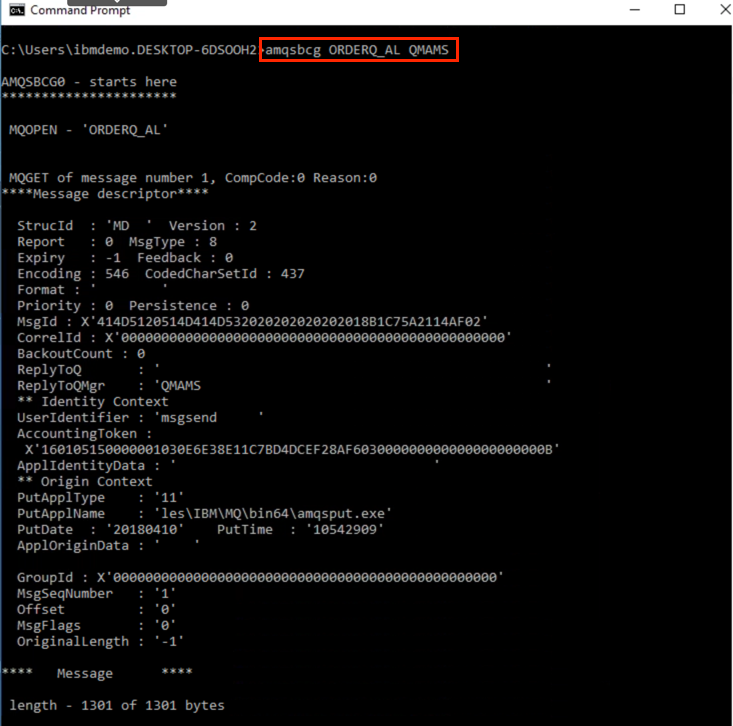
You will now browse the ORDERQ_AL queue as user ibmdemo to verify that the message is encrypted. Remember that ORDER_AL is an alias queue for ORDERQ. The alias is not protected and has been setup to demo encryption in this lab. This is not a best practice and should not be done in the real world (at least not without proper authorization).
a. From the ibmdemo command window use the sample program amqsbcg to browse.
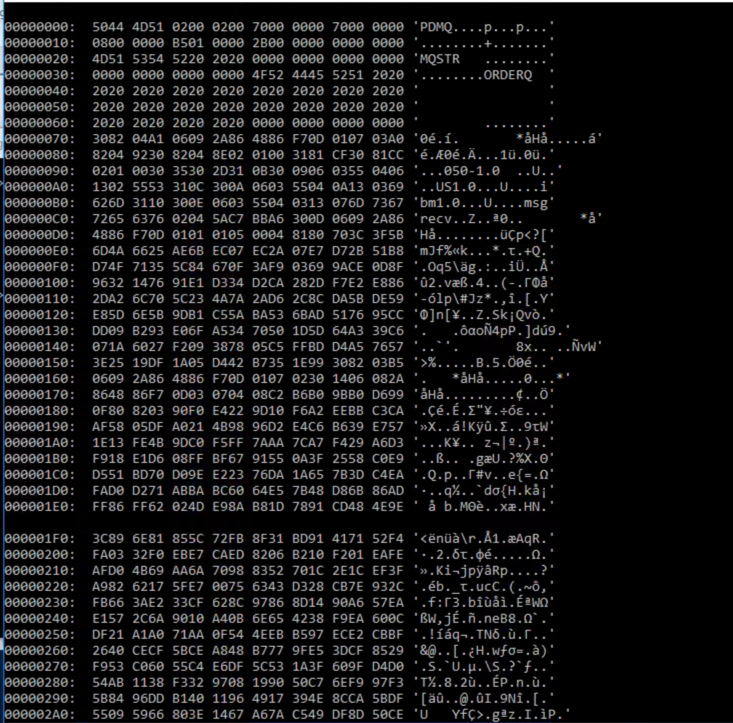
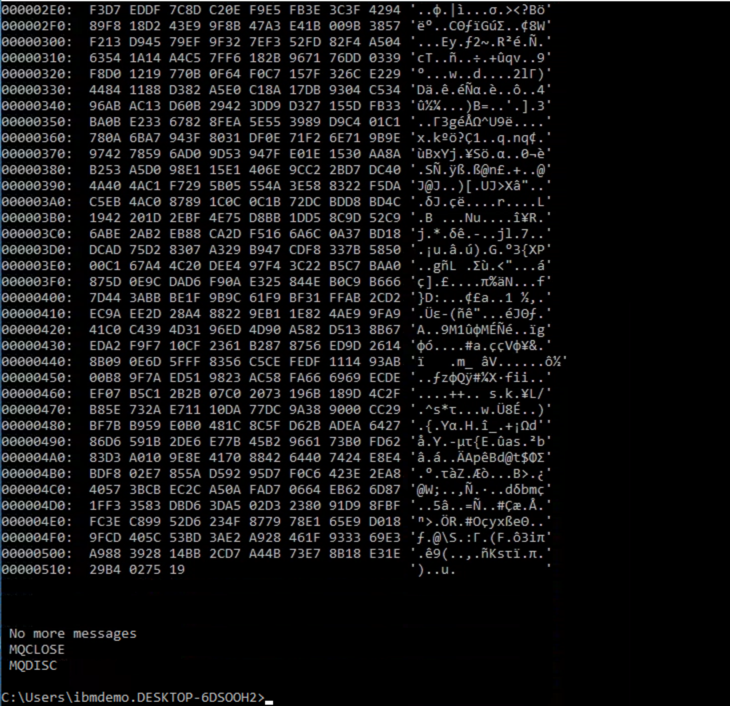
amqsbcg ORDERQ_AL QMAMSIf there is more than one message on the queue, let it scroll all the way to the end, to make sure you are viewing the last message on the queue. Notice that the message contents are no longer readable. The message is indeed encrypted.
(NB You could also have browsed the message using WMQ Explorer or RFHUtil, as before.)
-
User msgrecv retrieves the encrypted message with no problem.
a. Change to the msgrecv command window.
b. As msgrecv, use the sample program amqsget to get a message from ORDERQ.
amqsget ORDERQ QMAMS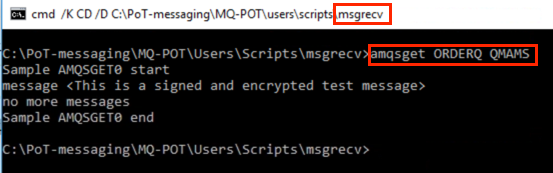
-
Put another new encrypted message from msgsend.
-
User msgspy attempts to retrieve the message from queue ORDERQ
a. Change to the msgspy command window.
b. As msgspy, use the sample program amqsget to get a message from ORDERQ.
amqsget ORDERQ QMAMS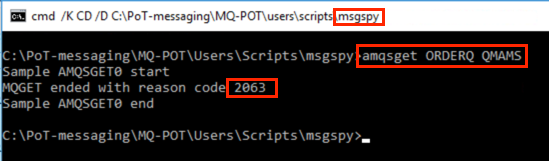
msgspy is unable to retrieve msgsend’s message because, based on the policy defined, the only recipient who can retrieve and decrypt the message is msgrecv. The message is again automatically sent to the error queue by the AMS interception code.
-
You may browse the SYSTEM.PROTECTION.ERROR.QUEUE queue to see the message.
a. Return to ibmdemo’s command window.
b. Use the sample program amqsbcg to browse the message on the SYSTEM.PROTECTION.ERROR.QUEUE.
amqsbcg SYSTEM.PROTECTION.ERROR.QUEUE QMAMS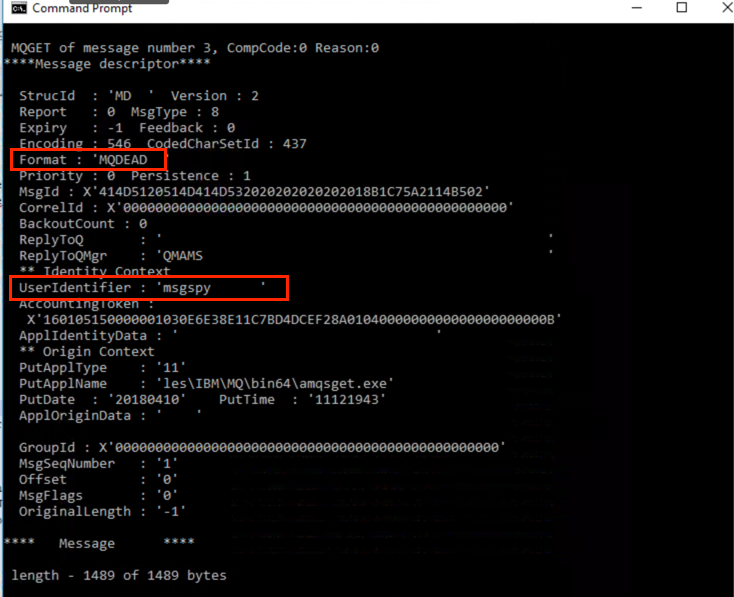
c. Allow the program to scroll down to the last message.
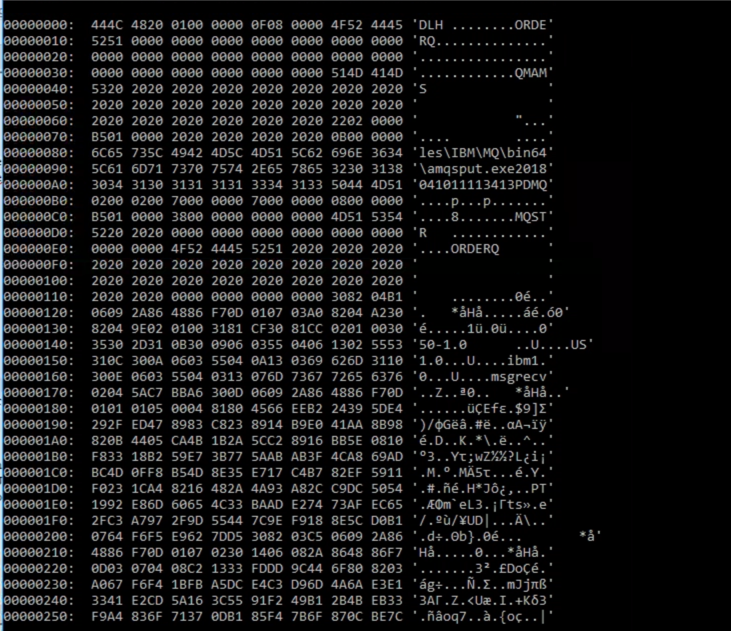
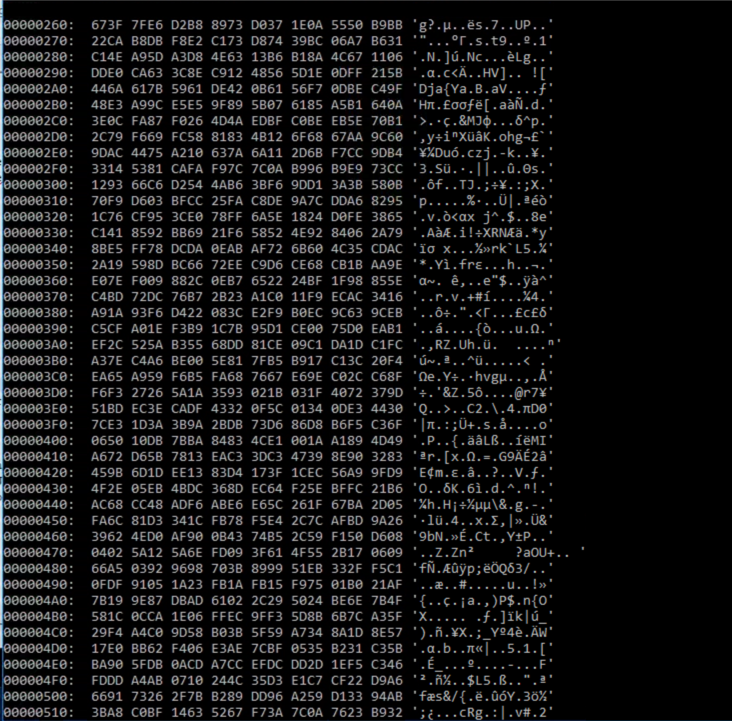
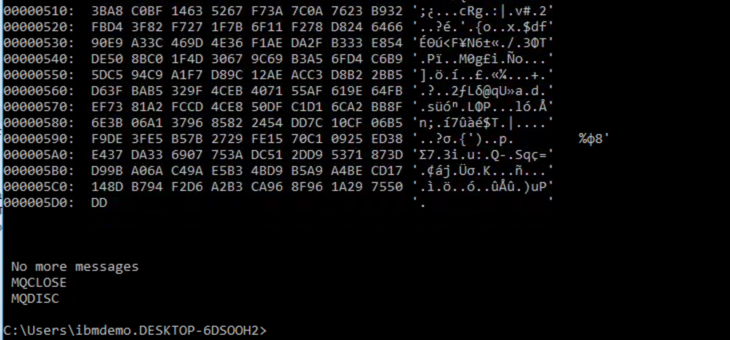
Review the message beginning with the header. Notice the format of MQDEAD and user identifier. Continue to browse the rest of the message. You will see nothing but encrypted text in the message body. The message remains encrypted when put the SYSTEM.PROTECTION.ERROR.QUEUE.
-
Check the log file.
a. Using Windows Explorer, navigate to directory C:\ProgramData\IBM\MQ\Qmgrs\QMAMS\errors and open the first error log - AMQERR01 with your favorite editor.
b. Move to the bottom of the file and you should see messages like those shown below.
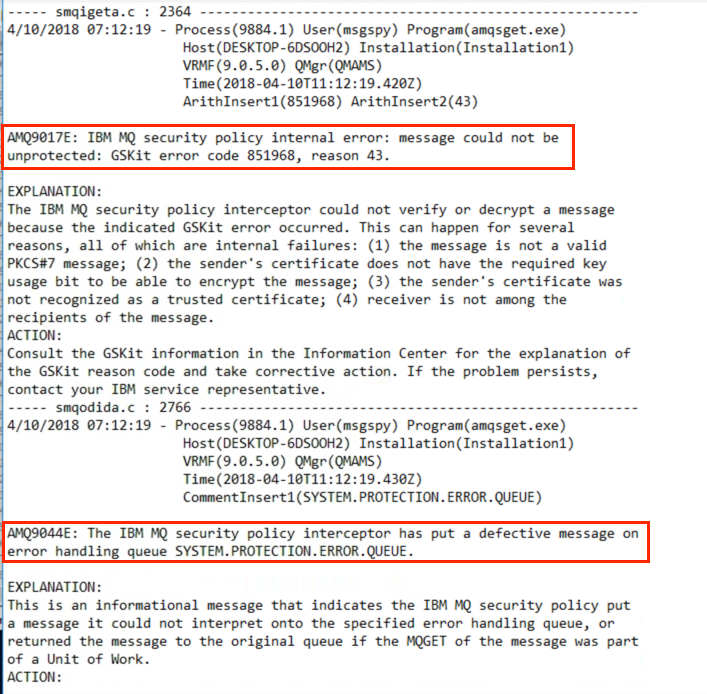
Of course, your file name and time/date will differ from the screen capture.
Signed and encrypted messages on remote queue
In this scenario, msgsend puts a message on queue REMOTE_ORDERQ on IIBQMGR and the message flows to queue ORDERQ on QMAMS. The message is signed and encrypted for user msgrecv using the same policy defined in the previous scenario. Only msgrecv can retrieve and decrypt the message. Any other users attempting to get the message from the queue will fail and the message will be placed on the error queue. The remote queue REMOTE_ORDERQ on IIBQMGR needs the same policy as its local queue ORDERQ on QMAMS. So, because we have recently changed the policy on ORDERQ, we now need to change the policy on REMOTE_ORDERQ.
-
Define the policy for queue REMOTE_ORDERQ on IIBQMGR.
a. As user ibmdemo, issue the following command:
setmqspl -m IIBQMGR -p REMOTE_ORDERQ -s SHA1 -e 3DES -r “CN=msgrecv,O=ibm,C=US”b. Display the policy you just created with the following command:
dspmqspl -m IIBQMGR -p REMOTE_ORDERQ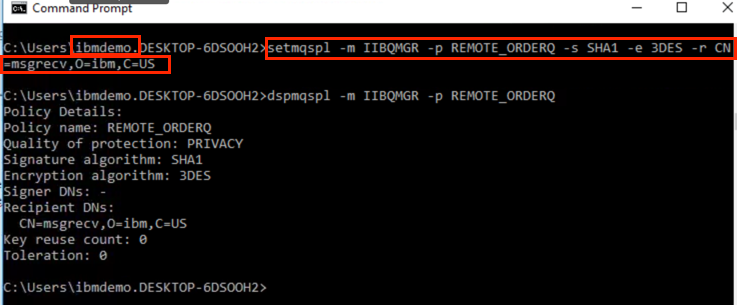
Again, alternatively you could Define and Display the Protection Policy using the MQExplorer plugin.
-
Once again, you need to provide the necessary MQ access authorities to any users on the IIBQMGR. Authorize user msgsend to connect to MQ, retrieve policies and PUT messages to this protected queue.
a. As user ibmdemo, issue the following commands:
setmqaut -m IIBQMGR -t qmgr -p msgsend +connect +inqsetmqaut -m IIBQMGR -t q -n SYSTEM.PROTECTION.POLICY.QUEUE -p msgsend +browsesetmqaut -m IIBQMGR -t q -n REMOTE_ORDERQ -p msgsend +put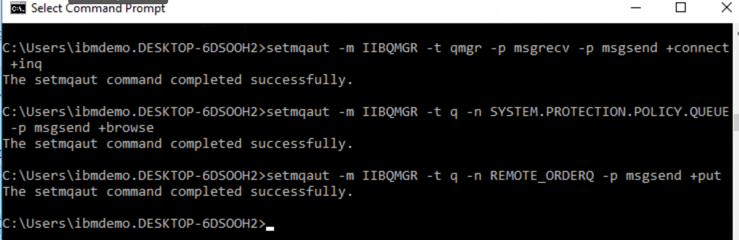
-
User msgsend puts a message on queue REMOTE_ORDERQ.
a. Return to the msgsend command window. b. As msgsend, use the sample program amqsput to put a message on REMOTE_ORDERQ on queue manager IIBQMGR.
amqsput REMOTE_ORDERQ IIBQMGRThis is a test message from REMOTE_ORDERQ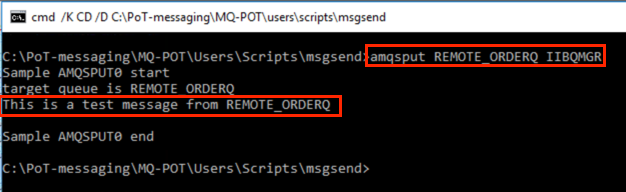
-
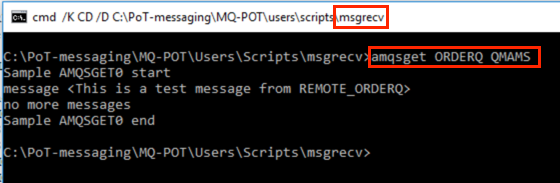
User msgrecv retrieves the encrypted message with no problem.
a. Return to msgrecv command window.
b. As msgrecv, use the sample program amqsget to get the message from ORDERQ.amqsget ORDERQ QMAMS!
Signed and encrypted messages on cluster queue
In this scenario, msgsend puts a message to cluster queue CLUSTER_ORDERQ from queue manager IIBQMGR and msgrecv retrieves the message from the queue on queue manager QMAMS.
Note that the policy for queue CLUSTER_ORDERQ must be defined on both queue managers, even though the queue itself may only exist on one queue manager.
-
Set the necessary MQ authorizations.
a. As user ibmdemo, issue the following commands:
setmqaut -m IIBQMGR -t q -n SYSTEM.CLUSTER.TRANSMIT.QUEUE -p msgsend +putsetmqaut -m QMAMS -t q -n SYSTEM.CLUSTER.TRANSMIT.QUEUE -p msgsend +putsetmqaut -m QMAMS -t q -n CLUSTER_ORDERQ –p msgrecv +getsetmqaut -m QMAMS -t q -n CLUSTER_ORDERQ –p msgsend +put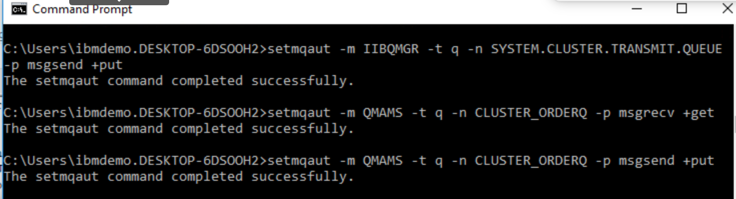
b. The following commands are also necessary for this scenario because the MQ cluster distribution may send the message to the instance of the queue on IIBQMGR, in which case you may need to get the message with the userid msgrecv. The following commands are all necessary to authorize msgrecv to connect to IIBQMGR and get a message. Issue the commands:
setmqaut -m IIBQMGR -t qmgr –p msgrecv –p msgsend +connect +inqsetmqaut -m IIBQMGR -t q -n CLUSTER_ORDERQ –p msgrecv +getsetmqaut –m IIBQMGR –t q –n SYSTEM.PROTECTION.POLICY.QUEUE –p msgrecv –p msgsend +browse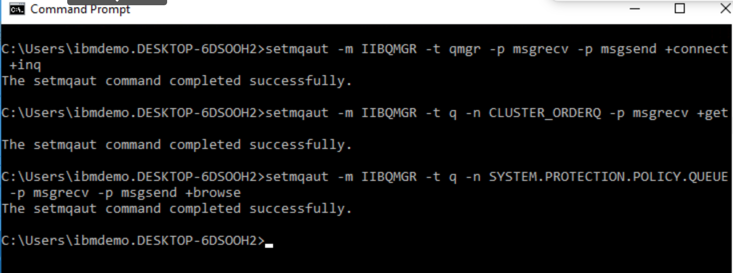
-
Create the policies on both queue managers.
a. As user ibmdemo, issue the following commands:
setmqspl -m QMAMS -p CLUSTER_ORDERQ -s SHA1setmqspl -m IIBQMGR -p CLUSTER_ORDERQ -s SHA1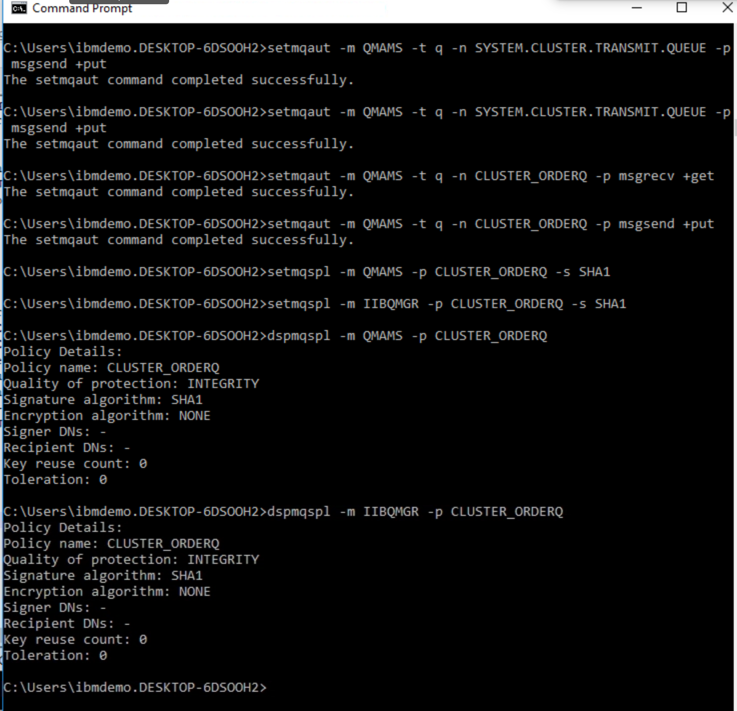
-
User msgsend puts a message on queue CLUSTER_ORDERQ.
a. Return to msgsend‘s command window.
b. As msgsend, use the sample program amqsput to put a message onto ORDERQ.amqsput CLUSTER_ORDERQ QMAMSThis is a test message to CLUSTER_ORDERQ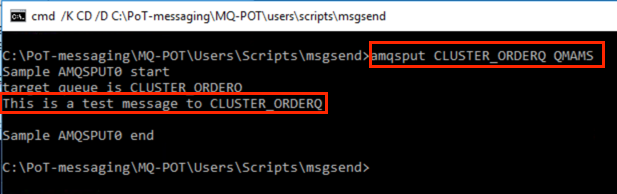
-
User msgrecv retrieves the signed message with no problem.
a. Return to msgrecv’s command window.
b. As msgrecv, use the sample program amqsget to get the message from CLUSTER_ORDERQ on IIBQMGR.amqsget CLUSTER_ORDERQ IIBQMGR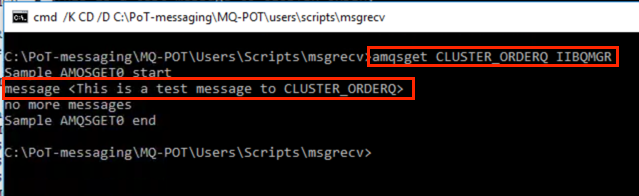
c. If there are no messages on the CLUSTER_ORDERQ on queue manager IIBQMGR, run the sample program amqsput from msgsend again specifying queue manager QMAMS. Since the default cluster workload distribution is round-robin, every other message should go to CLUSTER_ORDERQ on IIBQMGR.
CONGRATULATIONS!
You have completed this hands-on lab.
For extra practice, you may continue with Java interceptors described below if time permits, or later on your own.
Using other types of interceptors
If time permits, you may want to go through the previous scenarios again, but this time use another type of interceptor (C client interceptor or the Java interceptors) using amqsputc/amqsgetc and other Java samples. When using MQ Java or JMS applications in bindings mode, two different interceptors can be used:
-
Server interceptor (API exit)
- The server interceptor will also handle Java applications connecting to a queue manager in bindings mode.
-
Java interceptor
-
To use the Java interceptor to protect messages of Java applications connecting to a queue manager in bindings mode, the following additional option must be passed on the Java command line:
-Dmqs.intercept.bindings=1 -
By default, the Java interceptor only handles client connections. Be aware that if both are enabled at the same time, then the cryptographic operations will be performed twice!
-