Lab 7 - Service and Maintenance
In this lab, you will explore how to maintain the appliance. You will learn how to back up and restore the configuration, backup and restore an individual queue manager, and how to execute service procedures such as upgrading the appliance firmware.
The virtual environment
VMs required:
- Windows 10 x64
- MQAppl4
The lab environment consists of one virtual appliance MQAppl4 and the Windows image, Windows 10 x64, to perform console operations and testing. There are other virtual appliances (MQAppl1, MQAppl2, MQAppl3, MQAppl5, MQAppl6, and MQAppl7) that will not be used in this lab. You should suspend them.
The MQAppl4 appliance is currently running version 9.1.3.0 of the firmware. In this lab, you will upgrade the firmware to V9.2.2.0, before reverting to V9.1.3.0 again.
Back up the IBM MQ Appliance configuration
You can back up various features of your IBM MQ Appliance and restore these features to the same or to a different appliance, if required.
After you back up an appliance, you must restore it to the same or another appliance that is running the same firmware level.
To back up your IBM MQ Appliance, you back up the following features:
-
Configuration of the IBM MQ Appliance
-
Messaging users and groups
-
Key repository
-
Queue manager configurations and data
-
IBM MQ Appliance UI configurations
You use URIs to copy the backed-up information from the appliance to safe storage. You also use URIs to restore backed-up information to a target appliance. You restore an appliance in the following order:
-
Restore configuration of the IBM MQ Appliance
-
Restore messaging users and groups
-
Re-create the queue managers
-
Restore key repository
-
Restore queue manager configurations
-
Restore IBM MQ Appliance UI configurations
Commands are available to back up and restore a queue manager. You can back up a queue manager to an archive file that can subsequently be restored. The queue manager configuration is saved, together with log files and queue data.
For this lab, you will first back up the IBM MQ Appliance configuration, in preparation to upgrade the firmware. After upgrading the firmware, you will then try using the commands to backup and restore a queue manager. You will then restore the MQ Appliance configuration after you have reverted the firmware back to V9.1.3.0.
Performing the backup of the appliance configuration
You use the write memory command to write the current appliance configuration to the autoconfig.cfg file. You can then copy the autoconfig.cfg from a URI on the appliance to secure storage on another system. In this lab, you will use the accompanying Windows system as the external storage.
The backup you take is not secure, so sensitive data, such as appliance user IDs and passwords are not included. You must re-create these items manually if you use the backup to restore an appliance.
-
Go to the command line interface of your IBM MQ Appliance – MQAppl4.
-
If not logged in, use the user name admin and password passw0rd to log in to the administrators group.
-
Display the current firmware details with the command (ensure you are at the high-level prompt):
show firmware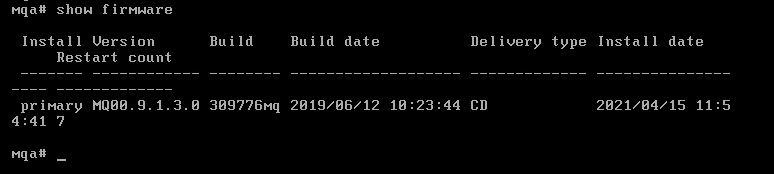
The installed firmware is at the 9.1.3.0 level. You will upgrade the firmware to v9.2.2.0.
-
Type the following command to enter configuration mode:
config -
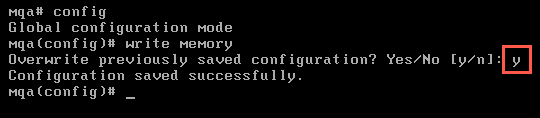
Type the following command to write the current configuration to the backup file autoconfig.cfg:
write memory -
When prompted, reply y that you want to overwrite the current autoconfig.cfg file.
Overwrite existing autoconfig.cfg? y.
-
Go to the Windows image (login if needed). Open the Firefox browser and connect to MQAppl4 (use the shortcut or use https://10.0.0.4:9090). Login as admin (password = passw0rd).
-
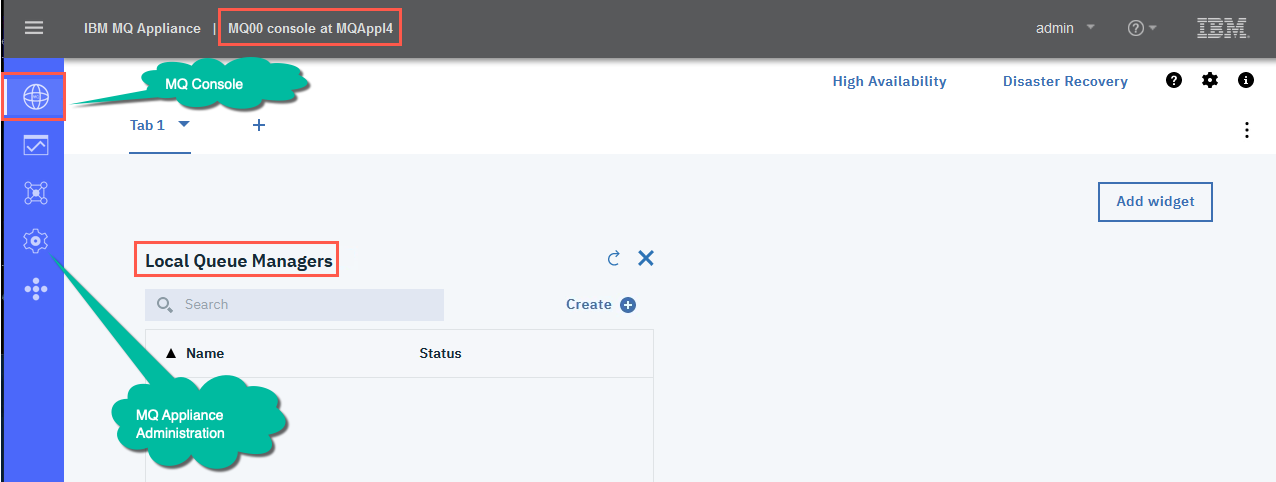
Remember this is the old version of the GUI, running at V9.1.3.0. In this version, there are two primary options: Manage Appliance and MQ Console. By default the UI opens to the MQ Console with Local Queue Managers. You see High Availability and Disaster Recovery across the top of the page.
-
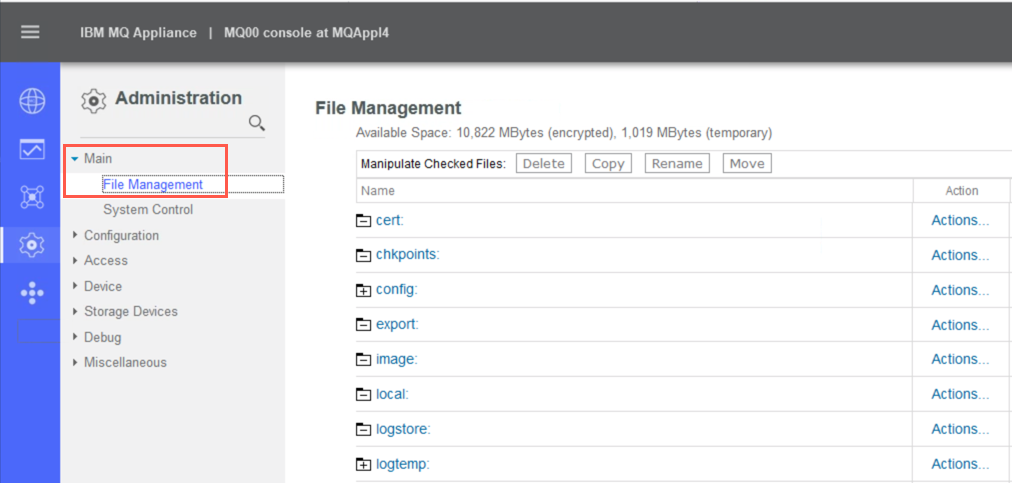
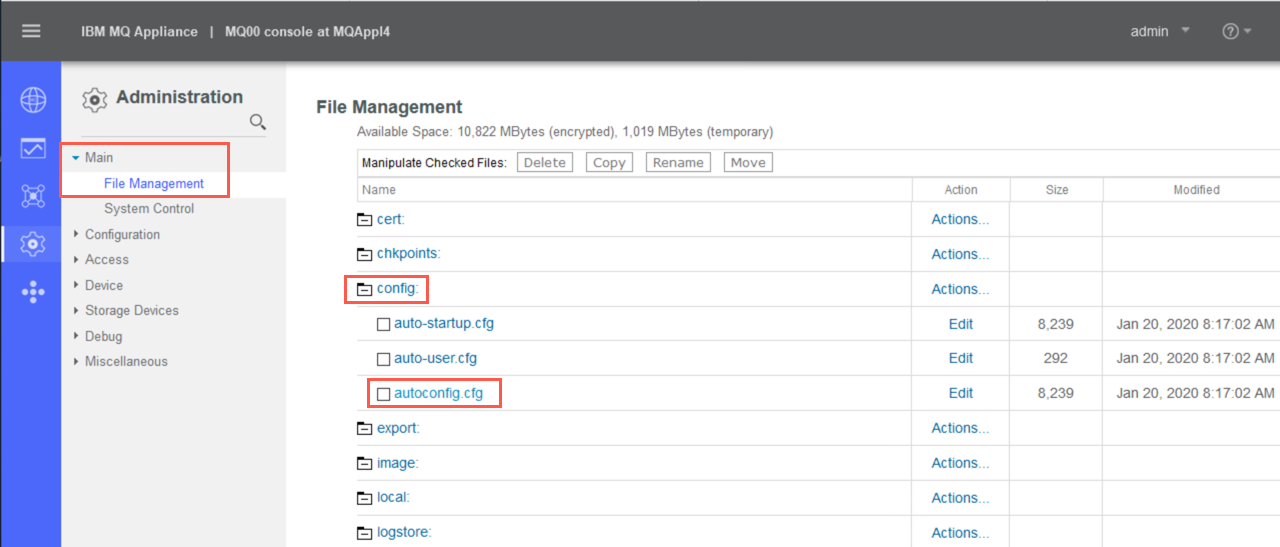
Click the Administration icon. Expand Main and click on File Management.
-
The File Management tool opens. You used the V9.2.4.0 File Management tool in Lab 3 and Lab 5. It enables you to upload a file from the system running your browser to the MQ Appliance; save a file from the MQ Appliance to your system; and move, copy, rename and delete files on the appliance.
We want to copy the updated and saved autoconfig.cfg for back up of the appliance. The autoconfig.cfg file is in the config: folder (URI) on the appliance. Click the config: folder in the File Management tool.
The config: folder opens and you see all of the files contained within that folder.
-
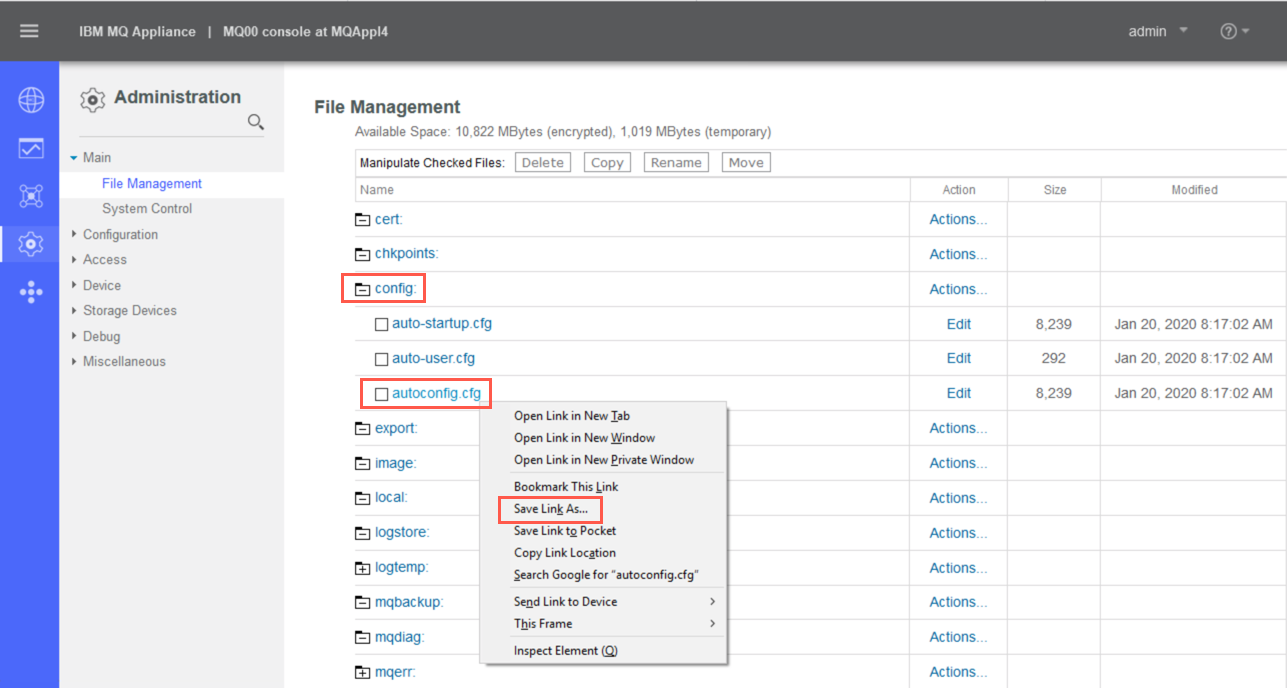
To copy the autoconfig.cfg file to a location on another system, from where you can write it to back up storage and later recover it if necessary, you use the facilities provided by your browser. Right-click on the autoconfig.cfg file and the browser popup menu should appear.
Click Save Link As…
-
Then Enter name of file to save to… dialog box opens up. Select C:\Setup-Install as the location to save the file. The file name of autoconfig.cfg and file type of Text Document (*.cfg) should be set for you. Click Save.
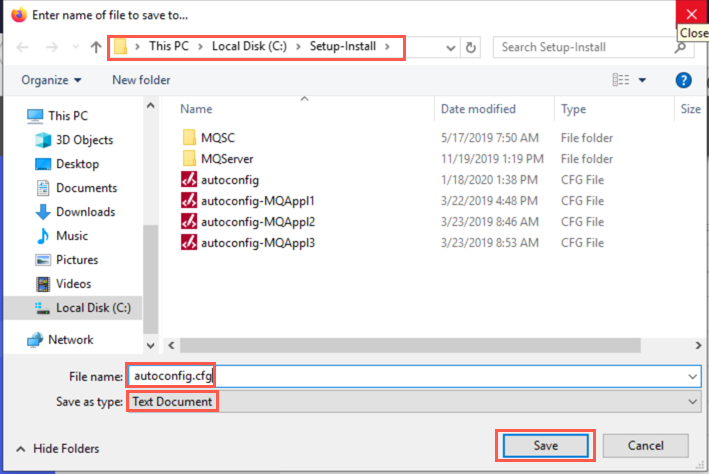
The file should be saved on your Windows system.
Using the File Management tool keeps you from having to use a SCP tool and issue a command on the appliance, using the appliance URIs, such as this:
copy config:///autoconfig.cfg scp://username\@ipaddress/[/]directorypath
Firmware upgrade
To upgrade your IBM MQ Appliance, you install the latest level of firmware on the appliance.
New function, security updates, and maintenance fixes for the IBM MQ Appliance are made available through firmware releases. Additional maintenance through iFixes are made available, as necessary, on the most recent firmware level release.
You can also revert to a previous level of firmware to back out of an upgrade, if required.
Fixes are cumulative, so you should always download the most recent firmware that is available on the IBM Fix Central website.
All queue manager information persists through upgrades and rollbacks.
The standard rules of applying upgrades to IBM MQ apply when firmware is upgraded and queue managers restarted. If the new firmware moves the IBM MQ installation to a new command level, any queue managers that are started at the new command level are no longer able to start under a lower command level, even following a firmware rollback.
Performing a firmware upgrade
You upgrade the IBM MQ Appliance by downloading a new version of the firmware, copying it to the appropriate URI on the appliance, and issuing the appropriate command to reboot the appliance with the new firmware.
Normally you would use a computer with web access to download the required image from IBM Fix Central. This website is a repository for all available and supported firmware images for IBM MQ Appliances. The fixes are cumulative, so always choose the most recent image.
In the lab environment, the download of Fix Pack V9.2.2.0 has already been done for you and is stored in the directory C:\Setup-Install\.
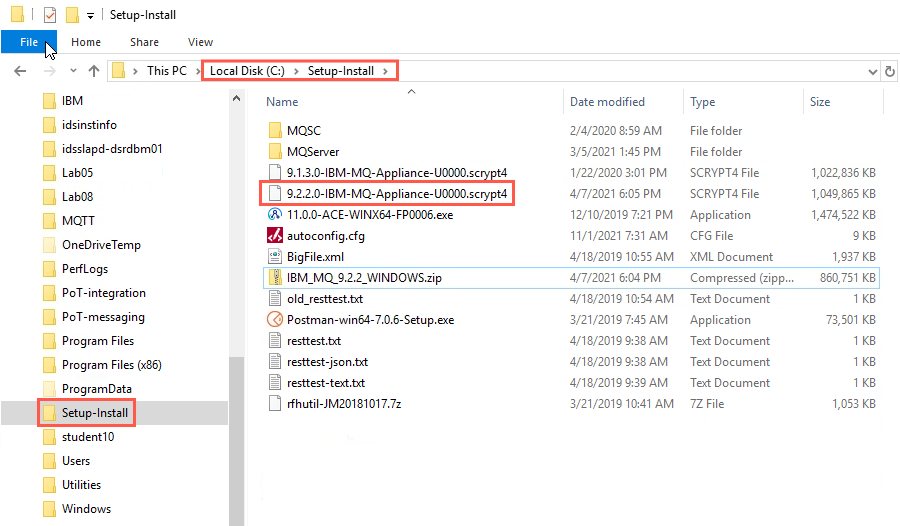
Fix Packs are delivered via a scrypt* file. The file with the scrypt3 extension is the Fix Pack for the physical appliance. The file with the scrypt4 extension is the Fix Pack for the virtual appliance. Use the file with scrypt4 in this lab.
If the appliance that you are upgrading is part of a high availability configuration, you should pause the first appliance, upgrade and resume the appliance. Then pause, upgrade, and resume the second appliance.
The first step in a firmware upgrade is to back up your IBM MQ Appliance. You have already done that in the first part of this lab.
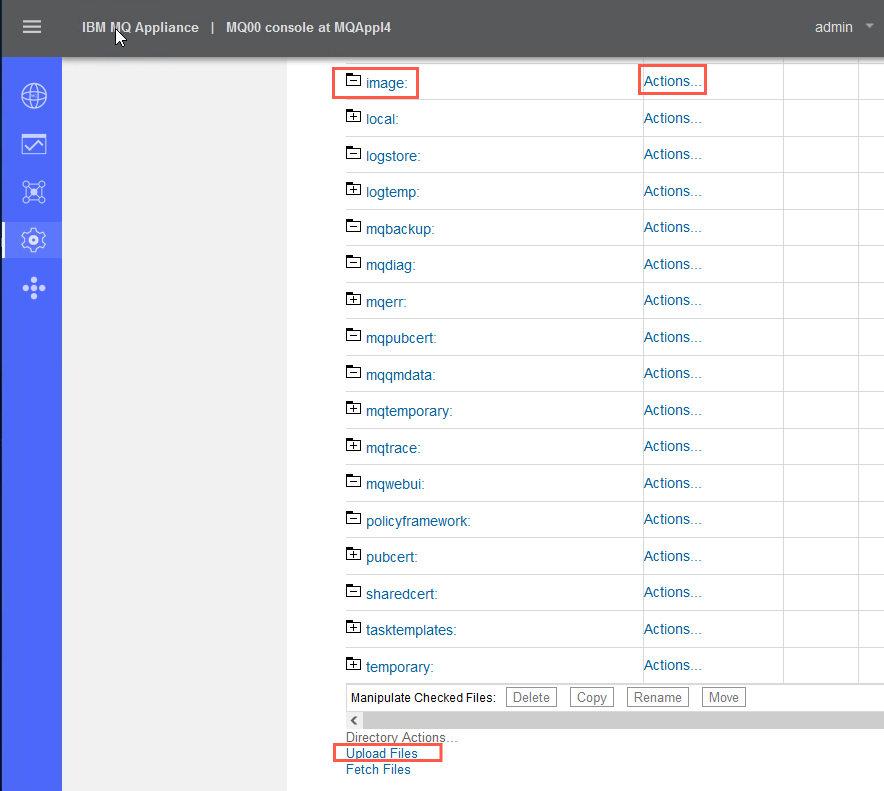
You will again use the File Management tool to copy the firmware file to the MQ Appliance. The firmware .scrypt4 file needs to be placed in the image: folder (URI) on the MQ Appliance.
-
Return to the Windows system and go back to your browser window and the File Management tool. If the config: folder is still open, you might want to click on the config: folder again to close it.
-
In the File Management tool, click on the Actions… link to the right of the image: folder. A popup menu opens. Click the Upload Files link.
-
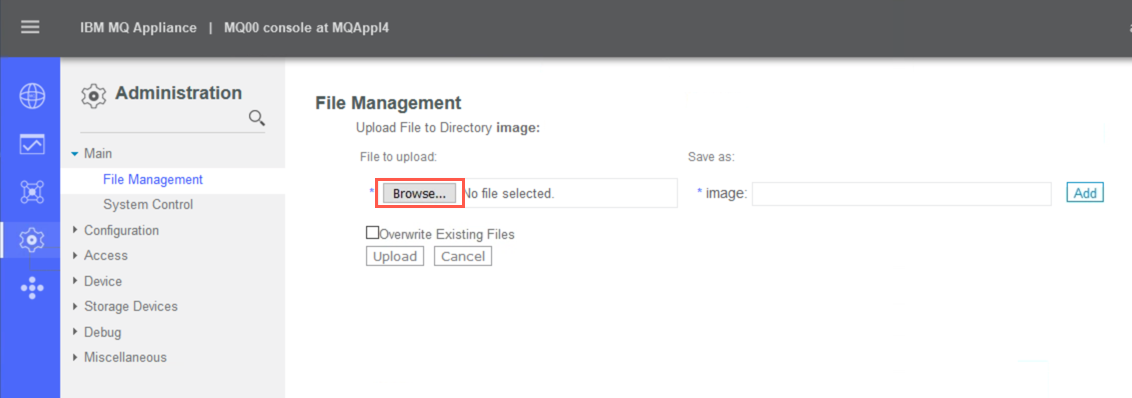
An upload dialog opens. Click the Browse… button.
-
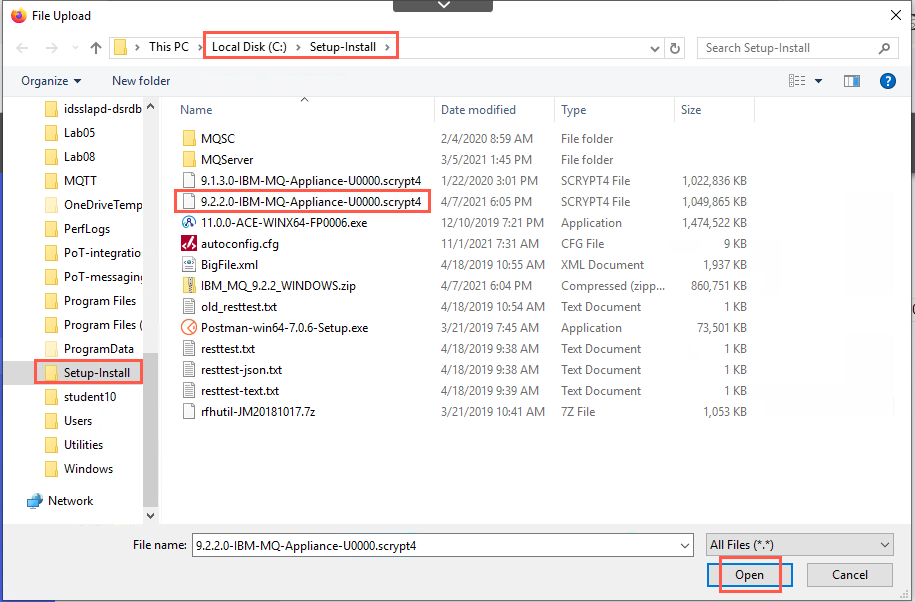
Navigate to the C:\Setup-Install directory. Select the 9.2.2.0-IBM-MQ-Appliance-U0000.scrypt4 file.
Click Open.
-
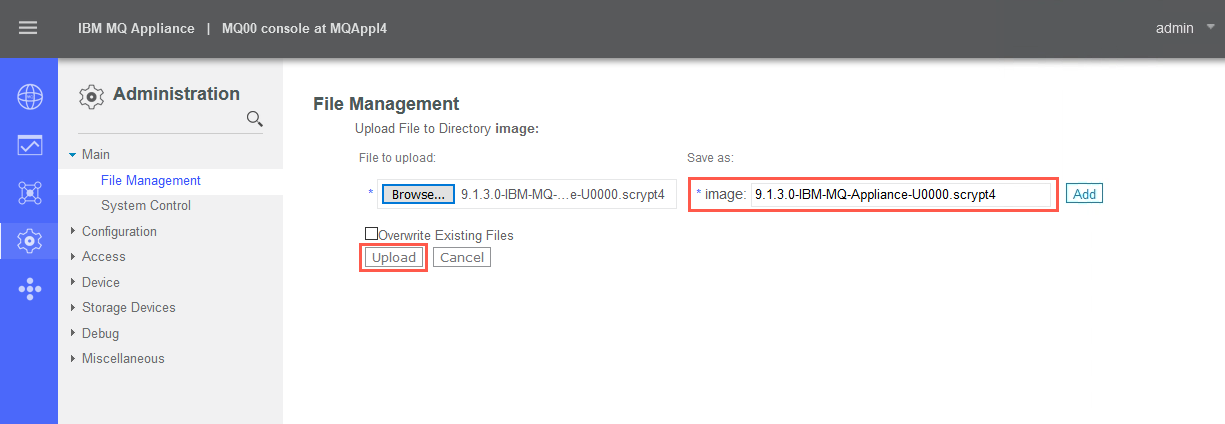
The file will be displayed in the dialog as the file to upload and as the file name to save in image:. We do not need to rename the file. Click Upload.
-
The browser tab will show that the browser is busy, showing the spinning circle to the left of the tab name. Wait for the upload to complete.
When the upload completes, the display will show a status message stating the upload was successful. Click Continue.
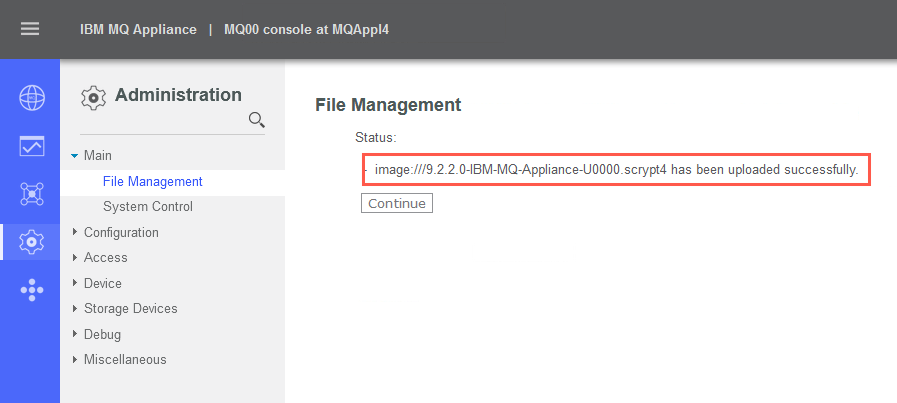
-
You will notice that the File Management tool now shows a
 (+ sign) next to the image: folder, signifying that the folder has some content.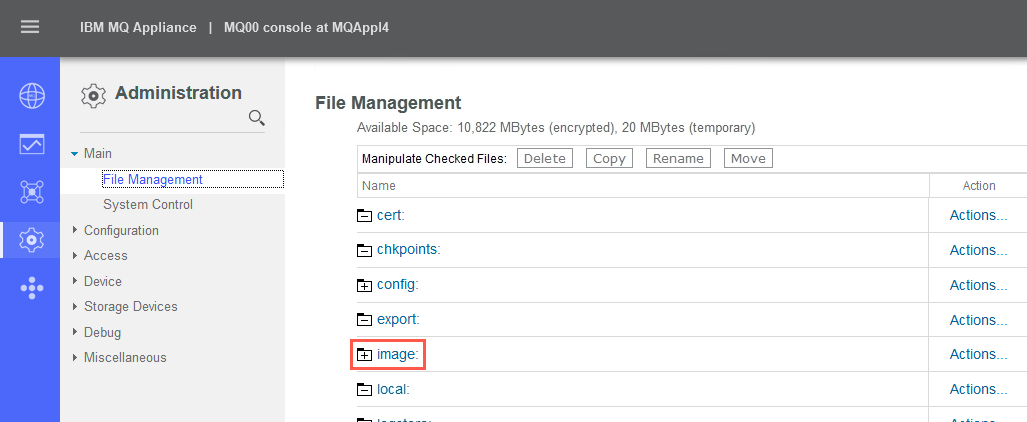
-
Click on image: and you will see the .scrypt4 file in the folder.
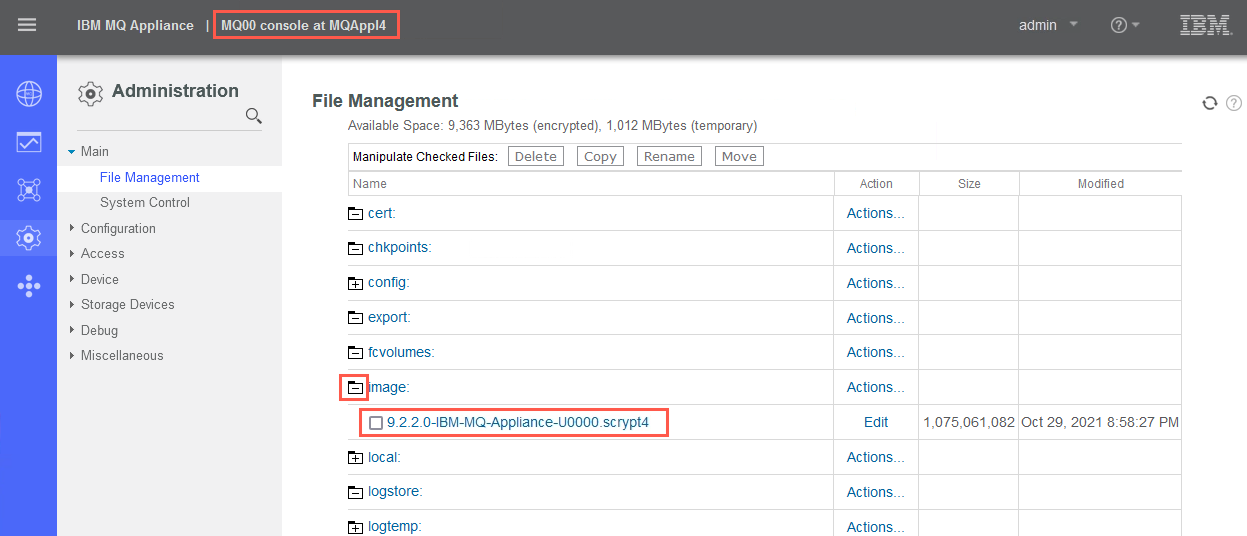
-
You are now ready to update the firmware file. This could be done at any time, now that you have the firmware file stored on the MQ Appliance.
Return to the MQAppl4 appliance command line. If you are still in Global configuration mode, type exit.
-
Ensure that all the queue managers are stopped.
Enter the followig commands:
mqcli

dspmq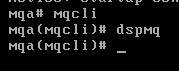
The dspmq command should not return anything since there should be no queue managers currently defined on the appliance.
-
Enter exit to exit the mqcli shell.
-
Get the current firmware version of the appliance by entering one of the following commands:
show firmwareor
show firmware-versionor
show version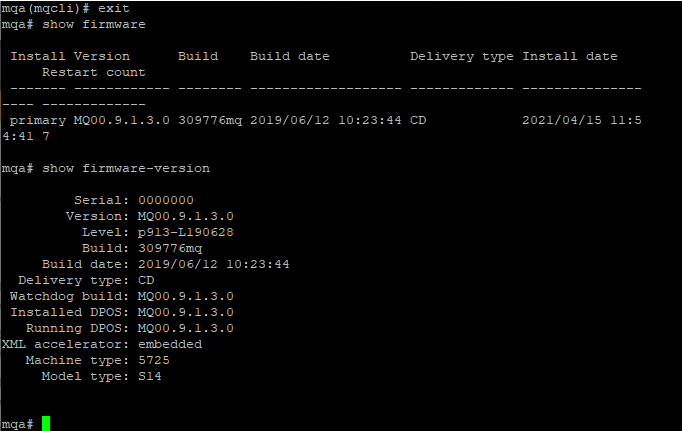
-
Type config to enter configuration mode.
-
Type flash to enter the correct mode for the firmware upgrade.

-
Restart the appliance with the new image by typing the following command:
boot image accept-license firmware_file
where firmware_file is the name of the file that contains the new firmware image. For this lab the command will be:
boot image accept-license 9.2.2.0-IBM-MQ-Appliance-U0000.scrypt4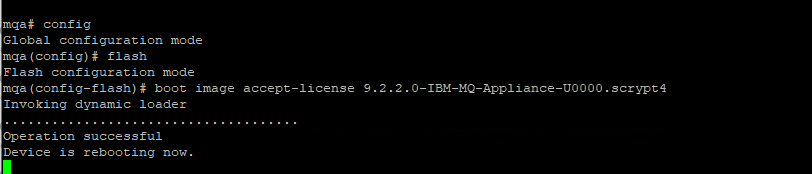
-
The appliance will then restart and the new firmware will be loaded.
Be patient. This will take a few minutes and the appliance will reboot. Wait for the Login: prompt to come back, then log in as before using the login admin and password passw0rd.
-
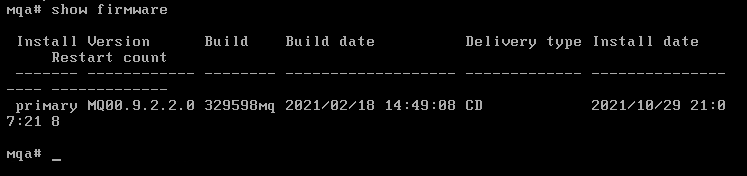
After you are logged in, verify that the firmware image is upgraded by entering the following command:
show firmwarewhich shows the following results. You should see a version of 9.2.2.0 and a ‘build date’ of 2019-06-12.
Or use one of the following commands, which show more information.
show versionor
show firmware-version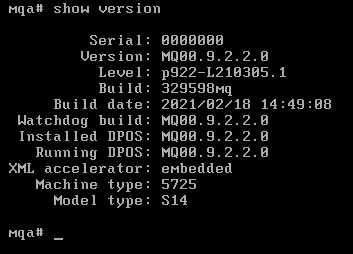 Note:
Note:
The device must be attached to the network to do a firmware upgrade. The upgrade image is downloaded from IBM Fix Central on a separate computer and then copied to the appliance using the appliance command line interface or File Management tool.
Queue manager backup and restore
IBM MQ includes commands to provide an easy way to back up and restore a queue manger. You connect to the MQ Appliance by using the command line to use the mqbackup command, and save the queue manager to a file. The queue manager configuration is saved, together with log files and queue data.
Before you do the first backup of a queue manager on an appliance, you must create the target directory for backup files, and allocate storage for it in the appliance RAID volume.
A backup of a high availability (HA) queue manager does not contain any HA configuration data, so if you restore the queue manager from a backup file, it is restored as a stand-alone queue manager. Similarly, disaster recovery (DR) configuration data is not preserved when you back up a DR queue manager. You can redo this configuration after restore.
You can back up a queue manager while it is running, but this requires sufficient unallocated space on the disk to contain a temporary snapshot of the queue manager. This space is not required if the queue manager is stopped before the backup is taken. If you are backing up so that you can use an archive file to migrate the queue manager, or if you want to be able to restore a queue manager to the state it was in at a particular time, then you should stop the queue manager before you back it up.
If the queue manager is running when you run the mqbackup command, a warning message is displayed. If a queue manager is stopped before you take a backup, it is locked during the backup and cannot be started, deleted or otherwise changed while the backup is running.
Performing a queue manager backup
-
Go to the command line interface of your IBM MQ Appliance – MQAppl4.
-
Enter mqcli to go to the MQ shell.
-
Create a queue manager to test with. Issue the following command:
crtmqm -p 1418 -u SYSTEM.DEAD.LETTER.QUEUE -fs 1 QM4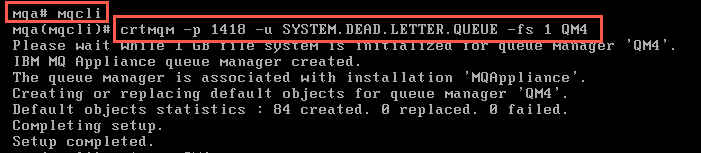
-
Start the queue manager:
strmqm QM4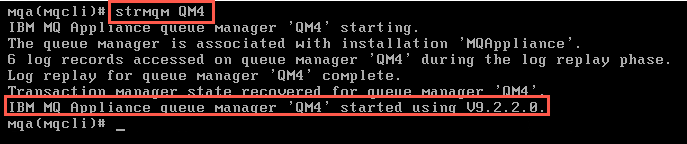
-
Return to the Windows image. Refresh the browser to reconnect to the appliance (after the appliance reboot) and login.
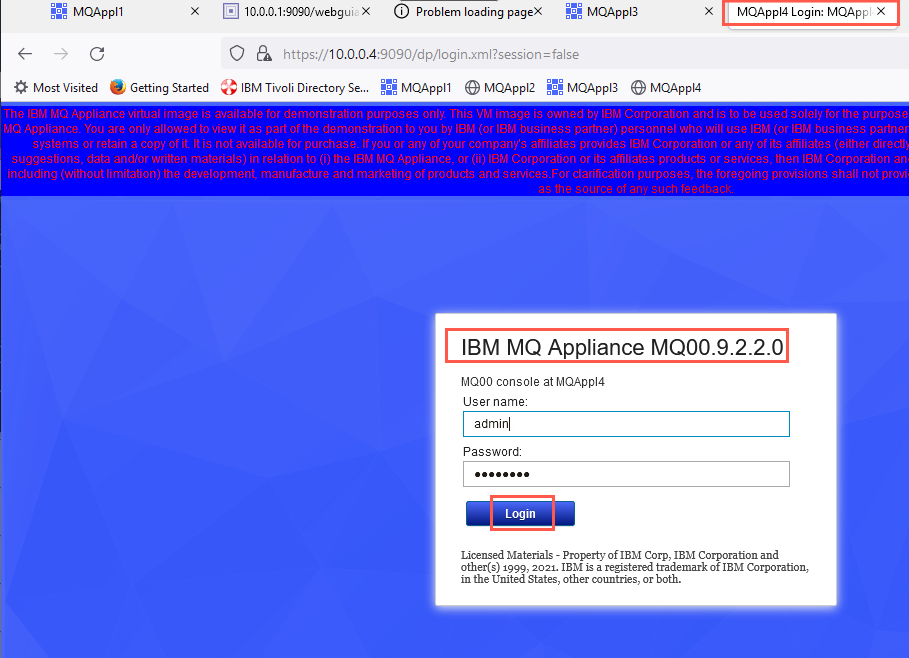
If you receive an information box concerning the upgrade from the V9.1.3 version of the MQ Console configuration to the current version, you may click on the X at the far right of the box to dismiss the message.
If the browser connects and the MQ Console has constant spinning wheel, attempt the following to correct this issue.
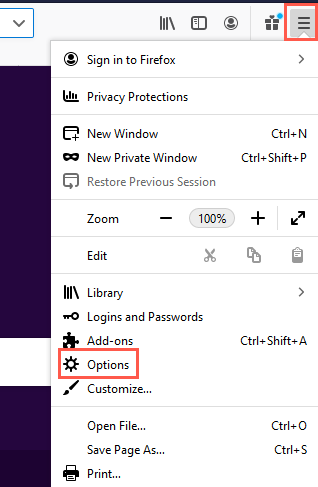
a. Select the hamburger menu, then click New Private Window.
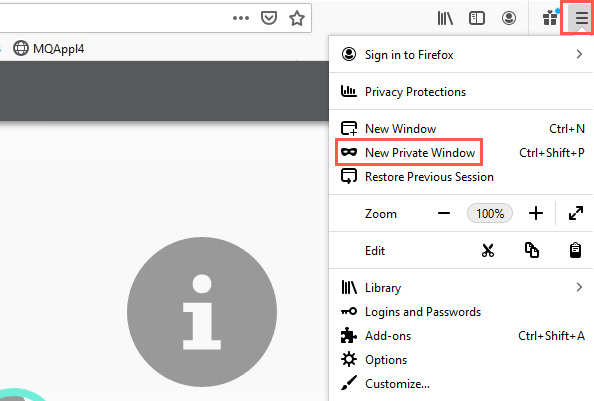
b. Select the hamburger menu, then select Options.
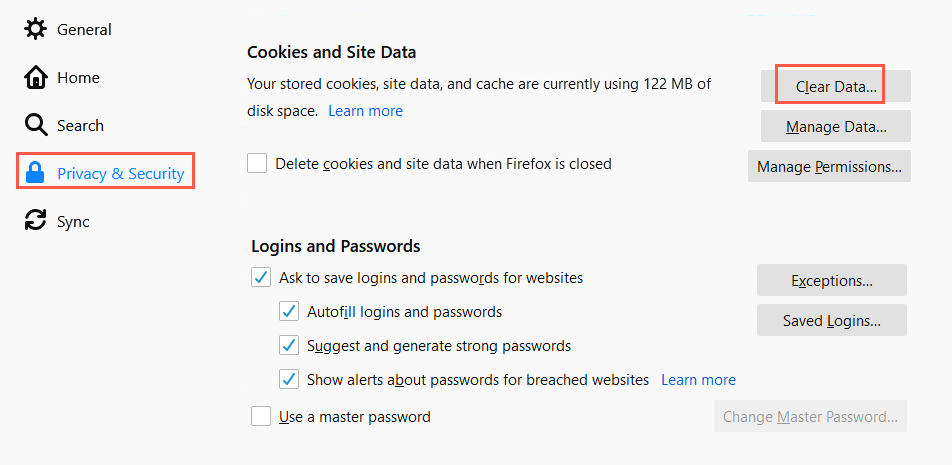
c. Select Privacy & Security then click Clear Data.
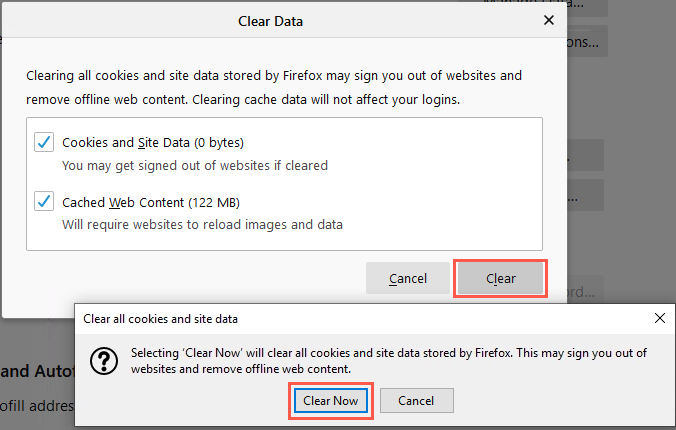
d. Click Clear.
-
You should have the Manage home page visible with the one queue manager shown as running.
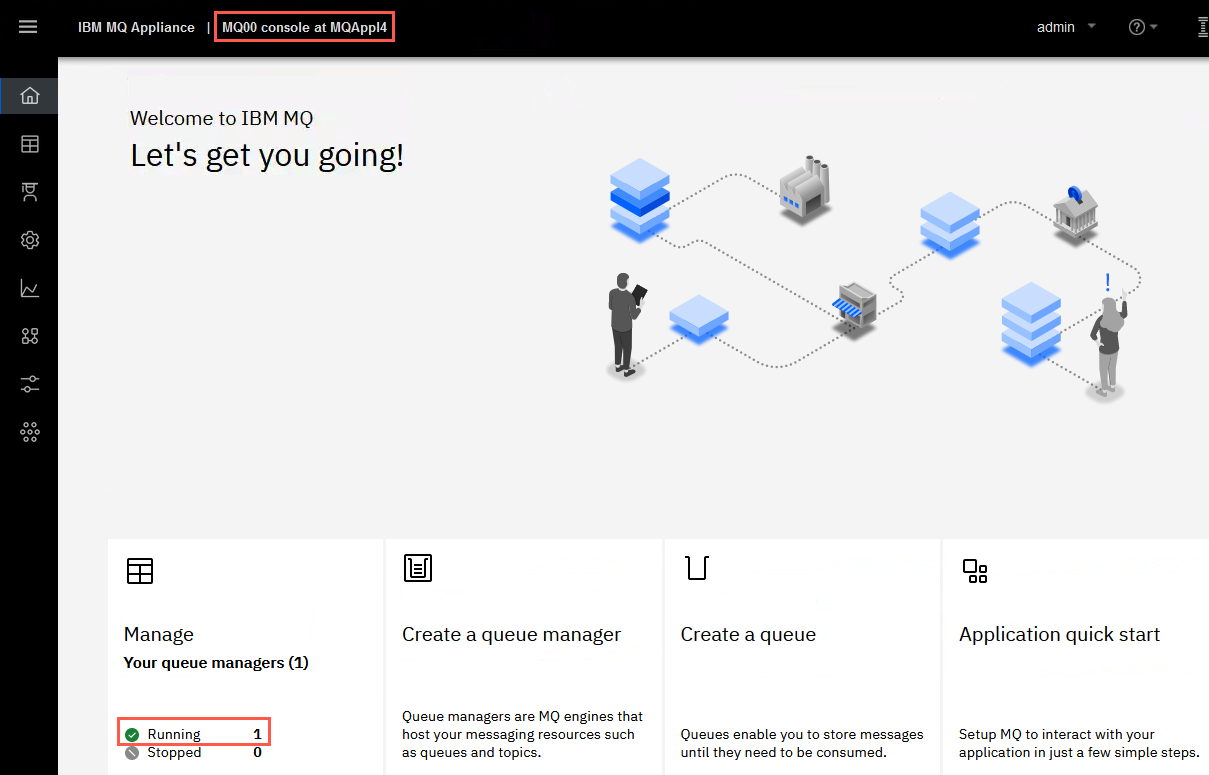
Click the Manage square.
-
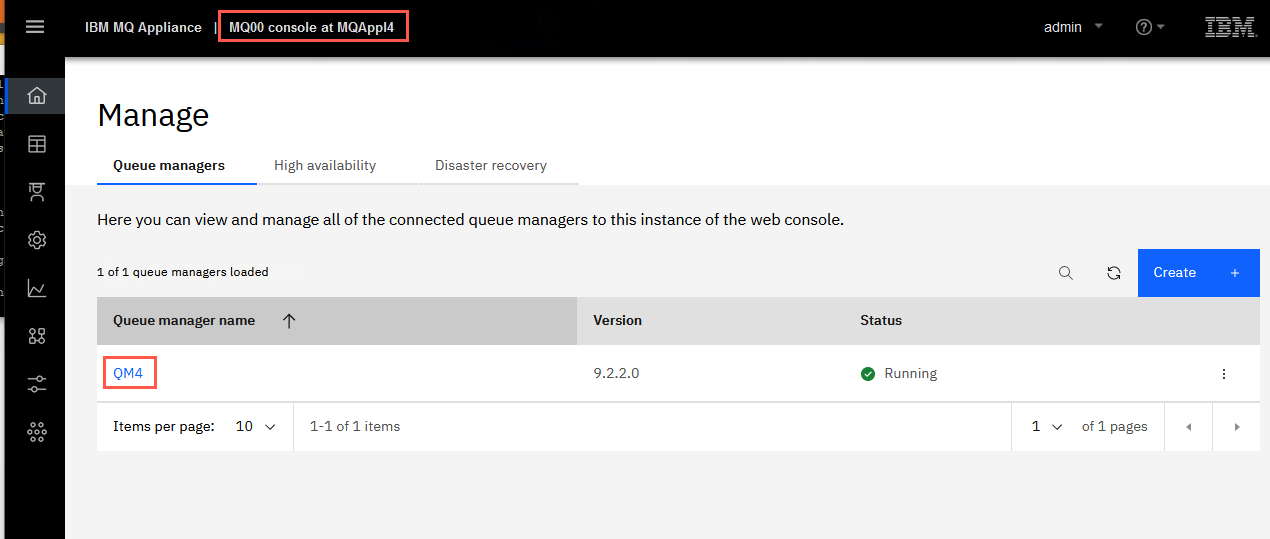
The QM4 queue manager should be selected as the Queue Manager already. Click the hyperlink for QM4.
-
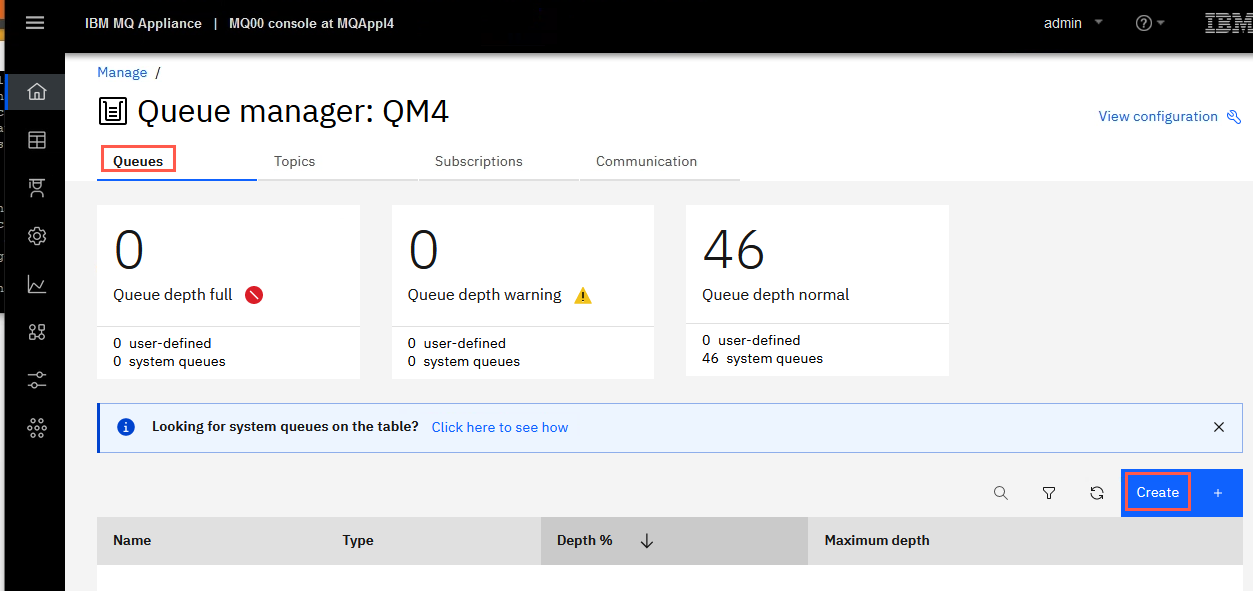
You are taken to the Manage > Queues page. There are no application queues defined. Click the Create button to create a queue.
-
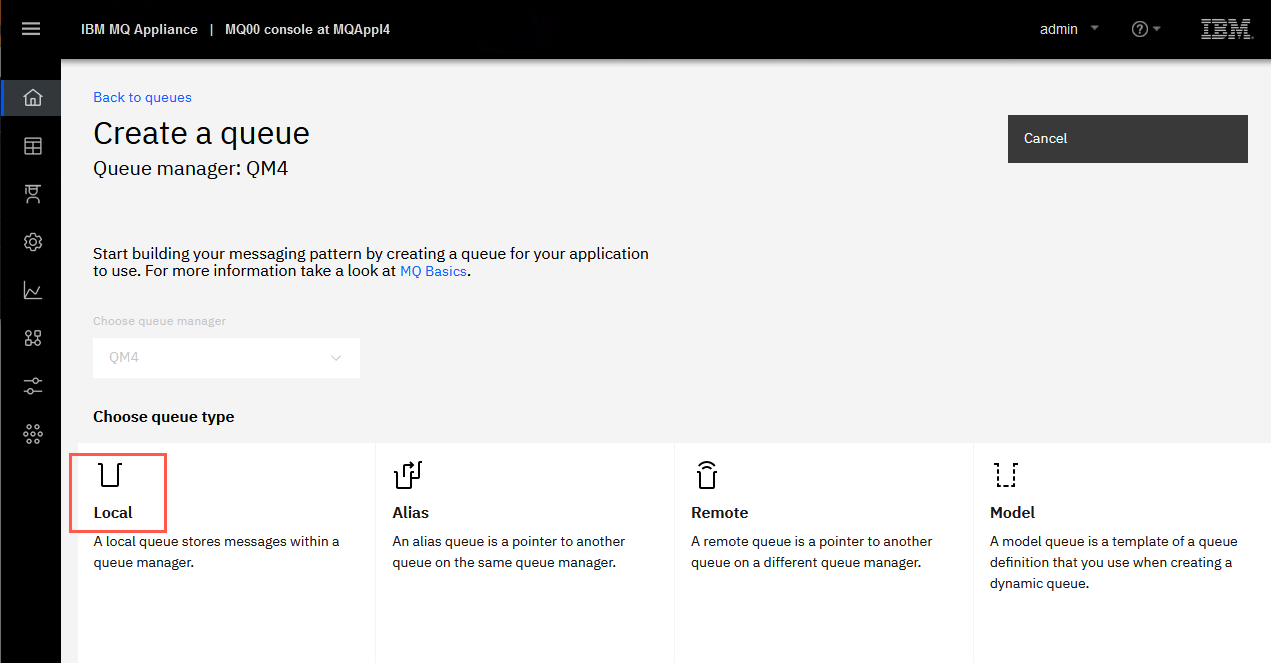
Click the Local block.
-
Enter MYQUEUE as the Queue name, ensure the Object type is Local, and click Create.
-
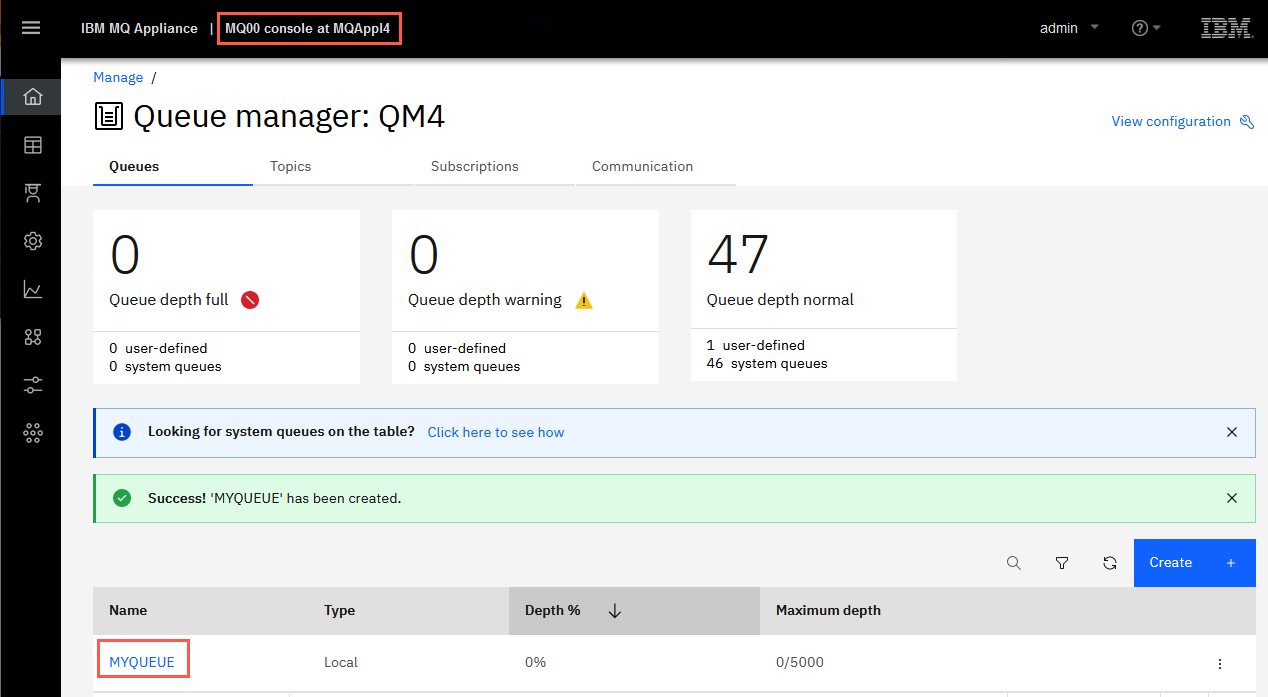
MYQUEUE should now be visible on the page.
-
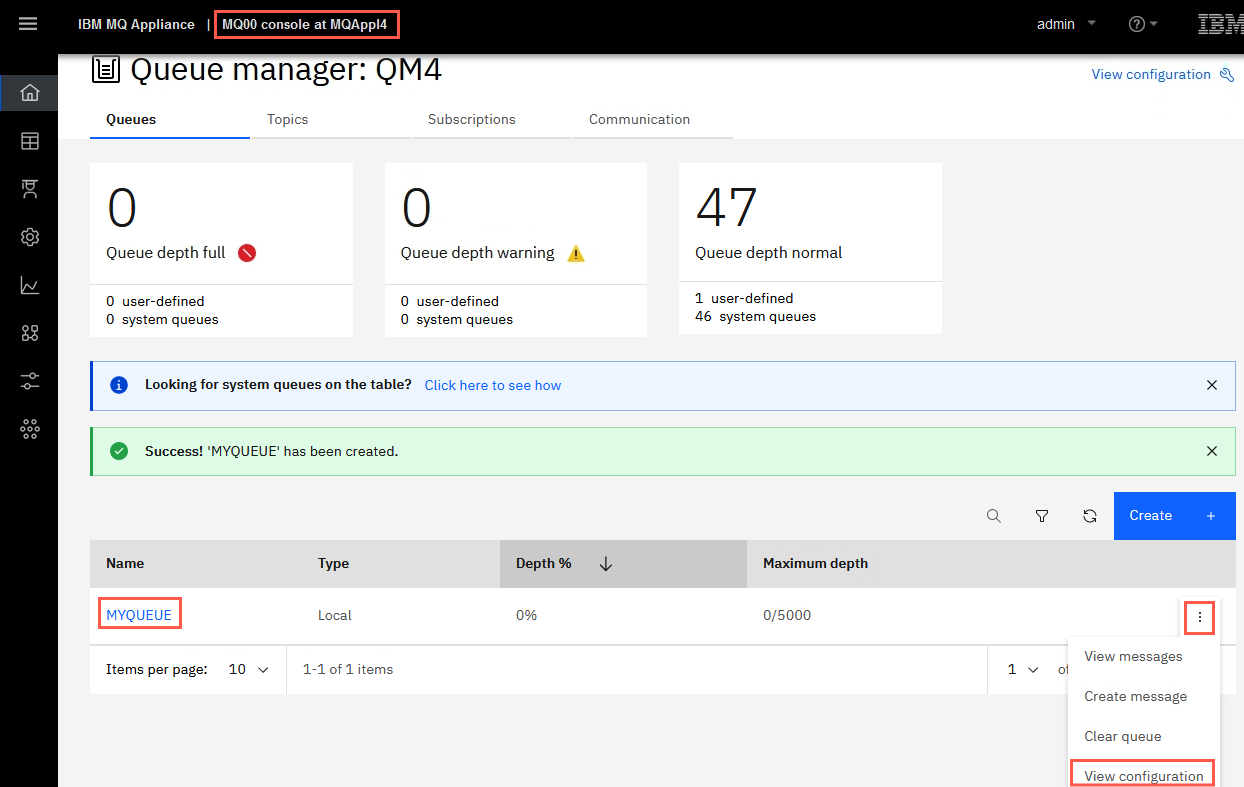
Click the elipsis for MYQUEUE then click View configuration.
-
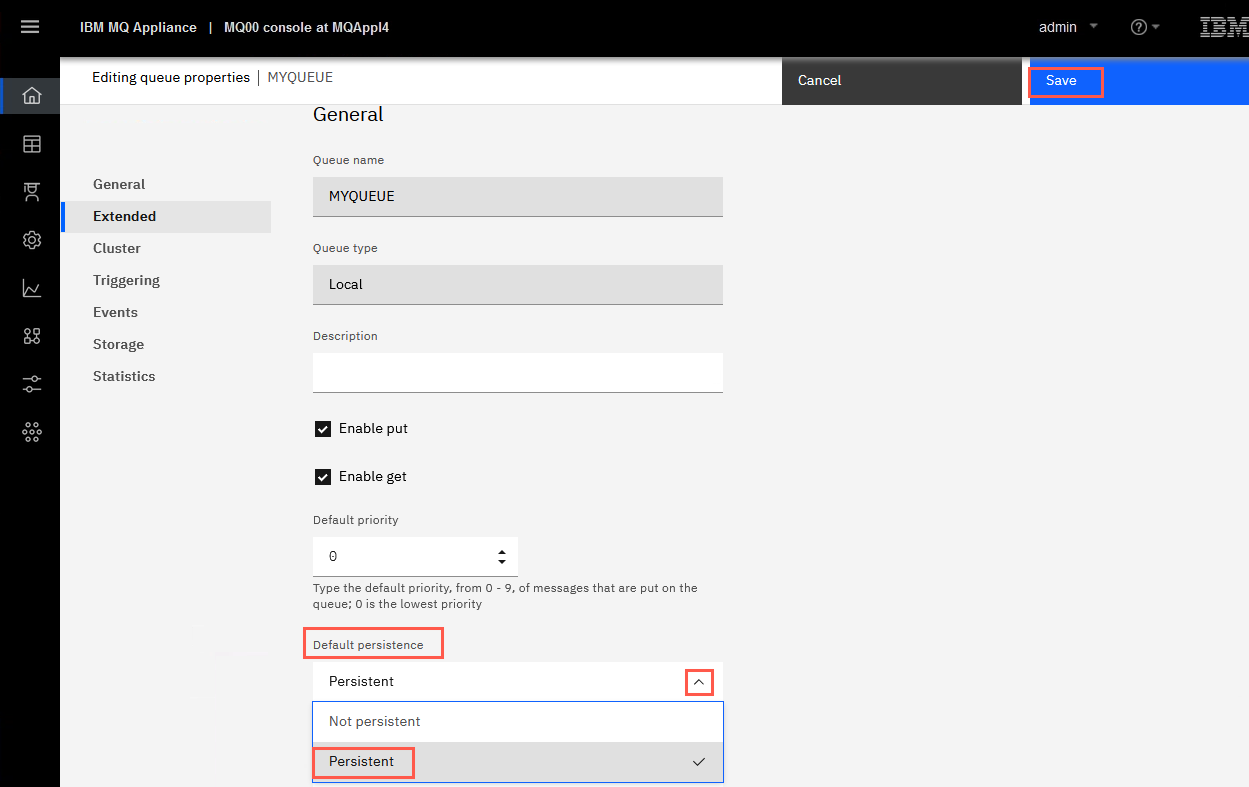
Click Edit. Use the dropbox to set the Default persistence to Persistent. Click Save.
-
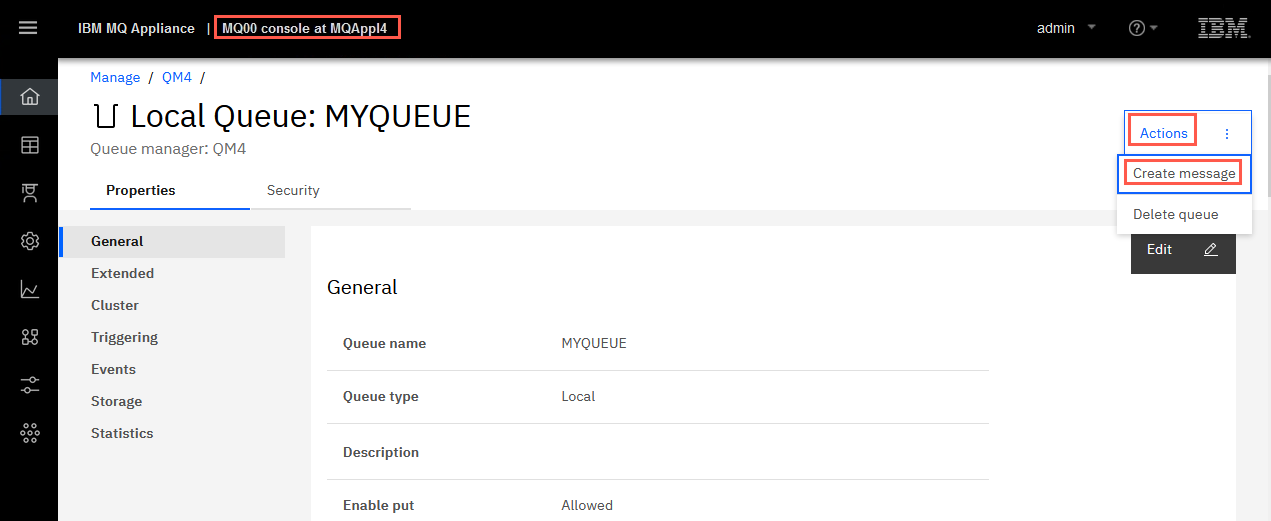
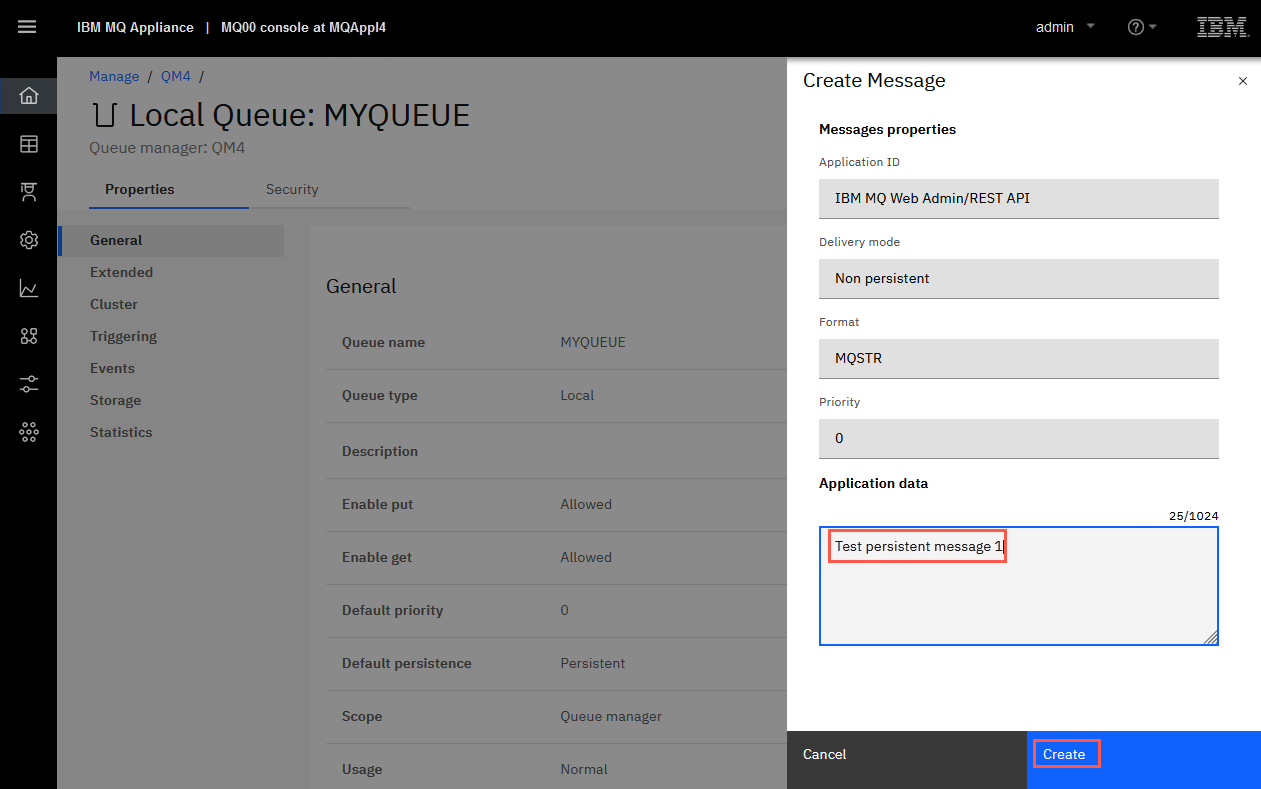
When you return to the properties page, click Actions > Create message.
-
Enter a message (e.g. Test persistent message 1) in the Application Data field and click Create.
-
Click the ‘x’ to remove the success message. Repeat the previous step two times, so you have three messages on the queue.
-
Click the breadcrumb QM4. The MYQUEUE queue should now have a Queue depth of 3.
Now that we have a queue manager with some objects and queue data, proceed with the backup of it.
-
Switch back to the command line for MQAppl4.
-
Since this is the first time you have backed up any queue manager on this appliance, type the following command to allocate storage for your backup:
createbackupfs -s 2where “-s” is the size of the space that is allocated in GB (you can use the “m” modifier to signify a size in megabytes if desired).

-
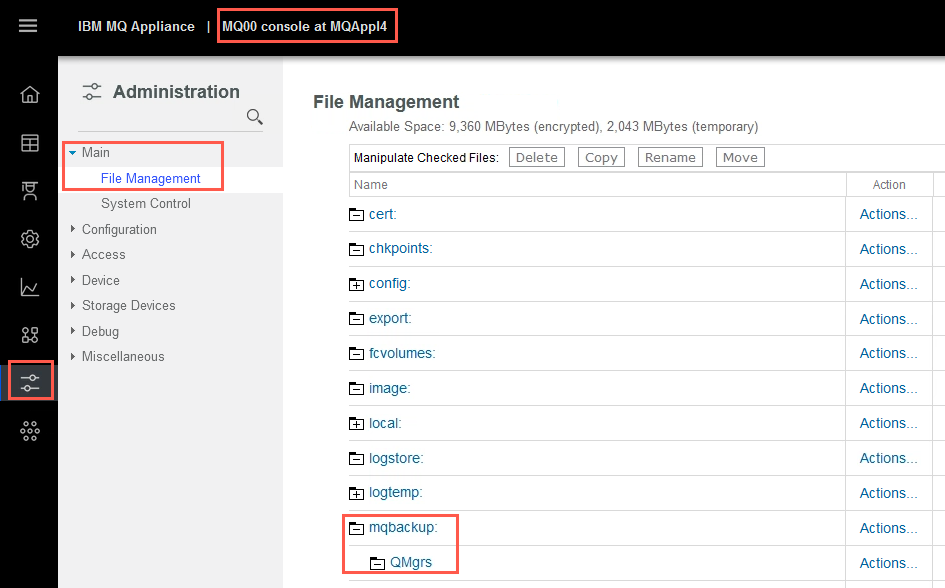
In the browser tab for MQAppl4 > Administration > File management you will see a new directory that is named mqbackup:///QMgrs has been created and allocated that storage.
-
Now that we have a queue manager with some objects and queue data, as well as space allocated, let us proceed with the backup of it. Enter the following command:
mqbackup -m QM4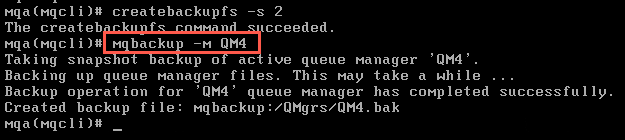
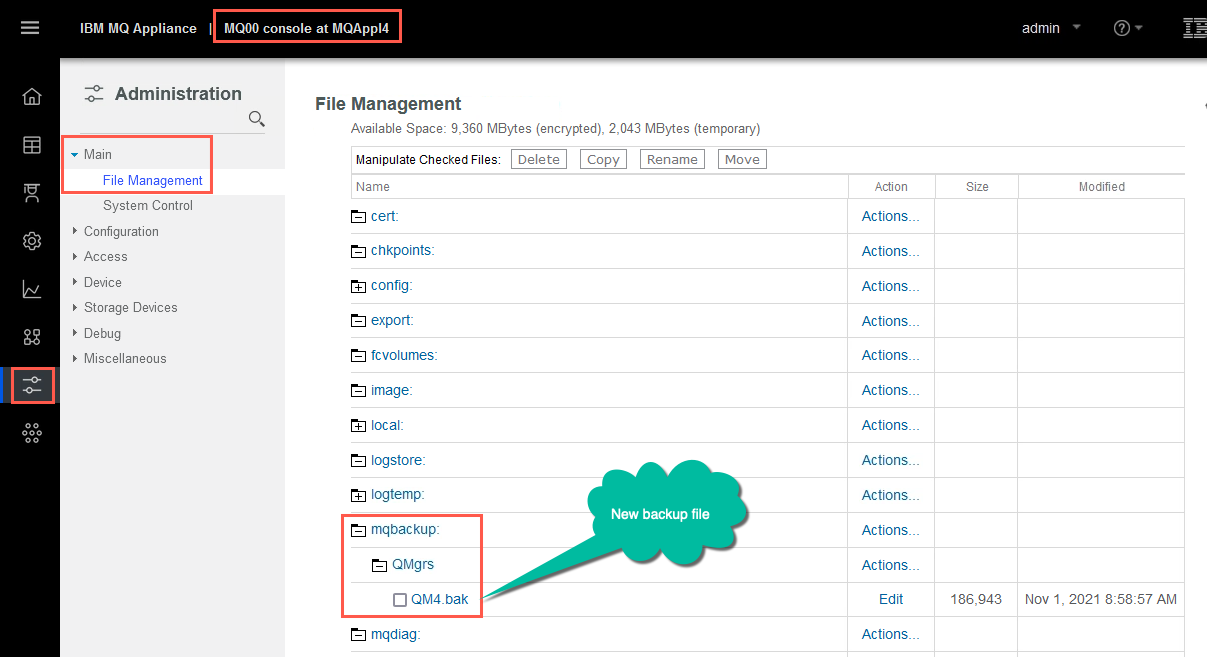
A backup file named QM4.bak is created and stored in the mqbackup:///QMgrs URI.
 Note:
Note:
The backup can take some time to|run, during which period you cannot use the CLI. By default, the archive file is named QM_name.bak, but you can add the -o outfilename argument to the mqbackup command to specify a file name, if required.You can of course copy the .bak backup file off the appliance, and copy it back on the appliance when needed.
Restoring a queue manager from a backup file
You use the mqrestore command to restore a queue manager, including all its log files and data, from a previously taken backup. The command cannot run if there is already a queue manager with the same name on the appliance. The archive file must be located in the backupfs location, mqbackup:///QMgrs.
You can only restore one queue manager at a time.
-
The queue manager must be stopped before it is deleted. From the mqcli command line, enter:
endmqm QM4 -
Wait a minute to ensure the queue manager ends, then enter:
dltmqm QM4
If you receive a message of “IBM MQ Appliance queue manager ‘QM4’ ending.”, then wait some more then try the dltmqm command again.
-
Now to restore the queue manager, enter the following:
mqrestore -f QM4.bak
The restore should complete successfully.
Note:
With a real world queue manager with larger logs and queues, the restoration might take some time, during which time the CLI is not available. -
Start the queue manager.
strmqm QM4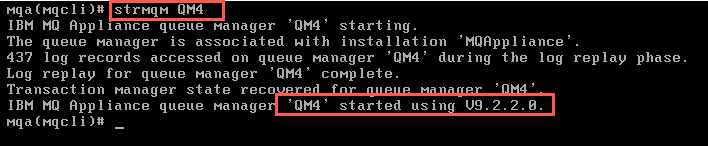
-
Return to the Windows image and the browser. In Manage > Queue managers, refresh the browser if necessary. QM4 should be shown as running in the Queue managers window.
-
Click the hyperlink for QM4. MYQUEUE with a queue depth of 3/5000 should be seen in the Queues on QM4.
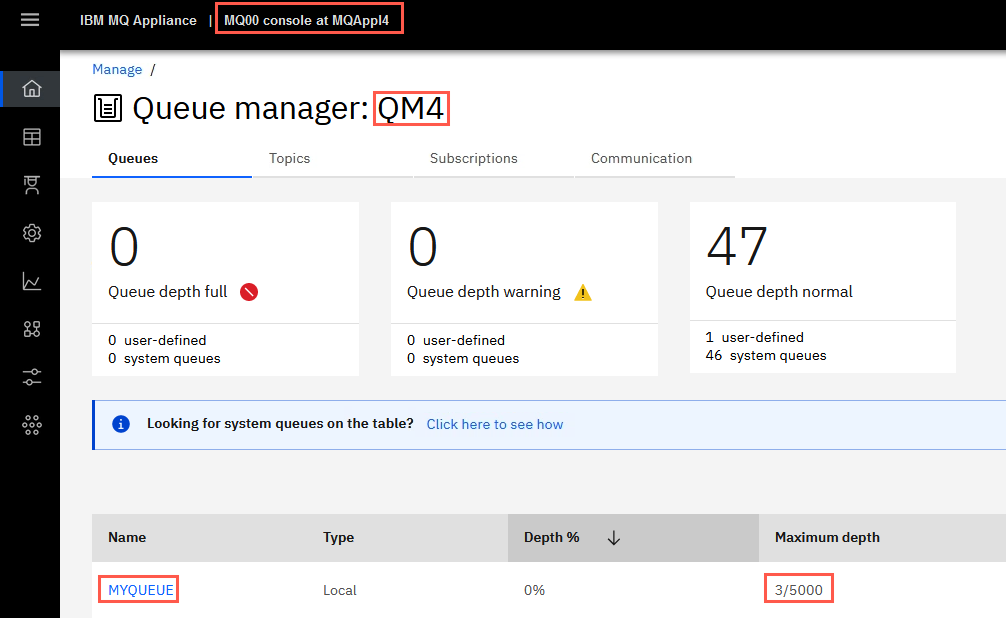
-
Click the elipsis for MYQUEUE and select View messages to browse the messages.
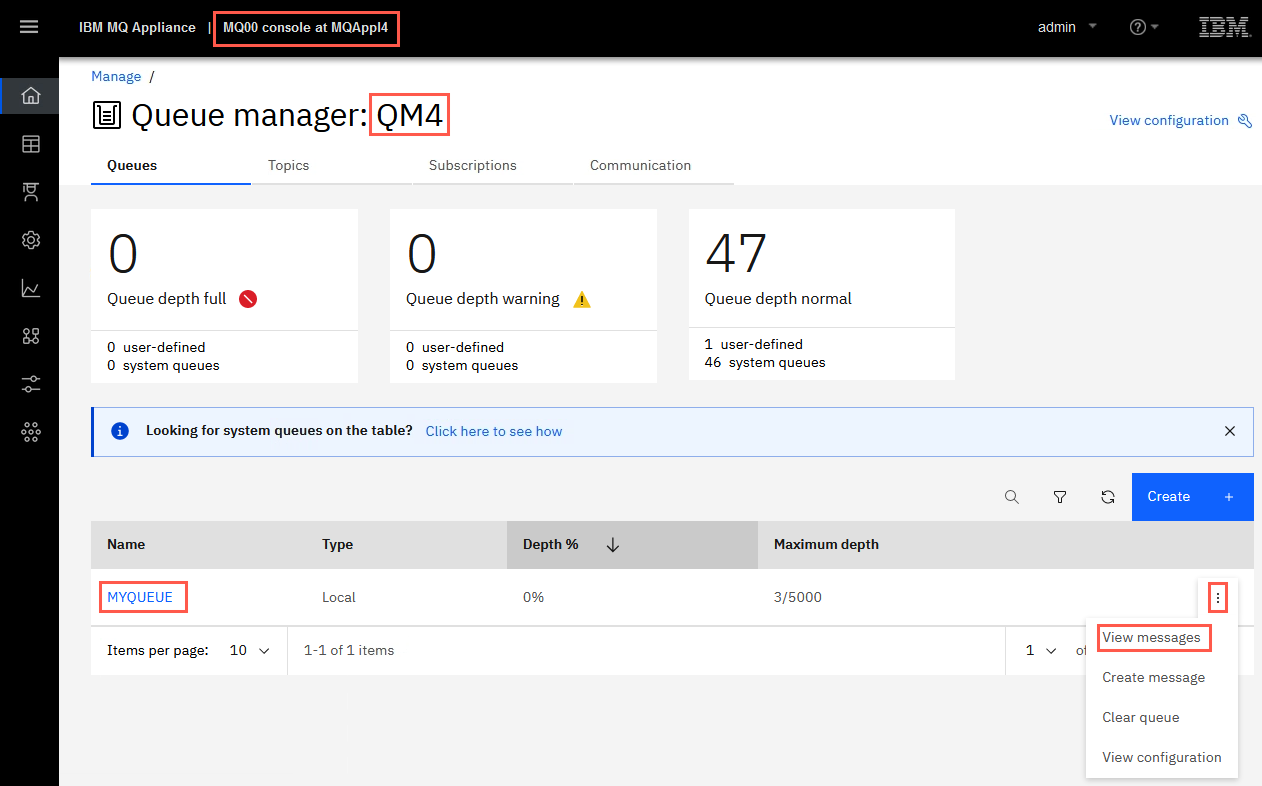
-
The messages should look familiar. Check the timestamp to prove these are the messages you put on the queue before you deleted the queue manager.
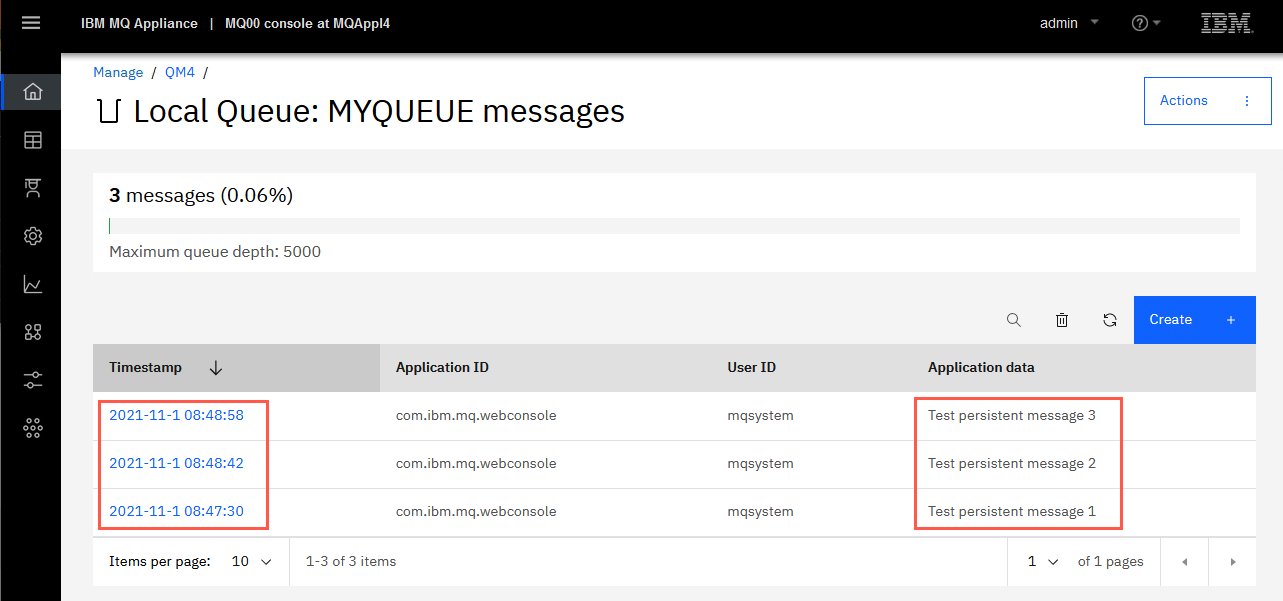
-
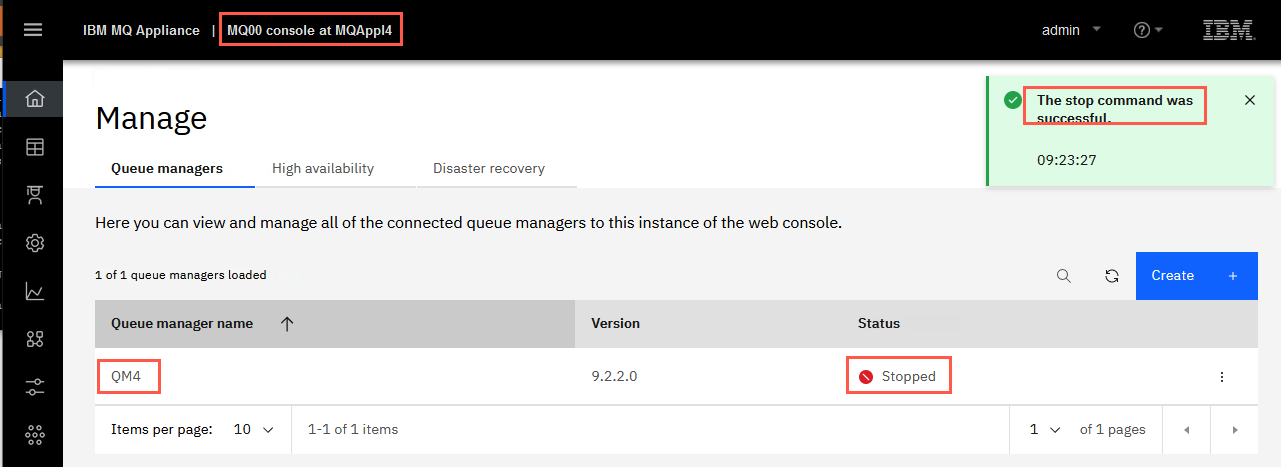
To prepare for the next step, stop the QM4 queue manager. Click the Manage breadcrumb. Click the elipsis for QM4 on the Queue Managers page, and select Stop.
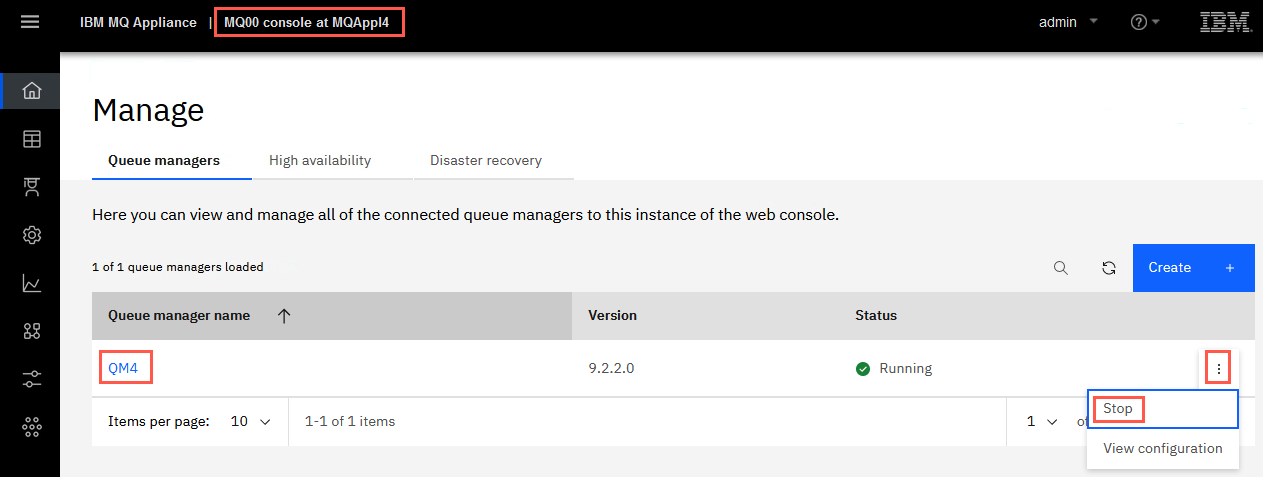
-
The status will change to Stopping, then Stopped and you receive the green success pop-up.
Reverting to the previous level of firmware and restoring configuration
You will now revert the appliance back to the previous, V9.1.3.0 level of the firmware, and restore the configuration of the appliance.
Reverting to the previous level of firmware
When you upgrade the IBM MQ Appliance firmware by using the boot image command, the appliance retains current configuration data. This feature is used to restore the appliance to a known, stable state if required.
-
The previous firmware image and associated configuration data is the secondary installation.
-
The newly installed firmware image and associated configuration data is the primary installation.
When you switch between firmware images, the switch can take some time. During this switch operation, do not power off or restart the appliance.
-
You should still be on the command line of the MQ Appliance. If not, log in to the appliance as an administrator.
-
Ensure that all queue managers are stopped.
-
Type exit if necessary to exit mqcli mode.
-
Type config to enter configuration mode.
-
Type flash to enter the correct mode for firmware rollback.
-
Restart the appliance with the original image by typing the following command:
boot switch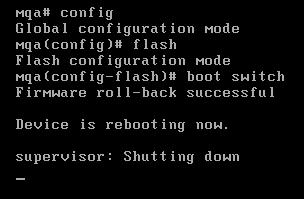
-
Wait for the appliance to reboot, and then login.
-
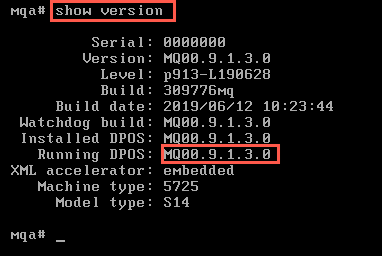
Enter show version to check the firmware level. Notice the return to the previous V9.1.3.0 level.
Restore the IBM MQ Appliance configuration
You can restore the configuration of an IBM MQ Appliance to the same or to a different appliance.
If you are restoring to the same appliance, it will have the same IP address and the same name. The first steps are the same as initially configuring the appliance when you first installed it.
If you are restoring to a different appliance, it must be running the same firmware level.
Copy a previously saved autoconfig.cfg file to the target IBM MQ Appliance and then restart the appliance.
-
Return to the Windows image. Refresh the browser if necessary, and then login as admin. You will need to login in again since the appliance rebooted.
-
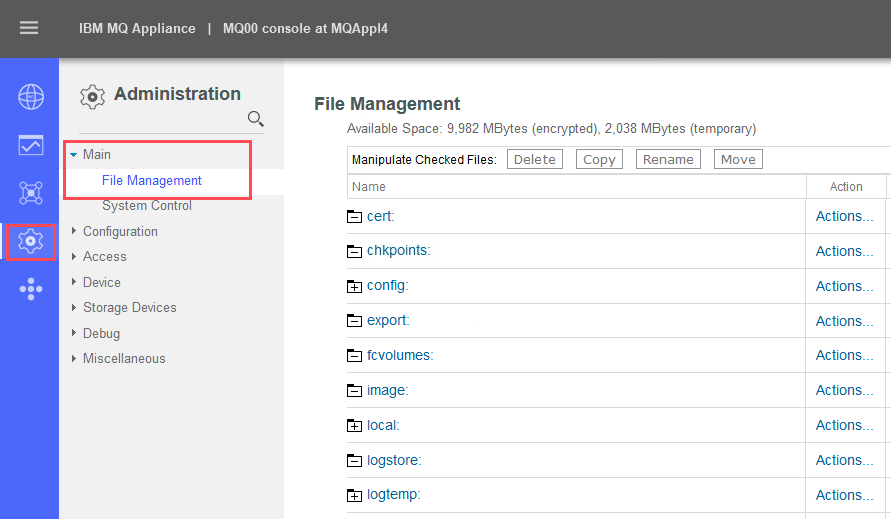
Click on File Management.
-
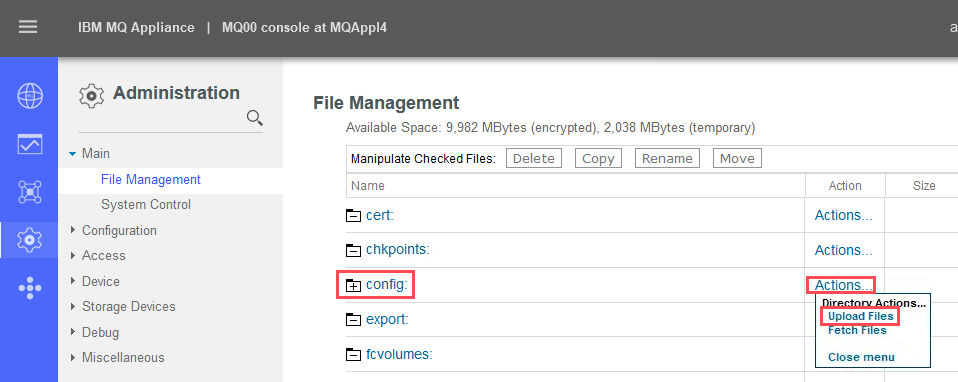
Click on the Actions… link to the right of the config: folder. On the popup menu, click Upload Files.
-
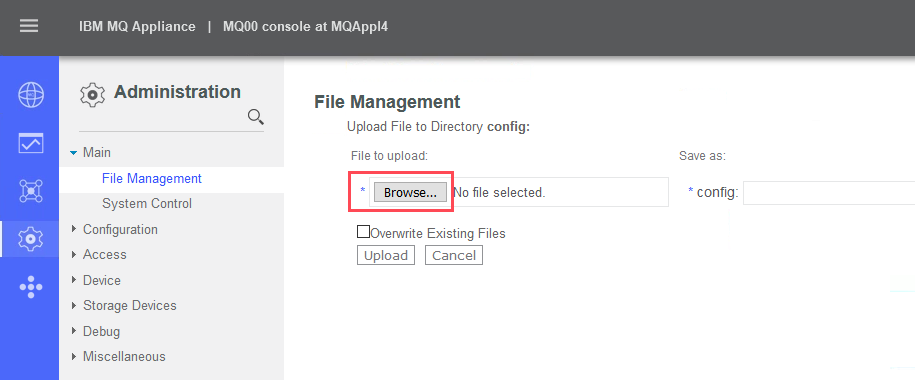
Click Browse.
-
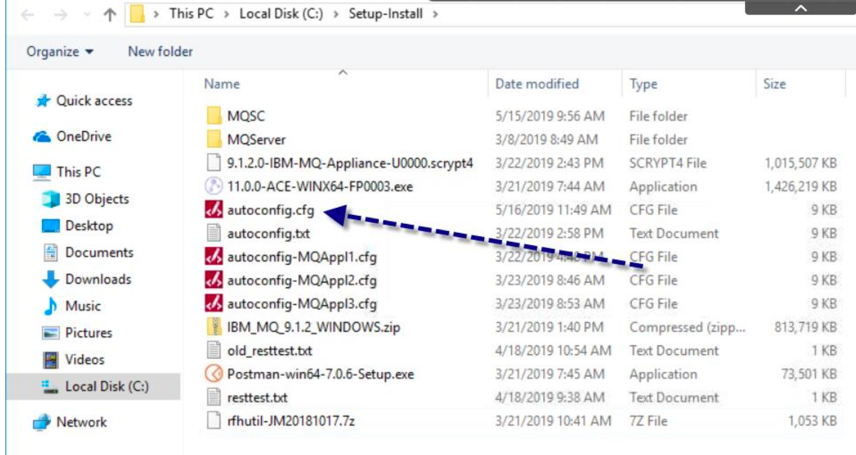
In the File Upload dialog, navigate to C:\Setup-Install and select the autoconfig.cfg file. Note the date modified to ensure this is the file you copied earlier. Click Open.
-
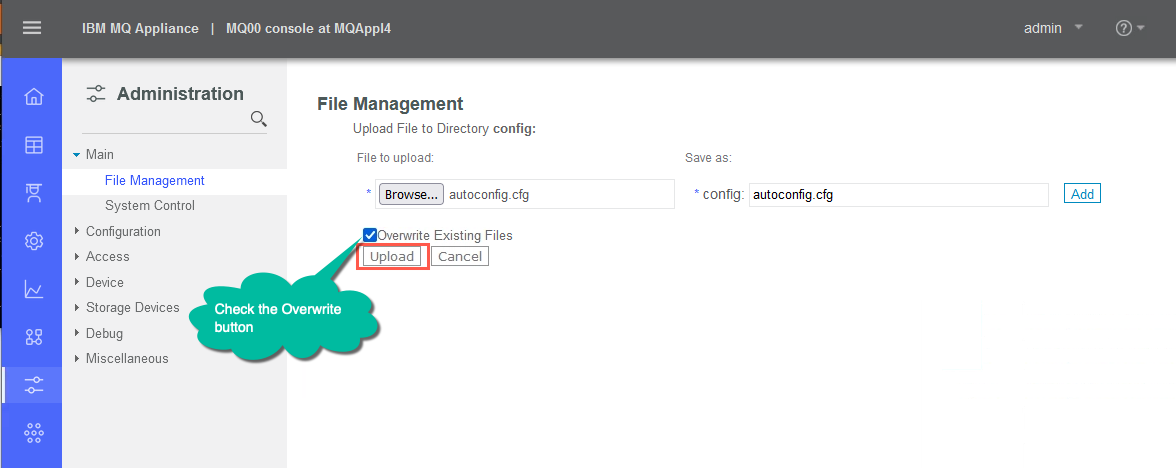
Note the autoconfig.cfg file as the name to upload and the name to save the file in the config: folder. Click the Overwrite Existing Files checkbox, and then click Upload.
-
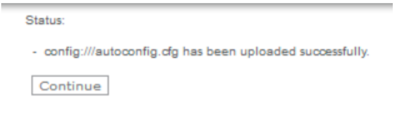
Note the Status confirmation, then click Continue.
-
Return to the MQAppl4 command line..
-
Shut down and restart the appliance by entering the following command:
shutdown reboot -
Answer y to the prompt for reboot.

You can move on to the next section and start reading, but you will have to wait for the reboot to complete before taking the next lab step.
Factory reset
A factory reset restores the IBM MQ Appliance to its default state. Be aware that a factory reset deletes all queue managers and messages that are hosted on the appliance. The reset forcibly ends all queue managers and detaches any applications that are connected to them. After the update, you require direct console access to reinitialize the system.
Performing factory reset
To do a factory reset on a physical appliance, you need to complete the following steps:
-
Connect the appliance to the network.
-
Connect a terminal to the appliance as shown below.
-
Connect cabling on the physical appliance:
-
Black is the terminal USB cable to a PC.
-
Red is the Ethernet port ETH10 connected to the network.
-
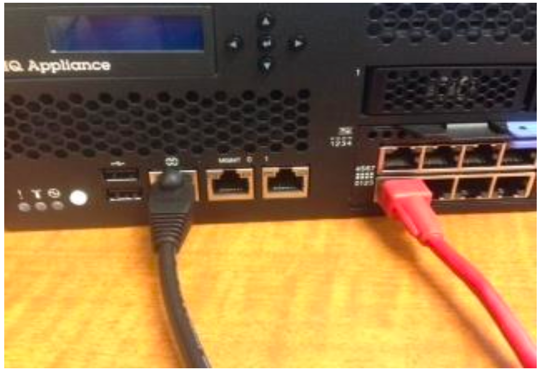
This example uses the RJ45 to USB cable and PuTTY for the terminal window. To do this you need a USB serial driver such as the one here: http://www.prolific.com.tw/US/ShowProduct.aspx?pcid=41
Because you are using a virtual appliance, you will simulate the above steps. You will still use PuTTY from the Windows machine and connect to eth0 – 10.0.0.4.
-
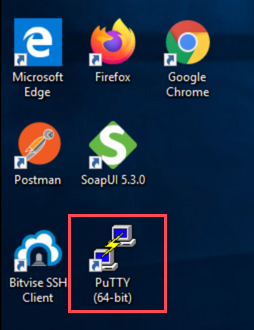
Double click the Putty icon on the desktop to open the configuration window.
-
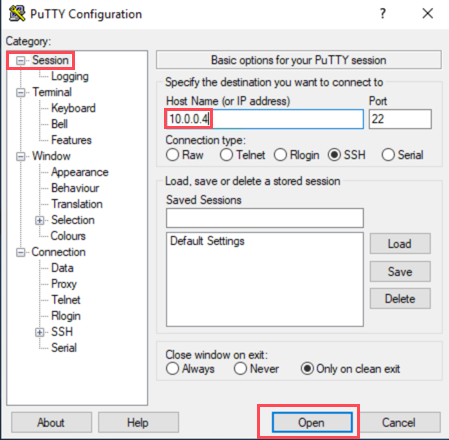
In the PuTTY window, click Session and enter 10.0.0.4 for the Host Name (or IP address). The port should already be set to 22. Click Open to start the session.
-
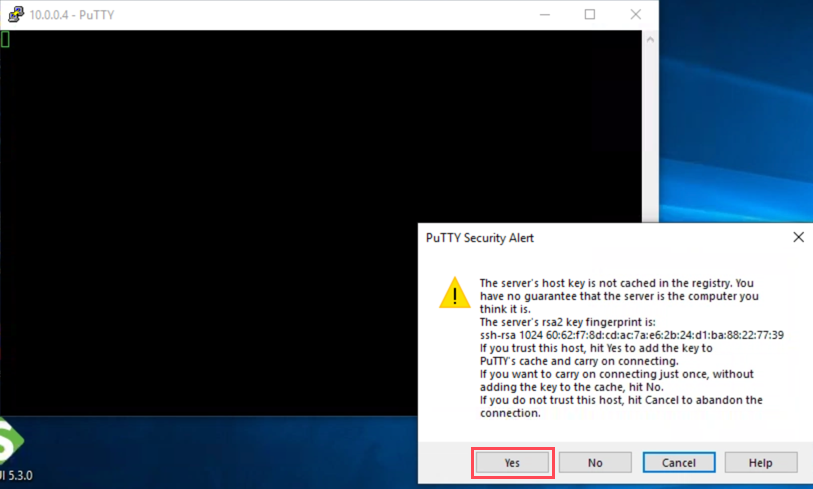
Reply Yes to allow any security alerts.
-
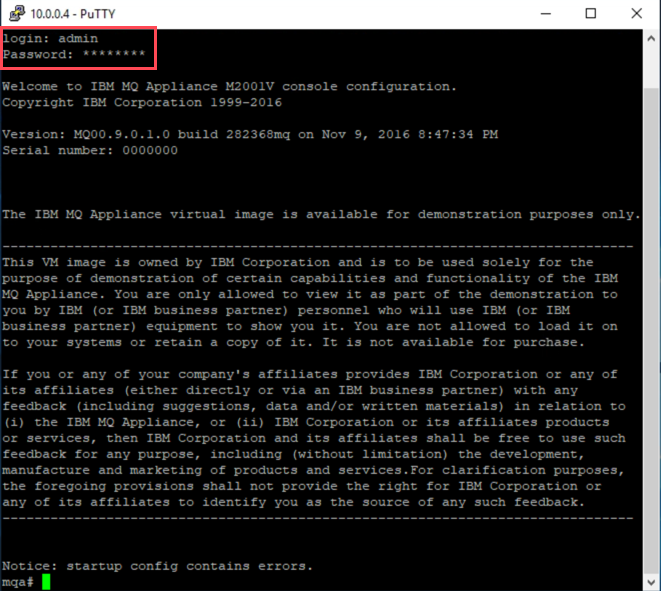
Hit Enter when you get the first login as prompt, then log in as the default administrator: use the login admin and password passw0rd.
-
Enter config mode by typing:
config -
Enter flash mode by typing:
flash -
Check the firmware version:
show firmware-version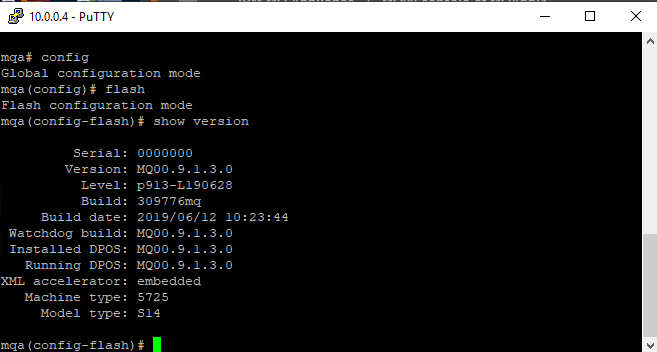
-
Verify the firmware image is in the image directory:
dir image: -
If the image directory is empty or the correct image is not present, go to IBM Fix Central and obtain the latest firmware release. The download has been done for you and is located in the directory C:\Setup-Install. The normal extension for the firmware is *.scrypt3. However for the virtual appliance, the firmware has the extension *.scrypt4.

We will use the 9.2.2.0-IBM-MQ-Appliance-U0000.scrypt4 file.
-
Refresh your Firefox browser to reconnect to the MQAppl4 appliance after the appliance reboot. Login as admin.
-
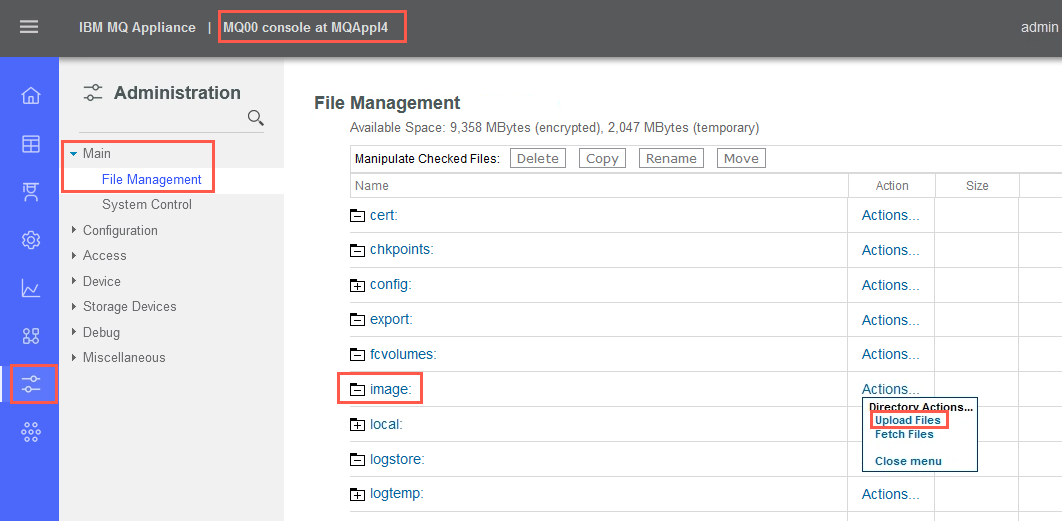
Click Administration > Main > File Management.
-
Click the Actions… link to the right of image:, then click Upload Files on the popup menu.
-
Click Browse.
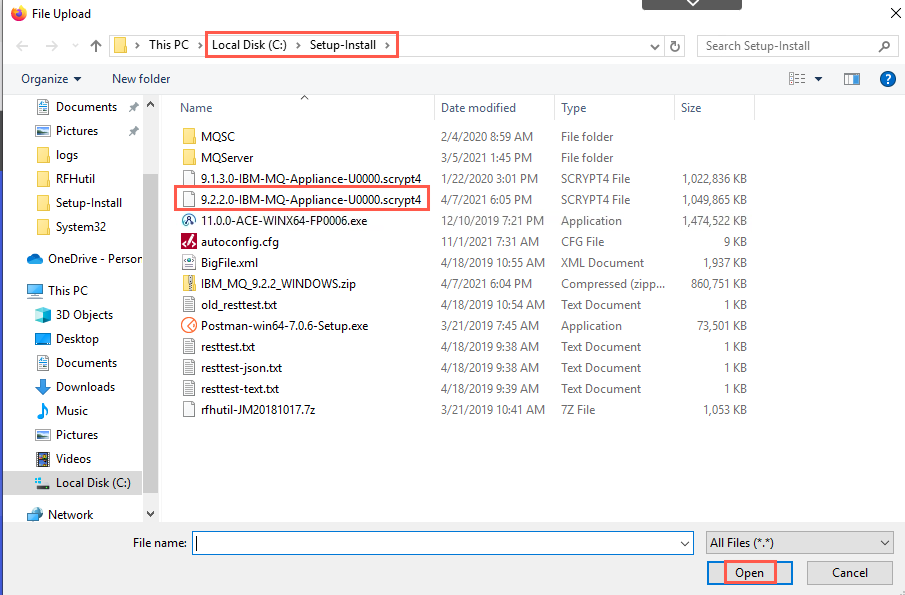
In the File Upload dialog, navigate to C:\Setup-Install directory.
Select 9.2.2.0-IBM-MQ-Appliance-U0000.scrypt4. Click Open.
-
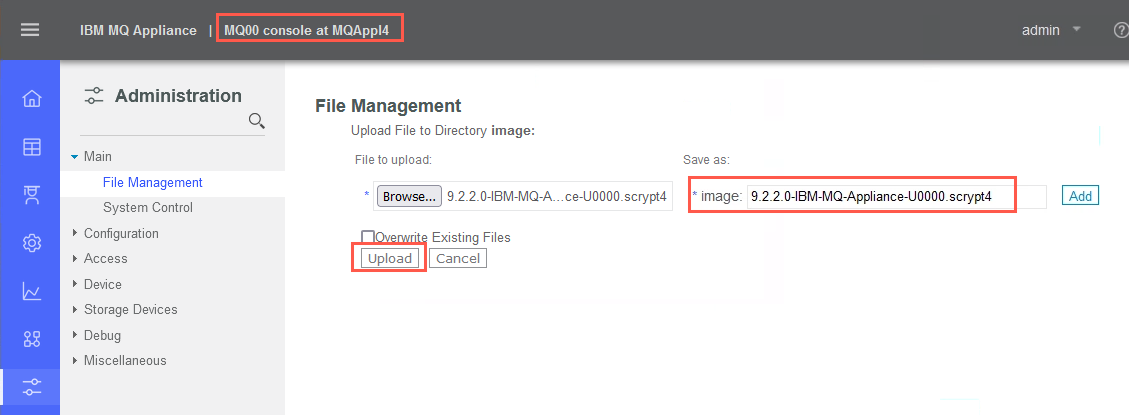
Click Upload.
-
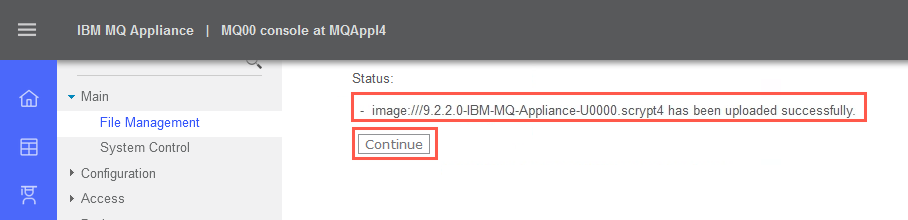
Wait for the upload to complete. It is complete when you receive the confirmation message. Click Continue.
-
Return to your PuTTY window.
-
In order to reinitialize the appliance, the file must be in the image: directory. Once the firmware file is copied into the image: directory, you can reinitialize the firmware.
Verify the firmware image is in the image directory:
dir image: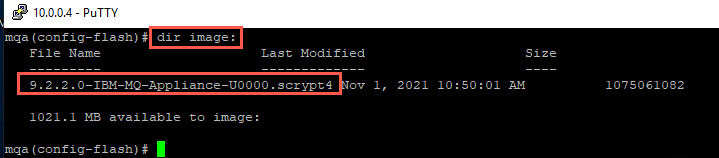
-
Type the following command:
reinitialize firmware_image_file`
For example:
reinitialize 9.2.2.0-IBM-MQ-Appliance-U0000.scrypt4 -
You will be prompted to verify that you want to reinitialize the device as this will wipe out everything. Enter y to confirm.
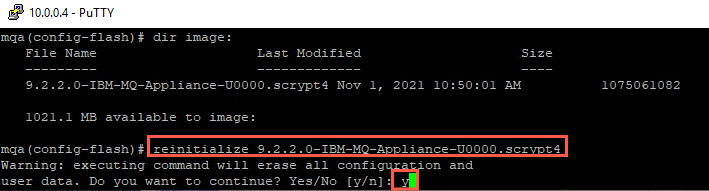
All queue managers will be stopped and deleted as will all services such as the Web GUI, HA clustering, and syslog.
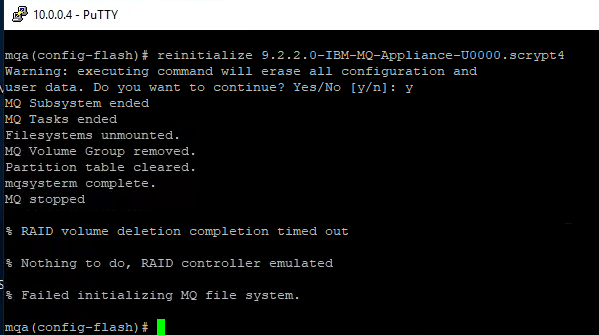 Note:
Note:
On the virtual appliance, the factory reset function is not a supported function; therefore, it does not complete the same as it would on a physical appliance. On the physical appliance, the factory reset will take a few minutes and then the appliance will reboot. The factory reset would then be complete. You would wait for the Login: prompt to reappear.
After reinitialization is complete, you must log in as admin, using the password admin, and follow the initial setup procedure described in initializing the appliance in the KnowledgeCenter (the steps you performed in Lab 1).
Note that after files are deleted, they cannot be recovered. If you might need any of these files after you reinitialize the appliance, ensure that you have copies of these files.
The network configuration is removed too, so you can no longer access the appliance through the former IP address. You can connect to the appliance only through a serial cable.
Summary
You have seen how to do a backup of the IBM MQ Appliance, including how to backup and restore a queue manager. You also have upgraded the MQ Appliance firmware from V9.1.3.0 to V9.2.2.0. You tested the factory reset option, loaded the latest firmware and restored the configuration from a backup.
- Shutdown the MQAppl4 image.
Congratulations, you have finished Lab 7 Service and Maintenance.