Lab 5 - IBM MQ Appliance Security
In this lab, we will explore the unique security aspects of the MQ Appliance compared to a standard IBM MQ installation. This lab assumes that you are familiar with basic IBM MQ security functions.
VMs required:
- Windows 10 x64
- MQAppl1
The following instructions assume you are using MQAppl1. Any VMs not in use should be suspended or shut down. These include the virtual appliances MQAppl2, MQAppl3, MQAppl4, MQAppl5, MQAppl6 and MQAppl7. The Windows image is used to:
-
Demonstrate SSL/TLS protection of channels between queue managers on separate platforms.
-
Perform console operations and testing of the queue managers used in this exercise.
-
Host an LDAP server to support configuration and testing of MQ’s support for using an LDAP repository for authentication and authorization functions.
Prerequisites
-
The Skytap environment has been created and both VM images have been started. NOTE: The starting point for this lab reflects the completion of Lab 1 – Getting Started with the MQ Appliance. You should have the lab guide for Lab 1 on hand in case you need to refer to steps that are referenced within this lab exercise.
-
Ensure that the clocks on both VM images are set to the current date and local time (required for SSL/TLS certificate generation and use.)
-
For the Windows VM image, the clock should be set automatically.
-
For the MQ Appliance VM image, you can verify the clock setting by logging on to the command line interface using the admin user ID and entering the show clock command.
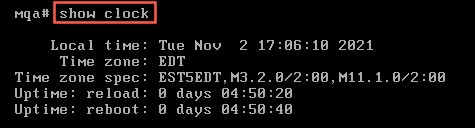
-
If necessary, set the clock by using the clock yyyy-mm-dd and clock hh:mm:ss commands.
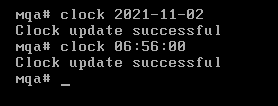
-
-
Verify that the IP addresses for the Windows and Appliance images are 10.0.0.8 and 10.0.0.1 respectively. Otherwise, all the references to IP addresses, as well as the provided mqsc scripts, will need to be edited to reflect the proper addresses.
If you see a message that states ‘Notice: startup config contains errors’, you can ignore the message.
Overview of security
Managing security of the IBM MQ Appliance may be considered from two perspectives. First is identifying the users that are authorized to access the Appliance and associated MQ resources. Second is configuring security for MQ channel connections to the Appliance.
User security
There are two types of users on the IBM MQ Appliance: appliance users and messaging users.
-
Appliance users are users that can configure and administer the Appliance and IBM MQ resources.
-
Messaging users are users that can perform operations on messaging resources.
MQ Appliance users
Authentication of appliance users, and authorization of them to access appliance resources is controlled by Role Based Management (RBM). RBM defines how users are authenticated and authorized. You can specify the following authentication methods:
-
Users can be authenticated by an LDAP server.
-
User details can be specified in an XML file.
-
You can specify local users on the appliance itself. In this lab, we will refer to this as the appliance user repository.
You can specify the following authorization methods:
-
Access policies can be defined in an XML file.
-
Access policies can be defined in local user groups.
You can map user groups looked up in an LDAP directory onto groups defined in an XML file.
Where you have locally defined users, RBM can specify password polices and account policies for them. These policies define the rules governing password (such as minimum length, character types, and expiration periods) and those rules governing when accounts are locked out after failed log in attempts.
Messaging users
Messaging users can connect to queue managers to perform typical MQ functions such as performing PUTs and GETs of messages. They may also be authorized to remotely manage some aspects of queue managers by using tools such as:
-
The web based MQ Console
-
The IBM MQ Explorer
-
Via the runmqsc command shell
Messaging users can be stored in the appliance’s internal user store, or in an external LDAP repository. In this lab, we will refer to this as the messaging user repository.
Keep in mind: The local user ID repository for messaging users is separate from the local user ID repository used for appliance users.
Messaging users stored in the local messaging user repository are created by using user administration commands from the MQ Appliance’s command line interface.
The scalability of the messaging user repository is limited, so in situations where many messaging users are required, an external LDAP repository would provide better performance.
Connection security
Securing IBM MQ Appliance connections
The MQ Appliance is delivered in a completely locked down state. All of the network ports as well as the IBM MQ Console are disabled. As part of the initial configuration of the device, the installer must enable each of the network ports that will be used, and must configure the IBM MQ Console to enable access from one or more of the network connections.
Configuration of connection security for the MQ Appliance as well as the IBM MQ Console were enabled as part of Lab 1 – Getting Started with the MQ Appliance.
Securing IBM MQ channel connections
Connection security for each of the queue managers configured on the MQ Appliance must be considered as well.
To control access to connecting systems at a channel level, MQ uses channel authentication records. Channel authentication functions for queue managers hosted on the MQ Appliance are similar to server based queue managers so we will not focus on those in this lab.
Configuration of SSL/TLS protection for channels on the MQ Appliance is slightly different due to the fact that that the MQ Appliance does not support a traditional file system for storage of keystore and certificate files. For this lab exercise, we will review the steps required to enable SSL/TLS security on SENDER and RECEIVER channels to protect messaging traffic between queue managers hosted on the MQ Appliance and queue managers hosted on remote platforms.
Securing access to the MQ Appliance
Since Lab 1 covered the initial tasks required to enable connections to the MQ Appliance, we will not repeat those steps in this lab. Instead, we will review the steps required to create an additional IBM MQ Appliance user and utilize the appliance’s Role-Based Management (RBM) features to control which functions the user may access.
-
Start the FireFox web browser in the Windows VM image and navigate to the MQ Appliance console for MQAppl1, which is located at https://10.0.0.1:9090/.
Note:
Shortcut available. There is a shortcut to the MQAppl1 image on the FireFox bookmarks bar.Click Allow exceptions for any warnings that you may receive regarding untrusted certificates.
-
Enter admin and passw0rd (or whatever you chose earlier) in the User name and Passw0rd text boxes.
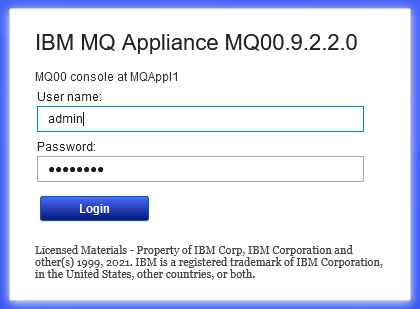
-
You are now logged on to the IBM MQ Appliance console.
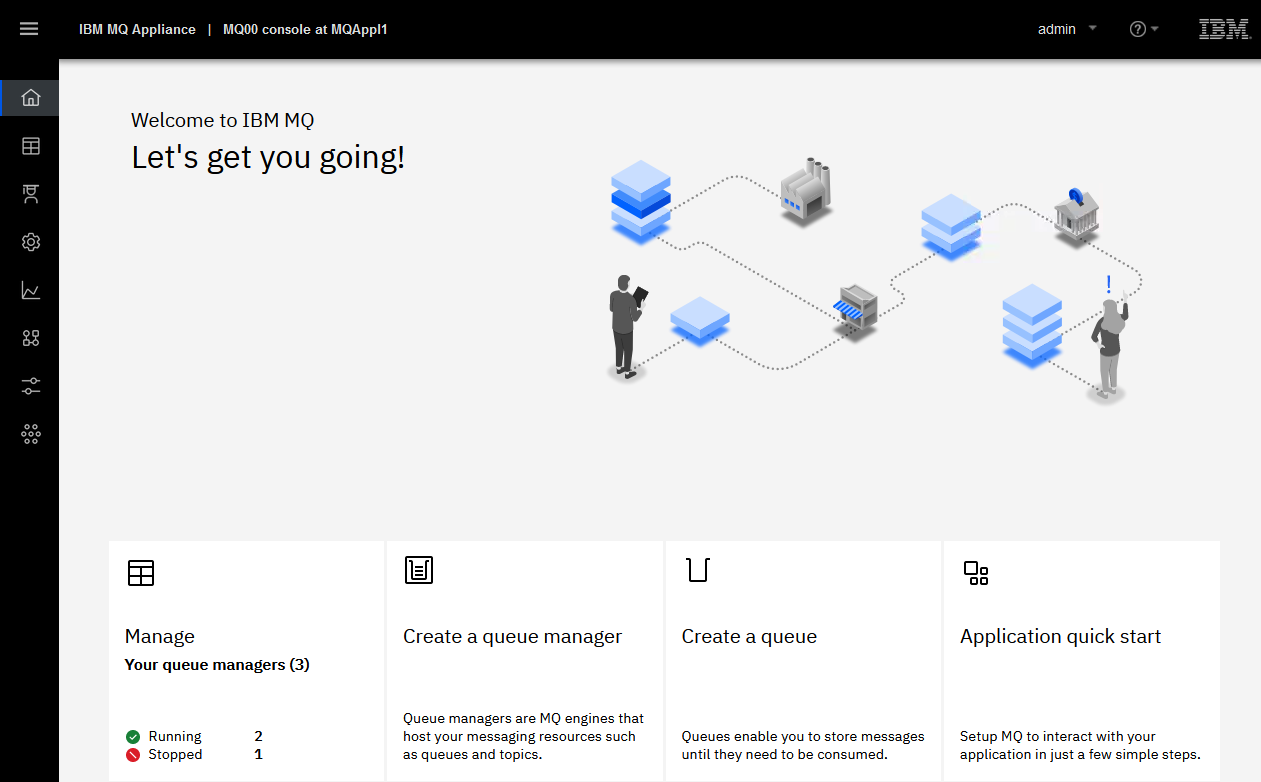
-
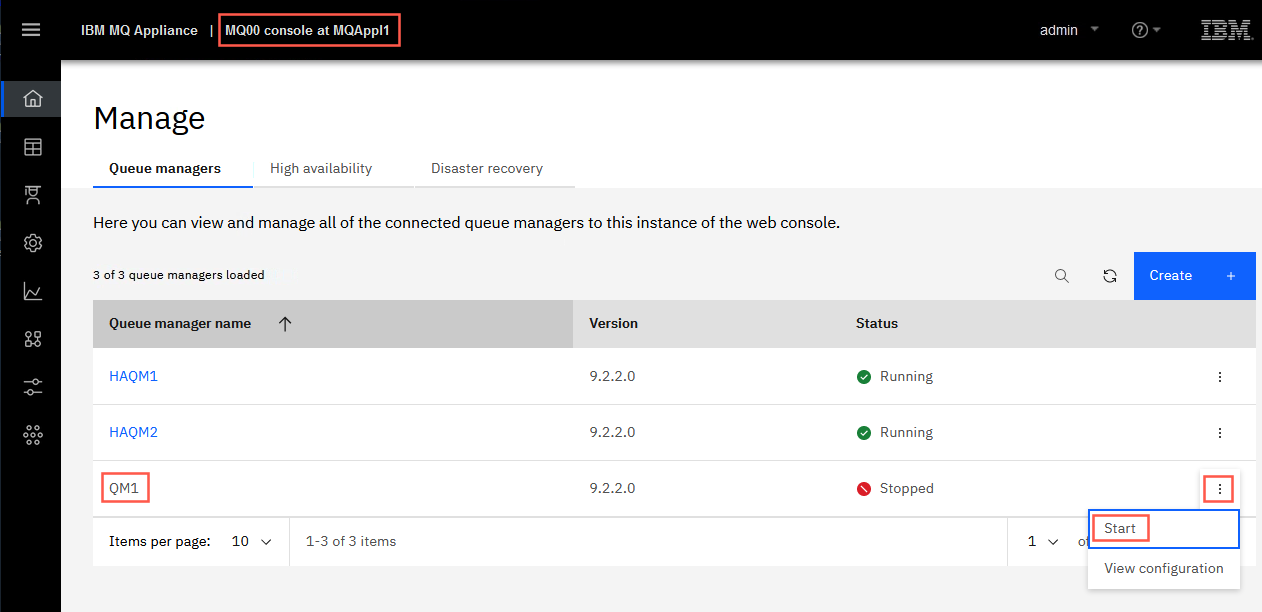
Click the Manage block to see Queue managers. Queue Manager QM1 may still be running from previous labs. If it is not running, start QM1 now.
-
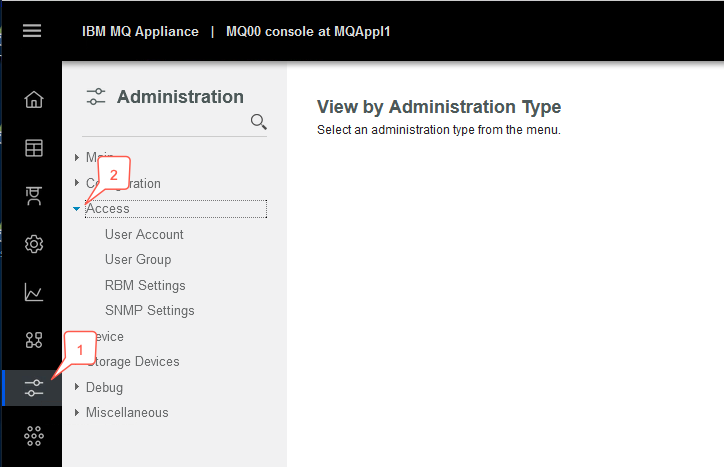
Click the Administration tab and then expand the Access settings menu. You will see a list of menu items that you may use to configure various access settings for the MQ Appliance.
-
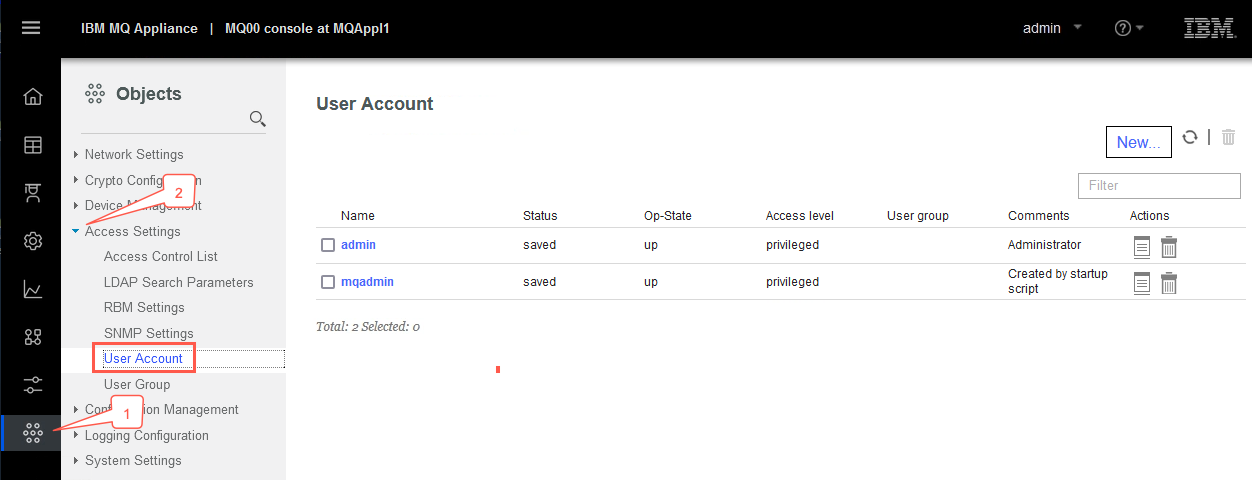
Click the Objects icon then expand Access Settings.
-
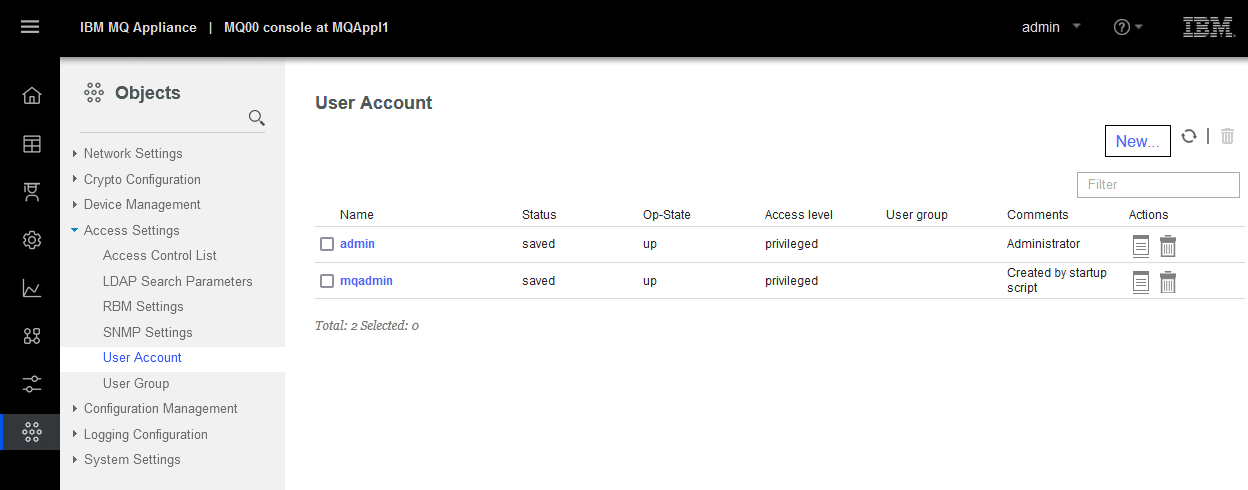
Click the User Account menu item to display a list of the currently defined user accounts. Note that the default admin account is listed as well as the user account that was created in the Lab 1 exercise.
-
Both of the accounts listed have Privileged access rights. That gives these users full access to all capabilities of the Appliance as well as full access to all MQ resources. In order to create an account with a restricted set of permissions you should first create a User Group that has the desired permissions. Once that group has been created, you may create and assign a User Account to be a member of that group.
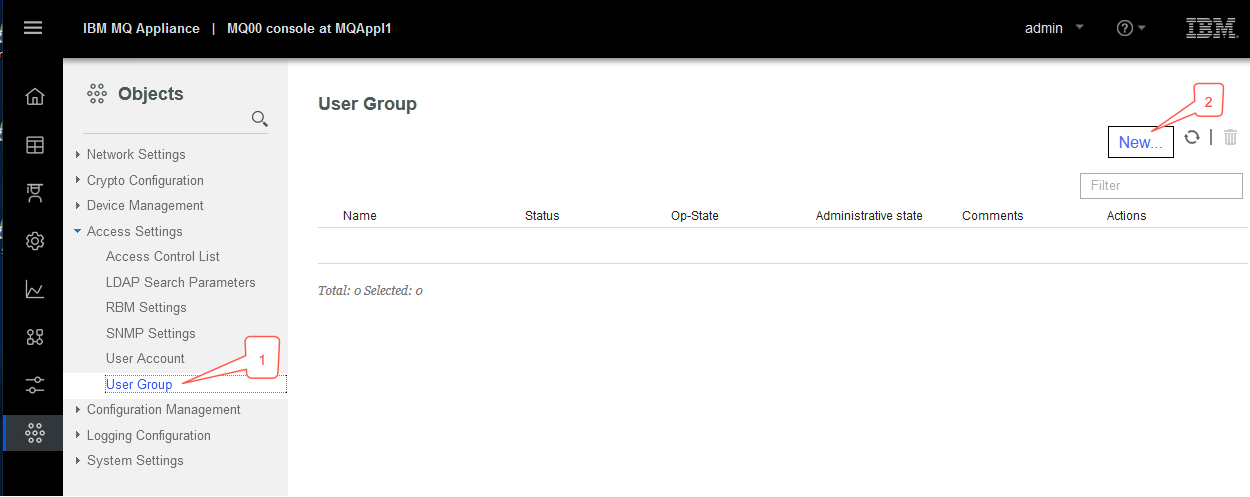
To create a group that contains a subset of privileges, select the User Group menu item and then click the New… button.
-
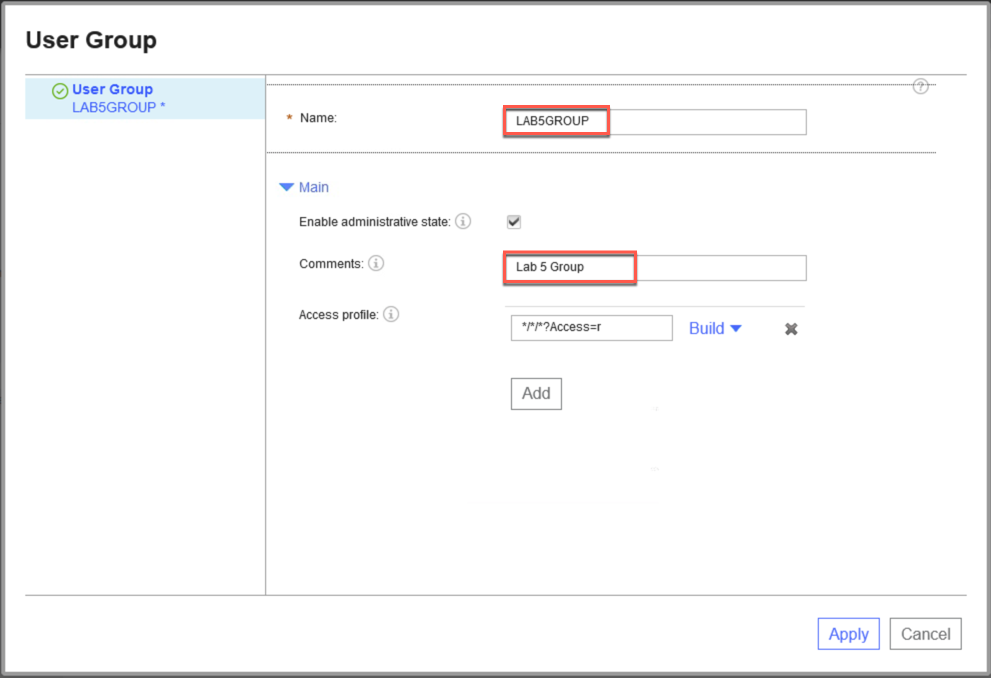
Enter LAB5GROUP in the Name: and Lab 5 Group in the Comments: text boxes (do NOT click Apply yet).
-
The default access profile for a new user group enables a member of the group to login to the MQ Appliance user interfaces and browse all appliance and queue manager resources, but not to administer any of the appliance’s resources. Perform the following steps in order to enable a member of LAB5GROUP to perform some MQ Appliance related tasks.
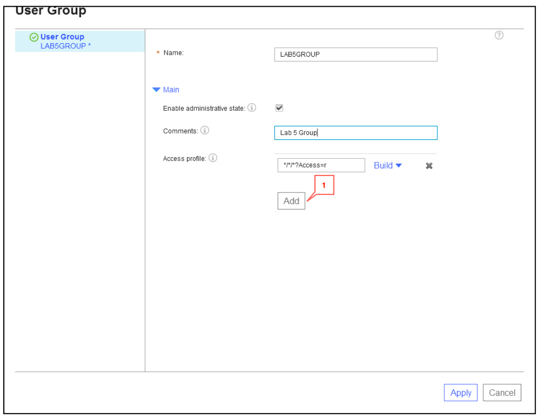
a. Click the Add button to create a new access profile entry.
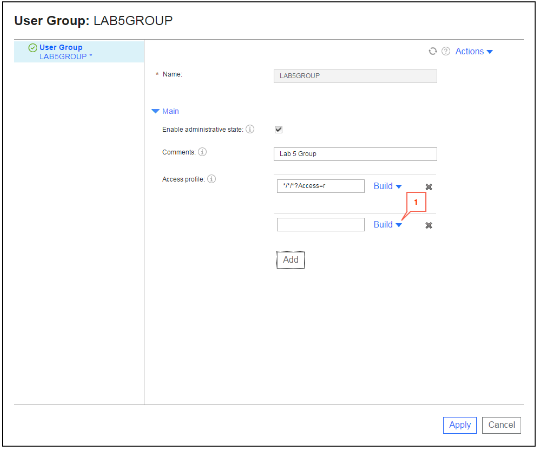
b. Click the Build icon next to the newly created access profile entry.
 Note:
Note:
Resource Types – Refer to the following table for an explanation of the valid permissions that may be specified for the resource types listed in the popup field.Resource Type Privilege Explanation MQ CLI Administration x (execute) Enables “mqm” like authority to access queue managers and their objects from the mqcli command prompt. This permission applies regardless of whether a queue manager has been configured to use LDAP or to use the appliance’s messaging users repository. MQ Web Administration a (add) Enables “mqm” like authority to access queue managers and their objects regardless of whether a queue manager has been configured to use LDAP or the appliance’s messaging users repository. Utilizes the mqsystem reserved user ID. I.E. if a message is PUT to a queue, the User Identifier associated with the message will be mqsystem. MQ Web User r (read) Provides read only access to access queue managers and their associated resources, but may not change any resources, or PUT or GET messages to/from queues. MQ Web User x (execute) Provides read only access to queue managers and their objects from the MQ Web Console. NOTE: If a queue manager has been configured to use an LDAP repository for authentication and authorization, additional permissions may be granted to the MQ Web Console user under the following conditions – If the appliance user ID matches an entry in the LDAP repository and if specific OAM permissions have been granted to the user ID. For example, if PUT authority has been granted to a queue for the user ID, then the MQ Web Console may be used to PUT a test message onto a queue. c. A popup dialog will appear. Select MQ Web User as the Resource type from the popup list that appears (you need to scroll to the bottom of the list).
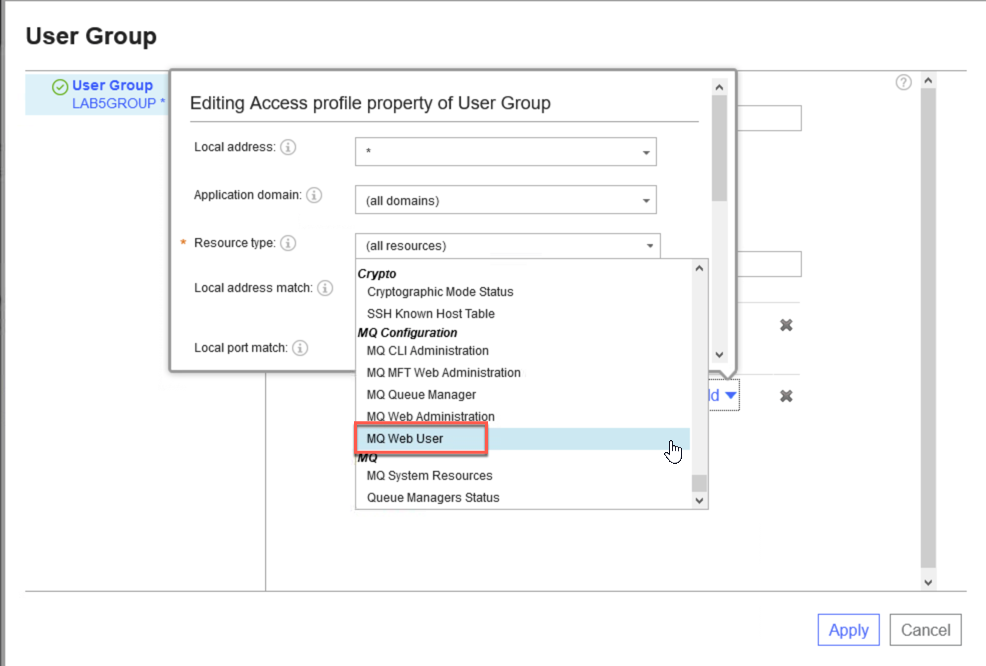
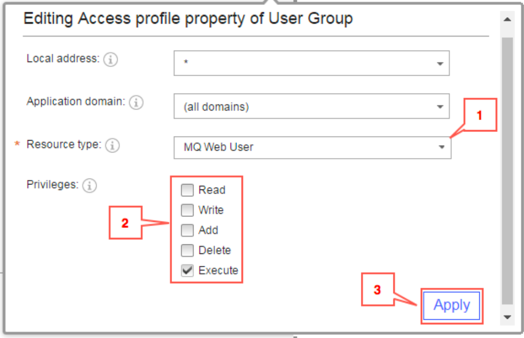
d. Now scroll towards the bottom of the dialog and select the Execute privilege. Click the Apply button in the Build dialog when you have finished.
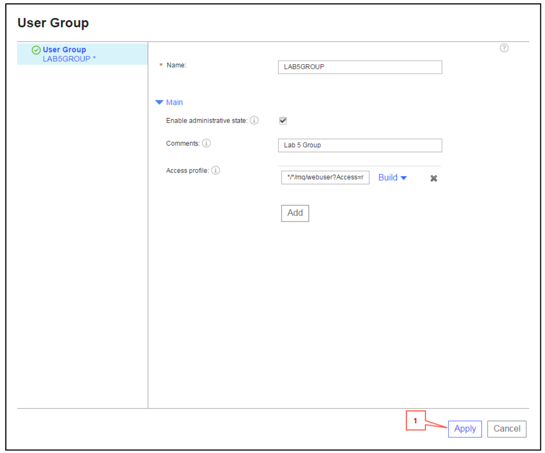
e. Click the Apply button to save your new group definition.
f. You may add additional Access profile entries as needed to configure the desired permissions for the group. Note that these permissions are additive and are ‘most permissive’, so plan and test your settings carefully.
g. Click the Save changes link.
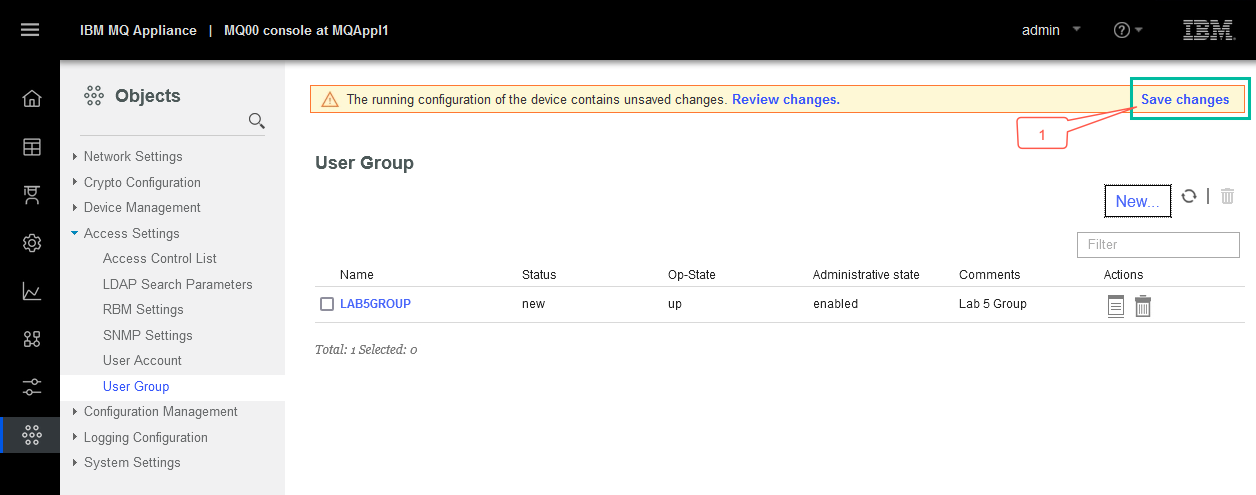
-
Perform the following steps in order to create a User Account that will utilize the new group to perform authorized MQ Appliance related tasks.
a. Select the User Account menu item and then click the New… button.
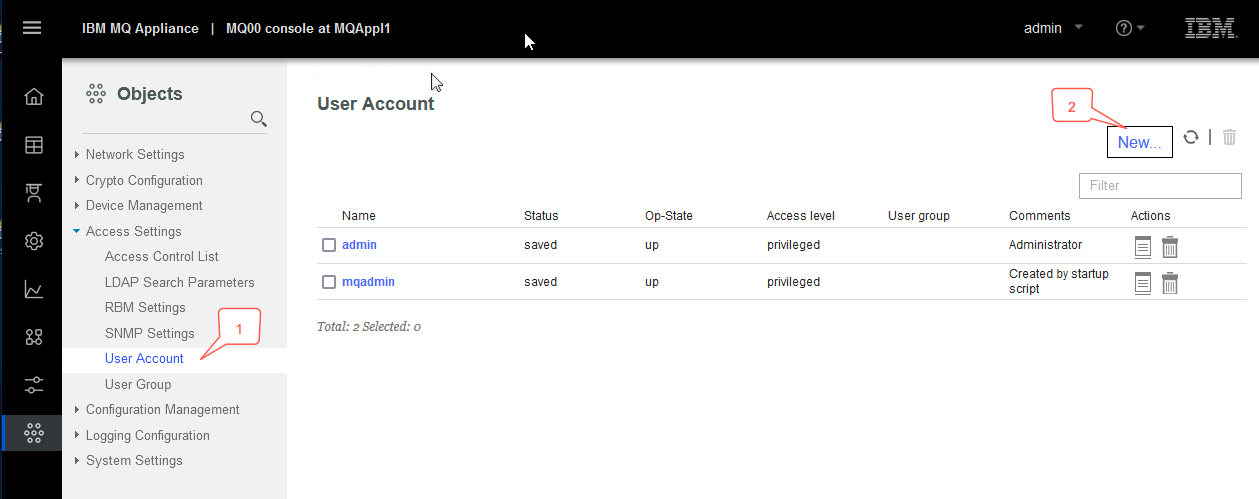
b. Enter the following information as shown in these screen shots and then click the Apply button when all of the fields have been entered.
Note:
Usage tip
The User group: section may not appear unless you first set the access level to Privileged, then select Group defined.Property Value Name LAB5USER Enable administrative state Leave checked to enable this user Comments Lab 5 User Password passw0rd Suppress initial password change Checked Access level Group defined User group LAB5GROUP 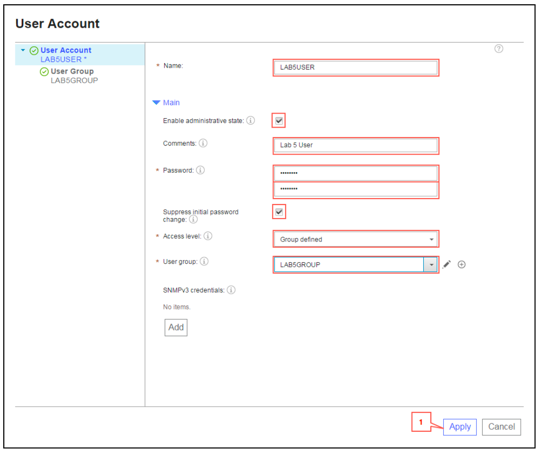
c. Click Apply.
d. In the pop-up, click the drop-down for Username and select LAB5USER. Click Save.
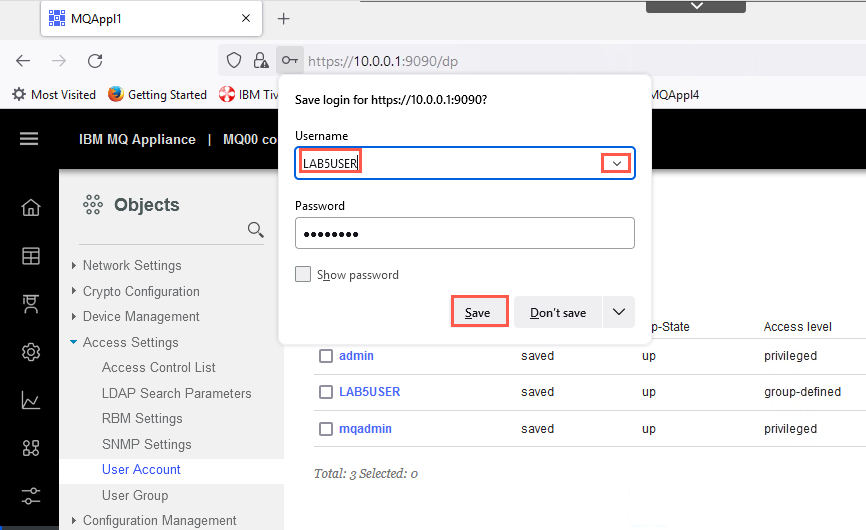
-
Perform the following steps in order to test out the new User account and Group.
a. Logout of the MQ Appliance, then log on using the LAB5USER account.
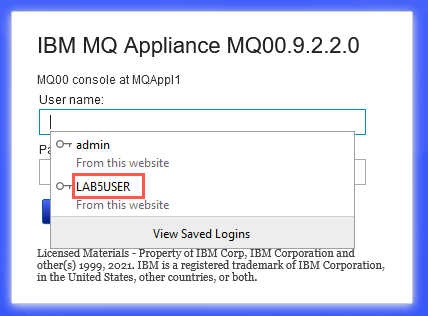
b. Click the Queue managers block. Note that the Queue managers page allows the LAB5USER to view various properties of the queue manager, but does not allow the user to change any properties or start and stop the queue manager. Click the drop-down for QM1 and select Stop.
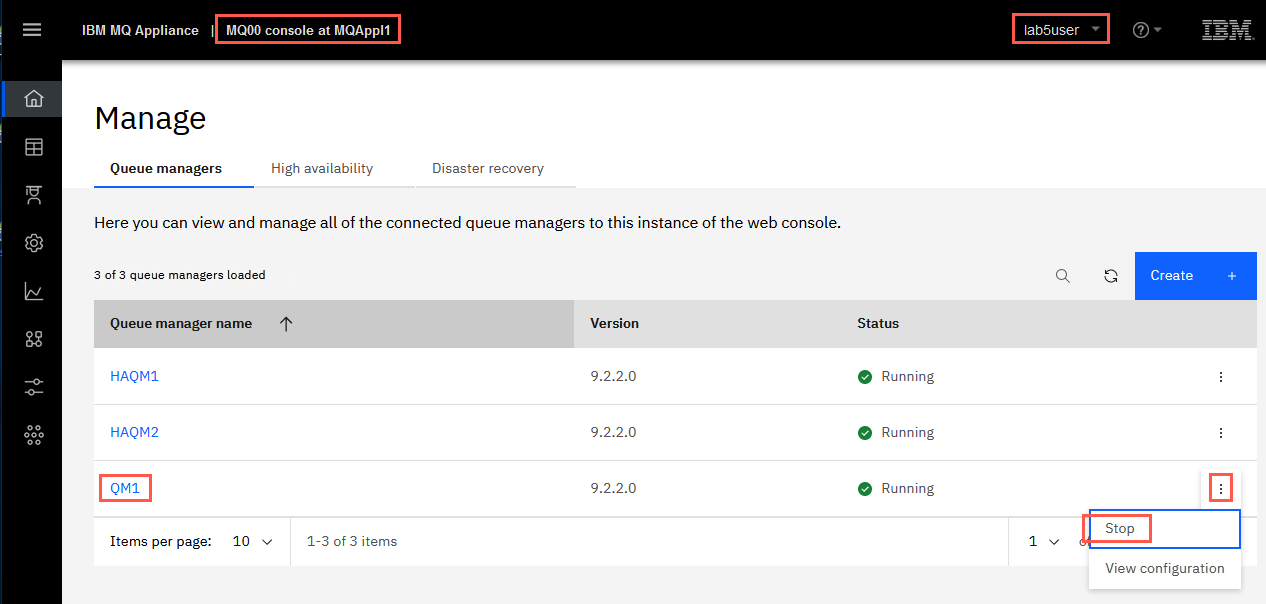
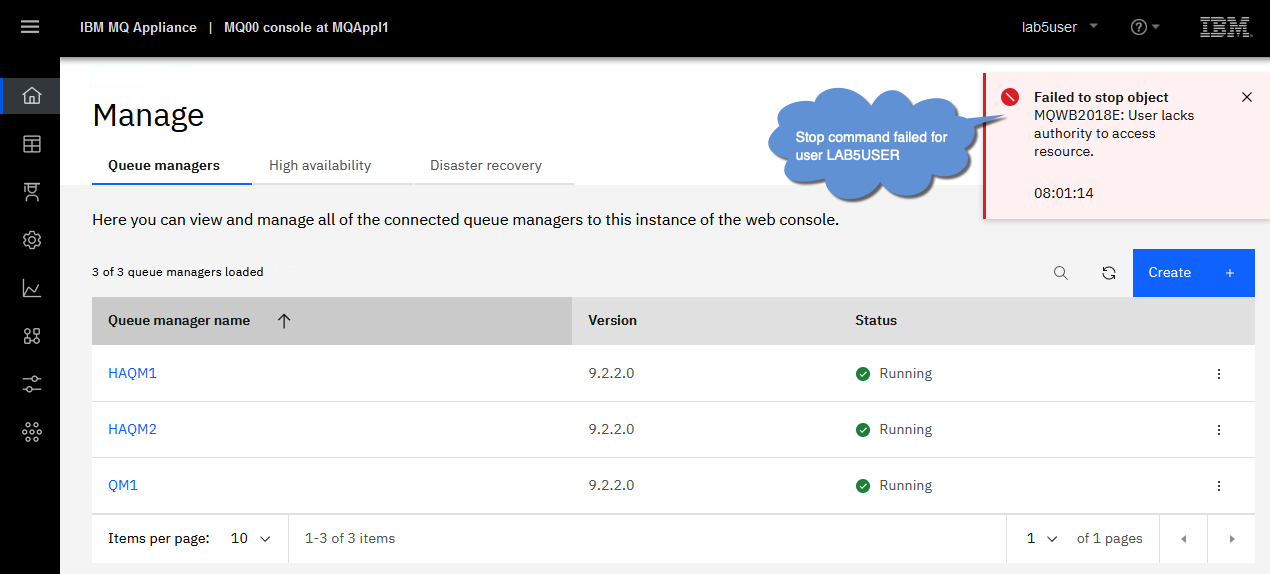
The command fails because LAB5USER does not have the correct authority.
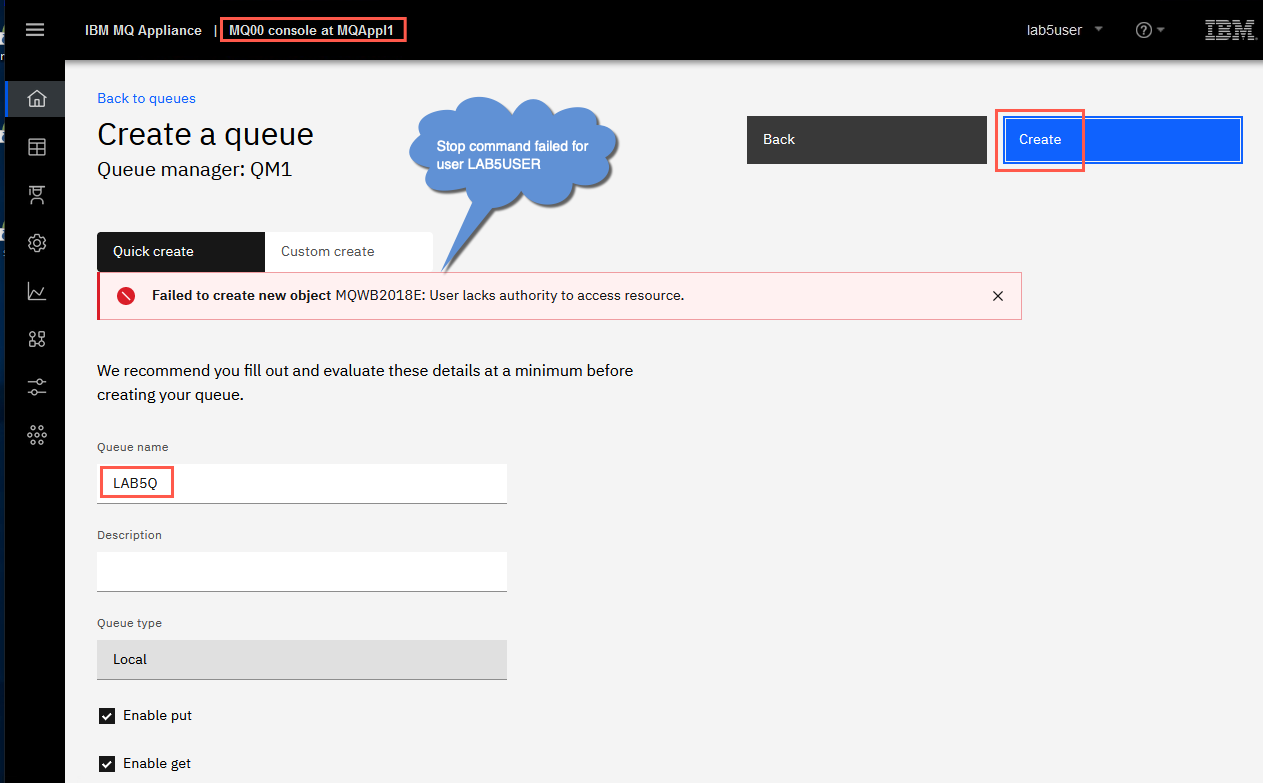
c. Click the hyperlink for QM1. Click Create to add a queue then click Local. Name the queue LAB5Q and click the Create button. The command fails again due to lack of authority.
d. Try to perform various operations against any of the queues. You will find that with MQ Web User privileges, you can view various queue manager objects and their properties, but you are not able to make changes to any objects. Return to Manage > Queue managers. Click the drop-down for QM1 and select View configuration.
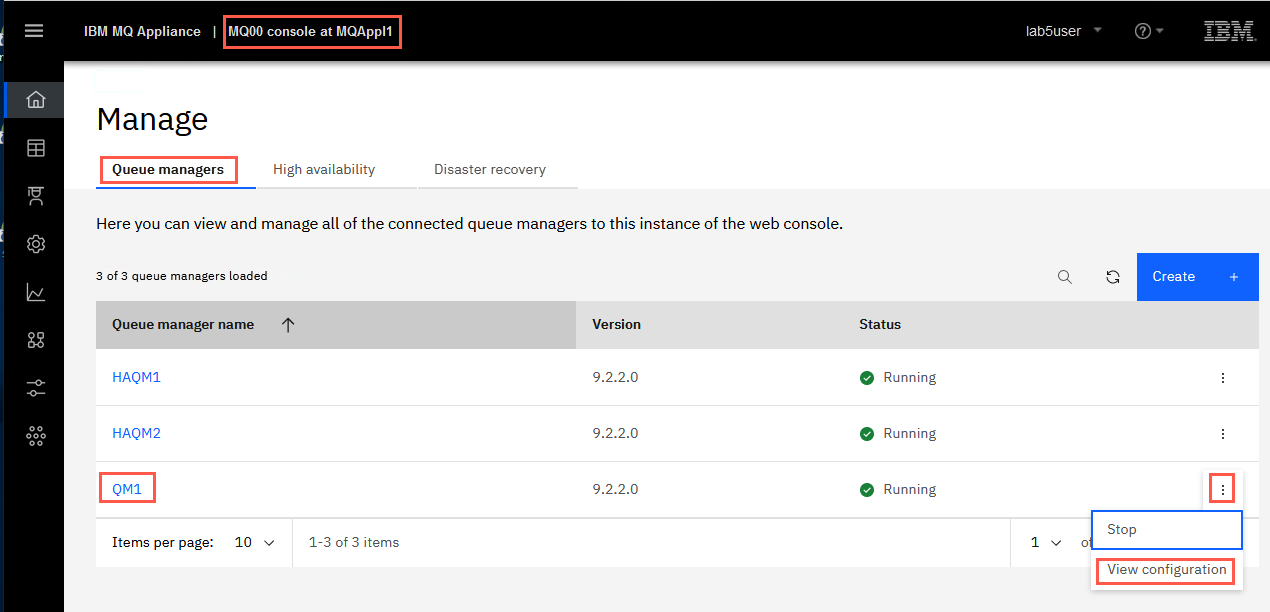
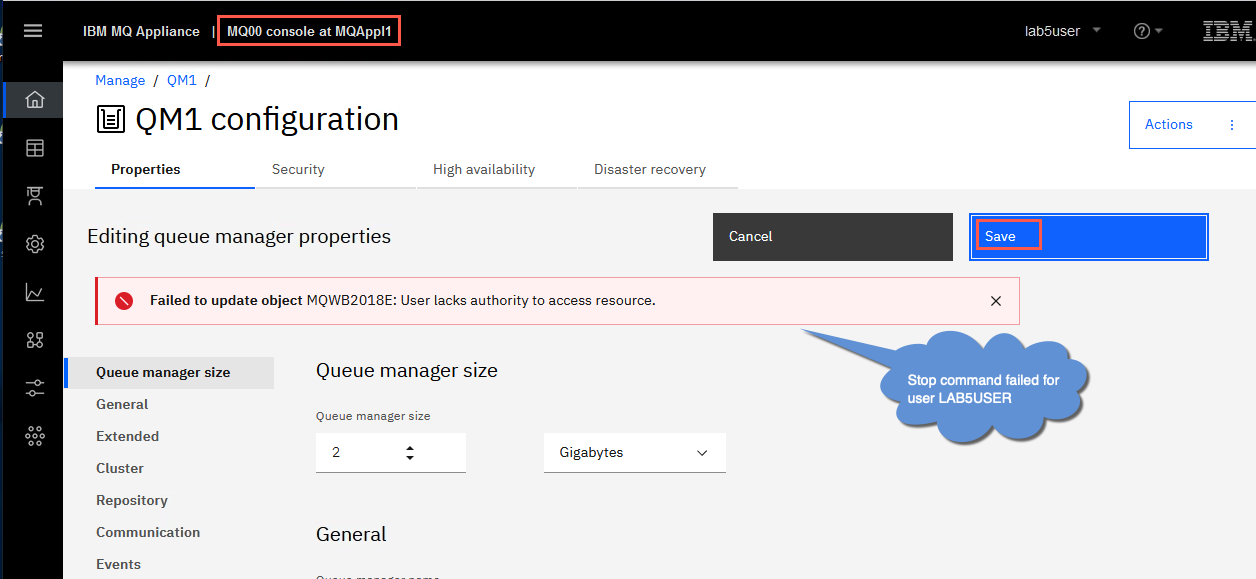
e. LAB5USER can view the queue manager properties. Click Edit. Try to change a property and click Save. The command fails again.
-
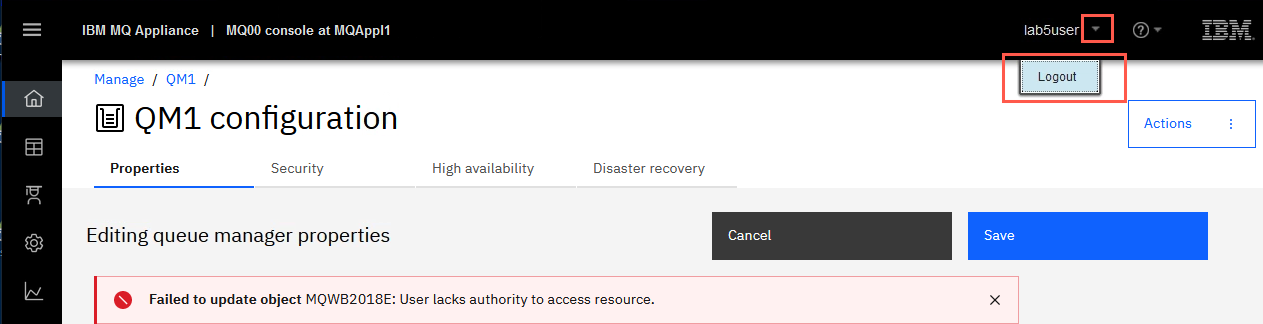
Log out of the MQ console.
Securing access to MQ resources
User repositories
The IBM MQ Appliance is based on IBM MQ V9.2.2.0 with several modifications to enable support of an appliance form factor. One modification that has been made to MQ is the management of messaging users that are allowed to access IBM MQ objects.
Previous lab exercises have demonstrated how to manage MQ Appliance objects using user ID’s that are defined in the appliance user store. In order to support a separation of responsibilities for management of MQ resources from Appliance resources, the Appliance also provides a separate user store for messaging users only. The users defined in this message store may manage and access only MQ resources. They do not have access to any of the MQ Appliance resources.
User ID repositories for appliance and MQ users are hosted on the appliance by default. The appliance also supports accessing user ID’s that are stored in an external LDAP repository. The scalability of the internal stores is limited, so for situations where many users exist an external LDAP repository may provide better performance.
SSL/TLS channel security
IBM MQ supports the configuration of SSL/TLS protection for message channels. This support requires the use of keystores to hold public and private certificates. The concepts for managing certificates and keystores for queue managers hosted on the MQ Appliance are similar to traditional MQ; however, since the Appliance does not enable traditional command line or filesystem access, new procedures must be followed in order to configure this support.
Exploring the MQ Appliance internal store for messaging users
NOTE: Access to the Appliance’s internal user store for messaging users is currently supported via a command line interface only. Either you may use the Appliance’s console window for entering commands, or if you prefer, a copy of Putty has been provided in the C:\Lab05\Commands directory. (HINT: Use Putty. It is a lot easier to use!)
If you choose to use the MQ Appliance console window, you will notice there are no scroll bars for data that was displayed, but has since scrolled off the window. To view the older information, use the shift+PgUp keyboard combination to scroll up and shift+PgDn to scroll down.
-
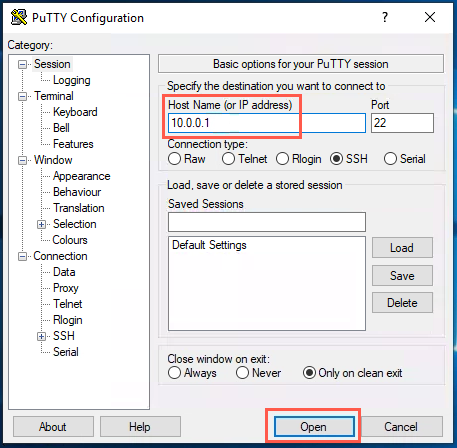
Double-clock the Putty icon on the desktop and enter MQAppl1’s IP address - 10.0.0.1 in the host name field. Click Open.
-
If you receive a security alert popup, click Yes to continue.
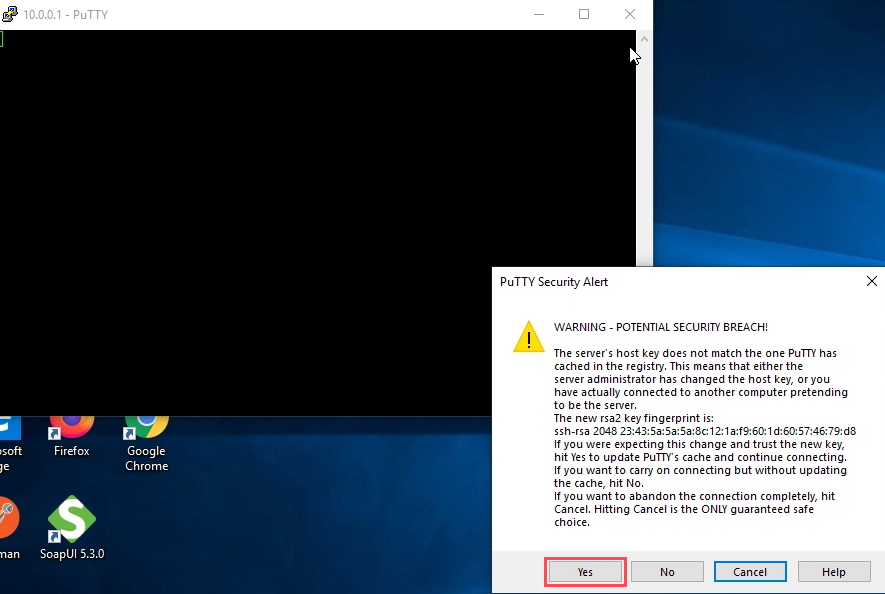
-
Hit Enter once, and then log on to the command line interface by using the admin user ID and associated password.
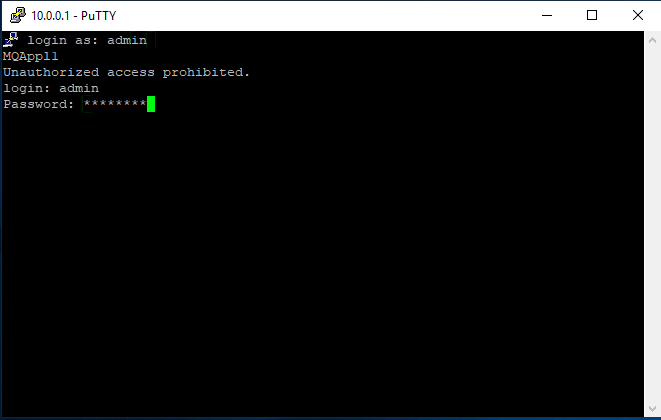
-
Execute the mqcli command to enter MQ command line mode.
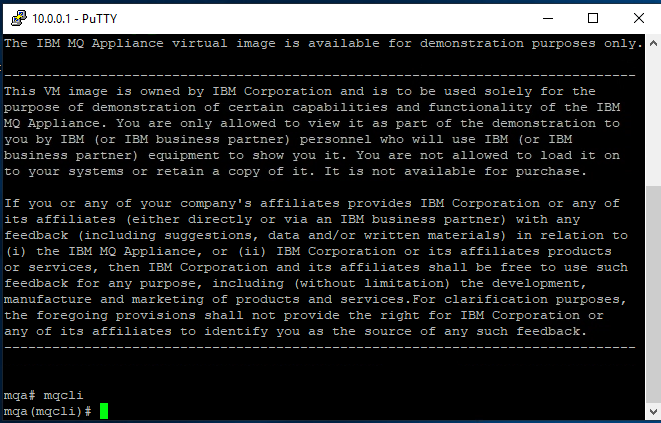
-
The mqcli command prompt enables an appliance user to configure MQ resources. Use the help command to see a list of command categories that are supported by the Appliance.
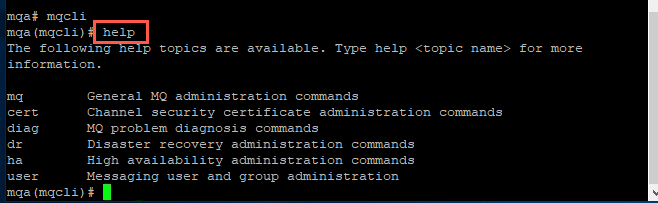
-
Our goal in this section of the lab is to create messaging users. To see the list of available commands to create messaging users and groups use the help user command.
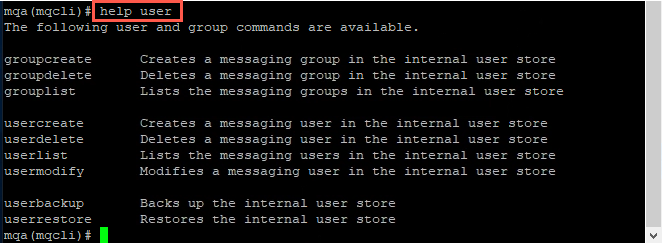
-
In lab 1, you created a messaging user to test the ability to PUT messages to the TEST.IN queue on QM1. Display a list of messaging users defined to the Appliance by entering the following command:
userlist
-
Note that there is a single user named ibmdemo listed. To display details of this user enter the following command:
userlist -u ibmdemo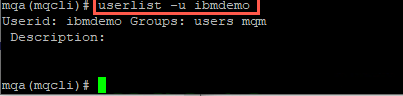
-
As you can see, ibmdemo is a member of the mqm group. Just like IBM MQ, being a member of the mqm group gives ibmdemo full access to all resources in a queue manager. We will want to create a new user and group that does not have full access.
-
Create a new group for messaging users by entering the following command:
groupcreate -g newgroup
-
List all of the messaging groups that are now defined to the Appliance by entering the following command:
grouplist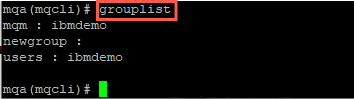
-
Now create a new user by entering the following command:
usercreate -u newuser -d "New user for Lab 5" -g newgroup -p passw0rd
-
Now that you have created a new user, you will need to grant permissions for that user to connect to the queue manager and access various MQ resources. Switch to the Windows image and open the MQ Explorer. Connect to the QM1 queue manager, if necessary. Right click QM1 and select the:
Object authorities → Manage Queue Manager Authority Records… menu item.
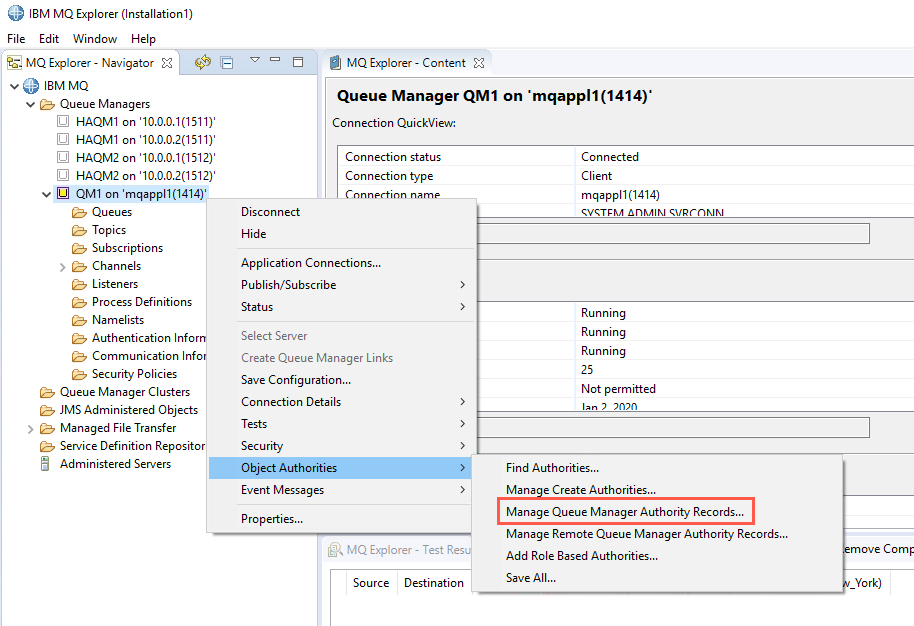
-
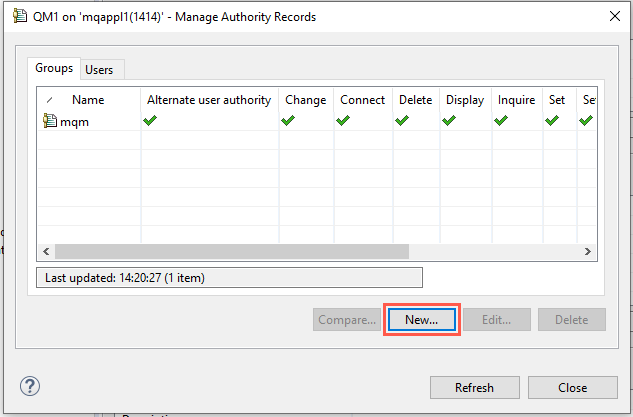
Click the New… button to add a new group record.
-
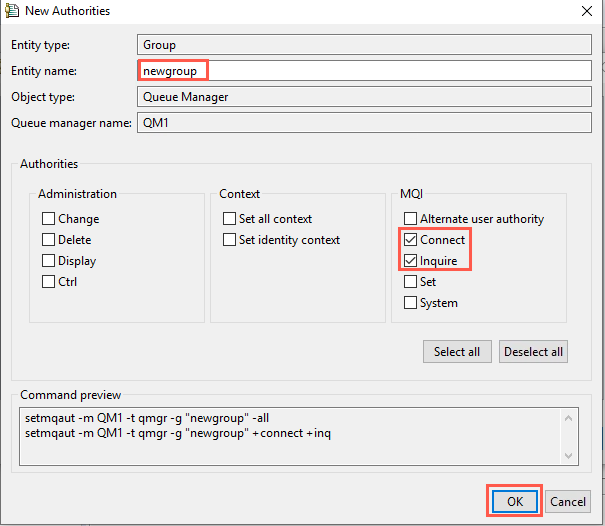
Enter newgroup in the Entity name: text box, then select the Connect and Inquire check boxes. Click the OK button when finished.
-
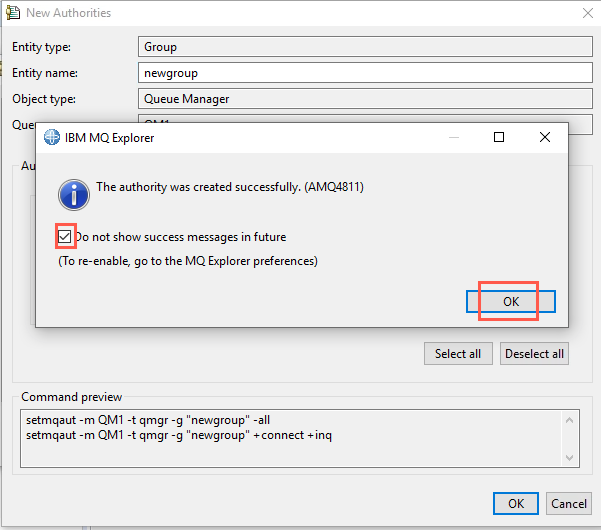
If prompted, select the Do not show success messages in the future checkbox and click the OK button to continue.
-
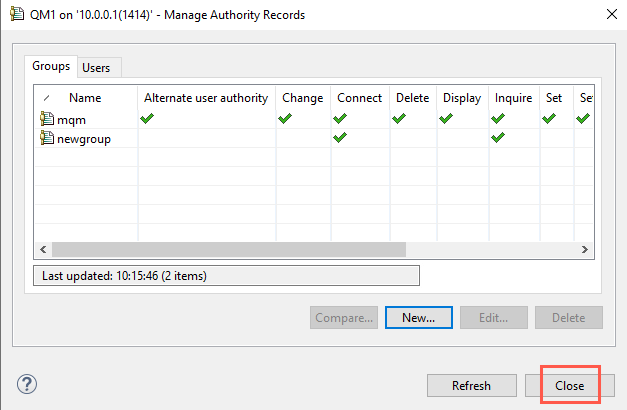
Click the Close button to close the window.
-
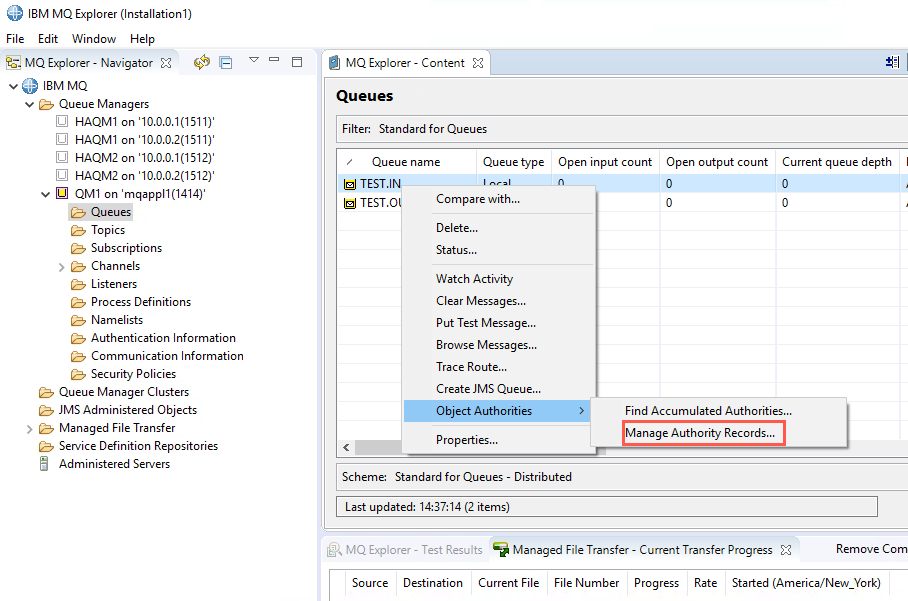
Now select the Queues folder for the QM1 queue manager and right click the TEST.IN queue. Select the Object Authorities → Manage Authority Records… menu item.
-
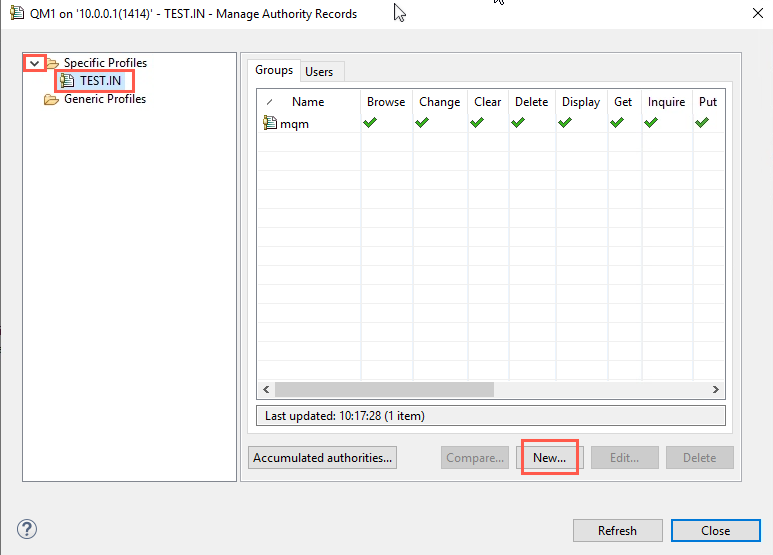
Expand the Specific Profiles section and select the TEST.IN entry, then click the New… button.
-
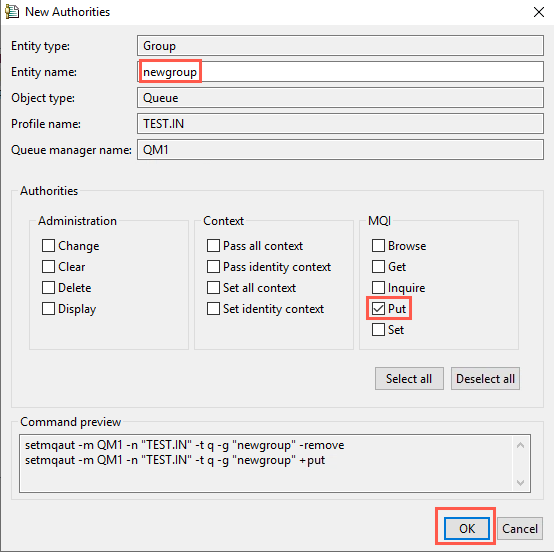
Enter newgroup in the Entity name: text box, then select the Put check box. Click the OK button when finished.
-
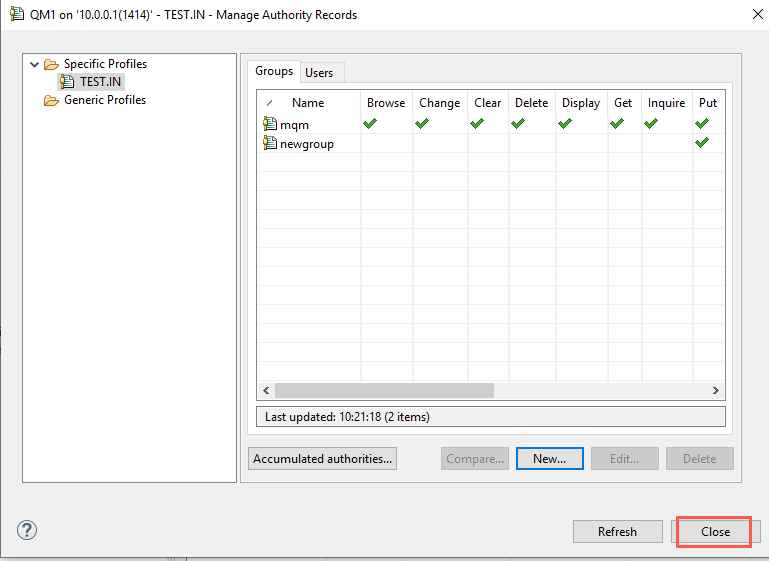
Close the Manage Authority Records window and minimize the MQ Explorer window.
-
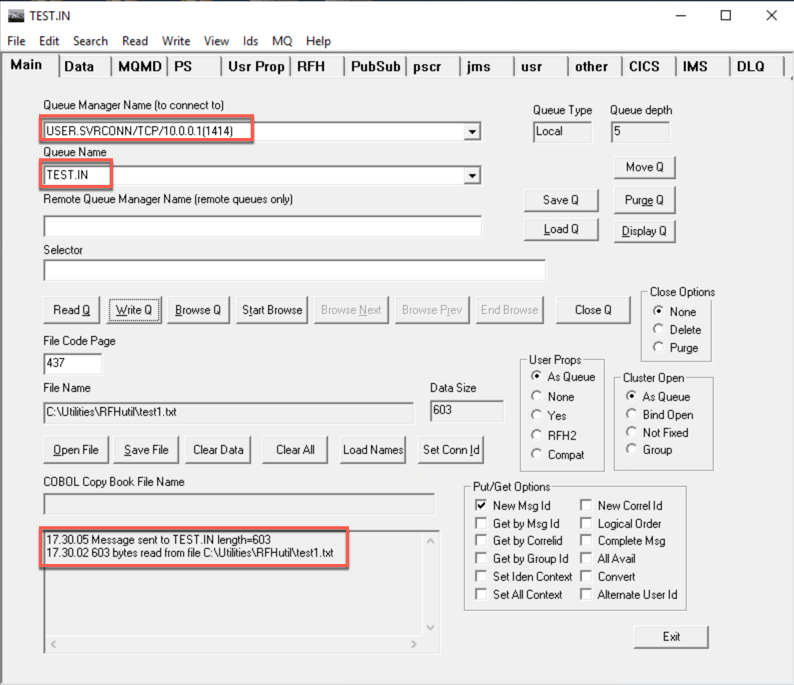
Now you will need to use the rfhutilc program to test the security settings you have defined. Refer to the steps in Lab 1 to launch the program and connect to the queue manager as ibmdemo. Continue through the steps in Lab 1 until you have successfully written a test message to the TEST.IN queue.
-
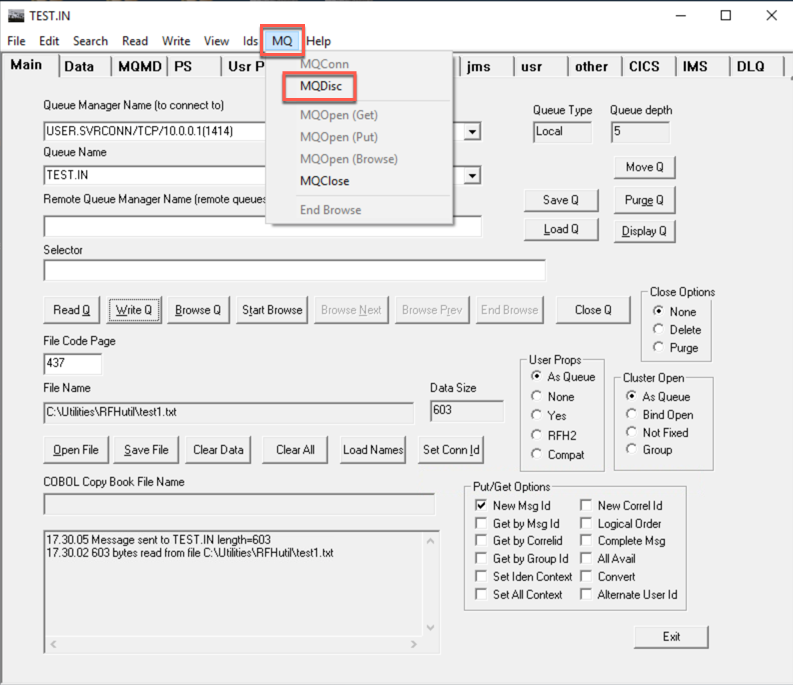
Disconnect from the queue manager by clicking on the MQ → MQDisc menu item.
-
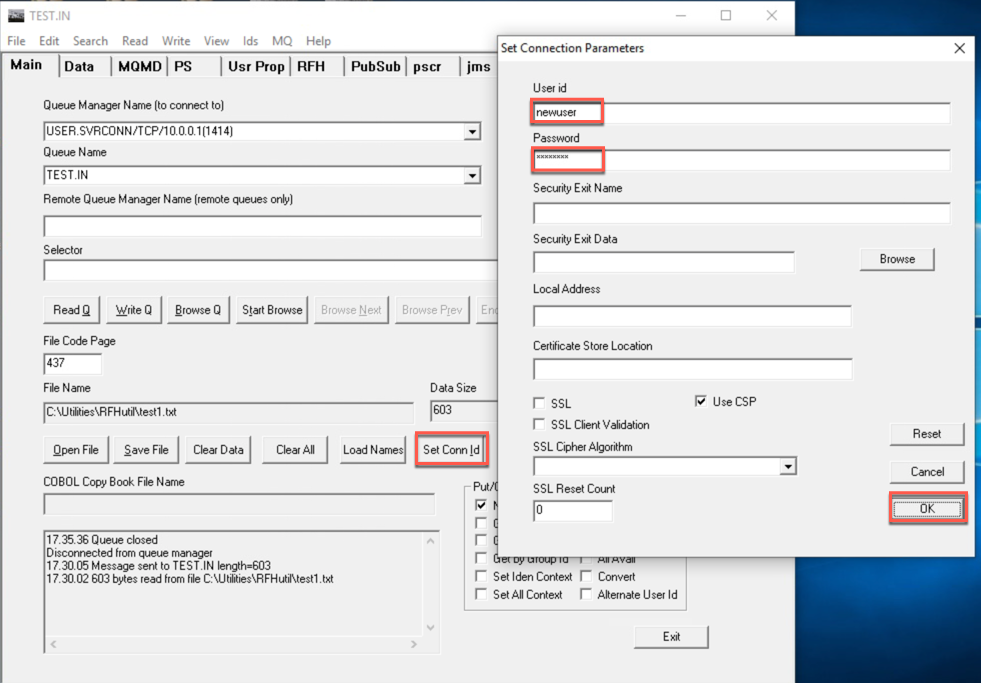
Now change the user ID associated with the connection to QM1 by clicking on the Set Conn Id button and using the newuser user ID and associated password.
-
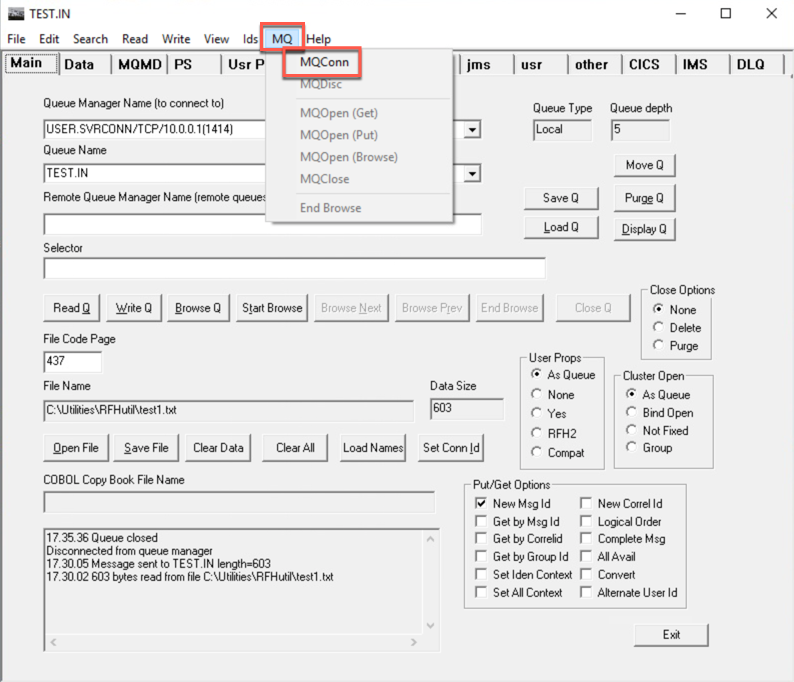
Reconnect to the queue manager by clicking on the MQ → MQConn menu item.
-
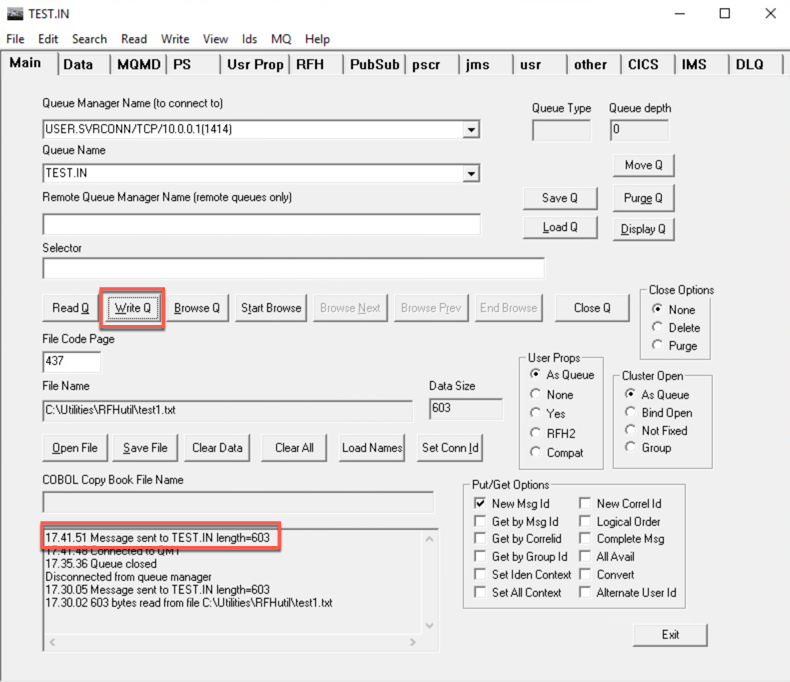
Click the Write Q button to send another test message to the TEST.IN queue. This message should be successfully written.
-
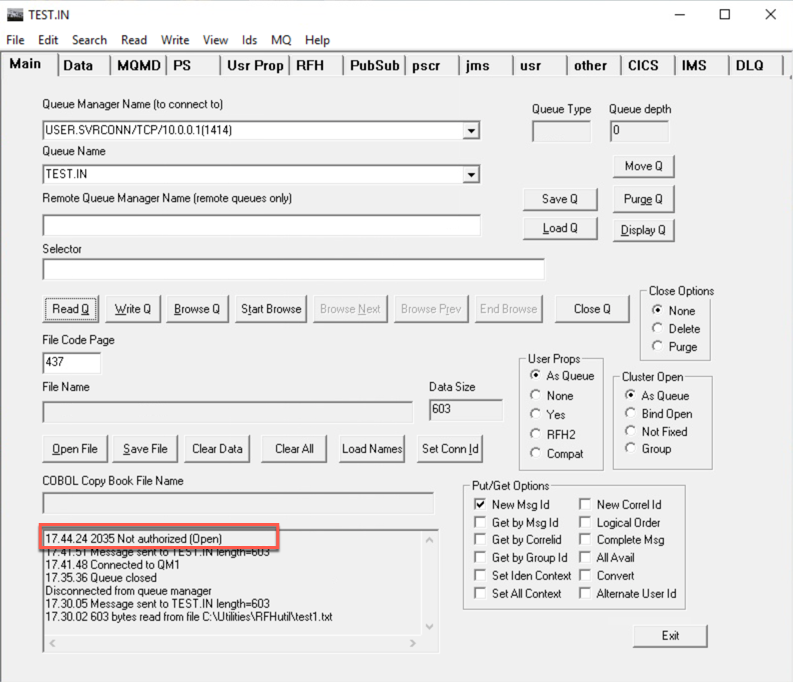
Now click the Read Q button. You will see a Not authorized error message.
-
Close the rfhutilc application.
Prepare the queue managers to enable distributed queuing
In order to enable SSL/TLS protection of messages flowing between queue managers, a basic distributed queueing environment must first be established. Once the initial configuration has been defined and tested, you may configure the additional settings required to enable SSL/TLS protection on the channels. In this portion of the lab, you will create and configure a Windows based queue manager to connect to QM1 on the Appliance. You will also create appropriate queue manager objects on QM1 to connect to the Windows queue manager. Since configuration of basic distributed queuing is assumed an existing skill, you will use MQSC scripts to create the initial configuration.
The following steps should be performed on the Windows VM image.
-
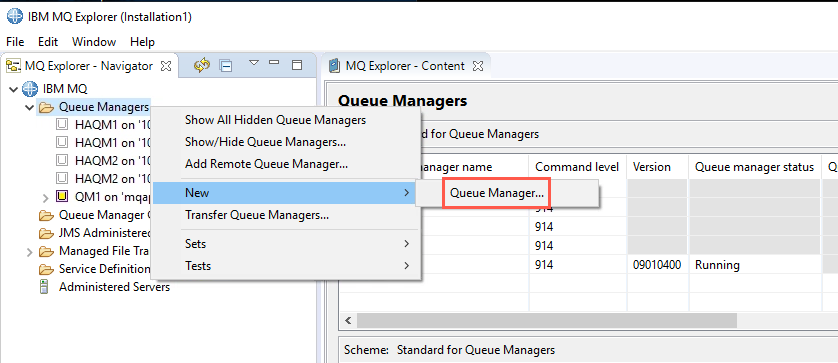
Use the IBM MQ Explorer to create a new queue manager by right clicking on the Queue Managers folder and clicking on the New → Queue Manager… menu item.
-
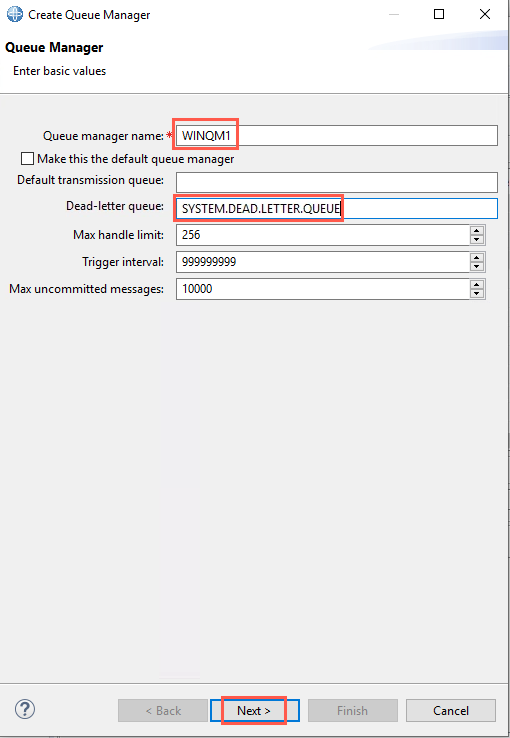
Enter WINQM1 in the Queue manager name: text box and SYSTEM.DEAD.LETTER.QUEUE in the Dead-letter queue: text box, then click the Next button.
-
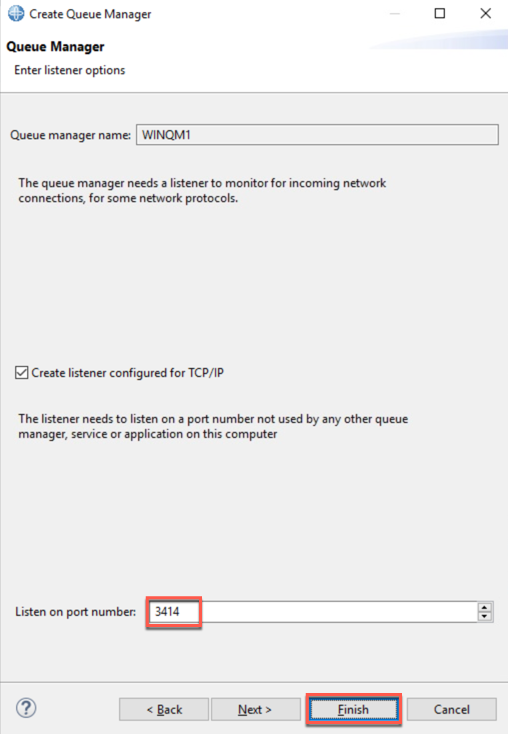
Click the Next button two more times to navigate past the Enter data and log values and the Enter configuration options windows, then enter 3414 in the Listen on port number: text box and click the Finish button.
-
The mqsc scripts to create a starter set of MQ objects for the WINQM1 and QM1 queue managers are located in the C:\Lab05\MQSC\ directory. If the IP addresses of the Windows and MQ Appliance VM’s are not 10.0.0.5 and 10.0.0.1 respectively, edit the files as necessary. Next, open a command prompt and navigate to that directory, then run the following command:
runmqsc WINQM1 < WINQM1.mqsc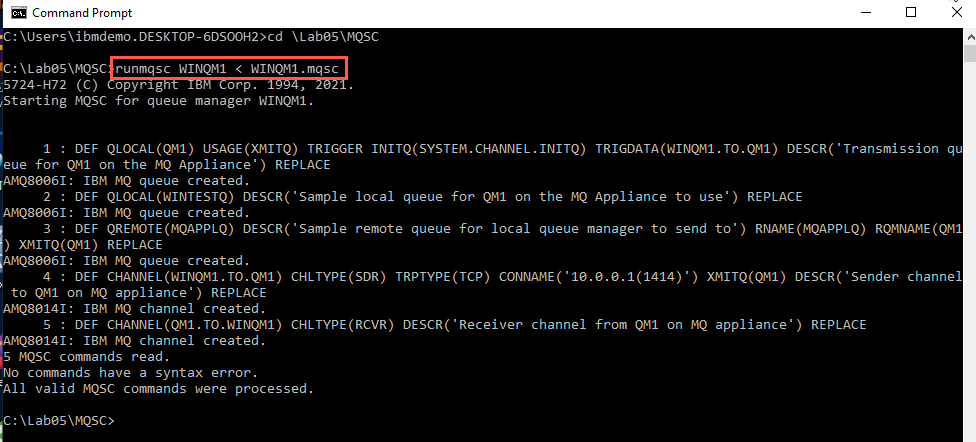
-
Next, you will need to create a similar set of objects on the Appliance’s QM1 queue manager. The easiest means to do that is to use a client connection to QM1 from the Windows image. To enable a client to connect, you must first set an environment variable to specify the connection parameters to QM1. Enter the following command to set the MQSERVER environment variable:
SET MQSERVER=USER.SVRCONN/TCP/10.0.0.1(1414)Important:
Ensure you substitute the actual IP address of the MQAppl1, if necessary.
-
Next use the following command to create the appropriate configuration objects on QM1:
runmqsc -c -u ibmdemo QM1 < QM1.mqscNote:
Note regarding redirecting input for runmqsc commands from mqsc files: This mqsc file contains the password for testuser as the first line of the file. This is necessary to enable the password to be passed blindly to the runmqsc command shell.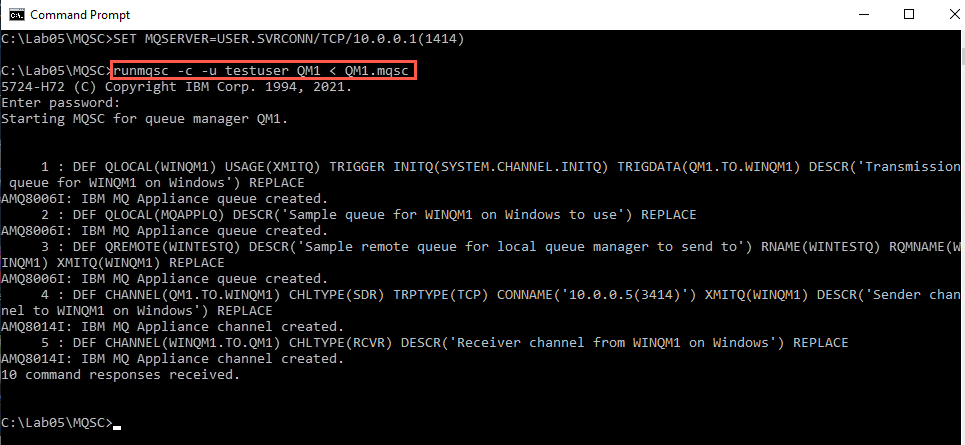
-
At this point, you should have a set of channels, local queues and remote queues that will enable sending messages between the two platforms and having the SENDER channels auto-triggered.
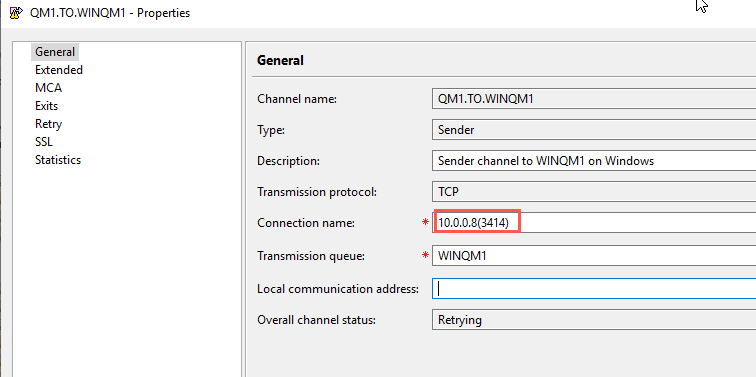
The IP address of the Windows VM has been changed since the MQSC file was created, so the properties of the sender channel need to be updated. Open MQ Explorer. Expand Channels under QM1. Right-click the channel QM1.TO.WINQM1 and select properties.
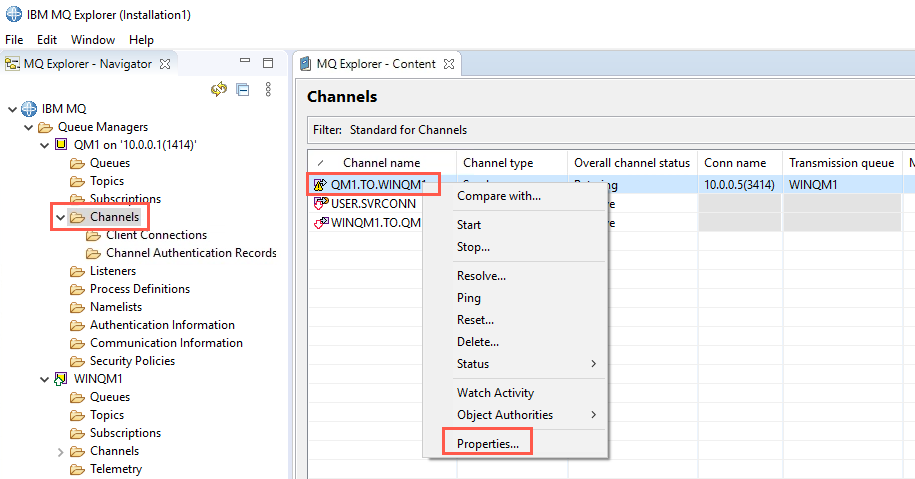 .
.Change the Connection name to 10.0.0.8(3414). Click OK.
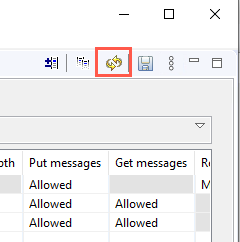
Refresh MQ Explorer.
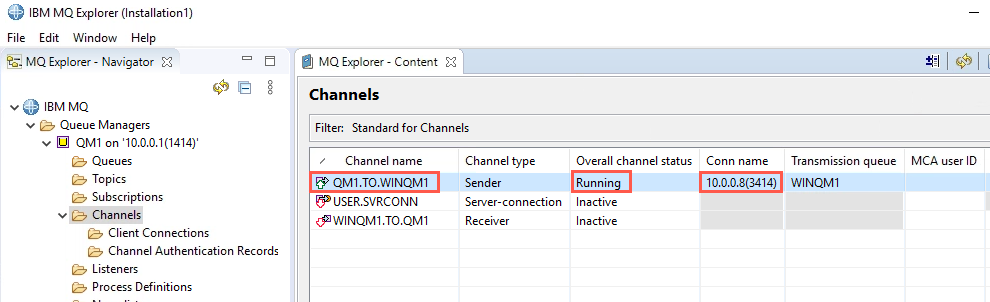
The channel should now be running.
-
Test your configuration by completing the following steps:
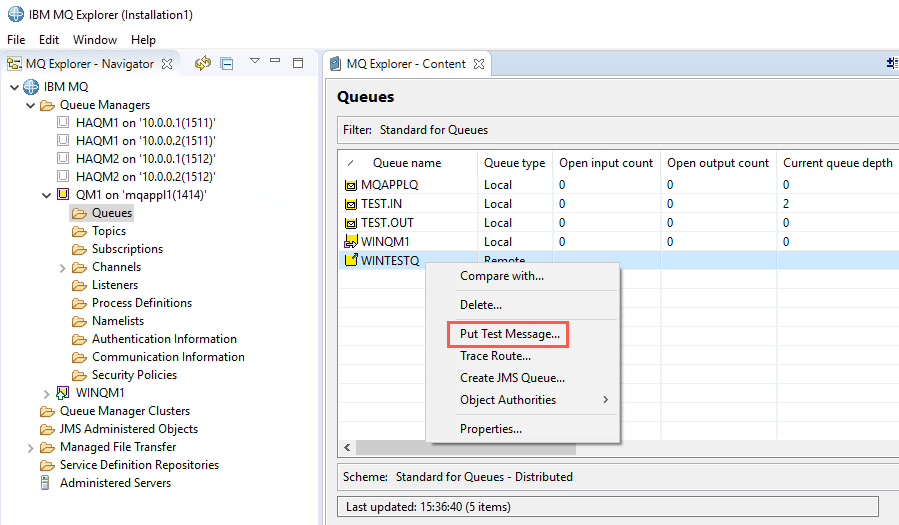
a. Expand the QM1 queue manager entry. Right click the WINTESTQ queue and click the Put Test Message… menu item.
b. Enter a simple message and click the Put message button.
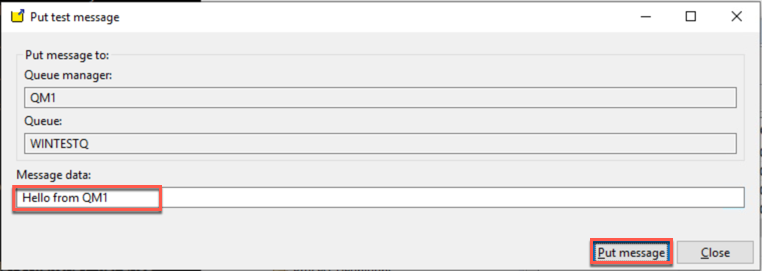
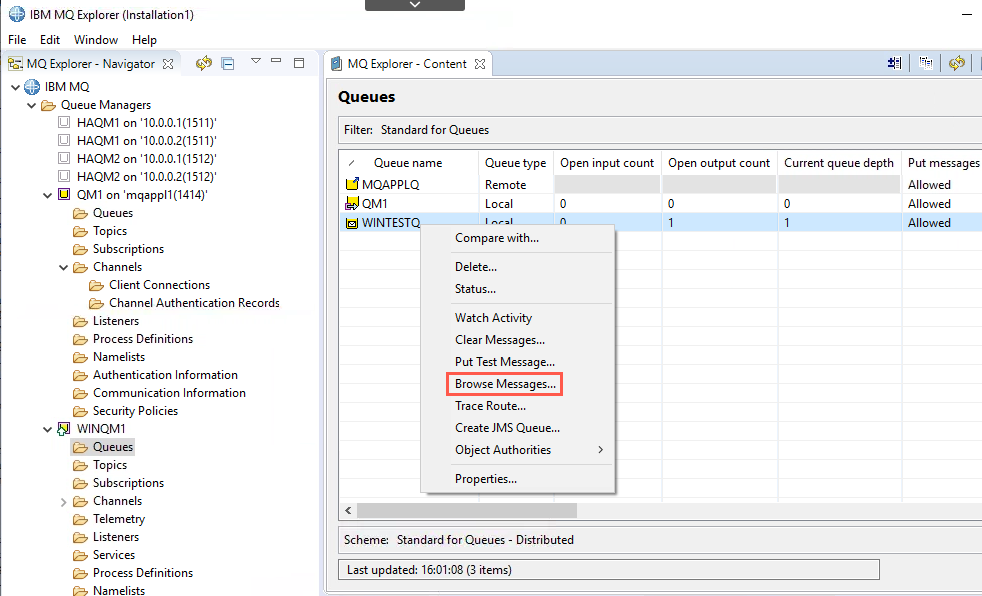
c. Close the test window, then expand the WINQM1 queue manager and right click the WINTESTQ queue. Select the Browse Messages… menu item.
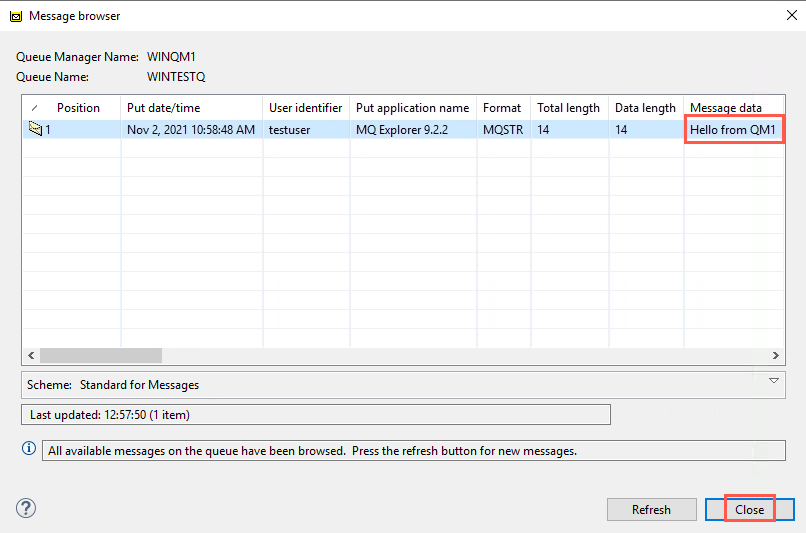
d. Your message should be listed in the browser window. Click the Close button to continue.
e. Repeat steps a through d to test triggering of channels from WINQM1 to QM1 by putting a simple message on WINQM1’s MQAPPLQ remote queue definition and ensuring it is PUT to the corresponding local queue on QM1. Correct any configuration issues before proceeding.
-
Stop the SENDER channels on both queue managers, setting their status to Inactive.
Configure the Windows queue manager to support SSL/TLS channels
It is IMPORTANT to note here that the following instructions have been tested and work. 99% Of the issues when setting up the SSL on the key-stores and channels ultimately are always cause my miss-spellings and bad typing. The configuration is very unforgiving in this area. Remember GIGO. Save yourself aggravation and time and please verify your typing, especially around spelling ‘qm’ and ‘mq’. ‘mq’ is a product designation while ‘qm’ is a Queue Manager Designation.
In order to enable SSL/TLS protection for channels, a queue manager requires a keystore for the storage of personal certificates as well as for signer certificates of any remote queue managers that may need to be accessed.
Perform the following steps to create and configure the keystore for the WINQM1 queue manager:
-
Launch the IBM Key Management tool by clicking on its icon on the Desktop.
-
Create a new keystore by clicking on the Key Database File → New… menu item.
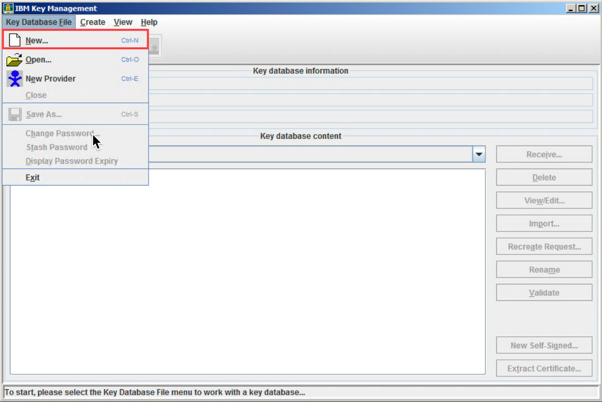
-
When a queue manager is created, it will look for a keystore in a default location. For this lab exercise, the WINQM1 queue manager will look for a keystore in the following location: C:\ProgramData\IBM\MQ\qmgrs\WINQM1\ssl\. The default name for the keystore is assumed to be key.kdb. Enter key.kdb in the File Name: text box and C:\ProgramData\IBM\MQ\qmgrs\WINQM1\ssl in the Location: textbox, then click the OK button.
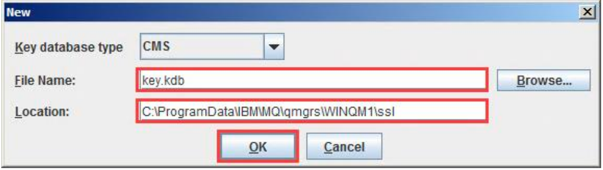
-
Enter passw0rd as the password for the keystore. Select the Expiration time and Stash password to a file checkboxes. Enter value of 3650 days in the Days text box (we do not want to deal with certificate expiration anytime soon!) and click the OK button.
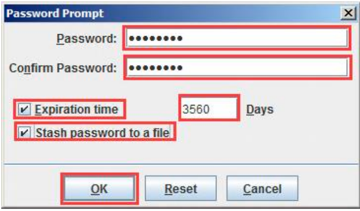
-
Now you will create a self-signed certificate to use for protecting messages. Ensure that Personal Certificates is selected then click the New Self-Signed button.
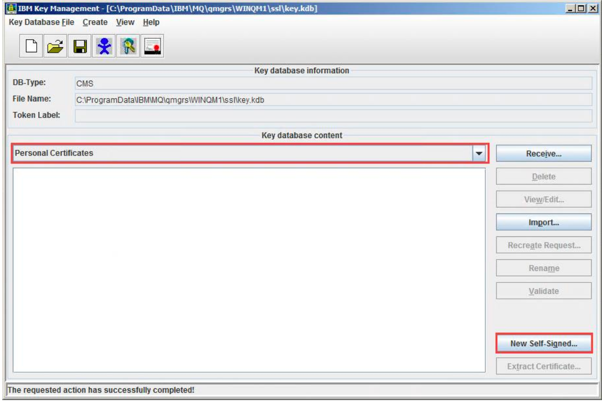
-
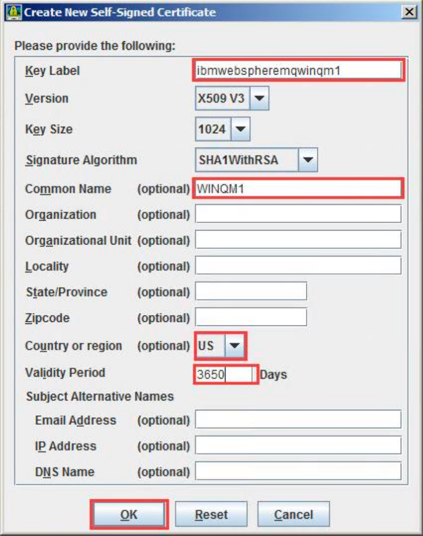
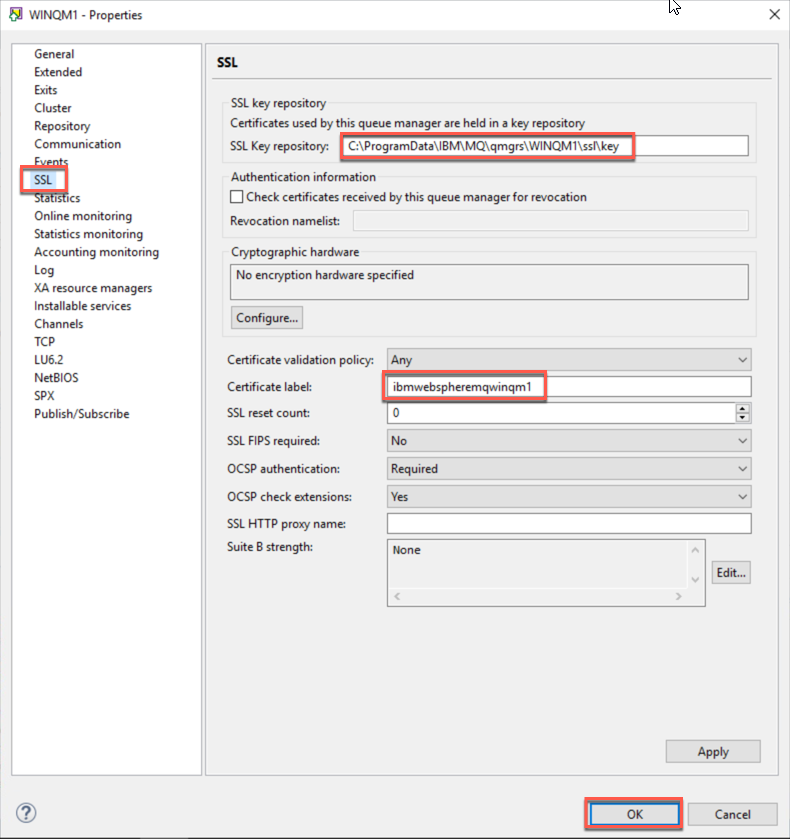
WebSphere MQ version 7 and earlier had specific requirements for the Key Label entry. Although we are working with a Version 9 queue manager, we will assign a label using the more stringent requirements. Enter a value of ibmwebspheremqwinqm1 in the Key Label text box. Enter a value of 3650 in the Validity Period text box.
The content of the remaining fields are not used by IBM MQ; however, for this lab enter WINQM1 in the Common Name text box and select a value of US in the Country or region drop-down list. Click the OK button when ready.
-
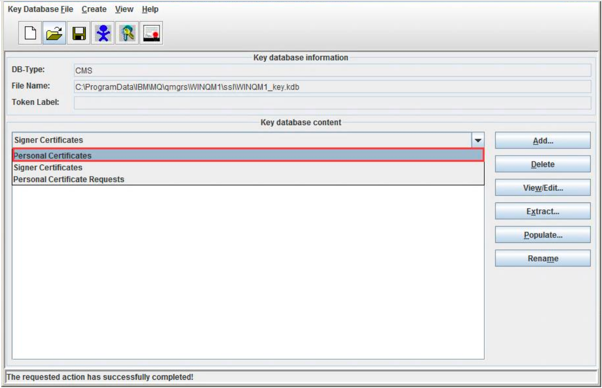
Next, you must extract the public part of WINQM1’s certificate for the QM1 queue manager on the Appliance to use. Verify that Personal Certificates selected from the drop-down list.
-
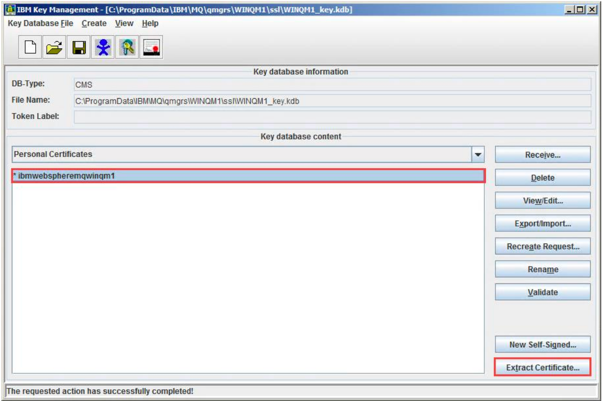
Select the certificate for the WINQM1 queue manager and click the Extract Certificate… button.
-
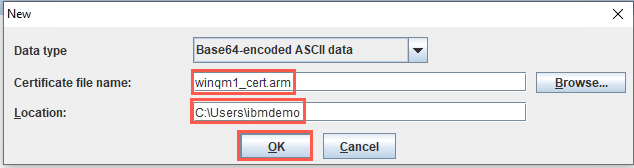
Export the certificate to a location where we will be able to easily access it for transfer to the Appliance. For this lab exercise, use winqm1_cert.arm for the Certificate file name: and C:\Users\ibmdemo for the Location. Click the OK button.
-
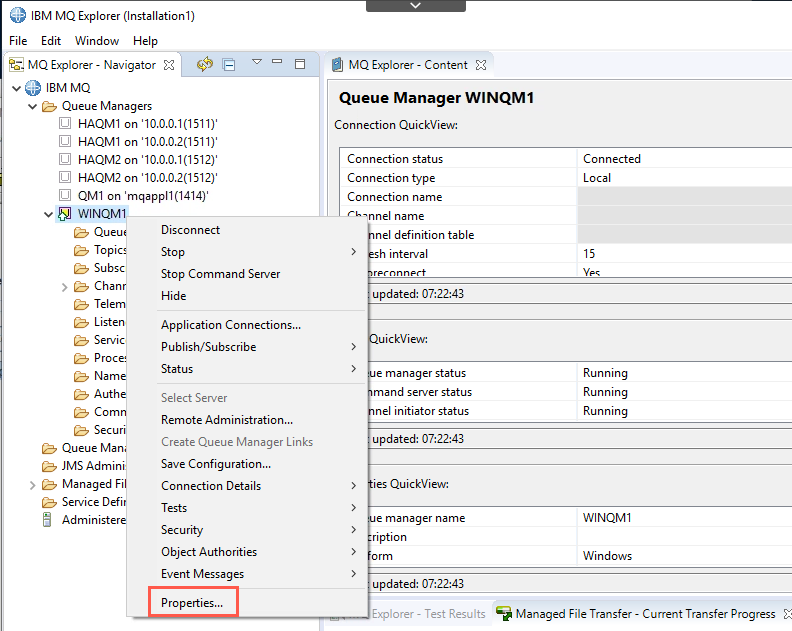
Now review the SSL properties of the WINQM1 queue manager to see where various settings match the values in the keystore and personal certificate. Open the MQ Explorer, right click the WINQM1 queue manager, and then click the Properties… menu item.
-
Select the SSL entry in the list. Note the entry for the SSL Key repository: text box. This entry specifies the path to the keystore file as well as the file name of the keystore (without the .kdb) extension). Also, take note of the Certificate label: entry. This label is used to match the personal certificate found in the keystore.
-
Click the OK button when done.
-
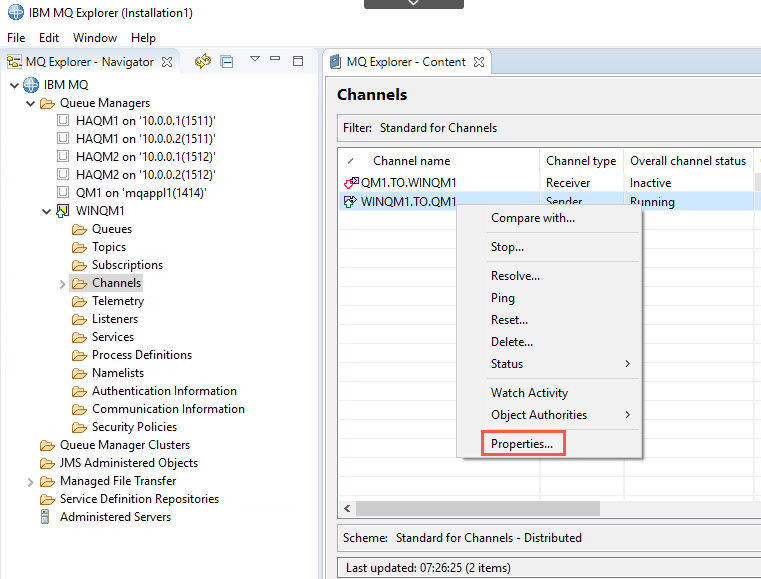
You must now specify which channels you would like to enable for SSL/TLS security. Expand the Channels folder for WINQM1 in the MQ Explorer, right click the WINQM1.TO.QM1 sender channel entry and then click the Properties… menu item.
-
Select the SSL entry from the list. Select an entry from the SSL Cipher Spec: list box that will match your selection on the other queue manager. Note there are a number of algorithms available in the list. For this exercise, select the TLS_RSA_WITH_AES_128_CBC_SHA256 cipherspec.
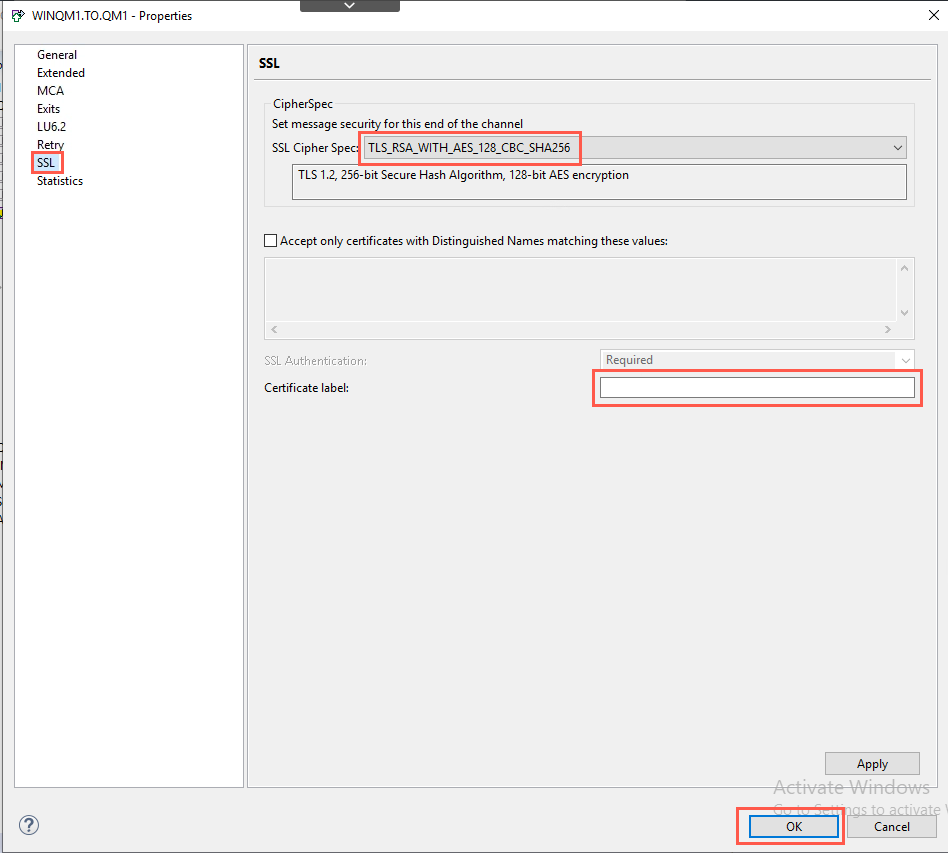
Note that there is a text box labeled Certificate label:. This allows you to specify different certificates for each channel. In this lab, we will use the default certificate specified at the queue manager level, so leave it blank.
-
Click the OK button to continue.
-
Repeat steps 13 through 15 for the QM1.TO.WINQM1 receiver channel.
-
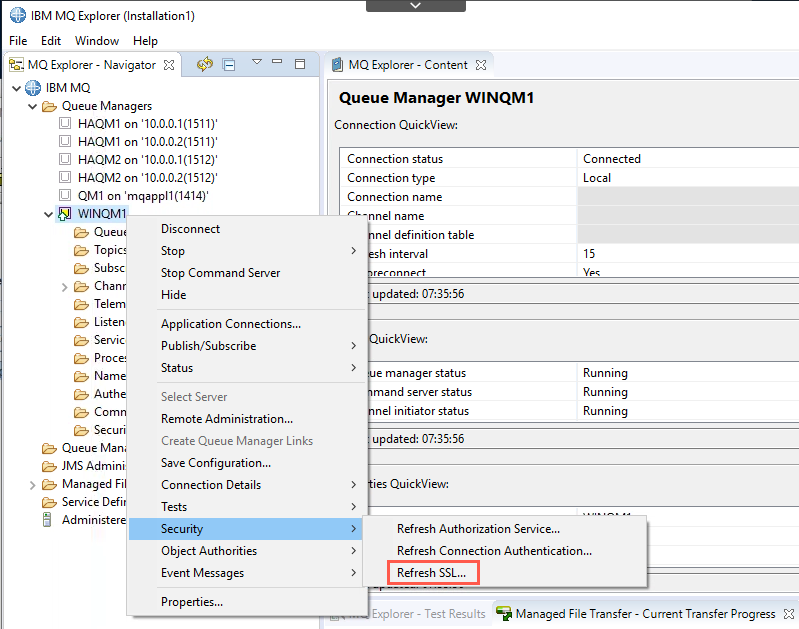
Since changes have been made to the SSL configuration for the queue manager, you will need to either restart the queue manager or refresh the SSL configuration settings. Right click the WINQM1 queue manager entry in the MQ Explorer and click the Security → Refresh SSL… menu item.
-
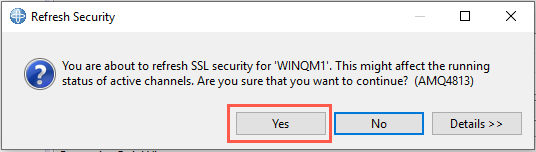
Click the Yes button when prompted.
Proceed to the next section to configure the QM1 queue manager hosted on the Appliance.
Configure the MQ Appliance queue manager to support SSL/TLS channels
-
Switch to the Putty session (or the appliance’s console window) and ensure you are in MQ administration mode by entering the mqcli command (if necessary).

-
Create a self-signed certificate for the QM1 queue manager by entering the following command:
createcert -m QM1 -dn "CN=MQAppl1, O=IBM, C=US" -label ibmwebspheremqqm1
Note that you specified a value for -label that matches the CERTLABL value of QM1.
After the self-signed certificate is generated, the public part of the certificate is extracted to a file that is placed in the Appliance’s mqpubcert:// file system. The certificate’s file name was generated for you by default. Note that the file name was displayed when the command completed. In the example above the name of the generated file is QM1_ibmwebspheremqqm1.
The certificate for QM1 must now be transferred to the Windows server so that it may be imported into WINQM1’s keystore file. Transfer the certificate using the following steps:
-
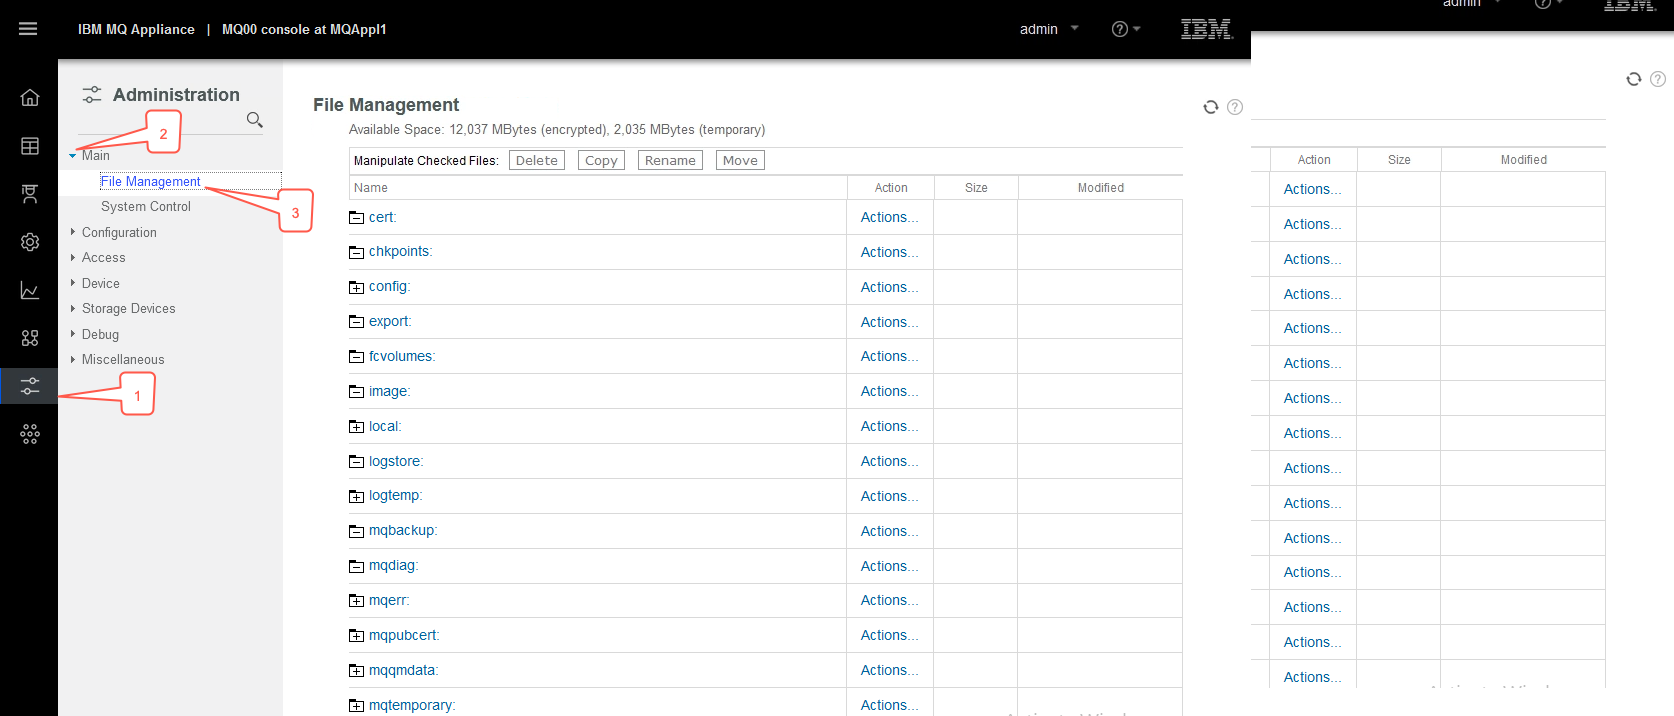
Logon to the MQ Appliance web console using the admin user ID. Click the Administration tab and then expand the Main menu. Click the File Management menu item to display a list of the file systems that are configured on the appliance.
-
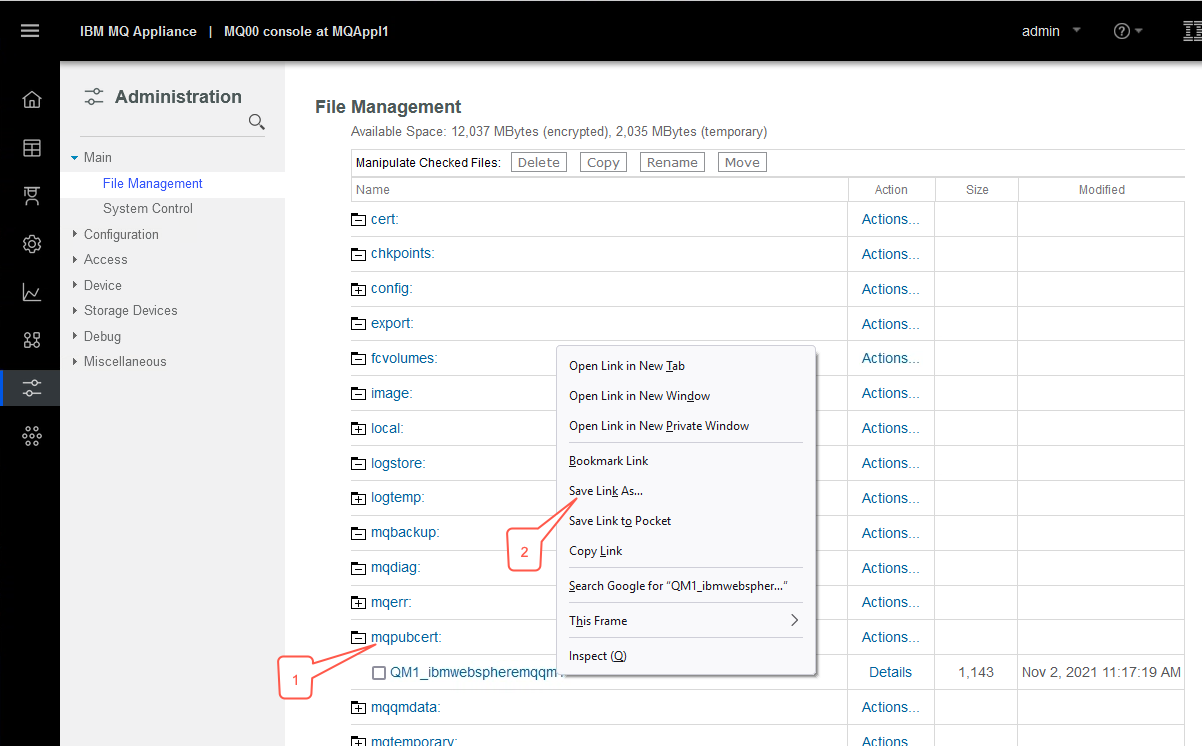
Click the mqpubcert entry to expand the contents of this file system. Next right click the QM1_ibmwebspheremqqm1 entry and select the Save link as… menu item.
-
Save the certificate file to the C:\Users\ibmdemo directory and remove the file extension from the file name (remember to set the Save as type to be All files, and remove the .txt from the name).
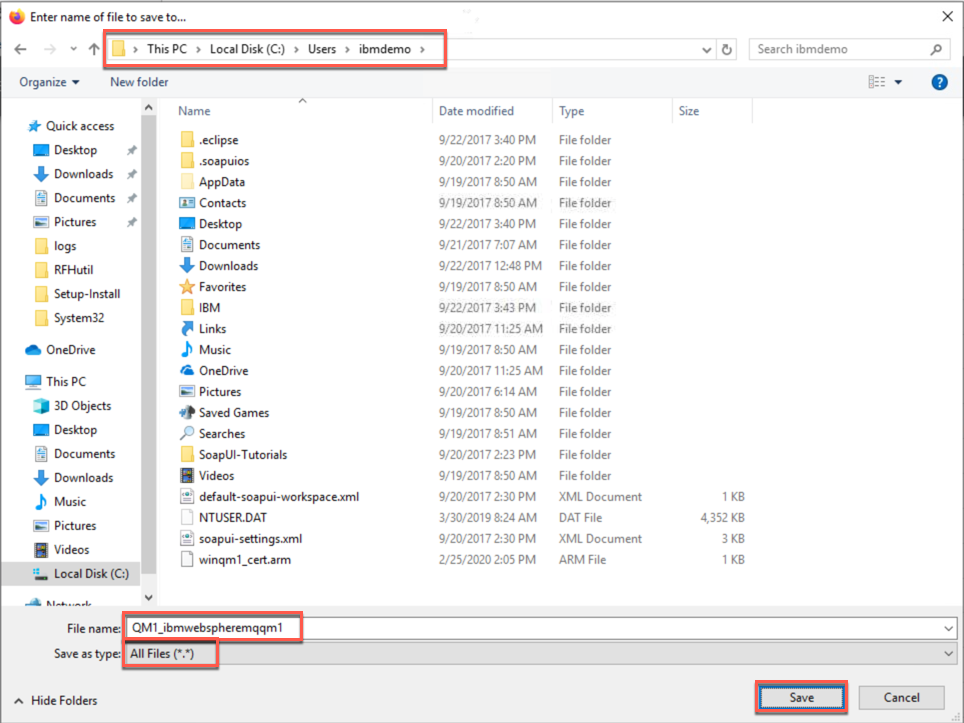
The certificate must now be imported into WINQM1’s keystore to enable the queue manager to be able to participate in SSL/TLS protected sessions. Use the following steps to import this certificate.
-
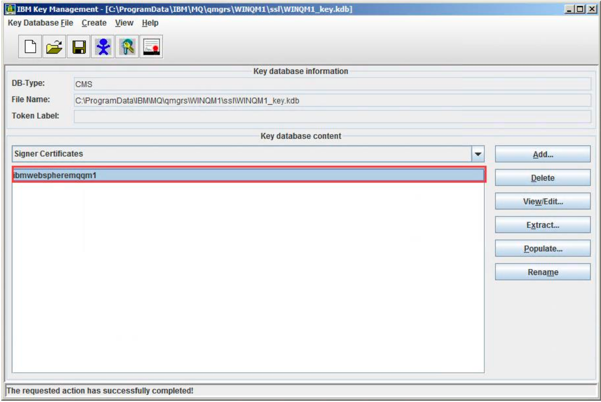
Return to the IBM Key Management window and select Signer Certificates in the drop-down list box.
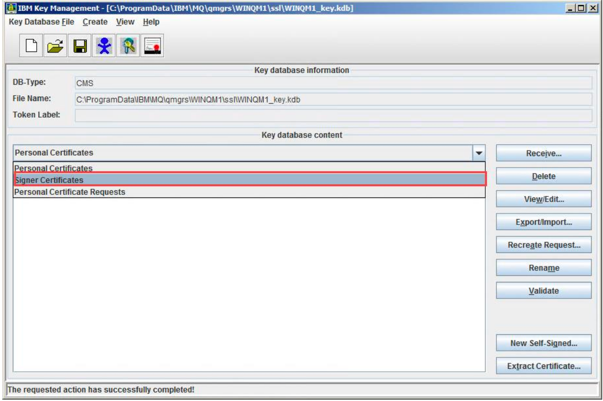
-
Click the Add… button to select the certificate to import. Navigate to the C:\Users\ibmdemo directory and select the certificate for the QM1 queue manager – QM1_ibmwebspheremqqm1. Click the OK button.
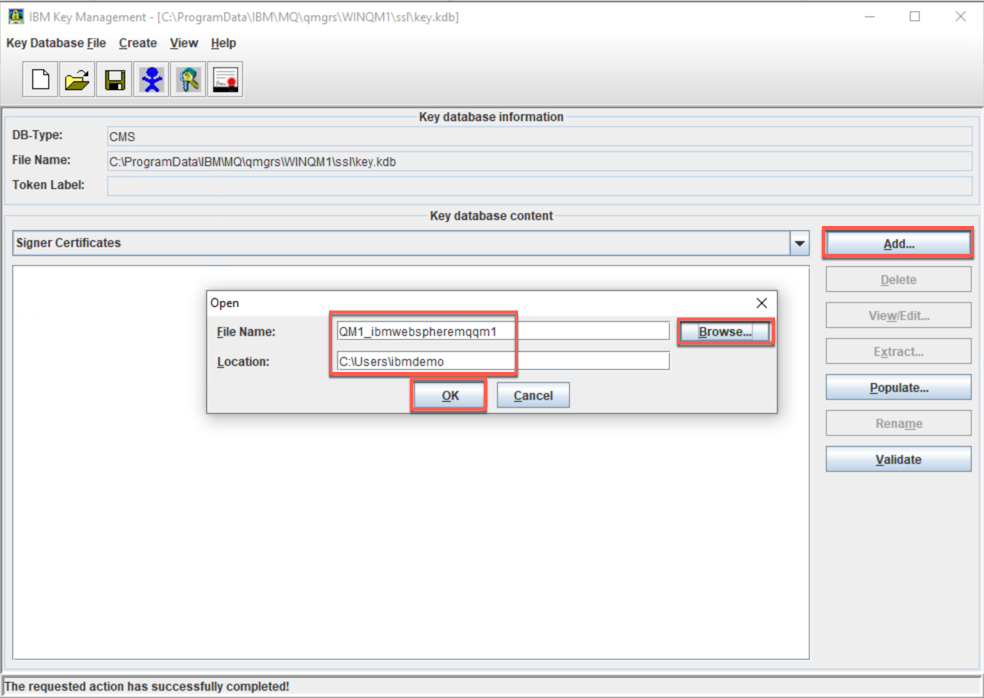
-
Enter ibmwebspheremqqm1 for the label name and click the OK button.
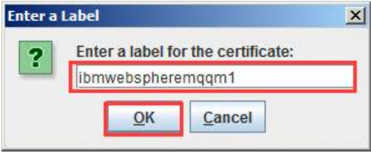
-
The public certificate for the QM1 queue manager is now available for the WINQM1 queue manager to use.
-
Close the IBM Key Management window.
You must now refresh the SSL configuration (again!) for the WINQM1 queue manager.
-
Return to the MQ Explorer window and right click the WINQM1 queue manager and then click the Security → Refresh SSL… menu item.
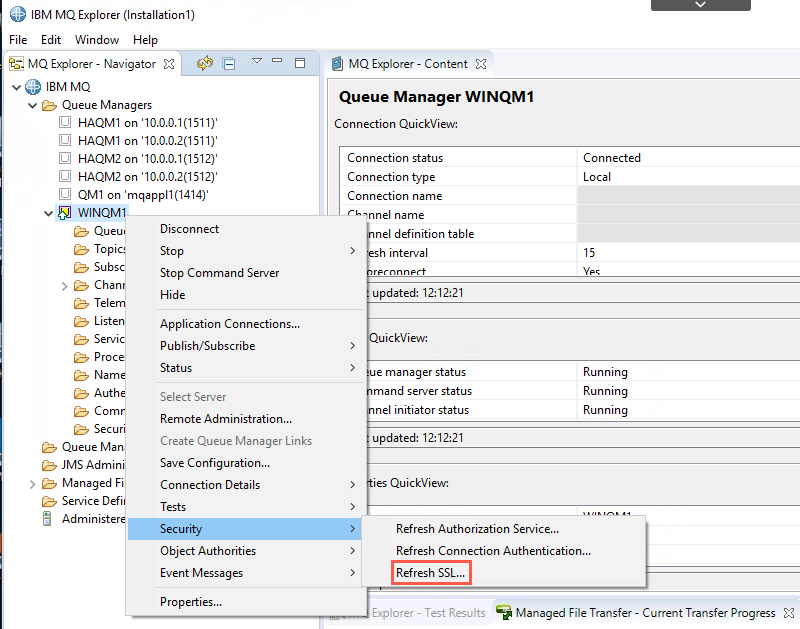
a. Click the Yes button when prompted.
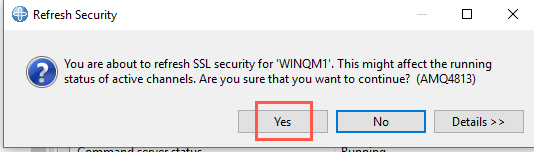
b. The amount of time required to refresh the SSL configuration will vary depending on the activity level of the queue manager and its active channels. You may get a warning message that states that the operation timed out. Continue with the following steps while the operation continues in the background.
-
You must now transfer the signer certificate for the WINQM1 queue manager (exported earlier) to the Appliance. Use the following steps to transfer the certificate:
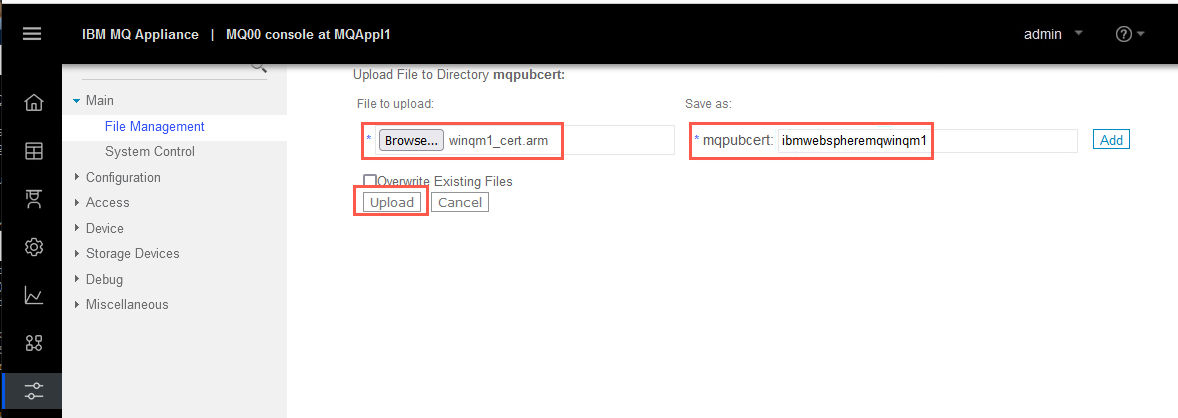
a. Return to the web browser and click the Actions… link next to the mqpubcert: item. The Directory actions… menu will appear. Click the Upload Files menu item.
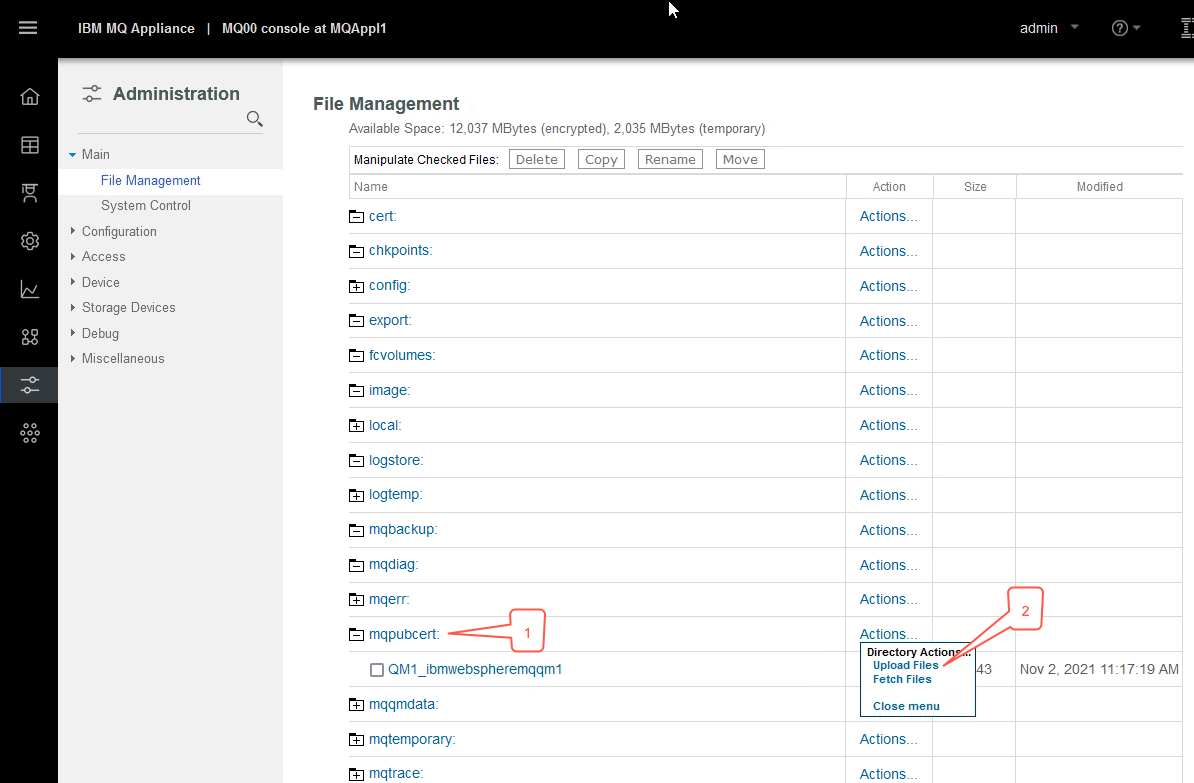
b. Click the Browse button to open the file picker dialog and select the C:\Users\ibmdemo\winqm1_cert.arm file. Specify ibmwebspheremqwinqm1 as the name of the file to save and then click the Upload button.
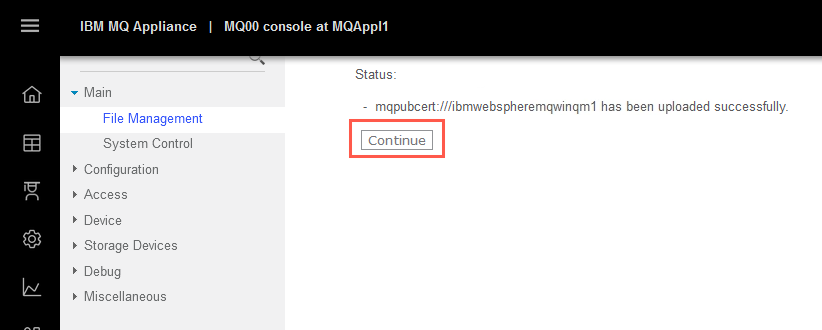
c. Click the Continue button to return to the File Management page.
-
Now you will add the public certificate for the WINQM1 queue manager to the keystore of QM1. (Reminder: You must be in the MQ administration mode in order to complete this step.) Enter the following command to import the certificate:
addcert -m QM1 -label ibmwebspheremqwinqm1 -file ibmwebspheremqwinqm1
-
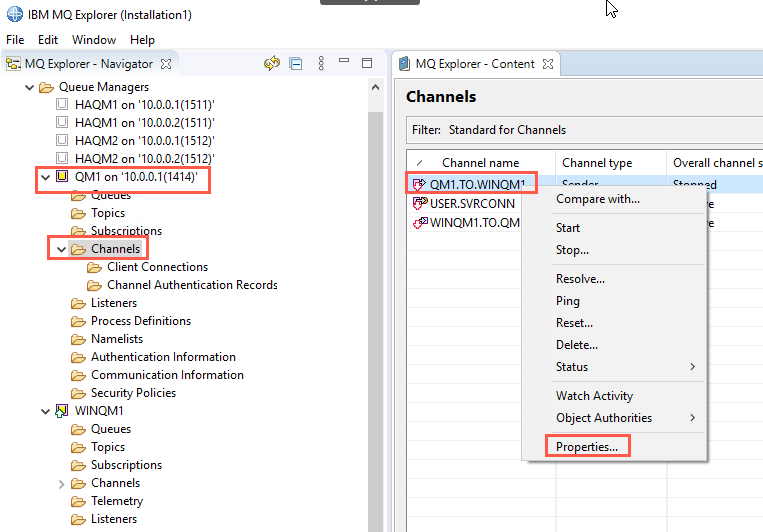
The sender and receiver channels must now be configured to support the same cipherspec that the WINQM1 channels are using. Return to the MQ Explorer and expand the QM1 queue manager entry. Click the Channels folder, then right click the QM1.TO.WINQM1 sender channel entry, and then click the Properties… menu item.
-
Select the SSL entry from the list. Select an entry from the SSL Cipher Spec: list box that will match your selection on the other queue manager. Note there are a number of algorithms available in the list. For this exercise, select the TLS_RSA_WITH_AES_128_CBC_SHA256 cipherspec.
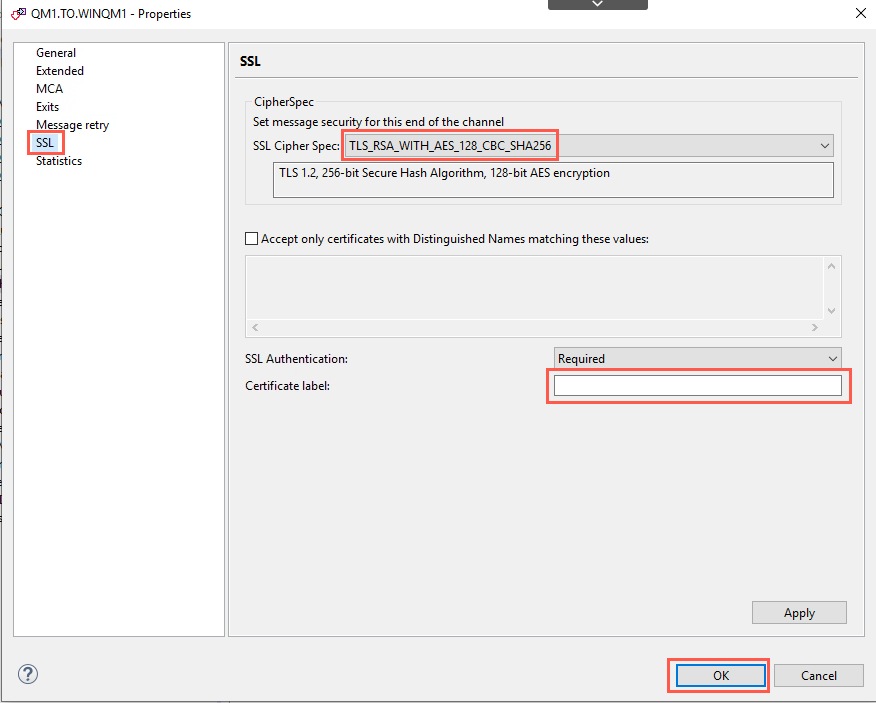
We will use the default certificate specified at the queue manager level, so leave the Certificate Label: field blank.
-
Click the OK button to continue.
-
Repeat steps 14 through 16 for the WINQM1.TO.QM1 receiver channel.
-
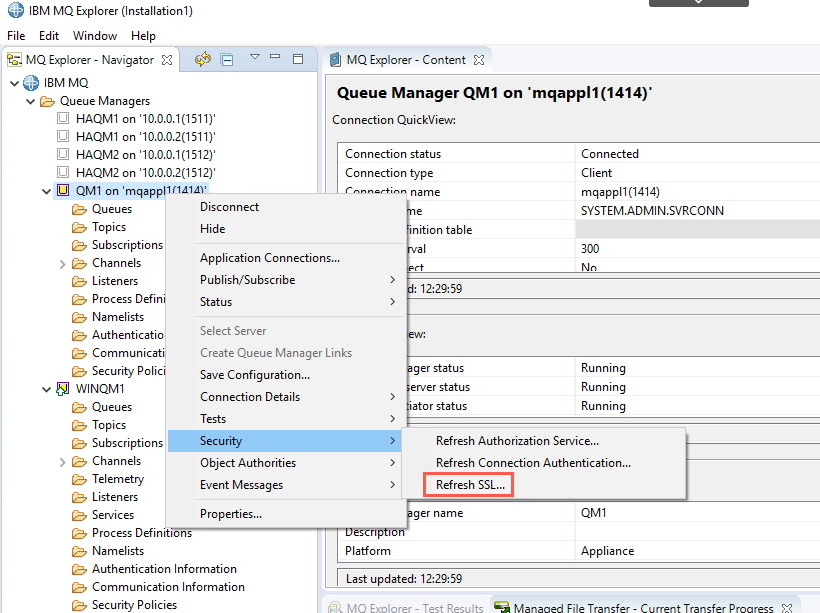
Since changes have been made to the SSL configuration for the queue manager, you will need to either restart the queue manager or refresh the SSL configuration settings. Right click the QM1 queue manager entry in the MQ Explorer and click the Security | Refresh SSL… menu item.
-
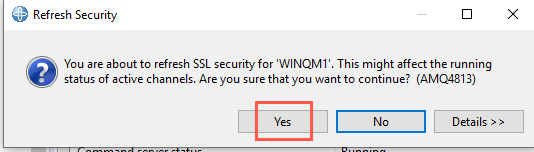
Click the Yes button when prompted.
Verify the SSL/TLS configuration
-
In order to verify your SSL/TLS configuration is correct, you will need to start the channels and verify that SSL attributes are in effect. Switch back to the Windows image, then use the MQ Explorer to start the sender channels for each queue manager and verify the SSL status.
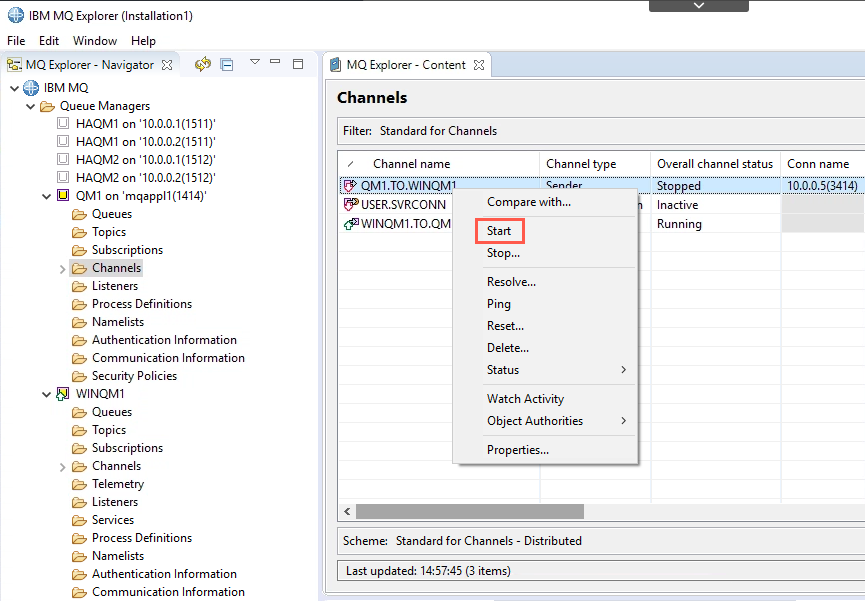
a. Expand the tree for QM1 to display Channels. Stop the QM1.TO.WINQM1 channel if it is not in Stopped or Inactive state, then start (restart) the channel.
b. After a few moments, the channel should reach a status of Running. Once it has reached running status, right click the channel and click the Channel Status… menu item.
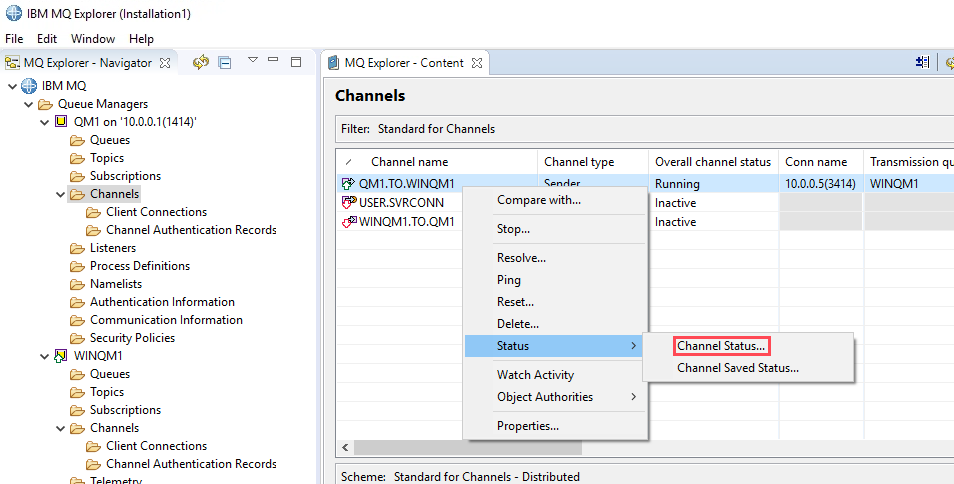
c. A status window will appear. This window has a number of columns that report on the channel status. Scroll to the right until you see a column labeled Short peer name. Presence of an entry in this column indicates that SSL/TLS protection is in effect, and shows the serial number and other information of the certificate this is in use.
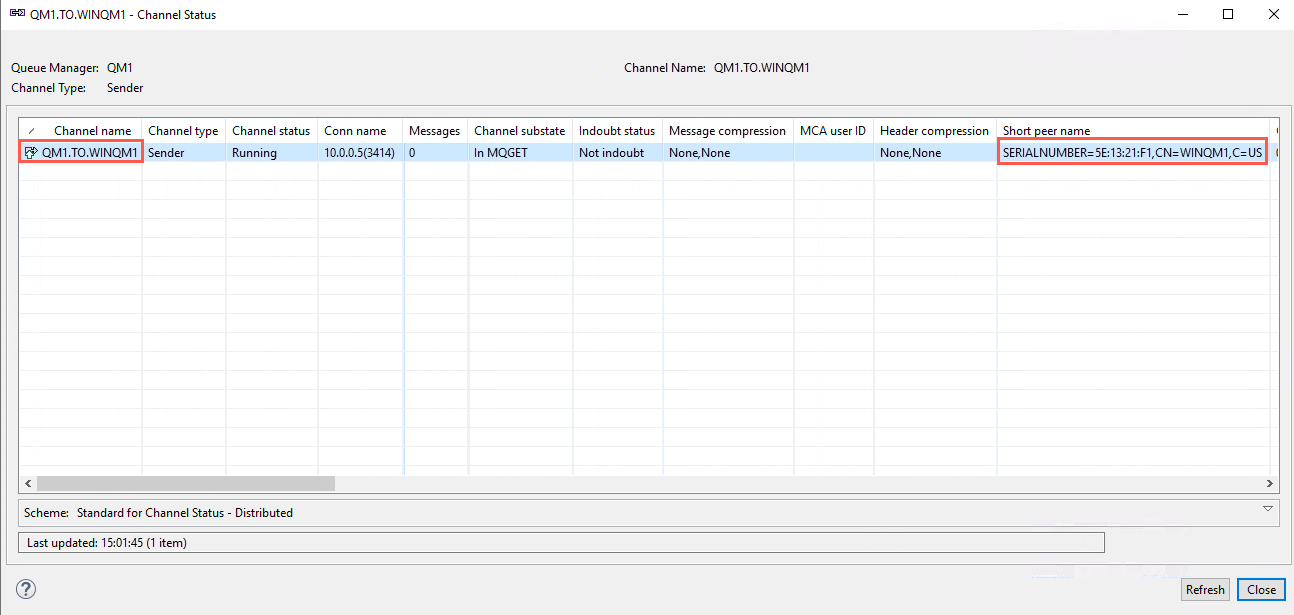
d. Repeat steps a through c for the WINQM1.TO.QM1 channel that is part of the WINQM1 queue manager.
-
This completes this portion of lab exercise 5.
Configure the QM1 queue manager to use an LDAP repository
Overview of MQ usage of an LDAP repository
With the MQ Appliance, an LDAP repository may be used for authentication and authorization purposes.
A queue manager may be configured to require an application to present a user ID for authentication before granting access. The queue manager may be configured to accept either an O/S or LDAP defined user ID when an application connects to the queue manager. When using LDAP based authentication, it is not necessary to have the LDAP user ID defined as a local O/S user.
Reminder
The MQ Appliance provides two user repositories out of the box: the appliance user repository and the messaging user repository. For this portion of the lab, consider the users in the messaging repository as equivalent to a local O/S user.
Once the user ID has been authenticated, the queue manager’s Object Authority Manager (OAM) handles the authorization functions to manage access to MQ objects. You can configure a queue manager to present one of two user ID’s to the OAM for authorization purposes:
-
The user ID associated with the application that has connected to the queue manager. That is, the O/S user ID that the application is running under.
-
The user ID used during the authentication phase of connecting to the queue manager. An application may authenticate to a queue manager with a different user ID and password combination from what the application is running under. The ADOPTCTX attribute on the AUTHINFO object that is active for the queue manager determines which method of authorization is used.
Changing the authorization processing method on a queue manager requires careful planning to avoid accidentally blocking all users from accessing a queue manager. OAM security authorizations are associated with the authorization method in place when they are configured. If you change from O/S authorization to LDAP authorization, any existing O/S authorization rules that have been set become inactive and invisible. Likewise, when switching back from LDAP to O/S based authorization, all LDAP authorizations that had been defined become inactive and invisible, restoring the original O/S rules.
LDAP fundamentals
A user ID is stored as a record in an LDAP repository and has a number of attributes associated with it. The specific attributes that are available, and which of those are mandatory, are determined by the objectClass that the records are derived from. For this lab, you will be using user ID’s that are part of the inetOrgPerson objectClass and group ID’s that are part of the groupOfNames objectClass.
When configuring a queue manager to use an LDAP user repository, there is more to be done than to just configure the queue manager to connect to the LDAP repository. User ID records defined in an LDAP repository have a hierarchical structure. In order to identify a specific record, you must be familiar with the directory structure. You will then use this information to properly configure the queue manager.
The following graphic illustrates the hierarchy you will use in this lab:
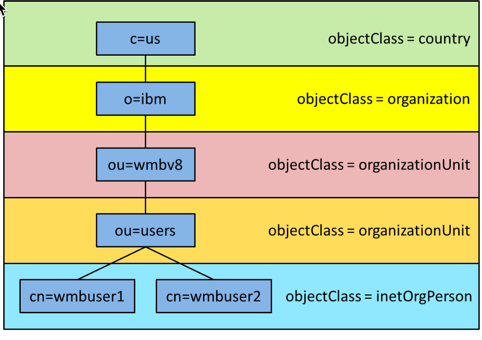
An example of identifying a specific user using a fully qualified domain name (FQDN) would be:
cn=potuser1, ou=users, ou=ibmpot, o=ibm, c=us
So an MQ application could connect to the queue manager and present an FQDN as its user ID. This, however, is a lot to provide and it would be simpler if you could configure the queue manager to assume all user ID’s that are presented are found in one specific branch of the hierarchy, and have the queue manager add that portion of the hierarchy to any user ID that the application provides.
This is one of the purposes of a queue manager’s AUTHINFO object. The BASEDNU attribute of an AUTHINFO object is used to identify the portion of the FQDN that is common for all user IDs. An AUTHINFO object also has a USRFIELD attribute that may be used to help compose an LDAP user ID. Refer to the following table to see how the AUTHINFO attributes are used to compose LDAP user IDs.
| Application Provides | USRFIELD | BASEDNU |
|---|---|---|
| cn=potuser1, ou=users, ou=ibmpot, o=ibm, c=us | ||
| cn=potuser1 | Adds ou=users, ou=ibmpot, o=ibm, c=us | |
| potuser1 | Adds cn= | Adds ou=users, ou=ibmpot, o=ibm, c=us |
NOTE: There are a similar set of attributes to manage group ID’s.
Gather LDAP server data
Like many other software components, an LDAP server has a wide range of options that may be used to store and retrieve entries. In order to enable a queue manager to utilize an LDAP repository you must configure queue manager objects to properly match LDAP objects. An instance of IBM’s Tivoli Directory Server V6.2 is installed in the Windows image to support this lab exercise. Before starting this exercise, note the following information about the LDAP server:
| Entry | Description | Value |
|---|---|---|
| LDAP server name: | Host name / IP Address of server. Include the port number in parenthesis if it is not the default. | 10.0.0.8 |
| User name: | A valid user ID that the queue manager may use to query the LDAP | cn=root |
| Password: | The password for the above user | db2admin |
| Equivalent short user: | The LDAP attribute that is used to map between an LDAP entry and the underlying O/S. Examples for the inetOrgPerson LDAP object class would be either sn or uid. | sn |
| User object class: | The LDAP object class that the user ID record is derived from. | inetOrgPerson |
| Qualifying user field: | The LDAP attribute that is used to identify the user. Refer to the previous section for an example of how to determine what value to use. | cn |
| Use secure communications: | Determines whether to configure SSL/TLS communications between the queue manager and the LDAP repository. For this lab exercise, leave this value at NO. | NO |
| Authorization method: | Used to determine how the queue manager should query for user and group ID’s. For this exercise specify SEARCHGRP to indicate you will search for users and groups in an LDAP directory, and that the queue manager should use the Qualifying group field attribute to identify which group attribute to use to search for group membership. | SEARCHGRP |
| Allow nested groups: | Used to determine if access rights may be aggregated through a group’s hierarchy. | YES |
| User base DN: | Used to compose an FQDN for a user ID as described above. (Note this is a single field.) | ou=users, ou=wmbv8, o=ibm, c=us |
| Group base DN: | Used to compose an FQDN for a group ID as described above. (Note this is a single field.) | ou=users, ou=wmbv8, o=ibm, c=us |
| Group object class: | The LDAP object class that the group ID record is derived from. | groupOfNames |
| Qualifying group field: | The LDAP attribute that is used to identify the group. Refer to the previous section for an example of how to determine what value to use. | cn |
| Group membership field: | The LDAP attribute that is used to identify the members of the group. Refer to the previous section for an example of how to determine what value to use. | member |
The LDAP server used for this lab contains five user ID’s and one group. The user ID’s are:
| User ID | password |
|---|---|
| cn=potuser1, ou=users, ou=ibmpot, o=ibm, c=us | passw0rd |
| cn=potuser2, ou=users, ou=ibmpot, o=ibm, c=us | passw0rd |
| cn=potuser3, ou=users, ou=ibmpot, o=ibm, c=us | passw0rd |
| cn=potuser4, ou=users, ou=ibmpot, o=ibm, c=us | passw0rd |
| cn=potuser5, ou=users, ou=ibmpot, o=ibm, c=us | passw0rd |
The group used for this lab exercise is named authorized. It contains the following users:
-
cn=potuser1, ou=users, ou=ibmpot, o=ibm, c=us
-
cn=potuser3, ou=users, ou=ibmpot, o=ibm, c=us
-
cn=potuser5, ou=users, ou=ibmpot, o=ibm, c=us
Prepare the queue manager
-
As mentioned earlier, the use of an LDAP directory for authentication is not limited to queue managers hosted on an MQ Appliance. This support was added to MQ V8.0.0.2 and later releases. The following steps are only required if you are configuring a server based queue manager that was created on a version earlier V8.0.0.2 and then migrated to the appliance.
a. In order to support the use of an LDAP, a queue manager needs to be running at COMMAND LEVEL 801 or higher. By default, an appliance based queue manager runs at COMMAND LEVEL 924. To verify the COMMAND LEVEL of the queue manager, use the runmqsc command shell and enter the following command:
DIS QMGR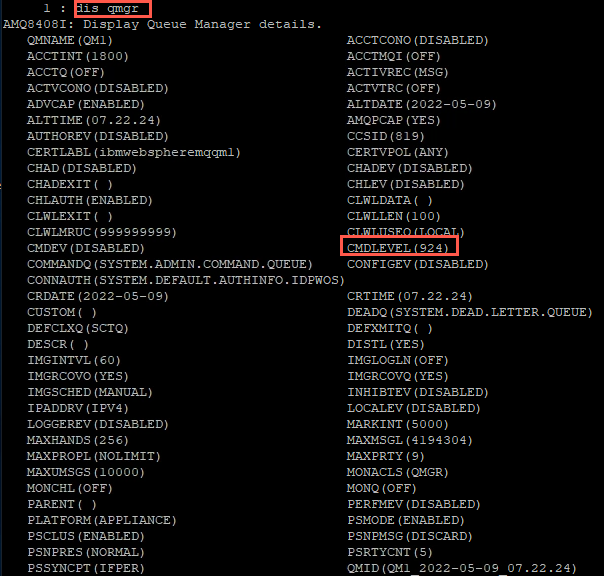
b. If the CMDLEVEL is not at a minimum level of 801, run the following commands to set it:
endmqm -i <queue_manager_name> strmqm -e CMDLEVEL=924 <queue_manager_name> (Or specify a higher CMDLEVEL if the installed MQ version supports a higher version) strmqm <queue_manager_name> -
Follow these steps to configure the queue manager to connect to the LDAP server.
Note:
For convenience, you can cut and paste these commands from C:\Lab05\Commands\Command Snippets.txt into the Putty session (not the Appliance’s console window).a. From your Putty session, enter the runmqsc QM1 command to enable entry of mqsc authorization commands.
b. Use the following command to create a new AUTHINFO object to reference the LDAP directory. Note you will need to substitute values in the command with those you collected from the LDAP server that you will be connecting to:
 DEFINE AUTHINFO(USE.LDAP) AUTHTYPE(IDPWLDAP) ADOPTCTX(YES)
CONNAME(10.0.0.8) CHCKCLNT(REQUIRED) CLASSGRP('groupOfNames')
CLASSUSR('inetOrgPerson') FINDGRP('member') BASEDNG('ou=users,
ou=ibmpot, o=ibm, c=us') BASEDNU('ou=users, ou=ibmpot, o=ibm,
c=us') LDAPUSER('cn=root') LDAPPWD('passw0rd') SHORTUSR('sn')
GRPFIELD('cn') USRFIELD('cn') AUTHORMD(SEARCHGRP) NESTGRP(YES)
c. Use the following command to modify the queue manager to use the new AUTHINFO object:
ALTER QMGR CONNAUTH(USE.LDAP)d. Use the following command to refresh the security settings of the queue manager:
REFRESH SECURITY TYPE(CONNAUTH)Warning:
Do not exit the runmqsc command shell until you have completed the next 2 steps. Otherwise, you may irrevocably block all access to the queue manager.e. Now that the queue manager has been configured for LDAP and security for the queue manager has been refreshed, you will need to use valid user ID’s from the LDAP for both authentication and authorization. At this point in your configuration none of the LDAP user ID’s will have any access to the queue manager or any of its objects until you start granting explicit authorities to all of the necessary objects.
Also, keep in mind that the MQ “superuser” group of mqm is known only to the O/S that the queue manager is running on. You will no longer be able to utilize membership within that group as you work with the queue manager’s objects.
For this lab exercise we will use an LDAP group named authorized to function the same as the mqm group does in an O/S based authorization configuration.
Complete the following steps to configure the authorized LDAP group to act as an MQ superuser. Use the following command to enable a member of the authorized group to connect to the queue manager:
SET AUTHREC OBJTYPE(QMGR) GROUP('authorized') AUTHADD(ALL)Note:
Reminder - All references to LDAP attributes are case sensitive.f. Use the following commands to enable access to the queue manager from the MQ Explorer and runmqsc command shell:
 SET AUTHREC PROFILE(SYSTEM.MQEXPLORER.REPLY.MODEL) OBJTYPE(QUEUE)
 GROUP('authorized') AUTHADD(ALL)

 SET AUTHREC PROFILE(SYSTEM.ADMIN.COMMAND.QUEUE) OBJTYPE(QUEUE)
 GROUP('authorized') AUTHADD(ALL)

 SET AUTHREC PROFILE(SYSTEM.MQSC.REPLY.QUEUE) OBJTYPE(QUEUE)
 GROUP('authorized') AUTHADD(ALL)

 SET AUTHREC PROFILE(USER.SVRCONN) OBJTYPE(CHANNEL)
 GROUP('authorized') AUTHADD(ALL)

 REFRESH SECURITY
g. Exit the runmqsc command shell.
h. There are a number of additional authorizations that need to be set in order to provide the authorized group full queue manager administrative rights. To simplify this task, the remaining authorizations have been added to an mqsc script. Open a Windows command prompt and navigate to the C:\Lab05\MQSC directory, then enter the following commands:
 SET MQSERVER=USER.SVRCONN/TCP/10.0.0.1(1414)
 runmqsc -c -u potuser1 QM1 < SET_authorized_ACCESS.mqsc
Note:
Regarding redirecting input for runmqsc commands from mqsc files. This mqsc file contains the password for the potuser1 user ID as the first line of the file. This is necessary to enable the password to be passed blindly to the runmqsc command shell.
Verify LDAP authentication and authorization
Now that LDAP authorization has been configured, the user ID’s that are members of the authorized LDAP group should be able to access the queue manager and all of its objects, whereas the user ID’s that are not in the authorized group should not have any access to the queue manager. Perform the following steps to test your configuration.
-
Open the MQ Explorer and right click the QM1 queue manager, then click the Connection Details → Properties… menu item.
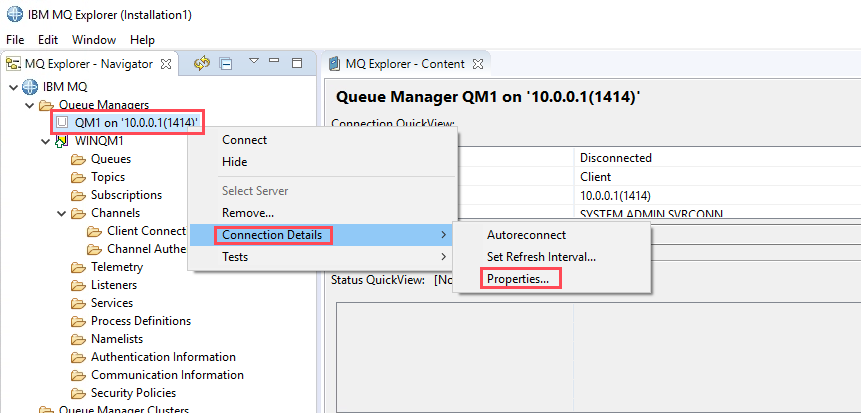
-
Select Userid from the list. Ensure the checkboxes are selected as shown, then enter the user ID you want to test from the list of LDAP users found in the table in Section “Prepare the queue manage” in the Userid: text box and click the Enter password… button to enter the password. Enter the password (passw0rd) and click OK. Click the OK button when done.
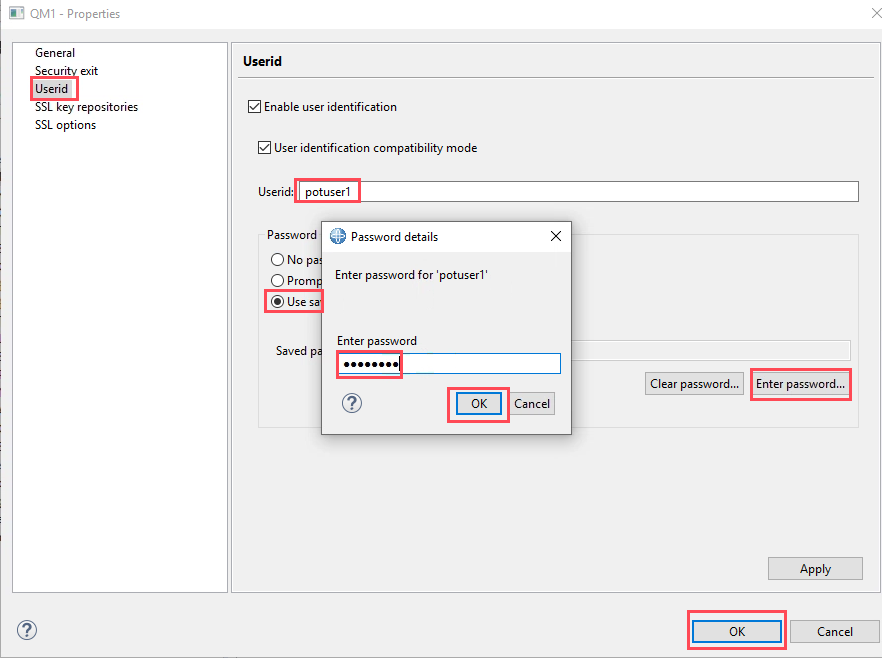
-
Right click the QM1 entry and click the Connect menu item. Your access to the queue manager should be granted or denied based on the user ID you entered. potuser2 and potuser4 should not be permitted access.
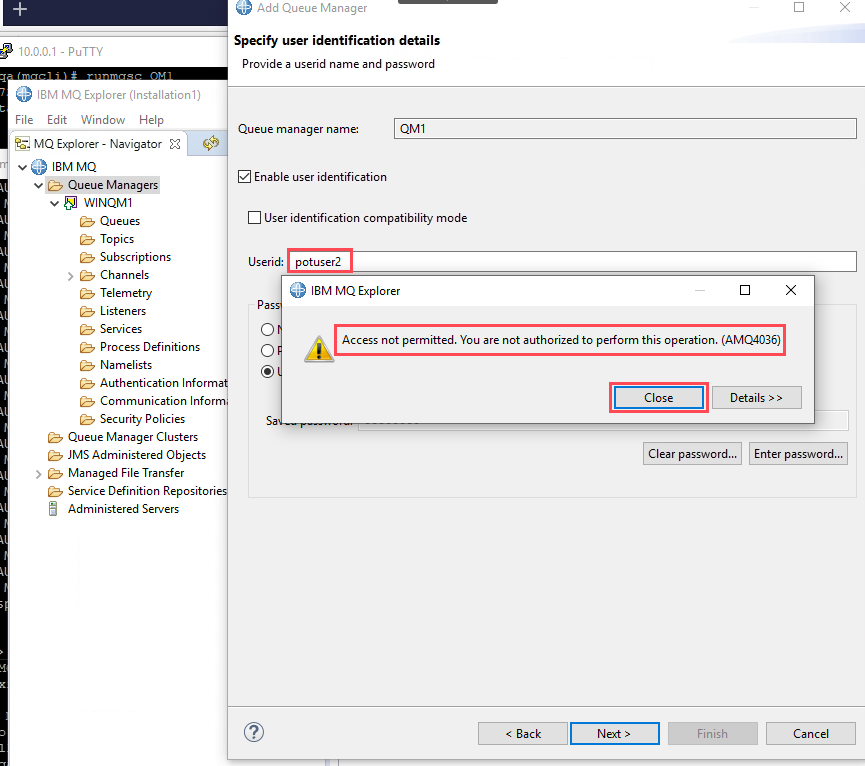
-
Disconnect from QM1, remove QM1 from MQ Explorer and retry using a different user ID. You should see that your access rights are now controlled by the LDAP server.
potuser1, potuser3, potuser5 - permitted
potuser2, potuser4 - denied.
Clean up
Reminder - You must complete the following steps to ensure that any additional lab exercises that you plan to complete are working with a local security repository.
You have now completed this lab exercise. Perform the following steps to reset your queue manager to use a local security repository for any additional lab exercises you plan to complete.
-
Enter the following commands to use the original AUTHINFO object:
runmqsc QM1 ALTER QMGR CONNAUTH(SYSTEM.DEFAULT.AUTHINFO.IDPWOS) -
Use the following command to refresh the security settings of the queue manager:
REFRESH SECURITY TYPE(CONNAUTH) -
Exit the runmqsc command shell.
-
Close all windows.
Summary
This lab has focused on a number of the unique security features of the MQ Appliance. Keep in mind that many of the security features you have explored in this lab are also available in the latest versions of the software versions of MQ. You should now have an understanding of how to implement MQ security functions for the appliance form factor.
Congratulations, you have now completed this lab exercise. Please close all windows.