MQ Uniform Cluster and Application Rebalancing
Featuring:
- Creating a Uniform Cluster
- Application Rebalancing
- Application Rebalancing & Queue Manager Outage
- Metrics
- Using CCDT Queue Manager Groups
Introduction
This lab introduces MQ Uniform Cluster and Application Rebalancing as at MQ 9.1.5 code level. In this lab, you will:
- Create a Uniform Cluster quickly using configuration files, a feature introduced in MQ 9.1.4.
-
Run re-connectable sample applications to a queue manager within the Uniform Cluster to show automatic rebalancing of the apps to other queue managers in the Uniform Cluster
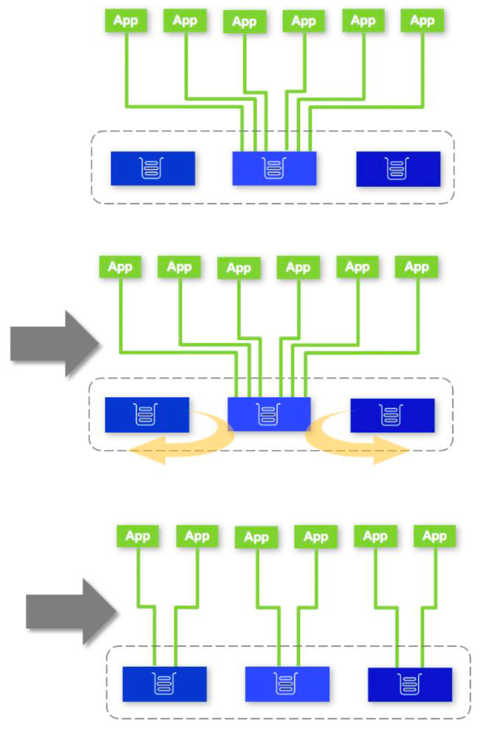
- Stop then restart a queue manager with connected apps to show automatic application rebalancing to remaining running queue managers in the Uniform Cluster
- Report resource usage metrics for the applications, introduced in MQ 9.1.5.
- Connect an application to a Queue Manager Group instead of a queue manager
Further information
- IBM MQ Knowledge Center
- “Building scalable fault tolerant systems with IBM MQ 9.1.2 CD” article by David Ware, STSM, Chief Architect, IBM MQ: David Ware article
- “Active/active IBM MQ with Uniform Clusters” video by David Ware: YouTube Demo Video
Acknowledgements
The technical content of this document is based on materials originally provided by Lewis Weedon, Laurence Bonney, Jason Edmeades and Ian Edwards from IBM MQ Development.
The illustration of application balancing is taken from the aforementioned article by David Ware.
Lab Environment
To develop this lab guide, we used a single MQ 9.1.5 installation running on Windows 10.
Windows user account – ibmdemo – has been created. This has been added to the Adminstrators and mqm groups. Password for ibmdemo is passw0rd.
Entering commands for this lab
In this lab, you will come across some quite long commands to enter. To avoid a lot of typing, it may be quicker to copy the commands from this document to a Notepad window and edit and format them there, before copying and pasting them to the Windows Command Prompt.
Some points to consider:
- there may be hyphens (-) introduced in this document where text is split between lines; you should remove these,
- commands may occupy multiple lines in this document; you should concatenate these into a single line in a Notepad window,
-
sometimes a command may be similar to a previous one that you have entered, and it may be quicker to use the up arrow in the Windows Command Prompt to retrieve the earlier command and then editing it there on the command line
Important:
If a command doesn’t work check the hyphen in front of parameters. When copying commands occasionally the hypehn will appear as a long dash. Make sure to change it to a short dash (-).
Create Uniform Cluster using Configuration Files (New in MQ 9.1.4)
A Uniform Cluster, UNIDEMO, is to be created, comprising queue managers: QM1, QM2 and QM3. QM1 and QM2 are to contain full repositories and QM3 is to contain a partial repository. The following are to be created for each queue manager in our cluster:
- a cluster receiver channel
- a cluster queue
- a server connection channel
Also, appropriate channel authentication needs to be set up for the server connection channel.
To help you do this, we have created two configuration files for you in C:\Student. The use of such files was introduced in MQ 9.1.4 and simplfies creation of a uniform cluster and ensures the queue managers in it are created in a consistent way.
These will be used when we create the queue managers in the cluster:
- uniclus.ini, which describes how the uniform cluster will look once it is set up. This will be added automatically to the qm.ini file for each queue manager during queue manager startup.
- uniclus.mqsc, which will be applied automaticlally to each queue manager at startup. Note that if you modify this file and restart a queue manager that uses it, then the definitions in the updated file will be applied to the queue manager as it restarts
Review Cluster configuration files
-
Log on to the provided system as user ibmdemo, password passw0rd. This user is a member of the Administrators and mqm groups.
-
Examine the file uniclus.ini in C:\Student. This shows there will be two full repositories stored by queue managers QM1 and QM2. Connection names for these repositories are also given. The cluster name, UNIDEMO, is specified and it is to be a Uniform Cluster.
AutoCluster: Repository2Conname=127.0.0.1(3001) Repository2Name=QM1 Repository1Conname=127.0.0.1(3002) Repository1Name=QM2 ClusterName=UNIDEMO Type=Uniform -
Examine the file uniclus.mqsc in C:\Student, numbered below for clarity:
- define channel(‘+AUTOCL+_+QMNAME+’) chltype(clusrcvr) trptype(tcp) conname(‘+CONNAME+’) cluster(‘+AUTOCL+’) shorttmr(5) shortrty(12000) replace
- define QL(QL) cluster(UNIDEMO) defbind(notfixed) clwluseq(any) maxdepth(99999999) replace
- define channel(TO_UNIDEMO) chltype(svrconn) trptype(tcp) replace
- SET CHLAUTH(TO_UNIDEMO) TYPE(ADDRESSMAP) ADDRESS(*) USERSRC(CHANNEL)
- SET CHLAUTH(TO_UNIDEMO) TYPE(BLOCKUSER) USERLIST(‘nobody’) DESCR(‘Allow privileged users on this channel’)
- ALTER AUTHINFO(SYSTEM.DEFAULT.AUTHINFO.IDPWOS) AUTHTYPE(IDPWOS) CHCKCLNT(OPTIONAL)
- REFRESH SECURITY
Line a defines, for each queue manager, a cluster receiver channel, which in our case will be called: UNIDEMO_QMn, where n=1, 2 or 3;
Line b defines a local queue, which is shared in the cluster:
- to allow the messages to be spread across all queue managers in the cluster, the DEFBIND (Default bind type) parameter is set as shown
- Setting the CLWUSEQ (Cluster Workload Use Queue) parameter as shown will allow other queue managers in the Uniform Cluster to get messages from that queue
- Uniform Cluster automatic application rebalancing is not dependant on the queues used by applications being cluster queues. We’re using cluster queues in this lab to demonstrate how messages put on to a single queue manager are shared among all the queue managers in the cluster.
Line c defines a server connection channel for each queue manager;
Line d allows connections through the server connection channel;
Line e allows only privileged users to connect through this channel;
Line f: the queue manager uses the local operating system to authenticate any provided user ID and pass-word. If these are provided by an application, they must be a valid pair, but it is not mandatory to provide them;
Line g refreshes security settings.
Create queue managers and the Uniform Cluster
We shall now create the queue managers – and our cluster - using these configuration files.
-
Open a Windows Command Prompt session and change directory to C:\Student.
cd C:\Student -
Before proceeding, shutdown and delete any queue manager with the name QM1, QM2 or QM3 as we shall be using these names for queue managers in this lab:
endmqm -w <queue manager>dltmqm <queue manager> -
Now create the queue manager QM1:
crtmqm -p 3001 -ii .\uniclus.ini -ic .\uniclus.mqsc -iv ^ CONNAME=127.0.0.1(3001) QM1Note:
- this queue manager will listen on port 3001
- we are providing automatic configuration of qm.ini attributes and also automatic MQSC commands to be run at startup, via the uniclus.ini and uniclus.mqsc files respectively
- the connection name parameter, comprising the loopback IP adddress of the host and the listener port of the queue manager, will be used by the cluster receiver channel definition in the uniclus.mqsc file

-
Start this queue manager:
strmqm QM1 -
Similarly create queue manager QM2. This will also contain a full repository.
crtmqm -p 3002 -ii .\uniclus.ini -ic .\uniclus.mqsc -iv ^ CONNAME=127.0.0.1(3002) QM2 -
Now create queue manager QM3. As this is not specified in the uniclus.ini file, it will have a partial repository.
crtmqm -p 3003 -ii .\uniclus.ini -ic .\uniclus.mqsc -iv ^ CONNAME=127.0.0.1(3003) QM3 -
Start these additional queue managers:
strmqm QM2strmqm QM3You should now have a fully functional Uniform Cluster!
Perform health-check on Uniform Cluster
Before proceeding, we need to check the cluster is up and running.
-
Start MQ Explorer (you can do this from a Windows Command Prompt using the strmqcfg command). Check that queue managers QM1, QM2, QM3 are running and if not, start them:

-
Expand Queue Manager Clusters to confirm that queue managers QM1 and QM2 have full repositories, while QM3 has a partial repository.
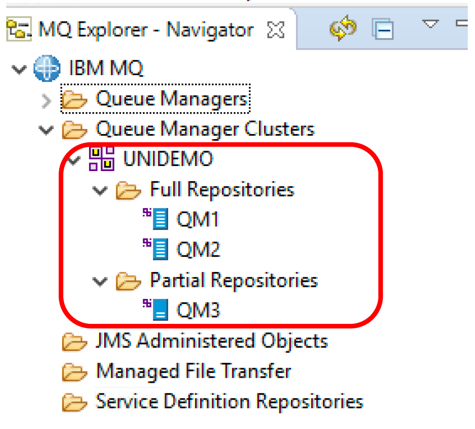
-
Note that in addition to the Cluster Receiver channels specified in the uniclus.mqsc file, Cluster Sender channels to the full repository queue manager, have been created automatically. In the case of QM3, which has a partial repository, there are 2 of these channels.
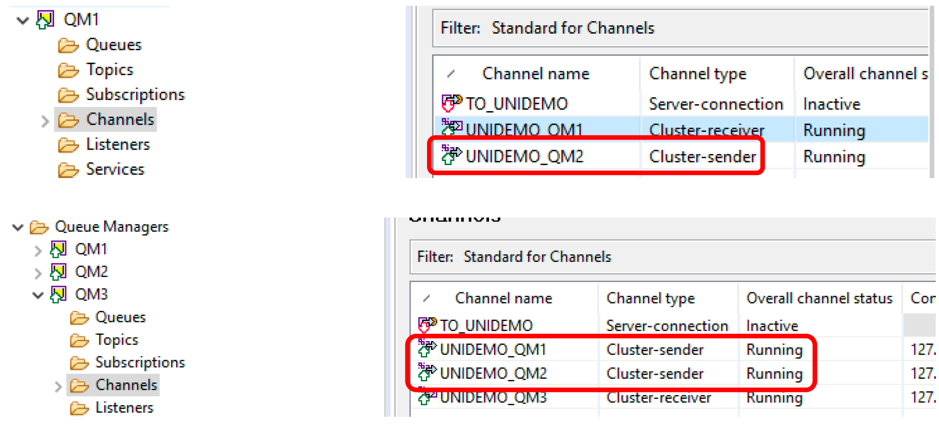
-
Check that Cluster Sender and Receiver Channels for each queue manager are running and if not, start them:
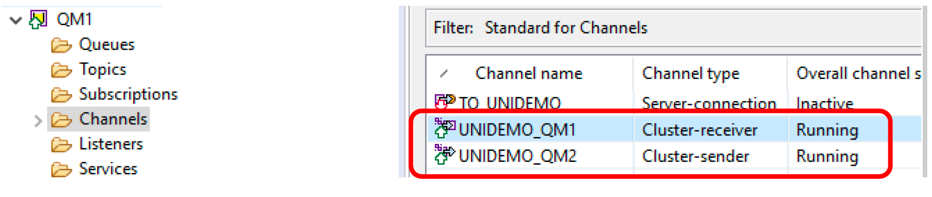
Note: the Server Connection Channels will be inactive – do not attempt to start these.
-
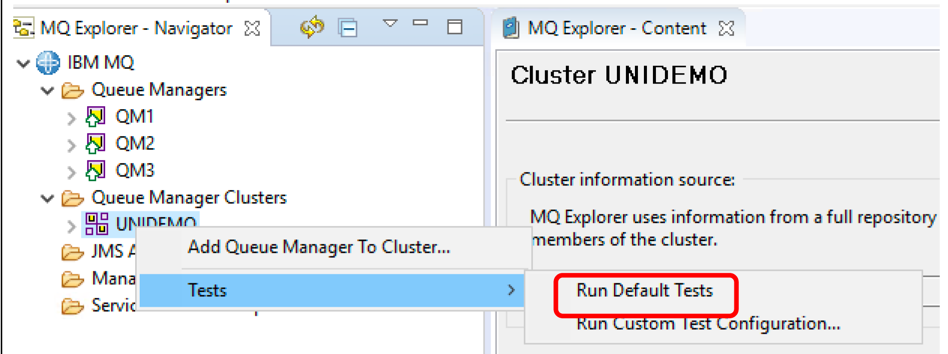
Run the default cluster tests:
-
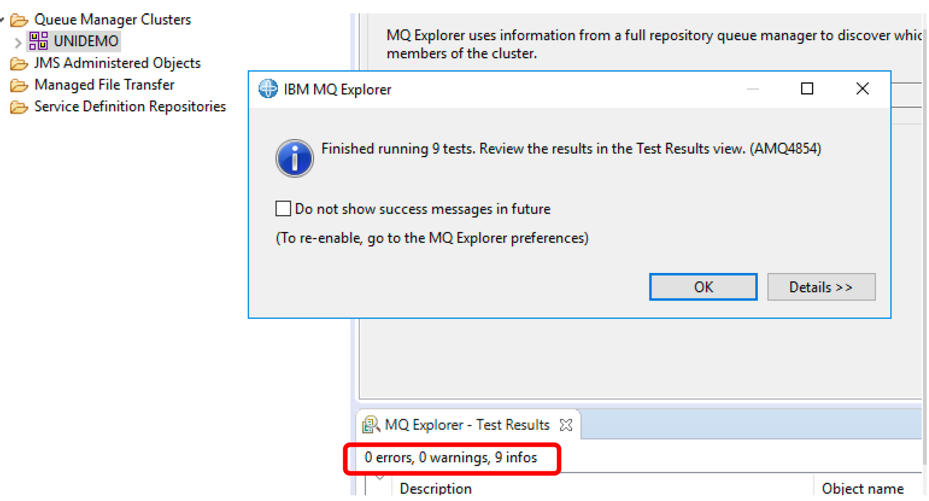
Check that there are no errors or warnings resulting:
Launch getting applications
In this section we shall launch 6 instances of an application connected to the same queue manager.
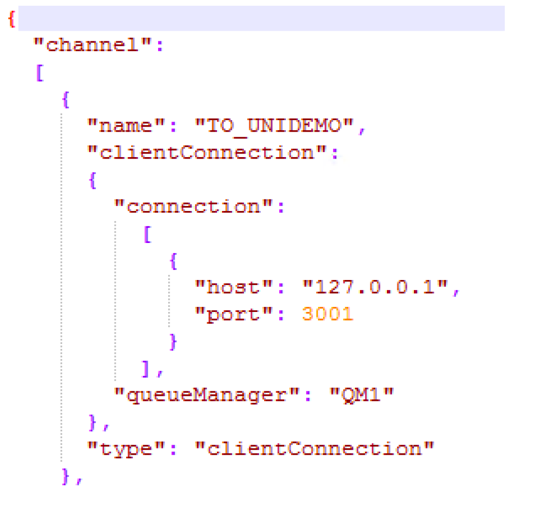
The Client Channel Definition Table (CCDT) determines the channel definitions and authentication information used by client applications to connect to a queue manager. We shall be using a CCDT in JSON format. The first few lines are shown below. In the classroom, the file path is: C:\Student\CCDT.json.
Note
- the channel names match those of the server connection channels on the queue managers
-
the port is the listener port for the queue manager
-
Start a new Windows Command Prompt session and run the following commands:
-
set MQCHLLIB=<JSON CCDT dir> (sets the folder containing the JSON CCDT file.)
In the classroom environment:
set MQCHLLIB=C:\Student -
set MQCHLTAB=<JSON CCDT filename> (sets the name of the JSON CCDT file.)
In the classroom environment:
set MQCHLTAB=CCDT.json -
set MQAPPLNAME=<YOUR_GETTING_APPLICATION_NAME> (sets the application name to a name of your choice, e.g.)
In the classroom environment:
set MQAPPLNAME=MY.GETTER.APP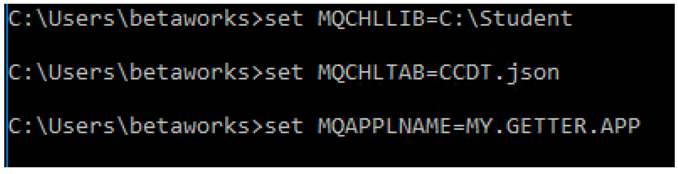
-
-
Now run the following command to start the sample application to read messages from queue QL on QM1. Do this 6 times.
start amqsghac QL QM1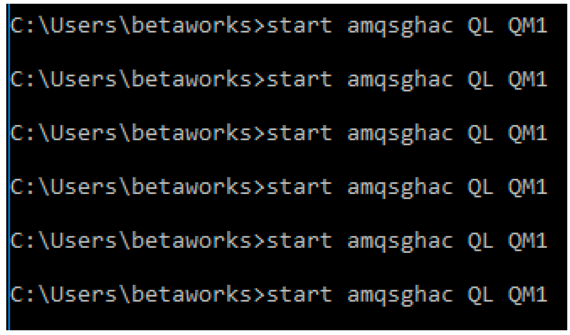
This will open 6 new sessions, each like this:

Note:
-
as these sessions are created, they will appear above the session you are working on. Use this icon for the Windows Command Prompt session in the task bar to help find it again later:

-
To locate these new amqsghac sessions later, use this icon in the task bar:

-
-
There is a new MQSC command, DISPLAY APSTATUS, which we shall now use to display the status of an application across all queue managers in a cluster.
In a new Windows Command Prompt session, run the following:
DISPLAY APSTATUS(<YOUR_GETTING_APPLICATION_NAME>) TYPE(QMGR)
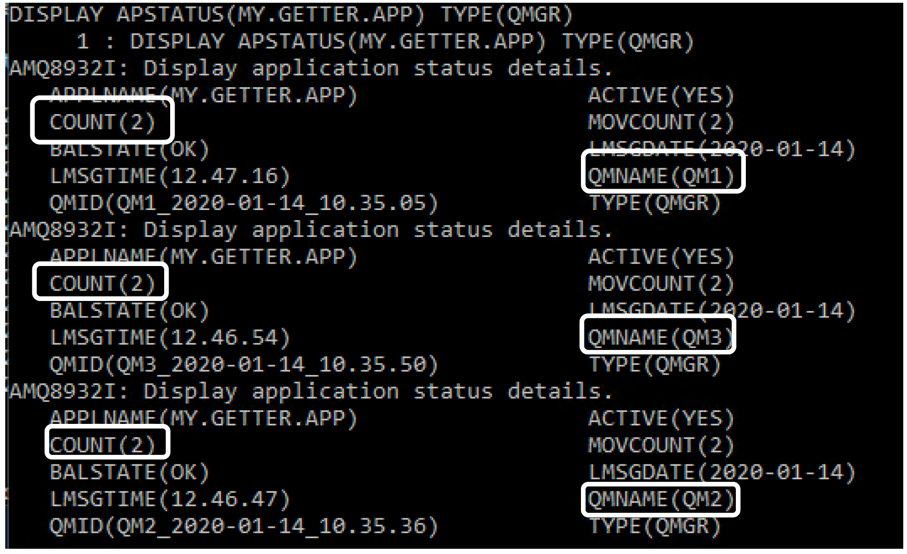
runmqsc QM1DISPLAY APSTATUS(MY.GETTER.APP) TYPE(QMGR)endAt first, all instances of the application will be running on QM1 and none on the other two queue managers. However, by the time you run this command, the instances will probably be shared across all queue managers as shown below.
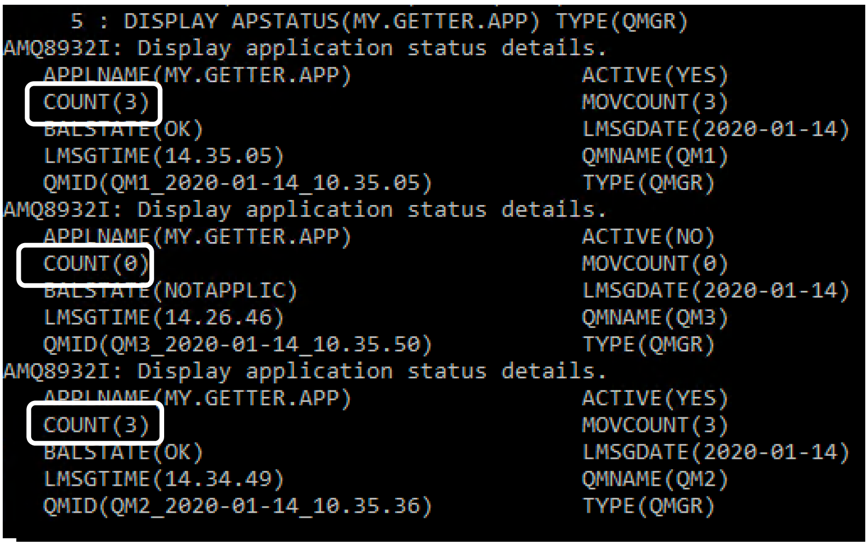
Note: COUNT is the number of instances of the specified application name currently running on this queue manager, while MOVCOUNT is the number of instances of the specified application name running on the queue manager which could be moved to another queue manager if required.
-
Some of the application instances will show reconnection events as the workload is rebalanced to queue managers QM2 and QM3.

-
High level application summary information is also available via the MQSC command DISPLAY APSTATUS with TYPE(APPL), instead of TYPE(QMGR).
DISPLAY APSTATUS(MY.GETTER.APP) TYPE(APPL)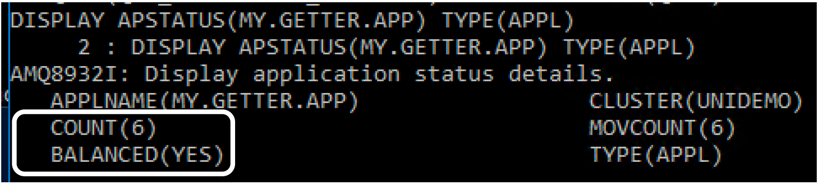
Note that COUNT reports the total number of application instances running in the cluster and that the applications are balanced across the cluster.
Launch putting application
We shall launch another sample which will put messages to each queue manager in the cluster. The running samples should then pick up these messages and display them. In this lab, we are using one putting application to send messages to all getting applications using cluster workload balancing. You could set up the same scenario with one or more putting applications per queue manager and application rebalancing would work in the same way that you’ve seen for getting applications.
-
Open a new Windows Command Prompt session and run the following commands:
-
set MQCHLLIB=<JSON CCDT dir> (sets the folder of the JSON CCDT file.)
In the classroom environment:
set MQCHLLIB=C:\Student -
set MQCHLTAB=<JSON CCDT filename> (sets the name of the JSON CCDT file.) In the classroom environment:
set MQCHLTAB=CCDT.json -
set MQAPPLNAME=<YOUR_PUTTING_APPLICATION_NAME> (sets the application name to a different name of your choice)
set MQAPPLNAME=MY.PUTTER.APP
-
- We shall be using the sample amqsputc in this scenario. There are a few extra input parameters that are required for this sample to run in the way we want:
- The target queue the sample will run on (QL)
- The queue manager the target queue belongs to (QM1)
- A file containing messages that we aim to spread across all the queue managers in our cluster. (This has been provided for you in the classroom environment: C:\Student\messages.txt)
Enter the following command:
amqsputc QL QM1 < <PATH of messages file>
In the classroom environment:
amqsputc QL QM1 < C:\Student\messages.txt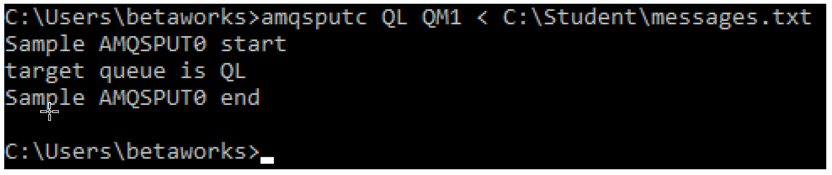
-
You should now see the generated messages split across the getting application sessions that are running. Each window will contain a subset, like this:
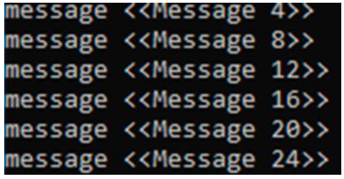
Note: the messages may not be evenly distributed across the getting applications instances.
Queue Manager maintenance
In this scenario, imagine a queue manager needs to be stopped for maintenance purposes. We shall demonstrate how doing this will cause the applications running on that queue manager to run instead on the remaining active queue managers in the Uniform Cluster. Once the maintenance is complete, the queue manager will be re-enabled.
-
When a queue manager is ended, the applications on that queue manager are usually lost. However, if the optional parameter -r is used, the applications will attempt to reconnect to a different queue manager.
Stop QM3 by running this command from the Windows command line:
endmqm -r QM3 -
The applications connected to QM3 will reconnect back to QM1. After a while, an application imbalance will be detected, and affected applications will be reconnected to the other available queue managers.
To see this happening, re-run the MQSC command DISPLAY APSTATUS on any active queue manager in the cluster. After a minute or two you should see all application instances now running on QM1 and QM2:
-
Once you are happy that the applications have balanced out equally across the 3 other queue managers, re-start the stopped queue manager using the command:
strmqm QM3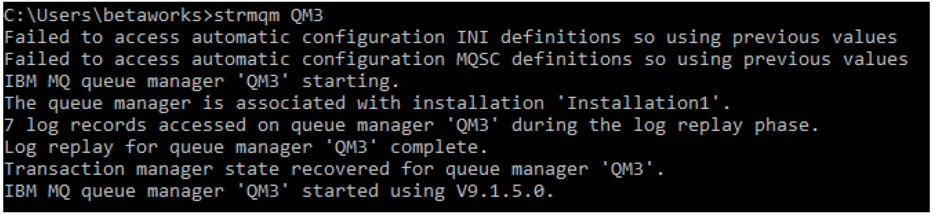
Note: because this queue manager is not mentioned in the uniclus.ini file, we see the messages above.
-
As this queue manager has started and has no applications connected, it will request some from the other queue managers in the cluster.
Re-run the MQSC command DISPLAY APSTATUS to see the applications being rebalanced once more.
Metrics (new in 9.1.5)
The amqsrua sample application provides a way to consume MQ monitoring publications and display performance data published by queue managers. This data can include information about the CPU, memory, and disk usage. MQ v9.1.5 adds the ability to allow you to monitor usage statistics for each application you specify by adding the STATAPP class to the amqsrua command. You can use this information to help you understand how your applications are being moved between queue managers and to identify any anomalies.
The data is published every 10 seconds and is reported while the command runs.
Statistics available are:
- Instance count: number of instances of the specified application name currently running on this queue manager. See also COUNT from MQSC APSTATUS that we saw earlier.
- Movable instance count: number of instances of the specified application name running on this queue manager which could be moved to another queue manager if required. See also MOVCOUNT from MQSC APSTATUS that we saw earlier.
- Instance shortfall count: how far short of the mean instance count for the uniform cluster that this queue manager’s instance count is. This will be 0 if queue manager is not part of a uniform cluster.
- Instances started: number of new instances of the specified application name that have started on this queue manager in the last monitoring period (these may have previously moved from other queue managers or be completely new instances).
- Initiated outbound Instance moves: number of movable instances of the specified application that have been requested to move to another queue manager in the last monitoring period. This will be 0 if the queue manager is not part of a uniform cluster.
- Completed outbound instance moves: number of instances of the specified application that have ended following a request to move to another queue manager. This number includes those that are actioning the requested move, or that are ending for any other reason after being requested to move (note that it does not mean that the instances have successfully started on another queue manager). This will be 0 if the queue manager is not part of a uniform cluster.
- Instances ended during reconnect: number of instances of the specified application that have ended while in the middle of reconnecting to this queue manager (whether as a result of a move request from another queue manager, or as part of an HA fail over).
- Instances ended: number of instances of the specified application that have ended in the last monitoring period. This includes instances that have moved, and those that have failed during reconnection processing.
-
In a new Windows Command Prompt session, run the amqsrua command as follows, i.e. with a class of STATAPP, a type of INSTANCE, and object of your getting application name.
amqsrua -m QM1 -c STATAPP -t INSTANCE -o MY.GETTER.APP(Note: you can omit the class, type and object parameters and enter them when prompted instead).
Initial stats are displayed and then updated every 10 seconds to show activity in the previous interval. You should see an Instance Count and Movable Instance Count of 2 as shown below. You may see different numbers for the other stats in the first interval, but these should be 0 in subsequent intervals.
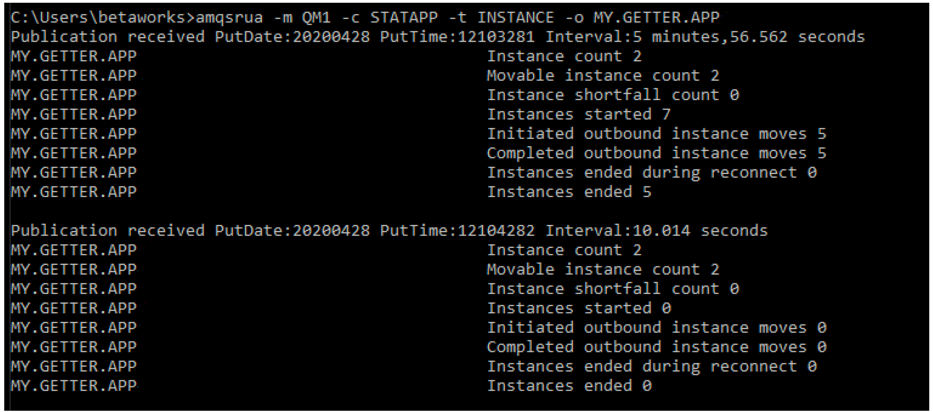
Refer to the description of these stats at the start of this section. Keep this command running.
-
In another Window, stop QM3 once more by running this command from the Windows command line:
endmqm -r QM3 -
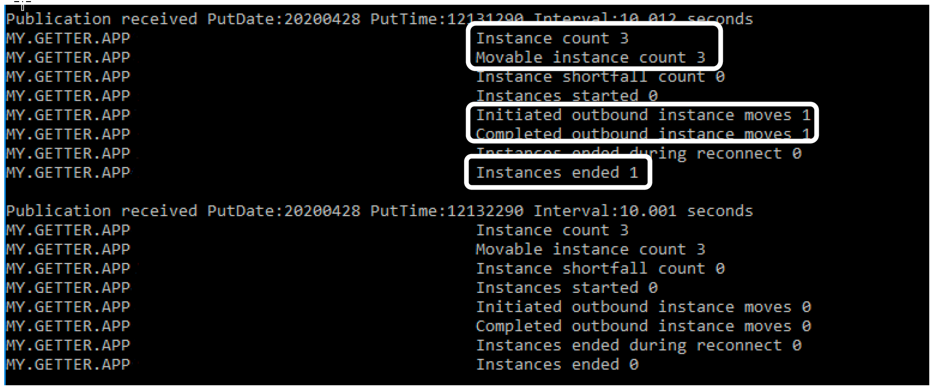
Refer back to the window with the running amqsrua session. When the next update is shown, the following should have changed:
Instance Count & Movable Instance Count
there are now 3 instances of the application running on this queue manager;
Initiated & Completed Outbound Instance Moves, Instances ended
temporarily equal to 1 during the first interval as an instance is moved from QM3 to this queue manager.
-
In the other Window, restart QM3:
strmqm QM3 -
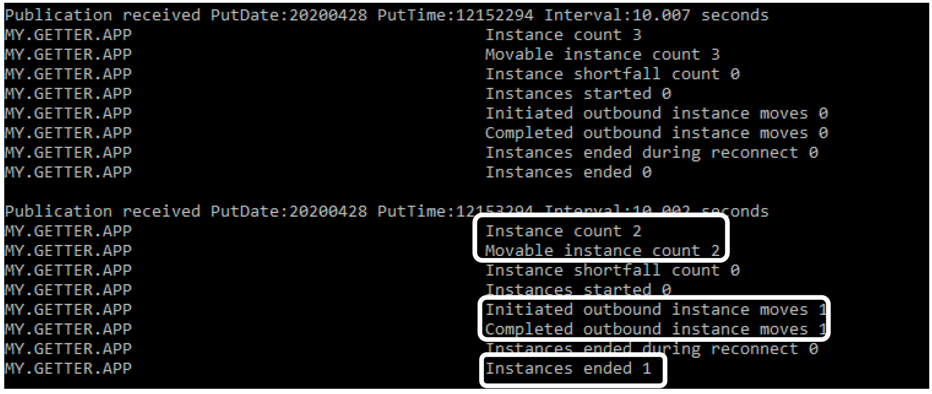
Again, refer back to the amqsrua session. When the next update is shown, the stats will have changed again. There are now 2 instances running on this queue manager, one having been moved (back) to QM3. As this happens, the numbers of moved and ended instances are again temporarily equal to 1.
-
Stop the amqsua session when you are ready, using ctrl-c.
Using CCDT Queue Manager Groups
So far we have connected our getting applications to QM1 directly, and relied on the Uniform Cluster to rebalance them across the other queue managers over a period of time. There are 2 disadvantages to connecting in this way:
- When the applications initially connect, they all start out connected to QM1 and there is a delay in the Uniform Cluster balancing them across the other queue managers
- If QM1 is stopped unexpectedly or for maintenance, any applications connected to it will try to reconnect to QM1 and fail. They will not attempt to connect to the other queue managers in the cluster. This will also be true if applications connected to other queue managers try to reconnect after an outage.
In this section, we shall see that by using Queue Manager Groups within our CCDT file we can decouple application instances from a particular queue manager and take advantage of the built-in load balancing capabilities available with CCDTs.
For a fuller description of the issues highlighted here, see step 5 of the following article:
Stop queue manager - application refers to queue manager directly
-
Stop QM1 by entering the following from the command line:
endmqm -r QM1 -
This time, unlike the case where you stopped QM3, the getting application instances connected to QM1 will continually try to reconnect to the stopped queue manager:

Note: these are the sessions you started earlier by running start amqsghac and can be found here:

-
Now run the following MQSC command on any active queue manager in the cluster:
DISPLAY APSTATUS(<YOUR_GETTING_APPLICATION_NAME>) TYPE(APPL)
DISPLAY APSTATUS(MY.GETTER.APP) TYPE(APPL)After a while, there should be fewer than the 6 application instances that were originally present.

-
Now restart QM1:
strmqm QM1
Stop queue manager – application refers to CCDT Queue Manager Group
-
In the classroom environment, an updated CCDT file has been created for you to use: C:\Student\CCDT3.json.
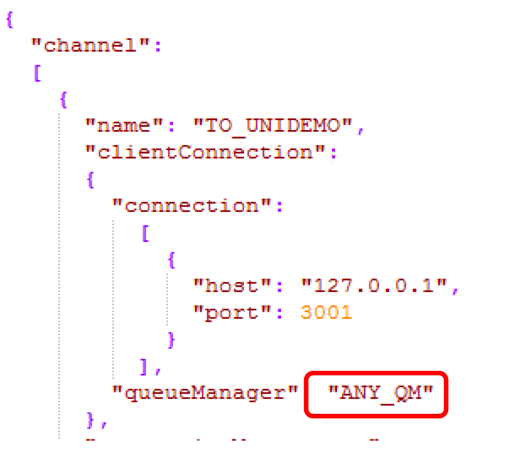
Browse this file. As well as containing the original set of direct references to the queue managers, it gives a queue manager group definition with a route to all queue managers using the name ANY_QM:
-
In the classroom environment, scroll down the file and note two new attributes:
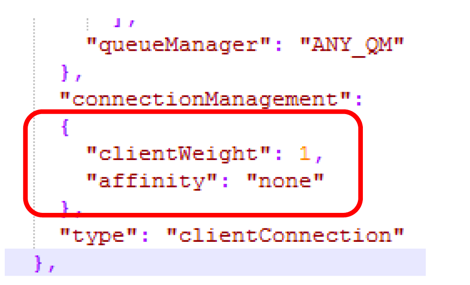
These are defined under connectionManagement:
- clientWeight: a priority list for each client. The default value is zero. A client with a higher clientWeight will be picked over a client with a smaller value.
- affinity: setting the affinity to “none” will build up an ordered list of group connections to attempt to try in a random order, for any clients on a particular named host.
-
Now let’s put the updated CCDT to the test. First, stop the 6 running getting application instances that you started earlier…

Remember, you can find them here:

-
Please note: the supplied updated CCDT file was originally created for a scenario with an additional queue manager called QM4. For completeness, we shall create that missing queue manager now.
In a new Windows Command Prompt session, create and start queue manager QM4.
cd C:\Studentcrtmqm -p 3004 -ii .\uniclus.ini -ic .\uniclus.mqsc -iv ^ CONNAME=127.0.0.1(3004) QM4strmqm QM4Like QM3, it will have a partial repository.
-
In a new Windows Command Prompt, run the following commands:
-
set MQCHLLIB=<JSON CCDT dir>
(sets the folder containing the new JSON CCDT file.)
In the classroom environment:
set MQCHLLIB=C:\Student -
set MQCHLTAB=<JSON CCDT filename>
(sets the name of the new JSON CCDT file.)
In the classroom environment:
set MQCHLTAB=CCDT3.json -
set MQAPPLNAME=<YOUR_GETTING_APPLICATION_NAME>
(sets the application name to a name of your choice)
set MQAPPLNAME=MY.GETTER.APP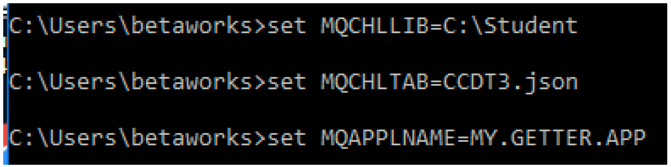
-
-
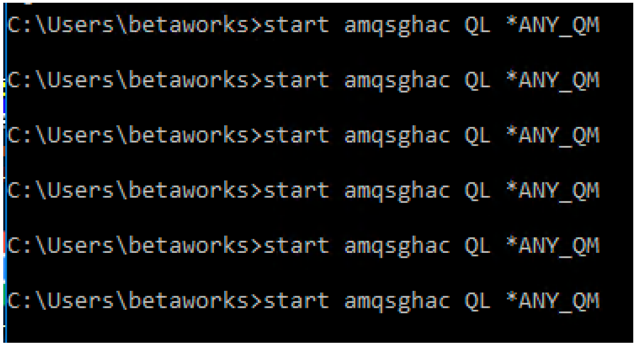
Now run the application instances, but this time specify the queue manager group ANY_QM, prefixed with * which tells the client to connect to any queue manager in the ANY_QM group.
start amqsghac QL *ANY_QMAgain, you will need to run this command 6 times.
-
The application instances will now attempt to connect to any of the queue managers defined in the queue manager group, and with the client weight and affinity options defined above, we should see each application instance connect to one of the queue managers in the Queue Manager Group and Uniform Cluster.
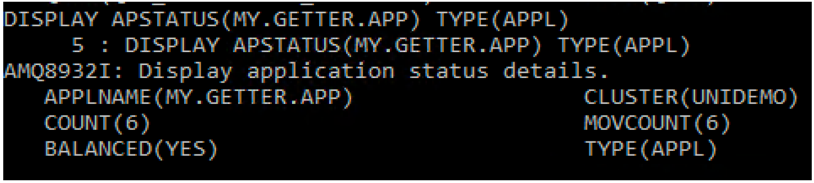
You can confirm this by running the MQSC command DISPLAY APSTATUS on any active queue manager in the cluster.
-
Now end QM1 to force the applications to be rebalanced:
endmqm -r QM1Rather than the applications getting stuck in a reconnect loop trying to connect to QM1 as we saw using the previous version of the CCDT file, the applications now tied to the queue manager group ANY_QM will go through each of the definitions of ANY_QM and when able to successfully connect to one of the underlying queue managers, will do so. You should see this reported in a subset of the application instances:

-
Run the MQSC command DISPLAY APSTATUS on any active queue manager in the cluster: After a while, there should once more be 6 connections in total, as there were before QM1 was shut down.
Congratulations
You have completed this lab Uniform Clusters and Application Rebalancing