Channel Authentication
Channel authentication using HOSTNAME
In IBM MQ v8 hostnames can now be used in channel authentication records where IP address were used at v7, with the exception of the TYPE(BLOCKADDR) record which only accepts IP addresses.
Hostnames are considered less specific than IP addresses and when determining which rule is used when multiple matches are found for incoming connections hostnames are at the bottom of the precedence order.
The hostname is not sent from the other end of a channel or TCP/IP so we use Domain Name Server (DNS) to provide the hostname of the IP address that we get from the socket. You will already be using DNS if you use hostnames currently in your CONNAME fields but for CHLAUTH we also need to reverse look-up IP address to find the hostname.
If this reverse look-up is not possible then any CHLAUTH rules with hostnames will not be matched.
There is a new queue manager property which defaults to REVDNS(ENABLED) but the reverse look-up of the IP Address to retrieve the hostname is only done when it is required. If you do not use hostnames in CHLAUTH rules, then this is only done when writing an error message which contains that information.
To demonstrate this we will set a rule to not allow any access from a specific Windows 2008 server machine by specifying the hostname. We will then check this using the MATCH RUNCHECK option.
If you performed the previous Lab 6 – Introduction to MQ V8 Security or Lab 7 – Multiple Certificates, you should still be logged in as ibmdemo and MQ Explorer should be running. You can skip ahead to XXXXXX. Otherwise continue with Lab Setup.
Lab Setup
Start Windows 10
-
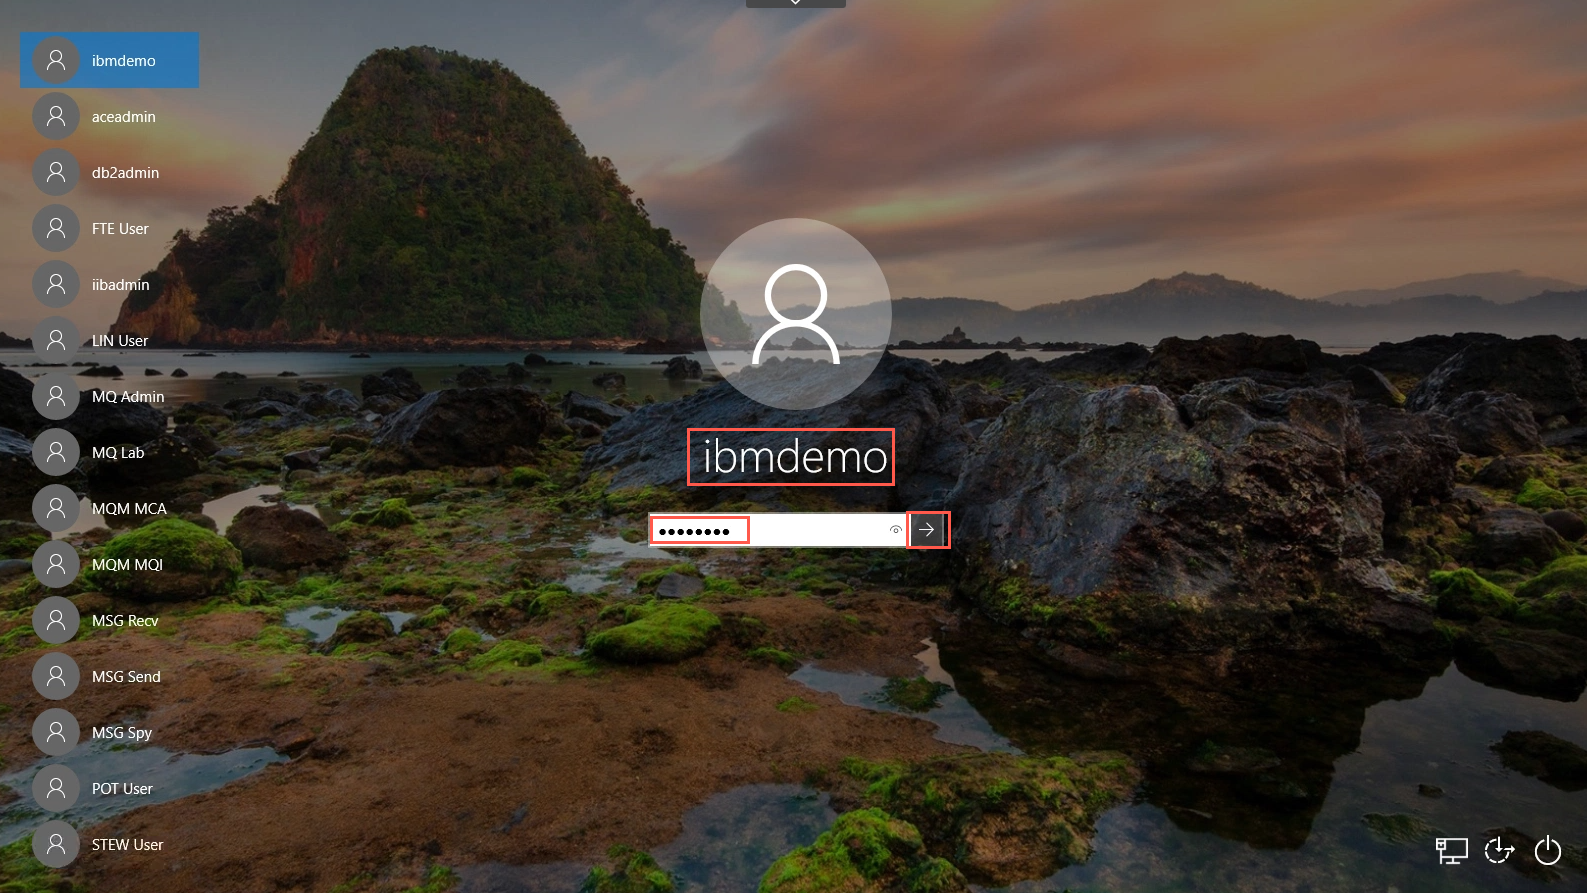
Once the Windows VMware image starts up a Windows desktop will appear and may be different than one shown in the screenshot below. Click the desktop and sign on as ibmdemo / passw0rd by clicking the right arrow.
-
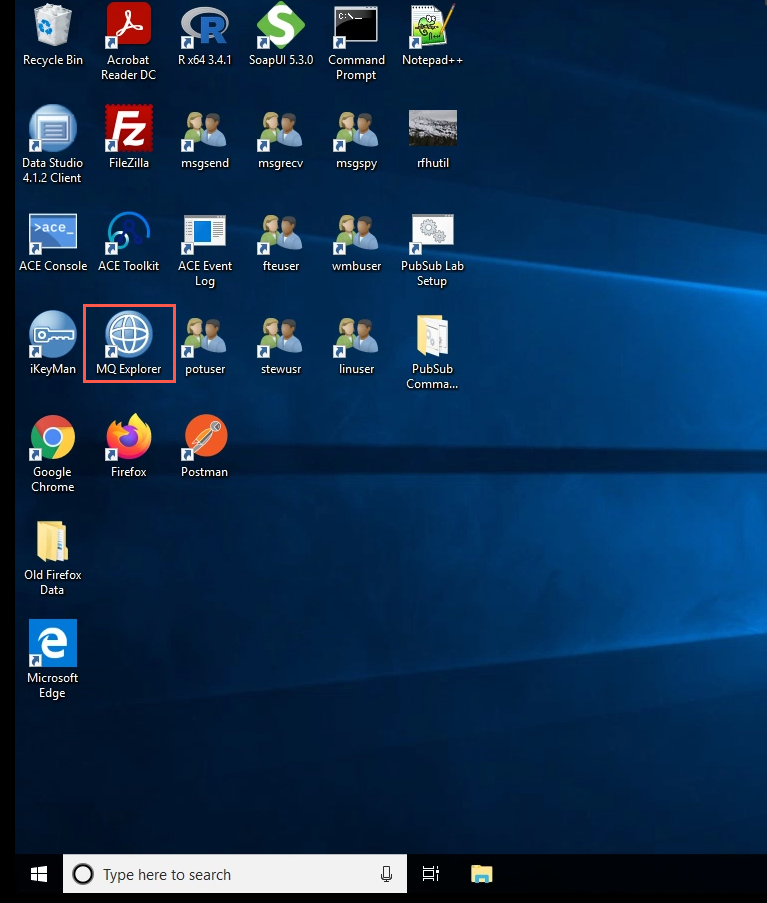
Your desktop will appear as below. Start the WebSphere MQ Explorer by double-clicking its icon.
-
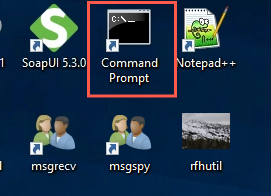
Open a command prompt by double-clicking the icon on the desktop.
-
Run the dspmqver command to confirm the version of MQ installed.
dspmqver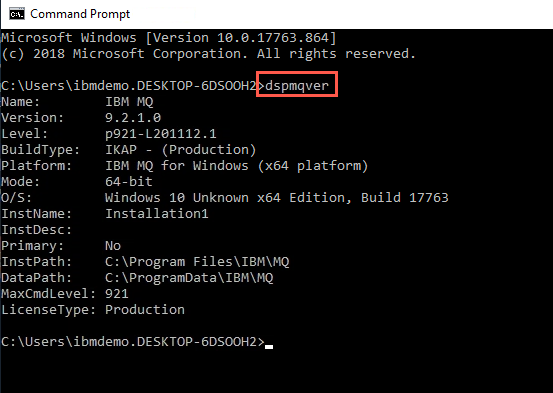
Create the queue manager ‘QM8’
-
On MQ Explorer, right click on the Queue Managers folder and choose New and Queue Manager.
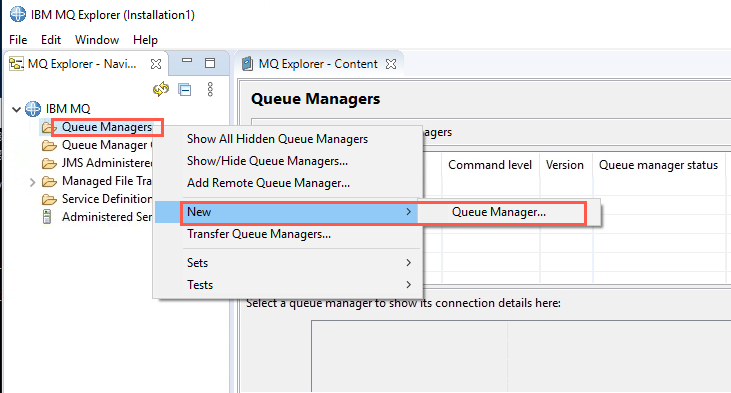
-
Provide Queue manager name as QM8 and click Next.
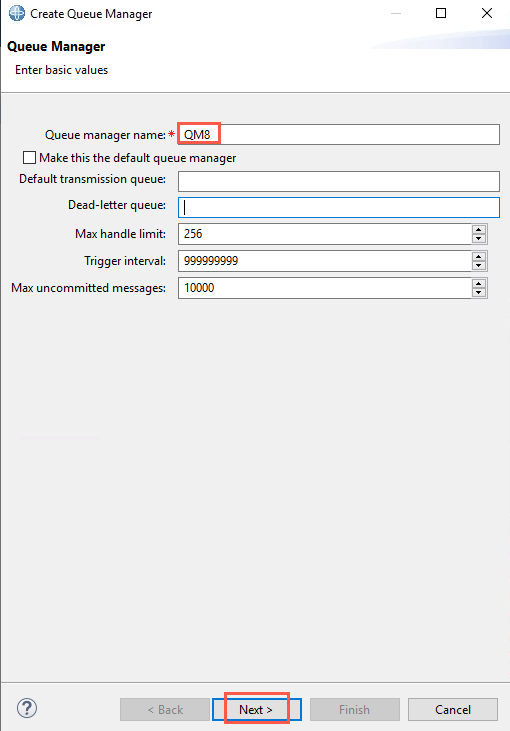
-
Accept the default values and click the ‘Next’ button.
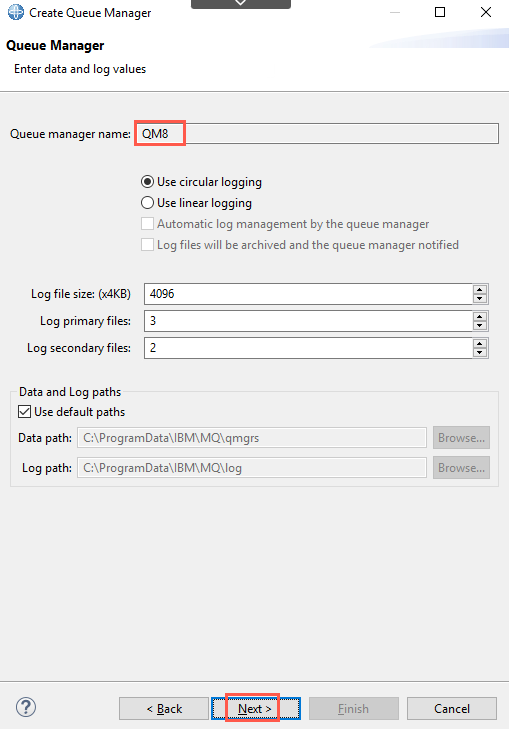
-
Accept the default values and click the ‘Next’ button.
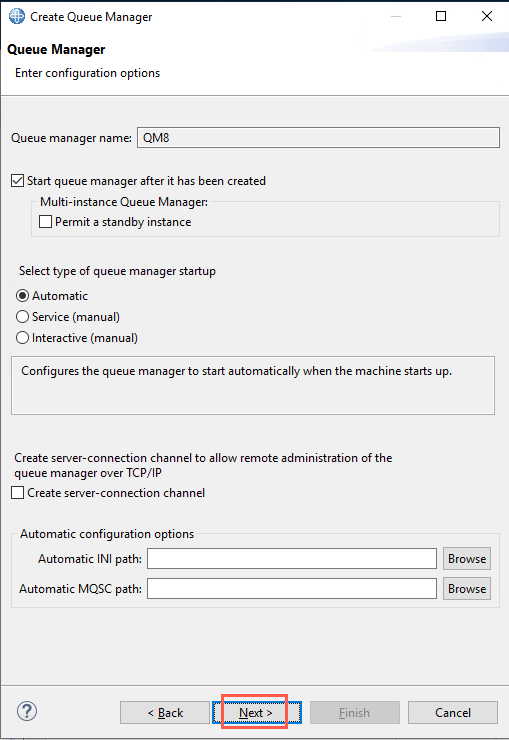
-
Provide the listener port as ‘5555’ and click on ‘Finish’ button.
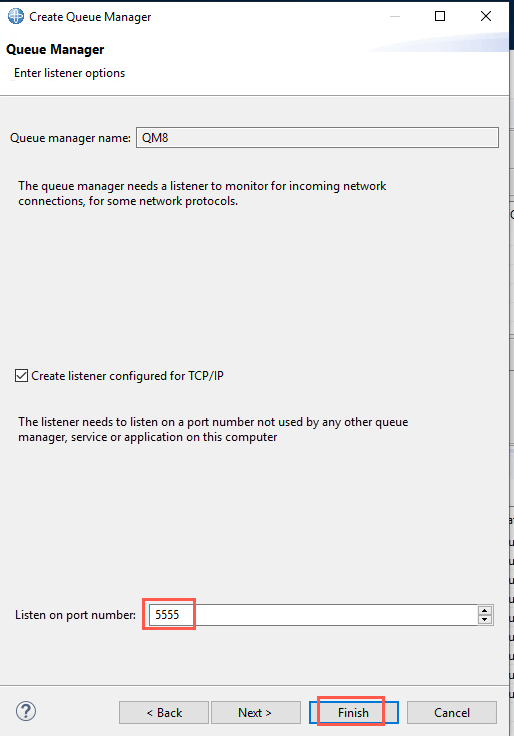
-
Alternatively, you can use the command prompt to create the queue manager by providing the following command.
crtmqm QM8Also, start the queue manager QM8 using the command below.
strmqm QM8If the queue manager is created on the command prompt, ensure that you create a listener by using the runmqsc editor provided by IBM MQ.
The command to create the listener is:
runmqsc QM8
DEFINE LISTENER('LISTENER.TCP') TRPTYPE(TCP) PORT(5555)
Start the listener using the command below:
START LISTENER('LISTENER.TCP')
end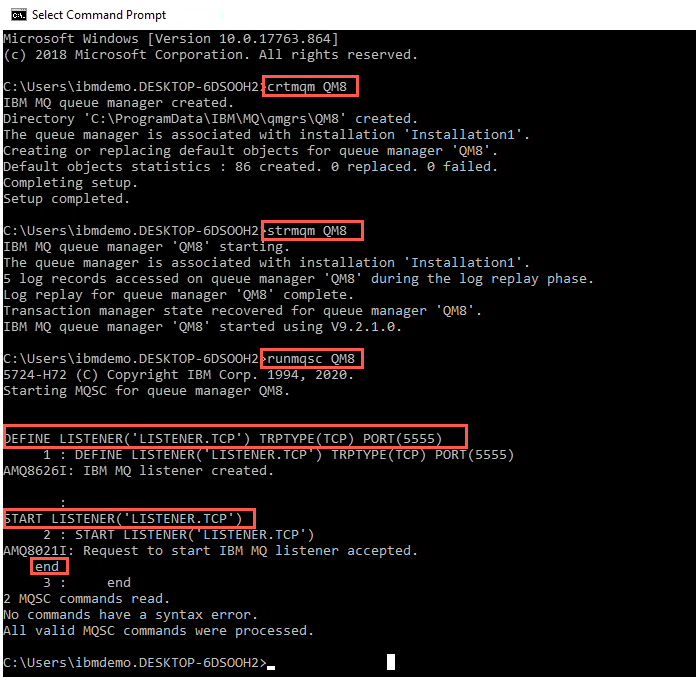
Set up a rule to restrict access
-
In MQ Explorer you can use the channel authentication wizard to do this. Under queue manager QM8, expand Channels. Right-click Channel Authentication Records, select New > Channel Authentication Records.
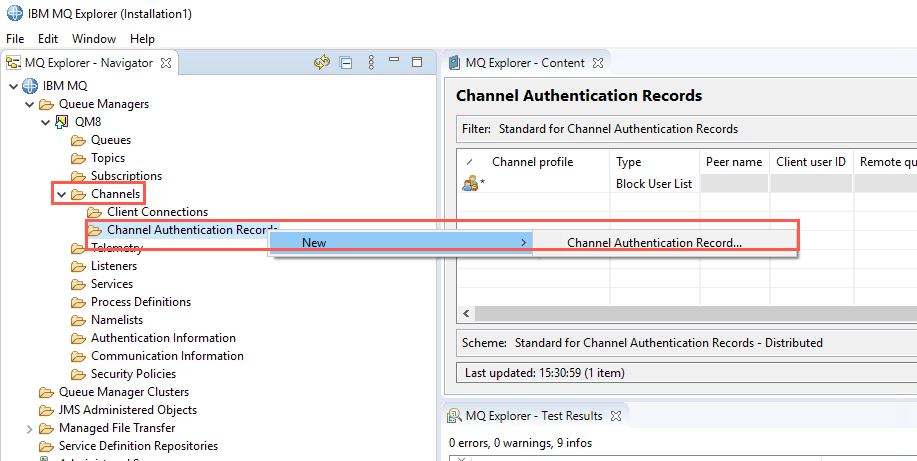
-
Now selecting the options we want for our new rule from the following panels a CHLAUTH rule will be created for us. We want to prevent any inbound connections coming to this queue manager, so select ‘Block Access’ and click Next.
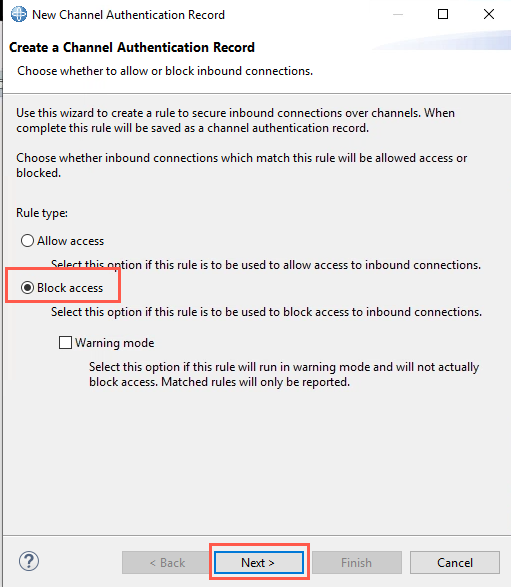
-
We want to restrict access by the hostname so select ‘Address’ and click Next.

-
We need to choose At the Channel then select Next.
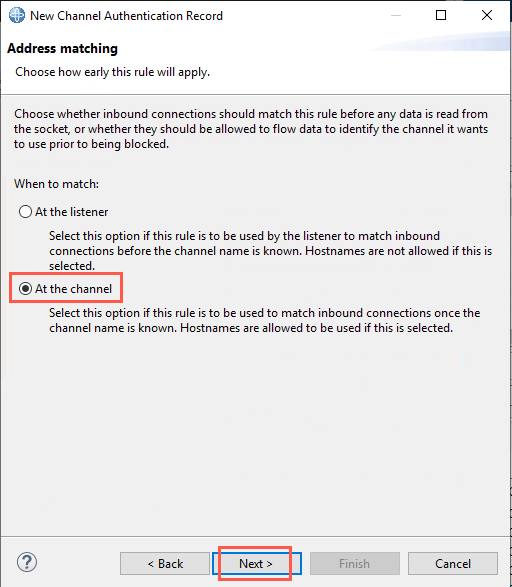
-
On the next panel, enter the channel name or pattern that the rule will apply to. For this example specify all channels so enter * for the channel name and click Next.
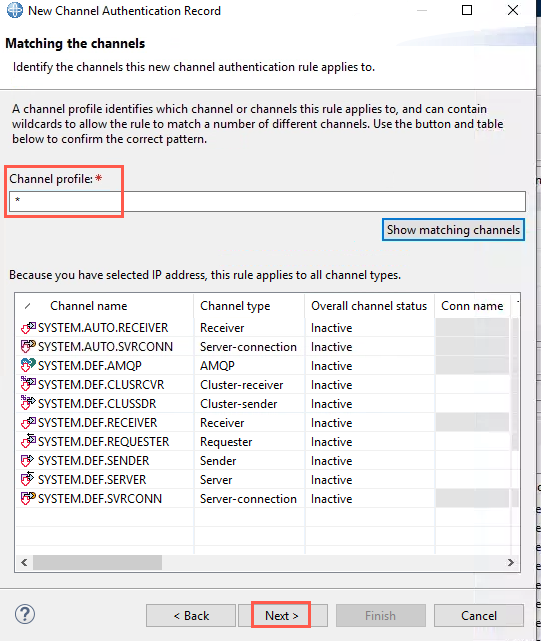
-
Now for the hostname, you need to enter win10. Click Next.
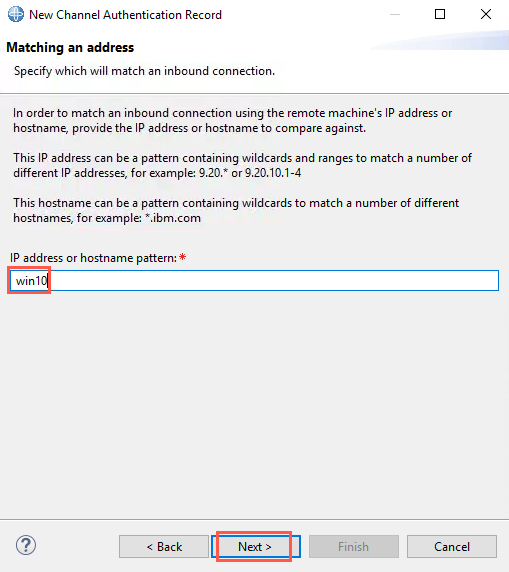
-
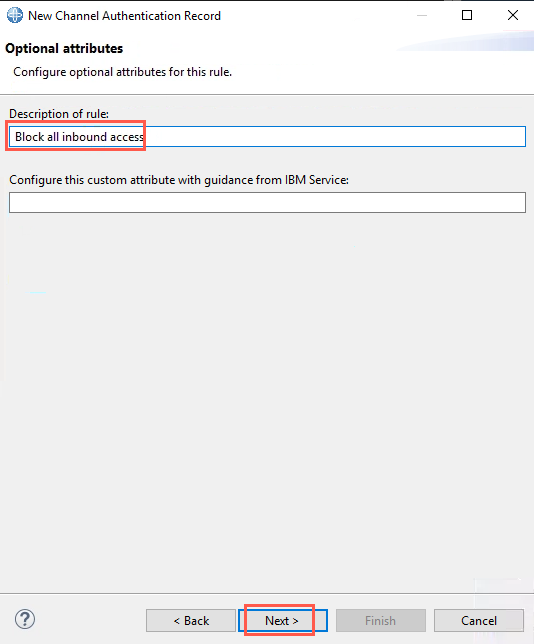
Enter a comment in the description field and click Next.
-
The next page provides a preview of the SET CHLAUTH rule generated.
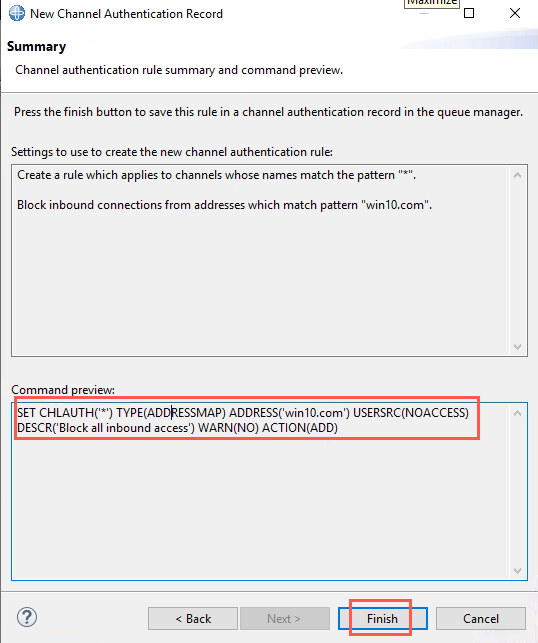
Click Finish. The SET CHLAUTH command will set the rule defined using the command listed.
SET CHLAUTH('*') TYPE(ADDRESSMAP) ADDRESS('win10') USERSRC(NOACCESS) DESCR('Block all inbound access') WARN(NO) ACTION(ADD) -
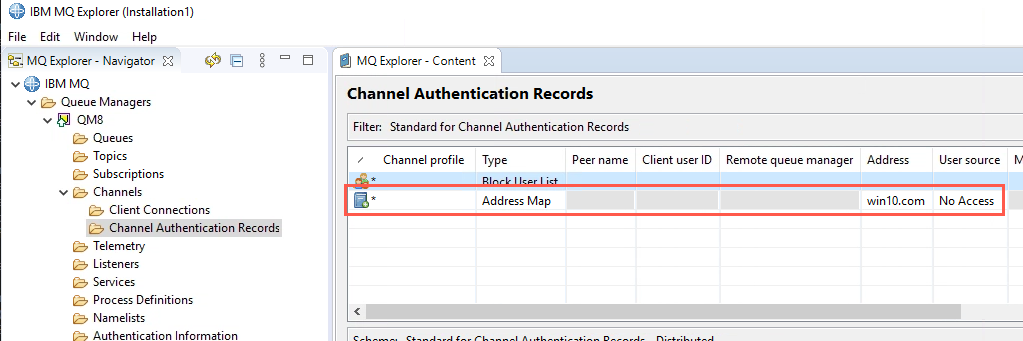
The new rule is now displayed.
Test CHLAUTH rule has the desired effect for hostname
To test the effect of this rule on an inbound channel we need to define the receiver channel and then run the DIS CHLAUTH command specifying MATCH(RUNCHECK). To do this we need to create a new receiver channel called FROM.WIN10.
-
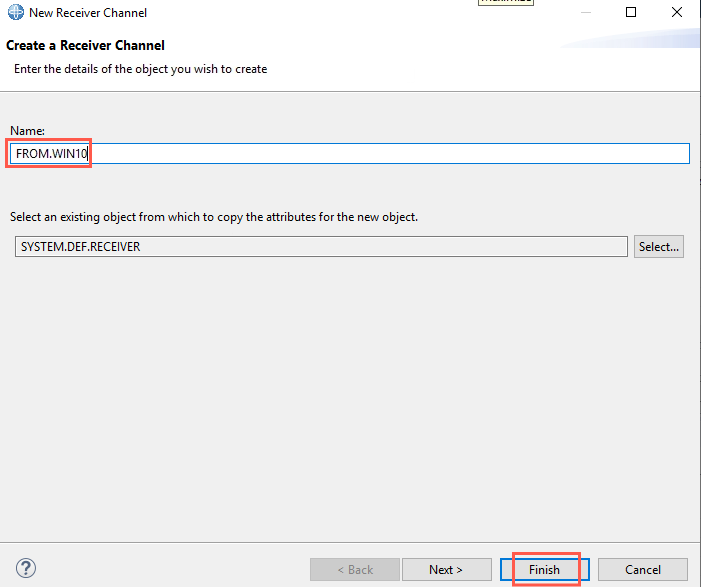
In the MQ Explorer right-click Channels, select New > Receiver Channel.

-
Enter the channel name FROM.WIN10 and click Finish.
-
Click OK to dismiss the results pane.
-
This will create the receiver channel which we will use to test the CHLAUTH rule using the MATCH(RUNCHECK) command. To run this command we need to provide the IP address of the Windows 10 queue manager and our queue manager will make the call to DNS, just as it would if the real inbound connection appeared, and find out what the hostname is so it can check if this connection would be allowed. To do this, open a command prompt from the icon on the desktop. You may use the existing command prompt if it is still open.
Start a runmqsc session for QM8 from the command prompt and enter the command:
runmqsc QM8
DIS CHLAUTH('FROM.WIN10') MATCH(RUNCHECK) ADDRESS('10.0.0.9') QMNAME(QM8)
This will return a message indicating the result of such an inbound channel starting.

In this case for the inbound channel from IP address 10.0.0.9, the reverse DNS lookup has returned hostname wwin10 which has matched the channel authentication rule we created.
-
Now you could try creating another rule using the channel authentication wizard which will allow channel FROM.WIN10 to connect from the Windows 10 Server but will enforce the MCAUSER to ibmdemo.
Answer:
Set CHLAUTH('FROM.WIN10') TYPE(ADDRESSMAP) ADDRESS('win10') USERSRC(MAP) MCAUSER('ibmdemo') DESCR('test ibmdemo') ACTION(ADD) -
Result of Runcheck, ibmdemo is allowed and MCAUSER is set to ibmdemo.

Channel authentication using SSLPeer Mapping
For the next few examples we are going to create channel authentication rules to allow a client application to access queue manager QM8 using the information provided in the SSL certificate provided by the client.
We will demonstrate using SSLPEER mapping with multiple certificates where the certificate label to be used by the client is specified in the client connection CERTLABL attribute.
We will also see how you can now ensure that the certificate supplied by the client was issued by a specific certificate authority by setting a channel authentication rule using the SSLCERTI attribute.
Client set up required for the exercises
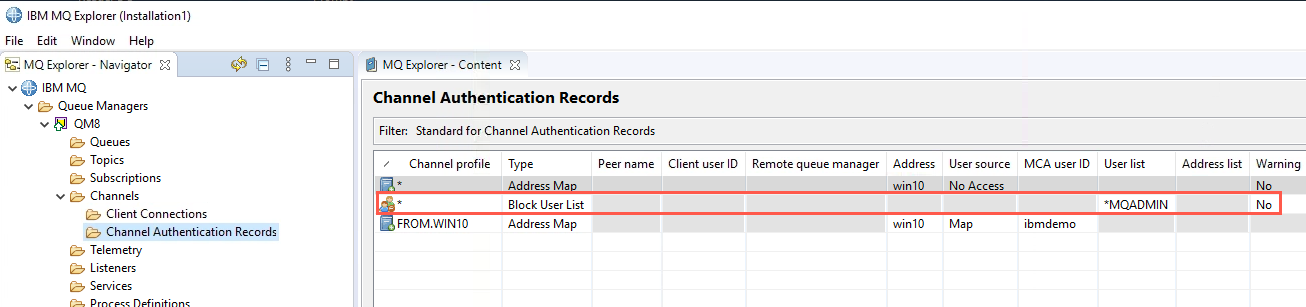
First check that a Channel Authentication record exists for blocking *MQADMIN access.
Important! Default Channel Authentication: If you completed Lab 6, then you deleted a channel authentication rule which will be needed in the remaining exercises. You must add the rule before continuing. If you didn’t do Lab 6, then just verify that the rule exists.
-
In MQ Explorer, under queue manager QM8, expand Channels and click Channel Authentication Records. You will need the following record:
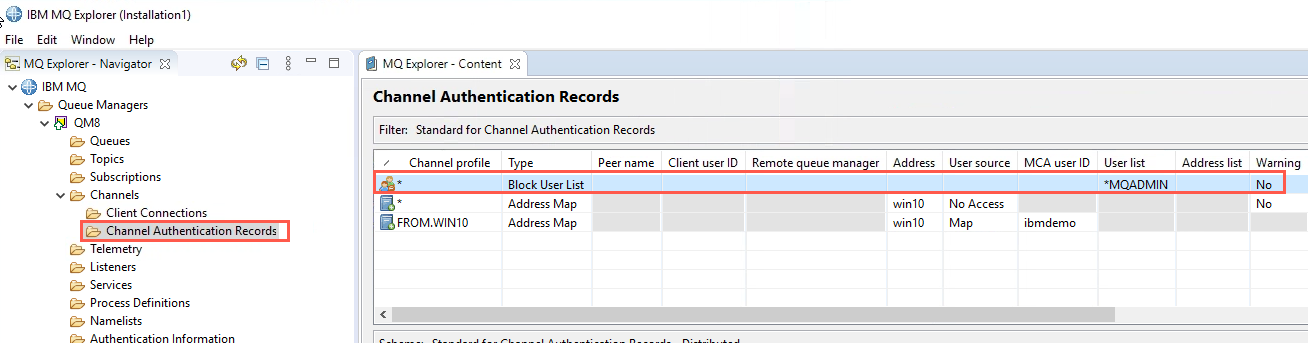
-
If the record does not exist, click this link to go to the Appendix and define the record. Then click the Return to exercises link to continue.
- If the record exists you do not need to do anything, continue with the next step.
Exercises
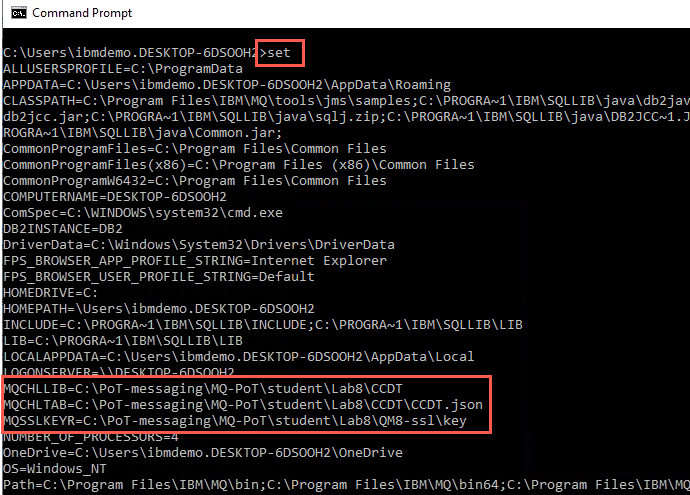
All exercises will require the following environment variables to be set for the client keystore and client channel definitions.
-
You can do this from a command prompt; just enter each of the following commands to set the environment variables.
 set MQCHLLIB=C:\PoT-messaging\MQ-PoT\student\Lab8\CCDT
 set MQSSLKEYR=C:\PoT-messaging\MQ-PoT\student\Lab8\QM8-ssl\key
 set MQCHLTAB=C:\PoT-messaging\MQ-PoT\student\Lab8\CCDT\CCDT.json
-
Issue the set command to check that the above environment variables were created correctly.
Queue manager set up required
-
The client channel in all cases will be CLIENT.CHL connecting to QM8. The client channel definition used in each exercise specifies a different certificate label to be used from the client’s keystore using CERTLABL and is set using the MQCHLTAB environment variable which will be detailed in each section.
-
Create the server connection on QM8. This is similar to setting up the sender channel in Lab7 except this time we are creating a server-connection channel.
-
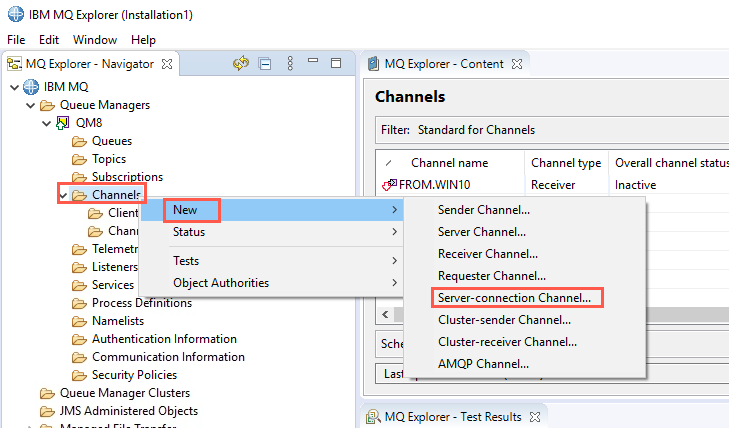
Using the MQ Explorer, right click Channels, select New > Server-connection Channel.
-
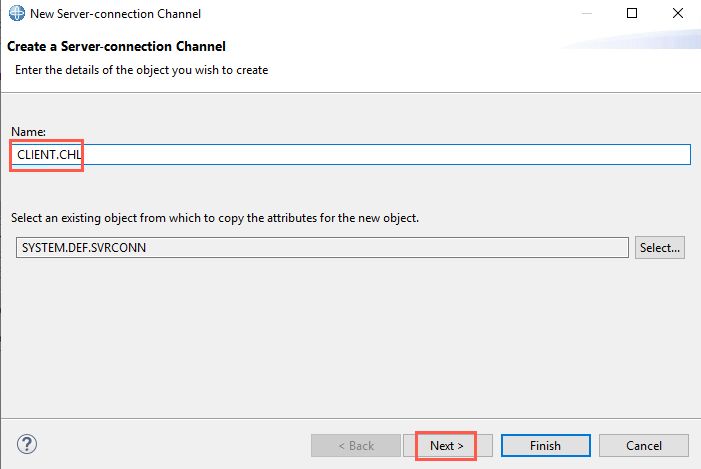
On the next panel enter the channel name CLIENT.CHL and click Next.
-
Select the SSL tab in the left-hand pane and select SSL Cipher Spec ANY_TLS12_OR_HIGHER.
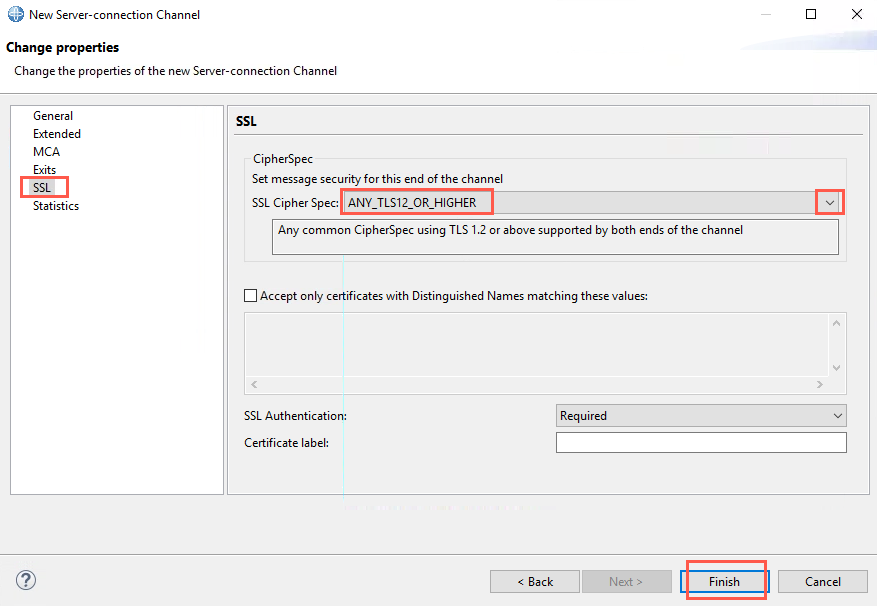
Click Finish to create the channel.
-
In the command window, copy a new CCDT to the directory we will use with the following command:
copy C:\student\CCDT.json C:\PoT-messaging\MQ-POT\student\Lab8\CCDT\Also copy the prepared keystore into a new directory with the following commands:
 mkdir C:\PoT-messaging\MQ-POT\student\Lab8\QM8-ssl
 copy "C:\PoT-messaging\MQ-POT\student\Lab7\QM8 ssl\*" C:\PoT-messaging\MQ-POT\student\Lab8\QM8-ssl\
Exercise 1: Create CHLAUTH rule to allow a client channel using SSLPEER mapping
We will use client applications amqsputc and amqsgetc to demonstrate the channel authentication rules are set.
-
Set up the client environment for this test by going to a command prompt and enter the following command:
set MQCHLTAB=CCDT.json -
Use the set command to confirm you now have all 3 environment variables set, you should see in the output.
- MQCHLLIB=C:\PoT-messaging\MQ-POT\STUDENT\Lab8\CCDT
- MQSSLKEYR=C:\PoT-messaging\MQ-POT\STUDENT\Lab8\QM8-ssl\key
- MQCHLTAB=CCDT.json
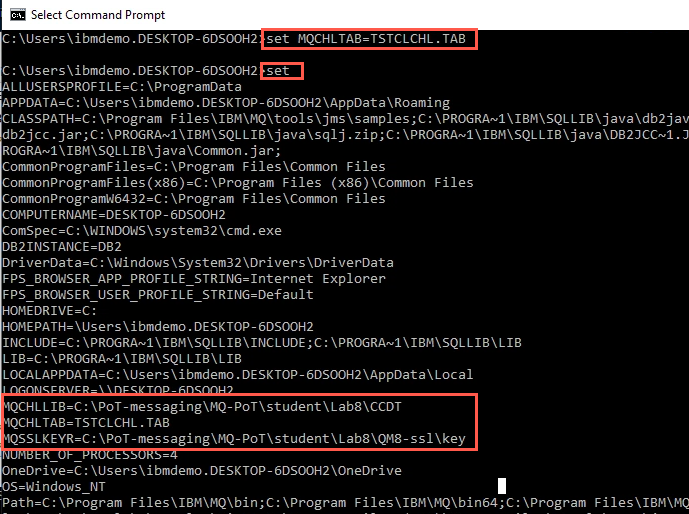
-
You need to update the CCDT before starting the test. In Windows Explorer, navigate to C:\PoT-messaging\MQ-POT\STUDENT\Lab8\CCDT. Right-click CCDT.json and select Edit with Notepad++.
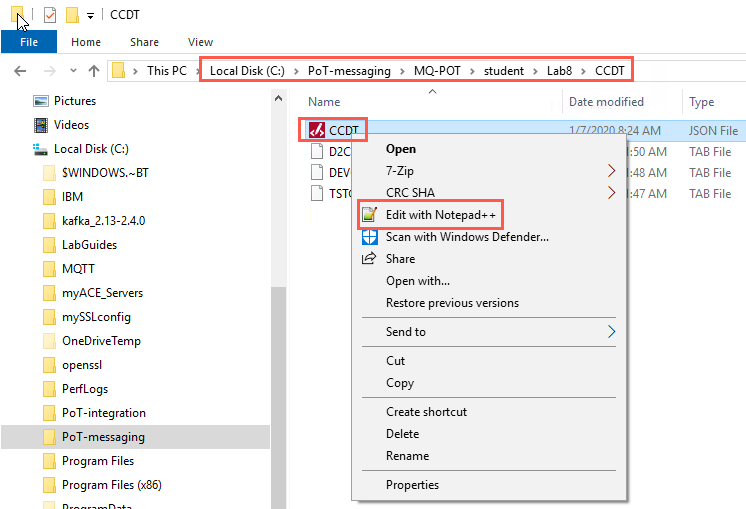
- In the editor delete lines 19 - 48. Remove the comma on the new line 18. Insert the following stanza after line 16
"transmissionSecurity":
  {
    "cipherSpecification": "",
    "certificateLabel": "",
    "certificatePeerName": ""
  },
The file should now look like the following:
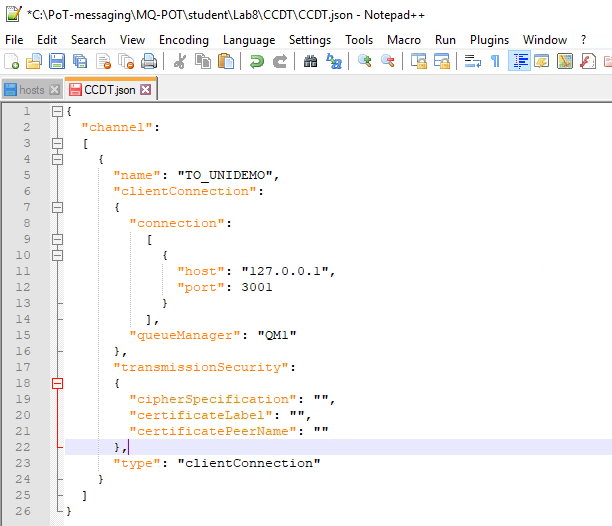
-
Make the following changes:
Field Name Value to Enter name CLIENT.CHL host win10 port 5555 queueManager QM8 cipherSpecification ANY_TLS12_OR_HIGHER certificateLabel TESTcert certificatePeerName CN=TEST,OU=Test Group,O=IBM Save the file.
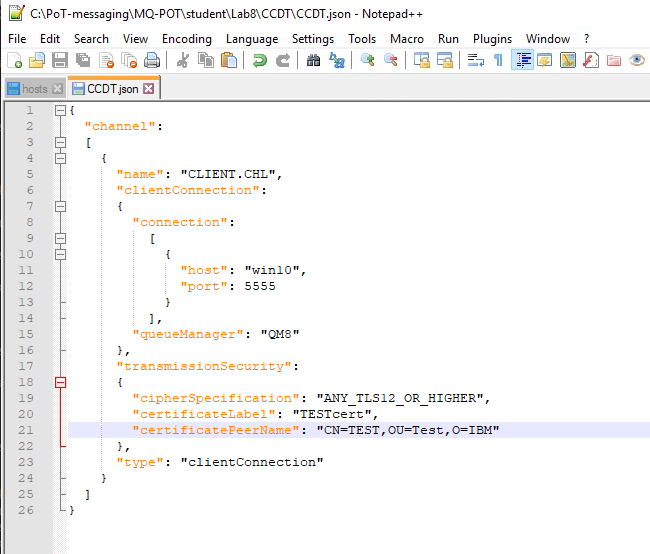
-
Now try putting a message to TESTQ on QM8. If you have multiple command windows open, make sure to use the window where you entered the set commands. In that command prompt enter:
amqsputc TESTQ QM8 -
The MQCONNX will fail with reason code 2035.
- Look at the error message in QM8 error logs C:\MQV80\qmgrs\QM8\errors. You should see error message:
AMQ9776: Channel was blocked by userid
EXPLANATION:
The inbound channel 'CLIENT.CHL' was blocked from address '127.0.0.1' because the active values of the channel were mapped to a userid which should be blocked. The active values of the channel were 'MCAUSER(Betaworks) CLNTUSER(Betaworks) SSLPEER(SERIALNUMBER=53:B1:37:A1,CN=TEST,OU=Test Group,O=IBM) SSLCERTI(CN=TEST,OU=Test Group,O=IBM) ADDRESS(WIN-K60N0S0RQQU)'.
- You can put the details from the AMQ9776 error message into a match runcheck command to find out why this connection is blocked as follows:
DISPLAY CHLAUTH(channel-name-from-message) MATCH(RUNCHECK) ALL
ADDRESS(IP-address-from-message)
CLNTUSER(if-seen-in-message)
SSLPEER(if-seen-in-message)
RQMNAME(if-seen-in-message)
- So from a command prompt enter
runmqsc QM8
NOTE: As some long character strings are going to be required it may be a good idea to open notepad and keep a copy of the commands.
- < Warning – the following step will not work if you have run security exercise 1 and deleted the default CHLAUTH(*) record > Enter the DISPLAY CHLAUTH MATCH(RUNCHECK) command as follows:
DISPLAY CHLAUTH(CLIENT.CHL) MATCH(RUNCHECK) ALL ADDRESS(127.0.0.1) CLNTUSER(Betaworks) SSLPEER('SERIALNUMBER=53:B1:37:A1,CN=TEST,OU=Test Group,O=IBM')
- This will return the channel authentication rule that the connection matches. You will see
CHLAUTH(*) TYPE(BLOCKUSER)
DESCR(Default rule to disallow privileged users)
CUSTOM( ) USERLIST(*MQADMIN)
WARN(NO) ALTDATE(2014-06-25)
ALTTIME(22.38.26)
User Betaworks is a privileged user which is why access has not been allowed.
We can now create a channel authentication rule for this client channel so when presented with the certificate from the Test Group, we will allow access as testuser, which was created in lab1, and map the MCAUSER for the channel to testuser access.
To do this from the MQ Explorer under Channels → right click Channel Authentication Records → select New → select Channel Authentication Record
→ select Allow access and click Next
→ select SSL/TLS Subject's Distinguished Name and click Next
→ we are creating this rule specifically for the channel CLIENT.CHL so enter the full channel name in Channel Profile field and click Next
→ enter the SSL/TLS Subject's Distinguished Name pattern as CN=TEST,OU=Test Group
and click Next
→ select Fixed user ID and enter testuser in the User ID field then click Next
→ leave authentication required as queue manager and click Next
→ add a comment and click Next
The next panel explains what we are doing and the SET CHLAUTH command generated by the wizard
SET CHLAUTH('CLIENT.CHL') TYPE(SSLPEERMAP) SSLPEER('CN=TEST,OU=Test Group') USERSRC(MAP) MCAUSER('testuser') DESCR('allow test group to use testuser') ACTION(ADD)
- Select Finish and this rule is now set.
If you issue DIS CHLAUTH(*) ALL from a runmqsc prompt you will see the new rule listed.
-
Now try running the amqsputc client application again to try putting a message to TESTQ on QM8
- From a command prompt enter amqsputc TESTQ QM8
You should now receive the prompt to enter messages to the queue as in the picture below.
Leave this window open and do not exit the application so we can check the channel status for this connection
 {width=”6.263888888888889in”
height=”1.8694444444444445in”}
{width=”6.263888888888889in”
height=”1.8694444444444445in”}
If you receive error MQCONNX ended with reason code 2058 this may be because you are using a new command prompt window and have not set the 3 environment variables as described earlier in this section.
- From a new command prompt start runmqsc QM8 and check the channel status for our channel using command DIS CHS(CLIENT.CHL) MCAUSER SSLPEER
You should see the channel is running with MCAUSER set to testuser
 {width=”5.513888888888889in”
height=”1.8895833333333334in”}
{width=”5.513888888888889in”
height=”1.8895833333333334in”}
- End the runmqsc session by typing end, terminate the amqsputc application using CTRL+C but leave both windows open for now.
In this exercise we were denied access by the channel authentication rule to prevent MQ administrator channel connections.
We created a new rule to allow our client channel to connect if the client's SSL/TLS certificate contains the Distinguished name pattern specified in the SSLPEERMAP rule.
Exercise 2: Create CHLAUTH rule to only allow access if the certificate was issued by a specific CA using SSLCERTI
It is possible that a subject's Distinguished Name may not be unique so in IBM MQ v8 you can also configured a rule to match the SSL/TLS Issuer's Distinguished Name as well as the Subject's DN.
Now we will try this again from another instance of the client using CLIENT.CHL but presenting a different certificate specified using CERTLABL in our client channel. This time we will use the issuing certificate authority information to set a rule to allow them access only if they are using the certificate issued by the CA specified in the rule.
- Set up the client environment for this test by going to a command prompt and enter the following commands:
set MQCHLLIB=C:\STUDENT\Lab3\CCDT
set MQSSLKEYR=C:\STUDENT\Lab3\client keystore\key
set MQCHLTAB=DEVCLCHL.TAB
- This client channel table includes the definition for CLIENT.CHLwith CERTLABL(DEVCA)
SSLCIPH(TLS_RSA_WITH_AES_128_CBC_SHA)
- Certificate label DEVCA issued to subjects DN CN=ULRIKE GOETHER and the certificate was issued by CN=WEBSPHERE MQ CA, OU=WEBSPHERE MQ DEVELOPMENT, O=IBM, L=HURSLEY, ST=HAMPSHIRE, C=UK
-
Now try putting a message to TESTQ on QM8
-
From a command prompt enter amqsputc TESTQ QM8
-
The MQCONNX will fail with reason code 2035
- Again look at the error message in QM8 error logs C:\MQV80\qmgrs\QM8\errors. You should see error message:
-
AMQ9776: Channel was blocked by userid
EXPLANATION:
The inbound channel 'CLIENT.CHL' was blocked from address '127.0.0.1' because
the active values of the channel were mapped to a userid which should be
blocked. The active values of the channel were 'MCAUSER(Betaworks)
CLNTUSER(Betaworks) SSLPEER(SERIALNUMBER=05,CN=ULRIKE GOETHER)
SSLCERTI(CN=WEBSPHERE MQ CA,OU=WEBSPHERE MQ
DEVELOPMENT,O=IBM,L=HURSLEY,ST=HAMPSHIRE,C=UK) ADDRESS(WIN-K60N0S0RQQU)'.
- As in the previous exercise from runmqsc QM8 you can use the DISPLAY CHLAUTH MATCH(RUNCHECK) to confirm which rule is preventing access.
Input all of the fields from the error message into the command so your command should look like this
DISPLAY CHLAUTH(CLIENT.CHL) MATCH(RUNCHECK) ALL ADDRESS(127.0.0.1) CLNTUSER(Betaworks) SSLPEER('SERIALNUMBER=05,CN=ULRIKE GOETHER')
-
From the output, as in the previous exercise, you will see that again it is the rule to block *MQADMIN access because user Betaworks is in the mqm group that is stopping our connection.
-
We can create a rule to allow this client access when presented with the certificate with CN=Ulrike Goether that we will allow access.
SET CHLAUTH('CLIENT.CHL') TYPE(SSLPEERMAP) SSLPEER('CN=ULRIKE GOETHER') USERSRC(MAP) MCAUSER('testuser') DESCR('allow test group to use testuser') ACTION(ADD)
-
However it may be possible that a certificate can be used with the same SSLPEER so we can further restrict this by only allowing access when the issuer of this certificate is WEBSPHERE MQ CA from IBM Hursley. To do this we can use the new SSLCERTI parameter.
-
We can use the MQ Explorer Create a channel authentication record wizard or input a command directly to runmqsc.
To do this from the MQ Explorer under Channels → right click Channel Authentication Records → select New → select Channel Authentication Record
→ select Allow access and click Next
→ select SSL/TLS Subject's Distinguished Name and click Next
→ we are creating this rule specifically for the channel CLIENT.CHL so enter the full channel name in Channel Profile field and click Next
→ enter the SSL/TLS Subject's Distinguished Name pattern as **CN=ULRIKE GOETHER **
ALSO on this panel enter the SSL/TLS Issuer's Distinguished Name pattern as
CN=WEBSPHERE MQ CA,O=IBM,L=HURSLEY then click Next
→ select Fixed user ID and enter testuser in the User ID field then click Next
→ leave authentication required as queue manager and click Next
→ add a comment and click Next
The next panel explains what we are doing and the SET CHLAUTH command generated by the wizard which should look like this.
SET CHLAUTH('CLIENT.CHL') TYPE(SSLPEERMAP) SSLPEER('CN=ULRIKE GOETHER') USERSRC(MAP) MCAUSER('testuser') DESCR('test sslcerti') SSLCERTI('CN=WEBSPHERE MQ CA,O=IBM,L=HURSLEY') ACTION(ADD)
It is possible that a subject's DN may not be unique so in IBM MQ v8 you can also configured a rule to match the SSL/TLS Issuer's DN.
-
Select Finish and this rule will be set.
-
If you issue DISPLAY CHLAUTH(CLIENT.CHL) ALL you should see the 2 rules we have set for CLIENT.CHL
 {width=”5.763888888888889in”
height=”2.609722222222222in”}
{width=”5.763888888888889in”
height=”2.609722222222222in”}
-
Now try running the amqsputc client application again to try putting a message to TESTQ on QM8
- From a command prompt where you have set the MQ environment variables set as
set MQCHLLIB=C:\STUDENT\Lab3\CCDT
set MQSSLKEYR=C:\STUDENT\Lab3\client keystore\key
set MQCHLTAB=DEVCLCHL.TAB
- enter amqsputc TESTQ QM8
You should now be allowed access and will be able to put messages to the queue.
Before exiting amqsputc you can check the channel
status information from another command prompt to check the channel is running and further details.
In this exercise we were denied access by the channel authentication rule to prevent MQ administrator channel connections.
We created a new channel authentication rule to allow our client channel to connect if the client's SSL/TLS certificate contains the Distinguished name pattern CN=ULRIKE GOETHER specified in the SSLPEERMAP rule.
It is possible that a subject's DN may not be unique so we have also configured the rule to match the SSL/TLS Issuer's DN using the SSLCERTI attribute on SET CHLAUTH. The next exercise will use a certificate which was not issued from the correct CA.
Exercise 3: Test CHLAUTH rule created to check certificate issuer's DN fails a connection using a different issuer.
Now we will try this again from another instance of the client using CLIENT.CHL but presenting a different certificate specified using CERTLABL in our client channel. This time the certificate subject's DN matches our rule but the certificate was not issued by the CA specified in the rule.
- Set up the client environment for this test by going to a command prompt and enter the following commands:
set MQCHLLIB=C:\STUDENT\Lab3\CCDT
set MQSSLKEYR=C:\STUDENT\Lab3\client keystore\key
set MQCHLTAB=D2CLCHL.TAB
- This client channel table includes the definition for CLIENT.CHL with CERTLABL(DEVcert)
SSLCIPH(TLS_RSA_WITH_AES_128_CBC_SHA)
- Certificate label DEVcert
subject's DN is CN=ULRIKE GOETHER and the issuer's DN is the same
- enter amqsputc TESTQ QM8
If this does not work then again look at the error message in QM8 error logs
C:\MQV80\qmgrs\QM8\errors. You should see error message
AMQ9776: Channel was blocked by userid
EXPLANATION:
The inbound channel 'CLIENT.CHL' was blocked from address '127.0.0.1' because
the active values of the channel were mapped to a userid which should be
blocked. The active values of the channel were 'MCAUSER(Betaworks)
CLNTUSER(Betaworks) SSLPEER(SERIALNUMBER=53:B2:ED:98,CN=ULRIKE
GOETHER,OU=Betaworks,O=IBM,L=Hursley) SSLCERTI(CN=ULRIKE
GOETHER,OU=Betaworks,O=IBM,L=Hursley) ADDRESS(WIN-K60N0S0RQQU)'
You can see from this message that the SSL certificate Issuer's DN does not match the channel authentication rule which specified that the issuer should be CN=WEBSPHERE MQ CA,O=IBM,L=HURSLEY
in the rule set n Exercise 2
SET CHLAUTH('CLIENT.CHL') TYPE(SSLPEERMAP) SSLPEER('CN=ULRIKE GOETHER') USERSRC(MAP) MCAUSER('testuser') DESCR('test sslcerti') SSLCERTI('CN=WEBSPHERE MQ CA,O=IBM,L=HURSLEY') ACTION(ADD)
Exercise 4. CHLAUTH rules for MQ Clients to provide a User ID and Password
It is now possible to force a MQ Client connection to provide a user ID and password by configuring a CHLAUTH rule specifying the attribute CHCKCLNT(REQUIRED). Any connection matching this rule will then be required to provide a User ID and password.
This might be useful if you have a particular MQ Client which is used for administration of MQ, in addition only allowing certain IP addresses or host names to connect using this channel you could also require a user ID and password are supplied for checking.
This exercise will show the effect of setting the following attributes on the CHLAUTH rules
-
CHCKCLNT(REQUIRED)
-
Use this to ensure the client supplies a userid and password for authentication.
-
USERSRC(CHANNEL)
MAP is the default where inbound connections will use the user ID specified in the MCAUSER in the CHLAUTH rule. In this example we show that when CHANNEL is specified the user ID is flowed from the client. Because we are running the client application as user betaworks, which is a privileged user, the connection is blocked. So we need to create a rule to allow a privileged user for a specific channel and create another rule to ensure this is restricted.
We will be using the sample client amqsputc which uses environment variable MQSAMP_USER_ID to set a user id. In the sample application if you set this then the sample program will ask you for a password. This is then passed on the MQCONNX to the queue manager and will be authenticated as required.
CHCKCLNT(REQUIRED)
- So create a new server aonnection channel MY.CLIENT. In the MQ Explorer right click 'Channels', select 'New' and then 'Server-connection channels'
Enter the channel name MY.CLIENT and click 'Finish'
- Create a CHLAUTH rule for the client channel to ensure this channel is from a specific IP address and ask them to enter a valid user ID and password.
To do this from the MQ Explorer under Channels → right click Channel Authentication Records → select New → select Channel Authentication Record
→ select Allow access and click Next
→ select Address and click Next
→ we are creating this rule specifically for channel MY.CLIENT
enter the full channel name in Channel Profile field and click Next
→ enter IP address 127.0.0.1 and click Next
→ select Fixed user ID and in the User ID field enter testuser then click Next
→ for User ID and Password authentication select Required and click Next
→ enter a comment and click Next
The next panel explains what we are doing and the SET CHLAUTH command generated by the wizard which should look like this
SET CHLAUTH('MY.CLIENT') TYPE(ADDRESSMAP) ADDRESS('127.0.0.1') USERSRC(MAP) MCAUSER('testuser') DESCR('allow access for this channel only') CHCKCLNT(REQUIRED) ACTION(ADD)
→ select Finish and the rule will be set.
- Now test this connection.
- From a command prompt set the MQSERVER environment variable
set MQSERVER=MY.CLIENT/TCP/localhost(5555)
amqsputc TESTQ
You should see this fail as in this screenshot
 {width=”6.2659722222222225in”
height=”2.04375in”}
{width=”6.2659722222222225in”
height=”2.04375in”}
- Why did this connection fail?
If you review the queue managers error logs you should see
AMQ9791: The client application did not supply a user ID and password
This is because the CHLAUTH rule we set requires a user and password.
- Now test this connection and set a user.
From a command prompt set the MQSERVER environment variable
set MQSERVER=MY.CLIENT/TCP/localhost(5555)
set MQSAMP_USER_ID=testuser
amqsputc TESTQ
You will be prompted for the password for the user ID supplied.
Enter a message and null line to end.
 {width=”5.997916666666667in”
height=”2.9458333333333333in”}
{width=”5.997916666666667in”
height=”2.9458333333333333in”}
The channel starts after authenticating the password supplied by the amqsputc application for testuser. The MCAUSER for this channel is set to testuser as set by the matching CHLAUTH rule.
USERSRC(CHANNEL)
With IBM MQ v8 we now have the ability to authenticate the user flowed from the client when the connection is made using USERSRC(CHANNEL) set in the CHLAUTH rule.
We will alter the CHLAUTH rule for MY.CLIENT and see what effect this has.
- From the MQ Explorer select the Channel Authentication Record for MY.CLIENT
then click Properties
 {width=”6.0159722222222225in”
height=”3.092361111111111in”}
{width=”6.0159722222222225in”
height=”3.092361111111111in”}
In the Properties panel select Extended
 {width=”6.2659722222222225in”
height=”3.027083333333333in”}
{width=”6.2659722222222225in”
height=”3.027083333333333in”}
From the 'User source' pull down menu alter Map to Channel, and click Apply, then OK to change and exit.
Now try the test again.
From a command prompt set the environment variables and start the applic
set MQSERVER=MY.CLIENT/TCP/localhost(5555)
set MQSAMP_USER_ID=testuser
amqsputc TESTQ
What happens? ….….
Answer:
You will see this fails with
AMQ9776: Channel was blocked by userid
This is because with USERSRC(CHANNEL) the user ID is flowed from the MQ Client and in this example this is a privileged user so the connection is blocked by the channel authentication record for *MQADMIN users.
Can we configure a rule to allow our channel to connect if the user is a privileged user?
Answer:
This is possible but you should also define a more specific channel authentication rule for this channel.
In the previous example we have already configured a rule for this channel to ensure that the client supplies a user ID and password for authentication and also that the connection is being made from the IP address we expect.
Create the CHLAUTH rule that will allow a privileged user
To configure a more specific CHLAUTH rule for MY.CLIENT channel with a 'dummy' user so this is not blocked by the generic CHLAUTH rule for privileged user.
From the MQ Explorer under Channels → right click Channel Authentication Records → select New → select Channel Authentication Record
→ Select Block user and click next
→ select Final Assigned User ID and click Next
→ enter channel profile MY.CLIENT and click Next
→ then on the 'Matching a list of user ids' page enter dummy and click next
→ enter a comment and click next
→ review the rule which should look like this
SET CHLAUTH('MY.CLIENT') TYPE(BLOCKUSER) USERLIST('dummy') DESCR('bypass for privileged users on this channel') WARN(NO) ACTION(ADD)
and select Finish
Ensure you have a CHLAUTH rule for this channel only allowing access to the client you expect as this allows a privileged user to connect.
Now try the tests again
set MQSERVER=MY.CLIENT/TCP/localhost(5555)
set MQSAMP_USER_ID=testuser
amqsputc TESTQ
Because we have set the environment variable to provide a user ID to the sample
program you will be prompted to enter a password. This will be sent to the queue manager and authenticated because we have CHCKCLNT(REQUIRED) set on the matching CHLAUTH rule.
Enter a message and null line to end.
The channel should start after authenticating the password supplied for the user ID set by the environment variable in this example.
Messages can be put to the queue successfully.
User ID testuser supplied is used to authenticate the client, though the MCAUSER is set to the ID flowed from the client which is betaworks.
Optional Exercise: MQ Explorer – supplying user Ids/passwords for connecting to queue managers
WARNING it is possible to accidentally stop MQ administrators from using MQ Explorer or runmqsc against a queue manager. This exercise explains how to create the problem and more importantly how to resolve it.
On QM8 set the 'Check locally bound connections' to 'Required for Administrators' in the authentication information for TESTAUTH. See what effect this has and how to resolve it.
- In your MQ Explorer make the Authentication Information change to the TESTAUTH object
 {width=”6.267361111111111in”
height=”4.20625in”}
{width=”6.267361111111111in”
height=”4.20625in”}
Alter Optional to 'Required for administrators'
 {width=”6.267361111111111in”
height=”4.267361111111111in”}
{width=”6.267361111111111in”
height=”4.267361111111111in”}
Select Apply then OK.
- Restart the Queue manager. When the queue manager starts the ICON will be white and not yellow as it was in the screenshot above and you won't be able to do any administration because you have not provided the password as you said you would in the TESTAUTH properties.
-
You can correct this by either
-
Stop and start the queue manager in safe mode OR
-
Provide a password for your MQ Explorer
-
-
We will provide a password to resolve this:
-
Right Click your queue manager
-
Select Connection Details and then Properties
-
Select Userid from the left hand pane
-
On the Userid Properties page there may be a link to take you to a page to enable the password cache (if this has not been done before)
-
If this link is present select the link
-
then select the option to Save passwords to a file
-
-
Back on the Userid Properties page
-
select 'Enable user Identification'
-
Remove selection of 'User Identification compatibility mode'
-
enter the user betaworks in the Userid field
-
select 'Enter Password'
-
enter password ibmclass when prompted
-
select Apply and then OK
-
-
 {width=”5.517361111111111in”
height=”3.188888888888889in”}
{width=”5.517361111111111in”
height=”3.188888888888889in”}
- You should then see your queue manager turn yellow and will be able to perform administrative tasks again. (you may need to refresh the display)
Summary
This concludes the Channel Authentication lab 8.
Appendix - Adding the required Channel Authentication Record
-
In MQ Explorer right-click Channel Authentication Records and select New > Channel Authentication Record.
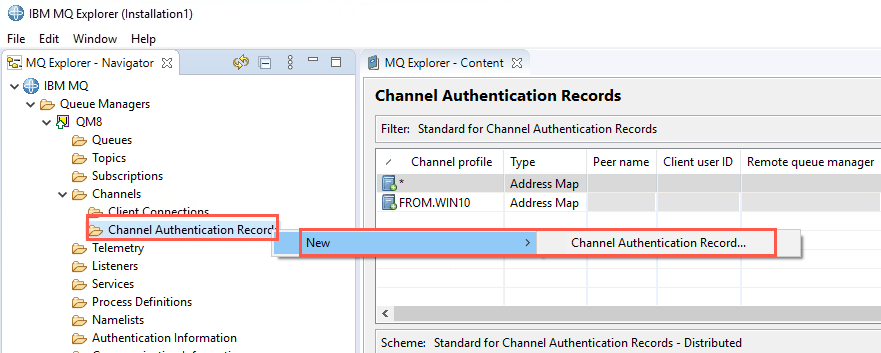
-
Check the radio button for Block Access.
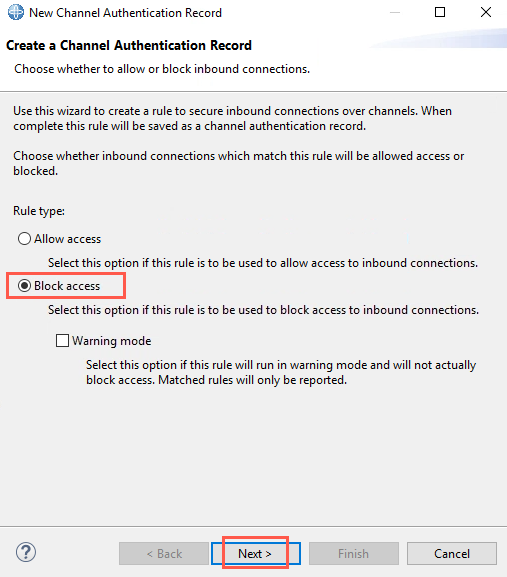
Click Next.
-
Check the radio button for Final assigned user ID. Click Next.
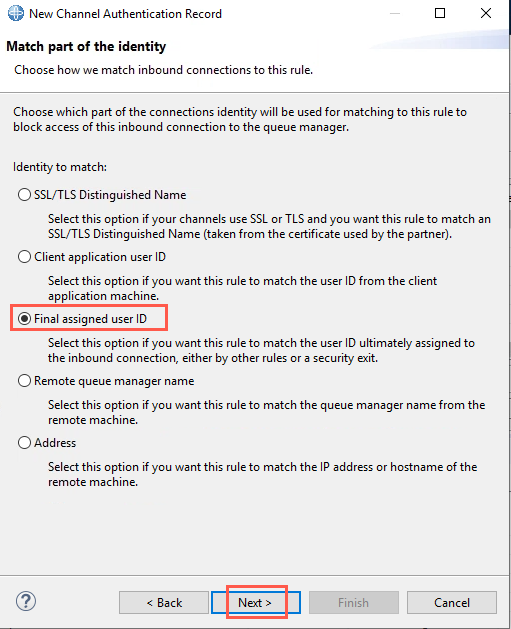
-
Enter * in Channel profile, then click Show matching channels. A list of channels will be produced for which the rule will apply.
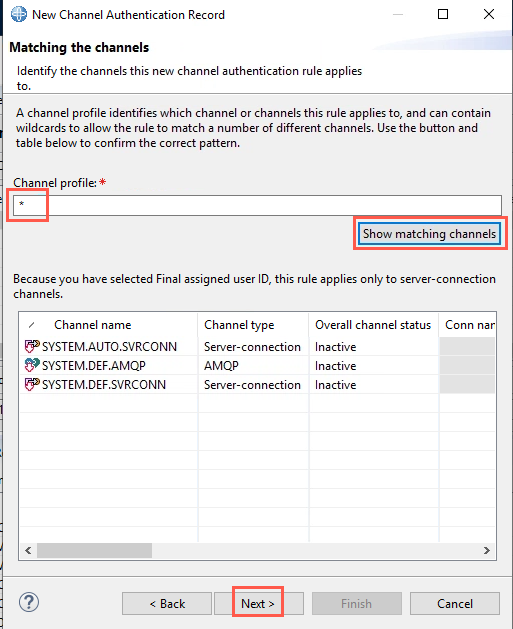
Click Next.
-
For the list of user IDs, enter *MQADMIN.
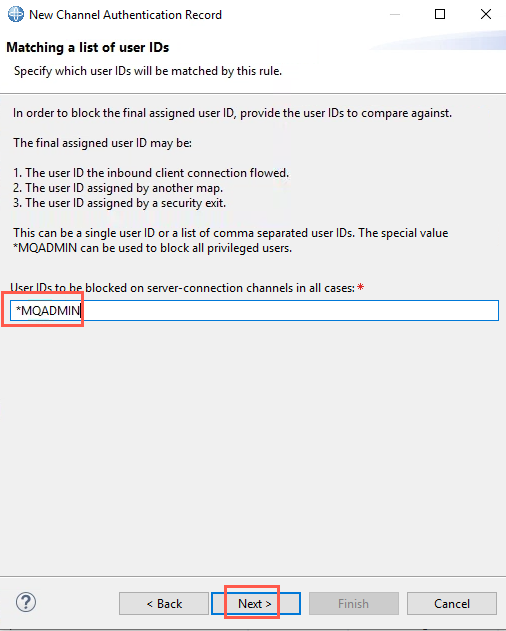
Click Next.
-
For a Description of rule, enter:
Default rule to disallow privileged users.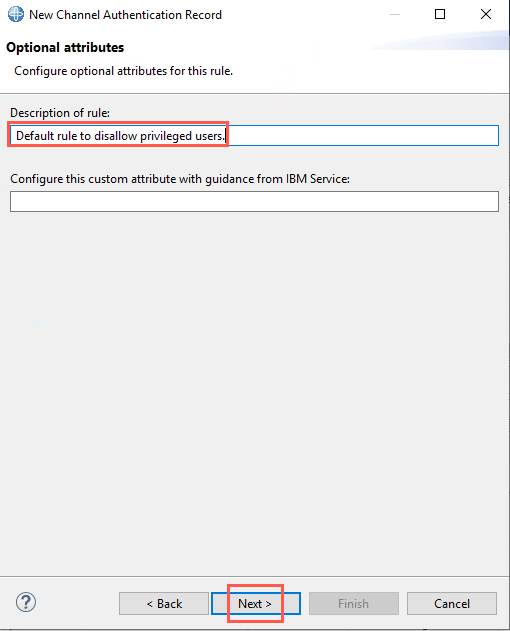
Click Next.
-
Finally a Summary panel is displayed.

Click Finish.
-
The default Channel Authentication Record is now back in place.