Software High Availability

Multi-Instance Queue Managers
Author(s): Jack Carnes
Contributed by Brian Cuttell
Acknowledgement
The World Wide Team would like to thank Brian Cuttell of the BetaWorks Team for contributing this lab.
Table of Contents
Part 1: Lab Introduction
Part 2: Starting the images
Part 3: Setting up the Network File System Server
Part 4: Setting Up Network File System Clients
Part 5: Setting Up Client Reconnect
Part 6: MQ Explorer
Part 7: More Failover Tests
Part 8: Summary
Lab Introduction
Software High Availability Lab Overview
This lab will show how the software high availability feature of IBM MQ can be set up in a Linux x86 environment. Similar steps must be followed in other Unix derived environments.
Lab environment
-
Seven virtual machines running in IBM TechZone - six RHEL 7.7 x86_64 systems and one Windows desktop:
- dr1 - NFS client primary node
- dr2 - NFS client secondary node
- dr3 - NFS server
- mq-pot - Windows desktop for connecting to the RHEL machines
- rdqm1 - not used
- rdqm2 - not used
- rdqm3 - not used
Note:
There are three VMs in the TechZone template which are not used for this lab; rdqm1, rdqm2, and rdqm3 can be ignored. -
Network interfaces:
Interface Purpose Interface Name dr1 (Primary node) dr2 (Secondary node) dr3 (NFS server) Administration ens34 10.0.0.14 10.0.0.15 10.0.0.16
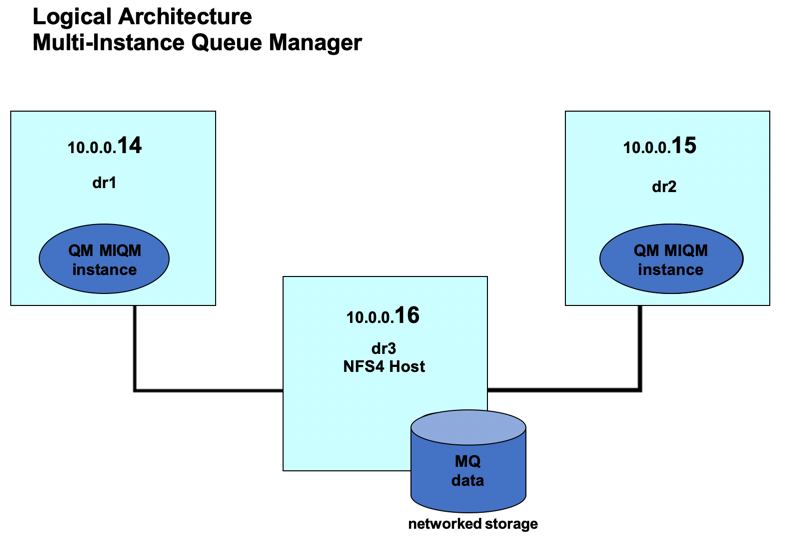
The machines will be running on an IBM TechZone network with the subnet 10.0.0.0. dr3 is the host (server) for the Network File system. This will not have an MQ Queue manager running but will have the MQ Client installed. The server could be any system capable of exporting an NFSv4 file system.
The dr1 and dr2 images are machines which will have MQ installed – they will each have IBM MQ installed and will have the same queue manager defined operating as an active / passive pair. These two systems must be running the same operating system.
Names used in this lab
| Host Name | IP | Purpose |
|---|---|---|
| dr3 | 10.0.0.16 | Host for NSFv4 system |
| dr1 | 10.0.0.14 | “Primary” host for queue manager. This is just a matter of naming. |
| dr2 | 10.0.0.15 | “Secondary” host for queue manager. This is just a matter of naming. |
Userids used in this lab
| Name | UID / GID (These are arbitrary but must be same on all machines) | Purpose |
|---|---|---|
| Userid - “mqm” | 1003 | The MQ userid – queue manager runs as mqm. |
| Groupid - “mqm” | 1003 | Primary group for mqm. |
| Userid - “ibmuser” | 1001 | A userid for logging on to console. |
NFS4 file system
| Name | |
|---|---|
| /NFS4FileSystem | This is the root of the file system that is being exported. |
| /mnt/NFS4Filesystem | This is the mount point of the file system that is mounted by mq701p and mq701s. |
Logical Architecture
Starting the images
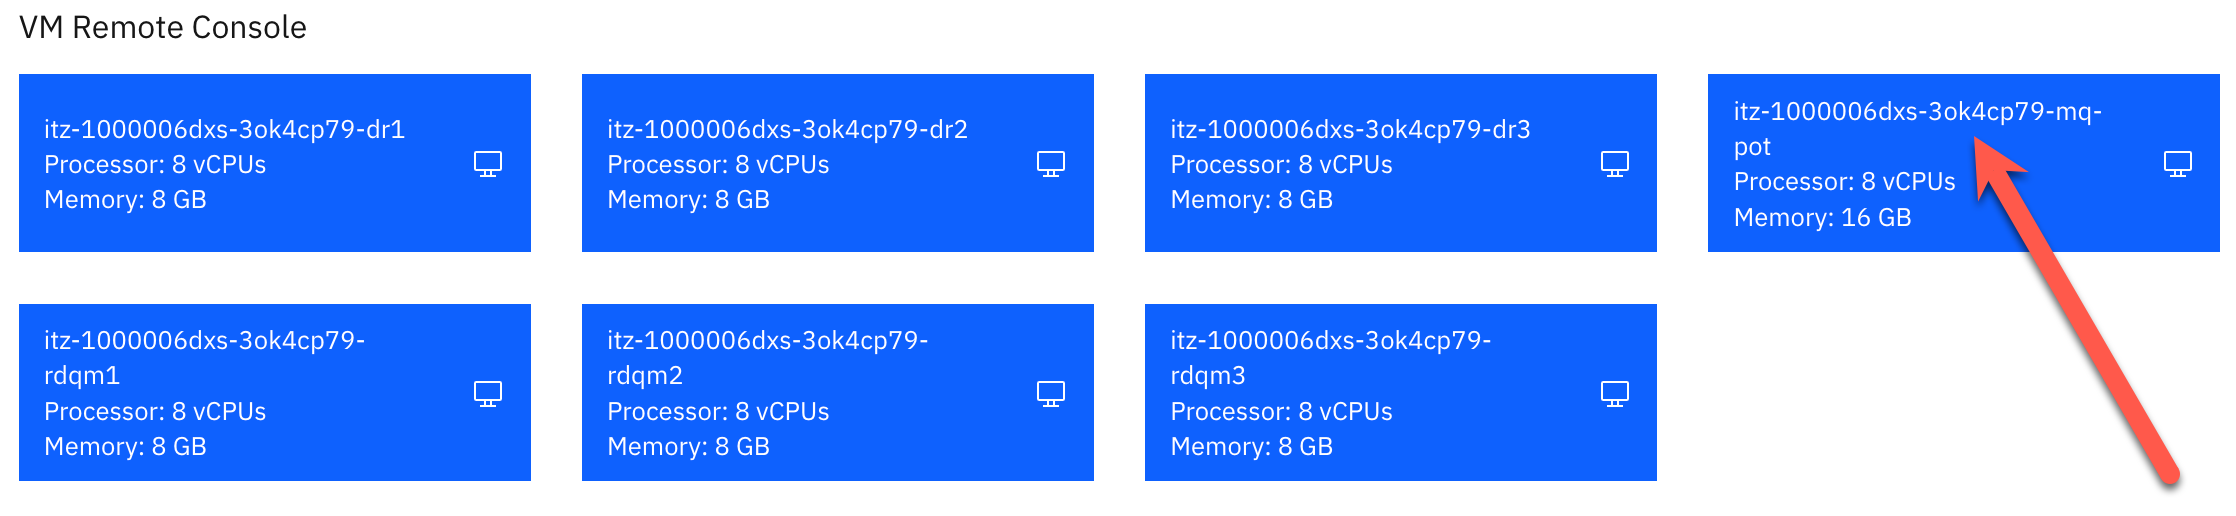
In the TechZone environment, there are seven virtual machines: rdqm1, rdqm2, rdqm3, dr1, dr2, dr3, and mq-pot which currently should be in a powered on state. rdqm1, rdqm2, and rdqm3 will not be used in this lab, so you can ignore them for now.
-
Click the VM Remote Console button for mq-pot.
-
When the desktop appears, click the Open in a new window button.

-
A new browser tab is opened. Click the desktop, enter passw0rd for ibmdemo’s password and hit enter.
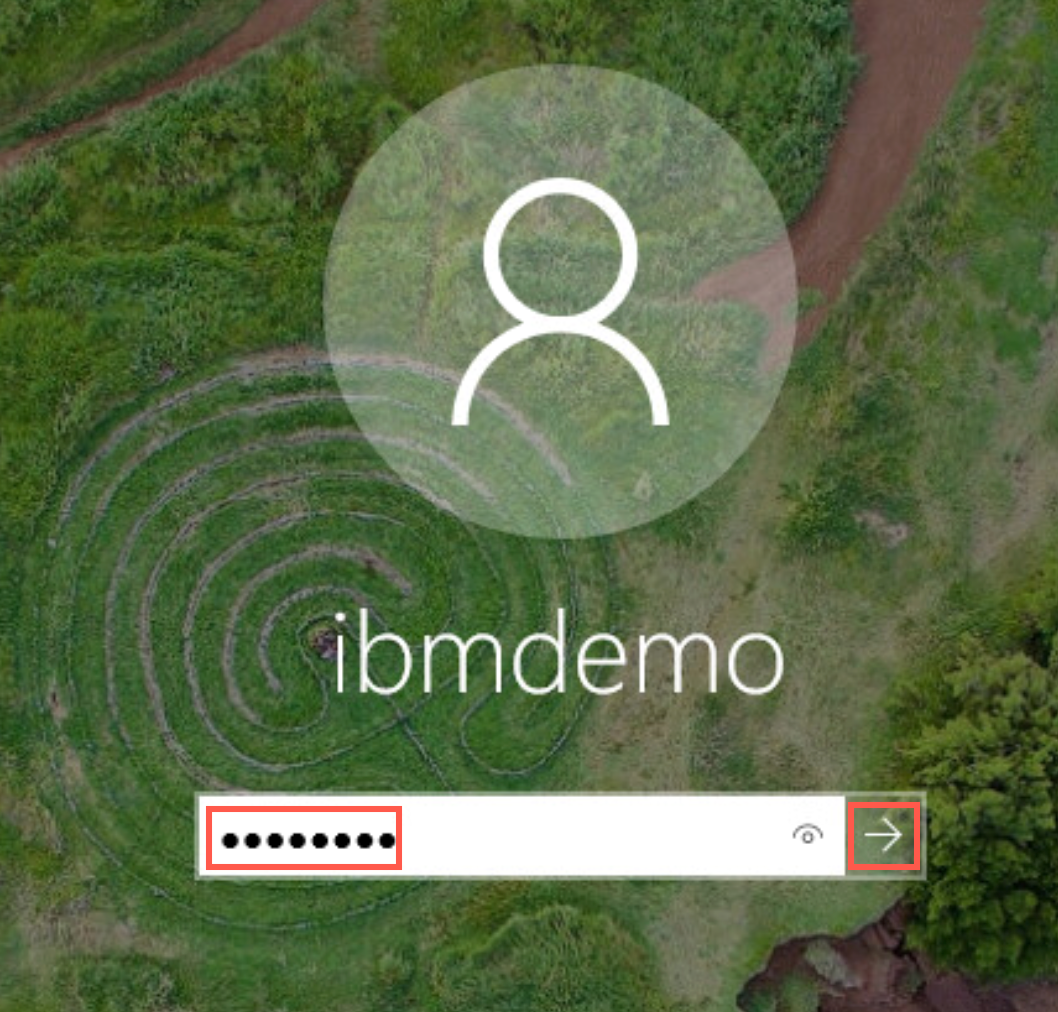
-
You will use putty to connect to each of the RHEL VMs. Double click the putty icon on the desktop.
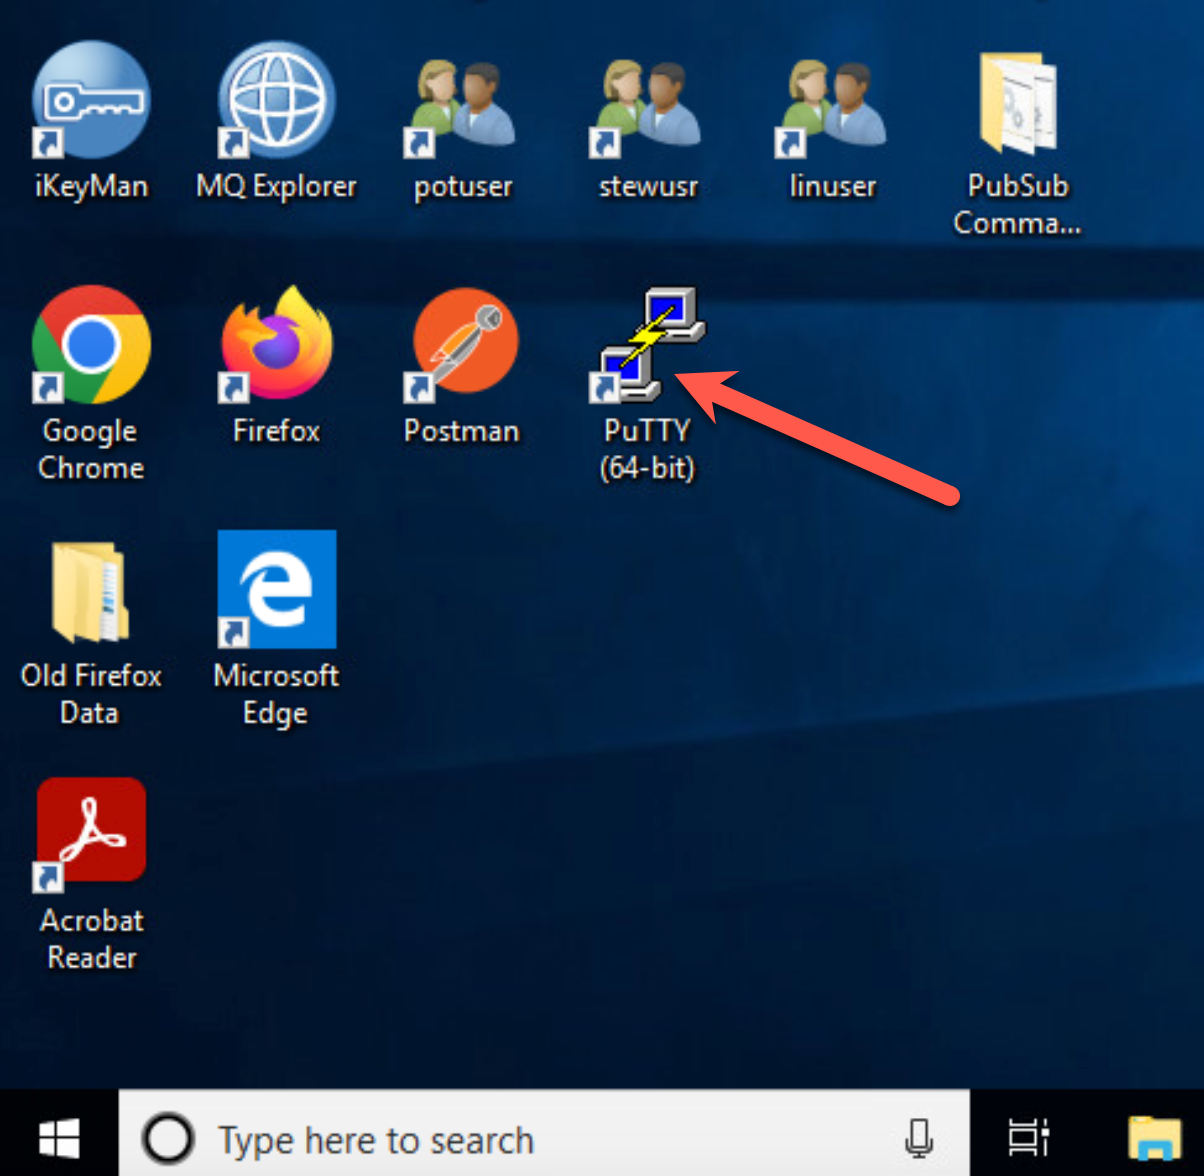
-
The IP address for dr3 is 10.0.0.16. Enter that address in the Host Name field and click Open.
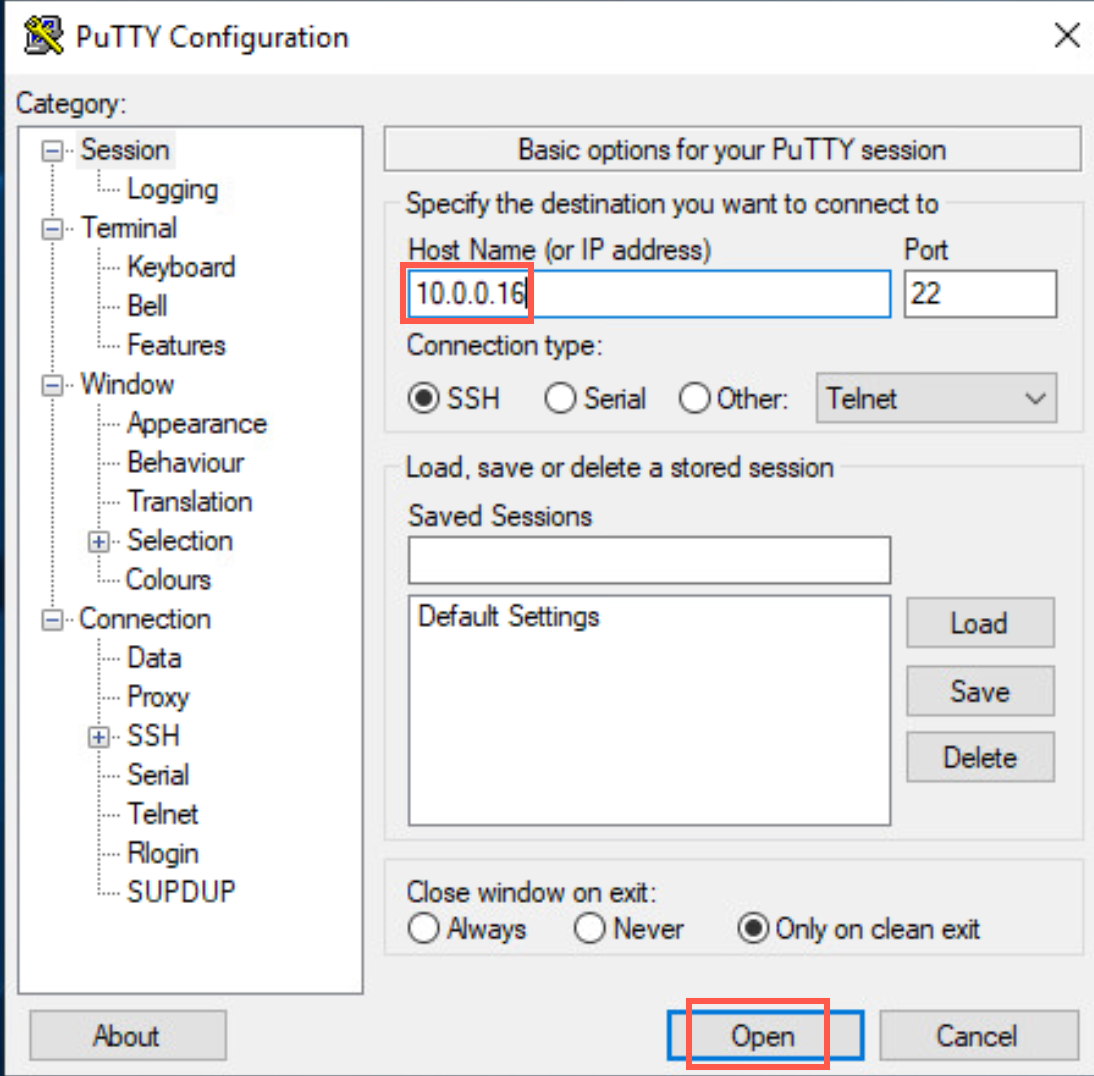
-
A new terminal window appears:
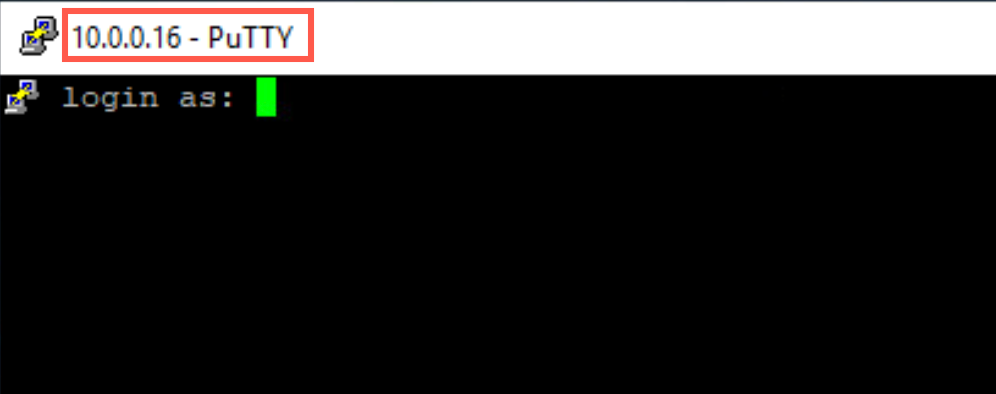
-
Log on to the VM as user ibmuser, using password engageibm.
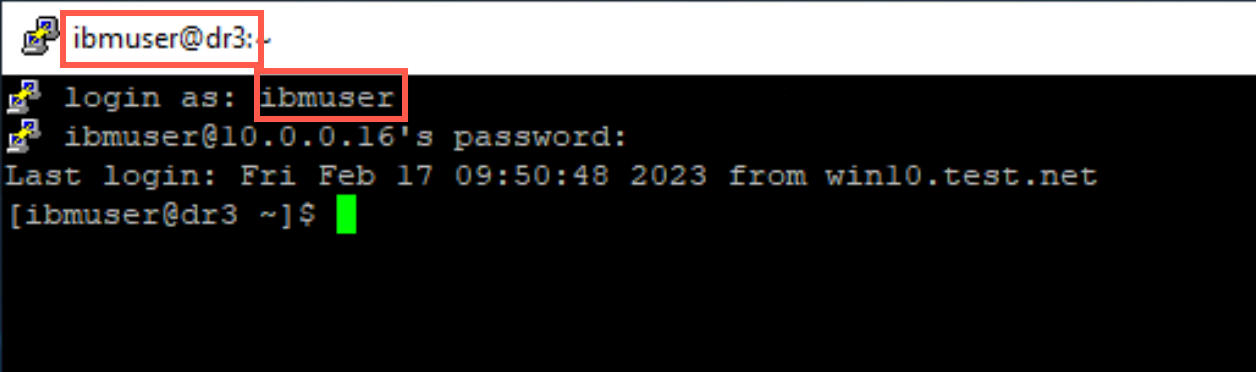
-
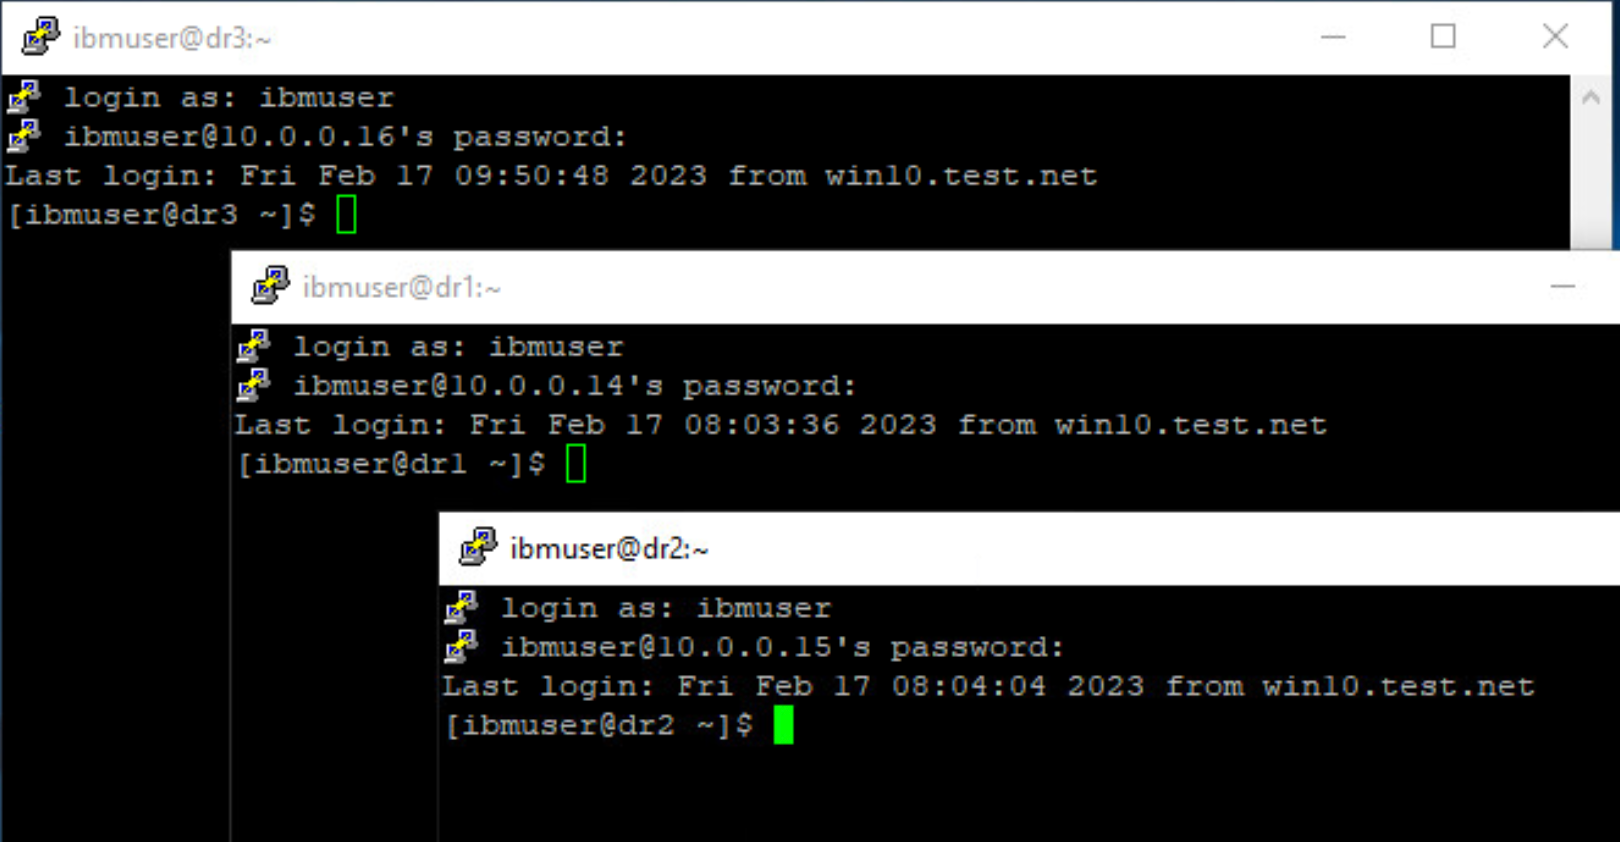
Open new putty windows dr1 and dr2 using 10.0.0.14 for dr1 and 10.0.0.15 for dr2.
-
You will use the putty terminal windows for interactions with the RHEL VMs. When instructed to open a additional terminals for a VM, just open another putty window for that VM.
Configure NFS server
The first step is setting up the Network File System. This must be created as an NFSv4 system and must be made available to the two other systems.
We wish the MQ systems on the other two computers to be able to have unfettered read /write access to (at least part of) the file system. In order to allow this we will need to create “mqm” users and groups that have the same UID and GID numbers on each computer. The users and groups have been pre-configured on this environment.
-
Return to the terminal window for dr3.
-
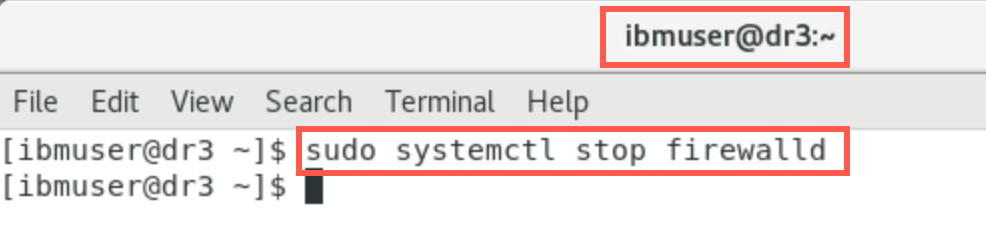
Stop the firewall for initial testing. You can restart firewall later to test with firewall running. Use the following command to stop firewalld.
sudo systemctl stop firewalldNo response is given.
-
Make a directory in which to store MQ logs and data to be shared with the NFS client machines. Enter the following commands:
 sudo mkdir /NFS4FileSystem
 sudo mkdir /NFS4FileSystem/mq915
 sudo mkdir /NFS4FileSystem/mq915/log
 sudo mkdir /NFS4FileSystem/mq915/data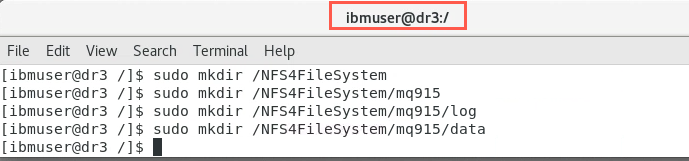
-
Change ownership of *NFS4FileSystem with following commands:
 sudo chown -R mqm:mqm /NFS4FileSystem
 sudo chmod 775 /NFS4FileSystem
-
You need to edit two system files. The first is /etc/exports. You need root permissions to edit these files. Enter the following command to open the editor:
sudo nano /etc/exports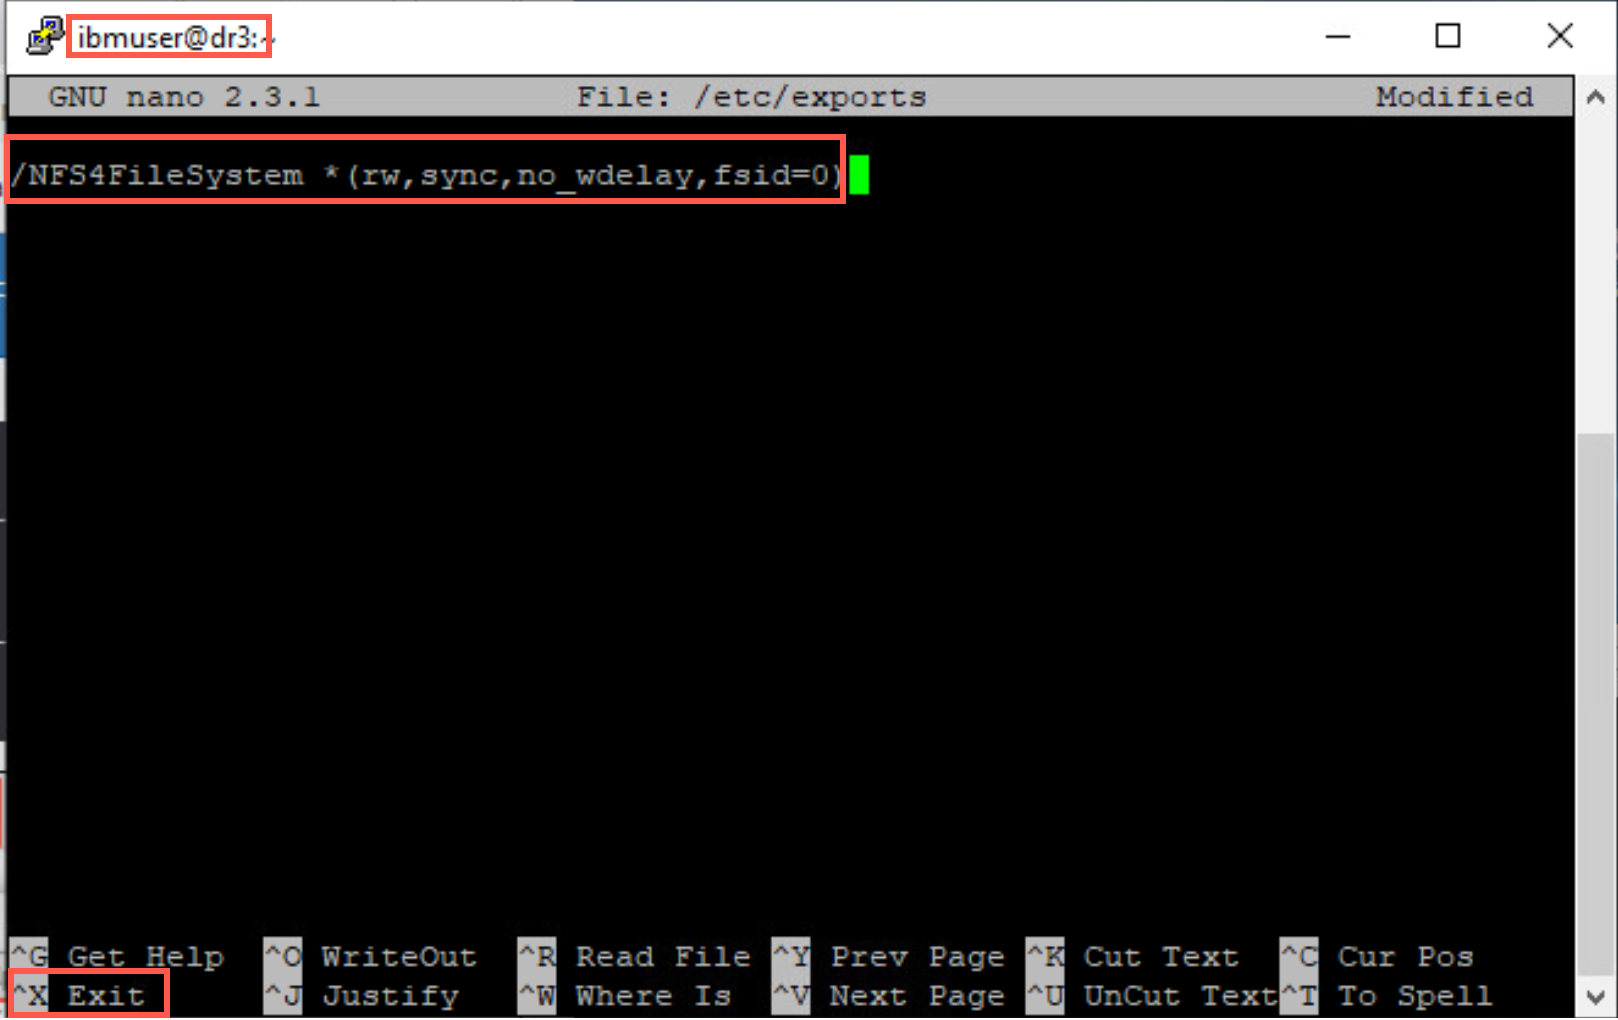
Add the following line to the file.
/NFS4FileSystem *(rw,sync,no_wdelay,fsid=0)To save the file, enter ctrl-X, then enter Y, and finally hit enter to complete.
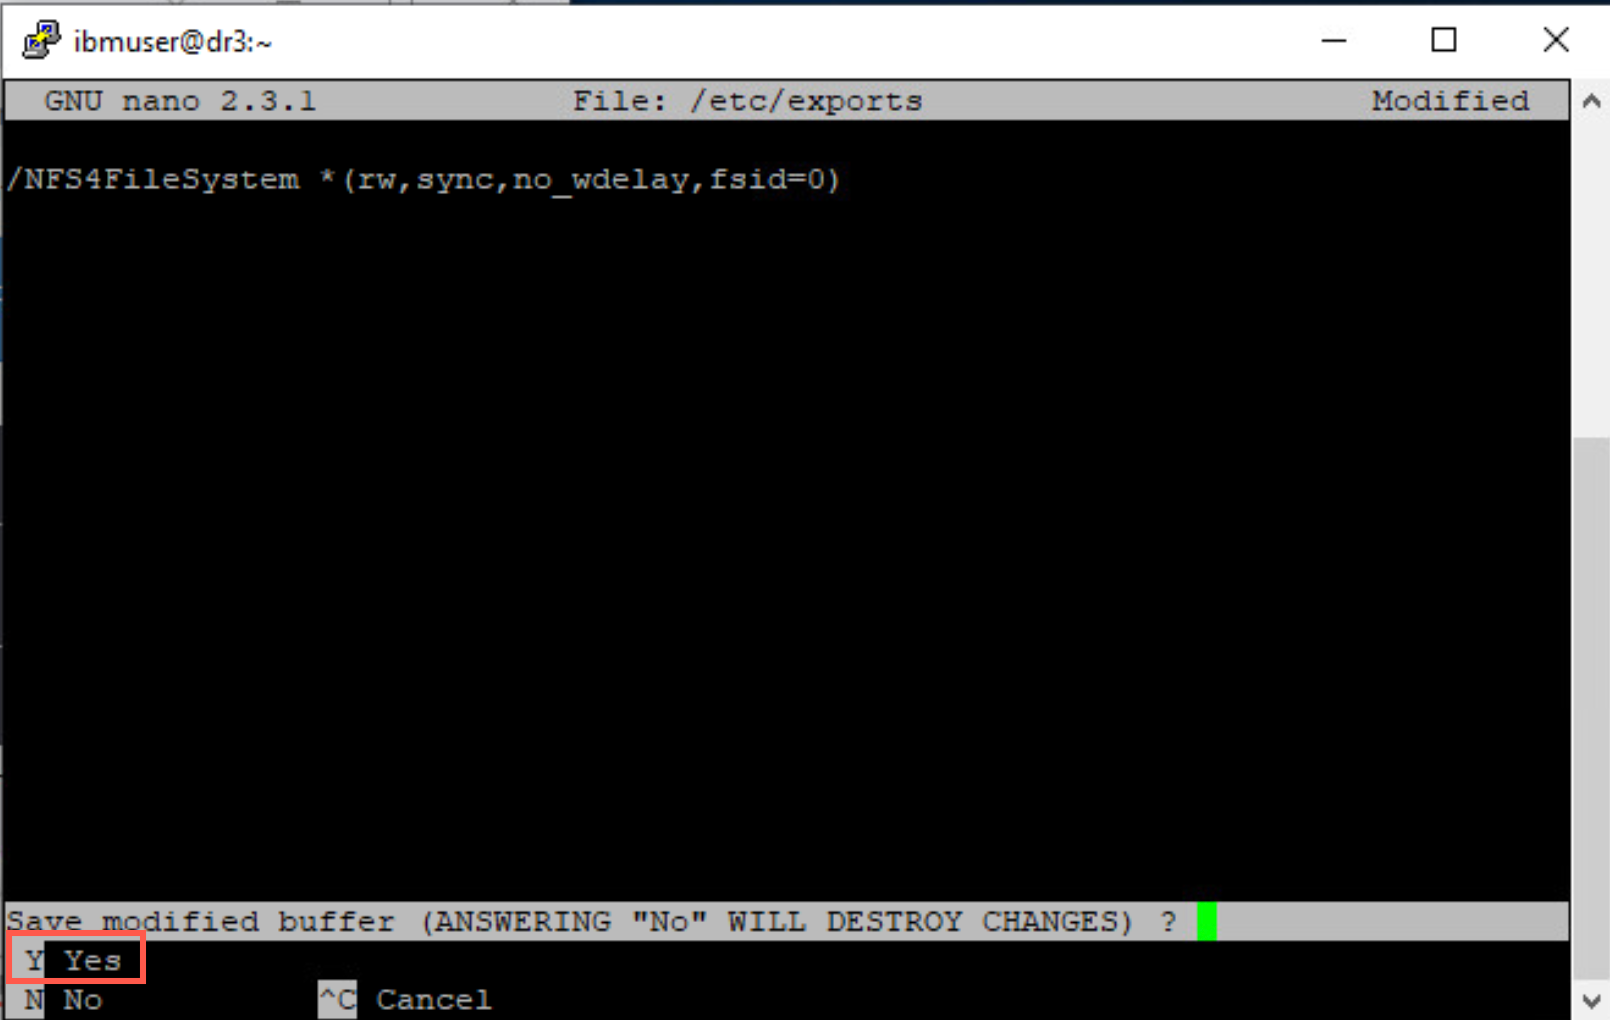
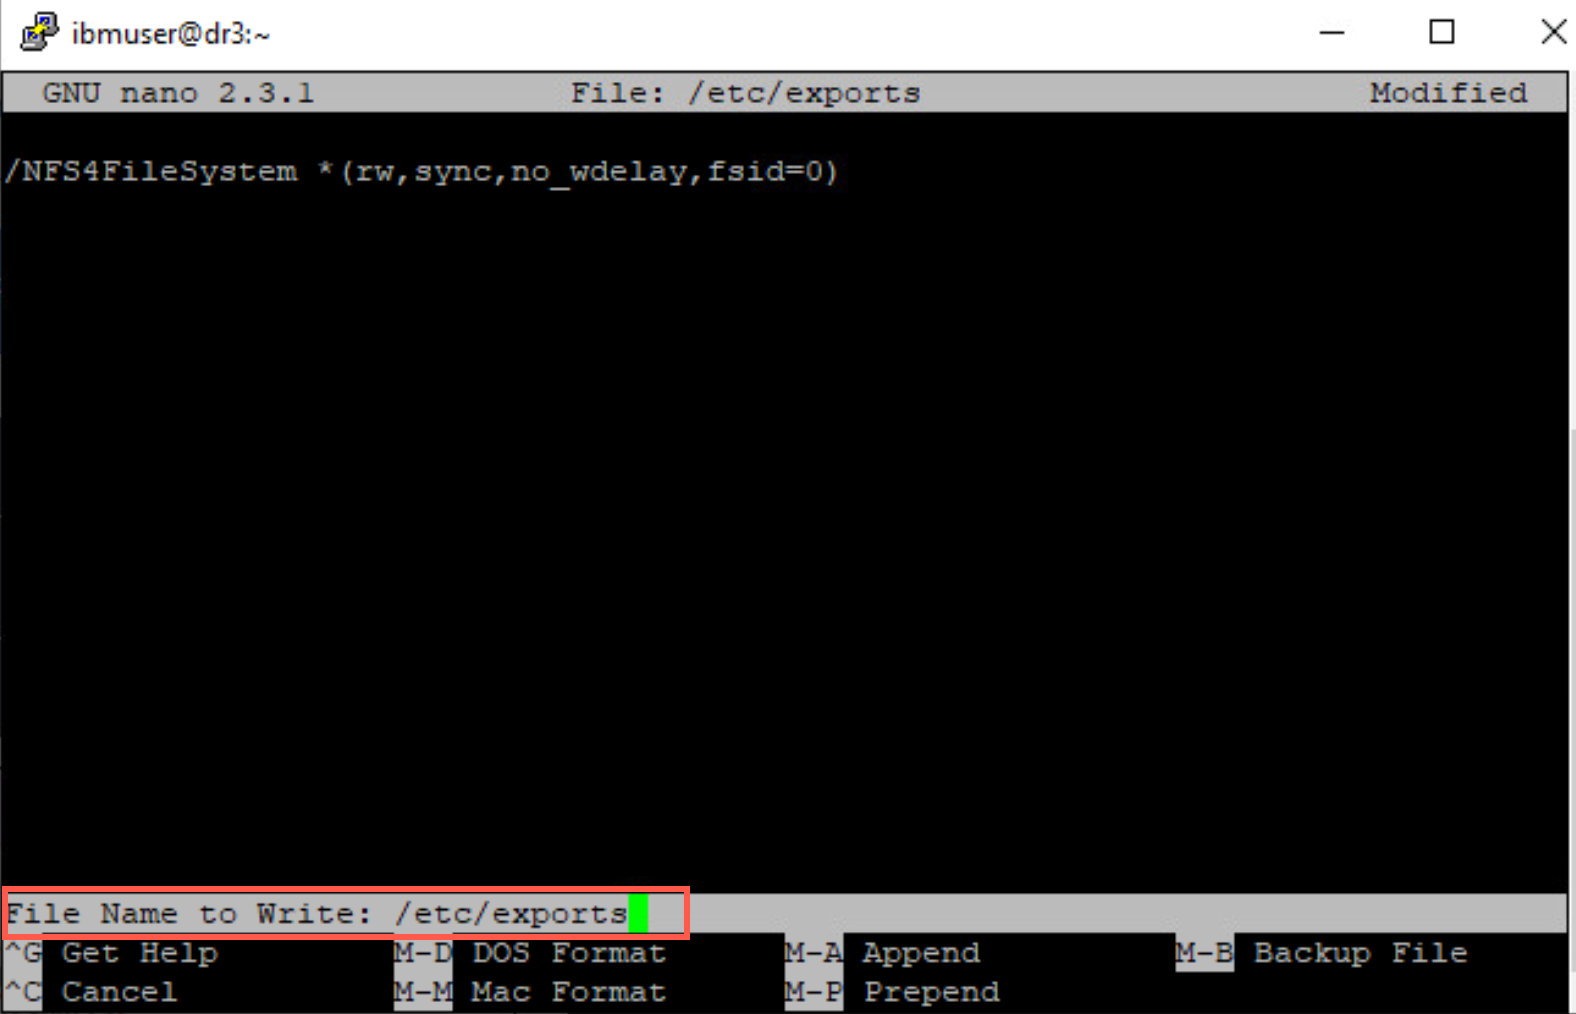
-
Now edit the file /etc/sysconfig/nfs. Using nano again use the following command:
sudo nano /etc/sysconfig/nfs -
Scroll down to the parameter RPCMOUNTDOPTS and add -p 829 between the quotation marks. Enter ctrl-X, then enter Y, and finally hit enter to save the file.
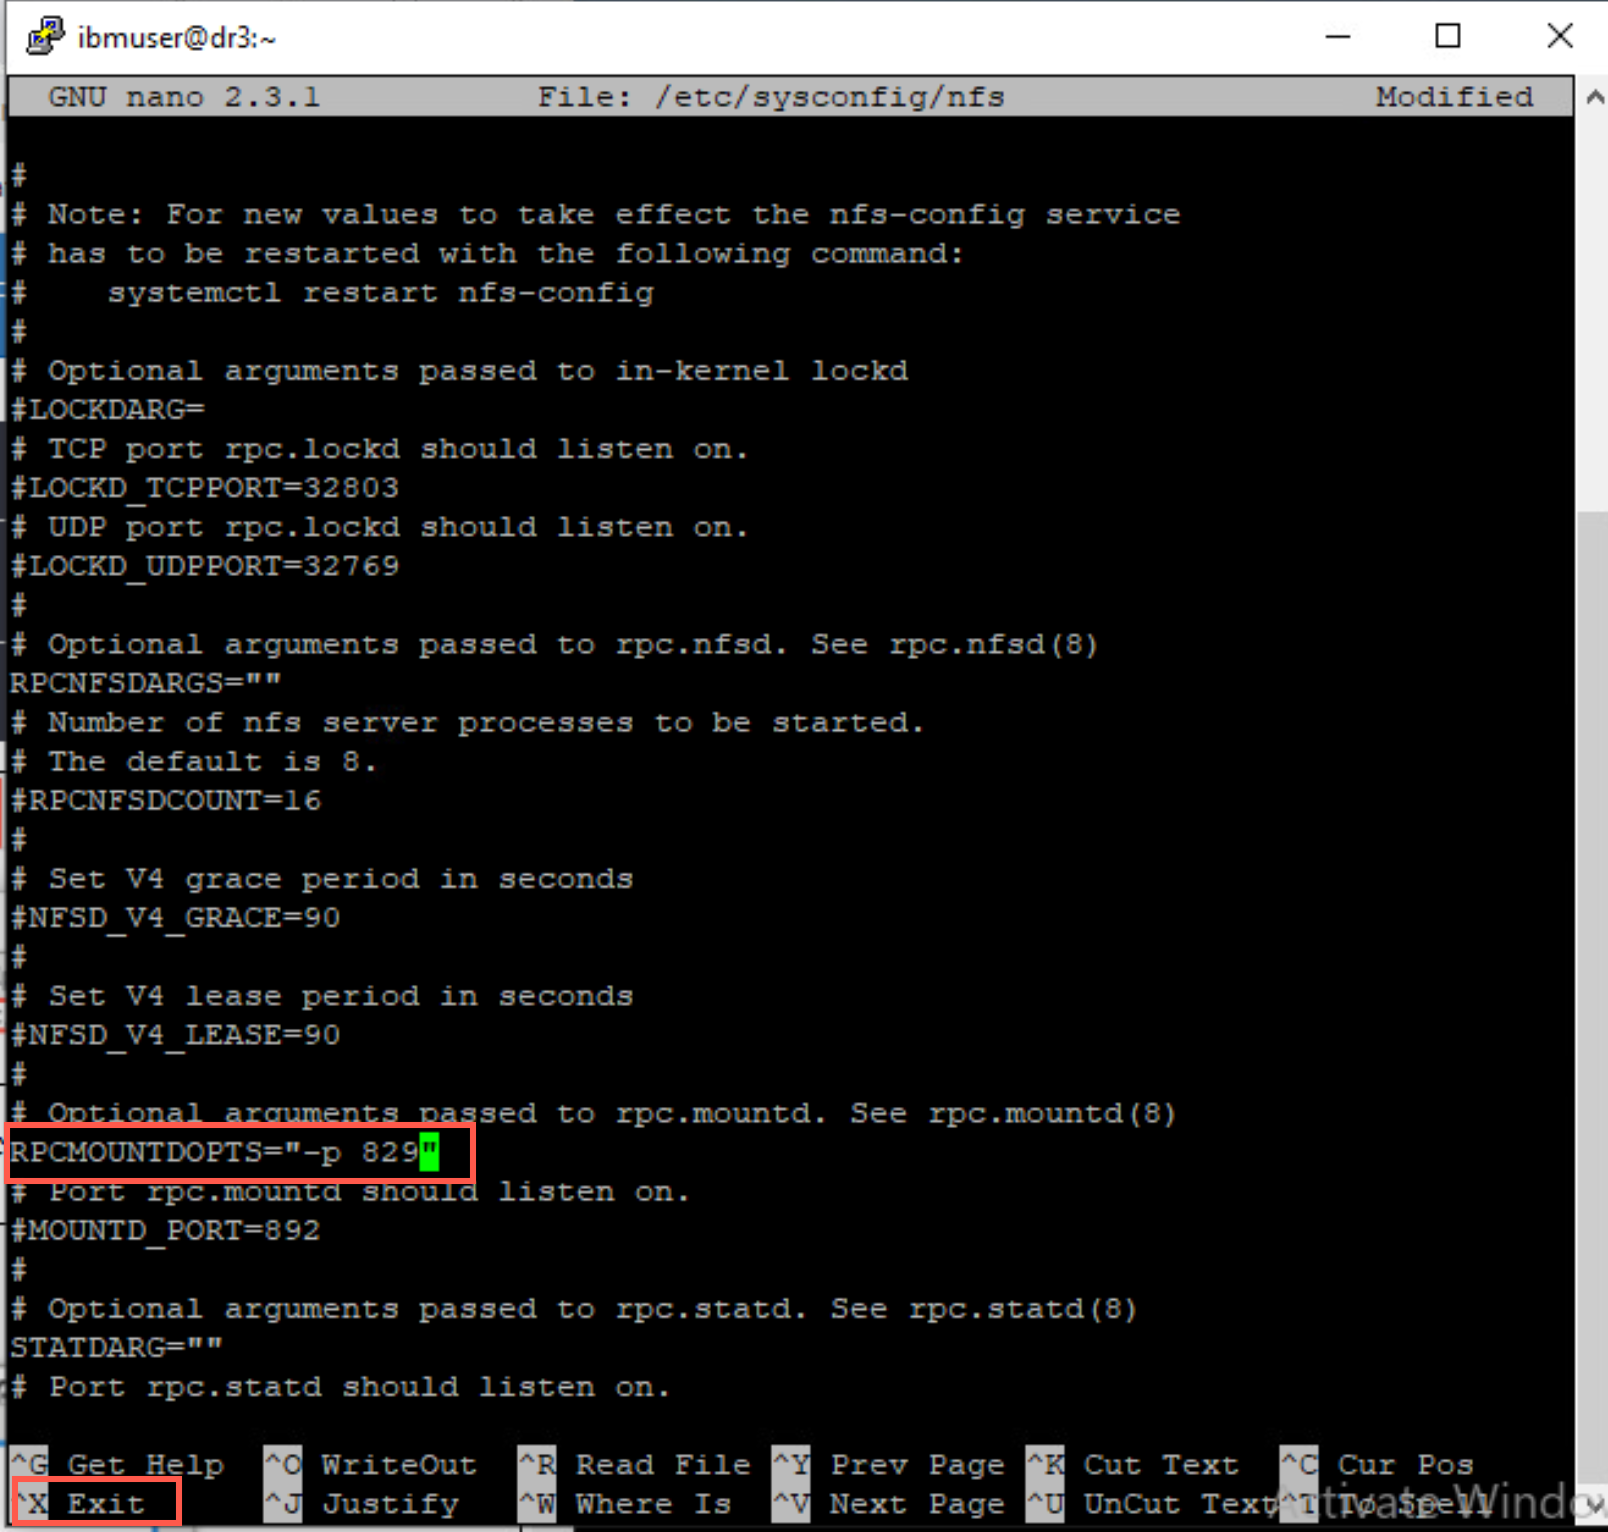
-
After editing the file, you need to restart two services, nfs-config and nfs-server. Open another terminal window and run the following commands:
 sudo systemctl restart nfs-config
 sudo systemctl restart nfs-server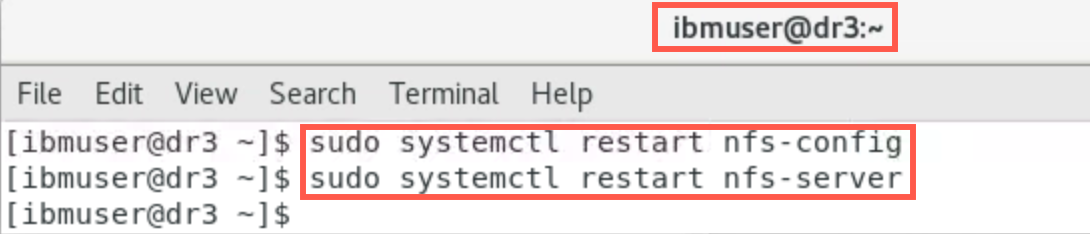
-
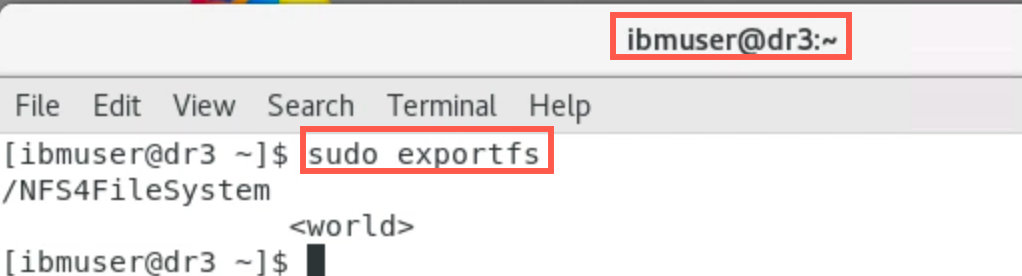
Now you can export the shared file system with the following command.
sudo exportfsThe response shows that the export was successful and is ready to be accessed by NFS clients.
Configure NFS clients
Now each machine that is to access the NFS4 file system must be configured. We wish the MQ systems on the other two computers to be able to have unfettered read/write access to (at least part of) the file system. In order to allow this we will need to create “mqm” users and groups that have the same UID and GID numbers on each computer. As stated previously, these were pre-configured on this environment so there is nothing to do.
-
Click in the dr1 terminal window.
-
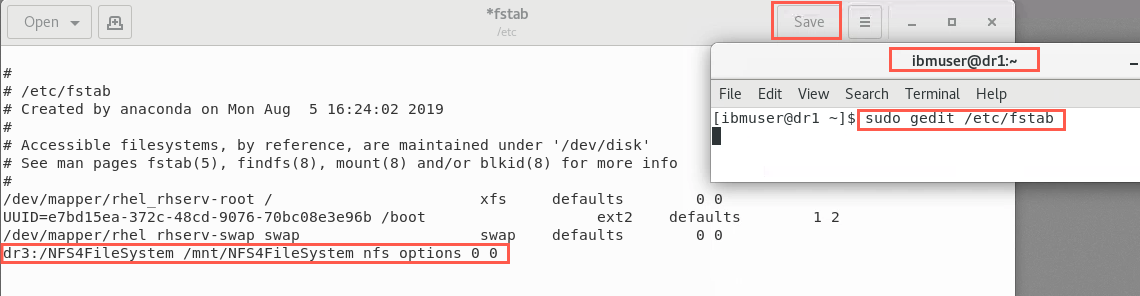
On the NFS clients you need to add the shared file system to /etc/fstab. Root access is required for this file also so open the editor with the following command:
sudo gedit /etc/fstabAdd the following line at the end of the file:
dr3:/NFS4FileSystem /mnt/NFS4FileSystem nfs options 0 0Save the file.
-
You are now ready to mount the shared file system (on dr1). Open another terminal window to enter commands. First you must create a directory for mounting the shared file system. Enter the following command to create the directory.
sudo mkdir /mnt/NFS4FileSystemNow you can mount the shared file system with the following command:
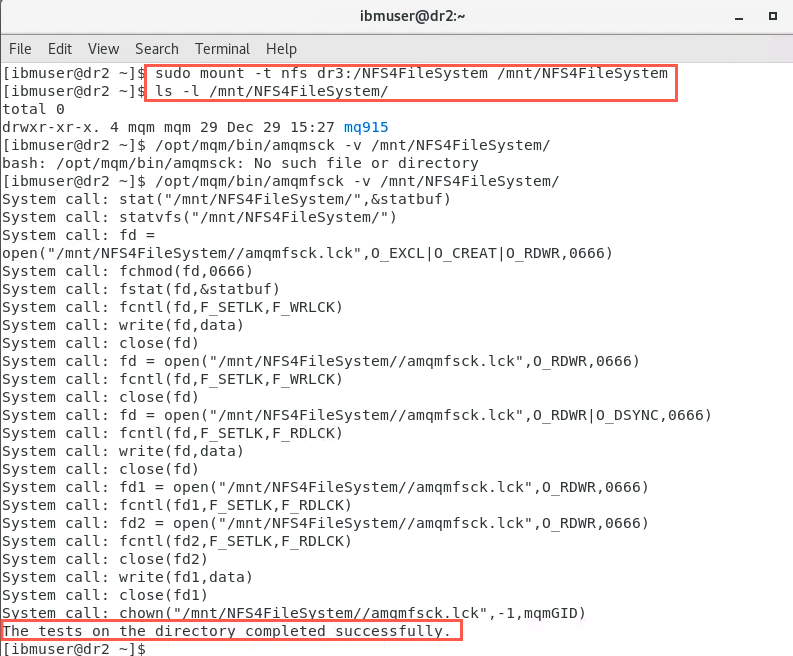
sudo mount -t nfs dr3:/NFS4FileSystem /mnt/NFS4FileSystemThis command mounts the directory NFS4FileSystem on dr3 (NFS server) onto the local mount point /mnt/NFS4FileSystem on dr1 (NFS client).
List the contents of the new directory and you will see the contents that you created on dr3. You should see the subdirecotry mq915.
ls -l /mnt/NFS4FileSystem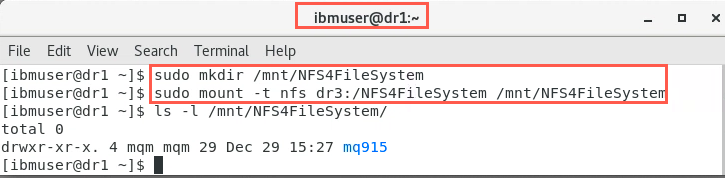
-
IBM MQ provides a test program to verify the file system is configured properly. amqmfsck checks whether a shared file system meets the requirements for storing the queue manager data of a multi-instance queue manager. It tests that a file system correctly handles concurrent writes to a file and the waiting for and releasing of locks.
Issue the following command to test your mounted shared file system:
/opt/mqm/bin/amqmfsck -v /mnt/NFS4FileSystem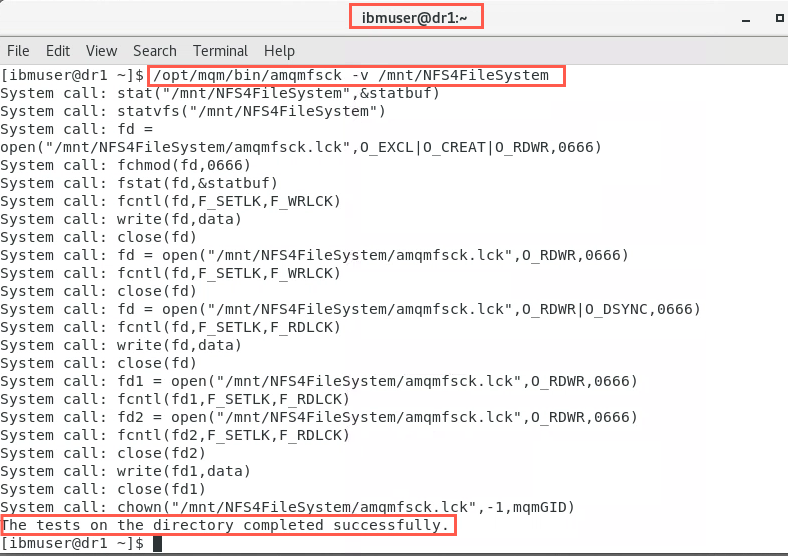
Running the command with the -v (verbose) parameter shows the checks being made. You should receive a message that the checks were succuessful.
-
Repeat this procedure on the other NFS client dr2 starting at Configure NFS clients.
Create and start active instance of the queue manager
The following steps should be carried out on one of the MQ queue manager machines (NFS clients). It does not matter which. But for this lab, we will start on dr1.
In this exercise on the NFS client machine dr1, you will:
- Create the queue manager called QMMI using the -ld and -md options to specify the location of the log data and the message data in the shared file system
- Start the queue manager called QMMI using the –x option to indicate that this startup allows a standby instance
- Create queue manager QMMI specifying the path for the logs and queue manager data.
-
Create queue manager QMMI with the following command from the terminal as userid ibmuser:
crtmqm -ld /mnt/NFS4FileSystem/mq915/log/ -md /mnt/NFS4FileSystem/mq915/data QMMI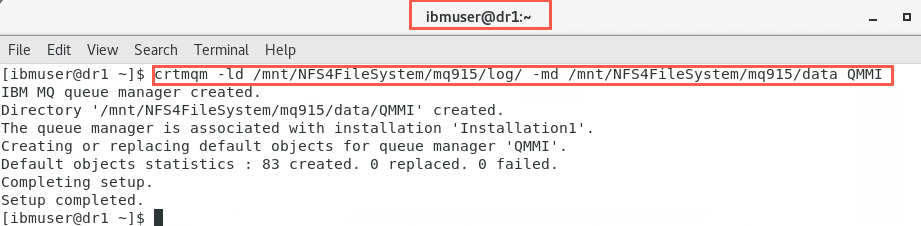
-
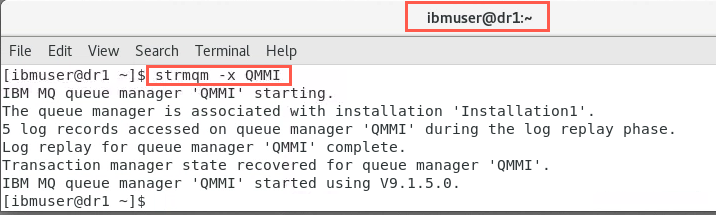
Start the queue manager QMMI as a multi-instance queue manager with the following command:
strmqm -x QMMIThe -x paramneter indicates that this startup allows a standby instance.
Define MQ Objects
For testing you need to define the queue manager objects.
- Define security
- Define a channel of type svrconn.
- Define a listener for port 1414.
- Start the listener.
-
Still on dr1, start the runmqsc command and enter the following commands:
runmqsc QMMIRun the following MQSC commands (remember that MQ objects are case sensitive):
ALTER QMGR CHLAUTH(DISABLED) CONNAUTH(' ')REFRESH SECURITY TYPE(CONNAUTH)DEFINE QLOCAL(Q1) DEFPSIST(NO) REPLACEDEFINE CHANNEL('SYSTEM.ADMIN.SVRCONN') CHLTYPE(SVRCONN) REPLACEDEFINE LISTENER('A.LISTENER') TRPTYPE(TCP) CONTROL(QMGR) PORT(1414) REPLACESTART LISTENER('A.LISTENER')END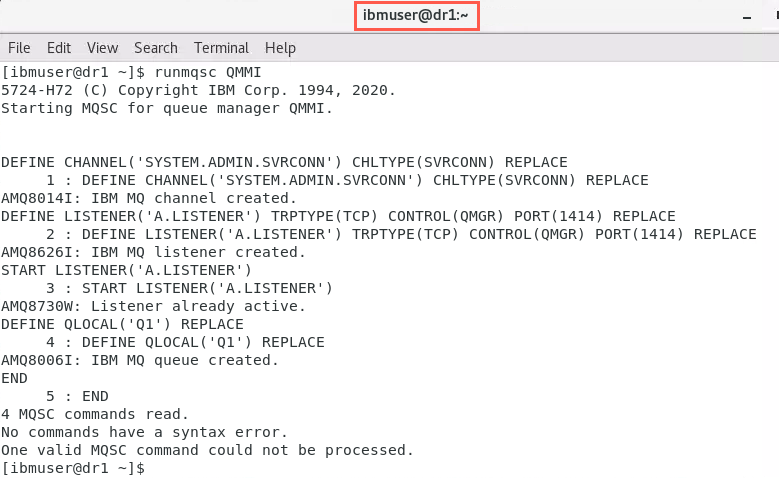
-
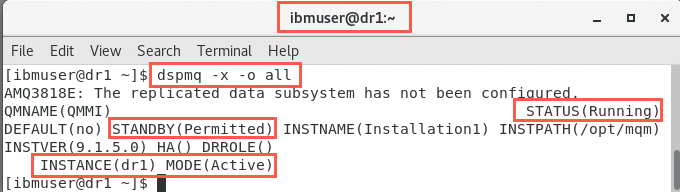
Display the queue manager status.
dspmq -x -o allThis command will:
- Display the queue manager with respect to standby and giving all output.
- We observe that the queue manager shows the STANDBY permitted option. And that the dr1 instance is active.
-
The next command will create the “ini.” definitions for the second (standby) instance. Enter the following command:
dspmqinf -o command QMMI- Command outputs the ini definitions in a command form that can be run on the second machine.
- The response from the command is the text of a command that can be run on another machine where MQ is installed to add information allowing it to find the shared file system.

-
Copy the text from the output of the above command. In the next section you will paste this text into a terminal window in dr2 to run the command.
Setup the standby instance
The following steps should be carried out on the other NFS client, dr2. The queue manager that we are going to set up is the same queue manager that was created and configured previously on dr1.
In this exercise you will update this instance with the location of the queue manager data.
-
Open a terminal window just as you did on the other machine logged in as ibmuser / engageibm. Paste the command copied from dr1 and hit enter.
addmqinf -s QueueManager -v Name=QMMI -v Directory=QMMI -v Prefix=/var/mqm -v DataPath=/mnt/NFS4FileSystem/mq915/data/QMMI
-
Start the standby instance. The start command is exactly the same as was used to start the active instance. Enter the following command:
strmqm -x QMMI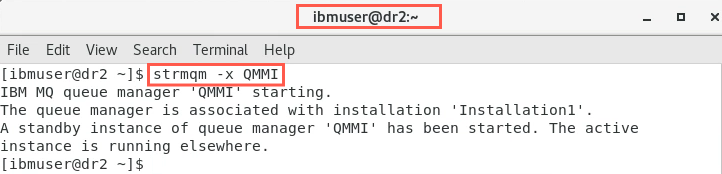
The –x option to indicate that this startup allows a standby instance. Observe that a standby instance is started.
-
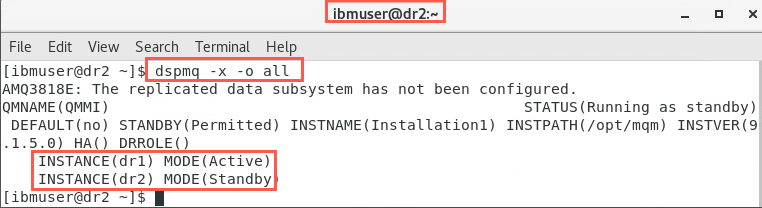
Display the queue manager status. Enter the following command to display all instances of the queue manager:
dspmq -x -o allThis command:
- Displays the status of the queue manager with respect to standby and giving all output.
- Observe that there are now two instances of queue manager QMMI.
- QMMI shows that it is ACTIVE on dr1 and in STANDBY on dr2.
Configuration Summary
In the previous exercises you have:
- Configured three Linux machines to use NFS4 file system; one as the NFS server and two other machines mounting the shared file system.
- Installed IBM MQ V9.1.5 Server (pre-installed) on the two machines that have the shared file system mounted (NFS clients).
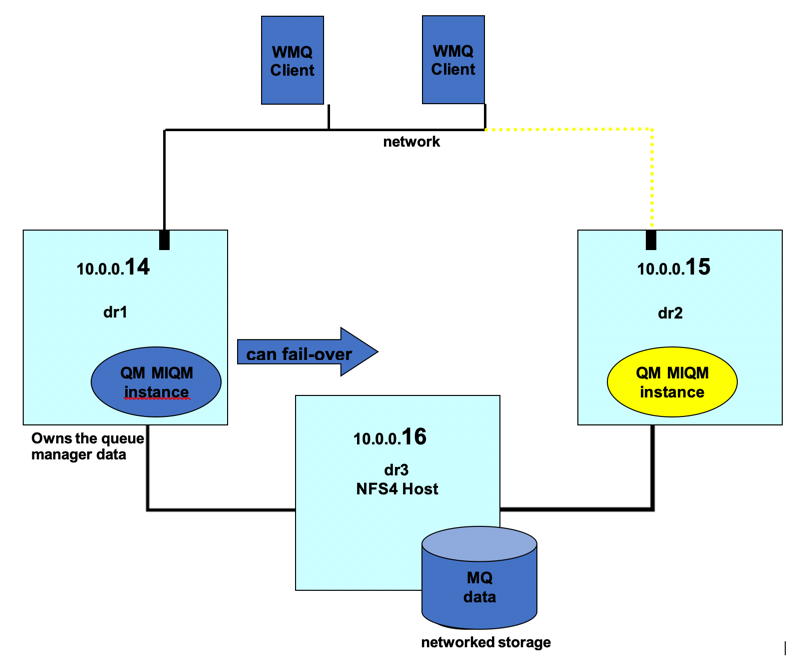
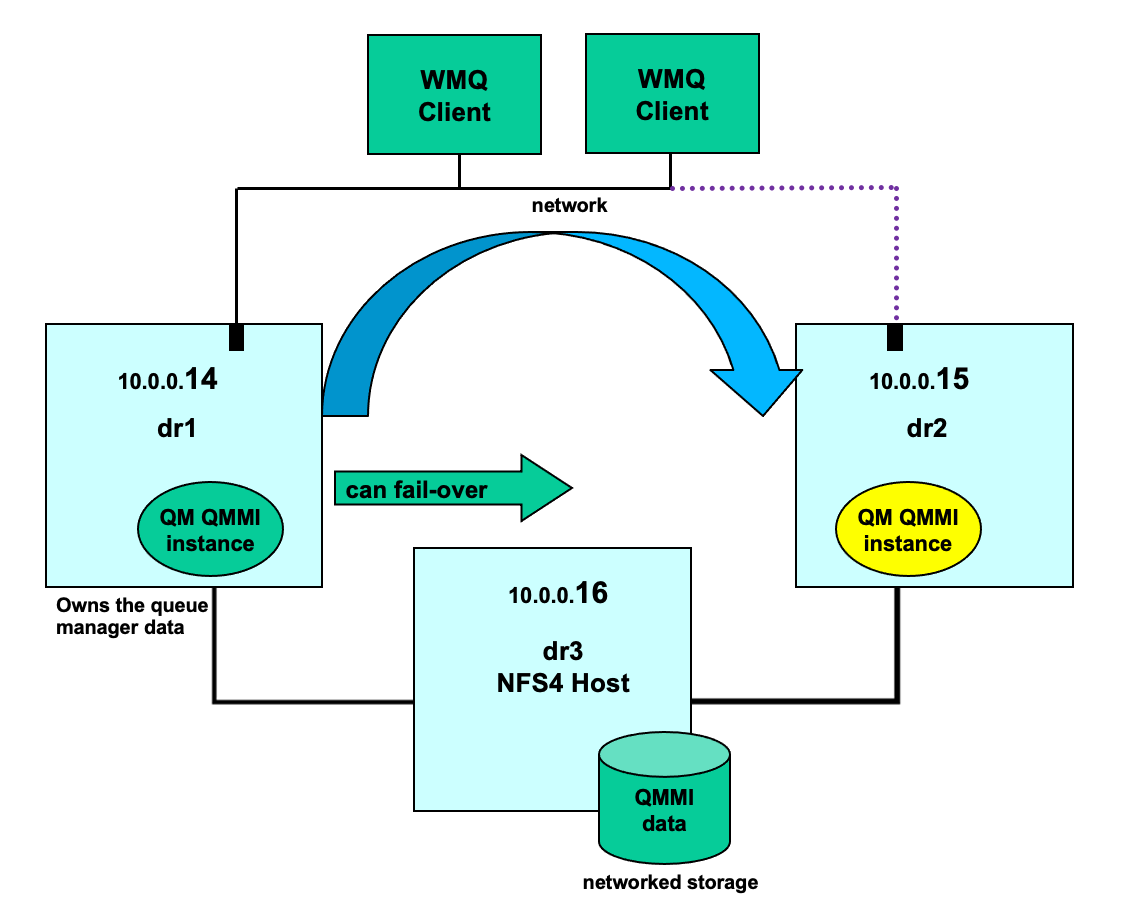
- Configured IBM MQ with a queue manager that is running on both machines in an active / standby mode as shown below:
Setting up client reconnect
Accessing the Network File System
The next step is to connect a client using the client reconnect feature that can access either instance of the queue manager.
The IBM MQ client code has been pre-installed on the NFSv4 host computer (dr3). This client will be able to access the highly available queue manager. We will also install the MQ explorer on this computer to use explorer with the multiple instances of a queue manager.
Using the sample programs
Two sample programs that illustrate the client reconnect program are shipped with IBM MQ. They are amqsphac and amqsghac which show putting and getting respectively.
-
In the dr3 terminal window, open a nano session to examine the sample program amqsphac.
nano /opt/mqm/samp/amqsphac.c
-
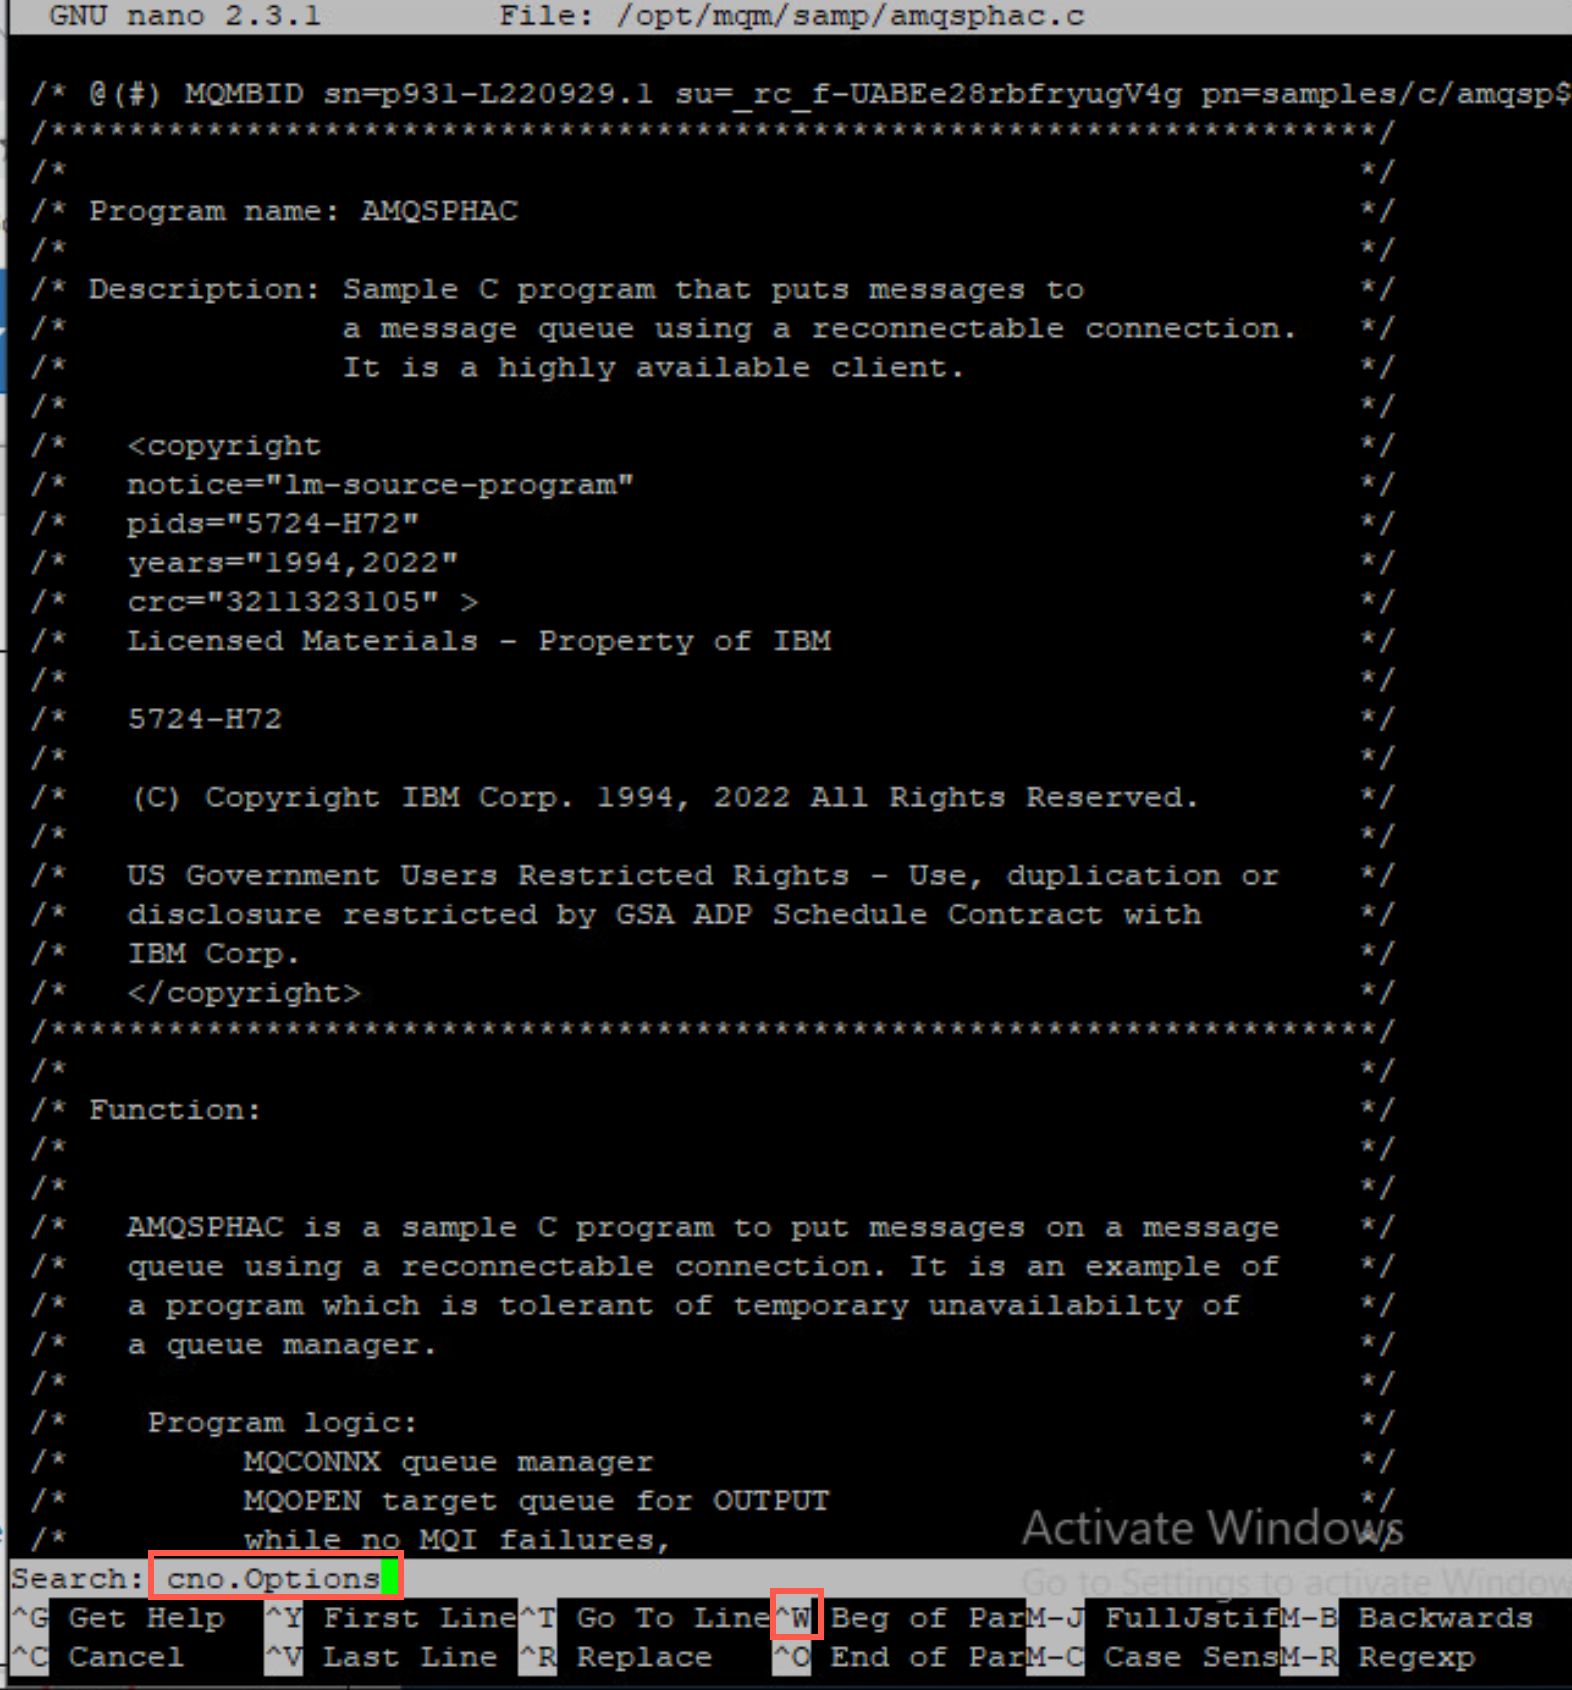
Use ctrl-W for searching. Enter ctrl-W in the search field, then type in cno.Options to find the reconnection code.
-
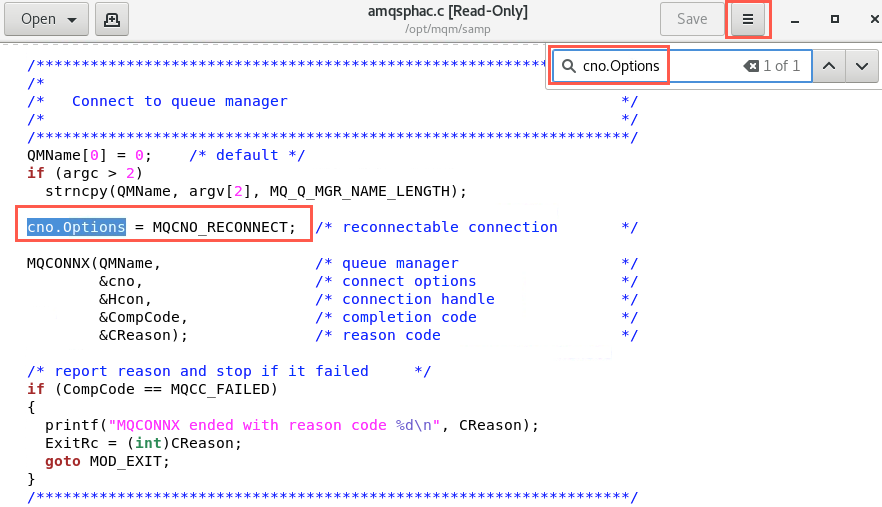
Examining the source code of the program (fragment shown below) shows the use of the new MQCONNX options.
-
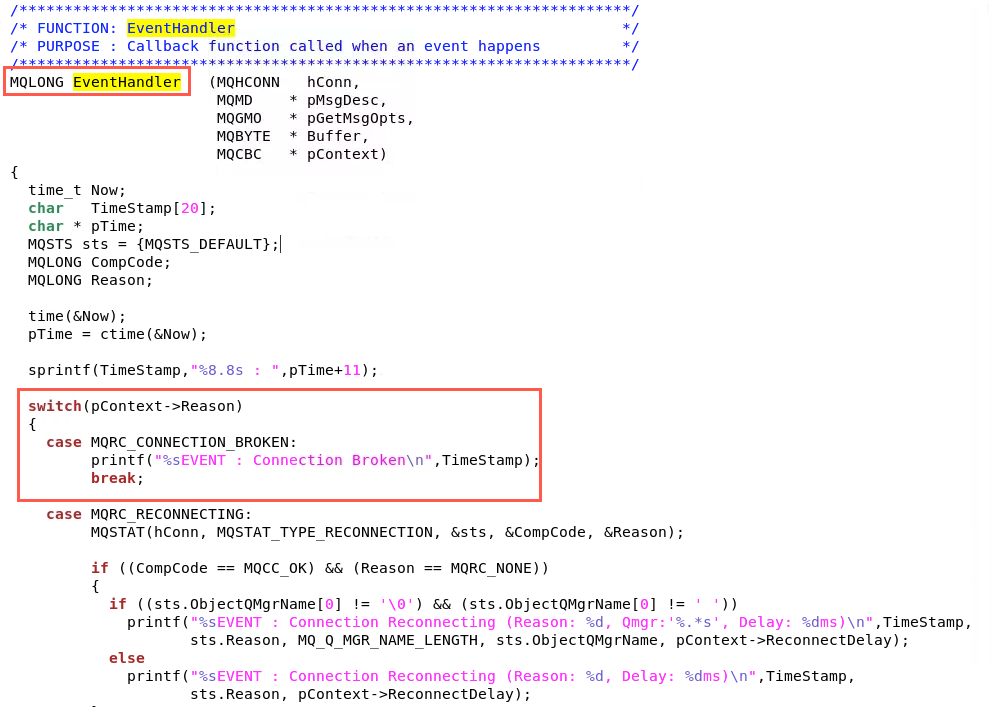
Do another find (twice) for EventHandler to examine the callback function to be notified of reconnect events. (you may nee
-
If you wish, continue to review the full program before closing the edit session.
-
You will need two command windows so open another putty session for dr3. One is for the get application and one is for the put application. Log in as ibmuser / engageibm.
-
Set the environment variable MQSERVER with the following command:
export MQSERVER=SYSTEM.ADMIN.SVRCONN/TCP/10.0.0.14,10.0.0.15The client uses this variable to find instances of the queue manager. Observe that we now supply a list of ip addresses for the connection separated by commas. Notice that there are no spaces.
-
In this command window start putting messages by starting the sample programn amqsphac.
/opt/mqm/samp/bin/amqsphac Q1 QMMI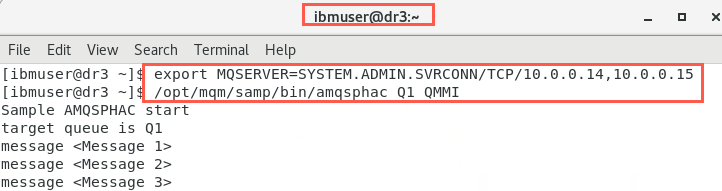
Notice that the sample putting program begins to put messages (about one per second) to Q1 on qmgr QMMI. Leave this command window open to run.
-
Open another terminal and position it so that you can see both terminal windows.
-
Set the environment variable MQSERVER with the following command:
export MQSERVER=SYSTEM.ADMIN.SVRCONN/TCP/10.0.0.14,10.0.0.15The client uses this variable to find instances of the queue manager. Observe that we now supply a list of ip addresses for the connection separated by commas. Notice that there is no spaces.
-
In this command window start getting messages by starting the sample program amqsghac.
/opt/mqm/samp/bin/amqsghac Q1 QMMI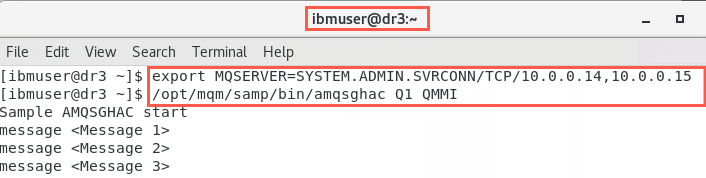
Notice that the sample getting program gets all of the messages from Q1 on qmgr QMMI that have been put to date and then keeps pace with the putting program, displaying each message as it arrives.
Leave this command window open to run.
Failing over the queue manager
While these two programs are running we will failover the queue manager and observe the results.
-
Verify that the two windows are still open on dr3 and that the sample programs are still running, putting and getting messages.
-
Go to the machine where the active instance of the queue manager QMMI is running, dr1 or dr2. For this lab it should be dr1.
-
Ensure that you are logged in as userid ibmuser / engageibm.
-
In a terminal session, stop the queue manager with the -i -s option to shutdown the queue manager allowing for failover. Enter the following command:
endmqm -i -s QMMI -
After the queue manager has shut down, restart it as a standby instance using the strmqm command with the –x option.
strmqm –x QMMI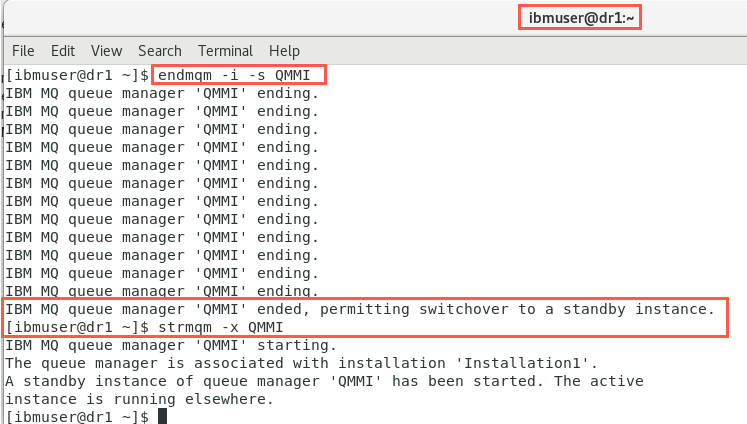
-
Switch back to the machine where the MQ client code is running (dr3 in this case). You will see something similar to the screen shots below for both command windows where the sample programs are running.
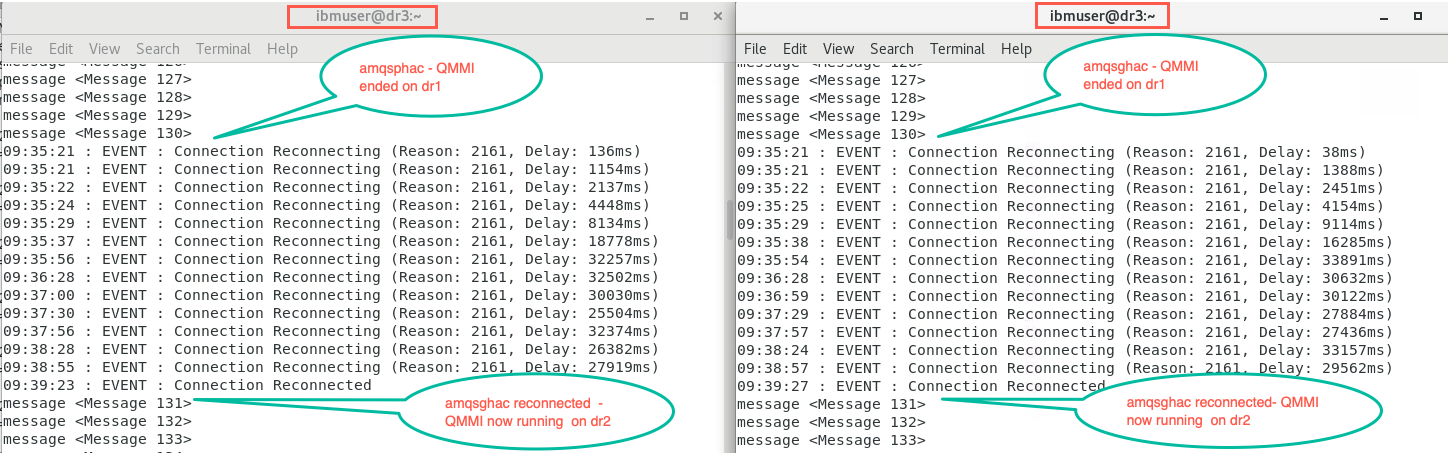
Messages are put until the switchover. At which point the event listener code reports the connection status. After reconnection is established, the putting program goes on as before but this time the queue manager is running on the other instance.
NOTES: The putting program in this illustration displays all the records being put. However it is possible that some messages may be lost, because the messages are being put out of sync-point as non persistent massages.
-
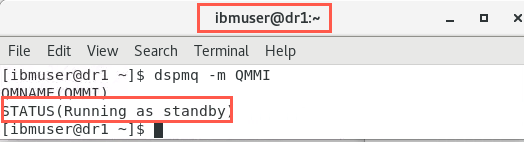
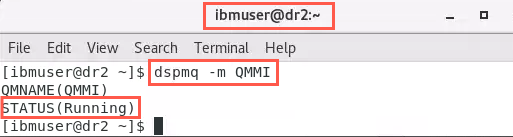
Verify where the queue manager is running by displaying MQ on both dr1 and dr2. Enter the following command on both dr1 and dr2:
dspmq -m QMMIAs shown below, you should see that QMMI is no longer running on dr1. But now it is running on dr2 where it failed over. The standby has become active and the old active is now on standby.
Basic Failover Summary
During this failover demonstration we have:
-
Configured an MQ client connection that identifies two instances of a queue manager as connection targets.
-
Observed the changes required in an MQ API program to support client reconnect.
-
Seen a failover occur and the client connected application keep running while the standby queue manager took over.
-
The configuration is as shown below
MQ Explorer
The MQ client code was pre-installed on the NFS server - dr3s. And the MQ Explorer was pre-installed on the Windows desktop. We will demonstrate multi-instance queue managers using MQ Explorer.
-
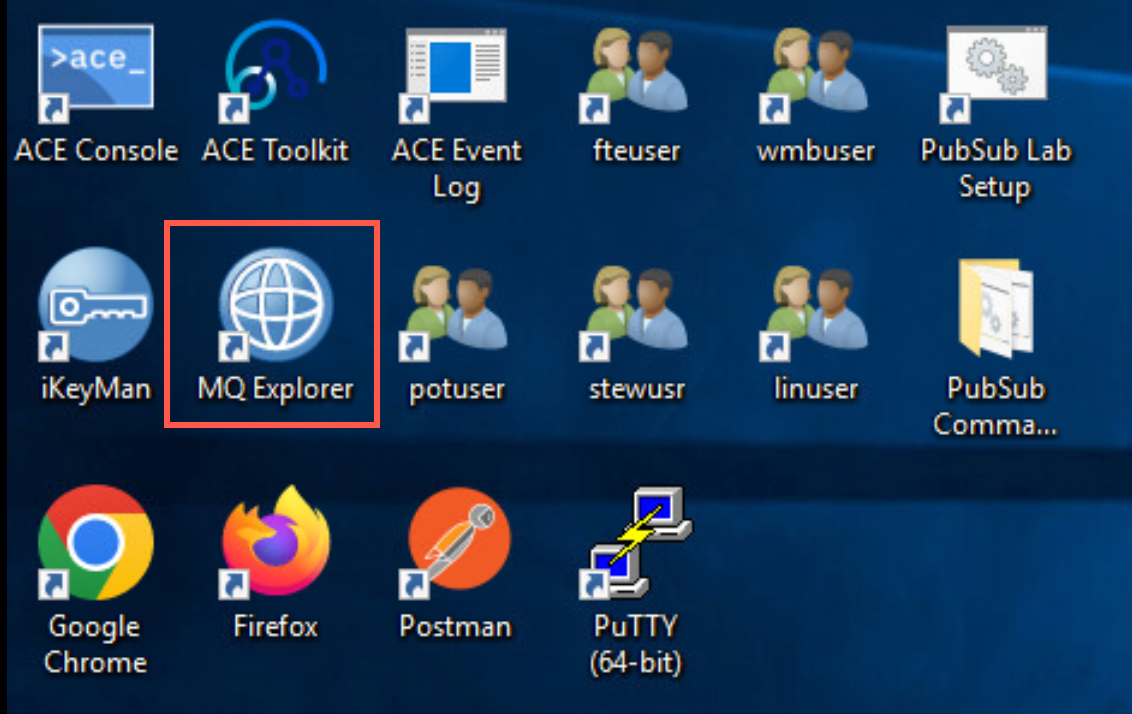
On the Windows desktop double-click the MQ Exporer icon to launch the eclipse based MQ Explorer.
-
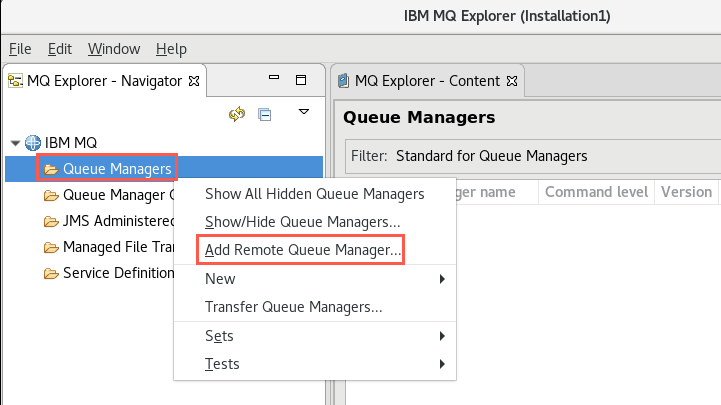
In the left hand navigation bar, right-click on Queue Managers and select Add Remote Queue Manager.
-
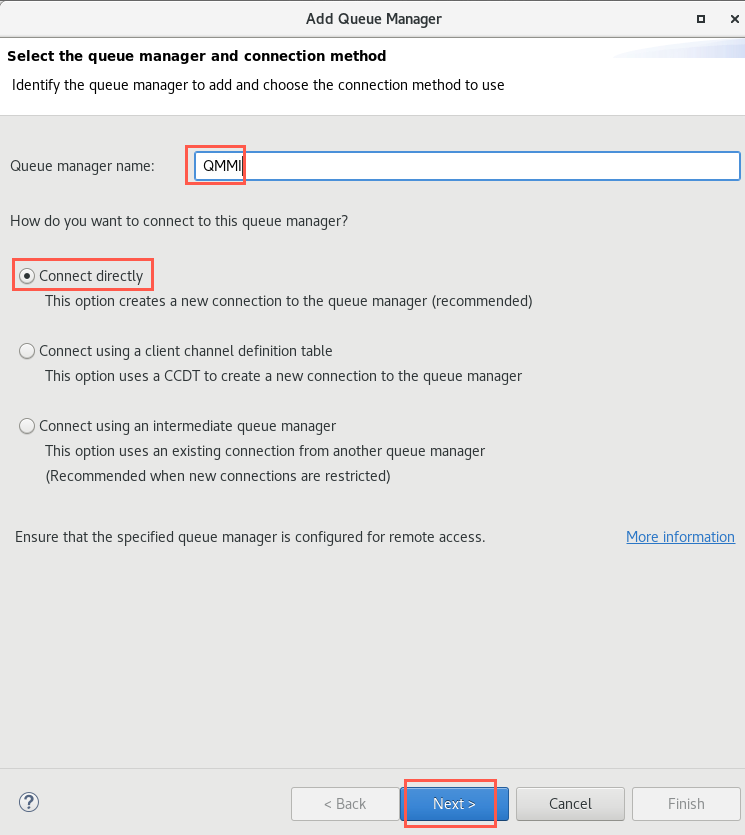
Enter the queue manager name as QMMI. Select Connect directly to an active instance. Click the Next button
-
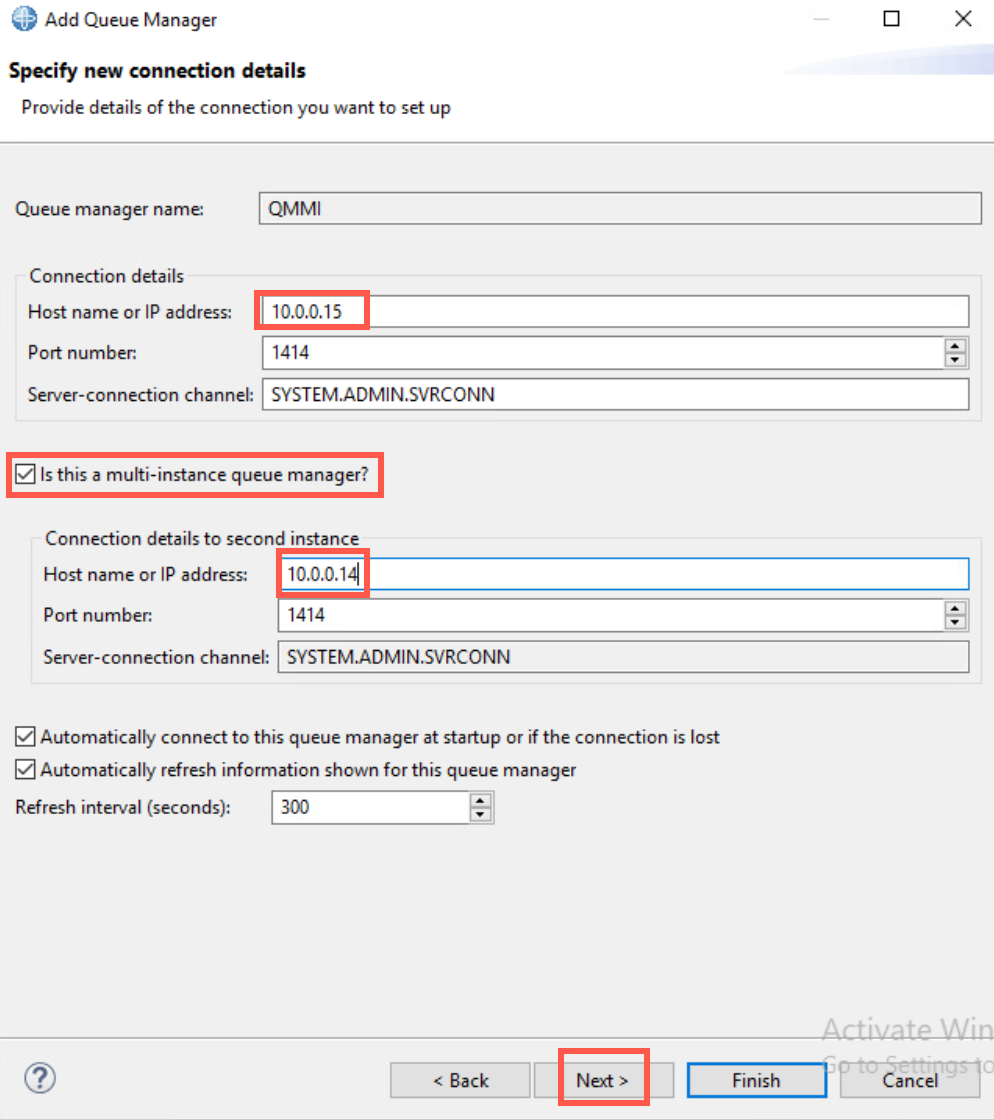
Enter the connection details, the IP address 10.0.0.15 for dr2. Leave the port and channel values at the default. Mark the checkbox for Is this a multi-instance queue manager?
Enter the connection details for the second instance, the IP address 10.0.0.14 for dr1. Leave the port and channel values at the default. Then click Next.
-
Click Next at the “Specify security exit details” screen.
-
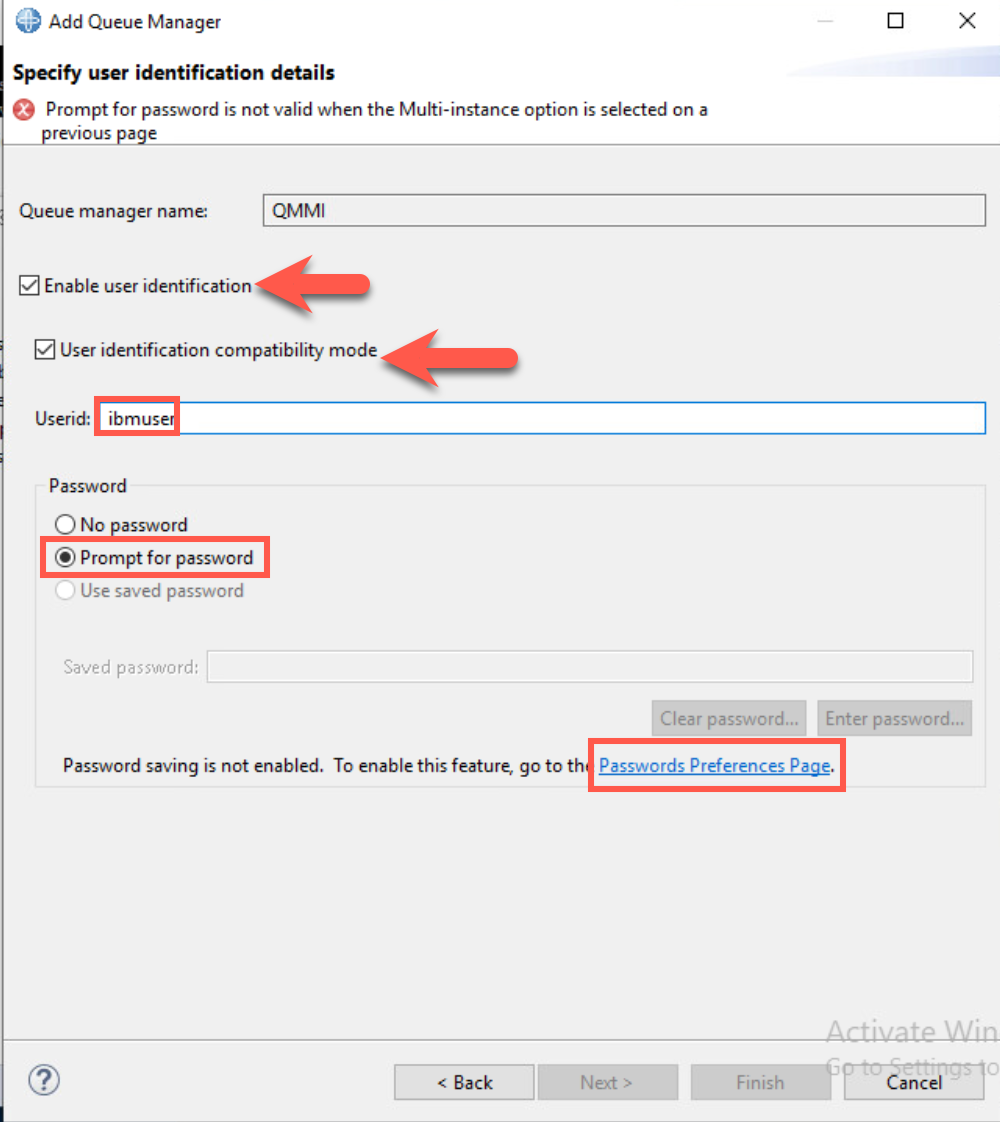
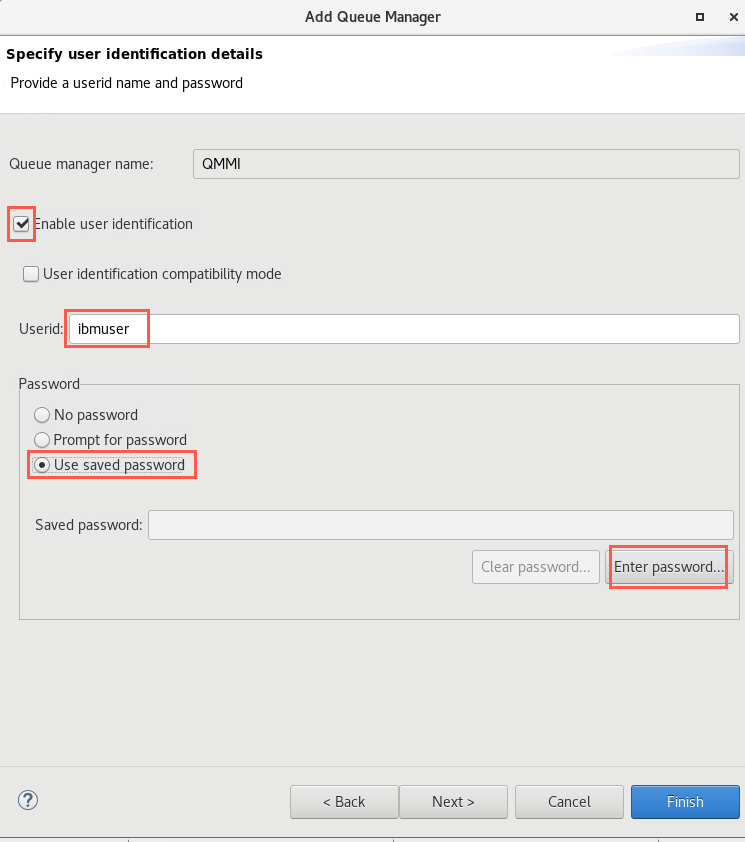
On the “Specify user identification details” screen check the Enable user identification and User identification compatibility mode checkbox. Enter ibmuser in the Userid field. Check the Prompt for password radio button. Notice the error message that Prompt for password is not allowed for multi-instance queue managers.
-
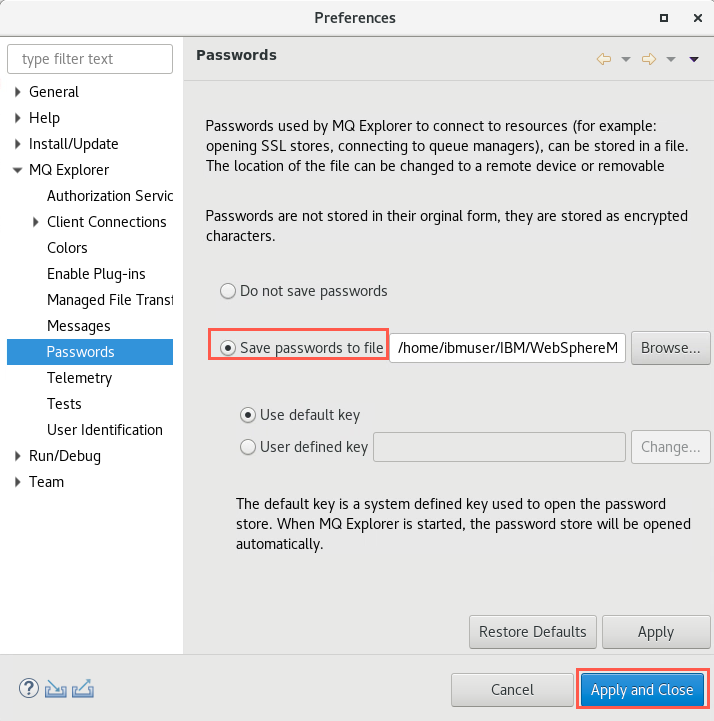
On the Preferences page check the radio button for Save passwords to file then click Apply and Close.
-
Now click the Use saved password radio button and click Enter password.
-
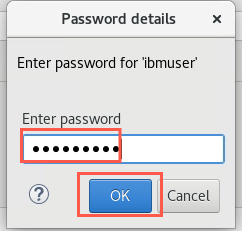
Enter the password engageibm and click OK. Click Finish.
-
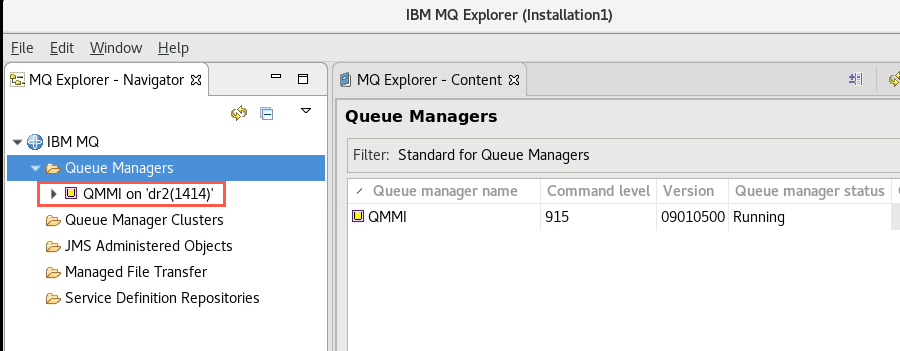
The queue manager will be added to those managed by the MQ Explorer.
-
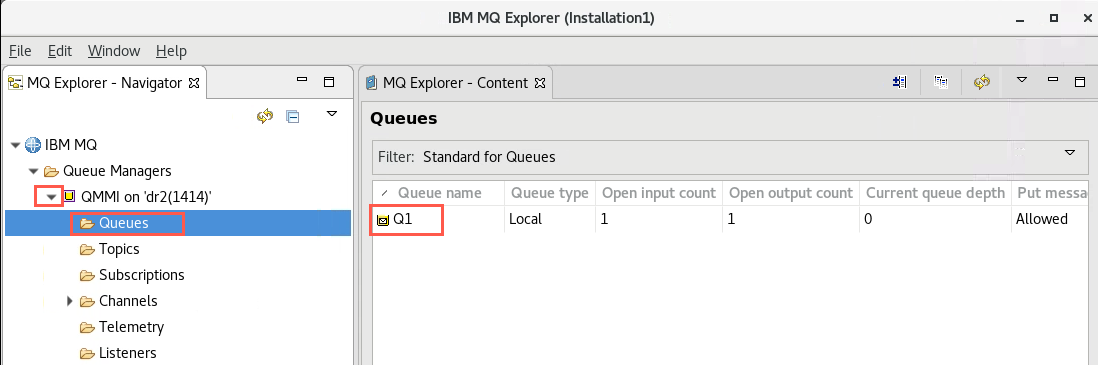
Click on the icon to expand the QMMI** queue manager. Click on *Queues to see the local queue Q1 added earlier in the lab.
-
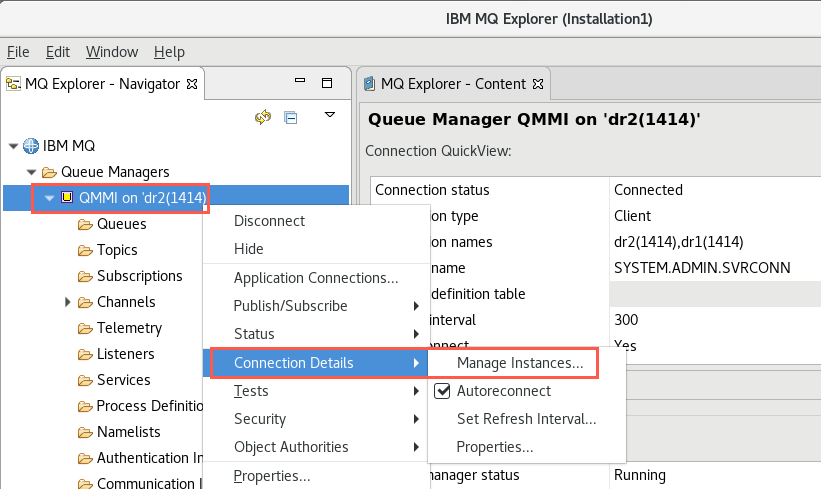
Right-click on the QMMI queue manager. Select Connection Details, then Manage Instances.
-
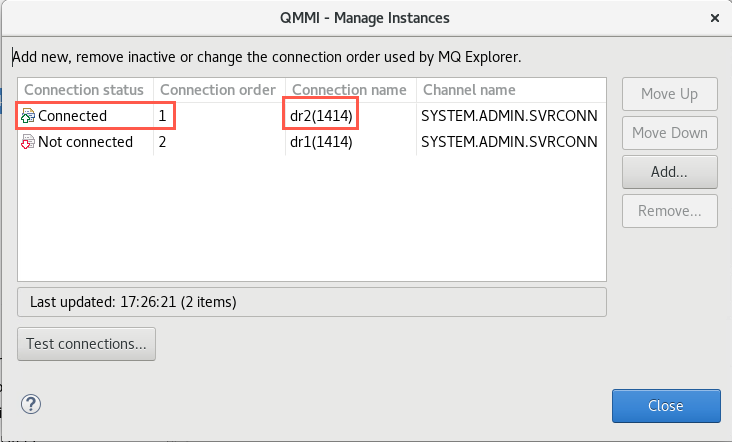
Review Manage Instances window. Note that the second instance (10.0.0.15 – dr2) is the one that is connected. This should be expected since the queue manager failed over from dr1 to dr2 earlier in the lab.
-
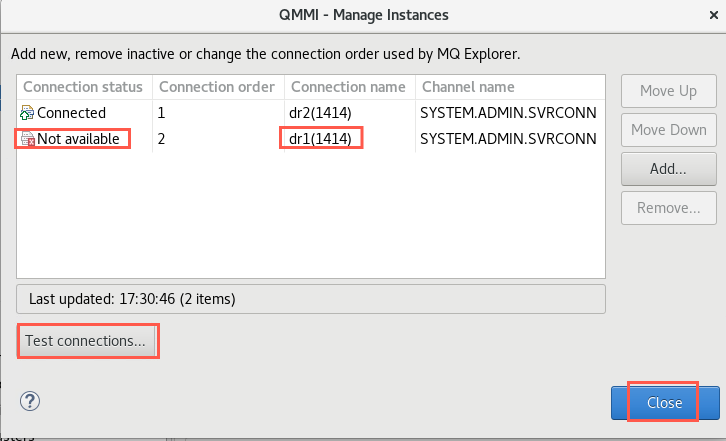
Click Test Connections.
Note that the first instance (10.0.0.14 – d1) shows Not available. Also note that you can reorder the list by clicking on Move up or Move down.
-
Click Close to end the dialog.
-
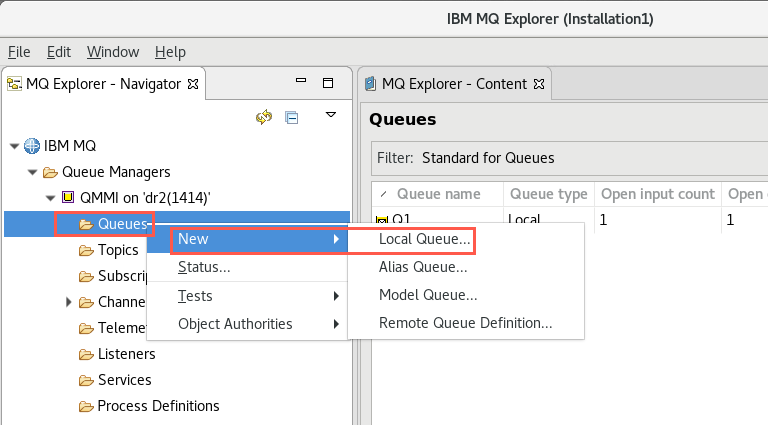
Add a Local Queue by right-clicking Queues. Select New > Local Queue.
-
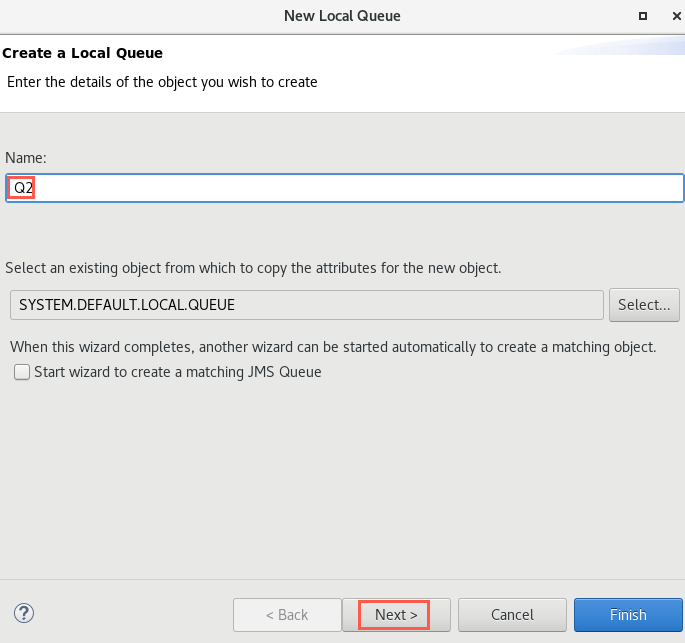
Enter the name Q2. This queue will be used in the next part of the lab. Press Next.
-
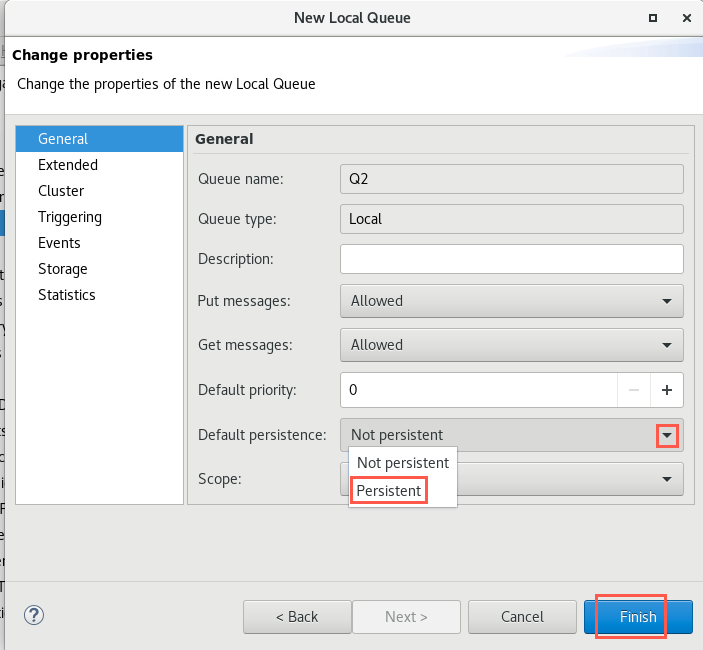
Click the the drop-down for Default persistence field and change to Persistent. Click Finish.
-
Click OK to dismiss the pop-up confirming success.
More Failover Tests
You have completed the lab, but you may want to work on this part if time permits. This section will give you more practice and further your understanding of fail-over and client reconnection.
Persistent and non-persistent messages
The test program amqsphac puts messages with the default persistence defined for the queue. Non-persistent messages DO NOT survive a failover between instances.
-
Return to the dr3 machine that connects as a client and work as ibmuser.
-
Open four terminals and set the environment variable MQSERVER in each command window.
Note: You may still have your open terminals running the sample programs. In this case you will only need to start open two additional terminals. If the sample programs are still running, please stop them by hitting ctrl-C. Position the windows, so you can see all four.
export MQSERVER=SYSTEM.ADMIN.SVRCONN/TCP/10.0.0.14,10.0.0.15 -
In terminal 1, start the putting application with non-persistent messages by putting messages to Q1.
/opt/mqm/samp/bin/amqsphac Q1 QMMI -
In terminal 3 (new terminal), start the putting application with persistent messages by putting messages to Q2.
/opt/mqm/samp/bin/amqsphac Q2 QMMI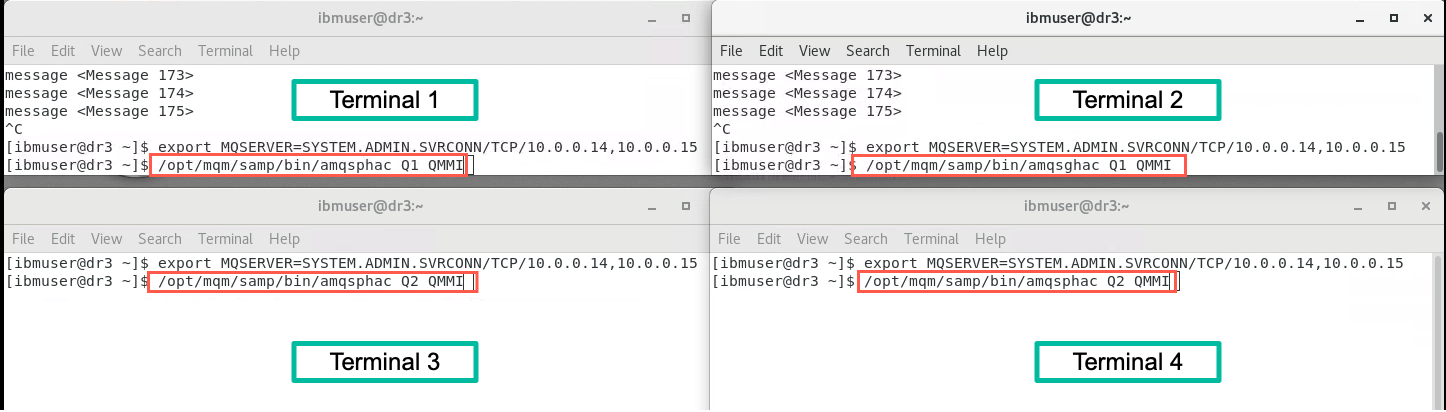
-
On the machine that is running the active instance of the queue manager (should be dr2), make sure you are logged in as ibmuser. End the queue manager with the following command allowing switchover.
endmqm -i -s QMMINote: If you forgot to restart the queue manager as standby on dr1, you will get a message that says switchover is not possible.
-
Restart the queue manager in standby mode with the following command:
strmqm –x QMMI -
Switch back to dr3.
-
In terminal 2, start the getting application for non-persistent messages from Q1.
/opt/mqm/samp/bin/amqsghac Q1 QMMI -
In terminal 4, start the getting application for persistent messages from Q2.
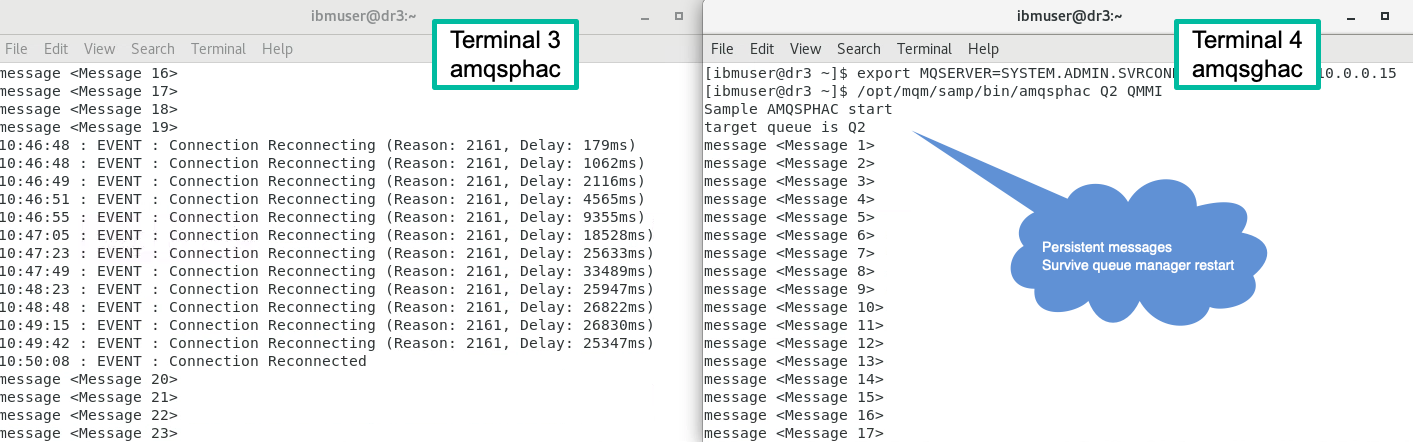
/opt/mqm/samp/bin/amqsghac Q2 QMMITerminal 1 – amqsphac – Q1 non-persistent Terminal 2 – amqsghac – Q1 non-persistent
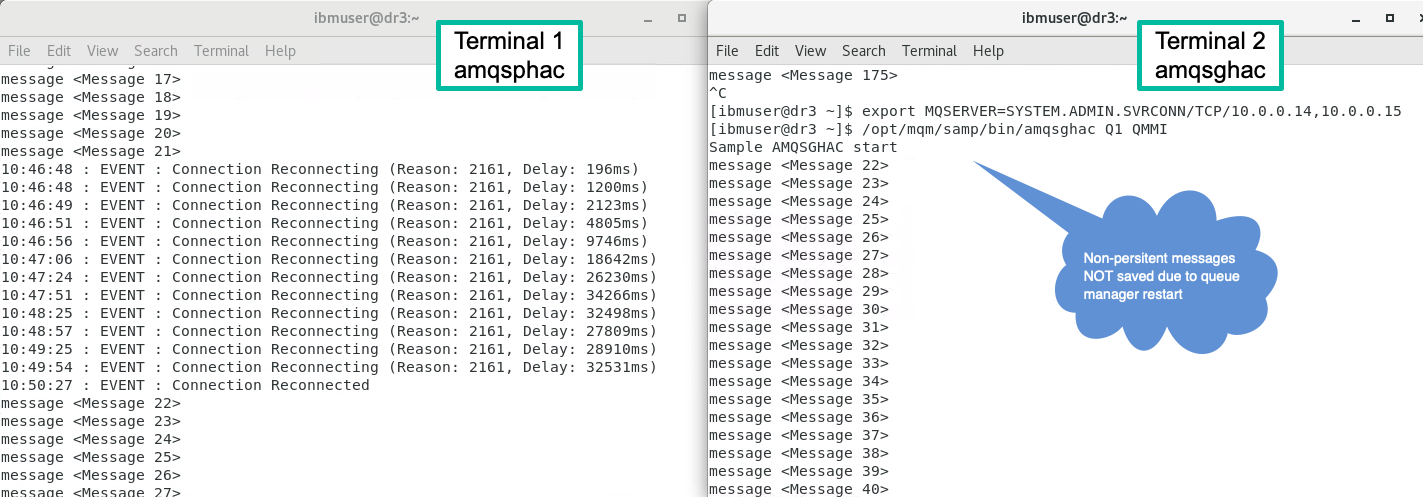
Terminal 3 – amqsphac – Q2 persistent Terminal 4 – amqsghac – Q2 persistent
-
Failure of the Queue Manager Host - the failover tests can be repeated, but instead of stopping the queue manager with the endmqm -i -s option simply kill the machine that the queue manager is running on or disable its network adapter. Failover will occur. Give it a try!
Summary
In this lab you have:
-
Configured 3 LINUX machines to use NFSv4 file system, one as host with two machines mounting the shared file system.
-
Configured IBM MQ Server on the two machines that have mounted the file system.
-
Configured IBM MQ with a queue manager that is running on both machines in an active/standby configuration.
-
Configured an MQ client connection that identifies two instances of a queue manager as connection targets.
-
Observed the changes required in an MQ API program to support client reconnect.
-
Seen a failover occur and the client connected application keep running while the standby queue manager took over.
-
Seen MQ Explorer with the multiple instance data.
Cleanup environment
If you plan to continue to use this environment for further labs it is a good idea to remove the queue managers you have been testing.
On Multiplatforms, to delete a multi-instance queue manager completely, you use the dltmqm command to delete the queue manager, and then remove instances from other servers using either the rmvmqinf or dltmqm commands.
Run the dltmqm command to delete a queue manager that has instances defined on other servers, on any server where that queue manager is defined. You do not need to run the dltmqm command on the same server that you created it on. Then run the rmvmqinf or dltmqm command on all the other servers which have a definition of the queue manager.
You can only delete a queue manager when it is stopped. At the time you delete it no instances are running, and the queue manager, strictly speaking, is neither a single or a multi-instance queue manager; it is simply a queue manager that has its queue manager data and logs on a remote share. When you delete a queue manager, its queue manager data and logs are deleted, and the queue manager stanza is removed from the mqs.ini file on the server on which you issued the dltmqm command. You need to have access to the network share containing the queue manager data and logs when you delete the queue manager.
On other servers where you have previously created instances of the queue manager there are also entries in the mqs.ini files on those servers. You need to visit each server in turn, and remove the queue manager stanza by running the command rmvmqinf Queue manager stanza name.
Stop and remove queue managers
-
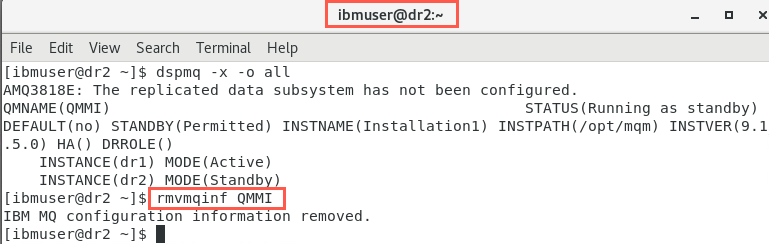
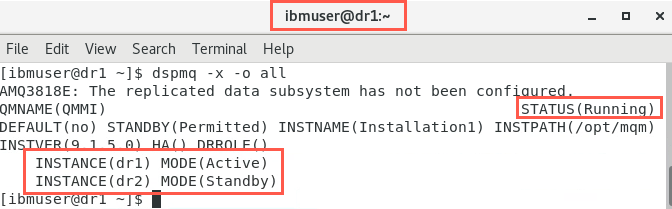
On either dr1 or dr2 display the status of the queue manager.
dspmq -x -o all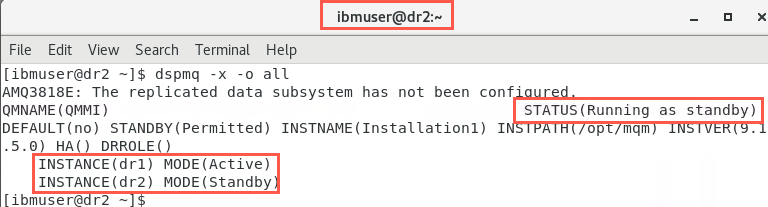
-
End the queue manager on the server where it is running. In this case it is running on dr1. Issue the endmqm on dr1.
endmqm QMMI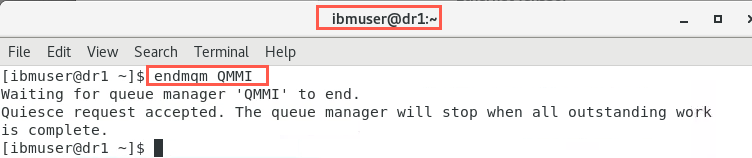
-
Use the dspmq command to determine when it is stopped.
dsmpmq -m QMMI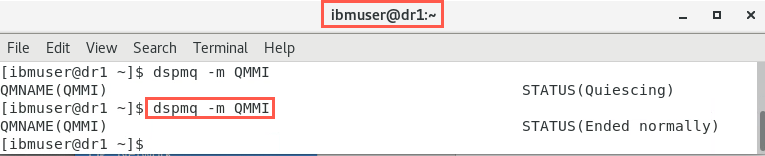
-
Once it is stopped delete the queue manager on dr1.
dltmqm QMMI
-
Delete the queue manager QMMI on the standby node (dr2 in this case) with the following commnad:
rmvmqinf QMMI