Overview
This Proof of Technology (PoT) provides a hands-on experience for those needing to understand how the IBM MQ Salesforce Bridge may be used to support bidirectional integration of IBM MQ and Salesforce. Integration is enabled via the Publish and Subscribe capabilities of IBM MQ and the Platform Event and Push Topic features of Salesforce.
For this lab you will examine:
- How to configure your IBM MQ and Salesforce environment to enable IBM MQ’s pub/sub capabilities to publish events related to create, update and delete operations that have occurred against a Salesforce Account object.
- How to use messages published to an IBM MQ Pub/Sub Topic to modify a Salesforce Account object.
Note that the IBM MQ Salesforce Bridge is supported on Linux platforms only.
Step 1 Complete All Prerequisites
You must complete the prerequisite steps for this PoT before starting this lab. The prerequisite steps may be found at the following URLs:
Step 2 Prepare the Salesforce Environment
In order to demonstrate how integration between IBM MQ and Salesforce is enabled it will be necessary to configure the following for your Salesforce account:
- An X.509 self-signed certificate and keystore will need to be created for TLS protection of messages sent between IBM MQ and Salesforce. This keystore will need to be transferred to the Virtual Machine that is hosting MQ. Once that has been done the MQ Salesforce Bridge will need to be configured to use this keystore.
- A set of “PushTopics” will need to be defined for the Salesforce account in order to enable Salesforce to send event messages whenever an update to an Account record is made.
- A “Platform Event” message and corresponding “Trigger” will need to be defined for the Salesforce account in order to enable IBM MQ to send Platform Events to Salesforce. The Salesforce Bridge will subscribe to messages that are published to a topic of /<root>/mqtosfb/event/+ (where <root> is the root topic configured in the Salesforce Bridge) and create Platform Event messages that may be processed by Salesforce.
The following steps will guide you through the completion of these tasks.
Creating an X.509 Self-signed Certificate and a Keystore
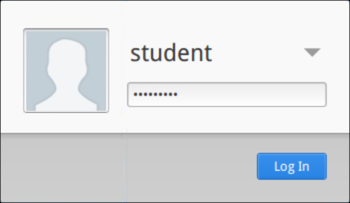
- Access the Xubuntu 64-bit 14.04 Virtual Machine. If logon is required use the following Username and Password:
- student
- Passw0rd! (Where 0 is numeral zero)
-
Logon to Salesforce by double-clicking on the Firefox Web Browser icon to open a web browser.
-
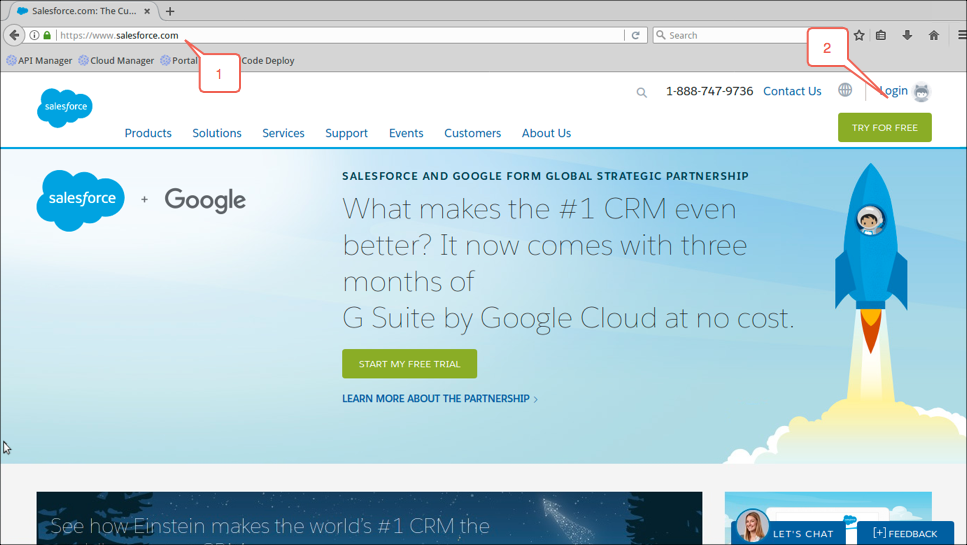
Enter the following URL and then click on the LOGIN link: https://www.salesforce.com
-
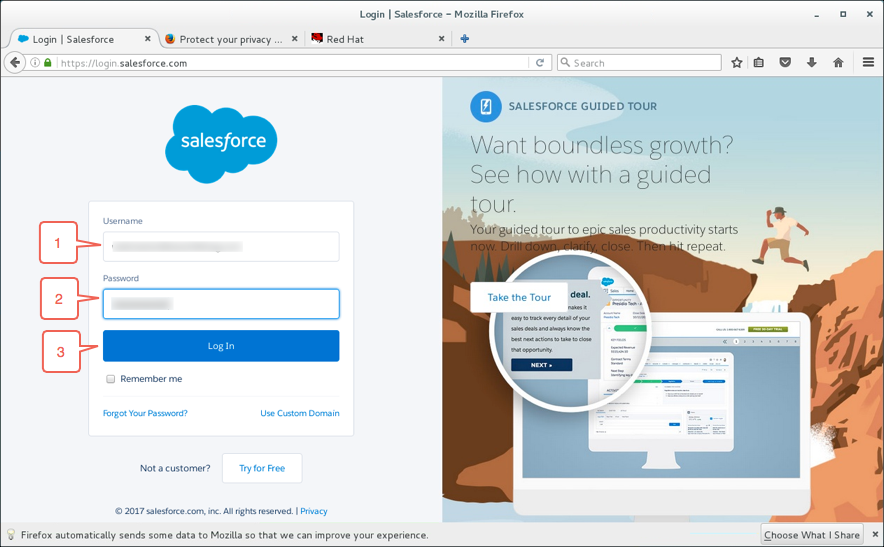
Enter your Username and Password and then click on the Log In button.
-
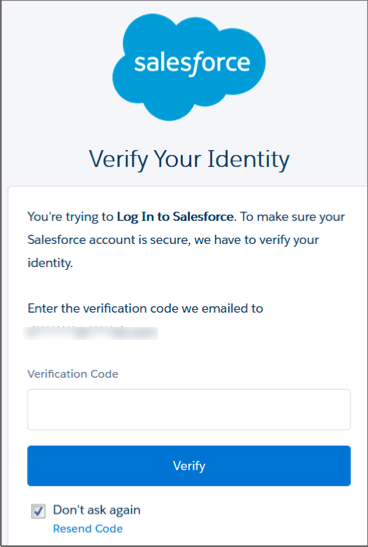
You may be required to verify your identity. Follow the instructions to access the verification code from your email and enter it to proceed.
-
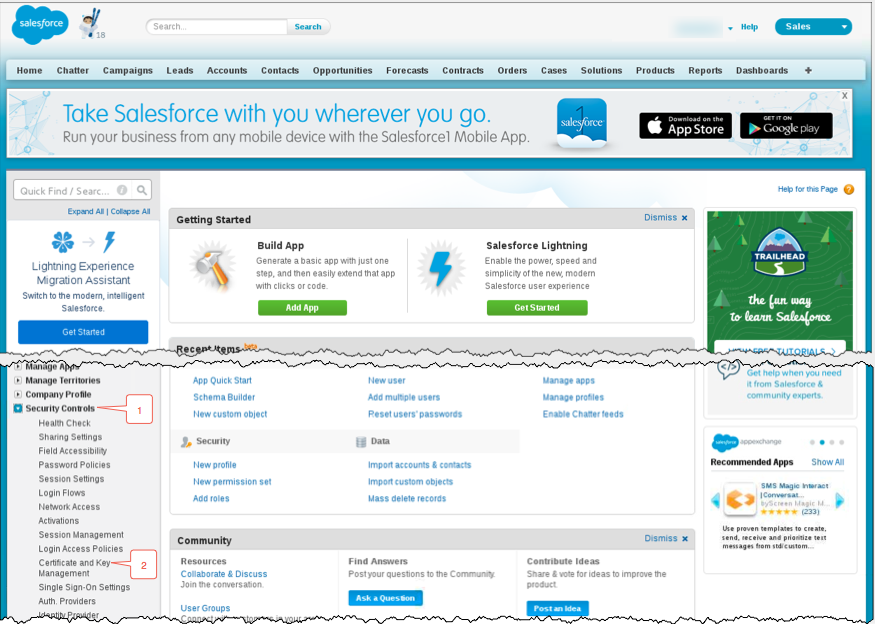
The Force.com Home page should appear. You will need to scroll the page down until you locate the section titled Security Controls. Expand that section and then click on the Certificate and Key Management menu item.
-
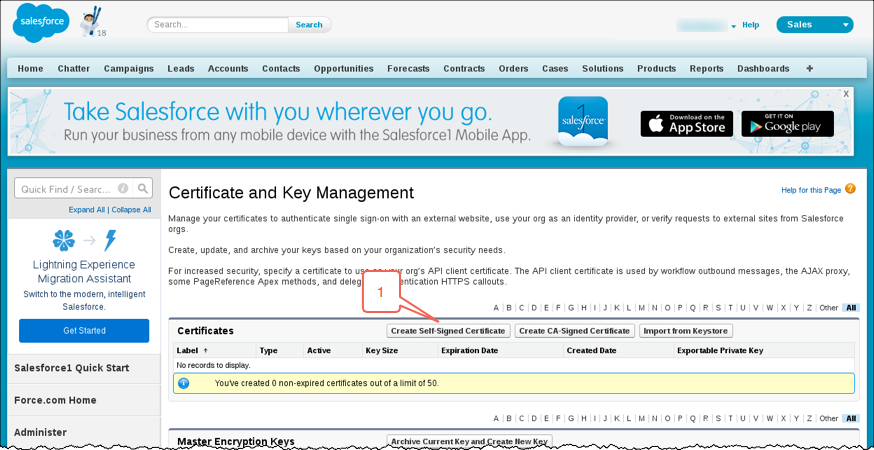
The Certificate and Key Management page will appear. Click on the Create Self-Signed certificate button.
-
Enter the values as shown in the following screen shot and then click on the Save button.
Field Name Value to Enter Label SQM1 Connection Unique Name SQM1_Connection Type Self-Signed Exportable Private Key Checked 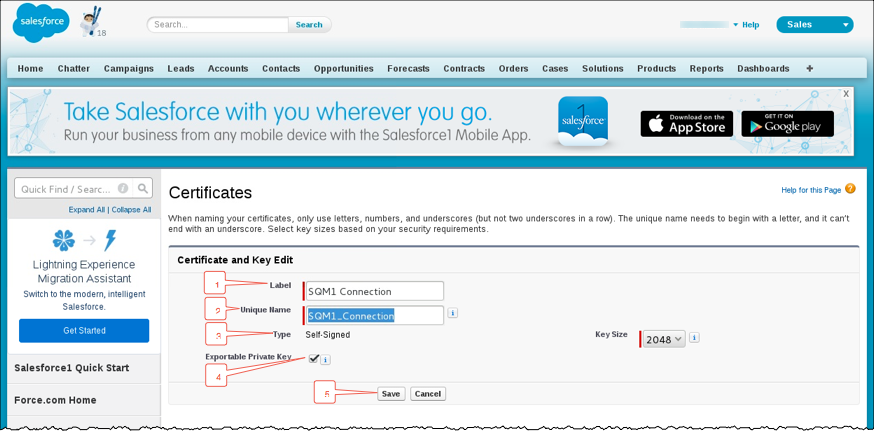
-
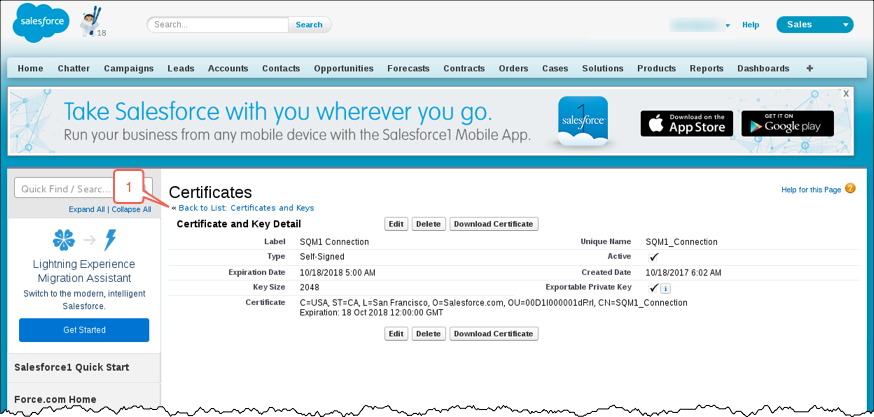
Click on the Back to List: link to return to the Certificate and Key Management page.
-
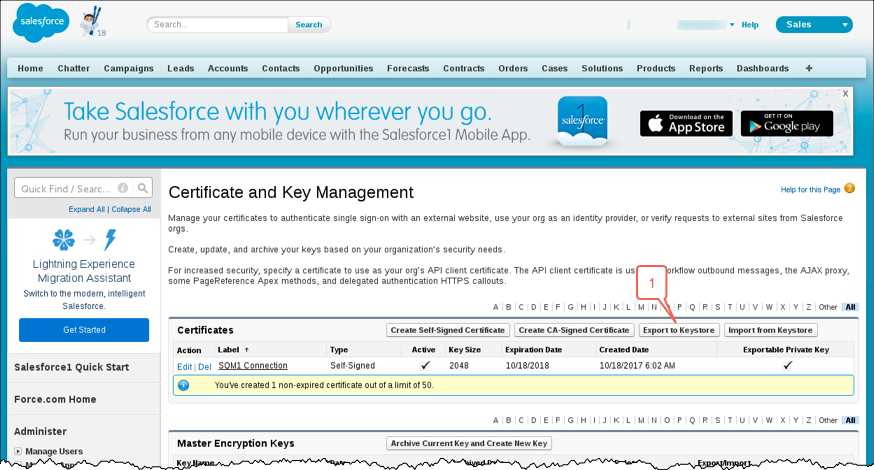
Click on the Export to Keystore button.
-
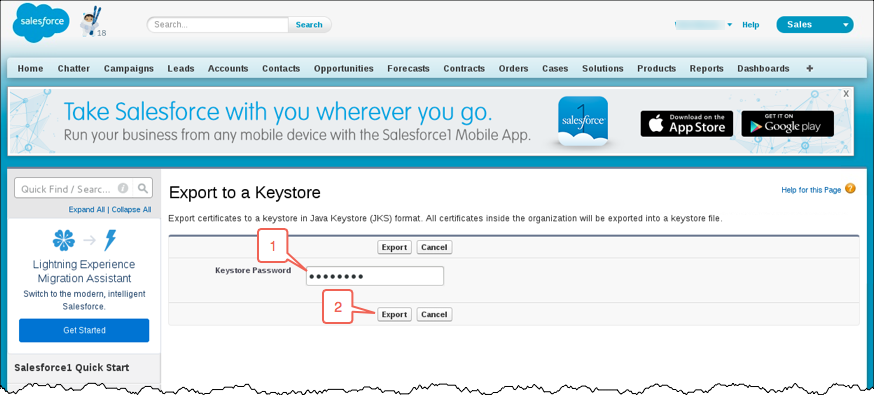
Assign a keystore password of passw0rd (where 0 is numeral zero) and then click on the Export button.
-
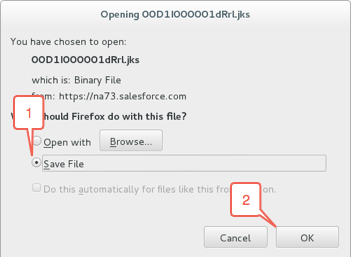
A dialog will appear asking you to confirm saving of the file. The format of the dialog may be different depending on the web browser you are using. Take the appropriate actions to save the file.
-
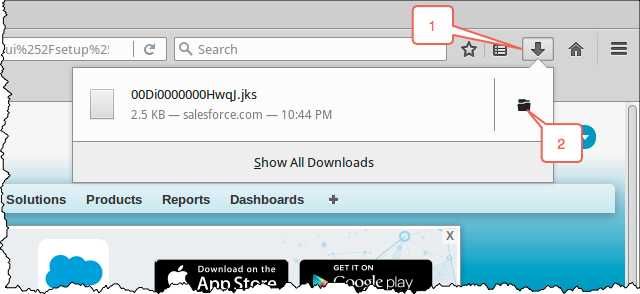
Depending on the web browser you are using you may see either a confirmation pop up dialog or you may see an acknowledgement of the download towards the bottom of the browser window. Click on the appropriate link to locate the downloaded file.
-
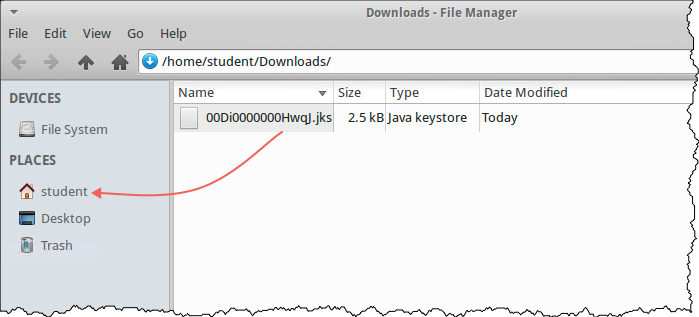
Copy the keystore file to the /home/student directory.
Create a Salesforce “Platform Event”
Starting from IBM MQ Version 9.0.4 you can use an IBM MQ application to create JSON formatted messages that are published to a queue manager topic of /<root>/mqtosfb/event/+. (For this lab you will use a root of /sf.) The IBM MQ Salesforce Bridge subscribes to the topic, gets the content from the messages, and uses the content to publish Salesforce Platform Event messages.
Platform Events are the event messages (or notifications) that Salesforce and external apps send and receive to take further action.
Complete the following steps in order to configure the Salesforce Platform Event objects that will be used in this lab.
-
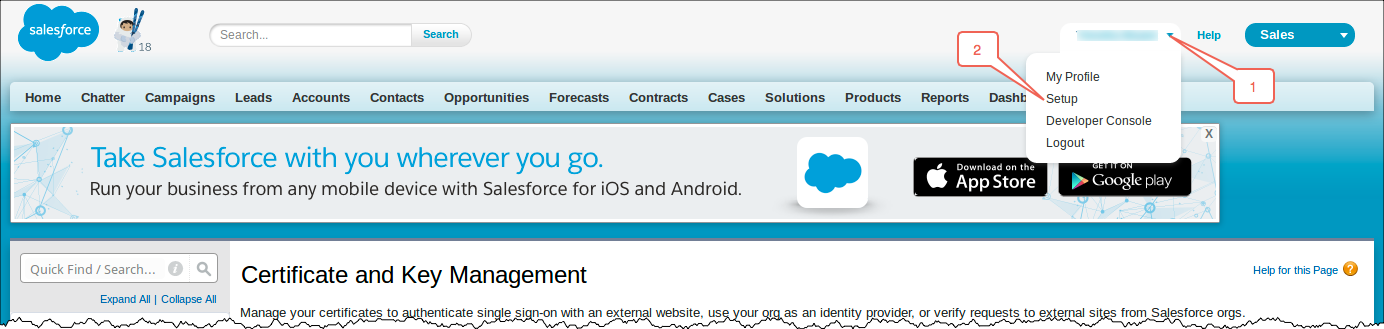
Click on the drop down icon next to your Salesforce username and then click on the Setup menu item.
-
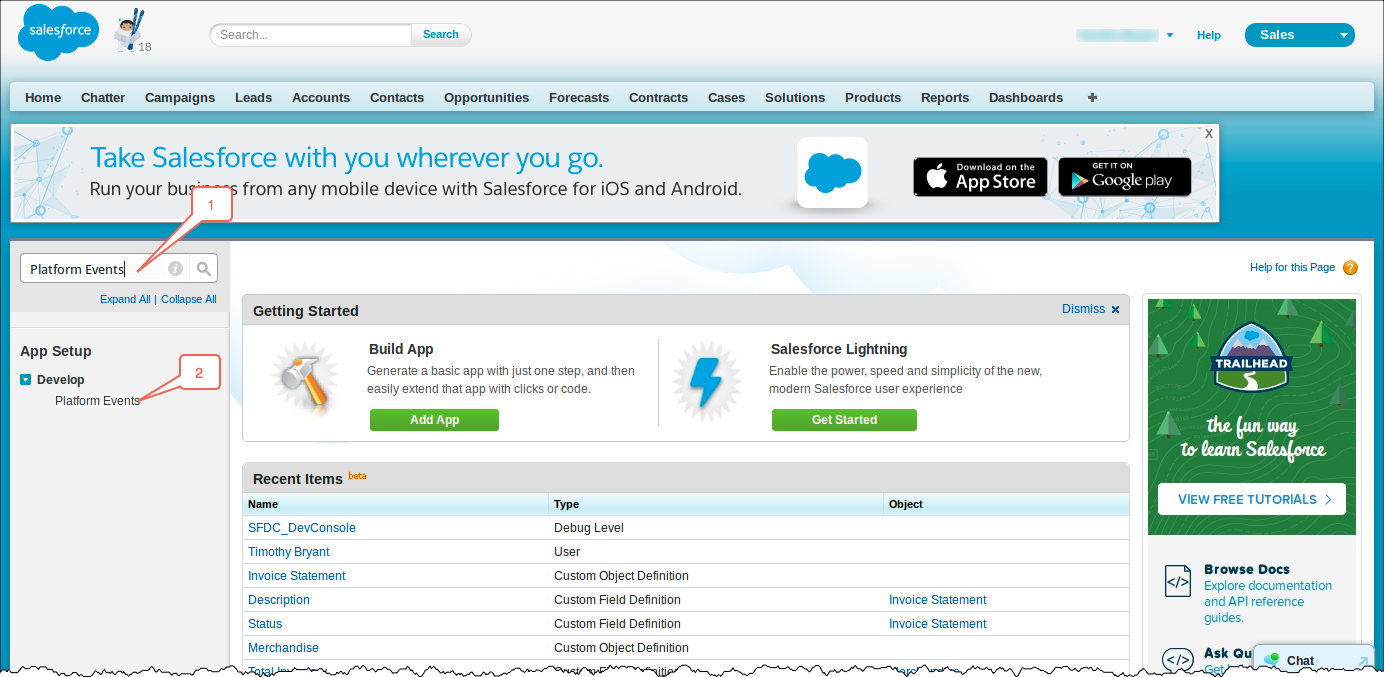
Enter Platform Events in the Quick Find / Search… field and then click on the Platform Events menu item.
-
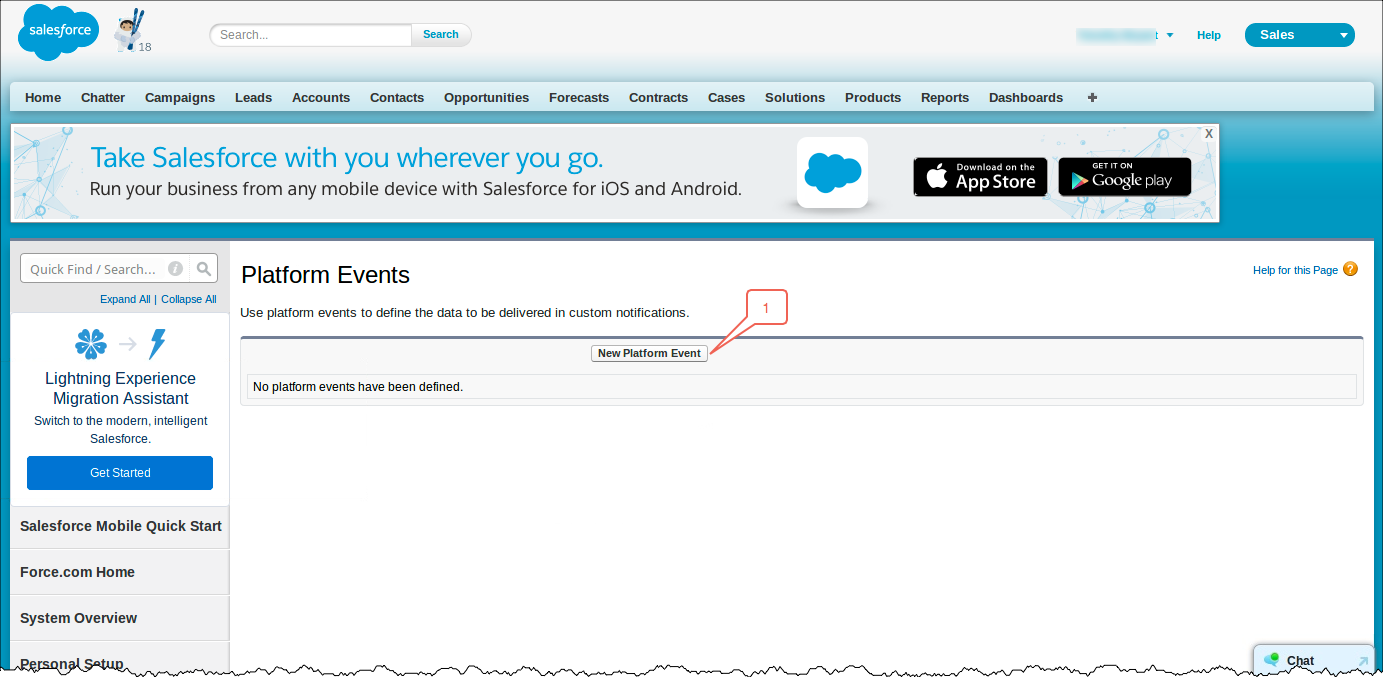
Click on the New Platform Event button.
-
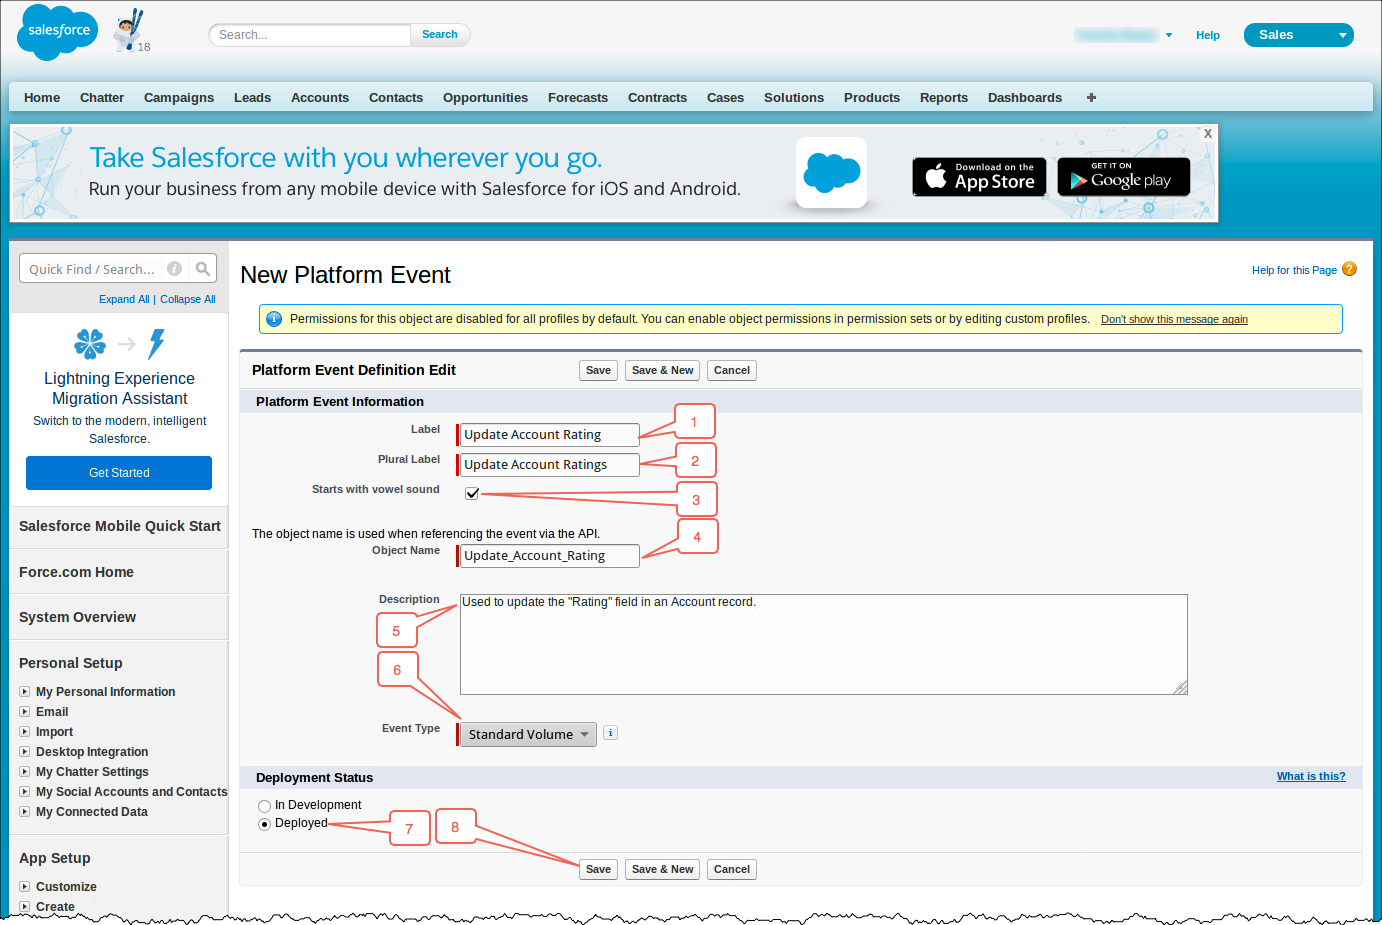
Complete each of the fields as shown. Note that the Object Name field will be automatically filled in when you enter the Label. Ensure that you have selected the Standard Volume for the event type and have also selected the Deployed status, then click on the Save button.
-
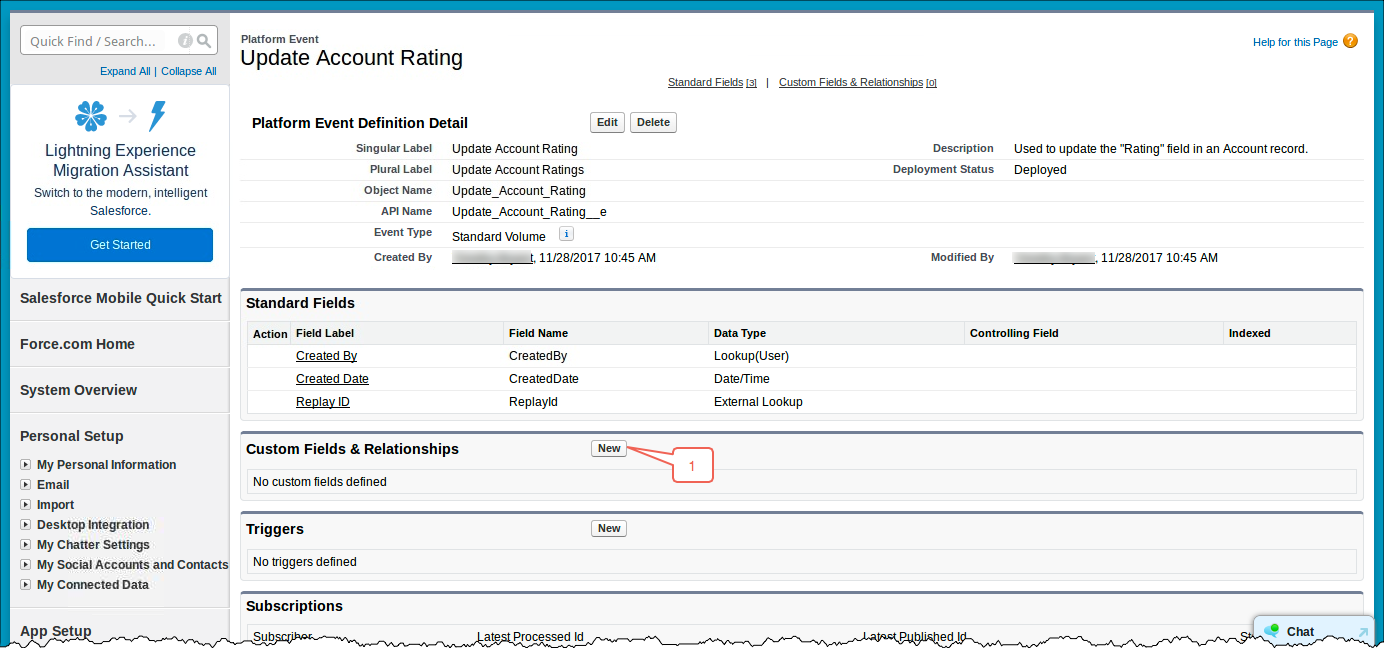
Now you need to add two custom fields to the event. Scroll down to locate the Custom Fields & Relationships section and then click on the New button.
-
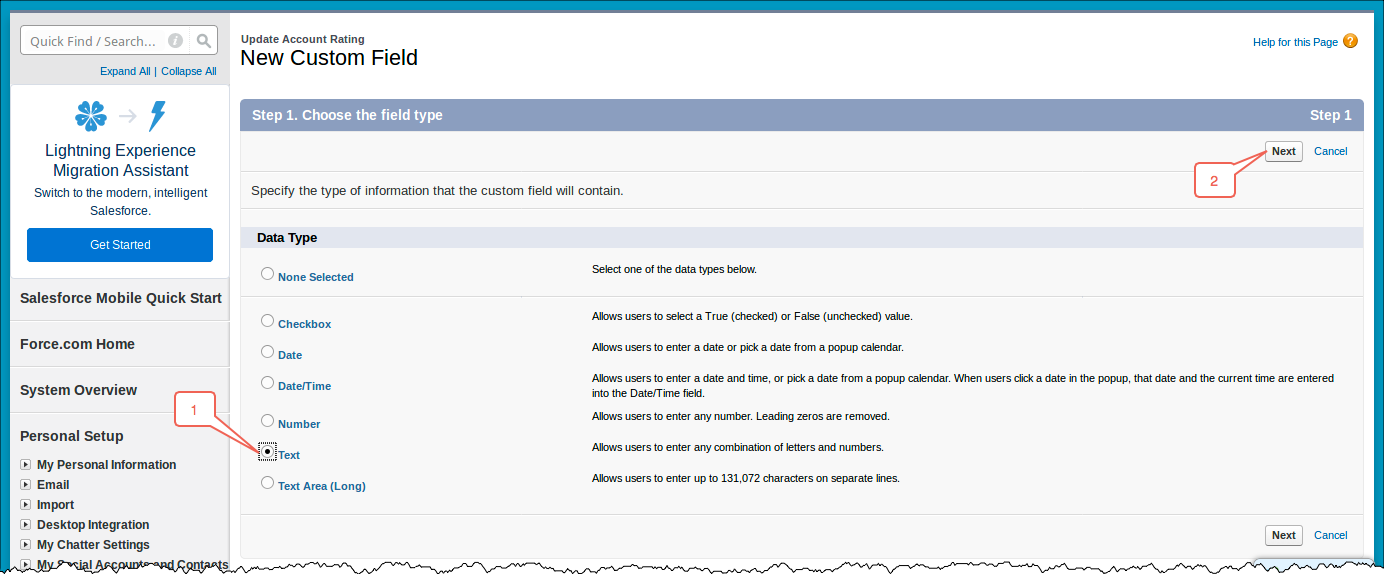
Scroll down to locate the Data Type section and select the Text type. Click on the Next button to continue.
-
Complete each of the fields as shown. Since this field will be used to match the Account Name field in the Accounts object it will need to be large enough to hold any account name that is passed in the event. Click on the Save button when finished.
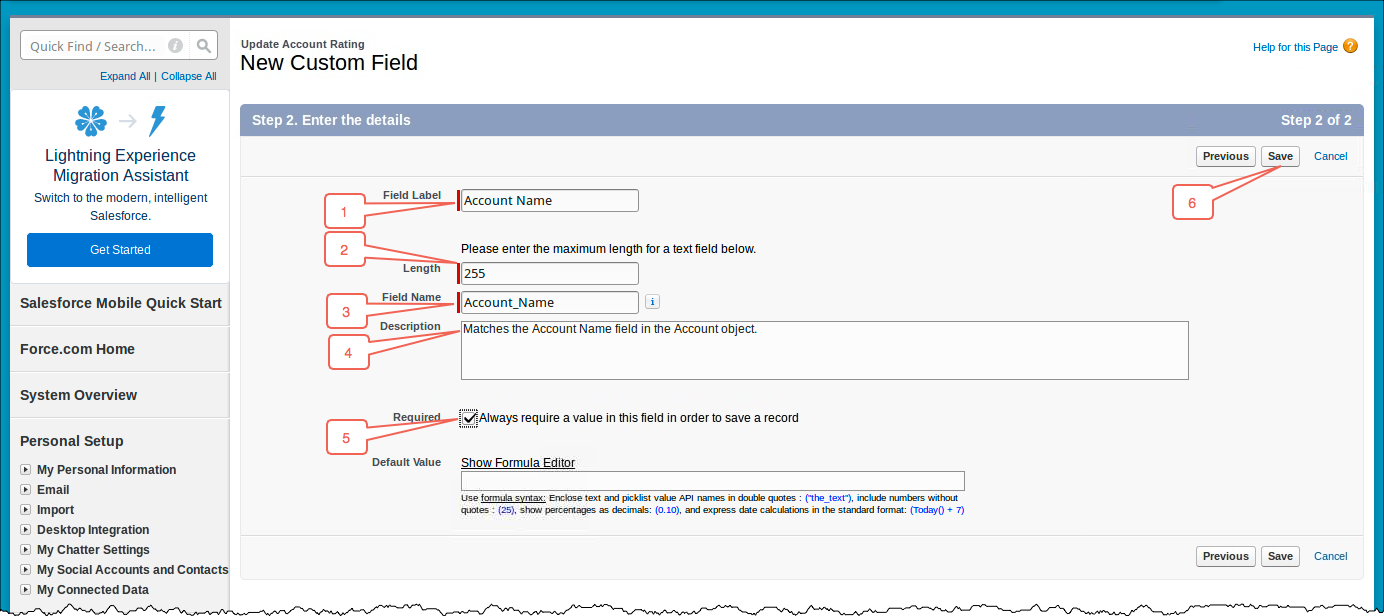
- Repeat the previous step to create a new field named Rating. Set the Data Type to Text, the Length to 40 and select the Required checkbox.
-
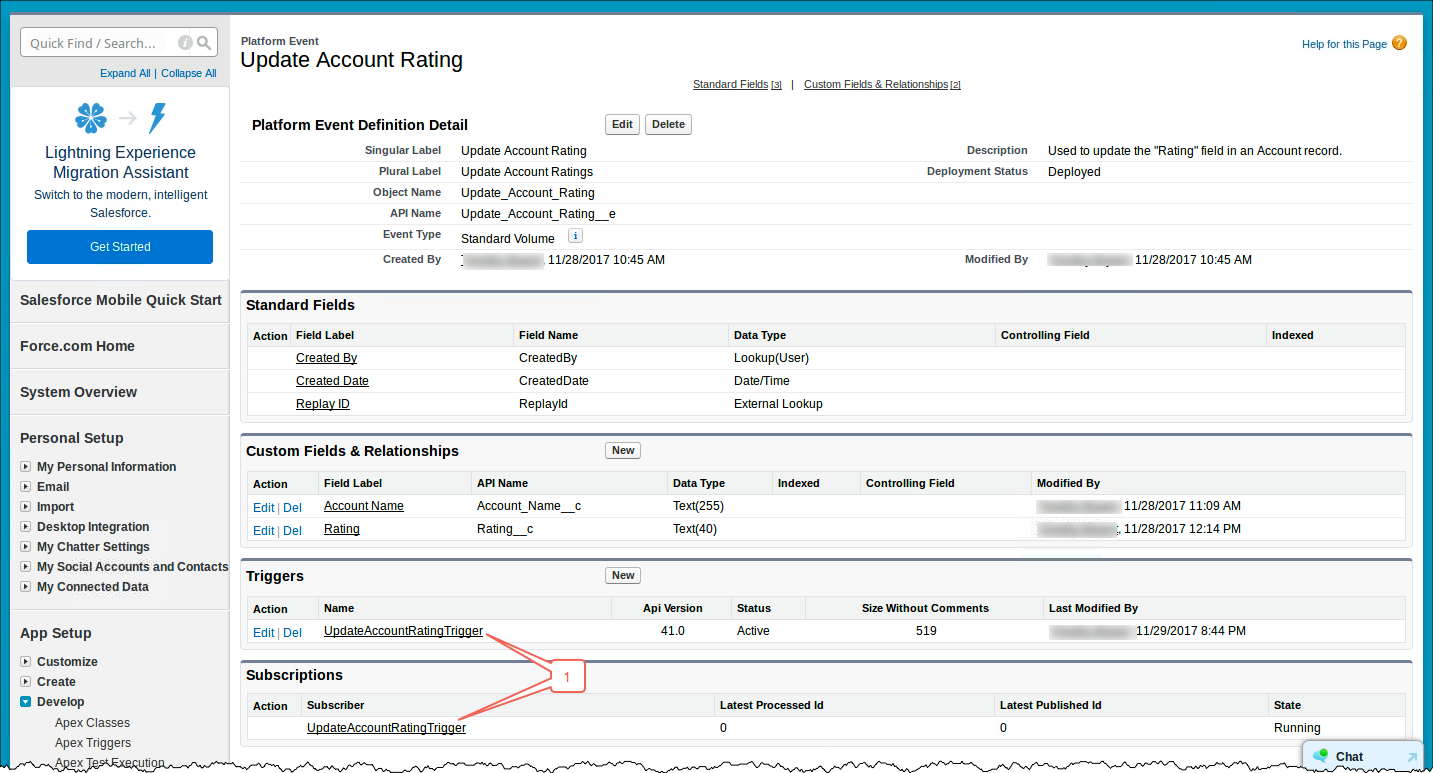
Take note of the API Name values that are assigned to the platform event and to each of the custom fields that you have created. These will be needed later on for testing.
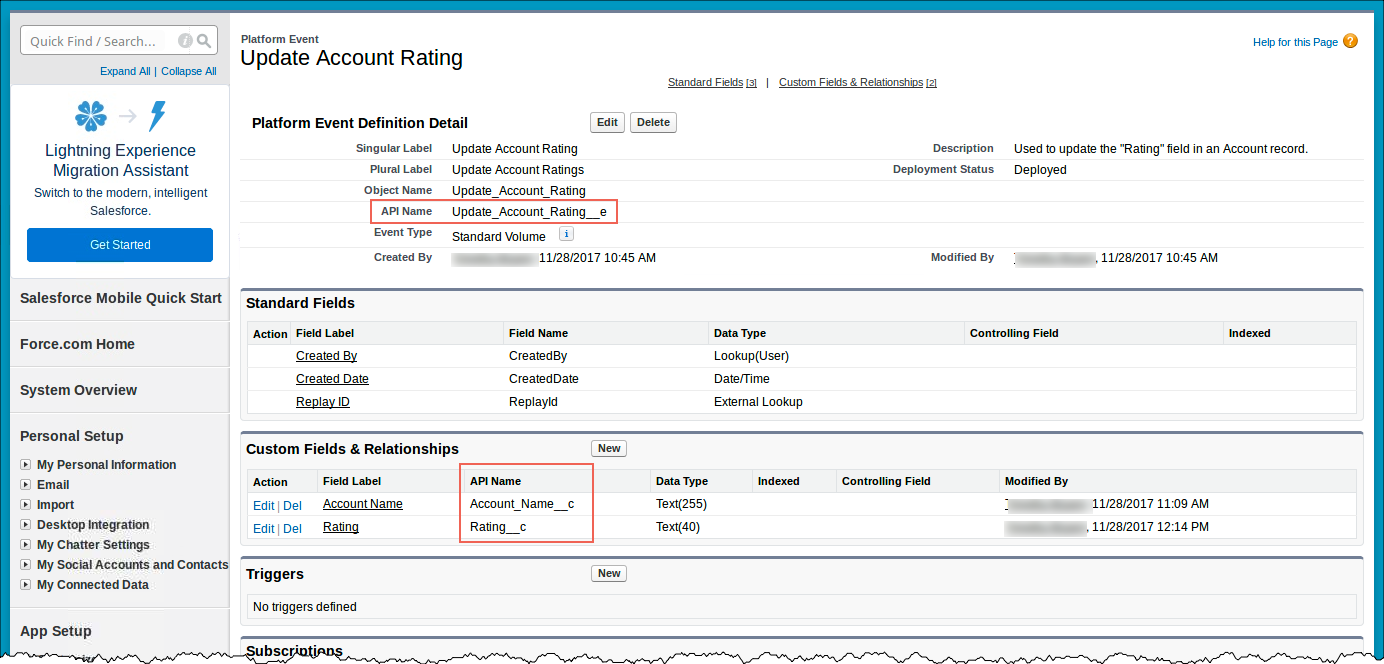
-
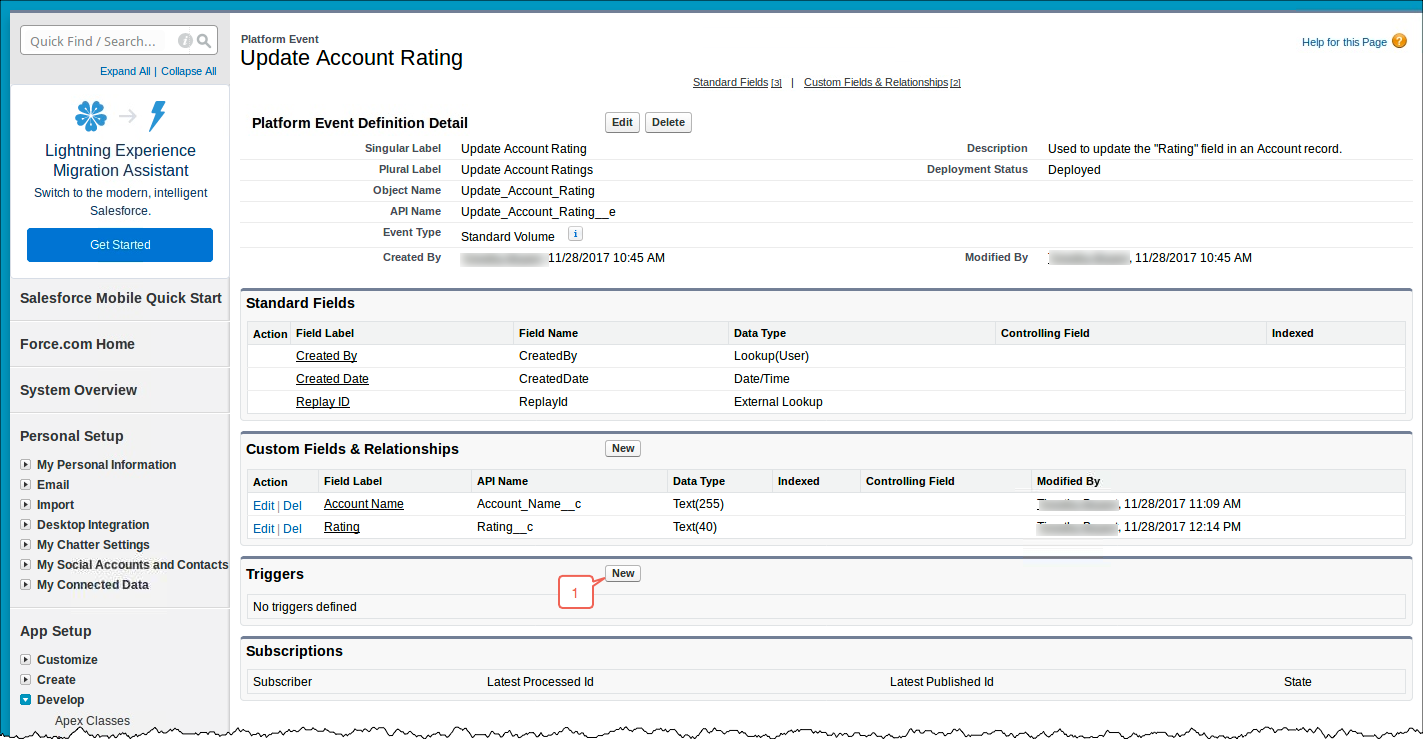
Now you must create a Trigger for the Update_Account_Rating Platform Event. A trigger is used to take action on platform events that have a Subscription associated with them. Click on the New button to create a new Trigger.
-
The following is the Apex code that will be used to process the Platform Event that will be sent by the Salesforce Bridge when a message is published to a specific topic on the IBM MQ queue manager where the Bridge has been configured. Copy and paste this code into the Apex code editor window and then click on the Save button.
Note:
You will configure the subscription topic string later in this lab.// Trigger to update an Account object with a new Rating value. trigger UpdateAccountRatingTrigger on Update_Account_Rating__e (after insert) { try{ // Iterate across all events. for (Update_Account_Rating__e event : Trigger.New) { Account acct = [SELECT Rating FROM Account WHERE Name = :event.Account_Name__c]; // Update existing records if (acct != null) { acct.Rating = event.Rating__c; update acct; } } } catch(DMLException e) { System.debug('Error when processing UpdateAccountRatingTrigger'); } }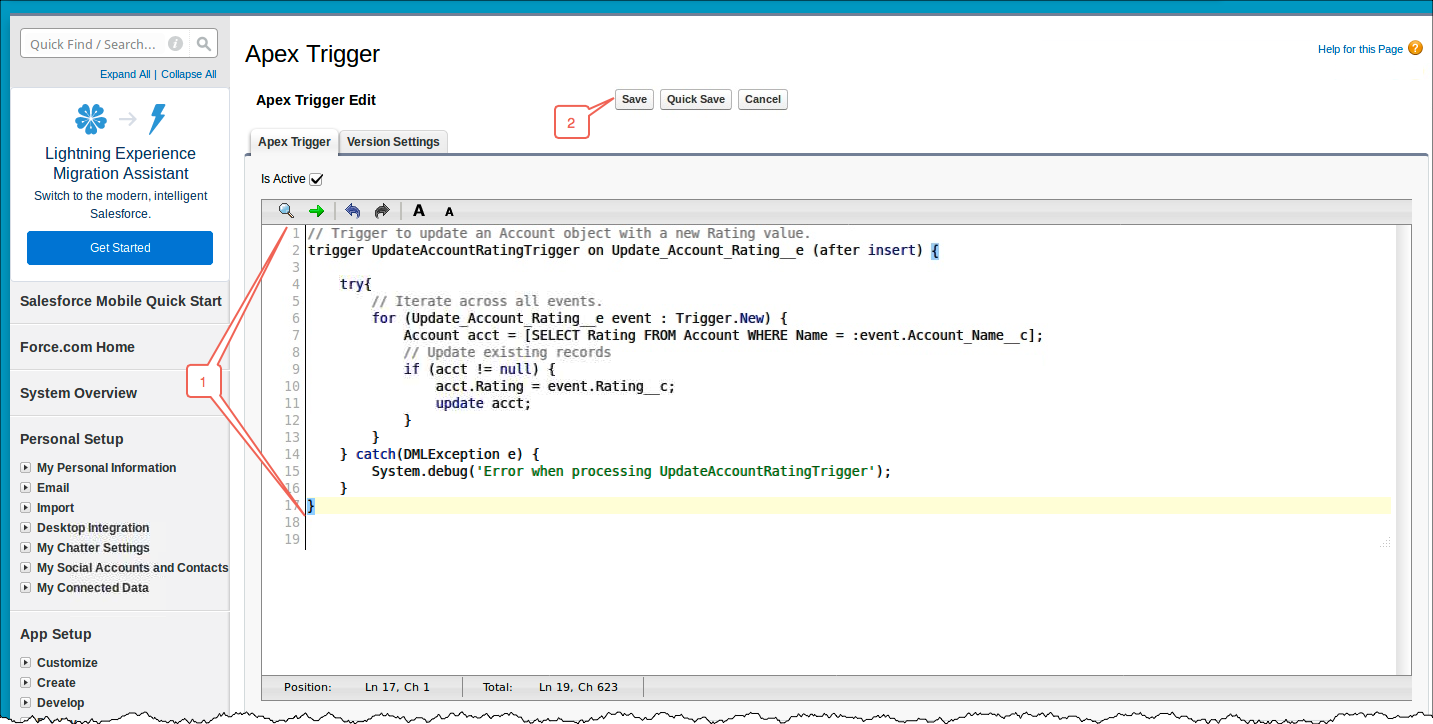
-
Click on the Back to List: Custom Object Definitions link.
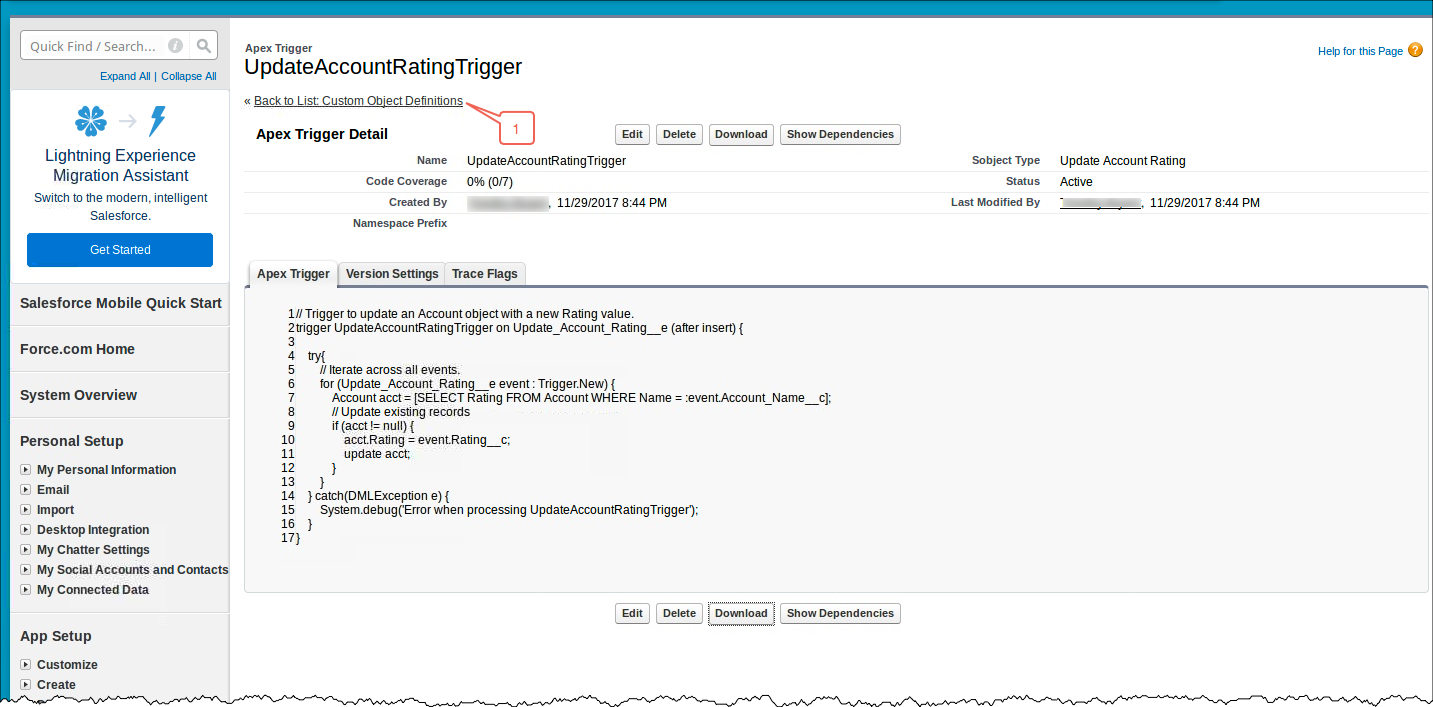
-
Note that your trigger as well as an associated Subscription have been created.
Create Salesforce “Push Topics”
You are now ready to create a set of Salesforce “Push Topics” that will generate events whenever there are changes to Account objects in your Salesforce instance.
-
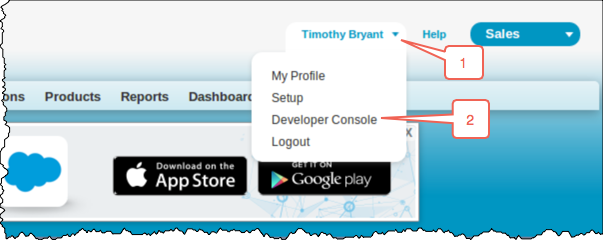
Click on the drop down icon next to your Salesforce username and then click on the Developer Console menu item.
-
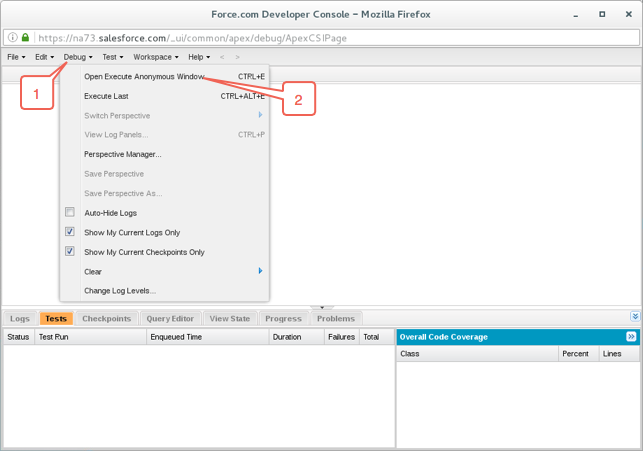
The Force.com Developer Console window will appear. This window enables developers to perform a number of tasks to customize their Salesforce instance. In our lab we will use the Execute Anonymous dialog to enter the necessary commands. Click on the Debug menu item and then click on the Open Execute Anonymous Window menu item.
-
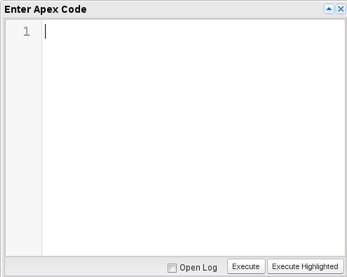
A window titled Enter Apex Code will appear. (Note that this window may contain contents from previous commands that have been entered.) You will use this window to enter the various commands that will be required to configure the Push Topics.
-
Clear the contents of the window, if necessary. Enter the following Apex code to create a new Push Topic that will generate an event for every new Salesforce Account object that is created. Click on the Execute button to execute the statements.
PushTopic pushTopic = new PushTopic(); pushTopic.Name = 'AccountObjectCreates'; pushTopic.Query = 'SELECT Id, AccountNumber, Name, BillingAddress, BillingStreet, BillingCity, BillingState,BillingPostalCode FROM Account'; pushTopic.ApiVersion = 39.0; pushTopic.NotifyForOperationCreate = true; pushTopic.NotifyForOperationUpdate = false; pushTopic.NotifyForOperationDelete = false; pushTopic.NotifyForFields = 'All'; insert pushTopic; -
Reopen the Open Execute Anonymous Window. Clear all existing statements and enter the following Apex code to create a new Push Topic that will generate an event for every existing Salesforce Account object that is modified. Click on the Execute button to execute the statements.
PushTopic pushTopic = new PushTopic(); pushTopic.Name = 'AccountObjectUpdates'; pushTopic.Query = 'SELECT Id, AccountNumber, Name, BillingAddress, BillingStreet, BillingCity, BillingState,BillingPostalCode FROM Account'; pushTopic.ApiVersion = 39.0; pushTopic.NotifyForOperationCreate = false; pushTopic.NotifyForOperationUpdate = true; pushTopic.NotifyForOperationDelete = false; pushTopic.NotifyForFields = 'All'; insert pushTopic; -
Reopen the Open Execute Anonymous Window. Clear all existing statements and enter the following Apex code to create a new Push Topic that will generate an event for every existing Salesforce Account object that is deleted. Click on the Execute button to execute the statements.
PushTopic pushTopic = new PushTopic(); pushTopic.Name = 'AccountObjectDeletes'; pushTopic.Query = 'SELECT Id, AccountNumber, Name, BillingAddress, BillingStreet, BillingCity, BillingState,BillingPostalCode FROM Account'; pushTopic.ApiVersion = 39.0; pushTopic.NotifyForOperationCreate = false; pushTopic.NotifyForOperationUpdate = false; pushTopic.NotifyForOperationDelete = true; pushTopic.NotifyForFields = 'All'; insert pushTopic; -
Close the Force.com Developer Console window.
Step 3 Prepare the MQ Salesforce Bridge
The MQ Salesforce Bridge is the key component that supports integration between IBM MQ and Salesforce.
- The Bridge subscribes to Push Topic events that are generated in Salesforce and then republishes these events as MQ Publish and Subscribe messages for other applications to subscribe to.
- The Bridge also subscribes to an IBM MQ topic of /<root>/mqtosfb/event/+ (Where <root> is configured when setting up the Bridge), which will then forward messages published in that topic space to the Salesforce Platform Event infrastructure.
Complete the following steps to configure the MQ Salesforce Bridge.
-
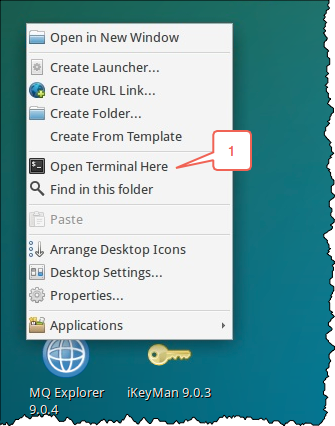
Open a Terminal window by right clicking on the desktop and clicking on the Open Terminal Here menu item.
-
You may need to set the MQ environment variables whenever you open a new Terminal window. Enter the following command to set the MQ environment.
Note:
Ensure that you include the preceding period and space before the start of the command.. /opt/mqm/bin/setmqenv -n Installation1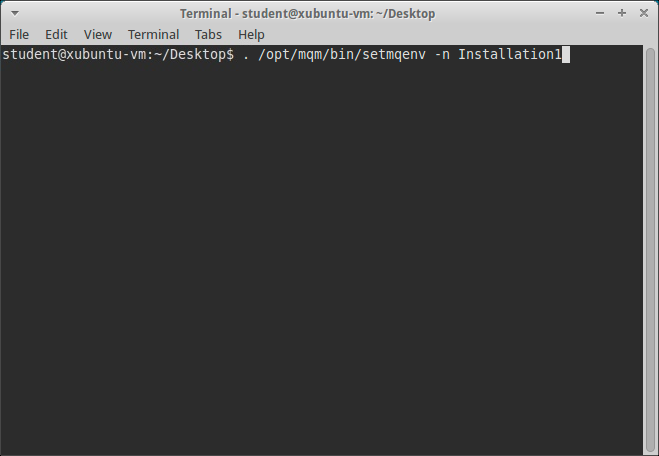
-
Next you will need to create a keystore database to store the keystore file that was downloaded from Salesforce. Enter the following command to launch the IBM Key Manager application.
strmqikm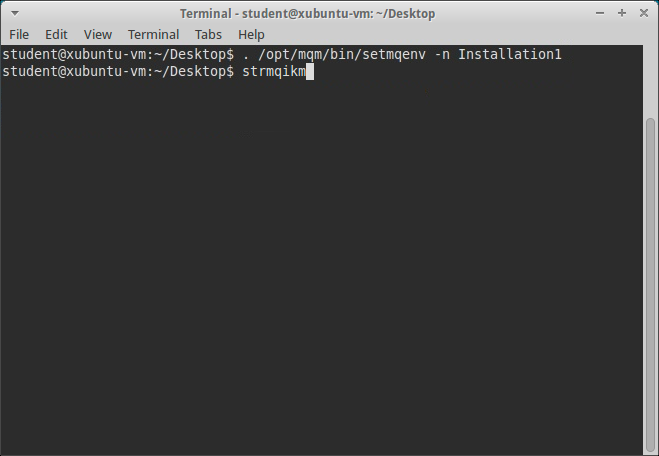
-
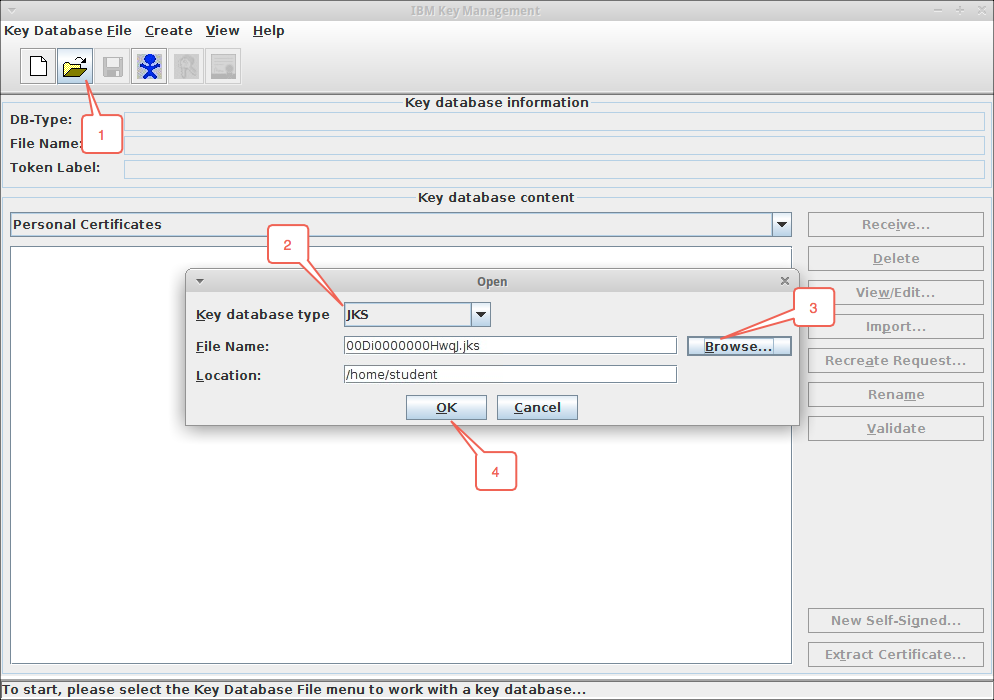
The IBM Key Management application will appear. Click on the Open icon, select a Key database type of JKS, select the exported keystore that you copied to the /home/student directory and then click on the OK button.
-
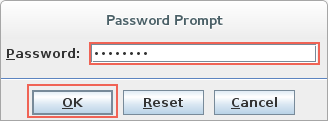
Enter passw0rd at the Password prompt and then click on the OK button.
-
The contents of the keystore are now loaded into the IBM Key Management tool. As of 2018 Salesforce uses DigiCert to sign their certificates. Thus, you will need to add the root signer certificates to the keystore. From a web browser enter the following URL to download the DigiCert root certificate:
https://www.digicert.com/CACerts/DigiCertSHA2SecureServerCA.crt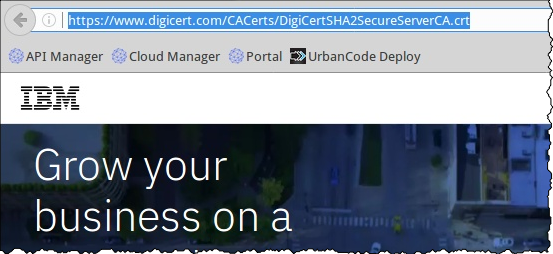
-
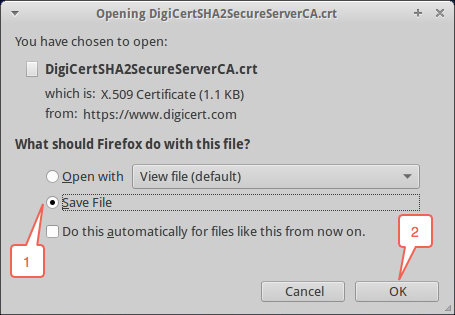
Select the option to save the file and then click on the OK button.
-
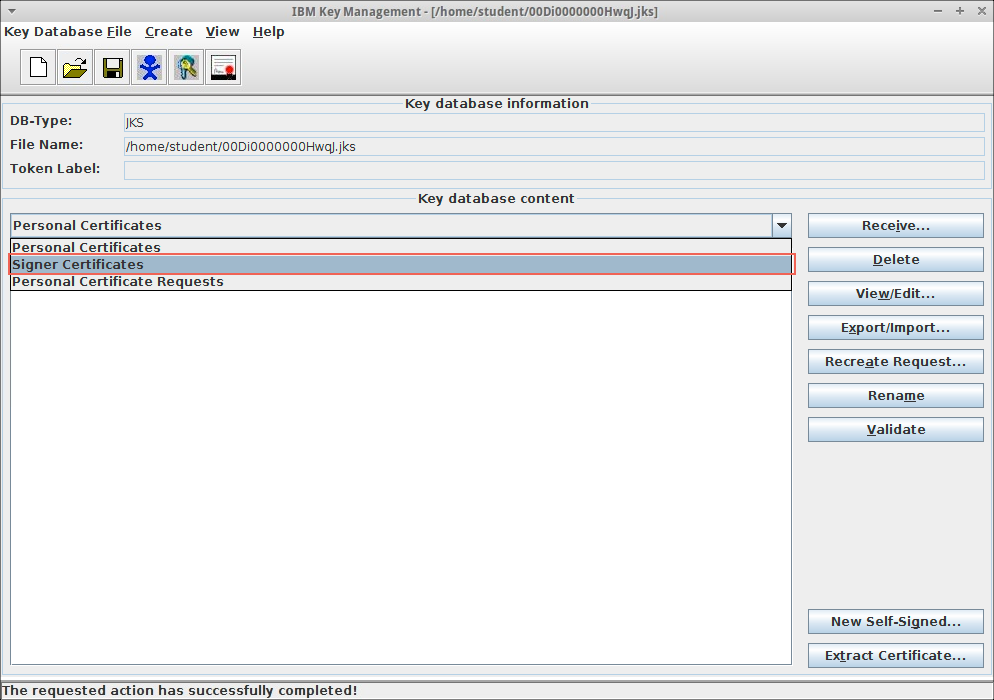
Return to the IBM Key Manager window and then click on the drop down menu and then select Signer Certificates.
-
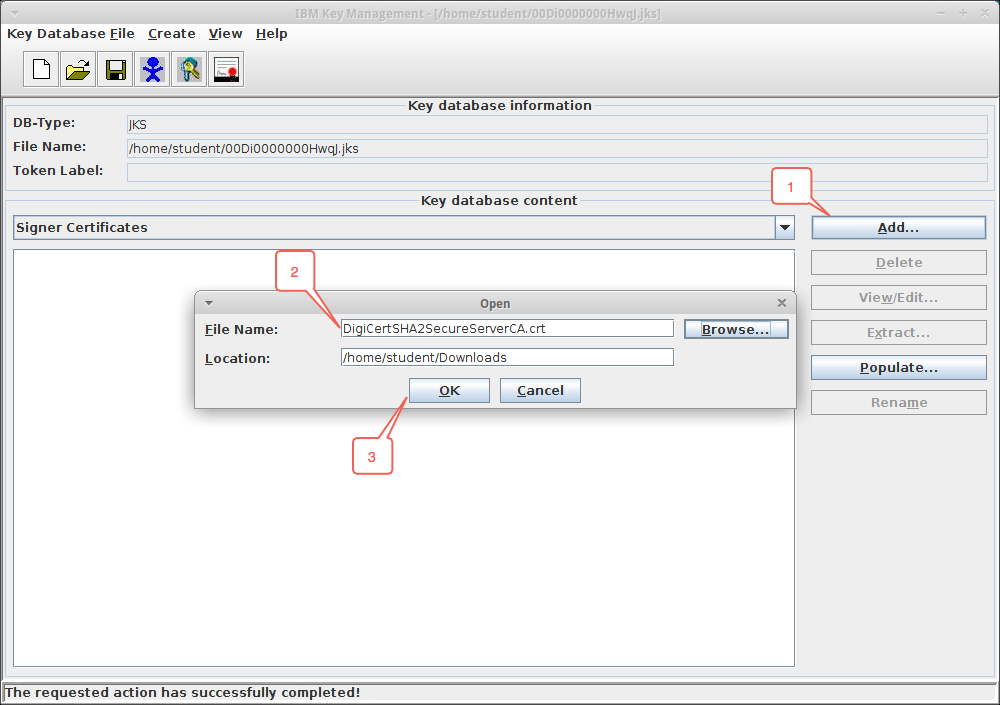
Click on the Add… button and then select the root signer certifcate file that you had just downloaded, then click on the OK button.
-
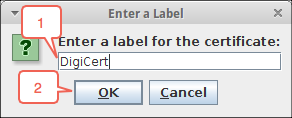
Add an appropriate label for the root certificate and then click on the OK button.
- Save the keystore and exit the IBM Key Management application.
-
You are now ready to create and configure the MQ Salesforce Bridge. Although you can configure the Bridge to work with an existing queue manager, for this lab exercise you will create a new queue manager to work with the Bridge. (The Bridge runs as an MQ service, so a restart of the queue manager will eventually be required to complete the configuration.) Return to the Terminal window and enter the following commands to create and start a queue manager:
crtmqm -p 1414 -u SYSTEM.DEAD.LETTER.QUEUE SQM1
strmqm SQM1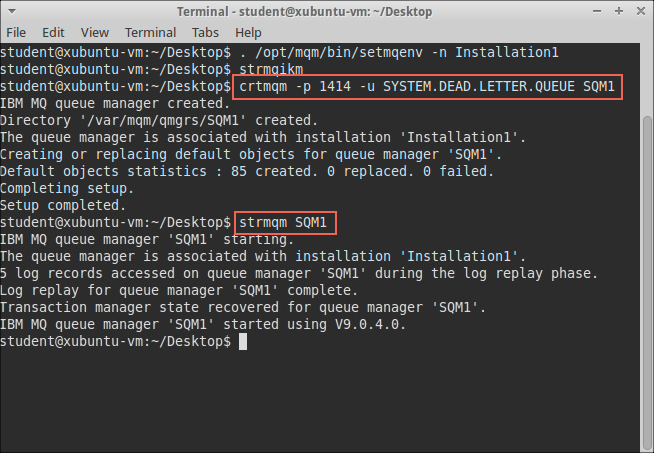
-
The student userid is a member of the mqm group. New queue managers created on version 8 and later MQ installations include several new security features that restrict access to members of the mqm group when utilizing client connections. Since configuring security is outside the scope of this PoT you will need to enter the following commands to reduce the number of steps required to complete this PoT. First, open the MQ command shell for the SQM1 queue manager:
runmqsc SQM1Next run the following mqsc commands:
ALTER QMGR CHLAUTH(DISABLED)
ALTER AUTHINFO(SYSTEM.DEFAULT.AUTHINFO.IDPWOS) AUTHTYPE(IDPWOS) CHCKCLNT(OPTIONAL)
REFRESH SECURITY TYPE(CONNAUTH)
END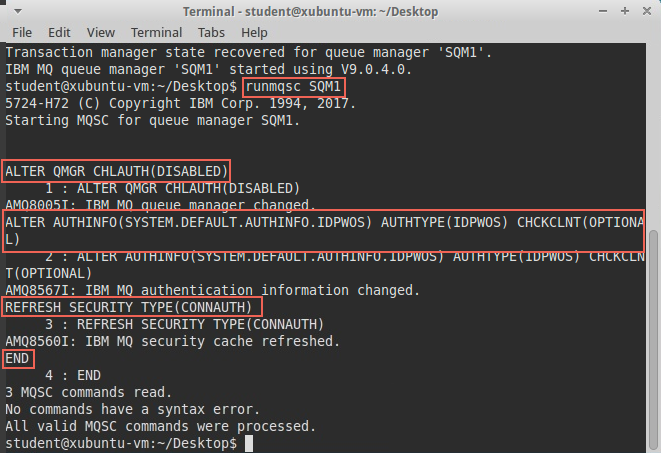
-
Now you will need to create several local queues that the Bridge requires. Enter the following command in the Terminal window:
cat /opt/mqm/mqsf/samp/mqsfbSyncQ.mqsc | runmqsc SQM1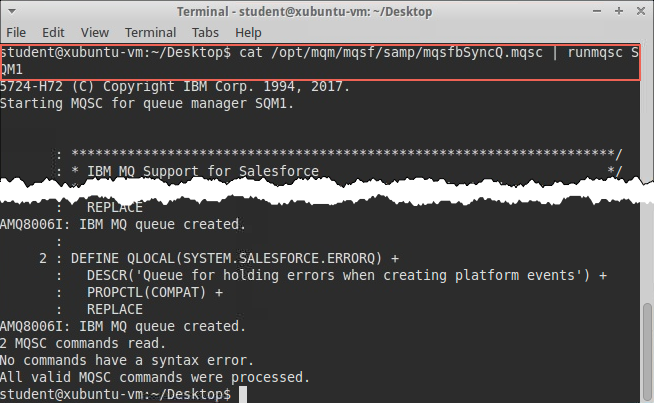
-
You will now need to enter a command that will provide a series of prompts to enable you to configure the Bridge. Note that the flags provided with the command allow you to specify both an input file and an output file. You would enter both flags if you are modifying an existing configuration. Assuming that you have not previously configured the Bridge you should only use the -o flag to initially configure the MQ Salesforce Bridge:
Flag Purpose -f OPTIONAL: The name of an existing configuration file to read. This may be specified when you are modifying an existing Bridge configuration. -o The name of the configuration file used to store the settings. runmqsfb -o /home/student/sfb_config.cfg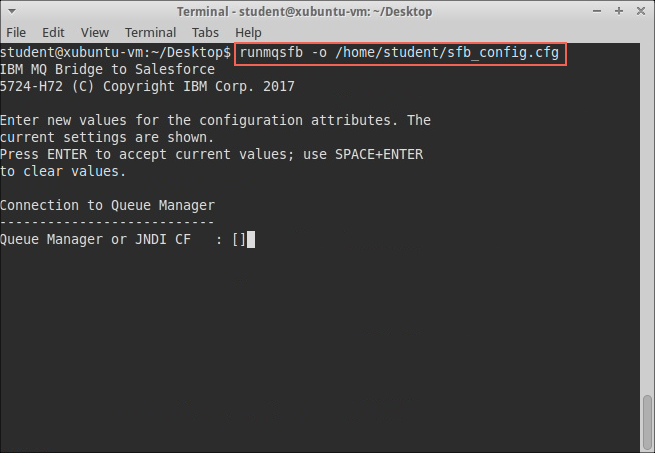
-
Use the following table to complete each prompt:
Prompt Value to Enter Queue Manager or JNDI CF SQM1 MQ Base Topic /sf MQ Channel SYSTEM.DEF.SVRCONN MQ Conname localhost(1414) MQ Publication Error Queue <leave default> MQ CCDT URL <leave default> JNDI implementation class <leave default> JNDI provider URL <leave default> MQ Userid <leave default> MQ Password <leave default> Salesforce Userid (reqd) < Enter your Salesforce Username > Salesforce Password (reqd) < Enter your Salesforce Password > Security Token < Enter your Salesforce Security Token > Login Endpoint <leave default> Consumer Key <leave default> Consumer Secret <leave default> Personal keystore for TLS certificates <Enter full path to keystore> Keystore password passw0rd (Where 0 is numeral zero) Trusted store for signer certificates <leave default> Trusted store password <leave default> Use TLS for MQ connection <leave default> PushTopic Names Add new topics AccountObjectCreates, AccountObjectUpdates, AccountObjectDeletes <Entered as a single line> Platform Event Names <leave default> MQ Monitoring Frequency <leave default> At-least-once delivery? (Y/N) <leave default> Subscribe to MQ publications for platform events? (Y/N) Y Publish control data with the payload? <leave default> Delay before starting to process events <leave default> Runtime logfile for copy of stdout/stderr /home/student/mqsfbridge.log -
Change the file permissions on the newly created configuration file by entering the following command in the Terminal window:
chmod 766 /home/student/sfb_config.cfg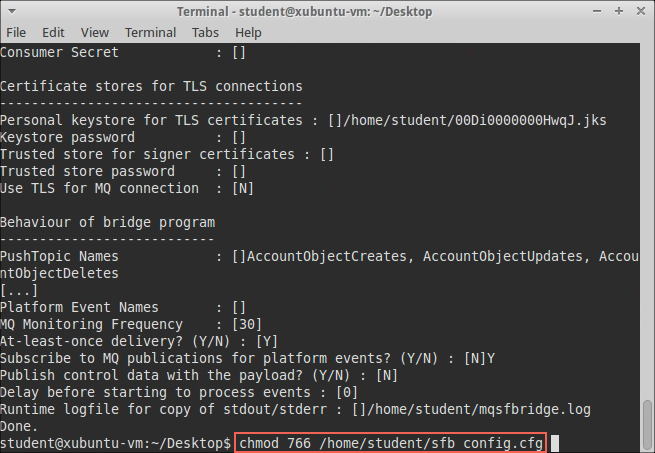
-
Now you must create an MQ Service on your queue manager that will automatically start the Bridge whenever the queue manager is started. There is a template file that you can use to simplify the creation of the Service. You will need copy and then tailor this file to suit your installation. Use the following commands to copy and then edit the file:
cp /opt/mqm/mqsf/samp/mqsfbService.mqsc /home/student
chmod +w /home/student/mqsfbService.mqsc
gedit /home/student/mqsfbService.mqsc
Note:
You may receive an error message stating the gedit is not installed. If so, follow the directions from the message to install it and then continue with this step.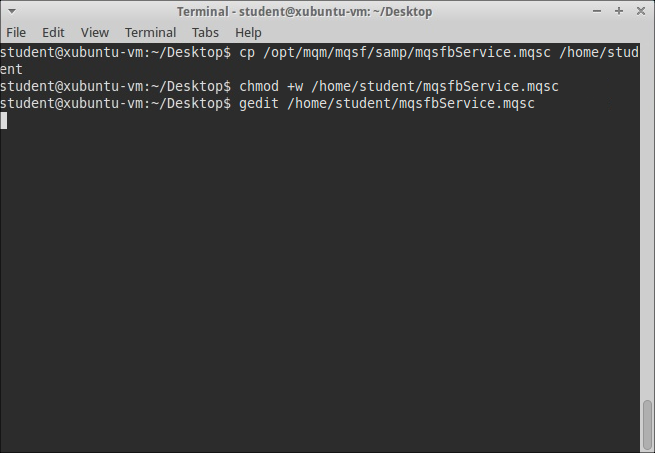
-
Edit the file as indicated in the following screen shot:
Change the following line:
STARTARG('-m +QMNAME+ -f +MQ_INSTALL_PATH+/mqsf/samp/mqsfb.cfg') +to:
STARTARG('-m +QMNAME+ -f /home/student/sfb_config.cfg') +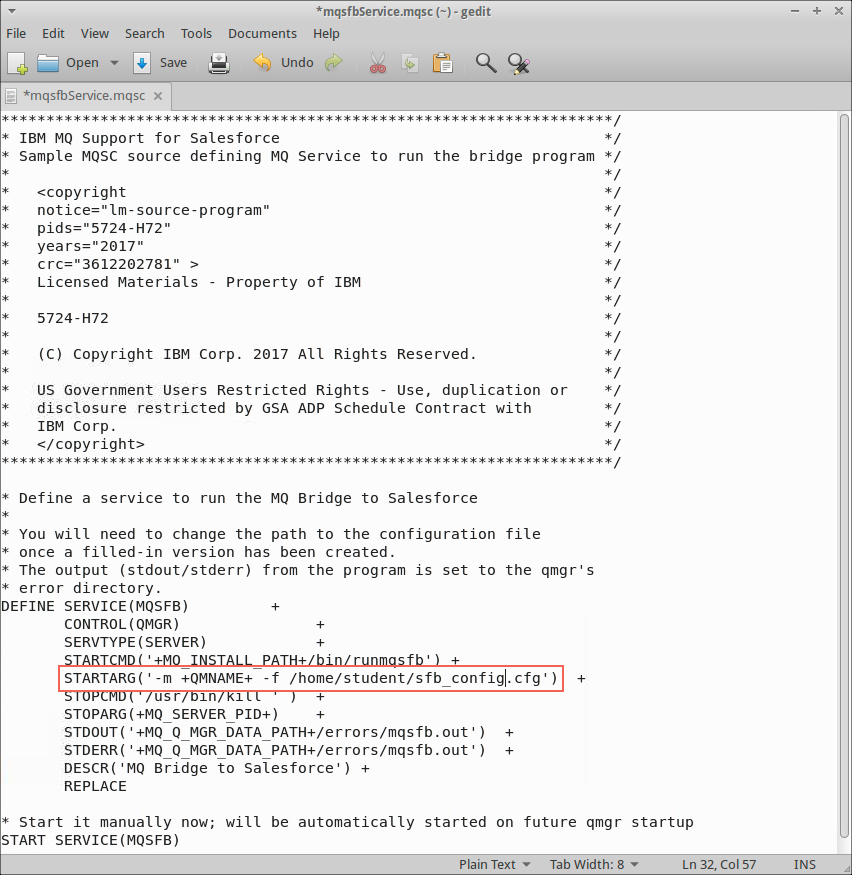
- Save the file and exit the editor.
-
Enter the following command to configure the queue manager for the Bridge service:
cat /home/student/mqsfbService.mqsc | runmqsc SQM1 -
Restart the queue manager to ensure that all configuration changes are active.
endmqm -i SQM1
strmqm SQM1
At this point your environment is now ready to start processing messages between your queue manager and your Salesforce instance. Continue with the next step to setup static subscriptions to the Salesforce events and test out the Bridge’s functions.
Step 4 Test Your Work
To test out the IBM MQ Salesforce Bridge you will need to configure MQ subscriptions that will enable you to capture Push Topic event messages that are sent from Salesforce. You will also need to publish a test message to your queue manager in order to see changes reflected in your Salesforce instance. In this step of the PoT you will create a set of static Subscriptions that will capture create, update and delete actions against Account objects.
From this point forward we will use the IBM MQ Explorer to configure the static Subscriptions and test out Bridge operations.
-
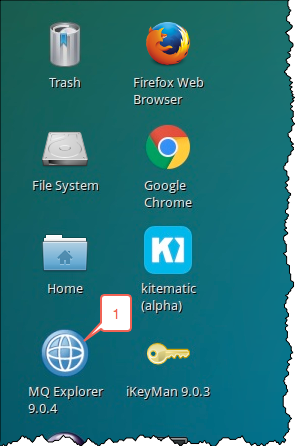
Launch the IBM MQ Explorer by double-clicking on the MQ Explorer icon the desktop.
-
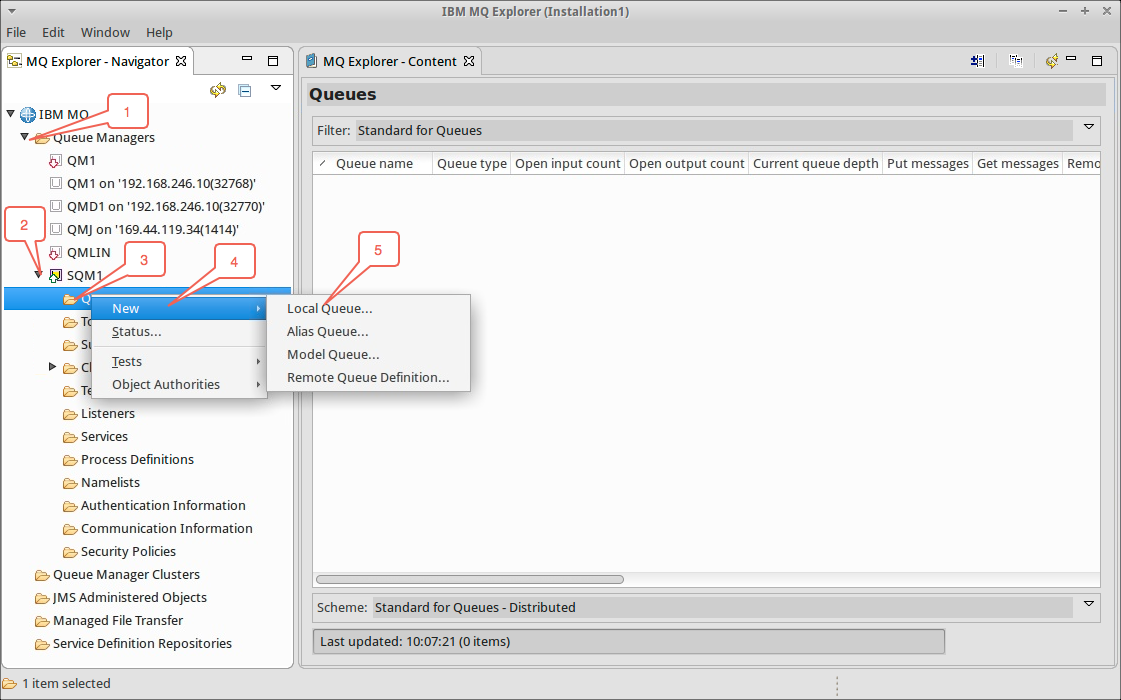
Expand the tree structure to expose the Queues folder of the SQM1 queue manager. Then right click on the Queues folder and select the New and Local Queue… menu items. The Create a Local Queue dialog will appear.
-
You will need to create a total of 4 queues for your static Subscriptions to route messages to. Use the Create a Local Queue dialog to create the following queues:
Queue Name Purpose ACCOUNTOBJECT_CREATES Receive events related to creation of a new Account object. ACCOUNTOBJECT_DELETES Receive events related to the deletion of an Account object. ACCOUNTOBJECT_UPDATES Receive events related to the update of an Account object. SALESFORCE_EVENTS Receives all events related to Account objects. 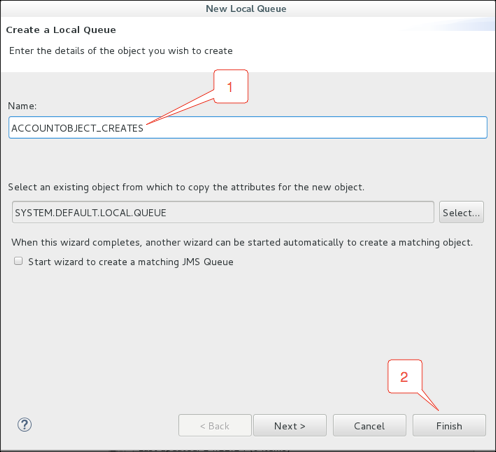
-
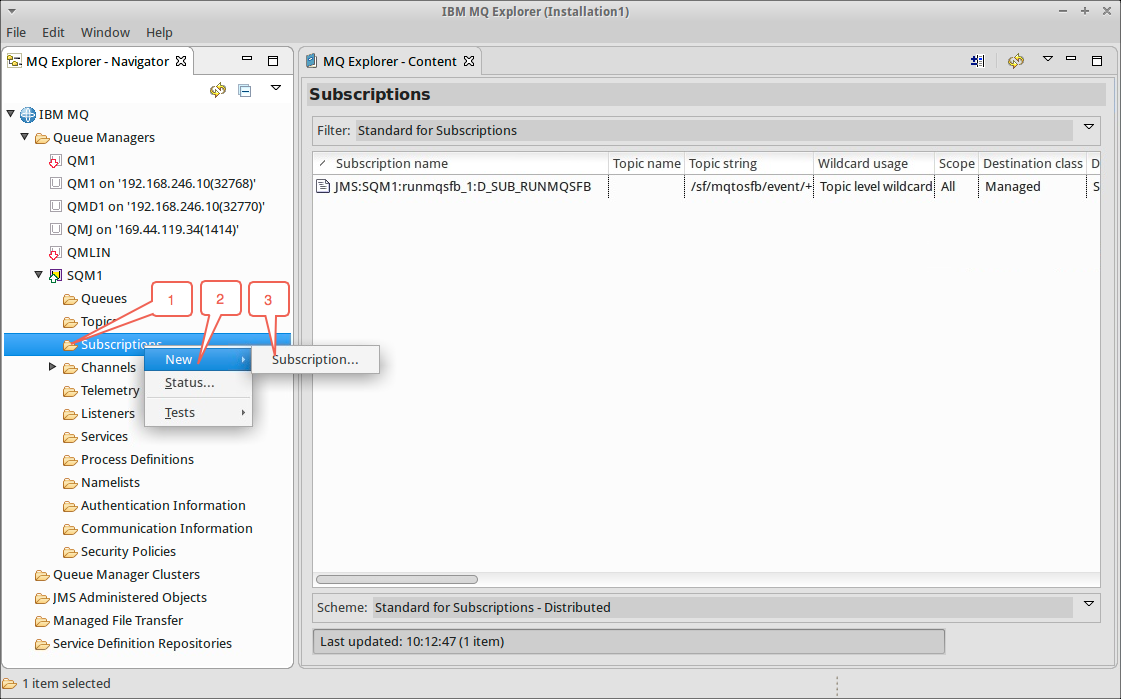
You will now need to create the static Subscriptions that will route the Salesforce events captured from the Bridge and send them to the queues you had just created. Right click on the Subscriptions folder and then click on the New and Subscription menu items. The New Subscription dialog will appear.
-
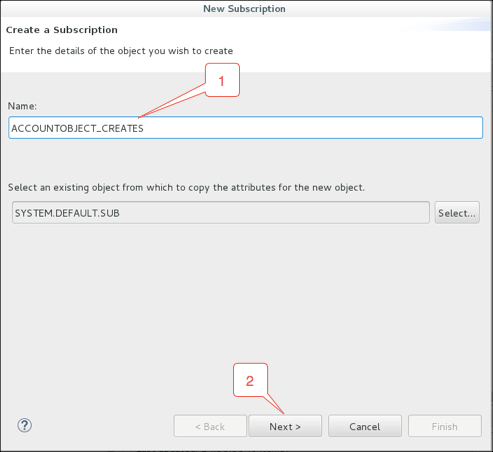
From the New Subscription dialog you will first need to name the static Subscription. For this lab exercise use the same name as the queues that you had created.
 Note:
Note:
This is not a requirement. It is simply a convenient naming convention.Refer to the following table for the proper entries to use for each static Subscription:
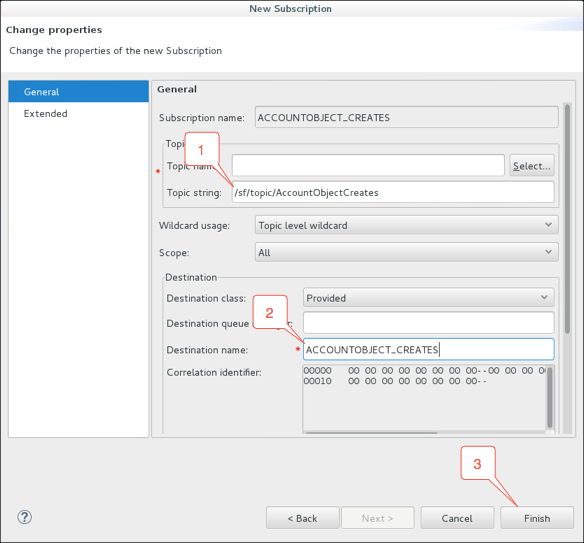
Name Topic String Destination Name ACCOUNTOBJECT_CREATES /sf/topic/AccountObjectCreates ACCOUNTOBJECT_CREATES ACCOUNTOBJECT_DELETES /sf/topic/AccountObjectDeletes ACCOUNTOBJECT_DELETES ACCOUNTOBJECT_UPDATES /sf/topic/AccountObjectUpdates ACCOUNTOBJECT_UPDATES SALESFORCE_EVENTS /sf/# SALESFORCE_EVENTS -
The next page of the dialog is where you specify the Topic string that you are subscribing to as well as the name of the queue (Destination name:) that you want the subscription to route the messages to. Click on the Finish button when ready.
-
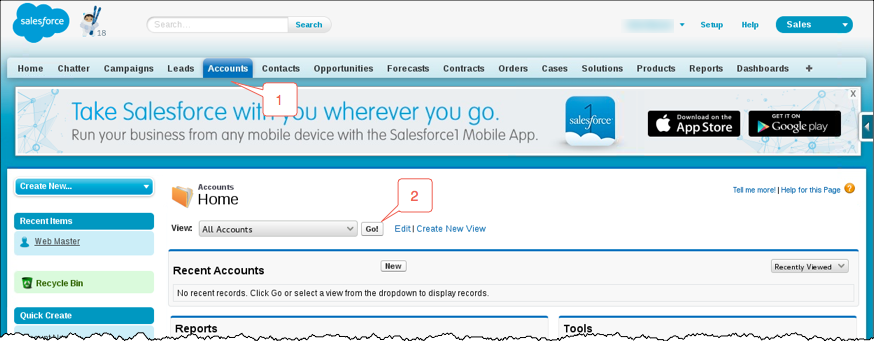
Once you have created all four subscriptions you are ready to test your work. Return to the Salesforce web page and navigate to the list of all Accounts.
-
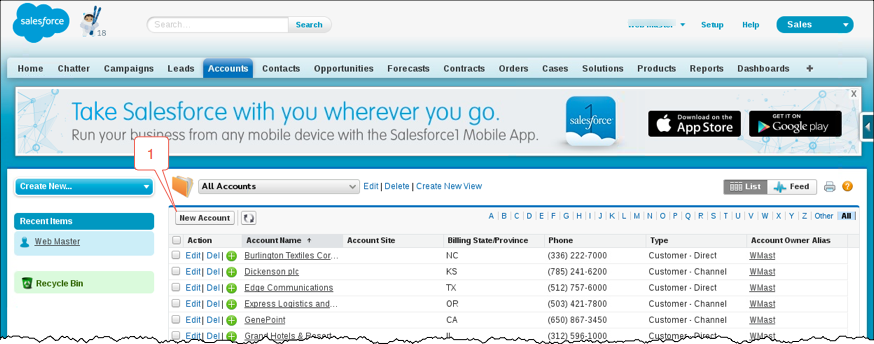
You will first test creating a new account. Click on the New Account button.
-
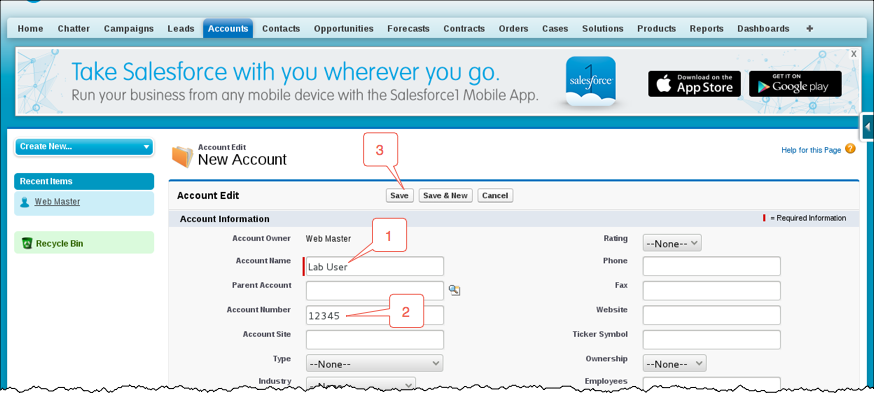
Fill in the Account Name and the Account Number fields and then click on the Save button. A new Salesforce Account object will be created.
-
Return to the MQ Explorer and click on the Queues folder. Observe that there is an entry in both the ACCOUNTOBJECT_CREATES and the SALESFORCE_EVENTS queues.
Note:
Note that the MQ Explorer refreshes its contents approximately every 20 seconds. You may click on the Refresh button if you would like to immediately refresh the list contents.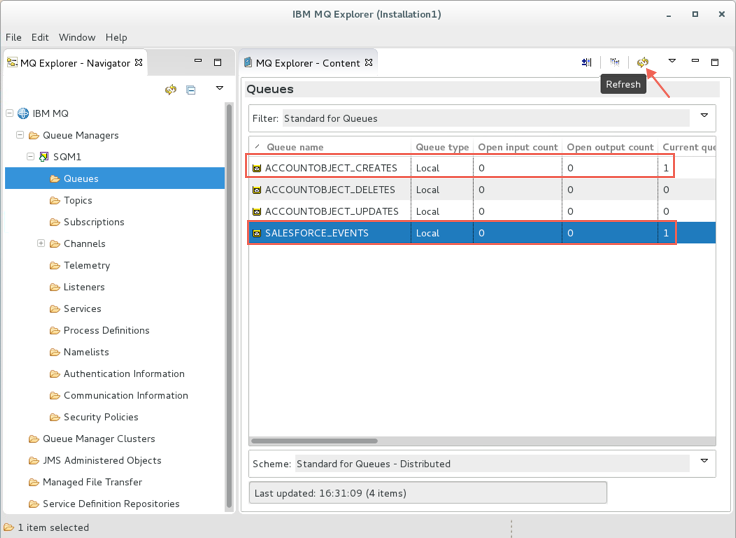
-
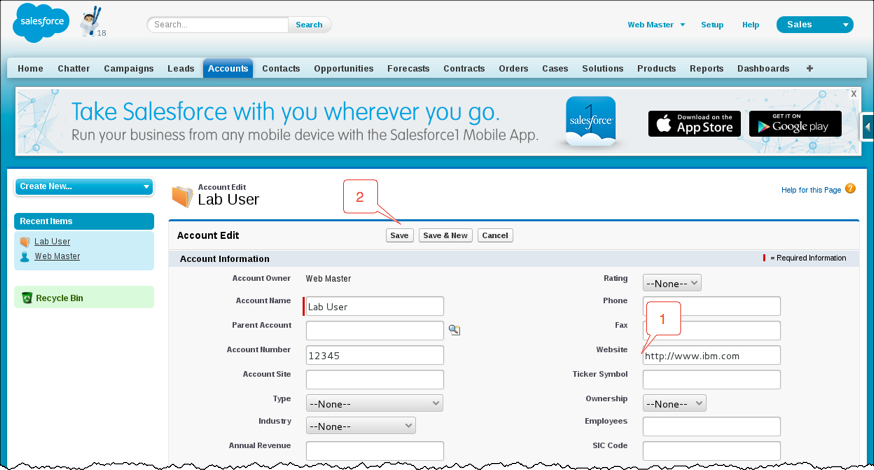
Return to the Salesforce page and then edit the Account object that you had just created to include additional data, such as the website of your employer.
-
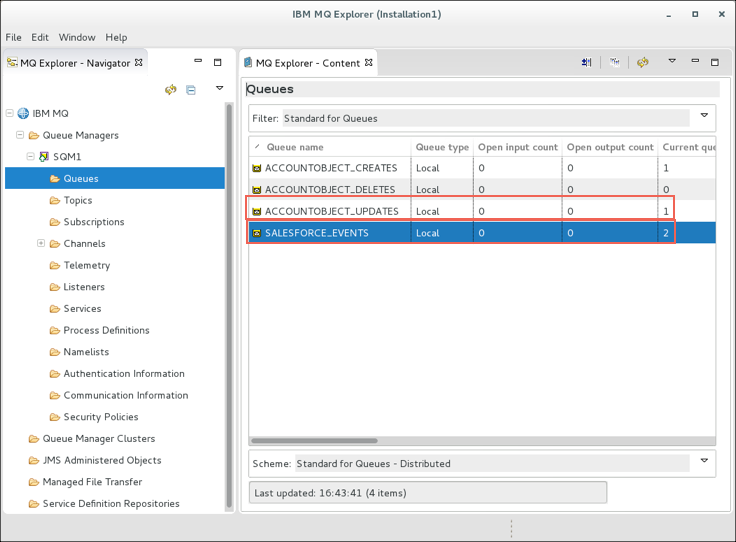
Again, check the MQ Explorer and observe that there is now an entry in the ACCOUNTOBJECT_UPDATES queue as well as an additional entry in the SALESFORCE_EVENTS queue.
-
Continue exploring how actions taken against Salesforce Account objects will be reflected in the MQ queues that have been configured in this lab. You may also want to use the MQ Explorer or command line tools to review the content of the messages that have been sent from Salesforce.
Note:
You may also want to review the Salesforce Push Topics section above to see how the various data fields that were included in the message payload was determined. -
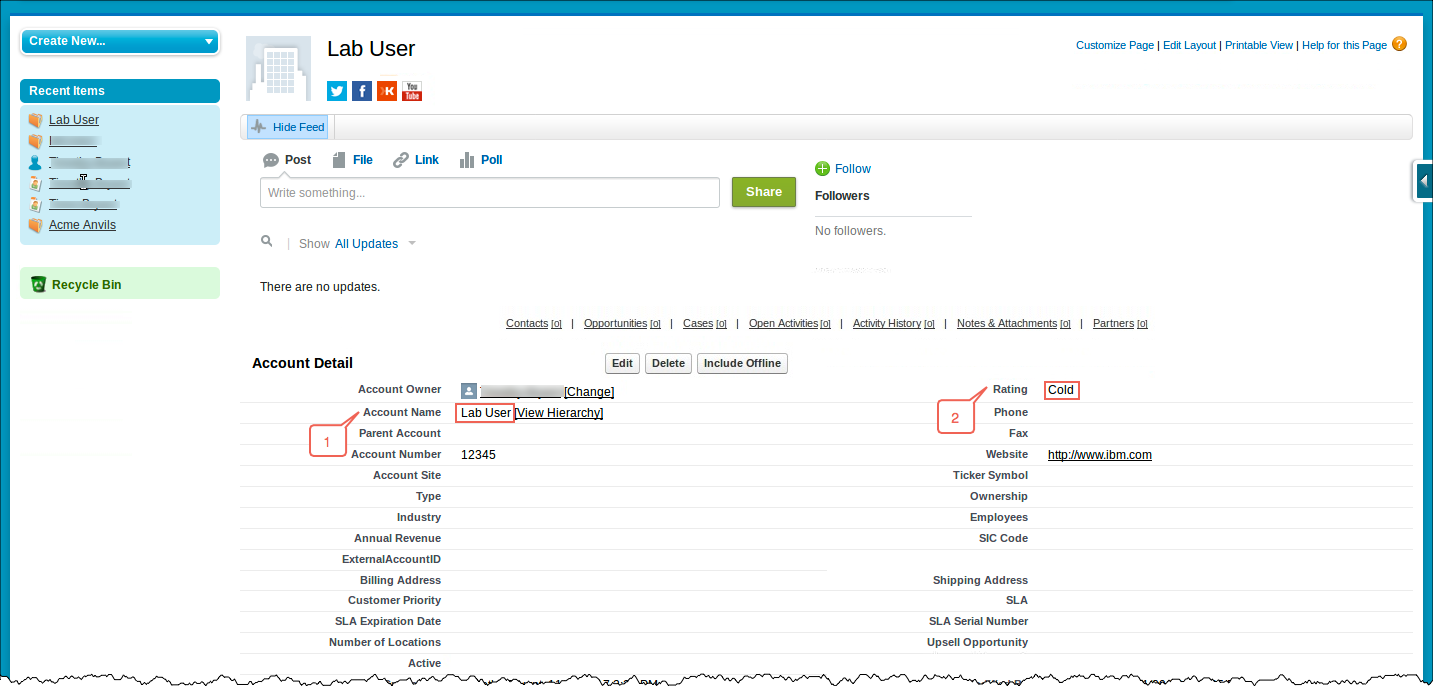
Now that you have had an opportunity to see how changes to Salesforce objects can be published to an IBM MQ queue manager, you will test how the Salesforce Bridge can forward messages published to the queue manage to Salesforce as a Platform Event. Start by selecting an existing Salesforce Account and noting both the Account Name and the Rating values.
 Note:
Note:
Note that Account objects in Salesforce are customizable. The two fields that have been selected are standard fields for all Account objects. -
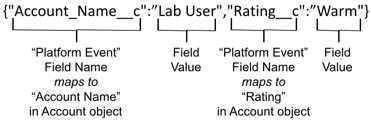
You will need to format a JSON message that will ultimately be consumed by the Salesforce Trigger that was created earlier. The format of the message will need to match the format expected by the Update_Account_Rating Platform Event. Note that for this lab you will need to substitute the field value for the Account_Name__c field with the value found in the Account object that you selected. The field value for the Rating__c field may be one of Hot, Warm or Cold. Select one of the values that will enable you to observe updates to the Salesforce Account object that you have selected.
-
Next you will need to determine the proper Topic String to publish messages to.
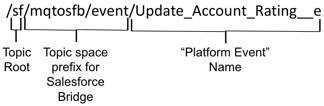
Which for this lab will be:
/sf/mqtosfb/event/Update_Account_Rating__e -
A convenient way to publish a message on a Topic is to use the MQ Explorer. Right click on the Topics folder in the MQ Explorer and then click on the Test Publication… menu item.
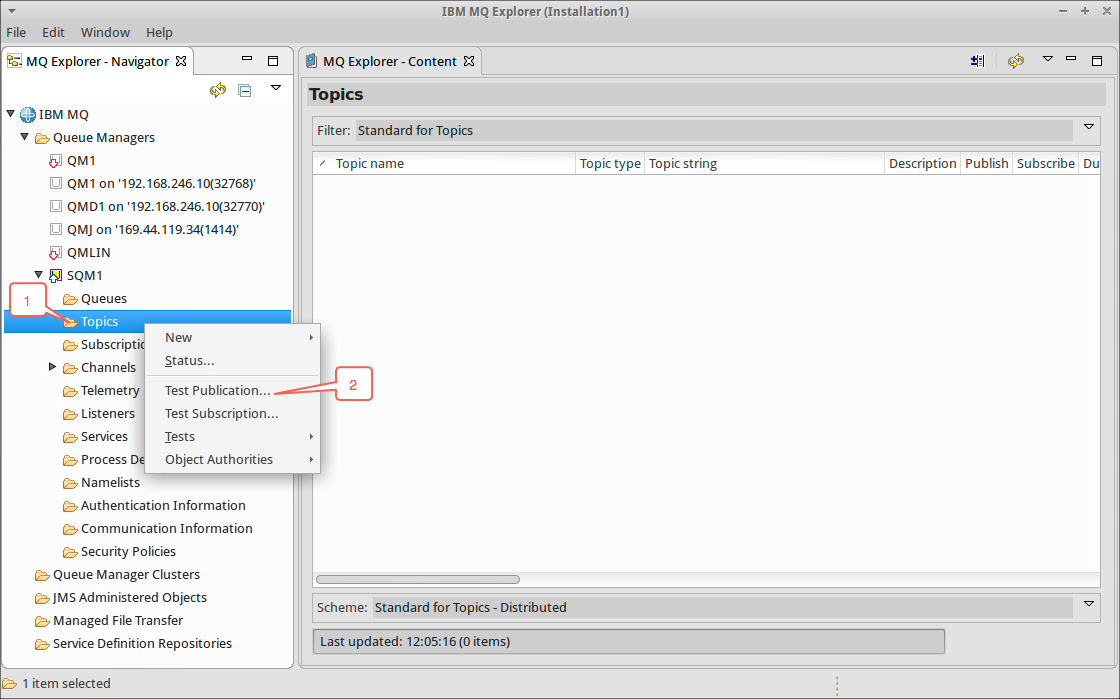
-
Enter your values in the Topic String: and Message Data: fields and then click on the Publish message button.
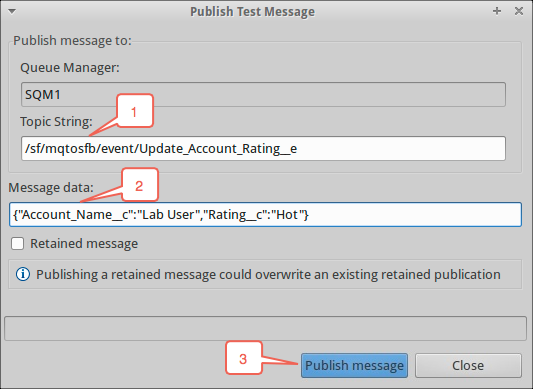
-
Verify that the updated value is shown in Salesforce.
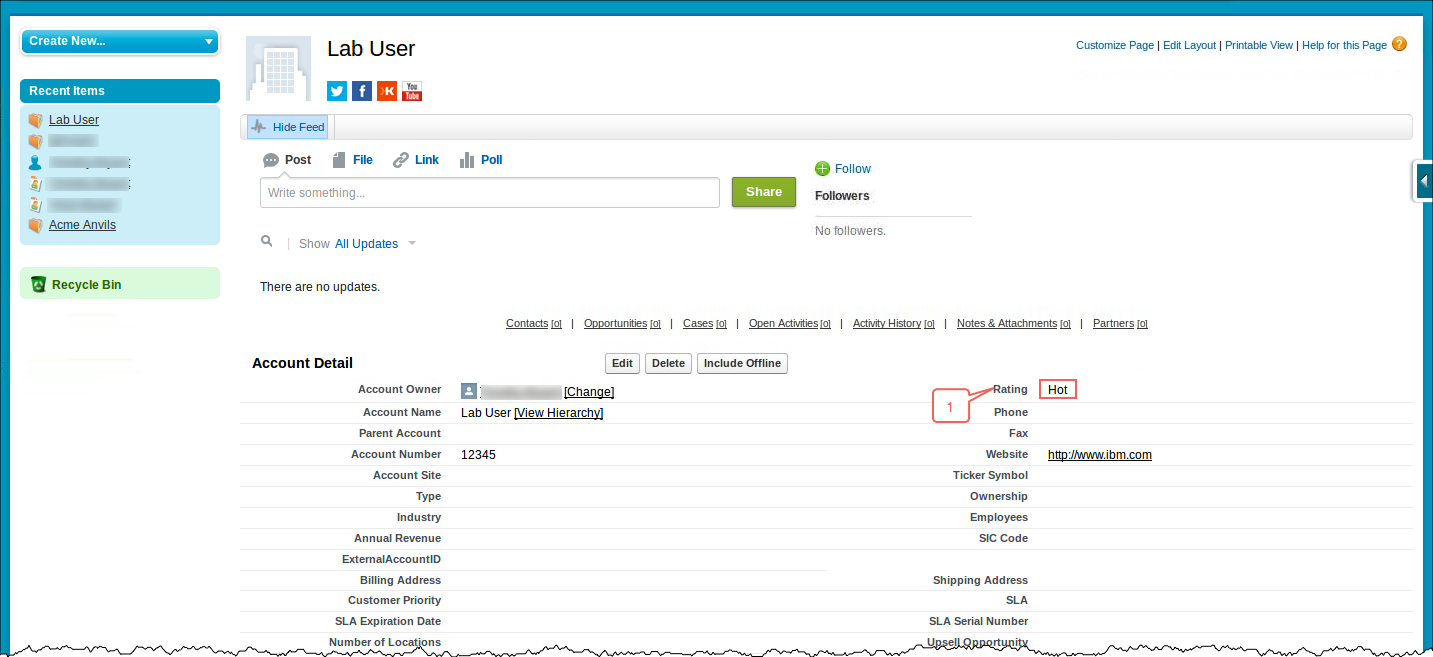
Summary
Congratulations! You have successfully completed this PoT.
If the Salesforce account that you used for this exercise is needed for other business purposes you may want to delete the Push Topics that were created as a part of this PoT. Refer to the steps that were outlined in the Salesforce Push Topics section above and use the following commands to remove the Push Topics that you created.
List<PushTopic> pts = [SELECT Id FROM PushTopic WHERE Name = 'AccountObjectCreates'];
pts.add([SELECT Id FROM PushTopic WHERE Name = 'AccountObjectUpdates']);
pts.add([SELECT Id FROM PushTopic WHERE Name = 'AccountObjectDeletes']);
Database.delete(pts);