File Transfer Patterns
IBM MQ Managed File Transfer (MFT) uses the Apache Ant scripting language for transfer tasks which require more complex processing such as multiple transfers, conditional processing, and building a process flow of interdependent transfers. This lab will showcase the power of combining Ant with MFT. Included are several typical patterns of complex transfer processing. These patterns have been compiled from actual customer implementations. The patterns were described in the presentation preceding this lab. The patterns available for exercise are:
-
Asynchronous transfer with await outcome
-
Multi step transfer job with program call
-
Transfer single file to multiple end points
-
Pull files from two spokes of a hub and concatenate into a single file
-
Use PGP with MFT
-
Dynamically set job name and MFT metadata based on file contents
-
Use a custom Ant task to validate the contents of a file
-
Transfer single file to multiple end points using RegEx to dynamically build the distribution list
-
Split a “stack” file using JScript and then programmatically invoke Ant to transfer each generated file
-
Invoke a remote Ant job to have it pull a file
-
Unzip two files each containing multiple files, concatenate all extracted files into a single file and send to remote agent
-
Transform CSV files to XML using WMB
IBM MQ Managed File Transfer Ant Extensions
IBM MQ Managed File Transfer includes a number of extensions for Apache Ant which enables you to carry out certain tasks. MQ File MFT provides tasks that you can use to integrate file transfer function into the Apache Ant tool.
MQ MFT provides a number of Ant tasks that you can use to access file transfer capabilities.
The following nested parameters describe nested sets of elements, which are common across several of the supplied Ant tasks:
You can use the fteAnt command to run Ant tasks in a MQ MFT that you have already configured. Using Ant scripts with MQ MFT allows you to coordinate complex file transfer operations from an interpreted scripting language.
The fteAnt command runs Ant scripts in an environment that has IBM MQ Managed File Transfer Ant tasks available. Unlike the standard ant command, fteAnt requires that you define a script file. Ant scripts (or build files) are XML documents defining one or more targets. These targets contain task elements to run.
Examples of Ant scripts that use IBM MQ Managed File Transfer tasks are provided with your product installation in the directory install_dir/samples/fteAnt.
A namespace is used to differentiate the file transfer Ant tasks from other Ant tasks that might share the same name. You define the namespace in the project tag of your Ant script.
<?xml version="1.0" encoding="UTF-8"?>
<project xmlns:fte="antlib:com.ibm.wmqfte.ant.taskdefs"
 default="do_ping">
   <target name="do_ping">
      <fte:ping cmdqm="qm@localhost@2414@SYSTEM.DEF.SVRCONN"
      agent="agent1@qm1" rcproperty="ping.rc" timeout="15"/>
   </target>
</project>
The attribute xmlns:fte=”antlib:com.ibm.wmqfte.ant.taskdefs” tells Ant to look for the definitions of tasks prefixed by fte in the library com.ibm.wmqfte.ant.taskdefs.
You do not need to use fte as your namespace prefix; you can use any value. The namespace prefix fte is used in all examples and sample Ant scripts.
To run Ant scripts that contain the file transfer Ant tasks use the fteAnt command. For example:
fteAnt -file ant_script_location/ant_script_name
The file transfer Ant tasks return the same return codes as the IBM MQ Managed File Transfer commands.
Create new agents for Lab 3
For Ant scripts, you will use a client agent on Win10 to connect to local agents on win16. First you will need to create additional agents for the scripts to run. We have provided Windows commnand files to create the additional agents.
-
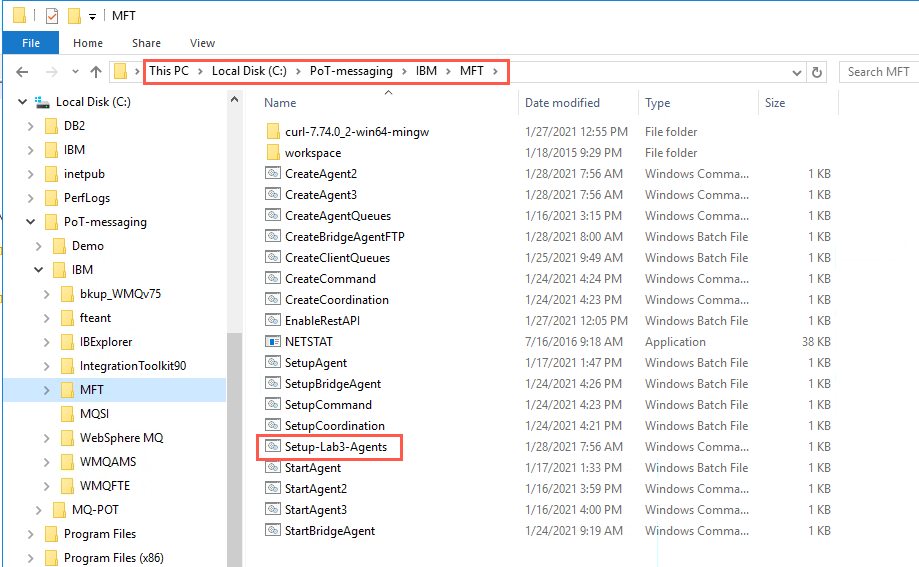
On the Teacher machine (win16) open the Windows explorer and navigate to C:\PoT-messaging\IBM\MFT.
-
Double-click Setup-Lab3-Agents. This script will define local MFT agents MFT4AGT2 and MFT4AGT3. Follow the instructions as the script displays each step and pauses until you continue.
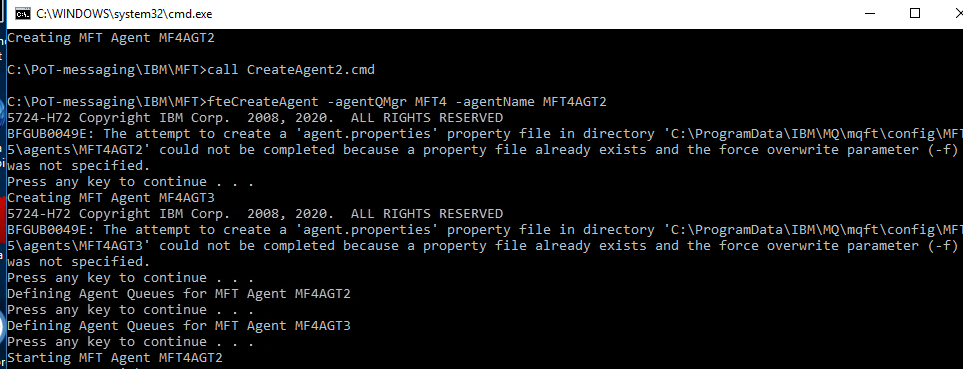
The script will create the agents, execute runmqsc to define the agents’ queues and start the agents.
-
In a command prompt enter the command:
fteListAgents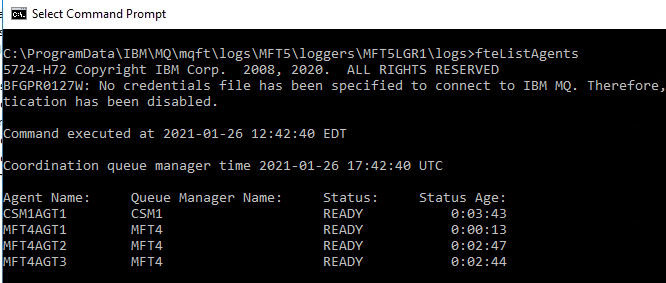
You can see the agents you created in the previous labs and the new agents created by the script.
-
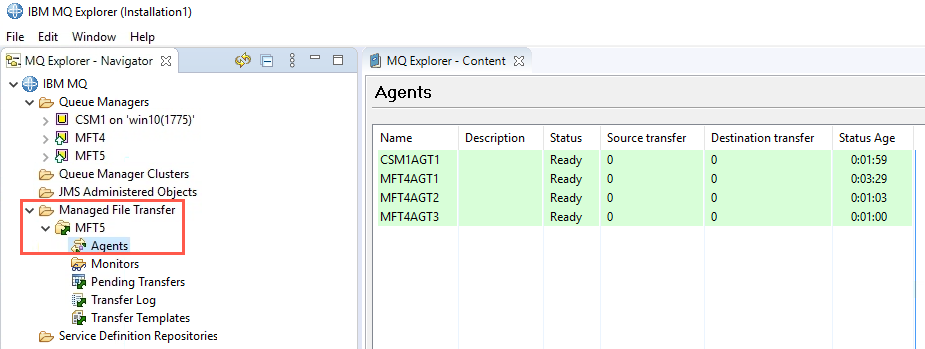
In MQ Explorer, expand Managed File Transfer, connect to the coordination queue manager MFT5 then click Agents.
-
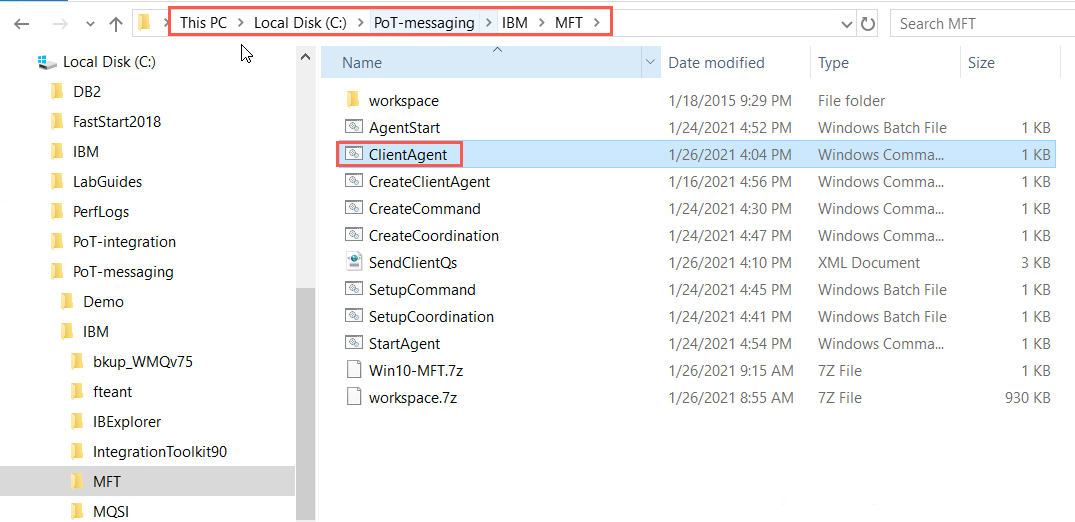
Switch to the Student machine (win10) to create the client agent. Open the Windows Explorer and navigate to C:\PoT-messaging\IBM\MFT.
-
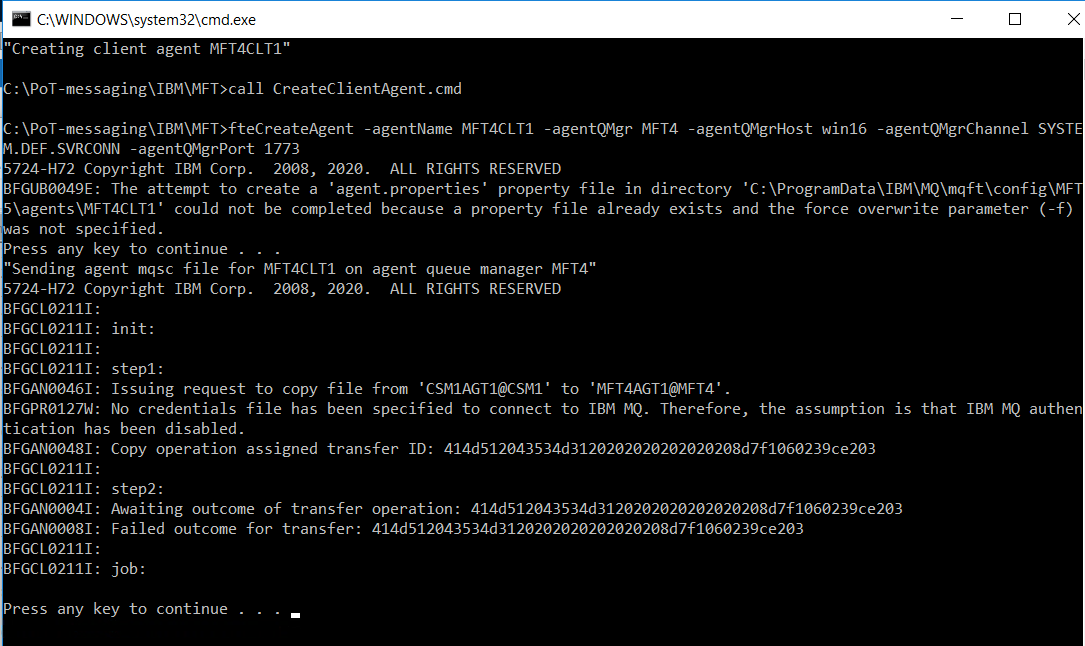
Double-click ClientAgent to create the agent and send the MFT4CLT1_create.mqsc file to win16 using MQ MFT Agent CSM1AGT1 on win10 to send and MQ MFT Agent MFT4AGT1 on win16 to receive.
-
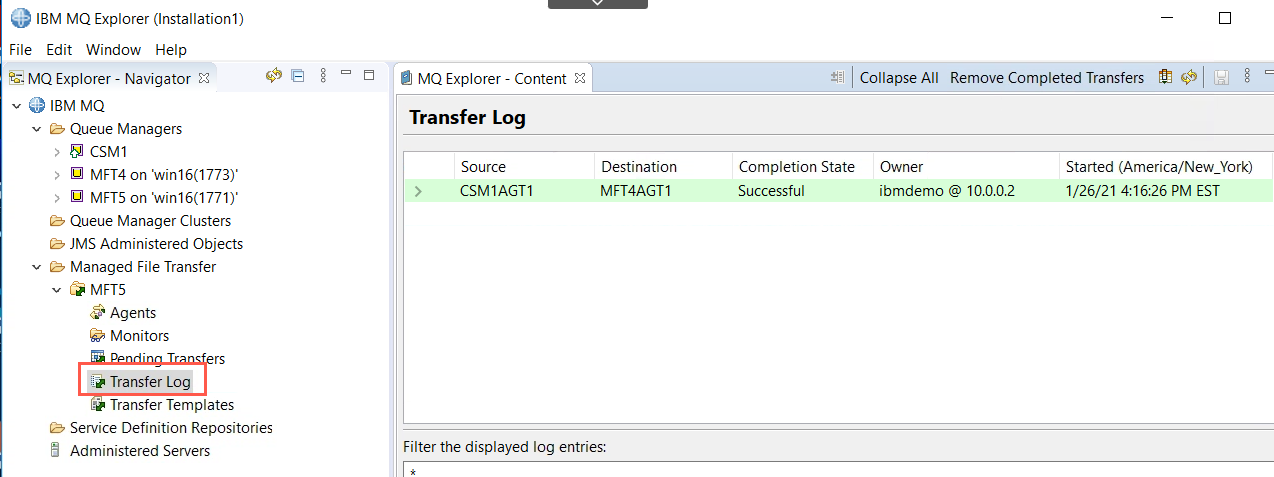
In MQ Explorer, click Managed File Transfer > MFT5 > Transfer Log. You will see the transfer highlighted in green with Completion State Successful.
-
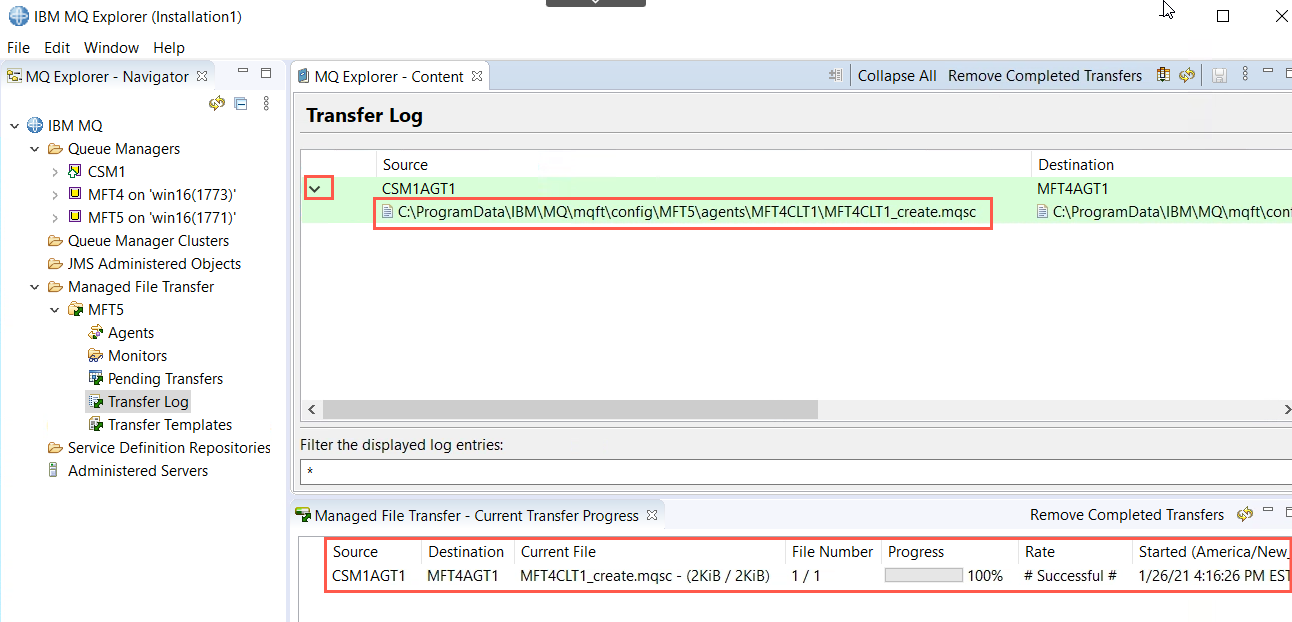
Expand the the transfer to see the file transferred. At the bottom of screen you will see the Current Transfer Progress. This display shows more detailed information such as number of files, size of files, and time stamp. If the transfer was still in progress you would see the progress bar move as data is received.
-
Switch to the Teacher machine (win16). In a command window, navigate to C:\ProgramData\IBM\MQ\mqft\config\MFT5\agents\MFT4CLT1.
cd \ProgramData\IBM\MQ\mqft\config\MFT5\agents\MFT4CLT1
-
Enter the dir command to show the directory members. You will see the transferred file MFT4CLT1_create.mqsc. Execute runmqsc on MFT4 to create the agent queues for agent MFT4CLT1. MFT4 is the agent queue manager.
runmqsc MFT4 < MFT4CLT1_create.mqsc > defineqs.txt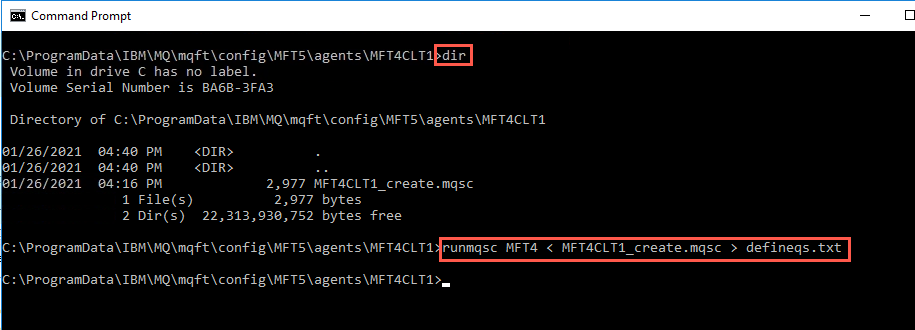
-
As you did previously, open defineqs.txt in Notepad++ to verify the queues were created successfully.
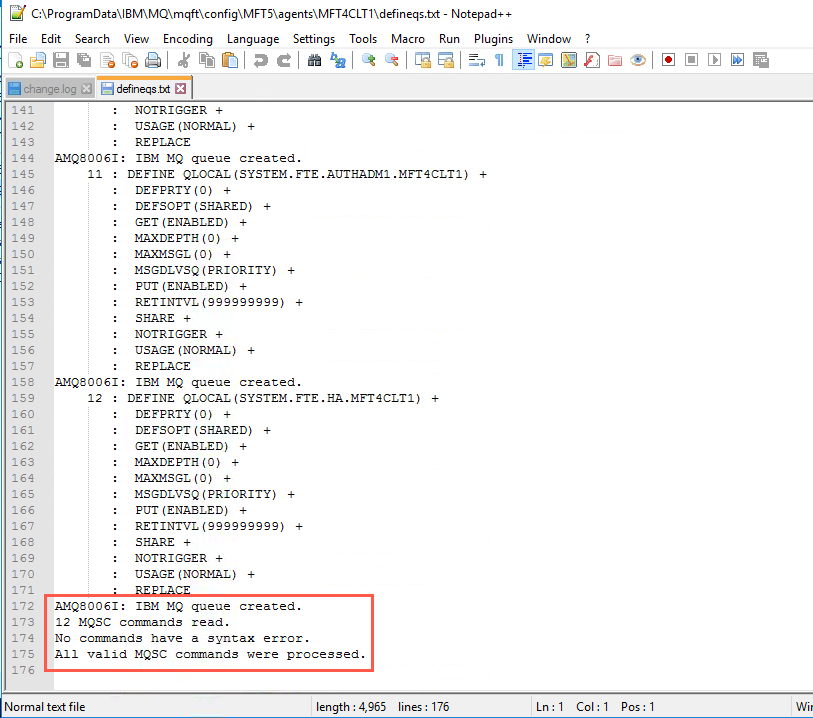
-
Return to MFT Client machine (win10). You can now start the agent. In the Windows Explorer where you have C:\PoT-messaging\IBM\MFT open, double click AgentStart.
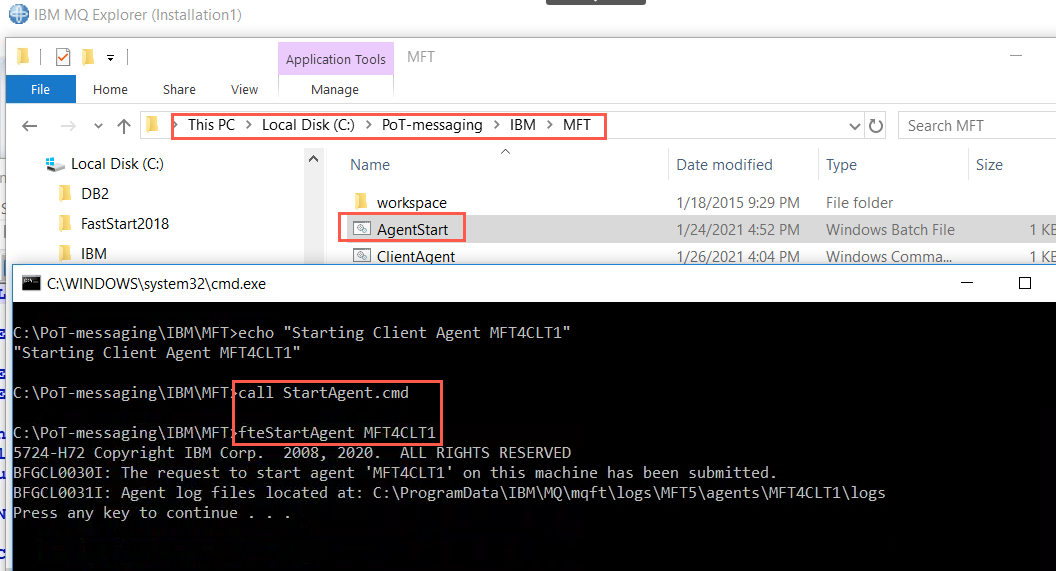
-
Enter the following command to display the agents:
fteListAgents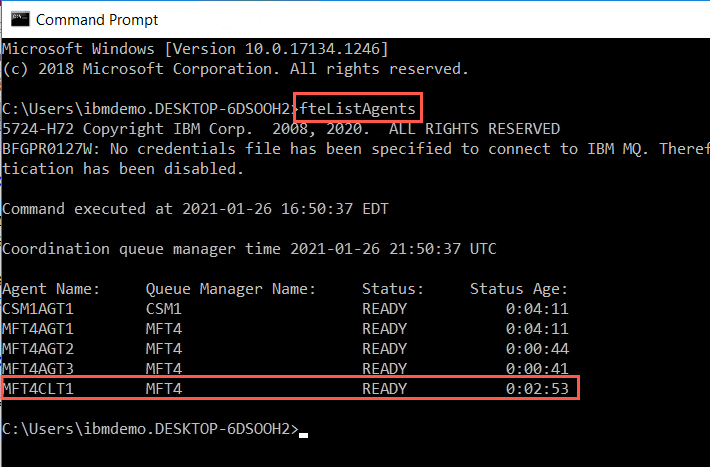
-
Display the agents in MQ Explorer.
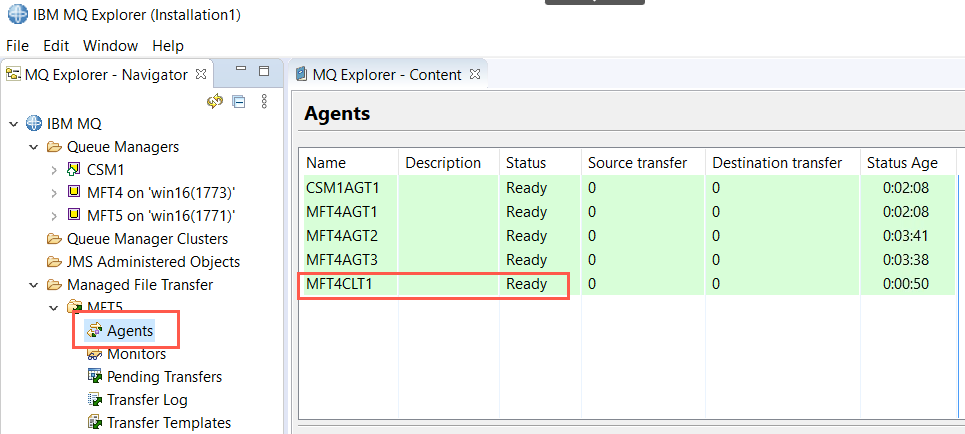 Both show that agent MFT4CLT1 is ready to go. You will see the same display on the MFT Server machine (win16).
Let’s review what happened.
-
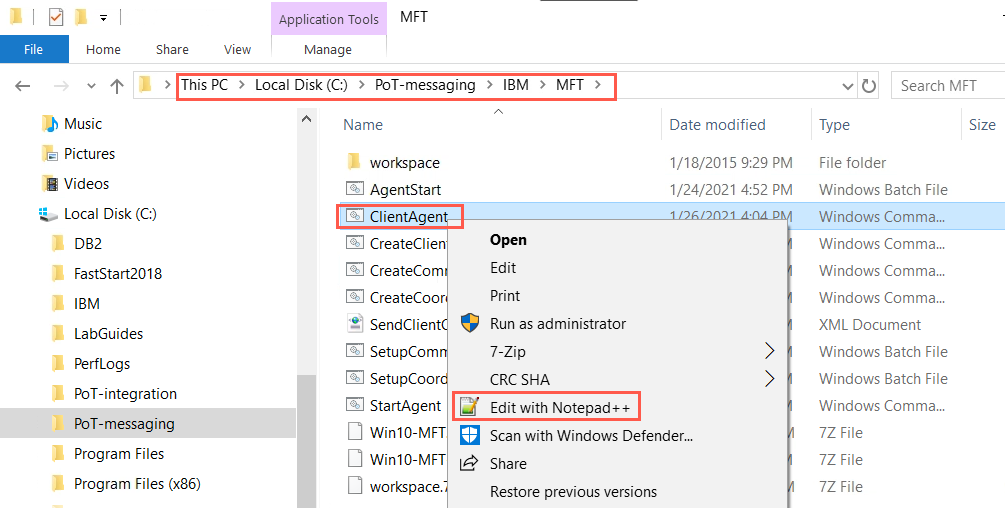
In Windows Explorer, navigate to C:\PoT-messaging\IBM\MFT. Right-click ClientAgent.cmd and select Edit with Notepad++.
-
In the same manner open CreateClientAgent.cmd and SendClientQs.xml in Notepad++ so you can review all three files.
-
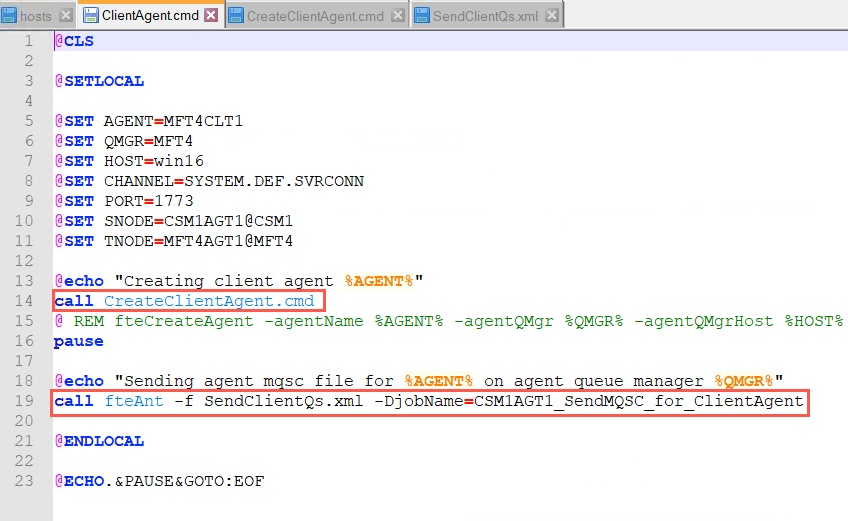
In Notepad++ highlight ClientAgent.cmd. This command file sets the variables to be used and calls CreateClientAgent.cmd and then calls fteAnt with the -f parameter which indicates the Ant script to use. Ant scripts are XML files.
-
Highlight CreateClientAgent.cmd. This is the MQ MFT command to create an agent. You used this command in Lab 1. The parameters are substituted from the calling program (ClientAgent.cmd). However you will notice the additional parameters agentQMgrHost, agentQMgrChannel, and agentQMgrPort. These are required to connect to the agent queue parameter MFT4 which is running on another host.

-
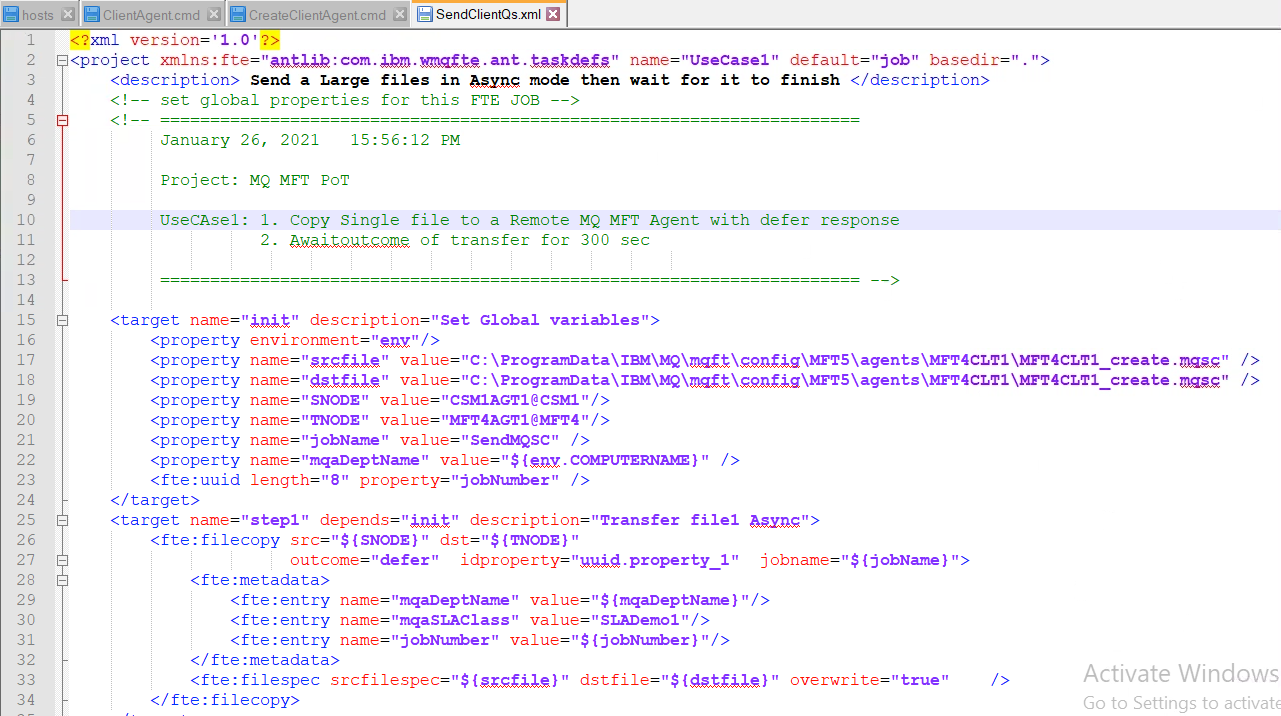
Hightlight SendClientQs.xml. This is the Ant script being called from ClientAgent.cmd. fteAnt is an MQ MFT extension. Since you are defining a client agent which will run on win10 connecting as a client to an agent queue manager (MFT4) on win16, you need to create the agent queues on MFT4. This Ant script will execute another MFT extension fte:filecopy to transfer the MFT4CLT1_create.mqsc file to the Teacher machine (win16) using the previously created agents CSM1AGT1 (local on win10) and MFT4AGT1 (local on win16).
Review the script paying particular attention to the targets inti, step1, and step2. init defines the properties to be used in the script. step1 executes the filecopy (MFT transfer), and step2 waits for the processing to complete on the destination agent MFT4AGT1. The script employs conditional processing with the depends parameter. Each target is dependent on the previous one completing successfully.
-
Once ClientAgent.cmd completed, you switched to win16 and ran runmqsc MFT4 using the transferred MFT4CLT1_create.mqsc file as input. Then you returned to win10 and started the MFT4CLT1 agent.
What you just did is actually the first pattern discussed in the next section Pattern 1 - Asynchronous Transfer with Await Outcome. A more advanced example would include one Windows batch file to transfer the file, call a program on win16 to create the queues, and start the agent. This would include the second pattern Pattern 2 - Multi step transfer job with program call.
Protocol Bridge Agent
You will create one more agent. Only this time instead of creating a standard MQ MFT agent, you will create a Protocol Bridge Agent.
The protocol bridge enables your Managed File Transfer (MFT) network to access files stored on a file server outside your MFT network, either in your local domain or a remote location. This file server can use the FTP, FTPS, or SFTP network protocols. Each file server needs at least one dedicated agent. The dedicated agent is known as the protocol bridge agent. A bridge agent can interact with multiple file servers.
The protocol bridge is available as part of the Service component of Managed File Transfer. You can have multiple dedicated agents on a single system running MFT that connect to different file servers.
You can use a protocol bridge agent to transfer files to multiple endpoints simultaneously. MFT provides a file called ProtocolBridgeProperties.xml that you can edit to define the different protocol file servers that you want to transfer files to. The fteCreateBridgeAgent command adds the details of the default protocol file server to ProtocolBridgeProperties.xml for you.
You can use the protocol bridge agent to perform the following actions:
- Upload files from the MFT network to a remote server using FTP, FTPS, or SFTP
- Download files from a remote server, using FTP, FTPS, or SFTP, to the MFT network
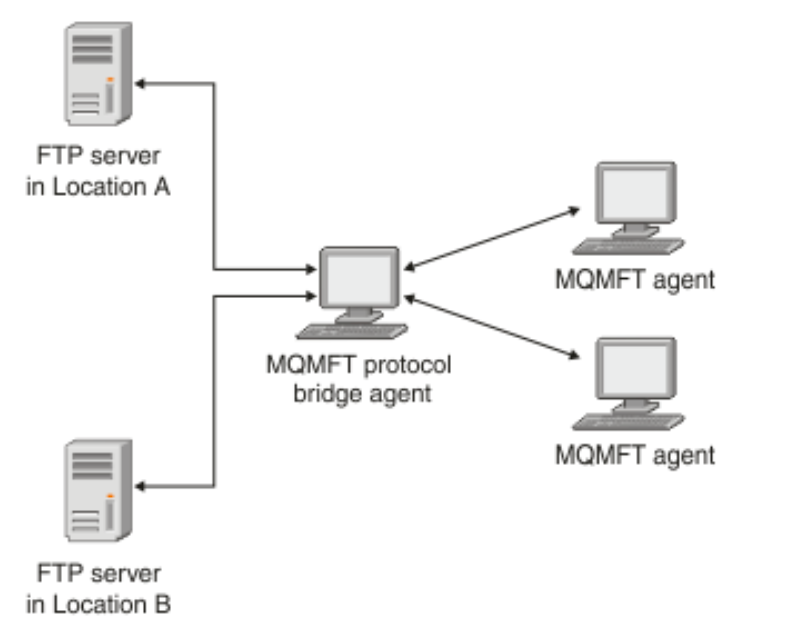
The diagram shows two FTP servers, at different locations. The FTP servers are being used to exchange files with the Managed File Transfer agents. The protocol bridge agent is between the FTP servers and the rest of the MFT network, and is configured to communicate with both FTP servers.
Ensure that you have another agent in your MFT network in addition to the protocol bridge agent. The protocol bridge agent is a bridge to the FTP, FTPS, or SFTP server only and does not write transferred files to the local disk. If you want to transfer files to or from the FTP, FTPS, or SFTP server you must use the protocol bridge agent as the destination or source for the file transfer (representing the FTP, FTPS, or SFTP server) and another standard agent as the corresponding source or destination.
-
On the Server machine (win16), there is a desktop icon for Filezilla which you will use as the FTP server. Double-click the icon.
-
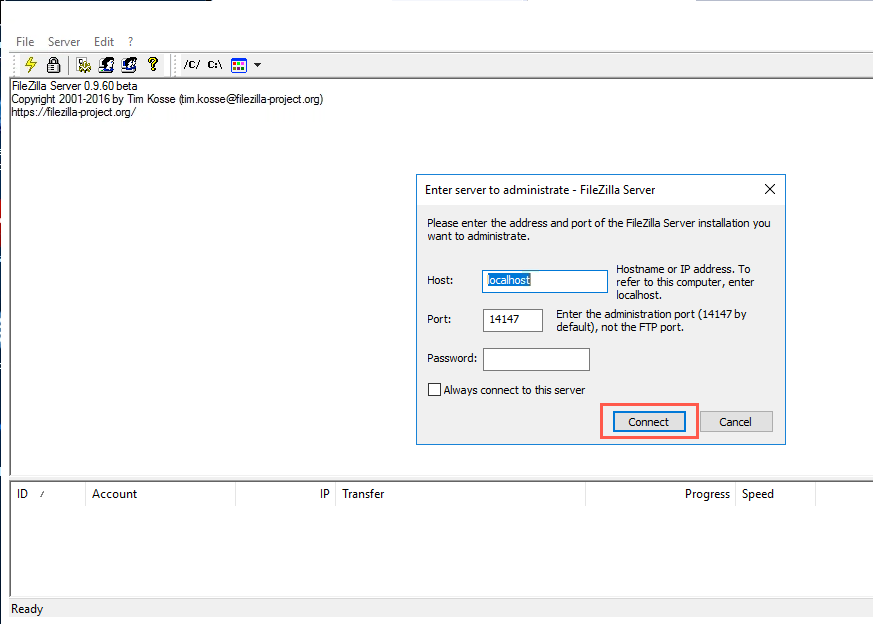
Click Connect to start the server. *ibmdemo is an authorized user of the server and has a home directory of C:\ which is really the root (/) of the server. You get a red highlighted message that FTP over TLS is not enabled. This is because you will be using an agent defined for FTP not FTPS.
-
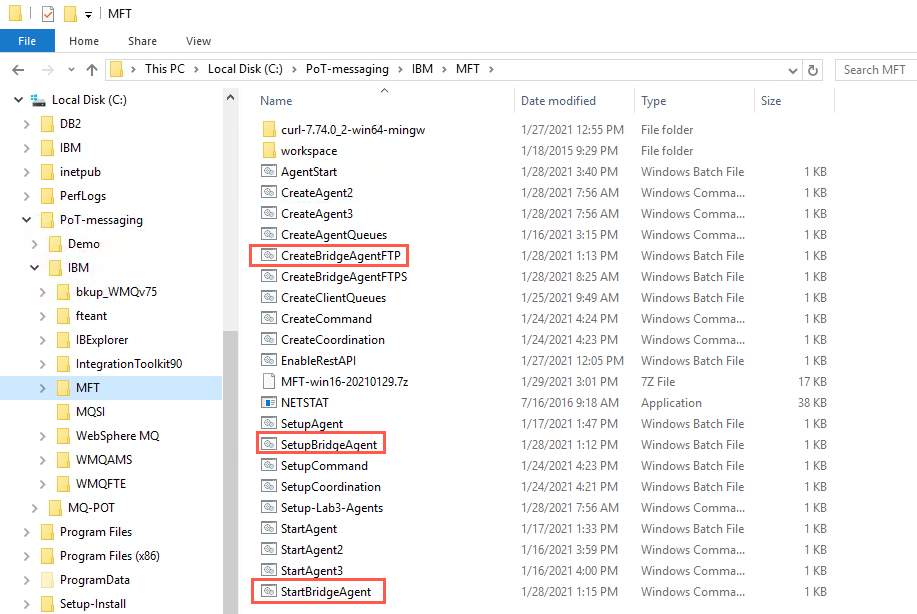
In Windows Explorer navigate to C:\PoT-messaging\IBM\MFT. There are a couple of scripts provided to create the agent so you don’t have to type the commands.
-
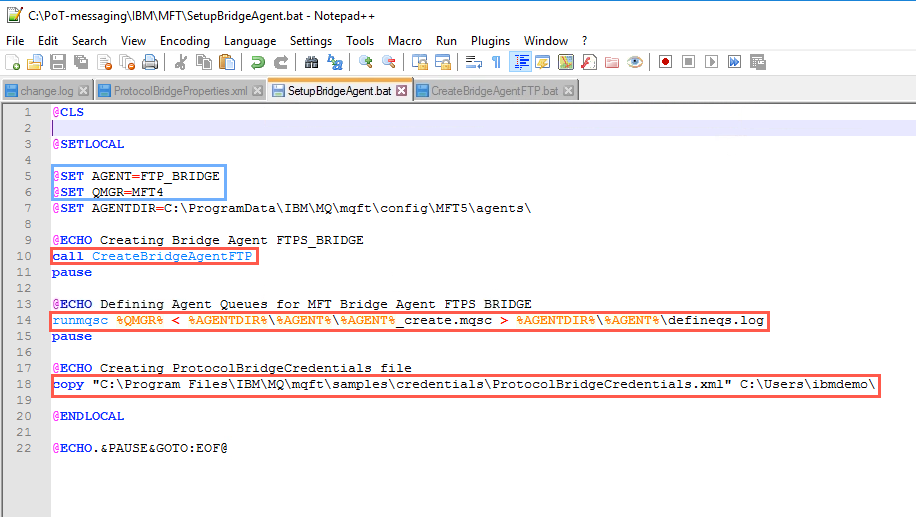
Open each of the three highlighted files in Notepad++. Review SetupBridgeAgent.bat first. As you can see it will call the CreateBridgeAgentFTP.bat to create the agent, then execute runmqsc to create the agent queues. It also copies a file from the MQ samples directory. This is the *ProtocolBridgeCredentials.xml. Protocol bridge agents require a credentials file to authenticate the user that is starting the agent - ibmdemo. So it is being copied to the user’s home directory. It needs to be manually created and edited so the agent will not be started by this script.
-
Review CreateBridgeAgentFTP.bat next. This command is a slightly different than the other commands. You will notice familiar parameters such as agentName and agentQMgr, but also the bridge type (bt), bridge host (bh), bridge platform (bm), bridge time zone (btz), bridge language (bl), bridge encoding (be), and bridge port (bp). All are required parameters.

-
inally call StartBridgeAgent.cmd to start the agent.
-
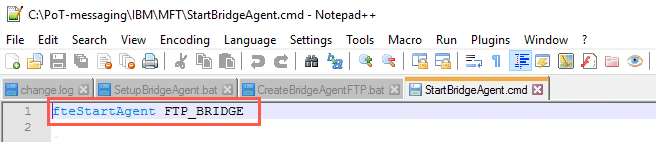
And lastly, have a look at StartBridgeAgent.cmd. It certainly looks familiar now. Notice the agent name FTP_BRIDGE and agent queue manager MFT4
-
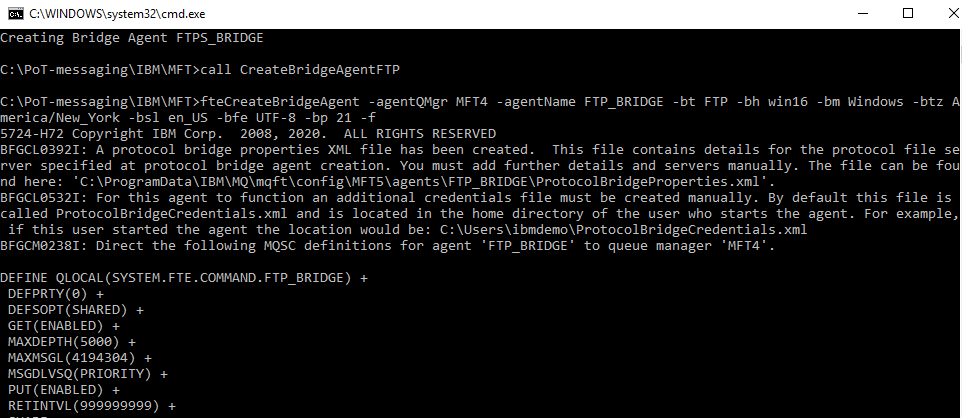
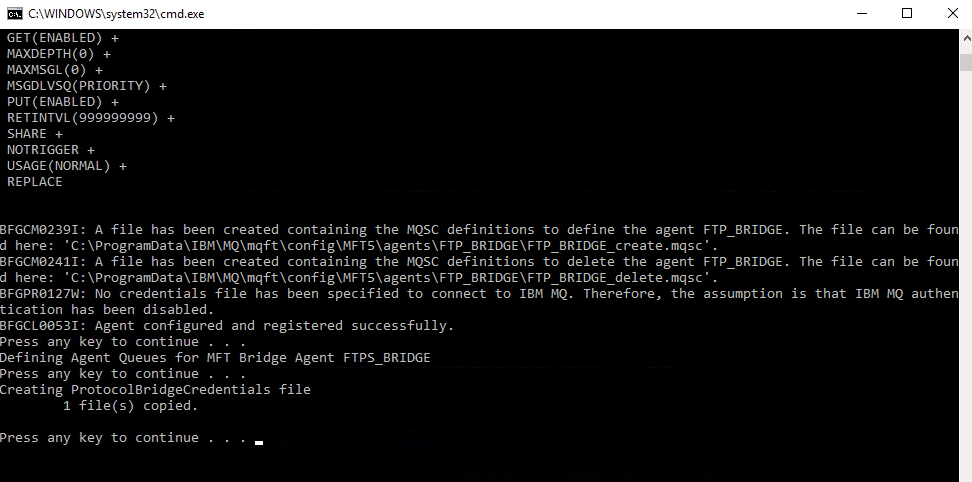
Return to Windows Explorer and double-click SetupBridgeAgent.bat. Your output should look like the following.
-
As you have with the other agents, check the log defineqs.txt to make sure commands were successful.
-
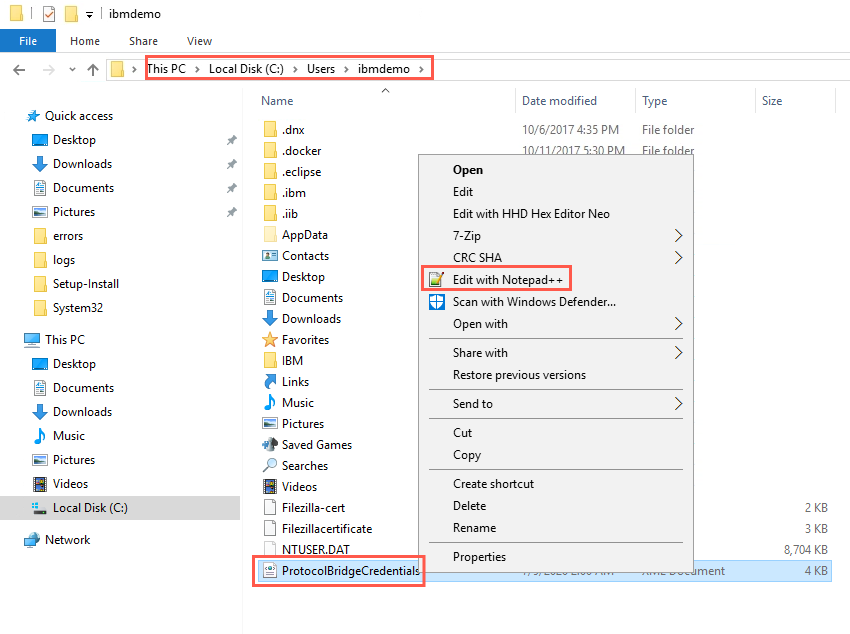
You must now edit the credentials file. Navigate to C:\Users\ibmdemo\. Right click ProtocolBridgeCredentials.xml and select Edit with Notepad++.
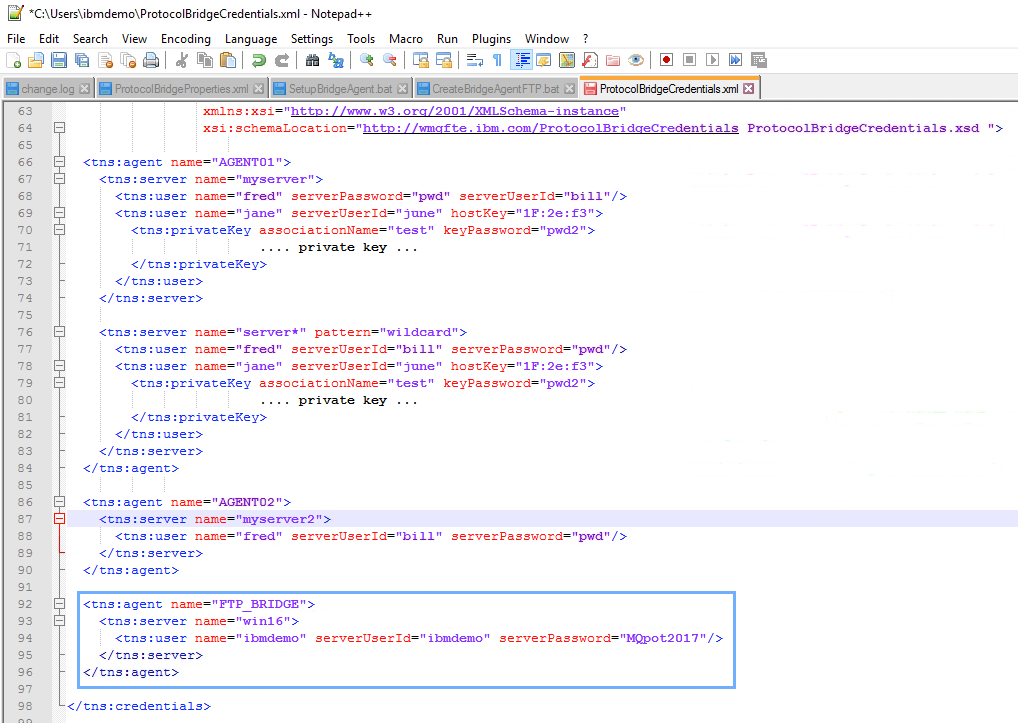
Add the following stanza after AGENT02 stanza towards the end of the file:
 <tns:agent name="FTP_BRIDGE">
    <tns:server name="win16">
       <tns:user name="ibmdemo" serverUserid="ibmdemo" serverPassword="MQpot2017"/>
    </tns:server>
 </tns:agent>
Make sure to save the file.
-
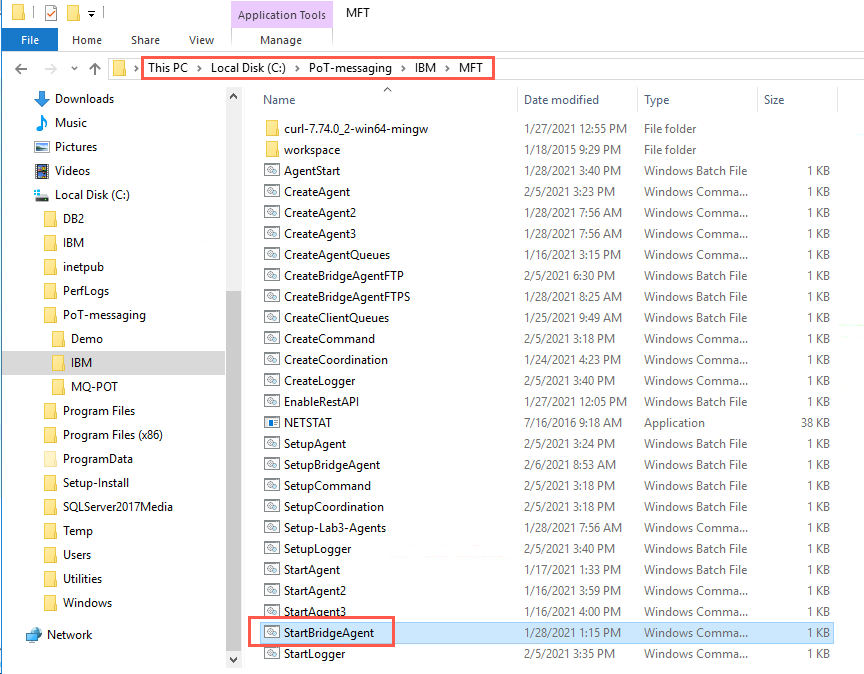
Finally you can start the agent. In the C:\Pot-messaging\IBM\MFT\ directory double-click StartBridgeAgent.
-
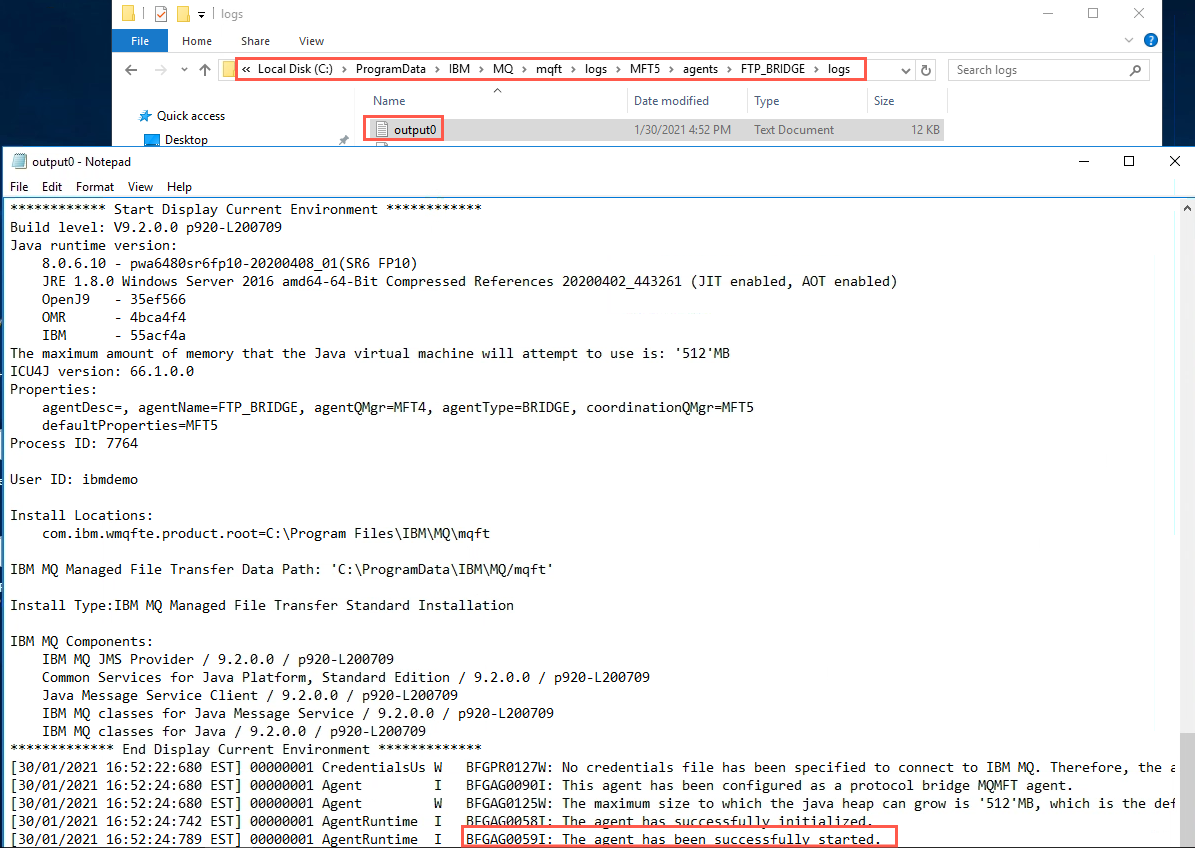
Navigate to C:\ProgramData\IBM\MQ\mqft\logs\MFT5\agents\FTP_BRIDGE\logs and output0.txt to very the agent start successfully. In the display you can see the agent properties.
-
View the agents in MQ Explorer or by running the fteListAgents command.
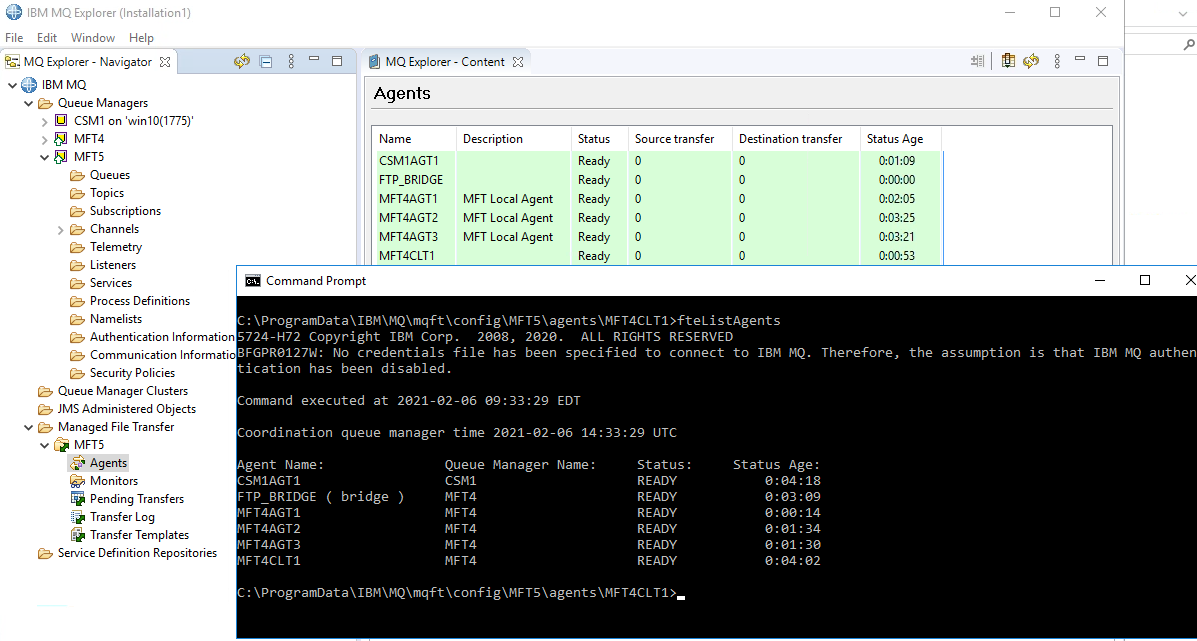
-
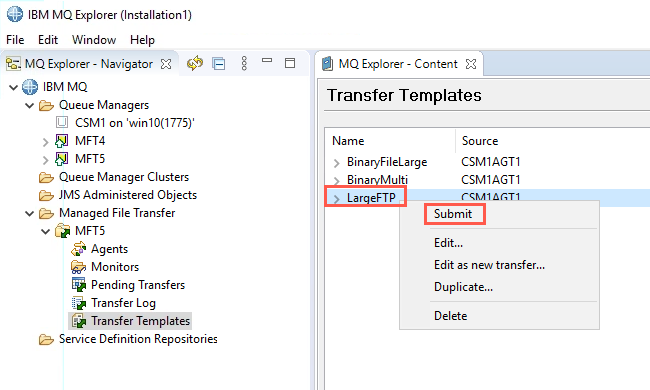
Switch to the client machine (win10) and create a new transfer template to test the new agent. In MQ Explorer, right-click Transfer Templates and select New Template.
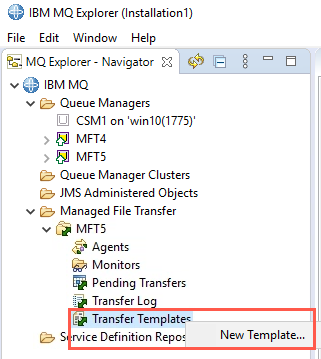
-
Call it LargeFTP. Use CSM1AGT1 for the source agent and FTP_BRIDGE as the destination agent using the pull-downs. The Server name win16 is auto-filled. Click Finish.
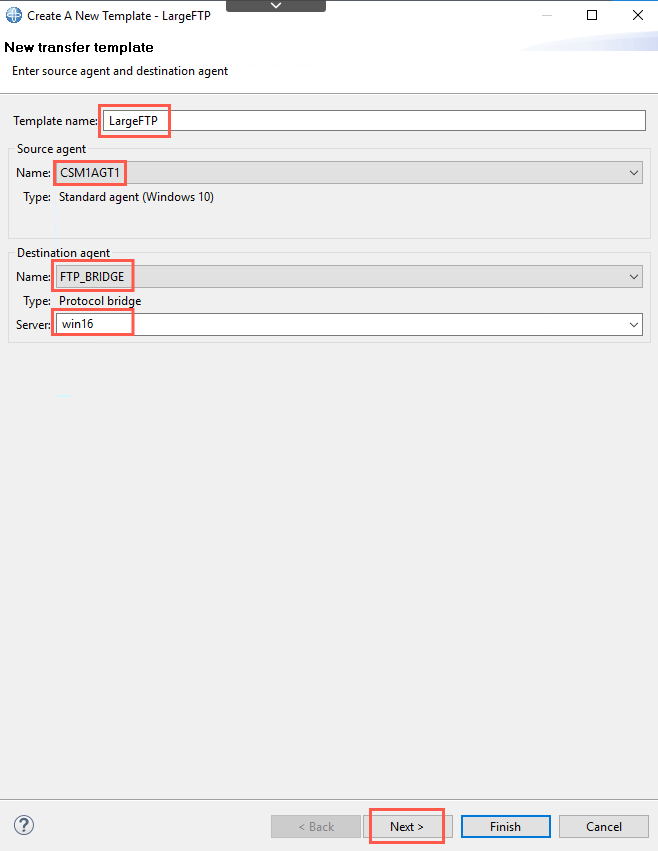
-
Click Add. In the Source panel, click Browse and navigate to C:\PoT-messaging\Demo\disk1 and select BIGFILE.BIN. In the Destination panel type the root symbol /BIGFILE.BIN. Notice that the file path is different for an FTP server. Mark the Overwrite files if present. Click OK. Then click Finish on the next window.
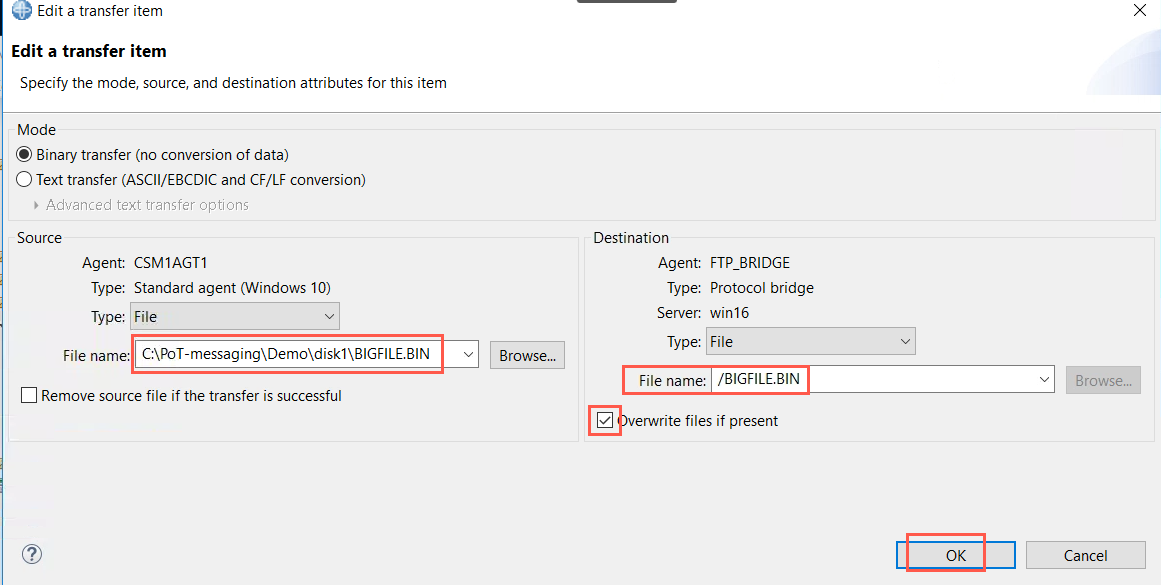
-
Right-click the new template LargeFTP and select Submit.
-
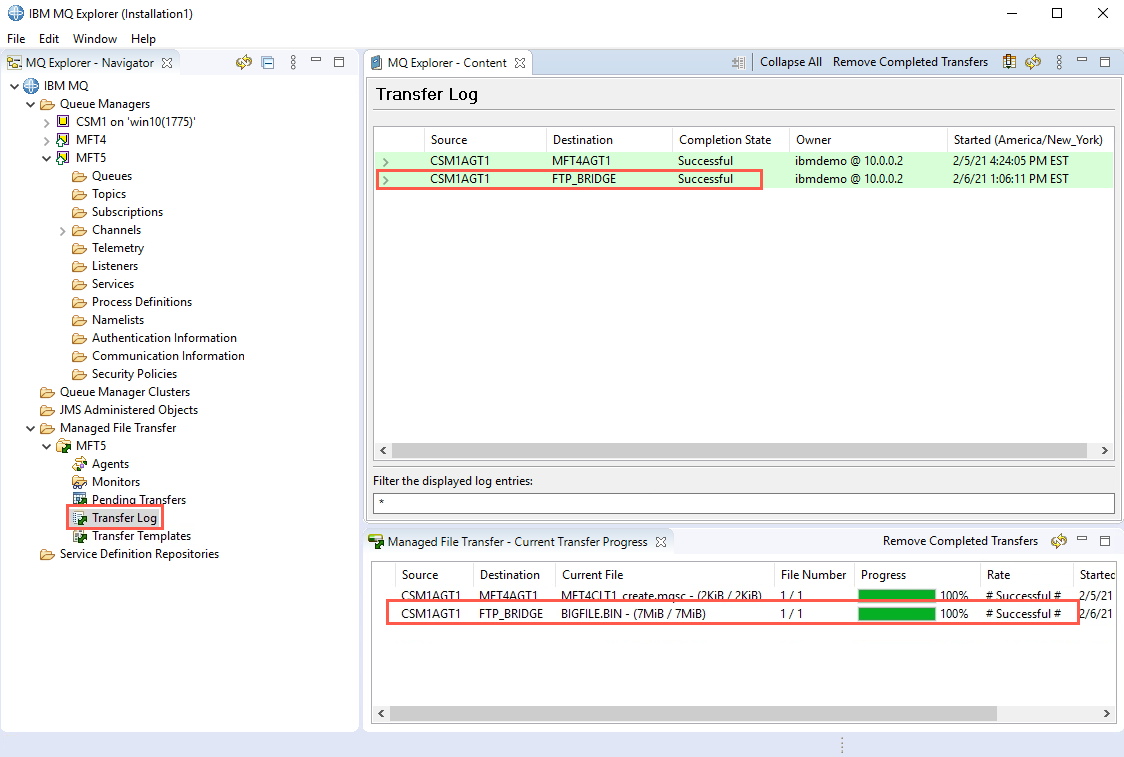
Switch to the server machine (win16). In MQ Explorer, click Transfer Log to see the results.
-
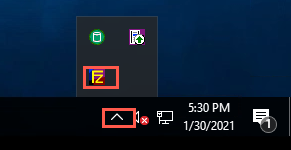
Check the Fillazilla server. If it is not on the desktop then it is minimized. In the bottom right corner of the desktop, click the up arrow then double-click the Filezilla icon to open it.
-
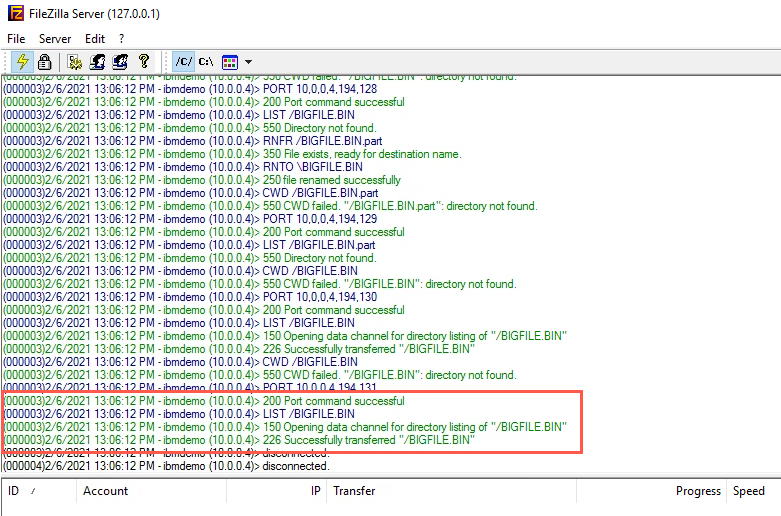
Filezilla produces quite a few messages. Review it quickly, but notice the success message at the bottom.
-
In Windows Explorer, navigate to C:\ and you will find BIGFILE.BIN. Remember, the home directory for ibmdemo on the file server is / or C:\ since Filezilla is running on the Windows (win16) platform.
MQ Console and REST API
IBM MQ 9.x introduced a web console and REST administrative API. The mqweb server process is required for the MQ Console and the REST API.
This section will introduce you to the MQ Web Console and the MQ REST API for MFT. The web server and REST are not started by default, so we have provided some scripts to start and stop the server mqweb.
MQ Console
-
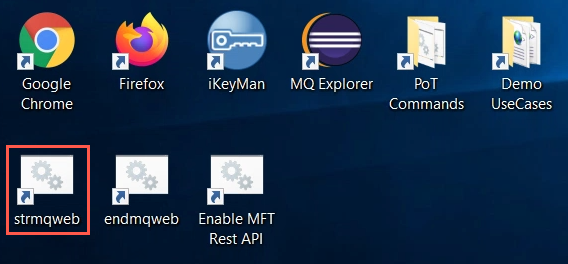
On the MFT client machine (win10) double-click the desktop shortcut strmqweb.
-
Start a Firefox browser session by double-clicking its icon on the desktop.
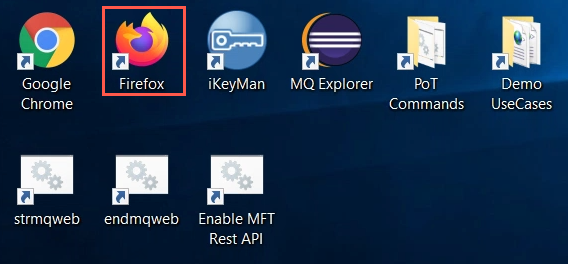
Click Not now to change the default browser to Firefox.
-
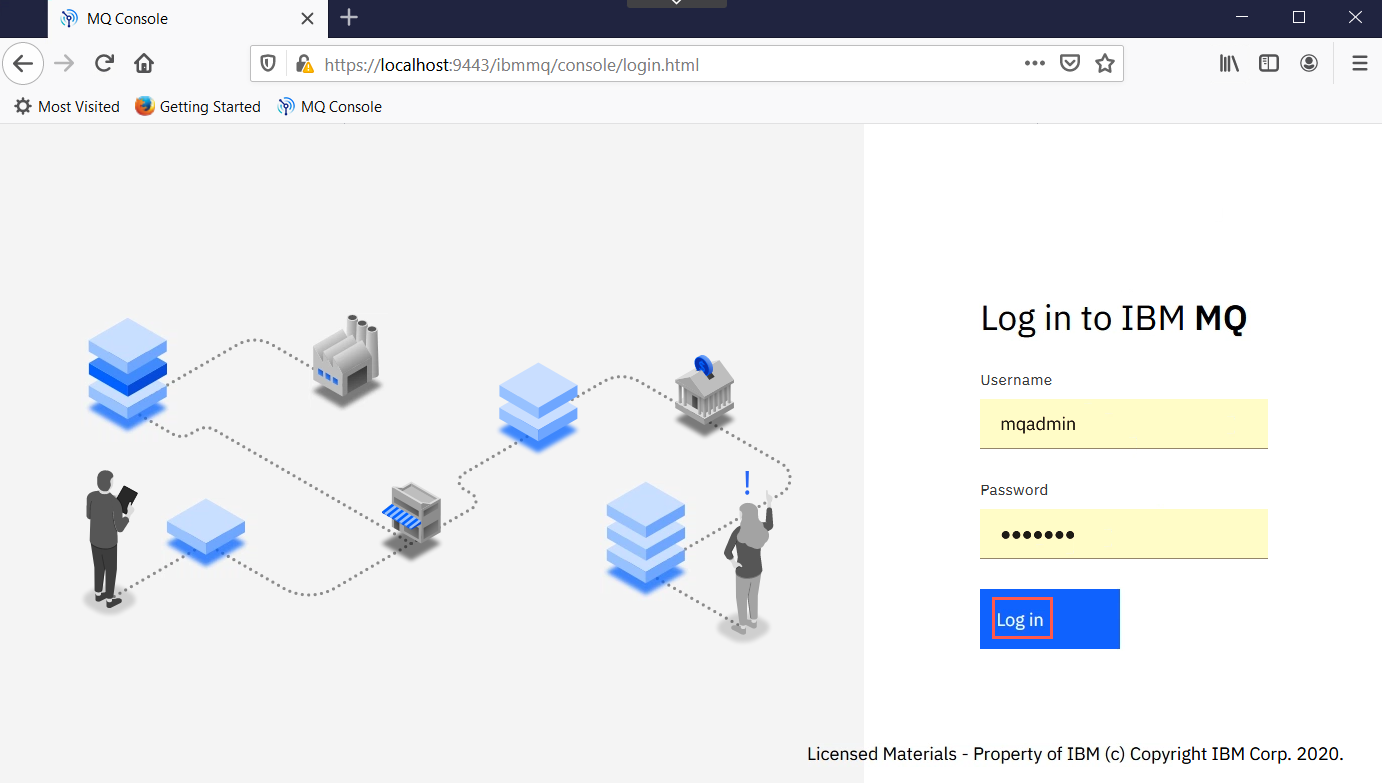
Click the MQ Console bookmark to open the console.

-
The Username and Password have been previously entered and saved - mqadmin / mqadmin. Click Log in.
-
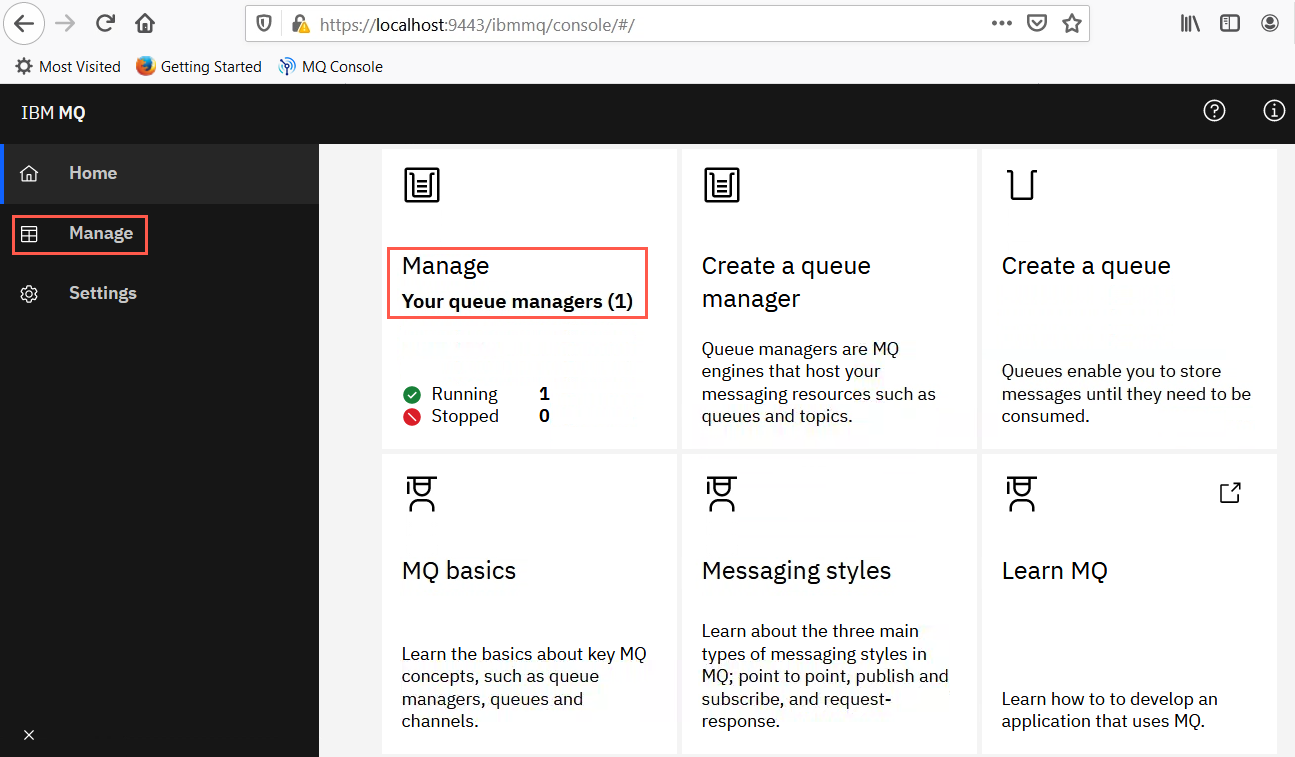
Scroll to display the tiles. There are tiles for a newbie to learn about MQ and Messaging. For someone experienced there are tiles for the most important MQ functions; creating a queue manager and creating queues. There is a tile for managing queue managers. You can see that there is one running queue manager. Click the tile. Alternatively you can click the Manage tab on the sidebar.
-
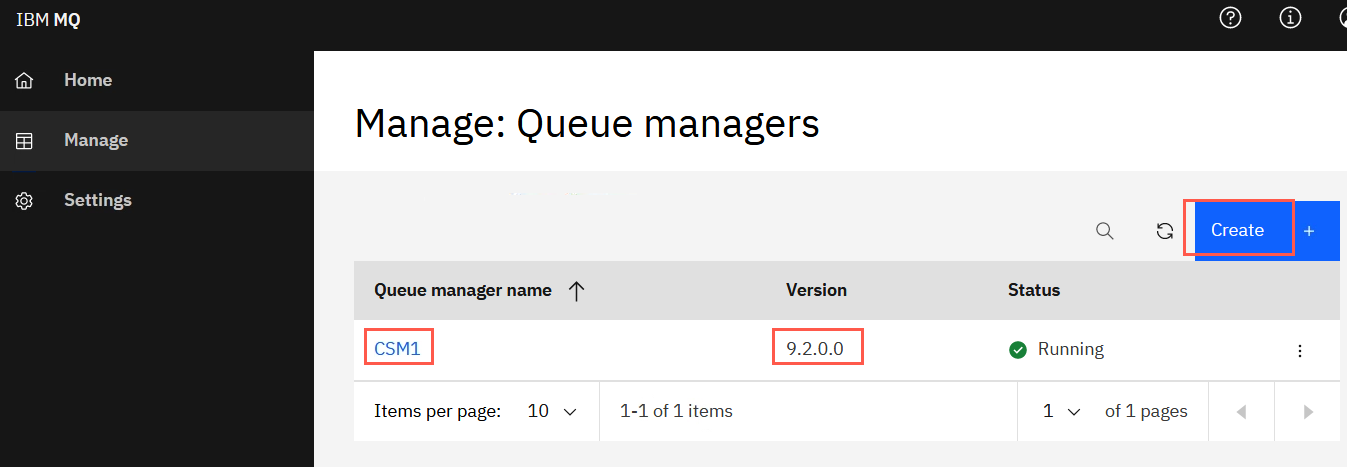
This display will show all queue managers running locally. You only have one queue manager running on the client machine, CSM1. You see it is at the 9.2.0.0 release. You can click Create and use the dialog to create a new queue manager.
-
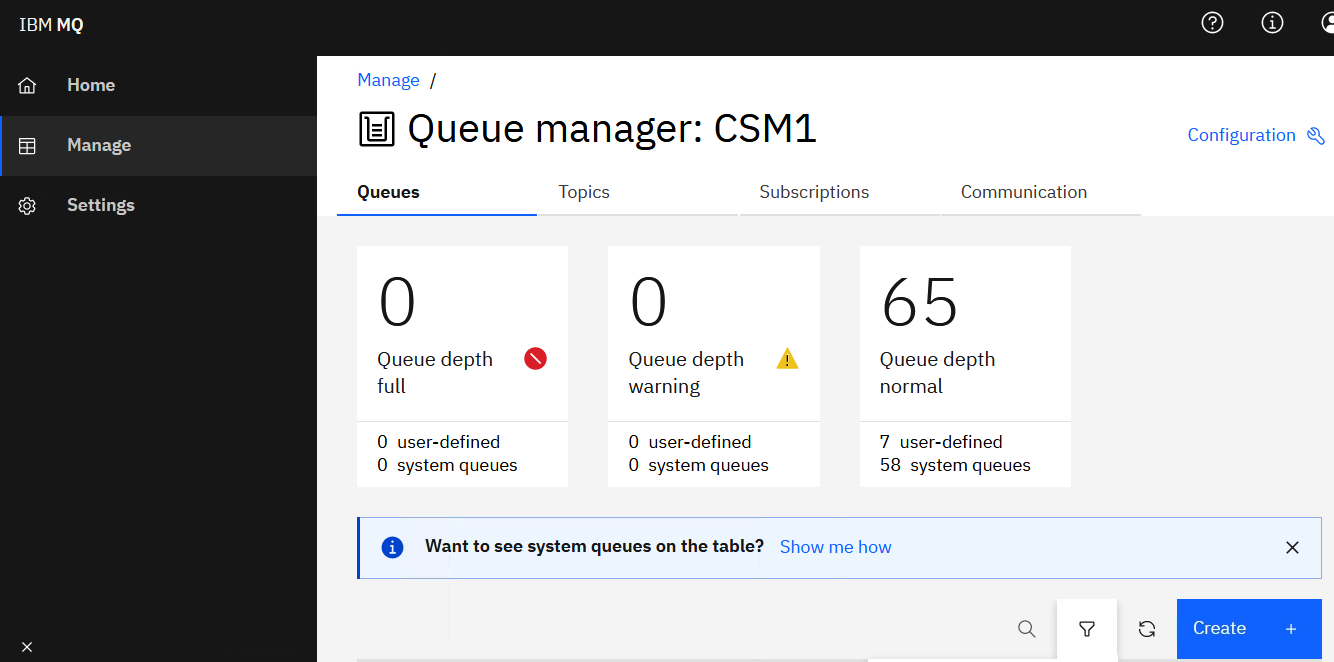
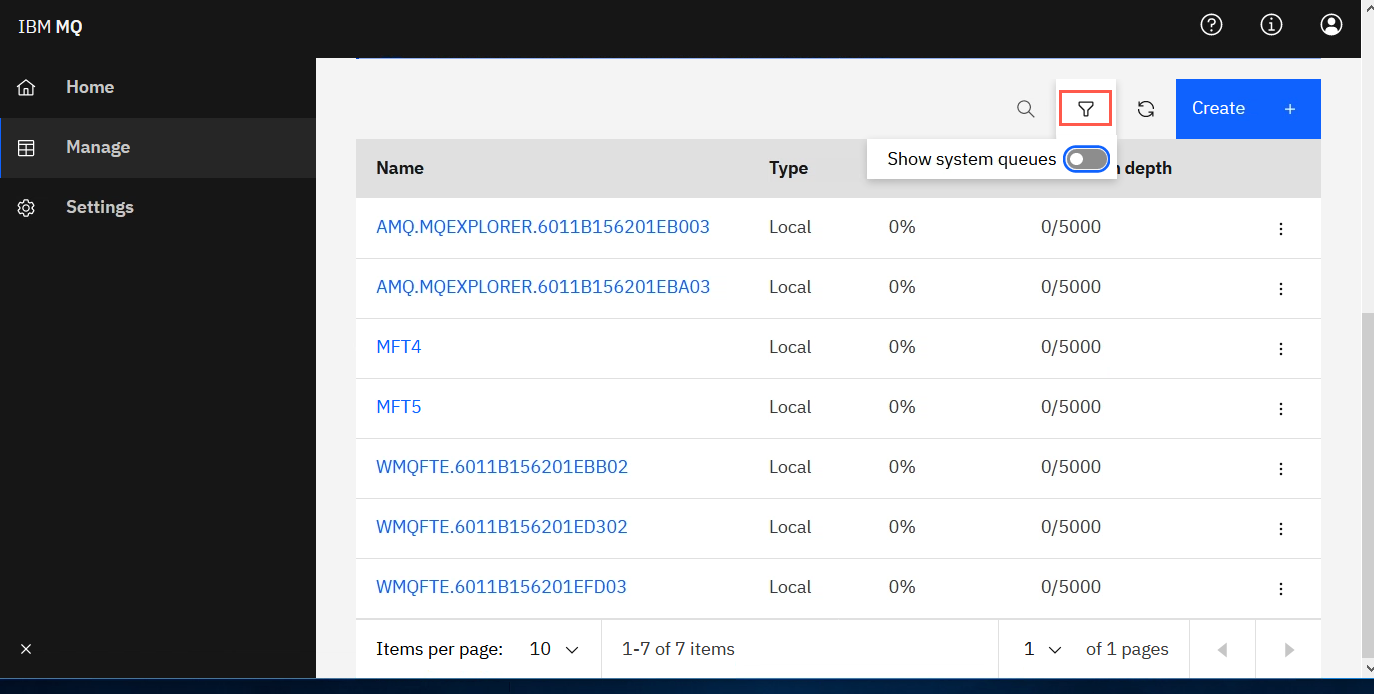
Click the hyperlink for CSM1. Here you can manage queues, topics, subscriptions, channels (under Communication). You can click Configuration to view and change queue manager properties. You can click the Create button to create any of the above. Scroll down to see the current queues. You can filter SYSTEM… queues by clicking the funnel icon and setting the switch.
MQ MFT API
The REST API supports certain Managed File Transfer commands, including listing transfers and details about file transfer agents.
From IBM® MQ 9.1.0, the REST API includes options to list all current Managed File Transfer transfers and to query the status of Managed File Transfer agents.
As mentioned previously the mqweb process is not started by default. It is started by the strmqweb command (it can also run as a Windows service). There is a corresponding endmqweb command.
The MQ REST API is enabled when mqweb is running. However the MQ MFT REST API is not enabled by default. You will enable it in this section.
-
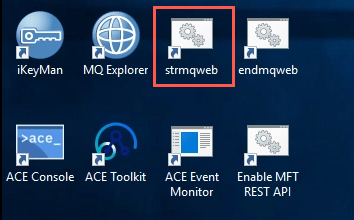
Switch to the server machine (win16) and start mqweb by double-clicking the shortcut on the desktop.
-
Start a Firefox browser session by double-clicking its icon on the desktop.
-
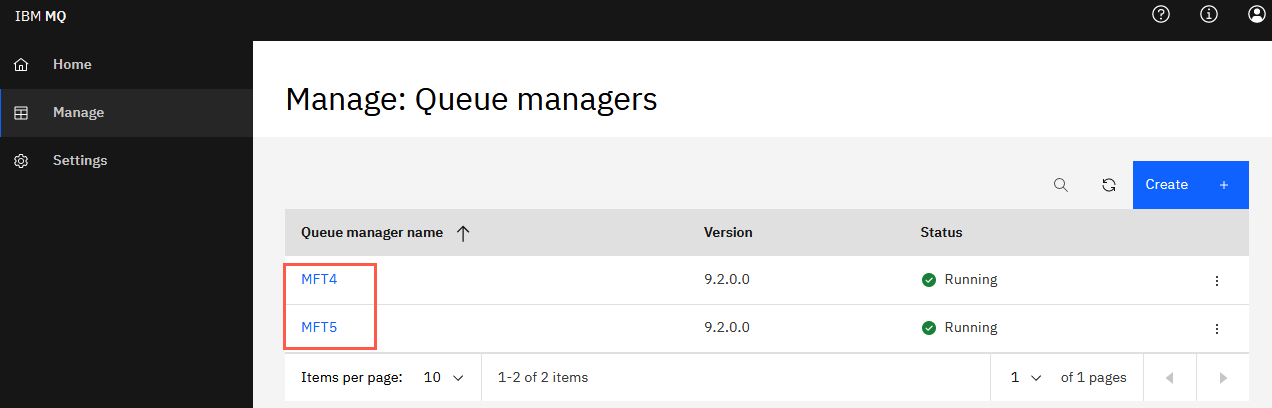
Click Not now in response to the default browser setting pop-up. Click the MQ Console bookmark. Log in as you did on the client machine. Click Manage and you’ll see your two queue managers running.
-
Display the status of mqweb with the following commmand:
dspmqweb status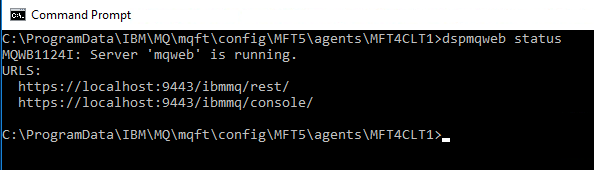
-
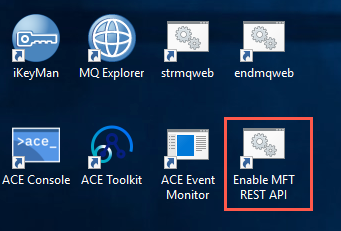
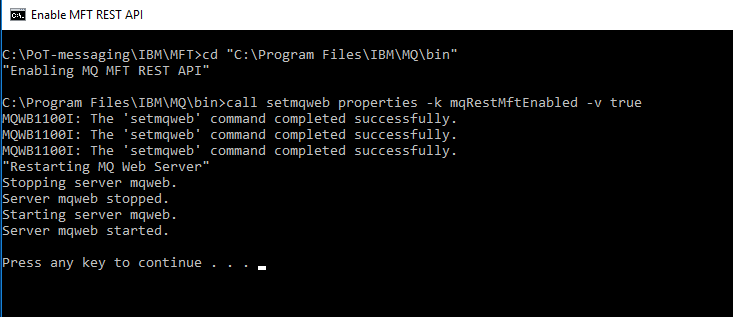
Since the MFT Coordination queue manager is running on the server machine, enable the MFT REST API by clicking the desktop shortcut Enable MFT REST API.
-
The script sets the following mqweb properties:
 setmqweb properties -k mqRestMftEnabled -v true
 setmqweb properties -k mqRestMftCoordinationQmgr -v MFT
 setmqweb properties -k mqRestMftCommandQmgr -v MFT4
Then stops and starts mqweb to reset it.
-
Use the following curl command to test REST. It should return the agents display.
curl -k https://localhost:9443/ibmmq/rest/v2/admin/mft/agent/ -X GET -u mftadmin:mftadmin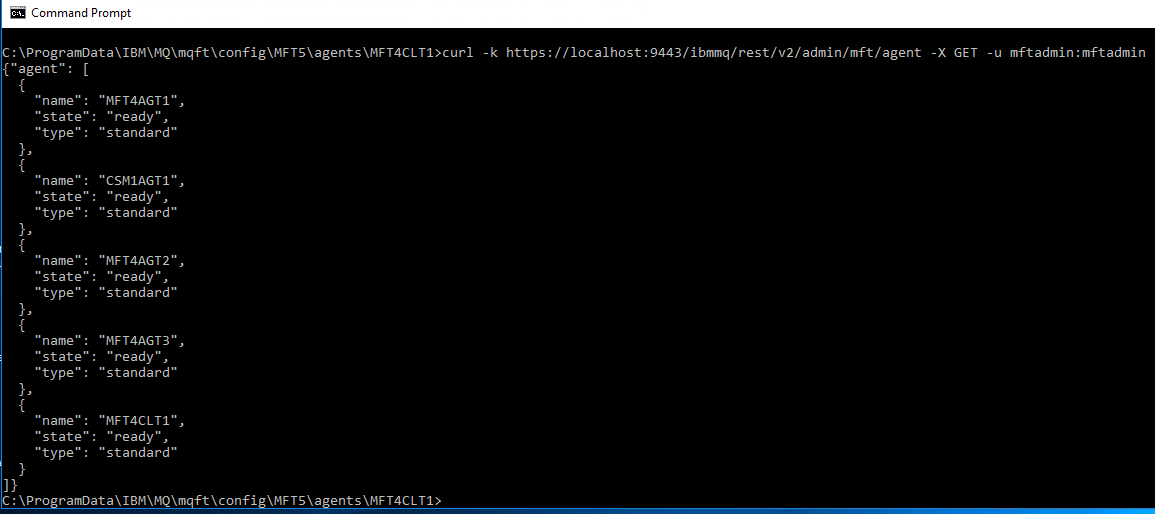
-
In MQ Explorer, click Transfer Templates and submit each one to produce some transfers. Remember: right-cick the template and select Submit.
-
Make a GET request on the transfer resource to return details of up to four transfers that were made since the mqweb server was started:
curl -k https://localhost:9443/ibmmq/rest/v2/admin/mft/transfer?limit=4 -X GET -u mftadmin:mftadmin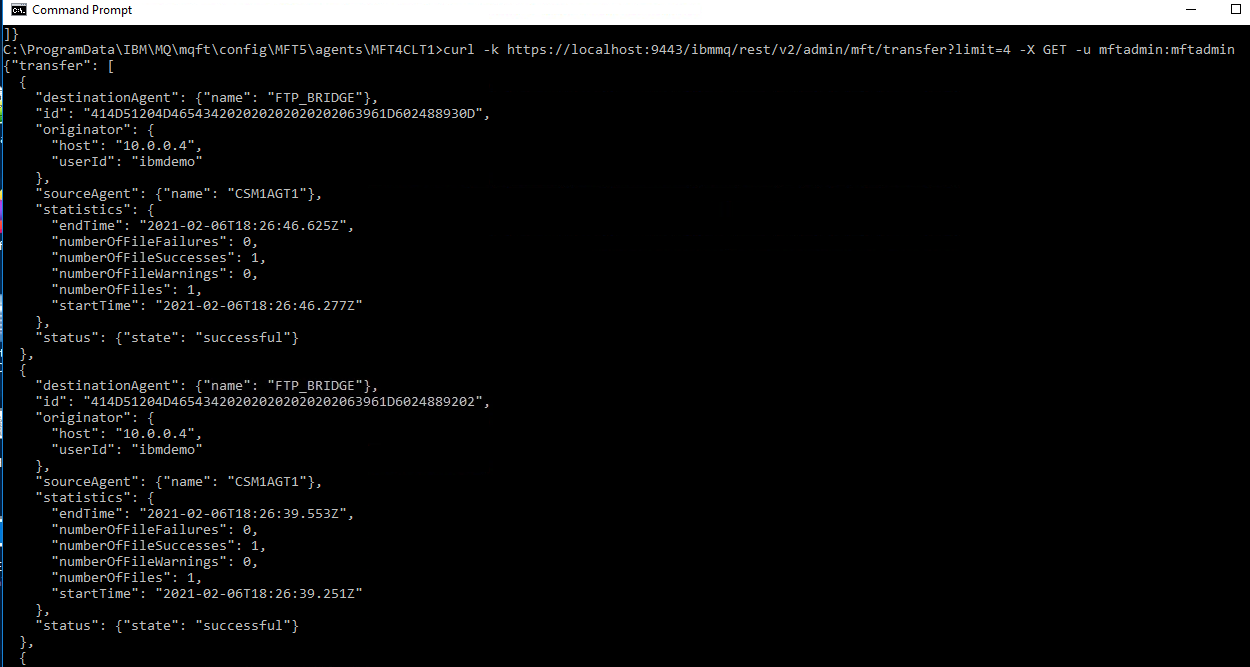
IBM Integration Bus Toolkit Resource Perspective
This PoT uses the IBM App Connect Toolkit to run the transfer pattern Ant scripts. The Integration toolkit was chosen because it is installed on the PoT VMware image. We will use the Eclipse Resource Perspective in the toolkit to analyze and run the scripts. Eclipse is a very effective development platform because it provides syntax assistance for Ant and XML. Eclipse is not required. In fact all you need is a text editor to create Ant scripts. Notepad++ is a good Ant editor. But Eclipse makes it much easier for developing and testing Ant scripts. The Eclipse Console provides better log messages for debugging.
Using the IBM Integration Toolkit is not required. You can freely download and Eclipse platform from www.eclipse.org.
-
On the Student image, start IBM Integration Toolkit by double-clicking the icon on the desktop.
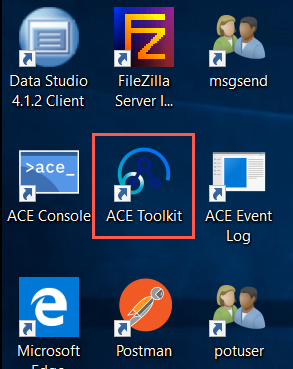
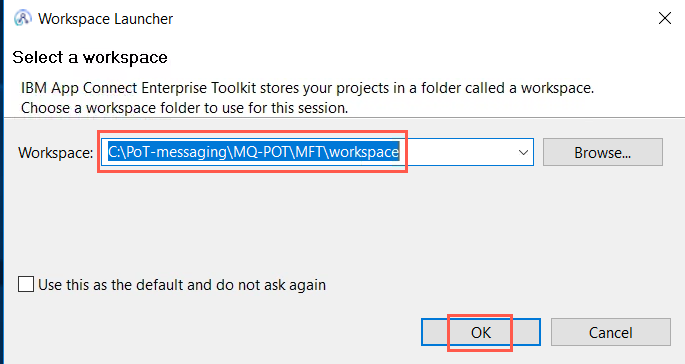
Enter C:\PoT-messaging\MQ-POT\MFT\workspace in the Workspace field. If the directory or file does not exist it will be created. Click OK.
-
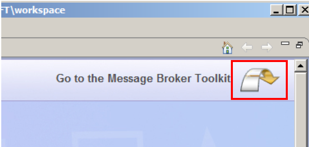
If the Welcome window opens, click the arrow to close the Welcome window and Go to the Message Broker Toolkit.
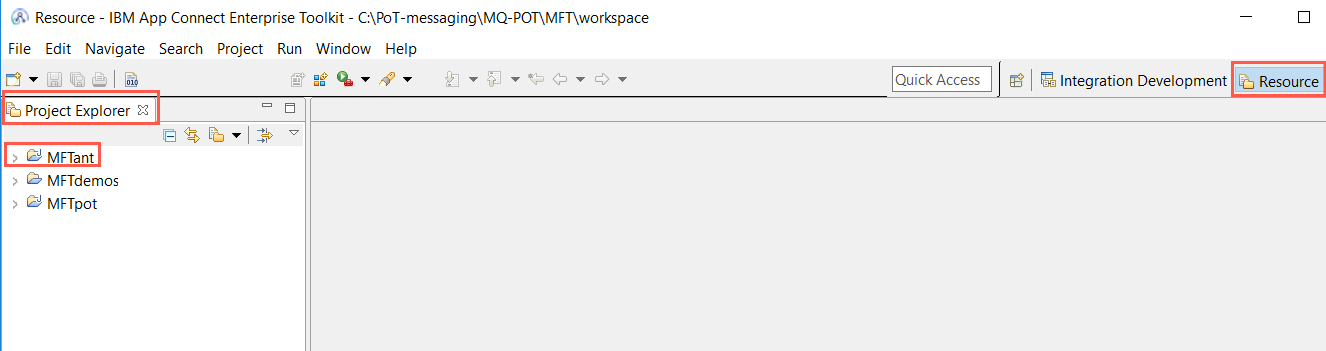
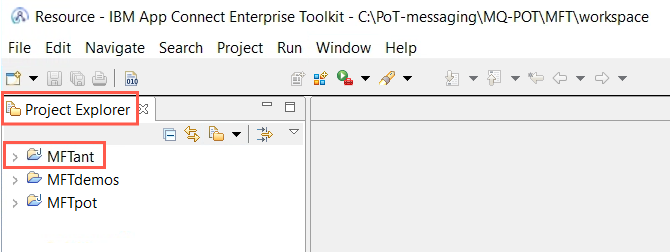
We will use the Resource perspective for the Transfer Patterns. If the toolkit opens in the Resource perspective and shows the project MFTant in the Project Explorer as shown here, then skip to Step 5.
-
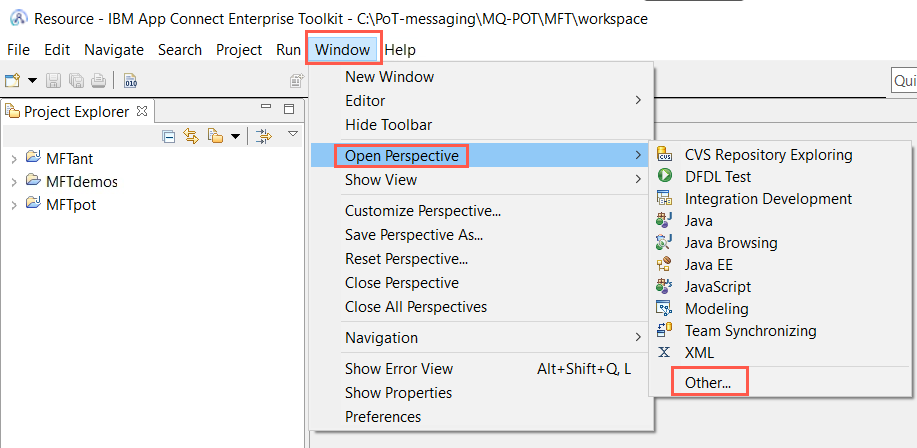
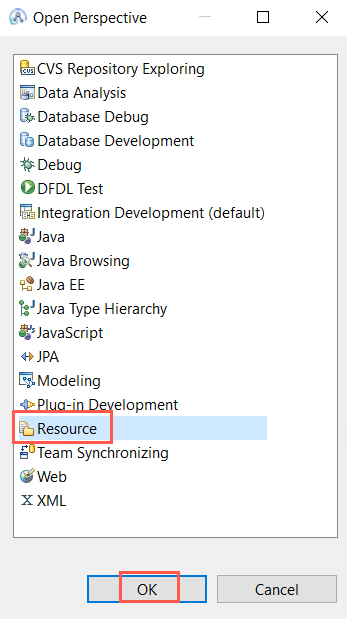
The toolkit should open in the Resource perspective. If not, click the Window pull-down menu and select *Open Perspective** > *Other**.
-
Select Resource.
-
When the Resource Perspective opens, you will see the MFTant project in the Project Explorer.
Expand MFTant.
-
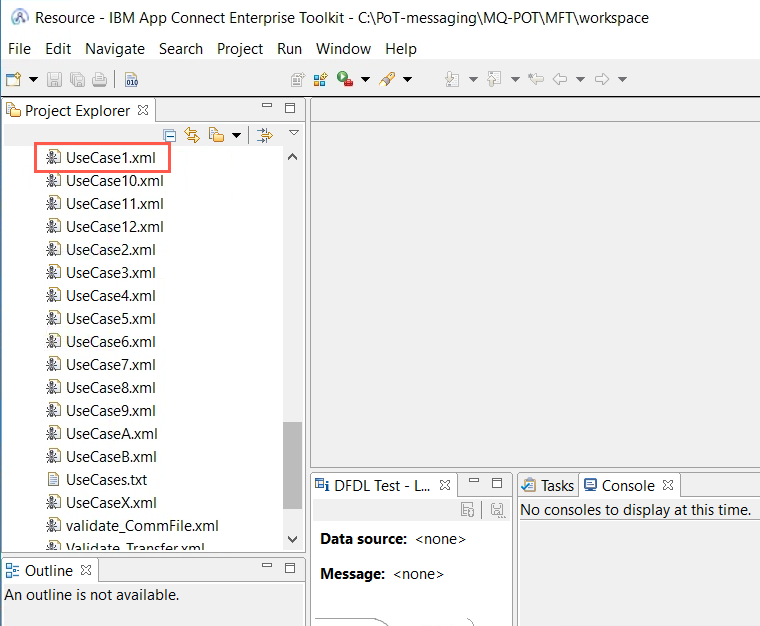
Scroll down until you reach the UseCase…. Files.
Pattern 1 - Asynchronus Transfer with Await Outcome
This transfer pattern demonstrates how an Ant Transfer Template can be used to send a file in asynchronous mode and then await the outcome. The fte:awaitoutcome task is one of the MFT extensions and is used to wait for the outcome of a MFT transfer.
The pattern demonstrates how one can setup an fteAnt template to be able to transfer a file to two different endpoints. The following end points can each be tested: MFT agent MFT4AGT1 or FileZilla FTP Server win16 via the FTP_BRIDGE agent.
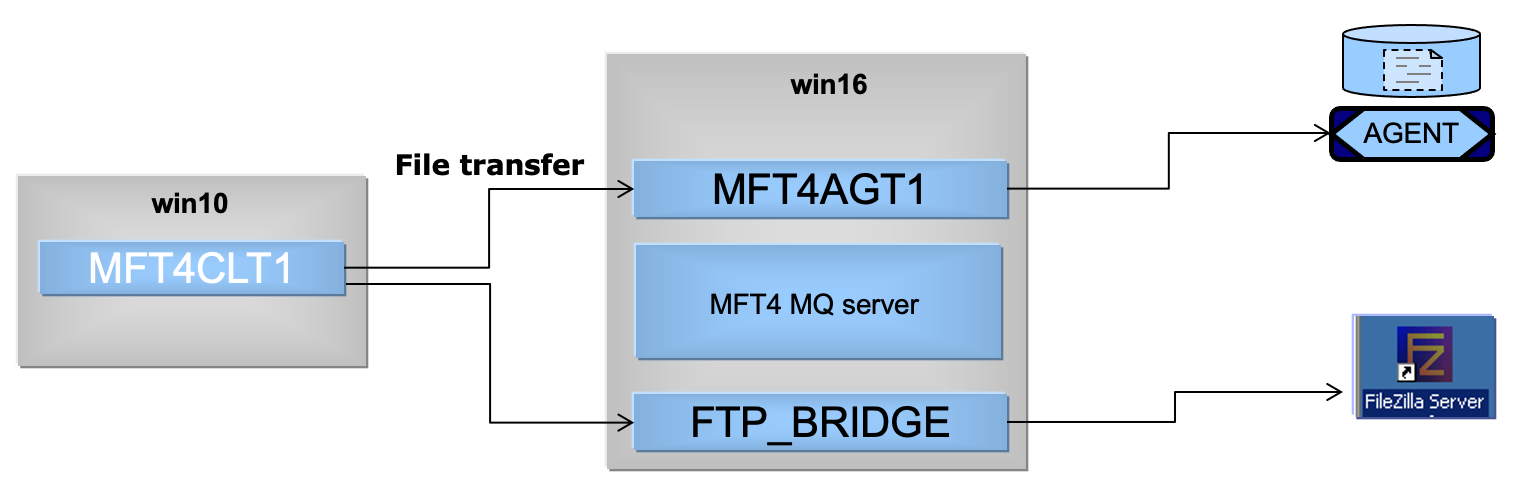
Figure 3.3.1 – Pattern 1 – Asynchronous Transfer with Await Outcome
This pattern uses the protocol bridge agent as well as the native MFT agent. The protocol bridge enables your IBM MQ Managed File Transfer network to access files stored on a file server outside your IBM MQ Managed File Transfer network. This file server can use the FTP, FTPS, or SFTP network protocols. Each file server needs at least one dedicated IBM MQ Managed File Transfer agent. The dedicated agent is known as the protocol bridge agent. See the Figure 3.3.2 below.
The protocol bridge is available as part of the Server component of IBM MQ Managed File Transfer. You can have multiple dedicated agents on a single system running IBM MQ Managed File Transfer Server that connect to different file servers.
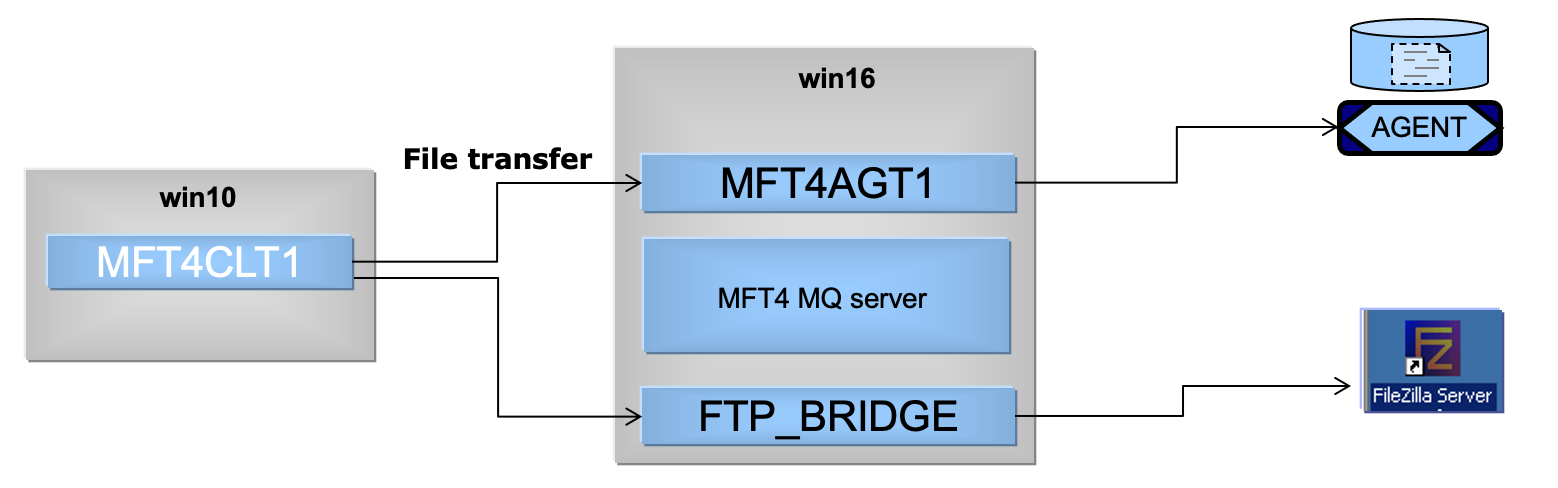
Figure 3.3.2 – MFT Protocol Bridge Architecture
Reference Material for Pattern 1
The following commands are examples which show how one invokes MFT Ant and overrides the default properties of the template. Pay particular attention to the TNODE parameter which indicates the destination agent involved in the transfer. You can find these commands on the client machine (win10) by double-clicking the PoTCommands shortcut on the desktop.
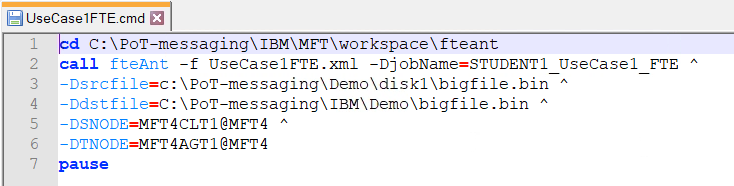
Figure 3.3.3 – POT Command file for MFT Pattern 1 Using MFT Agent
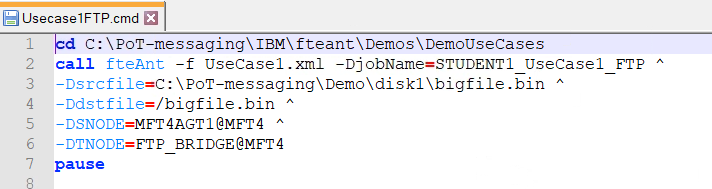
Figure 3.3.5 – POT Command file for MFT Pattern 1 Using FTP Bridge Agent
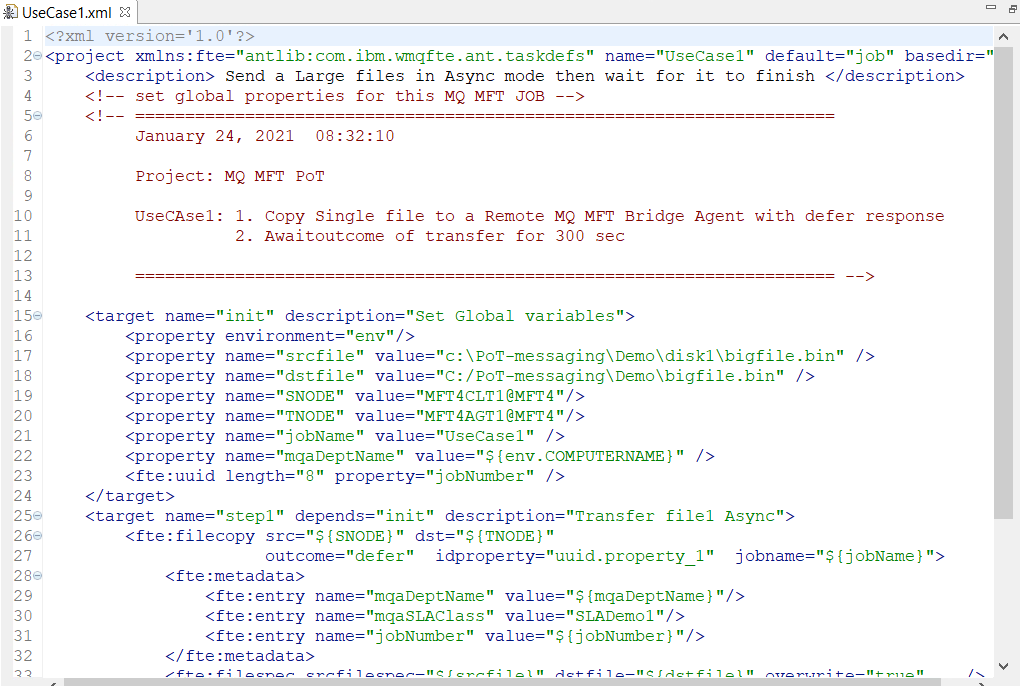
Figure 3.3.6 – Ant Script (template) for running MFT Pattern 1, UseCase1.xml
IBM MQ MFT also provides a Connect Direct Protocol Bridge. However we could not include a sample due to licening.
Review the Ant script UseCase1.xml
-
In the ACE Toolkit double-click UseCase1.xml to open it in the Editor panel.
-
Double-click the UseCase1.xml tab to maximize the edit pane for better viewing.
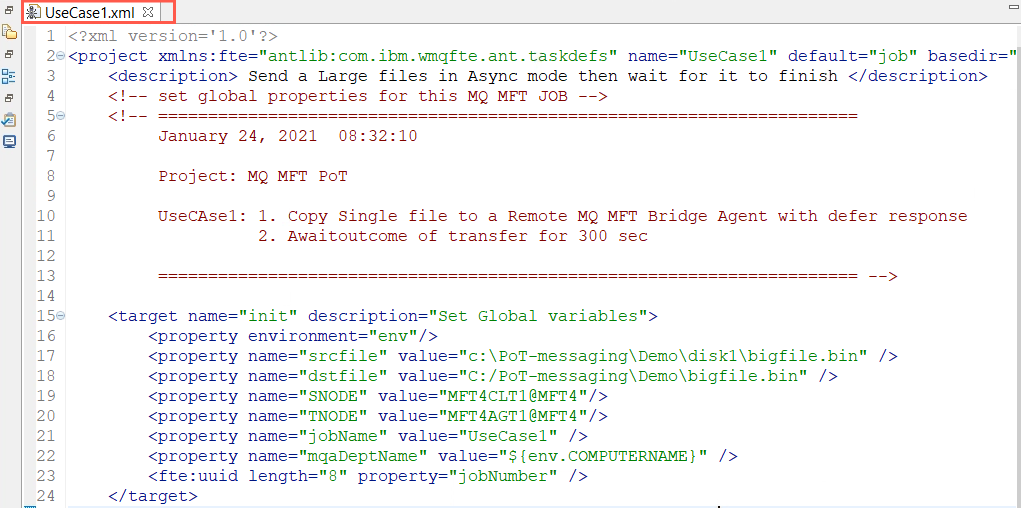
-
You are looking at an Ant script – XML file. The script can also be referred to as the Ant template. You may also refer to Figure 3.3.6. There are a few things we need to observe in order to understand how Ant functions.
-
XML version is declared on first line.
-
The Ant script is contained within a <project> tag.
-
<description> tags describe the function the script will perform.
-
Comments are embedded between <!– and –> tags and show up in a different color than the markup and values.
-
Ant tasks are coded within a target tag. There are four targets in this script named:
-
init
-
step1
-
step2
-
job
-
-
fte:xxxxxxx are Ant extensions for MQ MFT and provide translation from Ant to MFT functions.
-
Values can be over-ridden at run time.
-
For anyone who is familiar with JCL, you may discover a similarity between targets and JCL STEPs, fte:xxxxxx parameters and DD parms. Targets can be conditioned on previous targets just as STEPs in JCL can be (look for the “depends” parameter on the targets). The init target is very comparable to a COBOL Working-Storage Section.
Still referring to the Ant script or Figure 3.3.6 above, notice the steps (targets or tasks) of the script and the fte: commands that are being issued by the script. You can see that the script executes multiple steps to complete the transfer.
-
Target init is our housekeeping step that assigns values to variables (properties). The default values are defined here and can be over-ridden at runtime.
-
step1 is dependent on init and executes a fte:copy of the file from the agent MFT4CLT1 running on win10 to the MFT4AGT1 agent running on win16. A fte:copy does not delete the source file. Meta-data is defined with the fte:metadata stanza. Meta-data are name-value pairs of data about the transfer which is carried with the transfer. Each pair of meta-data is defined by the fte:entry command and can also be over-ridden at runtime. fte:filespec indicates the source file(s), destination file(s), and whether destination files should be overwritten.
-
step2 is dependent on successful completion of the step1 and awaits the outcome of the transfer with the ID of the transfer (assigned in step1). This is a substitution variable that gets resolved at runtime. It has a timeout value set at 10 mins (600 seconds).
-
Double-click the UseCase1.xml tab to return to the normal view.
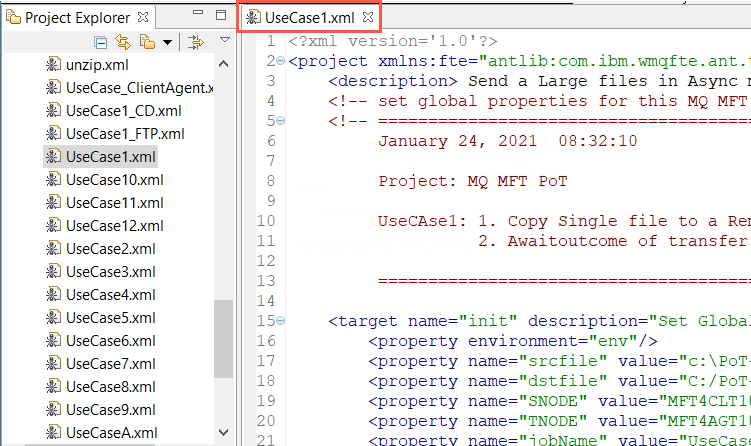
Run Script from MFT Eclipse workbench
-
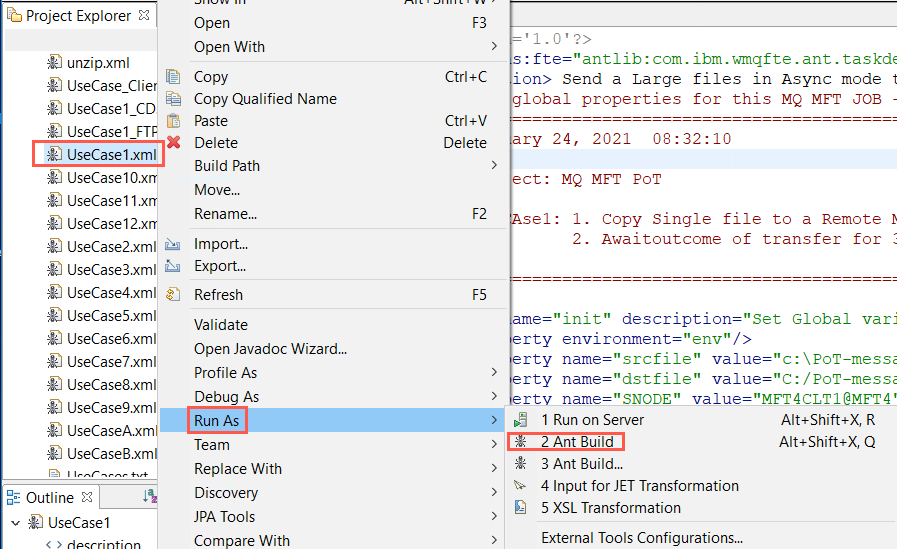
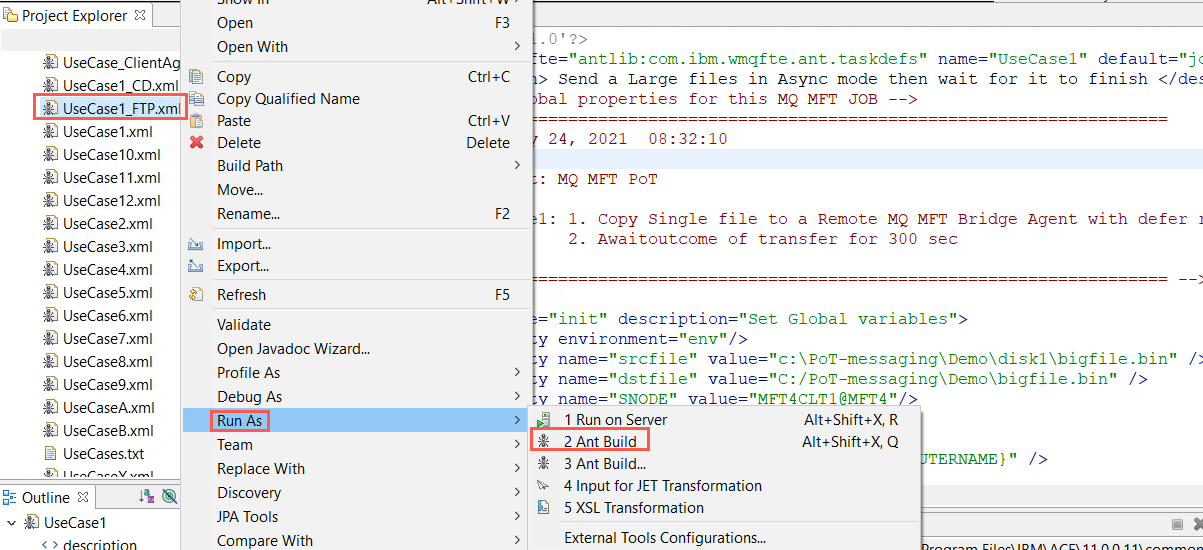
In the Project Explorer, right click the file UseCase1.xml.
-
Select Run As > Ant Build.
 Note:
Note:
You may also right-click inside the edit panel of UseCase1.xml to get the menu where you can select Run As. -
Click the Console tab to view the results of the transfer. You will see the the script starting. An Ant script is referred to as a Buildfile in the Ant runtime.

-
Double click the Console tab to view the log in full-screen mode. This will give you a better view and you will be able to see the entire log.
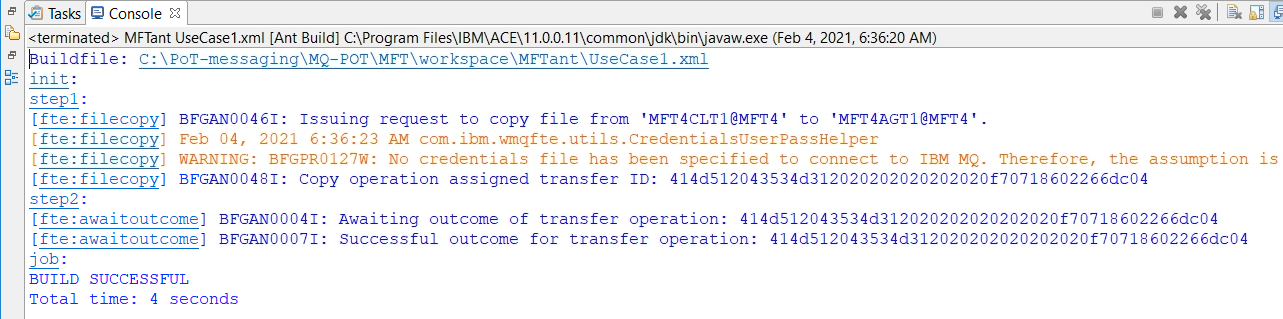
Notice that the file was transferred to the the server machine via the MFT4AGT1 agent. You can see that the BUILD (Ant script) was successful and took four seconds to run. Your time will vary.
-
Double-click the Console tab again to return it to normal size.
-
Still in the Toolkit, try UseCase1_FTP. This time a file will be transfered to the FTP server in a different directory. Review UseCase1_FTP and Run as Ant Build.
Review results on MFT Server
The agents report status messages about the transfer to the coordination queue manager – MFT5 on the MFT Server. The coordination queue manager publishes these messages on behalf of the agents. The MFT plugin for MQ Explorer subscribes to the publications and summarizes them in the MFT Transfer Log and the MFT – Current Transfer Progress panes.
-
Switch to the MFT Server and open MQ Explorer.
-
In the MQ Explorer, click Transfer Log under the Managed File Transfer folder.
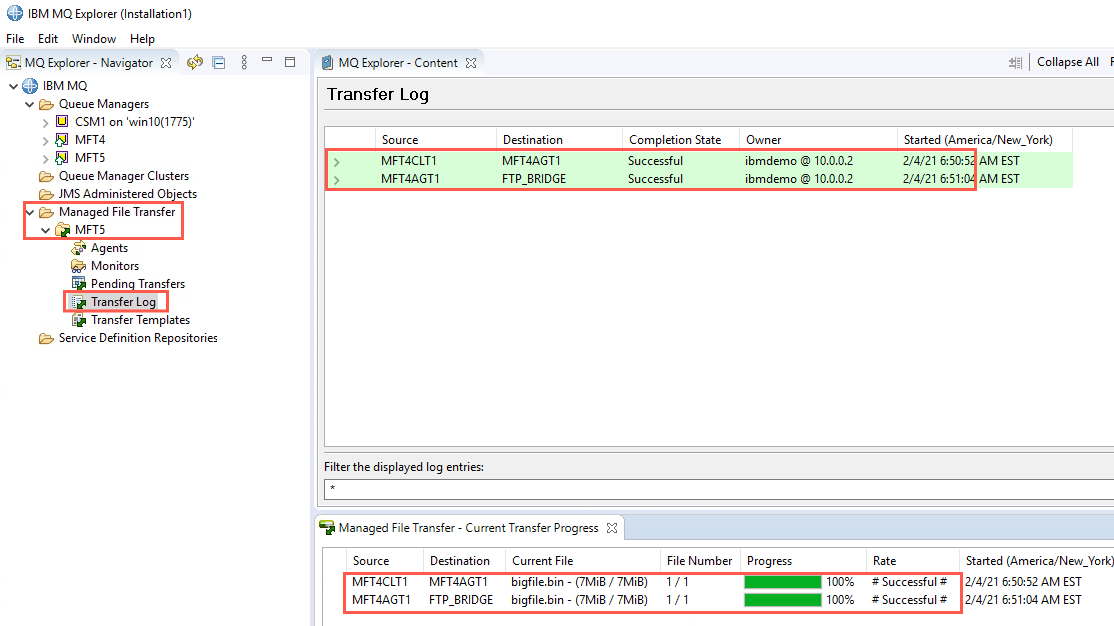
You will see a successful transfer from agent MFT4CLT1 to the MFT4AGT1 MFT agent and another one from agent MFT4CLT1 to FTP_BRIDGE protocol agent.
-
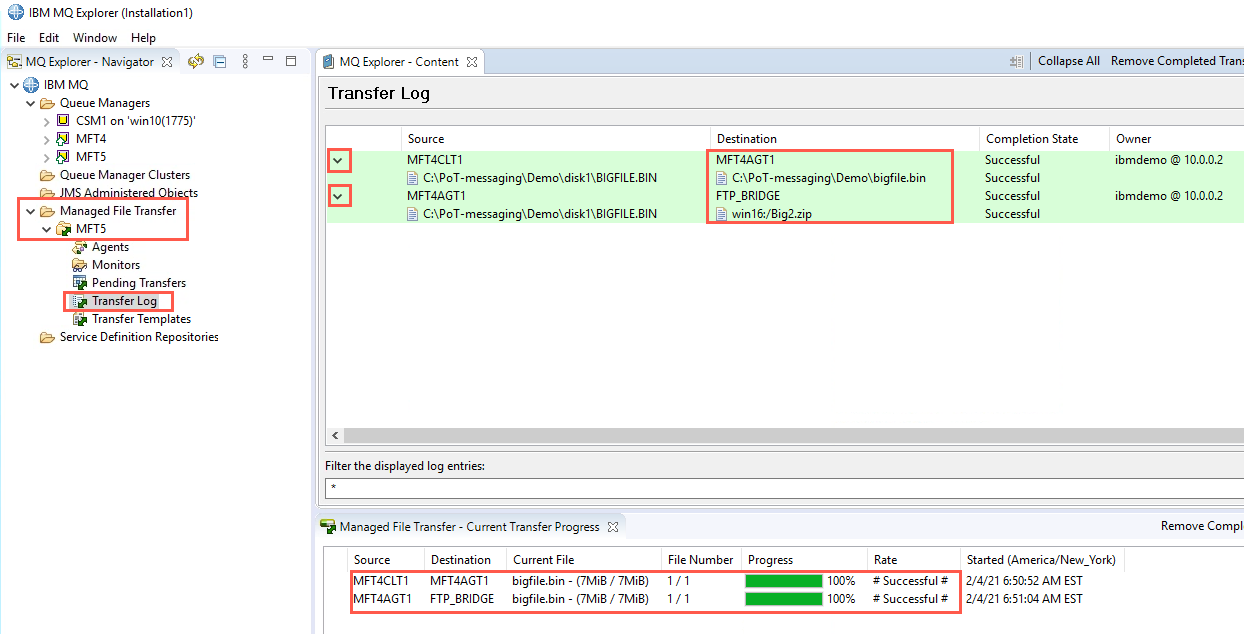
Expand the transfers by clicking the drop-down next to the Source agent MFT4CLT1.
-
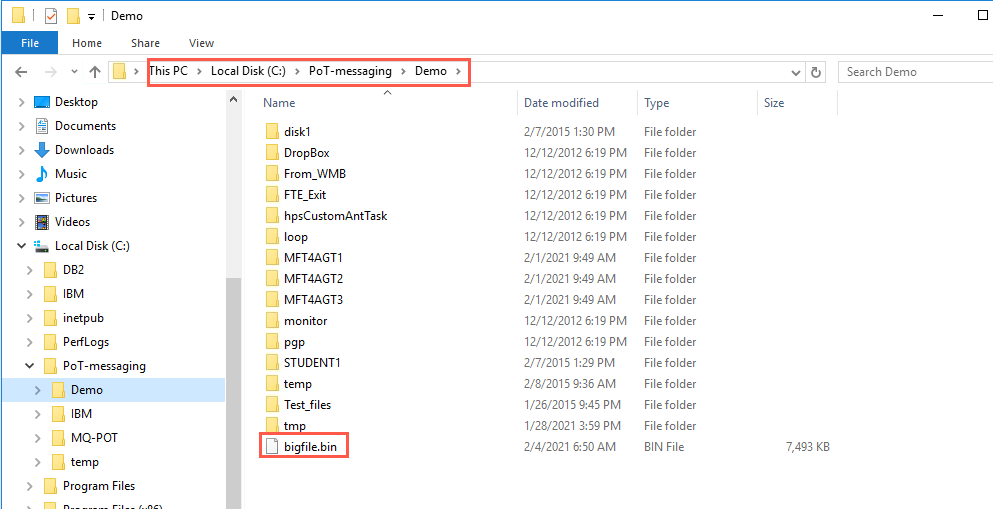
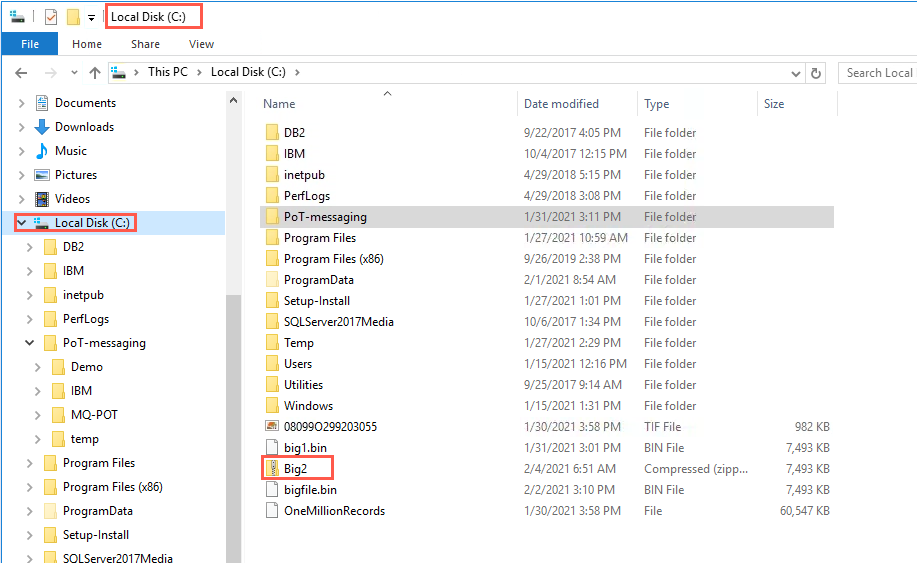
Open Windows Explorer on the MFT Server and navigate to C:\PoT-messaging\Demo\tmp\. You will find the file BIGFILE.BIN which was transferred from MFT4CLT1.
-
Navigate to C:\ where you will find the file Big2.zip which was transfered to the FTP_Bridge agent.
Run Script as batch file - runtime substitution
The Eclipse Workbench is not required to run Ant scripts. It is excellent for developing and testing Ant scripts. But in most cases, Ant scripts will be run from a command prompt submitted from scheduling systems or other programs. The same Ant scripts can be run by a command which overrides variables at runtime.
In this exercise you will rerun UseCase1.xml with different commands overriding the agents and protocols used. UseCase1_FTP.xml was coded to use the FTP protocol and transfer files from agent MFT4CLT1 to FTP_BRIDGE on the MFT server. Those are the default settings.
In the POTCommands subdirectory, there are commands to send the same file to the MFT Server using an MFT agent on MFT Server.
-
Return to the Student machine.
-
Open POTCommands by double-clicking the icon on the desktop.
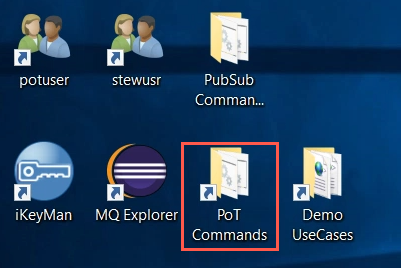
-
Right-click the UseCase1FTE file and select Edit in Notepad++. Notepad++ is a free editor comparable to Ultraedit and is an excellent tool for viewing and editing XML files, Windows command and batch files, etc.
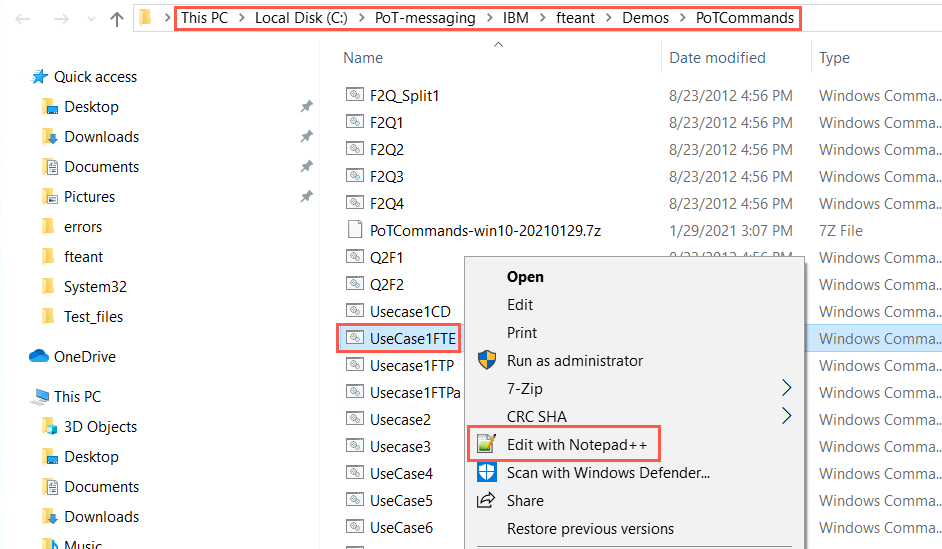
-
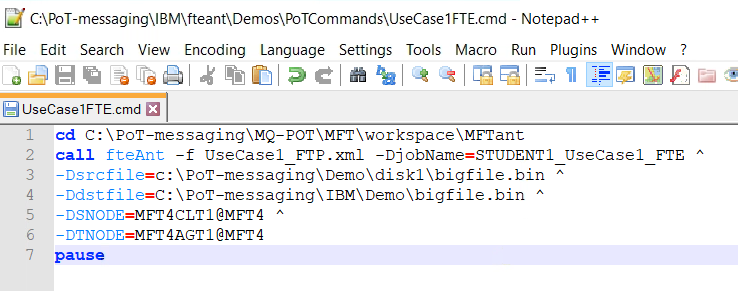
Notepad++ opens the file in edit mode and you can see the commands that will be issued when the command is run.
-
Examine the commands. There are only three commands:
-
cd change directory
-
call
-
pause
The rest of the lines are parameters for fteAnt. The “cd” just changes the current directory to the directory where the transfer patterns are located – C:\PoT-messaging\MQ-POT\MFT\workspace\MFTant\. The call command invokes the Java program “fteAnt”. If necessary edit the command to use:
cd C:\PoT-messaging\MQ-POT\MFT\workspace\MFTant\ -
-
Arrange Notepad++ window and the WMB Toolkit window so you can see both like shown here.
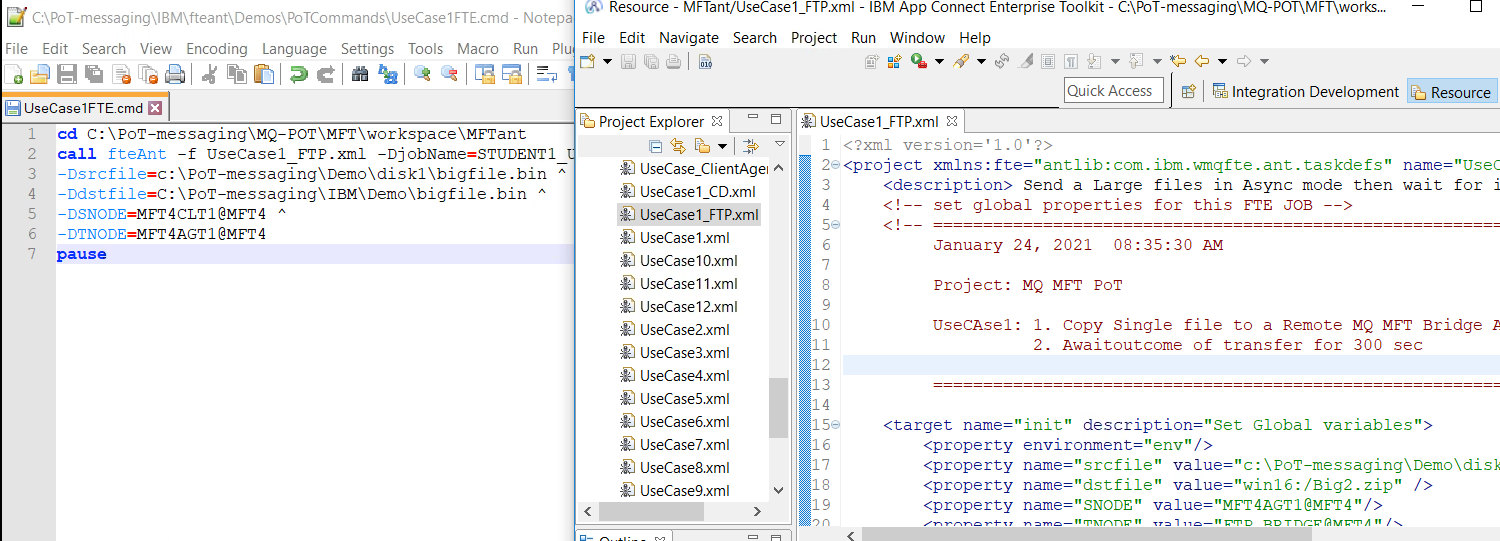
Here you can see the UseCase1FTE.cmd is invoking fteAnt and telling it to run fteAnt Java program with the UseCase1_FTP.xml script. The runtime overrides are indicated in blue. So even though the script has default values shown in the toolkit, the command file is overriding some of the values. “-D” is a Java convention for indicating parameters. So the property names in the script which are being overridden are jobname, srcfile, dstfile, SNODE, and TNODE. SNODE and TNODE are actually the agent names which will perform the transfer. The MFT convention is agent name@agent queue manager.
Take note, that for batch processing, it is the command file that should be started. Scheduling batch jobs is an alternative to MFT monitors or directory monitors. It depends on your processing requirements.
-
Minimize the Windows Explorer, Notepad++, and WMB Toolkit.
-
This time you will run UseCase1 as a batch command to run the Ant script, overriding the FTP_BRIDGE agent with a MFT agent. In the Windows Explorer POTCommands panel, double-click UseCase1FTE.
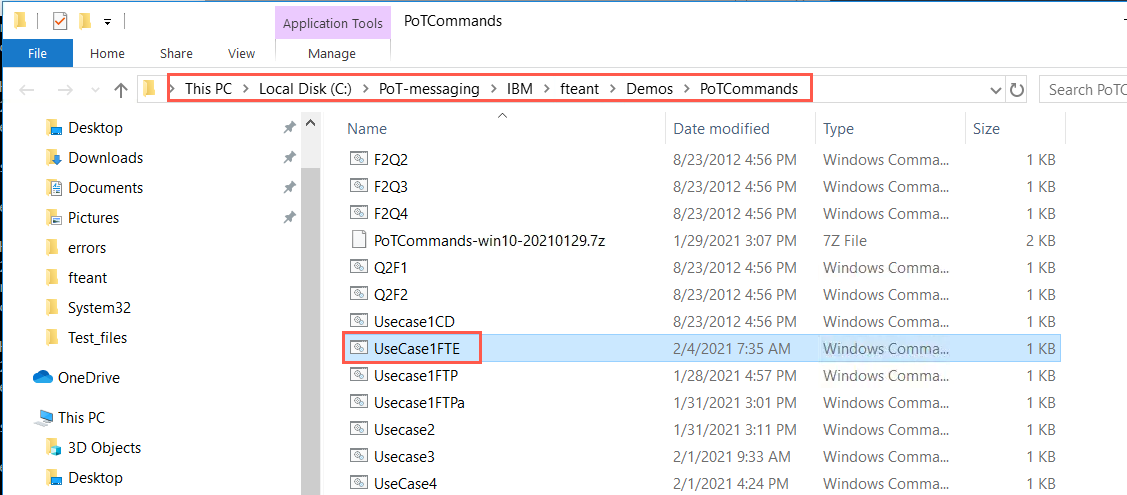
-
A Windows command window will appear where you will find the console messages. When running the Ant script from a batch command, the messages will appear in the command window instead of the WMB Toolkit console.
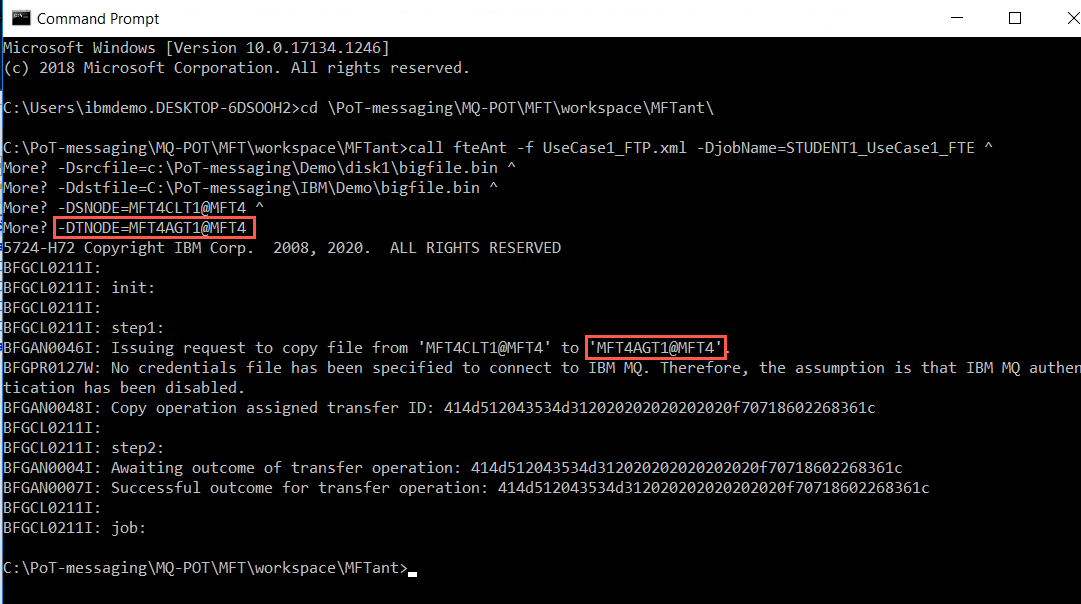
Review the messages. Notice the commands being issued and the messages which are logged. You will see a message for copying the file from agent MFT4CLT1 to MFT4AGT1. This is what we should expect since we are using the MFT protocol this time instead of the FTP protocol. The copy operation is assigned a unique transfer ID. Remember the three Ant tasks we saw in the script – init, step1, and step2. Step2 waits for the outcome of the transfer operation to be reported and checks that the operation was successful.
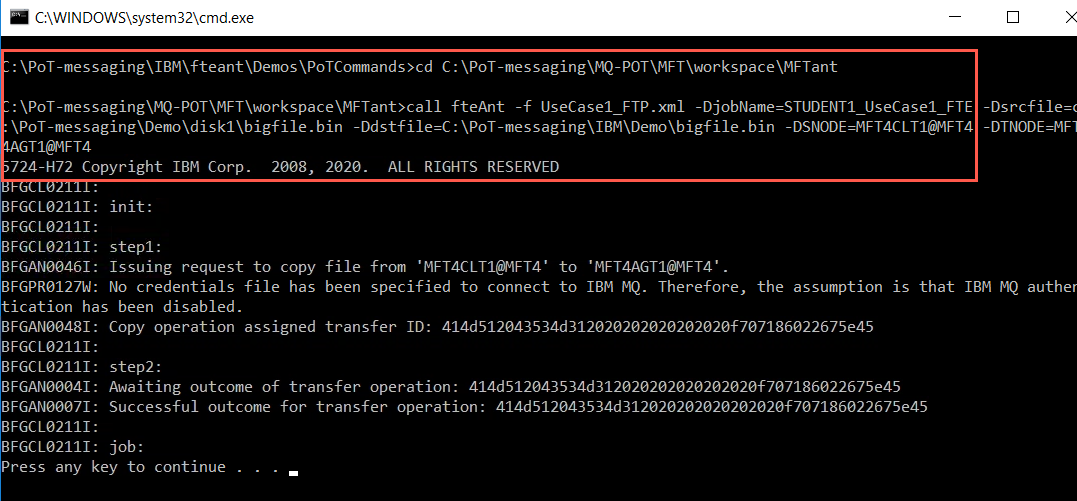
-
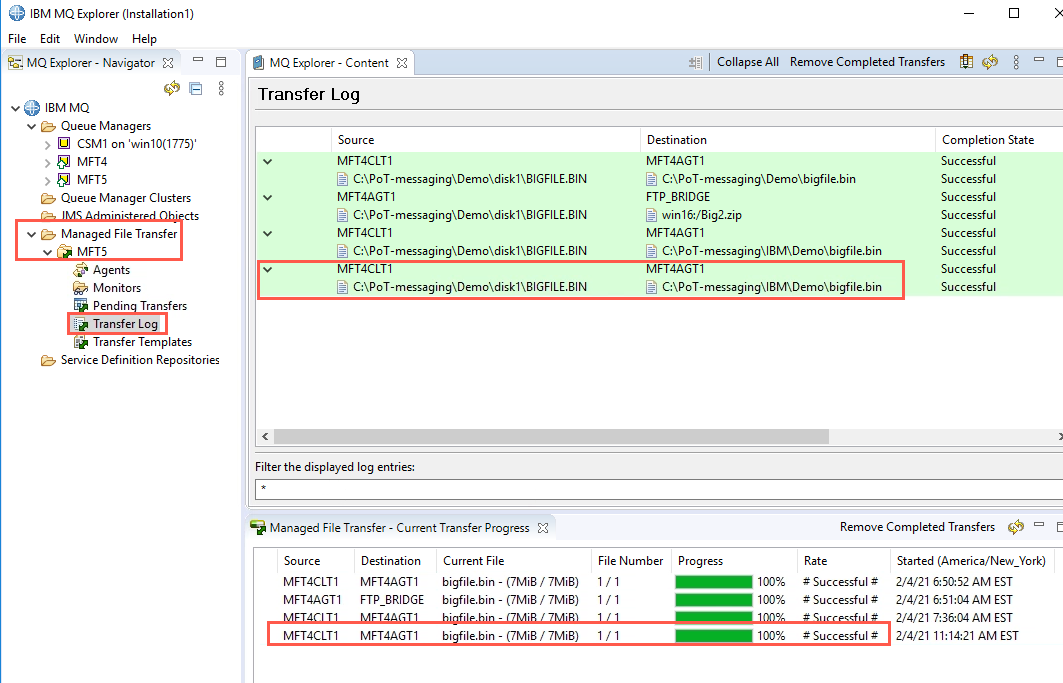
Switch to the MFT Server and the Transfer Log. You will see a new successful transfer from MFT4CLT1 to MFT4AGT1 for the same file bigfile.bin.
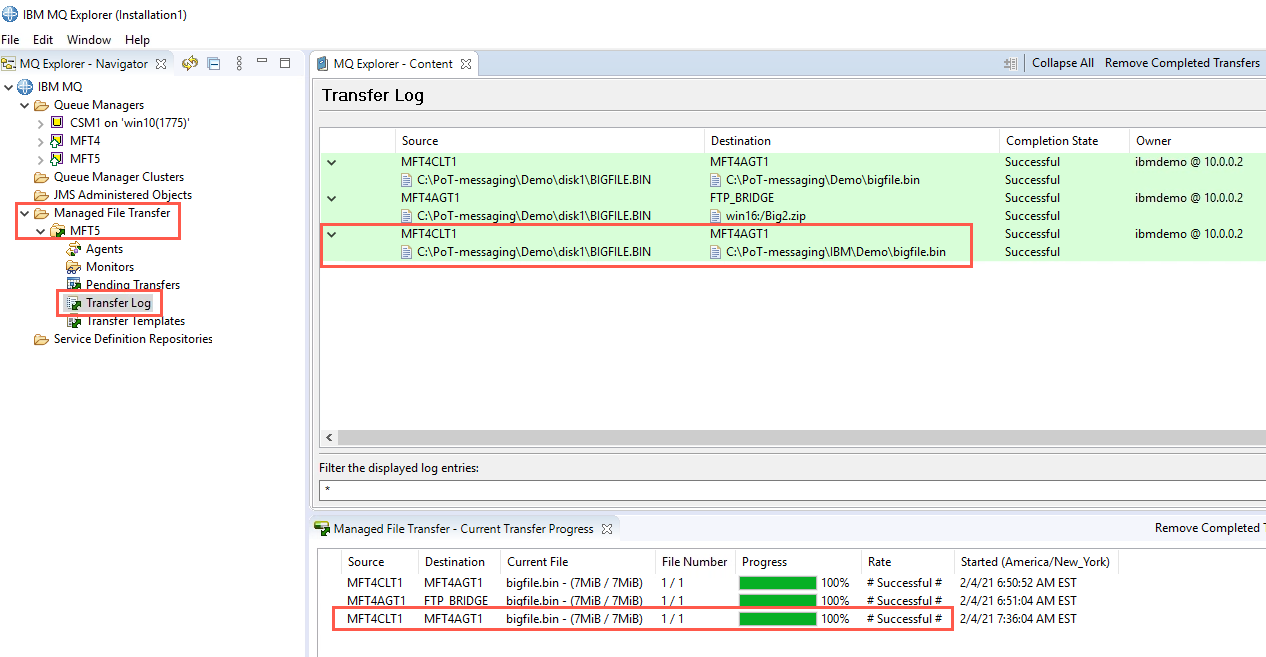
Run Script from command line
-
You have now used the Eclipse Workbench and a batch command file to run the Ant scripts. Another way to run the script is to manually issue the command from the command line prompt. In this next section you will run the UseCase1.xml script from the command line over-riding the default values.
In the previous exercises you ran UseCase1.xml with the FTP and MFT protocols. This time you will run the script using the MFT protocol.
-
Return to the Student machine.
-
Open a Windows Command Prompt from the taskbar by double-clicking the icon.
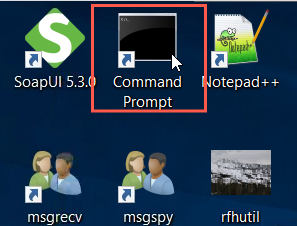
-
Change the directory to C:\PoT-messaging\MQ-POT\MFT\workspace\MFTant\demos\ by entering the command:
cd \PoT-messaging\MQ-POT\MFT\workspace\MFTant\
-
Return to the Windows Explorer window for PoTCommands.
-
Right click UseCase1FTE and select Edit with Notepad++.
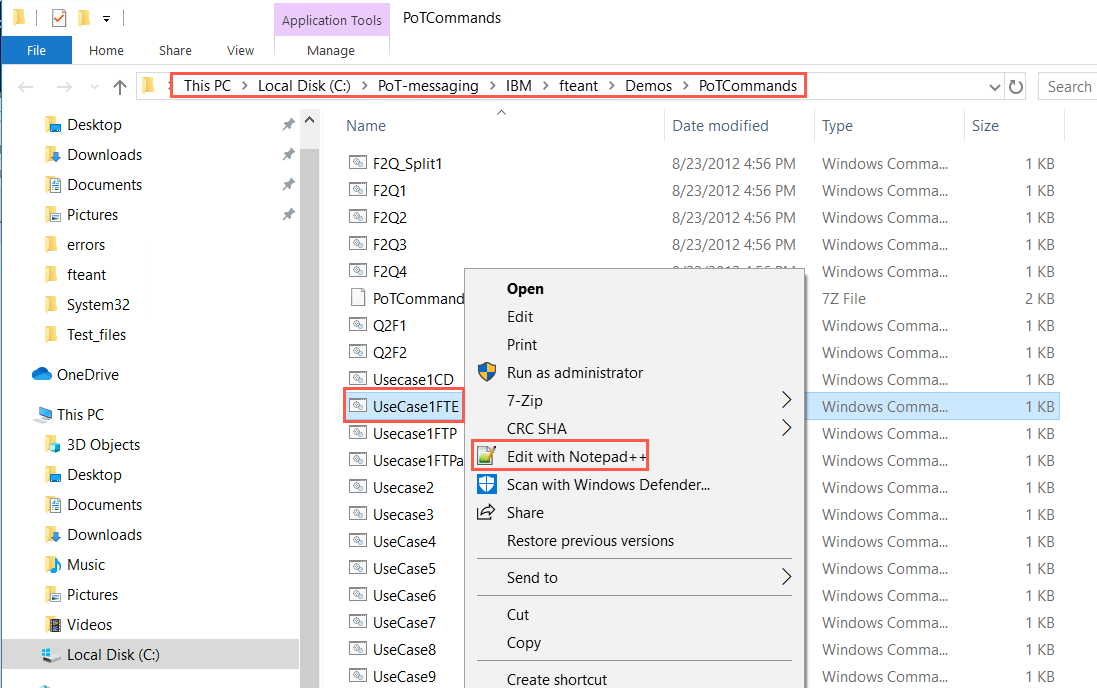
-
When the editor opens, select lines 2 - 6, right-click and select Copy.
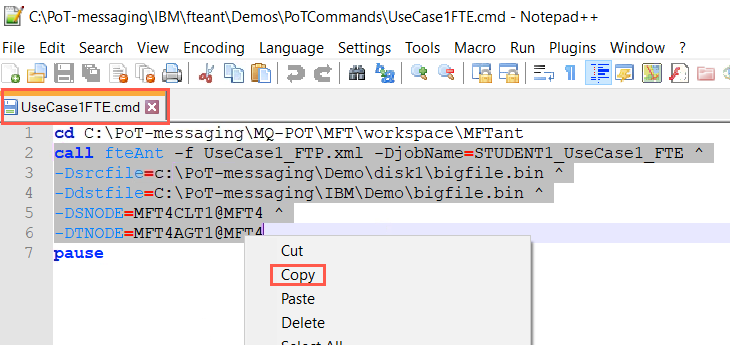
-
Return to the Command Prompt, right-click the empty line and select Paste and press Enter.
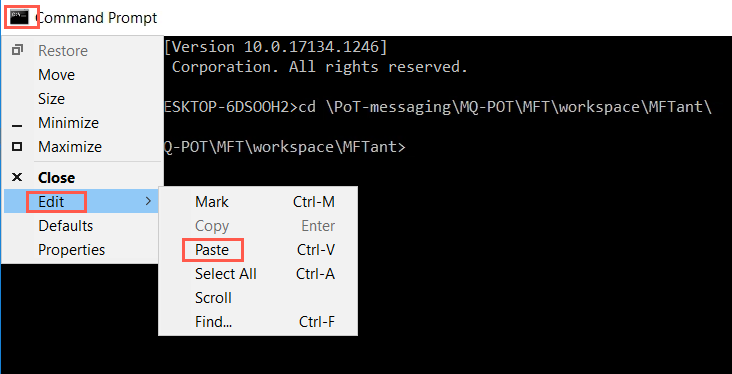
-
Review the messages. Notice the commands being issued and the messages which are logged. You will see a message for copying the file from agent MFT4CLT1 to MFT4AGT1. The destination agent in this transfer is the MFT agent. The copy operation is assigned a unique transfer ID. Remember the three Ant tasks we saw in the script – init, step1, and step2. Step2 waits for the outcome of the transfer operation to be reported and checks that the operation was successful just as it did with the other protocols.
-
Switch to the MFT Server and the Transfer Log. You will see a new successful transfer from MFT4CLT1 to MFT4AGT1 for the same file bigfile.bin.
Summary
In this section of the lab you have exercised three ways to submit MFT transfers – Eclipse workbench, batch file, and the command line. There are really four ways to submit transfers. In addition to the previous methods, you can also submit a transfer by putting a correctly formatted XML command message on an agent’s command queue or an application may put the command message on the command queue. We will not use this method in this lab.
For the transfers you performed, you transferred files using two protocols – MFT via the MFT agent MFT4AGT1 and FTP via the FTP_BRIDGE agent.
For patterns 2 – 12, you are to choose one or more patterns which interest you as time allows. The Ant scripts will be explained, but the detailed steps will not be repeated. Perform the exercises as were done in 3.3.1 – 3.3.7 substituting the appropriate UseCase / Pattern files. Use any one of the three previous methods to submit the transfer requests.
Pattern 2 - Multi step transfer job with program call
This pattern demonstrates the use of another MFT Ant extension. You can use the fte:call task to remotely call scripts and programs. This task allows you to send a fte:call request to an agent. The agent processes this request by running a script or program and returning the outcome. The commands to call must be accessible to the agent; that is the command’s path must be available to the agent and the agent must be permitted to execute the command.
In this exercise, you will see how a single Ant transfer template can be used to perform multiple steps as follows:
-
Transfer multiple files from MFT Agent MFT4CLT1 to MFT Agent MFT4AGT1
-
Call the “NETSTAT” program at the TEACHER Agent
-
Transfer multiple files from MFT Agent MFTAGT1 to MFT Agent MFT4CLT1
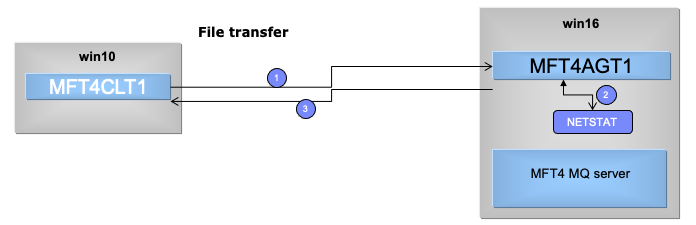
Figure 3.4.1 – Pattern 2 – Multi Step Transfer Job with Program Call
This pattern requires an update to the receiving agent’s properities. The agent must have the commandPath property including the path to the application beint called.
-
On the Server image (win16) navigate to C:\ProgramData\IBM\MQ\mqft\MFT5\config\agents\MFT4AGT1. Open agent.properties file in Notepad++.
-
Add a new line at the bottom:
commandPath=C:/Pot-messaging/IBM/MFT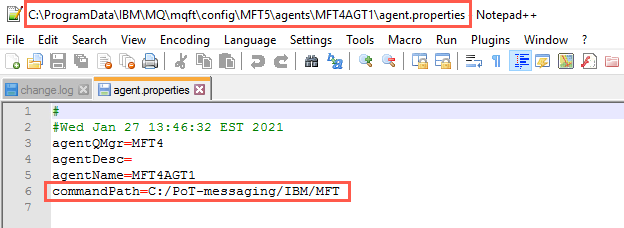
-
Save and close the file.
-
You now need to restart the agent with the following commands:
fteStopAgent MFT4AGT1fteStartAgent MFT4AGT1
Reference Material for Pattern 2
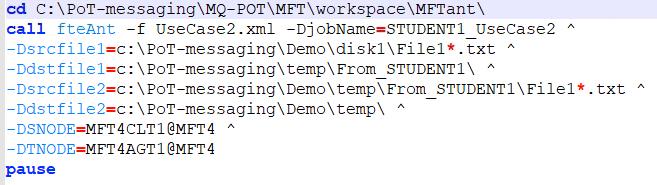
Figure 3.4.2 – POT Command file for MFT Pattern 2
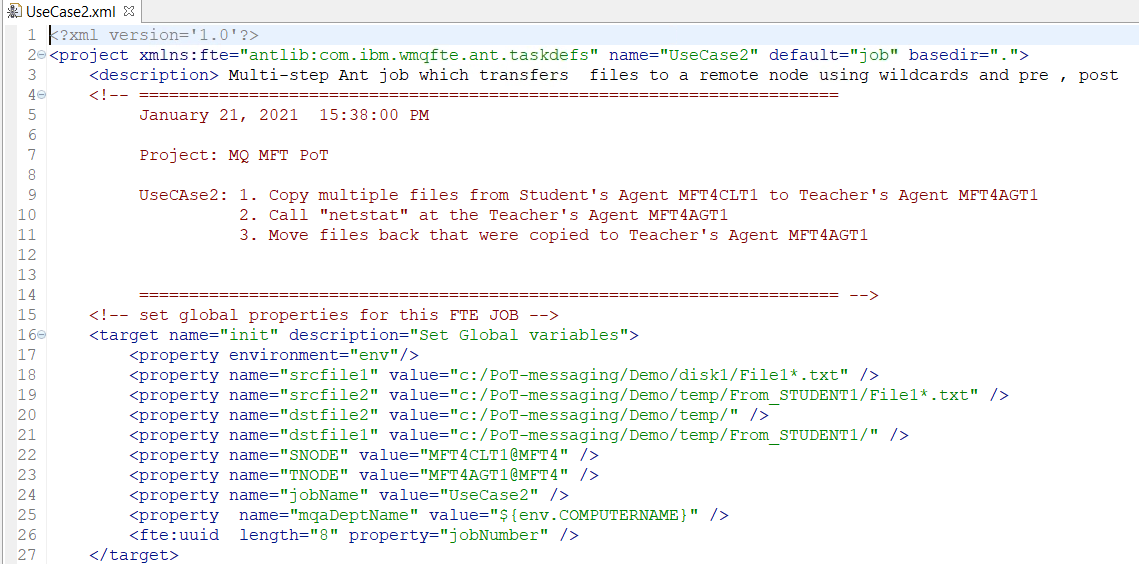
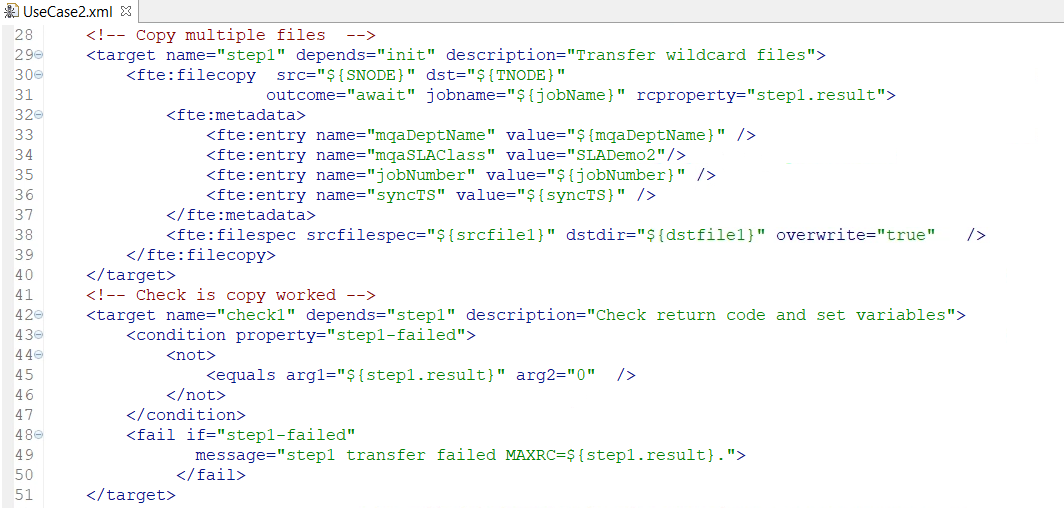
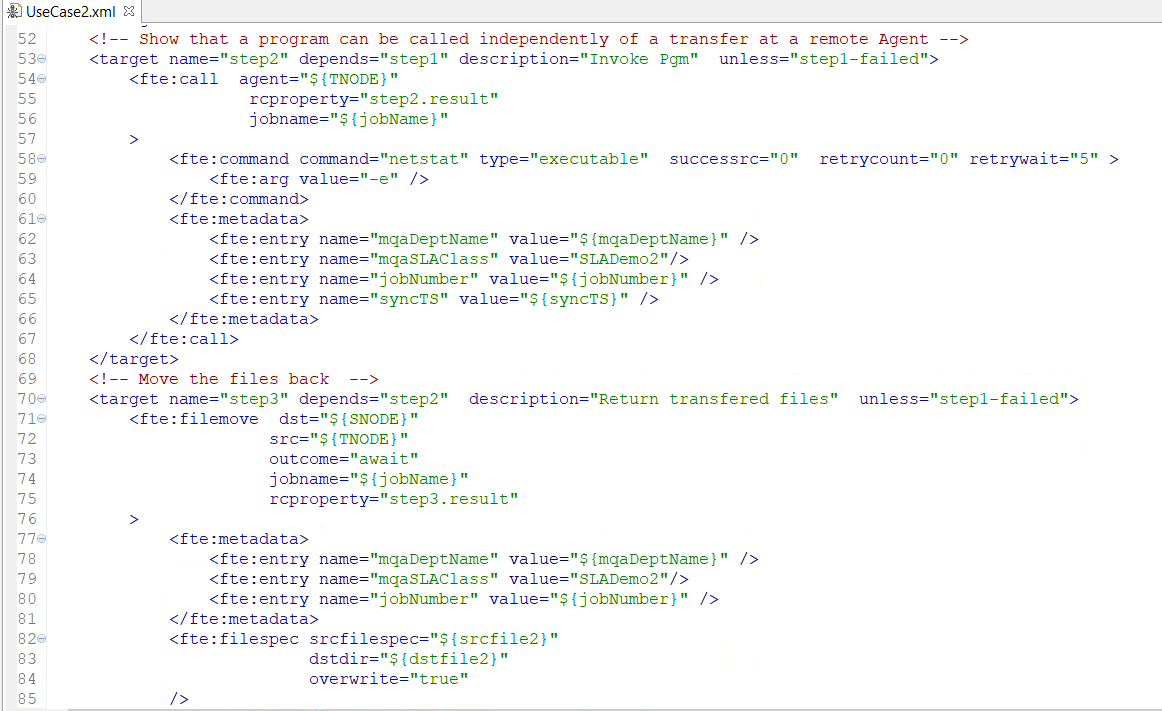
Figure 3.4.3 – Ant Script for running Pattern 2, UseCase2.xml
Review the Ant script UseCase2.xml
Notice the steps (targets or tasks) of the script and the fte: commands that are being issued by the script.
You can see that the script executed multiple steps to complete the transfer.
-
Target init is our housekeeping step that assigns values to properties (variables). The default values are defined here and can be over-ridden at runtime.
-
step1 is dependent on init and executes a fte:copy of the file(s) from the agent MFT4CLT1 to the MFT4AGT1 agent. A fte:copy does not delete the source file. Meta-data is defined with the fte:metadata stanza. Meta-data are name-value pairs of data about the transfer which is carried with the transfer. Each pair of meta-data is defined by the fte:entry command and can also be over-ridden at runtime. fte:filespec indicates the source file(s), destination file(s), and whether destination files should be overwritten.
-
check1 is dependent on step1 and checks return codes to either fail the script or let it continue.
-
step2 is dependent on successful completion of the step1 and issues fte:call to agent MFT4AGT1 to execute the “Netstat” command.
-
step3 is then run depending on the successful completion of step2. step3 issues fte:move to move the file(s) from MFT4AGT1 to the agent MFT4CLT1 on the student’s VMware image. A fte:move deletes the file from the source machine. In the case of step3, MFT4AGT1 agent is the source. Again, take note of the meta-data and filespec parameters.
Run Pattern Script
-
Run the Ant script with your preferred method.
-
Monitor runtime console – Console in the toolkit or command prompt window console.
Review results on MFT Server
-
Analyze the Transfer Log.
-
Find proof that the file(s) were transferred.
Pattern 3 - Transfer single file to multiple end points
This pattern demonstrates how to use an Ant transfer template to send one file to one or more endpoints. The script uses a pipe delimited file as a distribution list to send a single file to multiple MFT agents. Referring to Figure 3.5.1:
-
The distribution list is in a format which uses a pipe delimited record for each destination end point / destination directory combination
-
Transfers are assigned the same Job Name & Job Number metadata to allow all transactions to be correlated to simplify transfer tracking
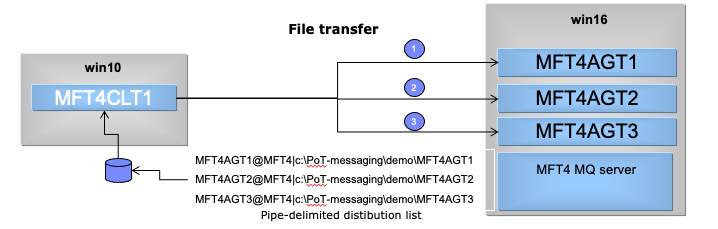
Figure 3.5.1 – Pattern 3 - Transfer single file to mulitple endpoints
Reference Material for Pattern 3

Figure 3.5.2 – POT Command file for running MFT Pattern 3
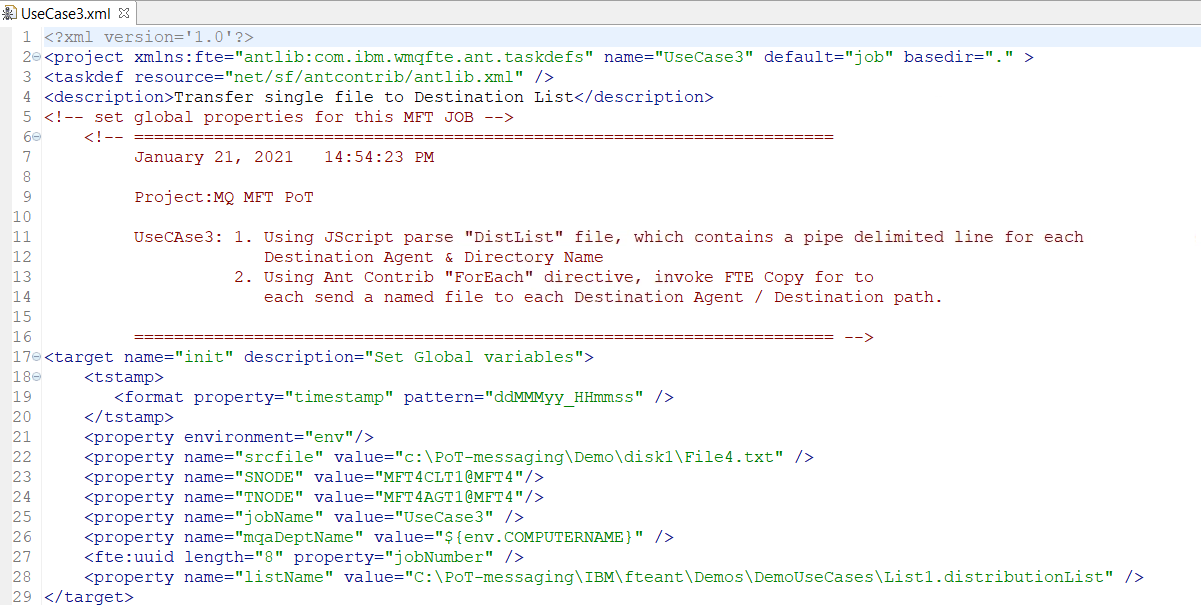
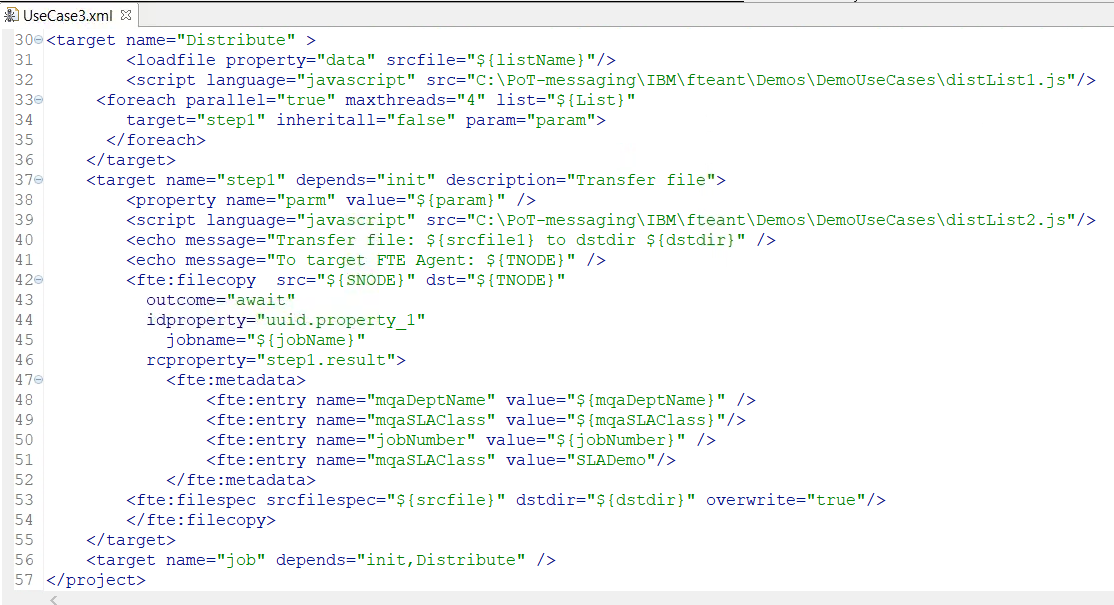
Figure 3.5.3 – Ant Script for running MFT Pattern 3, UseCase3.xml

Figure 3.5.4 – List1.distributionList
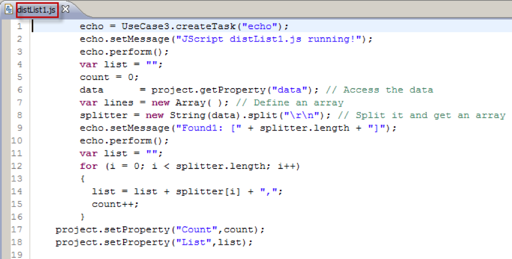
Figure 3.5.5 – JavaScript distList1.js
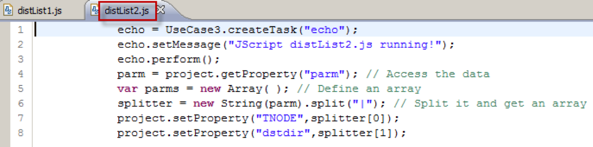
Figure 3.4.6 – JavaScript distList2.js
Review the Ant script UseCase3.xml
Calling JavaScript from Ant Script
In summary, this pattern needs to transfer a file to multiple endpoints. The file to be transferred will be substituted at run time into the reference variable $(srcfile).
The transfer will use a distribution list built dynamically from a text file.
Referring to Figure 3.5.2, this is the command file, Windows *.cmd or *.bat file, to run the Ant script. It simply contains two commands:
-
Change directory to location of the UseCaseN.xml files for the patterns
-
Execute the call command to execute fteAnt with the -f parameter to specify the xml file to run
The rest of the lines are overrides for properties set in the xml file. The java convention for overriding properties is “-Dproperty=xxxxxxx”. The example below shows the property srcfile being overridden and set to C:\Demo\disk1\File4.txt.
-Dsrcfile=c:\Demo\disk1\File4.txt
When the script runs, this is the file to be sent to all endpoints in the distribution list. Take note of the other properties.
$(listName) resolves to text file C:\IBM\fteAnt\Demos\DemoUseCases\List1.distributionList. Figure 3.5.4 shows the contents of the file. The records in the distribution list define the target agent and destination directory for each end point. The agent is represented in the MFT format agent@queuemanager. A pipe delimiter is used to separate the agent and the destination directory.
Figure 3.5.3 shows UseCase3.xml, the Ant script defined for this pattern. In it, you will find four Ant targets or steps, init, Distribute, step1 and job. The init target initializes the properties used in the script. Find the target named Distribute. This target uses the Ant task loadfile to load the data file distribution list defined by $(listname). It uses the JavaScript program distList1.js to read the distribution list and for each entry in the distribution list creates a transfer request.
The Distribute target also indicates that it will use JavaScript to manipulate the contents of the List1.distributionList file. Within the target, we are using the Ant-Contrib foreach command to loop through the contents of the List1.distributionList file running the step1 target for each record in the file. (The Ant-Contrib project is a collection of tasks for Apache Ant.)
The step1 target is the main body of the script, because this is where the transfer request is actually created. step1 executes another JavaScript file, distList2.js. The JavaScript in this file recognizes the pipe delimiter, creates an array, and splits the record into two items in the array. These fields are then used to set the property TNODE to the agent and the dstdir property to the directory path where the file will be written on the destination. Progress messages are written to the console via the echo.setMessage and echo.perform commands.
Using Metadata
fte:metatdata is a MFT extension to Ant. Metadata is used to carry additional user-defined information with a file transfer operation. fte:Metadata is nested by the following tasks:
-
The fte:entry parameter is specified as a nested element. You must specify at least one entry inside the fte:metadata nested element. You can choose to specify more than one entry. Entries associate a key name with a value. Keys must be unique in a block of fte:metadata. The name and value entry attributes are required. Still referring to target step1 in Figure 3.5.4, you can see examples of a fte:metadata definition which contains two entries:
 <fte:metadata>
     <fte:entry name="mqaDeptName" value="${mqaDeptName}" />
     <fte:entry name="mqaSLAClass" value="${mqaSLAClass}"/>
     <fte:entry name="jobNumber" value="${jobNumber}" />
     <fte:entry name="mqaSLAClass" value="SLADemo"/>
 </fte:metadata>
The fte:filecopy Ant extension creates a file transfer request for a source file to be copied from the source agent to the destination agent. A fte:filecopy leaves the source file on the source system. A fte:filemove will delete the source file when the transfer is complete.
fte:filecopy and fte:filemove extensions must include a fte:filespec extension to identify the file to be transferred. A fte:filespec is another nested element just as the fte:metadata. However, the fte:filespec is required, but fte:metadata is not. From Figure 3.5.4, here is the example of fte:filespec:
<fte:filespec srcfilespec="${srcfile}" dstdir="${dstdir}" overwrite="true"/>Notice that the fte:filespec element identifies the file being transferred and the directory path for storing the file on the destination. It also contains options for the transfer such as the overwrite option to replace an existing file.
Run Pattern Script
-
Run the Ant script with your preferred method.
-
Monitor runtime console – Console in the toolkit or command prompt window console.
Review results on MFT Server
-
Analyze the Transfer Log.
-
Find proof that the file(s) were transferred.
Pattern 4 - Pull files from two spokes of a hub and concatenate into a single file
The pattern demonstrates how to use an Ant transfer template to pull files from two or more end points in asynchronous mode. The Ant script waits for all files to arrive and then concatenates the files into a single file before deleting the temp files.
-
Pull file asynchronously from MFT4AGT2
-
Pull file asynchronously from MFT4AGT3
-
Await for all files to arrive
-
Concatenate all files into a single file
-
Delete temporary source files
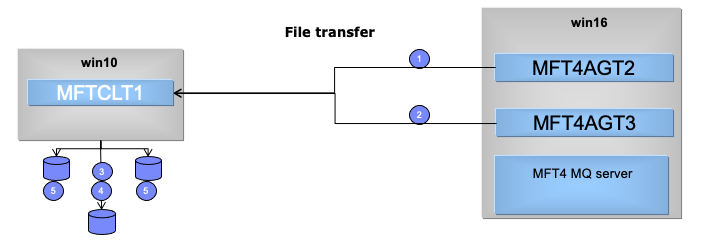
*Figure 3.6.1 – Pattern 4 - Pull files from two spokes to a hub and concatenate into a single file *
Reference Material for Pattern 4
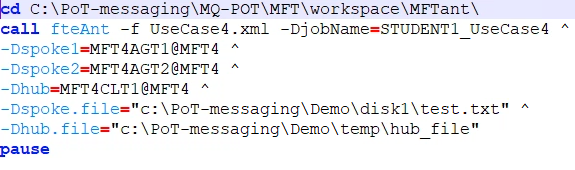
*Figure 3.6.2 – POT command file for Pattern 4 *
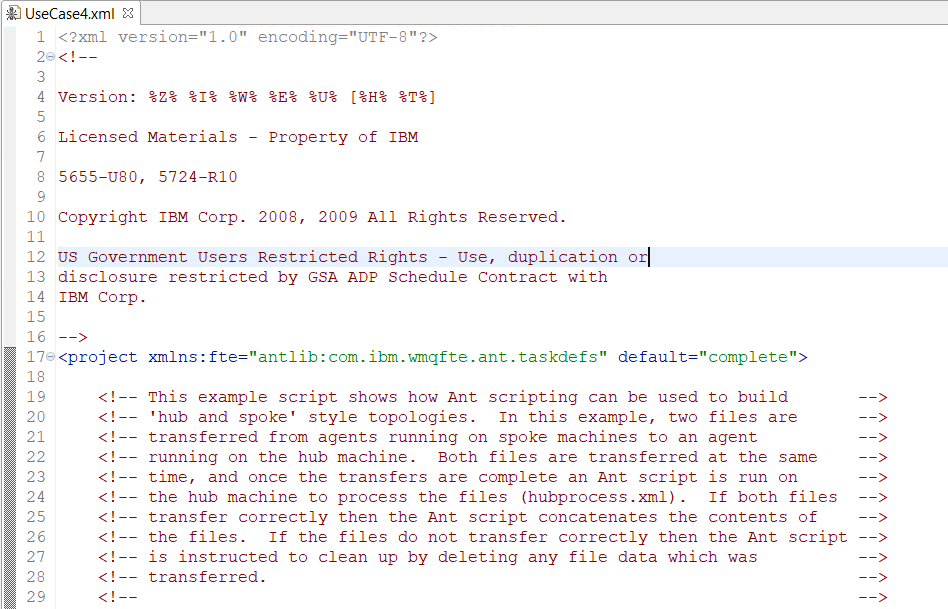
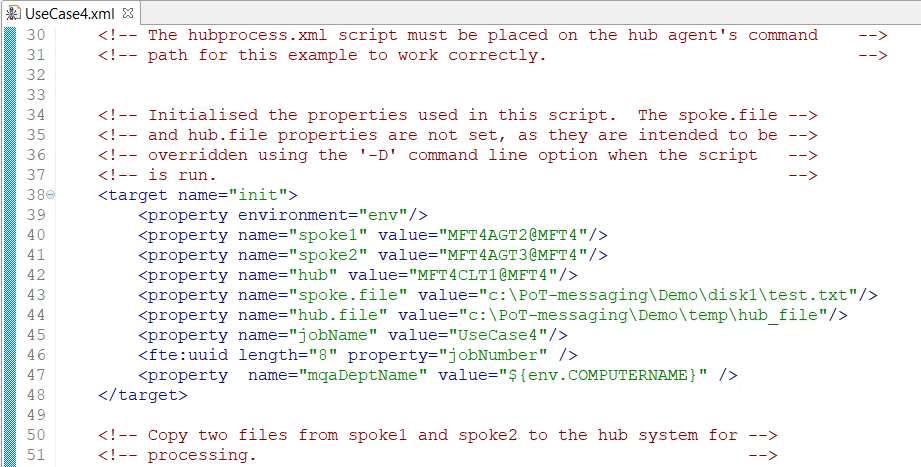
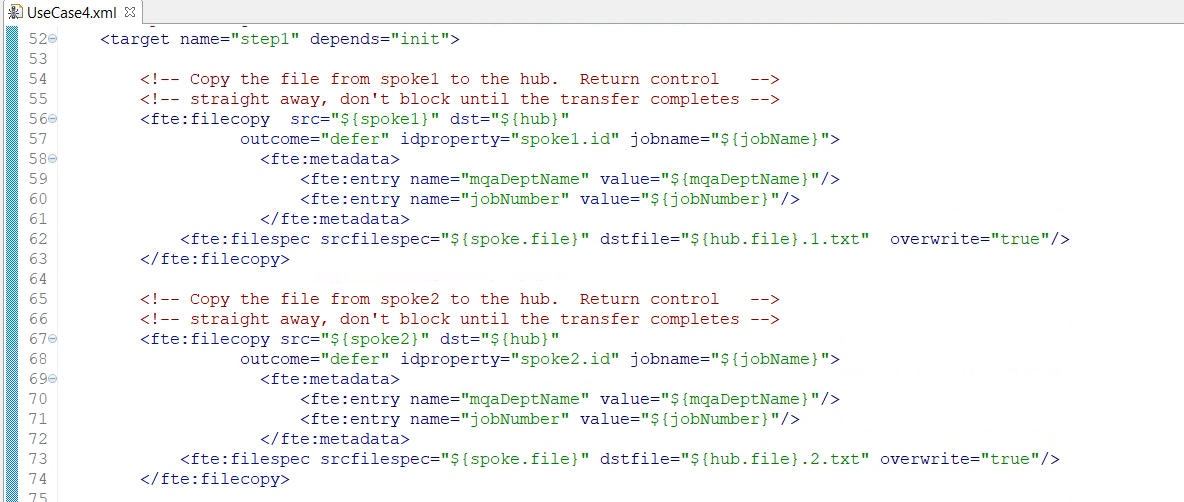
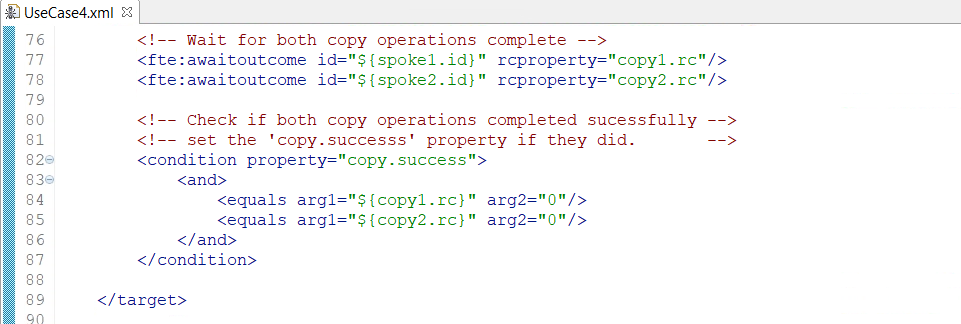
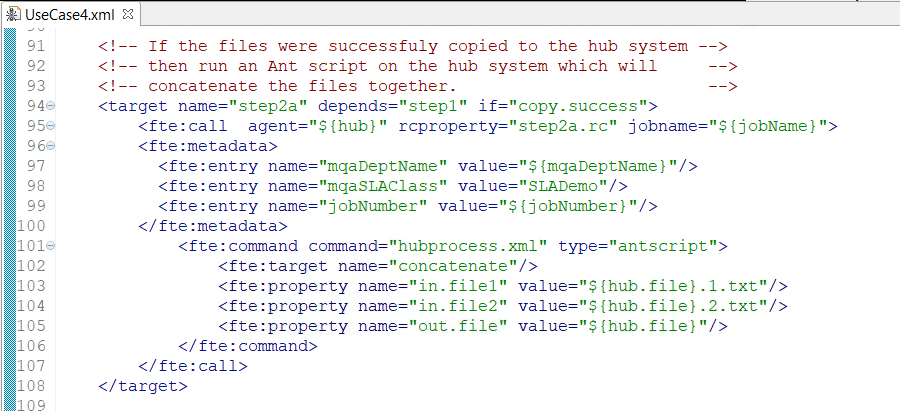
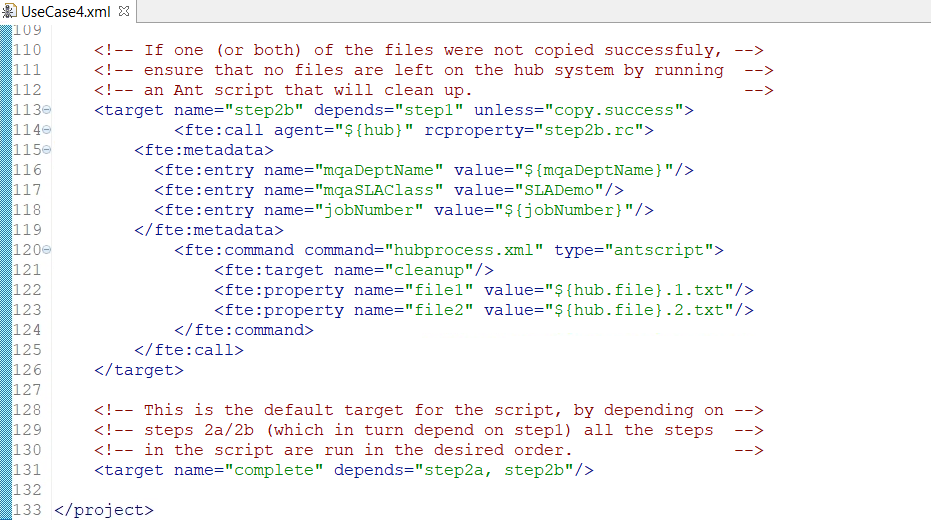
*Figure 3.6.3 – Ant script for running MFT Pattern 4, UseCase4.xml *
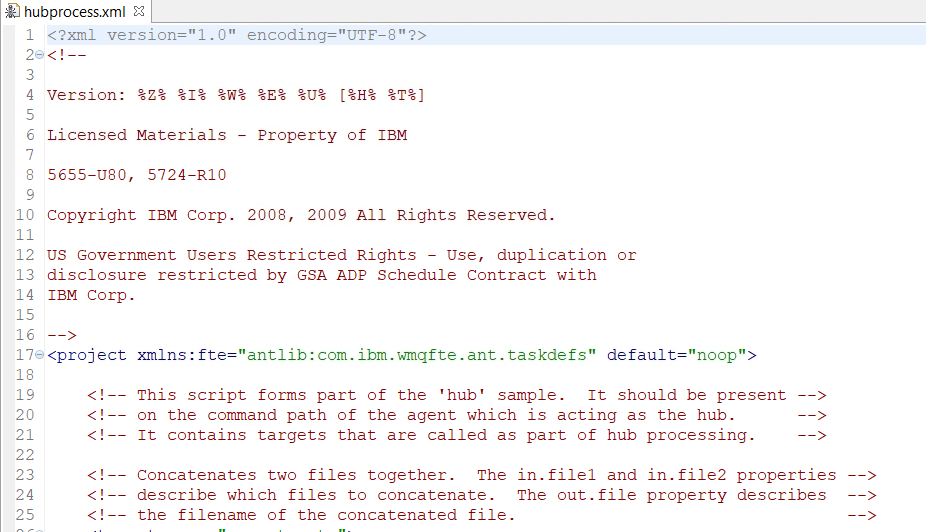
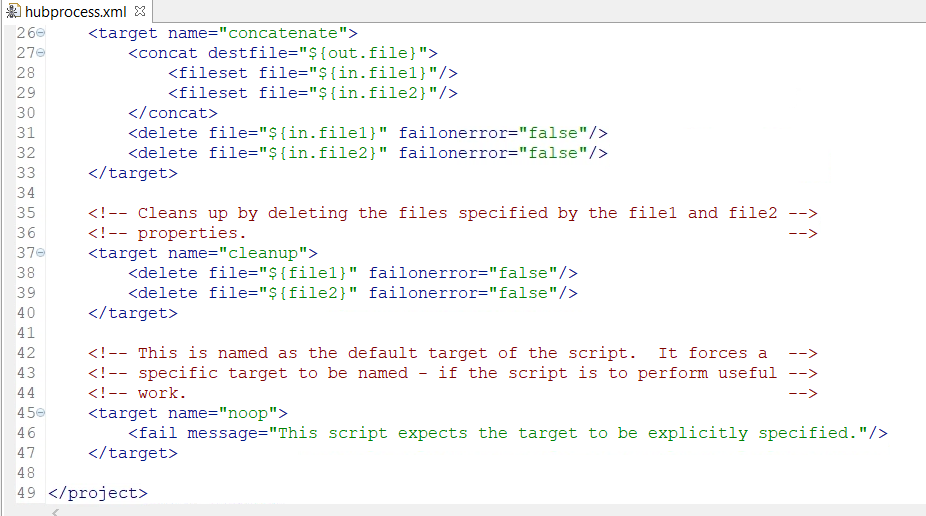
*Figure 3.6.4 – hubprocess.xml – command file *
Review the Ant script UseCase4.xml
Using fte:call in Ant Script
In summary, this pattern is intended to combine two source files from different locations (referred to as spokes) into one file (at the hub). The Ant script “pulls” files from various locations via transfer requests, then uses the fte:call extension to run a concatenate function to combine the files. Referring to Figure 3.6.3, the Ant script appears very long and complex, but if we break it down by the targets, it seems much clearer.
Starting with the init target, initial default property settings are defined. The important properties for this pattern are spoke1 and spoke2. Spoke1 has a value of agent MFT4AGT2 in the form agent@queuemanager. Spoke2 is set to agent MFT4AGT3. Spoke.file is the path to the file to be pulled from each spoke. Spoke1 is the student image and spoke2 is the MFT Server machine. The hub is also the student image. But look at the POT Command file (Figure 3.6.2) and you will see that the spokes are being over-ridden by MFT4AGT2 and MFTAGT3.
step1 target will issue a number of commands. fte:filecopy is used twice to create two transfer requests; one from spoke1 (MFT4AGT2@MFT4) to hub (MFT4CLT1@MFT4) and another from spoke2 (MFT4AGT3@MFT4) to hub. Fte:metadata is used for both commands. And each command includes fte:filespec to indicate the source file name/path and destination file name/path. Take note that each source file has the same name, but the first filecopy will add *.1.txt to the file name and the second filecopy will add *.2.txt to the file name. Using the substitution variable for hub.file the destination files will be c:\PoT-messaging\Demo\temp\hub_file.1.txt and c:\PoT-messaging\Demo\temp\hub_file.2.txt.
Following the transfer requests, the script will wait for the transfers to complete. The fte:awaitoutcome extension to wait on the transfer requests with the IDs specified by spoke1.ID MFT4AGT2@MFT4.ID and spoke2.ID MFT4AGT3@MFT4.ID.
Using Metadata
fte:metatdata is a MFT extension to Ant. Metadata is used to carry additional user-defined information with a file transfer operation. fte:Metadata is nested by the following tasks:
The fte:entry parameter is specified as a nested element. You must specify at least one entry inside the fte:metadata nested element. You can choose to specify more than one entry. Entries associate a key name with a value. Keys must be unique in a block of fte:metadata. The name and value entry attributes are required. Still referring to target step1 in Figure 3.6.4, you can see examples of a fte:metadata definition which contains two entries:
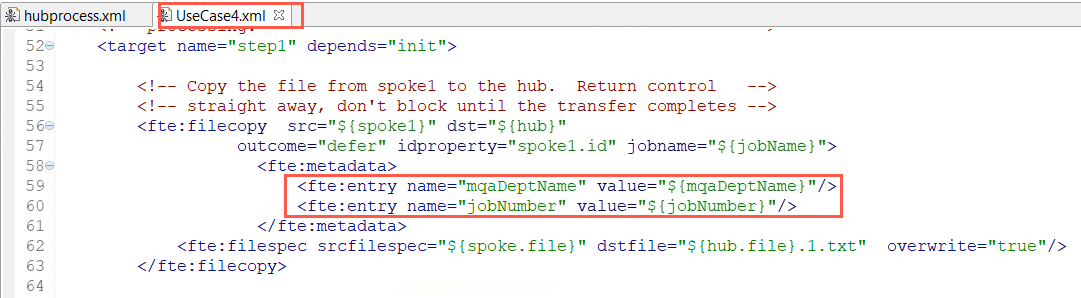
The fte:filecopy Ant extension creates a file transfer request for a source file to be copied from the source agent to the destination agent. A fte:filecopy leaves the source file on the source system. A fte:filemove will delete the source file when the transfer is complete.
fte:filecopy and fte:filemove extensions must include a fte:filespec extension to identify the file to be transferred. A fte:filespec is another nested element just as the fte:metadata. However, the fte:filespec is required, but fte:metadata is not. From Figure 3.6.4, here is the example of fte:filespec:
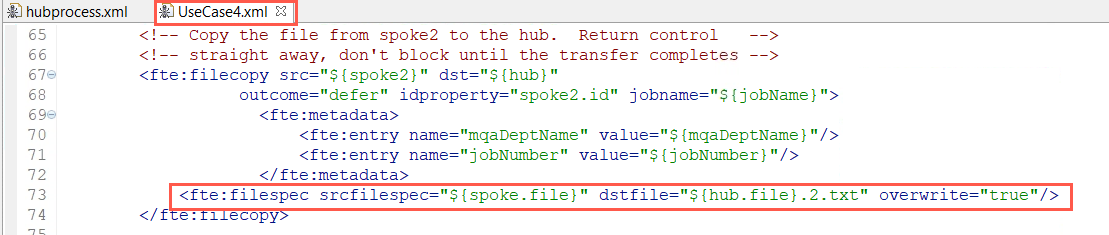
Notice that the fte:filespec element identifies the file being transferred and the file name for storing the file on the destination. It also contains options for the transfer such as the overwrite option to replace an existing file.
Run Pattern Script
-
As noted, the script includes an fte:call command to hubprocess.xml, another Ant script in the same workspace. It is being called by MFT4CLT1. Same as Pattern 2, an fte:call requires a commandPath property in the agent’s property file.
Navigate to C:\ProgramData\IBM\MQ\mqft\config\MFT5\agents\MFT4CLT1\. Right click agent.properties and select Edit with Notepad++. At the end of the file add the property:
commandPath=C:/PoT-messaging/MQ-POT/MFT/workspace/MFTant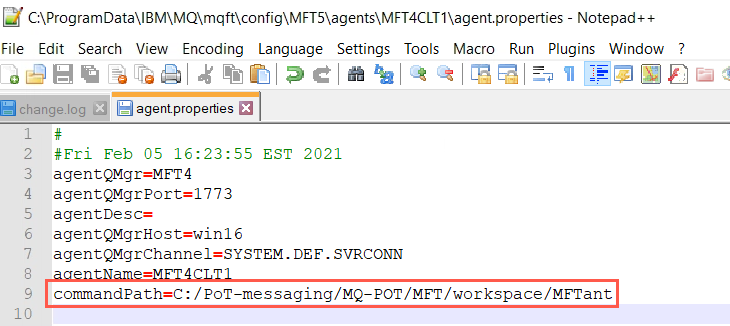
Save and close the file.
-
Restart the agent.
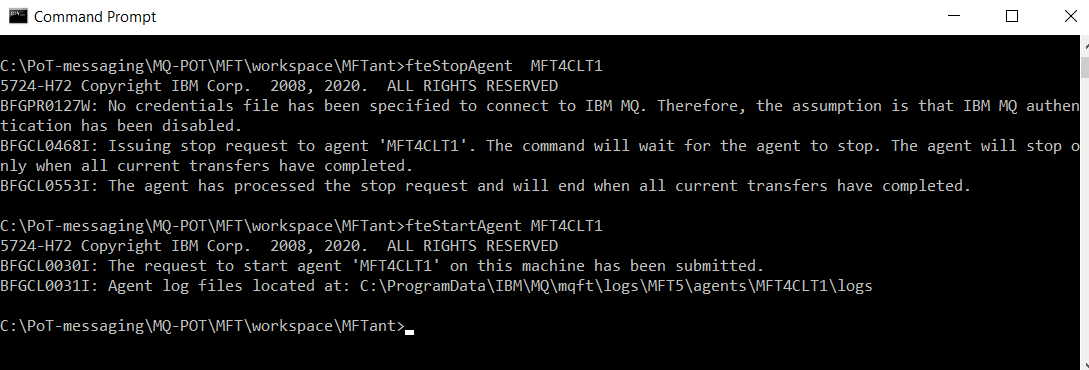
-
Run the Ant script with your preferred method.
-
Monitor runtime console – Console in the toolkit or command prompt window console.
Review results on MFT Server
-
Analyze the Transfer Log.
-
Find proof that the file(s) were transferred.
This concludes Lab 3.