Lab 6 - Migrating Queue Managers to the IBM MQ Appliance
In this lab, we will explore the steps required to migrate an existing queue manager running on IBM MQ on Windows to the IBM MQ Appliance.
VMs required:
- Windows 10 x64
- MQAppl1
The following instructions assume you are using MQAppl1. Any VMs not in use should be suspended or shut down. These include the virtual appliances MQAppl2, MQAppl3, MQAppl4, MQAppl5, MQAppl6 and MQAppl7.
The lab environment consists of one virtual appliance and a Windows environment to perform console operations and testing. The Windows environment also has our existing queue manager that we will migrate to the appliance.
The network adapters are described in IP Addresses in the Overview the IBM MQ Appliance PoT document. Addresses must be configured as indicated in that document.
Prerequisites
-
Lab 1 – Getting started with the MQ Appliance has been completed.
-
The IBM MQ Appliance image MQAppl1 has been started.
-
The Windows image has been started.
Differences between queue managers that are running on the IBM MQ Appliance and an IBM MQ installation
IBM MQ Appliance queue managers are similar in their capabilities to IBM MQ queue managers hosted on supported UNIX and Linux platforms, although some differences do exist.
Exits and services
You cannot run user code on the IBM MQ Appliance. Any attempts to create administrative objects that reference user code are rejected.
The following types of exits and services are not supported:
Channel exits
Any attempt to define or alter a channel to use and exit is rejected.
Channel auto-definition exits
Any attempt to alter a queue manager to use an exit is rejected.
Cluster workload exits
Any attempt to alter a queue manager to use an exit is rejected.
Data conversion exits
You cannot upload a data conversion exit to the appliance.
Services
Any attempt to define a service is rejected.
API exits, publish exits, and user authorization services
Stanzas about API exits, publish exits, and user authorization services cannot be added to the qm.ini file.
MQTT services
MQTT services cannot be used on the appliance.
JAAS security exits
JAAS security exits cannot be used with the IBM MQ Light API
MQLight services
The following type of service is supported: IBM MQ Light API
Queue Manager Configuration on the IBM MQ Appliance
Queue managers on the IBM MQ Appliance are created with different default values than queue managers in IBM MQ.
Maximum Channels
On the IBM MQ Appliance, you do not need to alter the MaxChannels or MaxActiveChannels attributes to define the maximum number of channels that can concurrently connect to a queue manager. On the IBM MQ Appliance, the default value of the MaxChannels and MaxActiveChannels attributes is set to infinite.
If you want to limit the maximum number of channel instances and client connections per channel, use the per-channel MAXINST and MAXINSTC attributes on the SVRCONN channel definitions to define limits for each SVRCONN channel.
MAXINST
Sets the maximum number of simultaneous instances of an individual SVRCONN channel that can be started.
MAXINSTC
Sets the maximum number of simultaneous individual SVRCONN channels that can be started from a single client. In this context, connections that originate from the same remote network address are regarded as coming from the same client.
You can use the DEFINE / ALTER CHANNEL command to set these attributes.
TCP Network Protocol
Any channels that are configured on an IBM MQ Appliance queue manager must be of TCP protocol type. The appliance does not support any other network protocols.
User and group permissions
IBM MQ Appliance queue managers support the user-based permissions model. Creating an authority record for a user results in only that user being granted access. To grant a group of users access, an authority record is required for the group.
Circular logging
IBM MQ Appliance queue managers support only circular logging. There is no support for creating a queue manager with linear logs.
Queue manager data
When you use the crtmqm command to create a queue manager on the appliance, a file system is created where all queue manager data, recovery logs, and errors logs are stored. The default size of this file system is 64 GB, but you can alter the size by using the -fs parameter with the crtmqm command.
Applications connecting to a queue manager
There are differences between applications that are connecting to a queue manager that is running on an IBM MQ Appliance, and one running in an IBM MQ installation. Queue managers that are running on the appliance support only applications that connect by using TCP, over IBM MQ channels.
IBM MQ objects on the IBM MQ Appliance
Some objects on the IBM MQ Appliance have different behavior than objects on an IBM MQ installation.
Listeners
When creating listeners on the IBM MQ Appliance, you should configure the listener to start and stop with the queue manager. You can set the listener by using the CONTROL(QMGR) argument to the DEFINE LISTENER MQSC command (see DEFINE LISTENER in the IBM MQ documentation).
Even if you leave the control property of a listener set to manual, note that it will automatically stop when the queue manager stops on the appliance.
Channels
The default client channel definition table (CCDT) for a queue manager is not automatically available on the IBM MQ Appliance. Use the rcrmqobj command to generate a CCDT file for a queue manager. The generated CCDT file can be downloaded from the appliance from the mqbackup:// URI.
For more information about client channel definition tables, see Client channel definition table in the IBM MQ documentation.
XA Transactions
Queue managers on an IBM MQ Appliance cannot act as XA transaction managers.
Queue managers on the appliance can participate in global transactions as resource managers, but they cannot act as transaction managers and coordinate external services.
An IBM MQ client that connects to a queue manager on an appliance is not able to issue an MQBEGIN API call. This means that the client cannot start a transaction with the queue manager acting as transaction manager.
Differences between administering an IBM MQ Appliance and an IBM MQ installation
Many IBM MQ administrative concepts and commands are supported on the appliance, although some differences do exist. You can use the IBM MQ control commands on the IBM MQ Appliance command line. However, not all of the control commands are supported and some of the control commands have different parameters than the IBM MQ equivalent. You must refer to the IBM MQ Appliance KnowledgeCenter for a list of the commands that are not supported on the MQ Appliance and to see what the differences are for the supported commands.
Overview of migration
You can consolidate your IBM MQ infrastructure by migrating existing queue manager configurations on to the IBM MQ Appliance. The IBM MQ Appliance is designed to be a good candidate for consolidation scenarios, where an existing diverse estate of IBM MQ queue managers and applications is converged into a messaging hub architecture. Features of the environment that make the appliance ideal for this use case include the system performance tuning for client connectivity, high availability capabilities, and segmentation available by using fixed storage allocations for queue managers.
Several factors need consideration when you plan such a migration and consolidation exercise, depending on your previous IBM MQ configuration. The steps that are described in the following topics must be tailored to the particular environment that is being consolidated or migrated.
Consolidation of your IBM MQ estate means moving your queue managers from their various platforms to your IBM MQ Appliance. IBM MQ Appliance V9.2 is compatible with IBM MQ V9.2.
You use the dmpmqcfg command on your source system to save the configuration of a queue manager. Running dmpmqcfg records a series of MQSC commands that you later run with the runmqsc command. You create a new queue manager on your target appliance and create a connection to it on your source system. You then use the runmqsc command on the source system to configure the remote queue manager.
As part of moving a queue manager, you must carefully check the details that you are exporting. If there are features in the export that are not supported on the IBM MQ Appliance, you must take action to remedy this. In particular, note you cannot run applications or services on the appliance. You must move such functionality to a client application.
If you move queue managers that are part of a distributed configuration, you must update channel definitions on other queue managers in the configuration to point to the new location of the moved queue manager on the appliance.
You move a queue manager by re-creating it on the target system. The procedure re-creates the configuration of the queue manager; it does not attempt to re-create the current state of the queue manager by, for example, unloading and reloading queues.
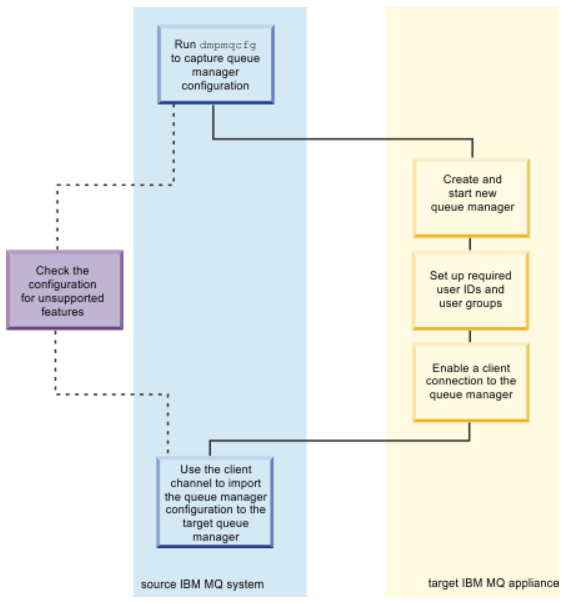
Steps to move a queue manager
The set of steps to move a queue manager are listed below, and these are the steps you will take in the lab.
These instructions assume that you are moving queue managers from platforms other than z/OS, but the general principles also apply to migrating from z/OS.
-
Log in to the source system as a user in the IBM MQ administrators (mqm) group.
-
Save the configuration information of the queue manager that you want to move by typing the following command:
dmpmqcfg -a -mQM_name>QM_fileWhere:
-
QM_name is the name of the queue manager that you want to move.
-
QM_file is the name and path of a local file on the source system that the configuration information is written to.
-
-
If the queue manager is part of a distributed configuration, quiesce the queue manager. Ensure that there are no messages currently transmitting and then stop the queue manager.
-
Create and start a new target queue manager on the IBM MQ Appliance. You can use the IBM MQ Console to do this action, or you can use MQSC commands with the required name and attribute values. If you want to use MQSC commands, you must complete the following steps:
a. Connect to the IBM MQ Appliance.
b. Log in as a user in the administrators group.
c. Type the following command to open the IBM MQ command line interface:
mqcli -
Set up any user IDs that are required by the queue manager that you are moving.
-
Enable a client connection to the target queue manager. You must define and start a TCP listener, define a SVRCONN channel, and allow administrator access to the queue manager by using this channel. You can use the IBM MQ Console to do this action, or you can use MQSC commands. If the source IBM MQ system has IBM MQ Explorer, you can use it to add a remote queue manager definition for the target queue to check that the client connection is working.
-
Ensure that your exported queue manager configuration is compatible with the target IBM MQ Appliance. Edit the file that contains the queue manager configuration information if necessary. Examples of necessary edits are exit definitions, SERVICE definitions, and non-TCP/IP listeners, but there may be others. You will read about these incompatibilities in section Handling incompatible features in the queue manager.
-
Import the source queue manager configuration into the target queue manager. You run these steps on the source system:
a. Define an environment variable that is named MQSERVER to identify the channel that connects to the target queue manager. For example, the value of MQSERVER could be set to:
SYSTEM.ADMIN.SVRCONN/TCP/9.20.233.217(1414)
b. Run the following command to replay on the target queue manager the commands that were exported from the source queue manager:
runmqsc -cQM_name<QM_file -
Restore the attributes that were masked in the dmpmqcfg output and that you identified when you checked the output. You restore attributes by using the client connection from the source system. You can either use IBM MQ Explorer, or start runmqsc interactively in client mode and then input MQSC commands:
runmqsc -cQM_name -
Stop and restart the queue manager on the target IBM MQ Appliance and ensure that it starts cleanly.
Moving queue managers secured by using TLS: You must take additional steps when you move queue managers that are secured by using TLS. When you move a secure queue manager to IBM MQ Appliance, you must re-create the repository on the appliance and regenerate certificates and keys. The repository is created when you create the queue manager on the appliance; you must take steps to regenerate certificates and keys. You then redistribute those certificates and keys to the various queue managers and clients that want to communicate with each other. See the IBM MQ Appliance KnowledgeCenter for the procedure.
Planning for incompatible features in the queue manager
It is possible that not all features in your source queue manager are supported by the target IBM MQ Appliance. You should take time to plan how to handle any incompatible features.
User IDs and groups
As part of moving the queue manager, you must identify any user IDs and groups that the queue manager configuration includes and re-create them on the IBM MQ Appliance. If different user IDs and groups are created on the appliance, then you must make the appropriate changes to the dmpmqcfg output.
Special considerations for moving a queue manager from z/OS
In most cases, it is not appropriate to move a queue manager from z/OS to an appliance, because the connecting applications (for example in batch, CICS, IMS and DB2 environments) must be locally bound to a z/OS queue manager running on the same LPAR as the application.
Queue managers on z/OS are likely to have several z/OS-specific attributes that are not supported on IBM MQ Appliance. You must remove or comment out such attributes.
These changes do not ensure that the migrated queue manager is functionally equivalent to the original queue manager on z/OS. You must consider each of the attributes that are not supported by the new queue manager to decide whether its value is significant for your applications, and if the behavior of the object in the new queue manager, without this attribute, is acceptable. In some cases, it might be necessary to define different objects or to set other values to achieve the same effect. This consideration also applies to differences in the default value of some attributes. For example, queues on z/OS default to non-shared so there might be several statements that replace queues, including default system queues, with non-shared versions. This action might be the right thing to do if your applications rely on this characteristic, or it might be the wrong thing to do because you want to preserve the default behavior of the appliance queue manager.
Inspecting qm.ini file for the source queue manager
Examine the qm.ini file and make a note of any settings that cannot be made by running the commands in the dmpmqcfg output. These settings might include, for example, log file settings. Particularly note any exit information in the configuration. IBM MQ Appliance does not support exits, so this functionality must be substituted. For example, channel exits can be replaced by channel authentication records, and API exits might be replaced by activity trace. Refer to section Editing qm.ini files on the MQ Appliance for information on how to set values in the Appliance’s qm.ini file.
Applications
Applications cannot be run on the IBM MQ Appliance. You must plan to migrate any applications that are local to the queue manager to client systems. Such applications need to be rebuilt so that they can connect to the queue manager from another machine by using client connections. If any applications are run as triggered processes, they must also be converted to run on a client machine. In that case, it is necessary to run the trigger monitor in client mode and to alter the queue manager's process definitions accordingly.
Exits and services
The IBM MQ Appliance does not support exits or services that are defined in the queue manager configuration. You must plan to migrate exits and services to equivalent functionality on a client system.
Channels that use SSLv3 or TLSv1 CipherSpecs
By default, IBM MQ v9.1 does not support SSLv3 or TLSv1 and related CipherSpecs. If you move a queue manager to the IBM MQ Appliance that has one or more channels that use SSLv3 or TLSv1, you can take action to enable support for these CipherSpecs. See the IBM MQ Appliance KnowledgeCenter for details.
Handling incompatible features in the queue manager
You must check that the queue manager that you are moving to the IBM MQ Appliance is compatible with the appliance.
The dmpmqcfg command that you run on your source platform produces a series of MQSC commands that you run to re-create the queue manager on the target IBM MQ Appliance. Certain features are incompatible with the appliance, and you must check the dmpmqcfg output, and amend it if necessary, to deal with incompatible features.
The output from the dmpmqcfg command contains lines that are commented out by the asterisk (*) character. Many of these values are read-only values that are set when the queue manager is created. They cannot be affected by the commands in the dmpmqcfg output.
You must also check the configuration file (qm.ini) for the source queue manager and make a note of any non-default attributes that cannot be set by the ALTER QMGR command, and so are not recorded in the output from dmpmqcfg.
Substitute appropriate values for masked values
The output from the dmpmqcfg command might include one or more masked values. If these values were replayed in commands, they would not correctly re-create the object’s configuration. The values are masked to prevent sensitive data, such as passwords, from being included in clear text in the configuration dump.
Before you replay the configuration, first check the output for masked parameters such as SSLCRYP, PASSWORD, or LDAPPWD that are commented. You must use additional commands to substitute valid values.
Remove definitions of queue manager services
Queue manager services are not supported by IBM MQ Appliance. You must search the dmpmqcfg output for any DEFINE SERVICE or ALTER SERVICE commands and remove service definitions. Services can be replaced by code in client applications.
Remove changes to the CCSID
Remove any change to the queue manager CCSID in the ALTER QMGR command. The default CCSID for the IBM MQ Appliance is 819. If you must change the CCSID, use a separate command and then restart the queue manager to ensure that all processes switch to the new CCSID.
Verify user IDs
Ensure that any user IDs specified in the commands are correctly defined on the IBM MQ Appliance. On Windows source systems, the user and group names might be in the form name\@domain. This format is not supported on the appliance, so any such user IDs must be mapped to new user IDs on the appliance.
Remove changes to the SSLKEYR queue manager attribute
The SSLKEYR queue manager attribute is managed by the appliance, and should not be overwritten when you replay the commands to create the queue manager configuration.
Removing listeners from Windows queue managers
Where you are moving a queue manager from a source Windows system, you must remove any definitions for NETBIOS, SPX, and LU62 listeners from the dmpmqcfg output.
Editing qm.ini files on the MQ Appliance
You cannot directly edit a queue manager qm.ini file on the IBM MQ Appliance. There are CLI commands, however, that you can use to work with qm.ini files.
-
You can add a value or modify an existing value in the configuration file of a queue manager by using the setmqini command on the command line.
-
You can delete a value from the qm.ini file of a queue manager by using the setmqini command on the command line.
-
You can view the contents of a single stanza or key in a queue manager configuration file by using the dspmqini command on the command line.
See the IBM MQ Appliance KnowledgeCenter for details on using these commands.
Preparing the Windows MQ installation for the lab
You will add two queue managers to the MQ installation on the Windows image that you will use in the lab. You will create APP1_QMGR and APP2_QMGR. APP1_QMGR will be the queue manager that you migrate to the MQ Appliance. Although you are going to add these queue managers now, the assumption is that they have been here and been used to communicate between the two queue managers. You will use mqsc scripts to update and create all of the MQ objects in each queue manager.
The scenario is you want to migrate APP1_QMGR to the appliance, and keep communication with APP2_QMGR, which for now will stay where it is.
-
Start MQ Explorer in the Windows VM image.

-
Notice that you do not see any local queue managers (you may see a local queue manager if you completed Lab 5). The first step will be to create the two queue managers used in this lab.
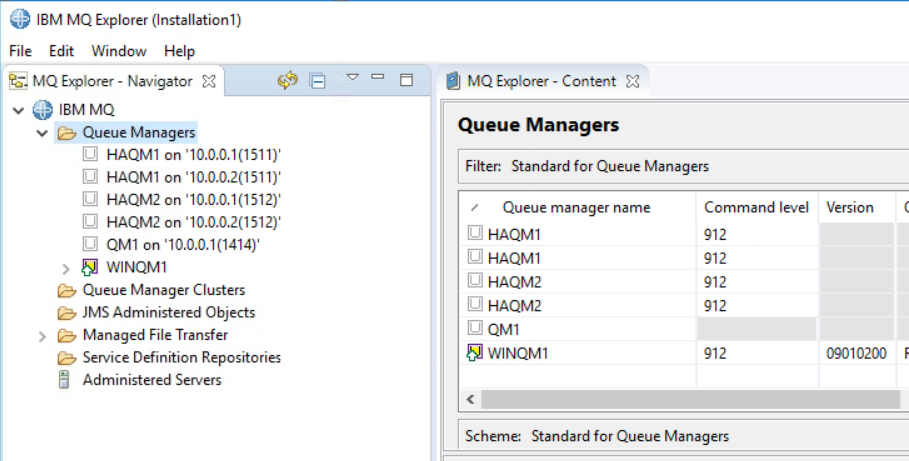
-
Right-click the Queue Managers folder in the MQ Explorer Navigator and click New > Queue Manager.
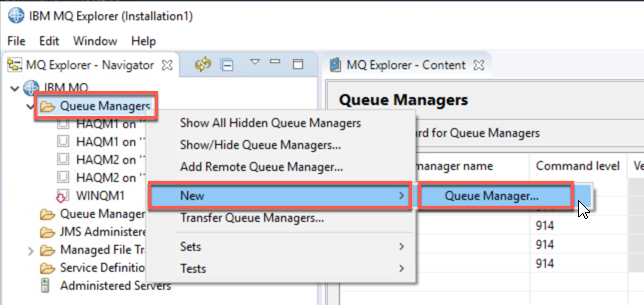
-
In the Create Queue Manager dialog, enter APP1_QMGR for the Queue manager name and click Next. Because you are using an mqsc script, all attributes will be set by the values in the script via an ALTER QMGR command, so you do not need to worry about other parameters that are changeable after queue manager creation.
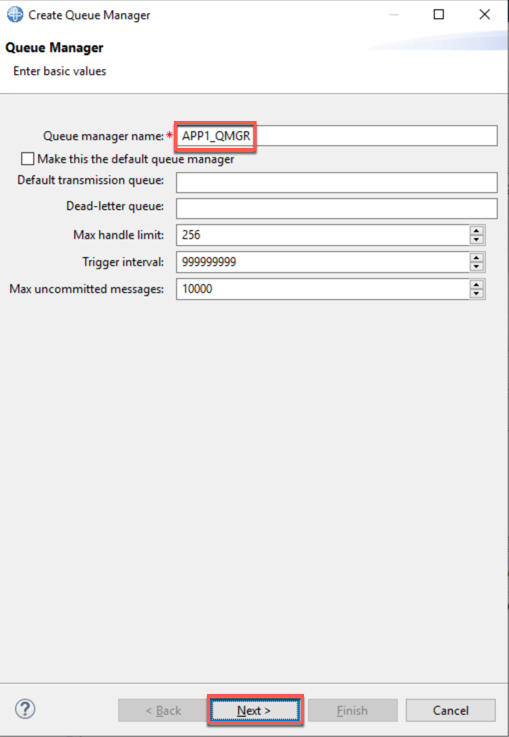
-
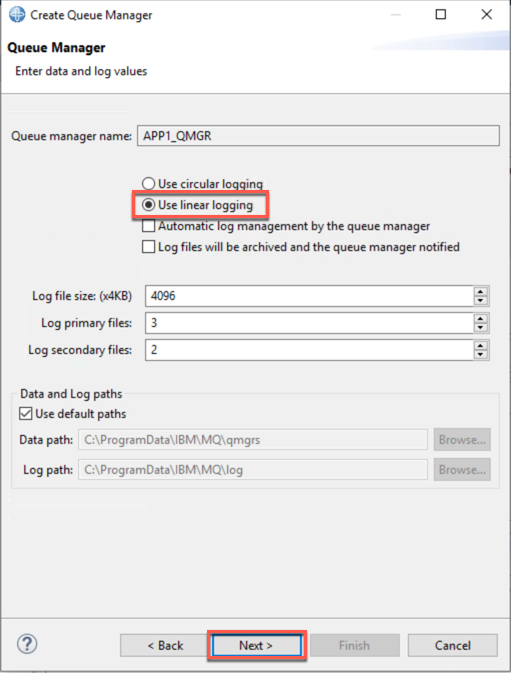
Select Use linear logging and click Next.
-
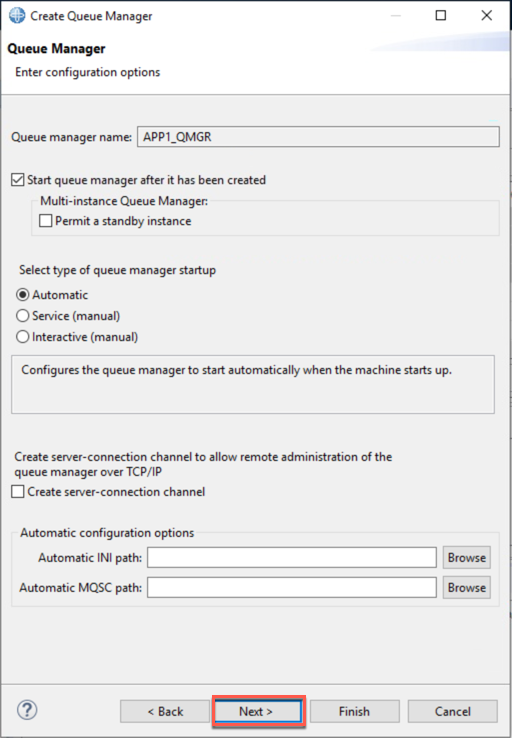
Keep the defaults on this page and click Next.
-
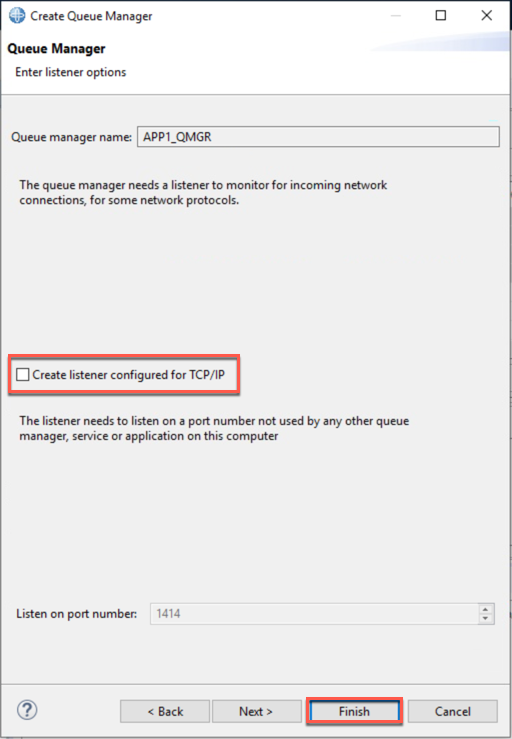
You will allow the mqsc script to create the listener, so deselect Create listener configured for TCP/IP and click Finish.
 Note:
Note:
Note that you may see an error when first getting to this panel stating, ‘The port is already used by another IBM MQ listener’. When you uncheck the box, the error goes away.

-
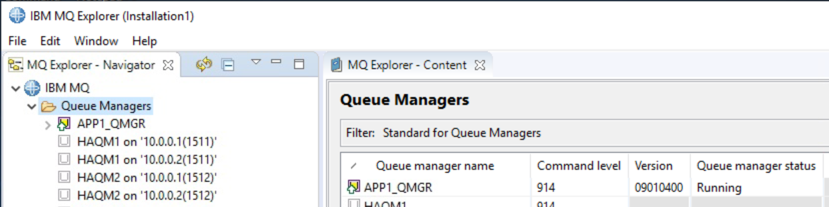
Wait for the queue manager to be created and started. It will show up in the Windows Explorer after it is created.
-
Now create the second queue manager. Again, right-click Queue Managers and click New > Queue Manager.
-
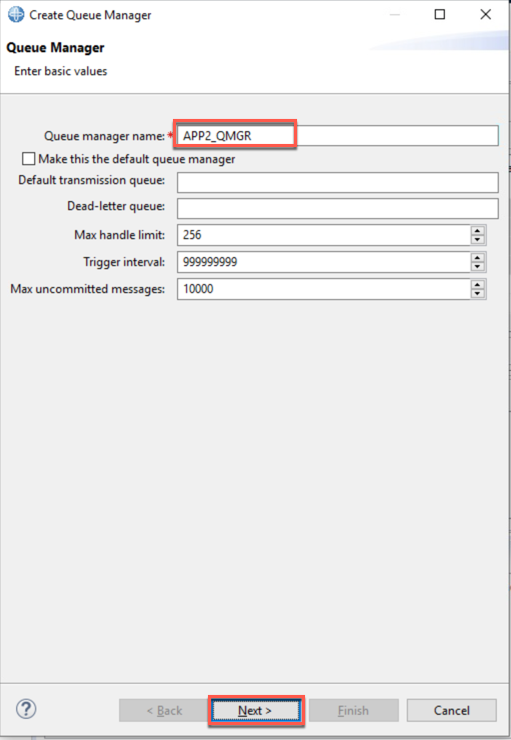
Enter APP2_QMGR for the queue manager name and click Next.
-
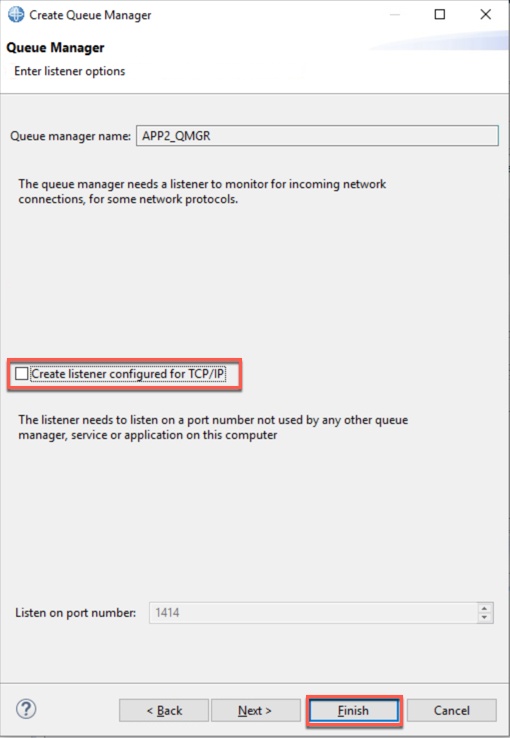
Click Next three more times, until you get to the listener dialog.
-
Deselect Create listener configured for TCP/IP and click Finish.
-
Now both queue managers should be running. You will now run the two mqsc scripts to restore the configurations of the two queue managers.
Open a Command Prompt window.
-
Issue the following commands:
CD \SETUP-INSTALL\MQSC\
runmqsc APP1_QMGR < APP1_QMGR.mqsc > APP1_QMGR.out
-
You should see the following message in APP1_QMGR.out at the end, after the script completes. Enter the following to see the script output and review the final messages (or use Notepad++ if you prefer to review the output file):
type APP1_QMGR.out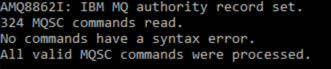
-
Now issue the following command to configure the second queue manager:
runmqsc APP2_QMGR < APP2_QMGR.mqsc > APP2_QMGR.out -
You should see the following message in APP2_QMGR.out at the end, after the script completes. Enter the following to see the script output and review the final messages (or use Notepad++ if you prefer to review the output file):
type APP2_QMGR.out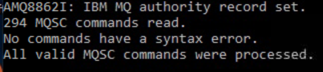
-
You should now have two “pre-existing” queue managers ready for the rest of the lab. To verify this, return to the MQ Explorer. You can leave the Command prompt open.
-
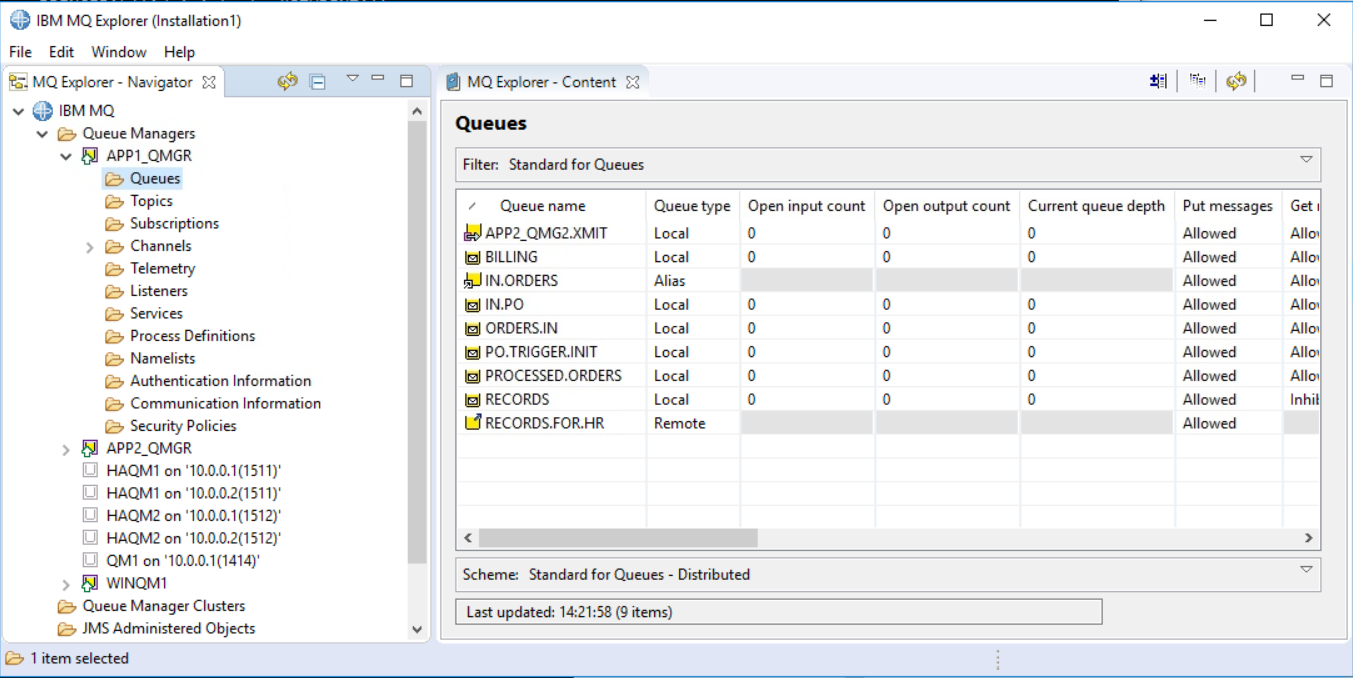
Click the > icon next to APP1_QMGR and then click the Queues folder. You should see all the queues that the script recreated.
-
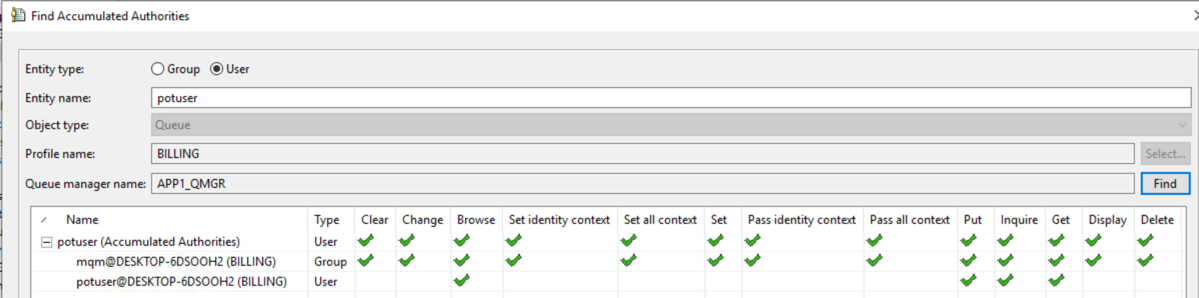
You can explore the other folders for the other MQ objects the script recreated, including Topic, Subscription, Channel, Listener, and Process Definition objects, as well as OAM accumulated authority records on the BILLING queue. You want to be familiar with this queue manager because you will be migrating it to the MQ Appliance.




-
Click the > icon next to APP2_QMGR and then click the Queues folder. You should see the queues that the script recreated.
-
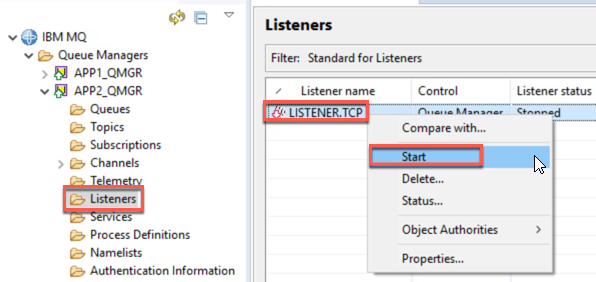
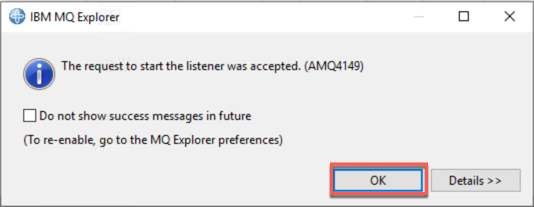
The one thing you need to do to prepare for later testing is start the listener on APP2_QMGR. Click the Listeners folder under the APP2_QMGR queue manager. Right-click the LISTENER.TCP listener, and then click Start.
-
Click OK to dismiss the dialog box (if shown).
-
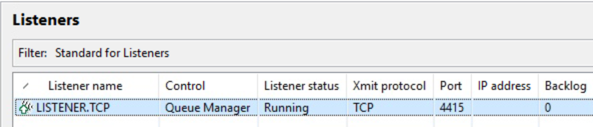
The listener should start and show a Listener status of “Running.”
Using dmpmqcfg on the source queue manager
For a real migration, this would be your starting point. You would go to the running queue manager that you want to migrate and issue the dmpmqcfg command to dump out the queue manager’s configuration and generate the mqsc script to recreate it.
You will generate output from the dmpmqcfg command a couple times, to get all MQ objects: the durable subscription, channel authentication records, and authority records that you want. You are doing this in multiple steps, to eliminate the extra hundreds of authority records that you do not need because there are default authorities (which the creation of the queue manager on the Appliance will take care of).
-
Return to the Command prompt. You still want to be in the \Setup-Install\MQSC directory.
-
Capture your MQ objects. Issue the following command:
dmpmqcfg -a -x object -m APP1_QMGR > APP1_QMGR_Migration.mqscThis dumps the configuration of all MQ objects, with the -a flag to include all attributes, and redirects the output to the file named APP1_QMGR_Migration.mqsc. You should just get the prompt back.

-
Now capture your durable subscription definition. Issue the following command:
dmpmqcfg -a -x sub -m APP1_QMGR >> APP1_QMGR_Migration.mqscThis dumps the configuration of all durable subscriptions (you have one), with the -a flag to include all attributes, and appends the output to the file named APP1_QMGR_Migration.mqsc. Be sure to use two greater than symbols (the ») so you append and do not overwrite the contents of your first output. You should just get the prompt back.

-
Now you will dump the channel authentication records. Issue the following command:
dmpmqcfg -a -x chlauth -m APP1_QMGR >> APP1_QMGR_Migration.mqscThis dumps the configuration of all channel authentication records, with the -a flag to include all attributes, and appends the output to the file named APP1_QMGR_Migration.mqsc. You should just get the prompt back.

-
Last, you will dump the authority records you need. You will limit the output as much as you can. Issue the following command:
dmpmqcfg -a -x authrec -n BILLING -m APP1_QMGR >> APP1_QMGR_Migration.mqscThis dumps the configuration of authority records, looking for a profile name of BILLING, with the -a flag to include all attributes, and appends the output to the file named APP1_QMGR_Migration.mqsc. You should just get the prompt back.

-
Now you need to quiesce the queue manager that you will move. At the Command prompt, enter the following command:
endmqm -c APP1_QMGR
-
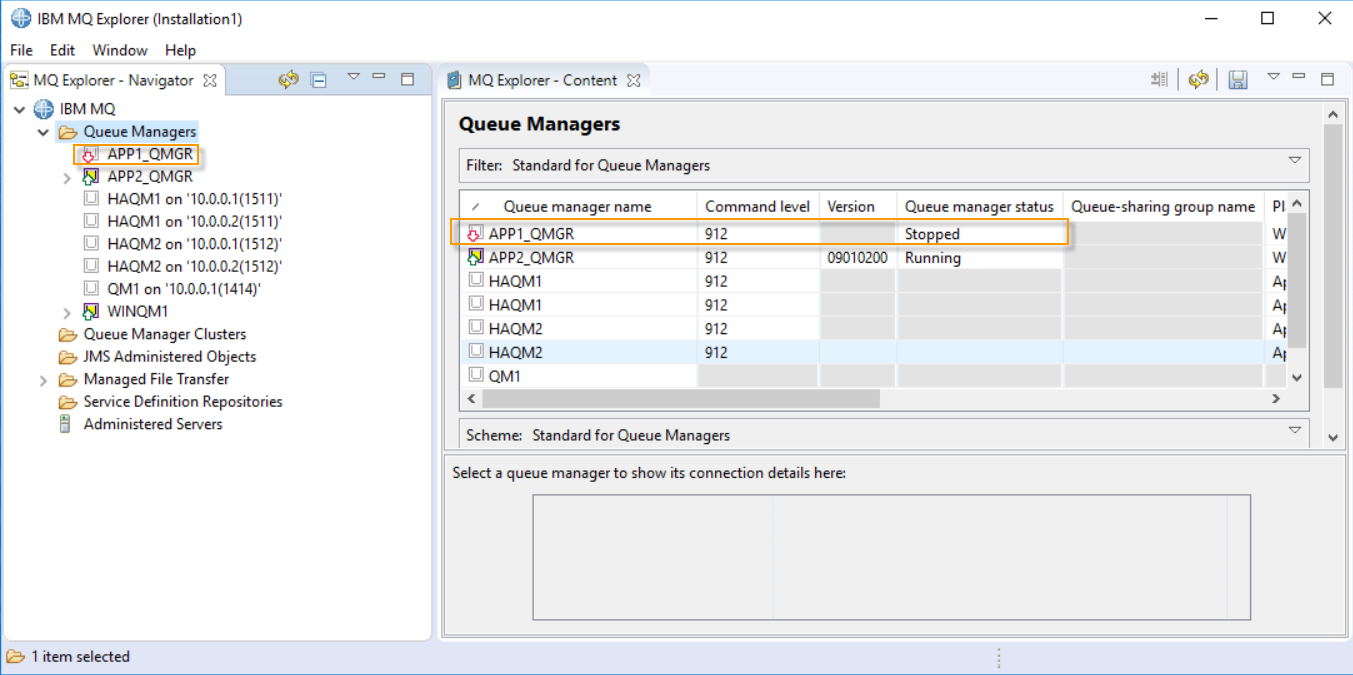
You can return to the MQ Explorer to verify that the queue manager is stopped.
Reviewing the exported queue manager configuration for compatibility with the target IBM MQ Appliance
You must now review this mqsc script for any incompatibilities with a queue manager running on the MQ Appliance. You must make any necessary changes to the mqsc script.
-
Start Notepad++

-
Click File > Open….

-
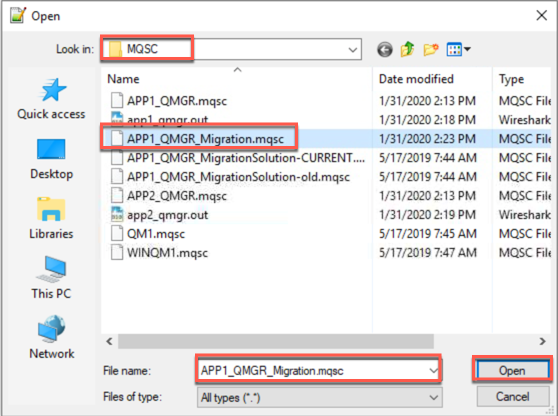
Navigate to C:\Setup-Install\MQSC and select the APP1_QMGR_Migration.mqsc file. Click Open.
-
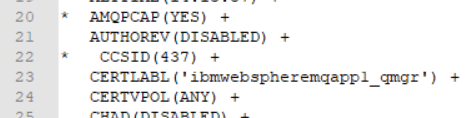
You see lines that are commented out by the asterisk (*) character. These values are read-only and are set when the queue manager is created, so you do not need to be concerned about these. The section titled Differences between queue managers that are running on the IBM MQ Appliance and an IBM MQ installation outlines the types of things you need to look for. The first one you encounter is the CCSID. You are advised to remove any change to the queue manager CCSID in the ALTER QMGR command, as the default CCSID for IBM MQ Appliance is 819.
-
Go to the line that has CCSID(437) (line 22) and place an asterisk (*) character at the beginning of the line to make it a comment.
-
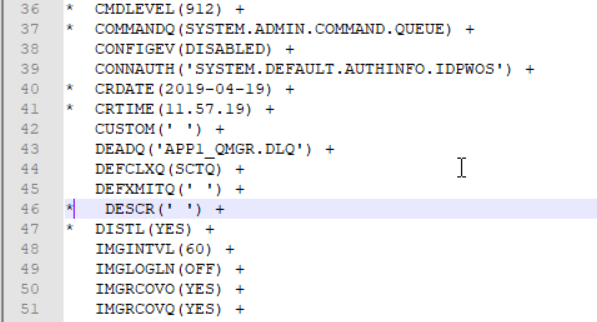
Do not overwrite the queue manager DESCR attribute that you will set when you created the queue manager on the Appliance. Find the DESCR attribute for the APP1_QMGR (on line 46), and place an asterisk (*) character at the beginning of the line to make it a comment. (Of course, you may want to keep your existing DESCR values when you do real migrations.)
-
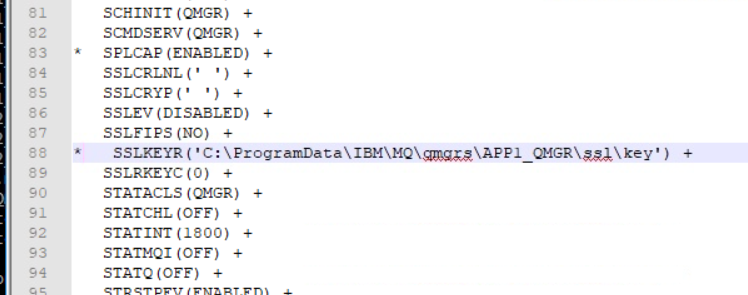
You are also advised that the SSLKEYR queue manager attribute is managed by the Appliance, and should not be overwritten when you replay the commands to create the queue manager configuration. So again, go to the line that has SSLKEYR at the beginning (line 88) and place an asterisk (*) character at the beginning of the line to make it a comment.
-
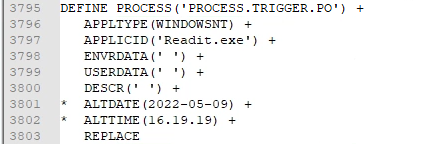
Find the DEFINE PROCESS command starting at line 3795. You do not need to alter it, and you will not test this. You simply need to understand how to migrate an application that uses triggering. You would need to change this to client triggering, and start running the client version of the trigger monitor (runmqtmc). Looking at the PROCESS definition, you would need to ensure that the Readit.exe application is built with client libraries (so if it were originally built with local binding libraries, it would need to be rebuilt). Unless the name or location of the .exe changes, there should be no need to edit the process definition.
-
You need to alter the CONNAME attribute for the channel, TO.APP2_QMGR. You need to set this to the IP address of the Windows system (the virtual image) running the APP2_QMGR. You need the IP address of the (destination) Windows system.
-
Return to the Command prompt.
Issue the following command:
ipconfig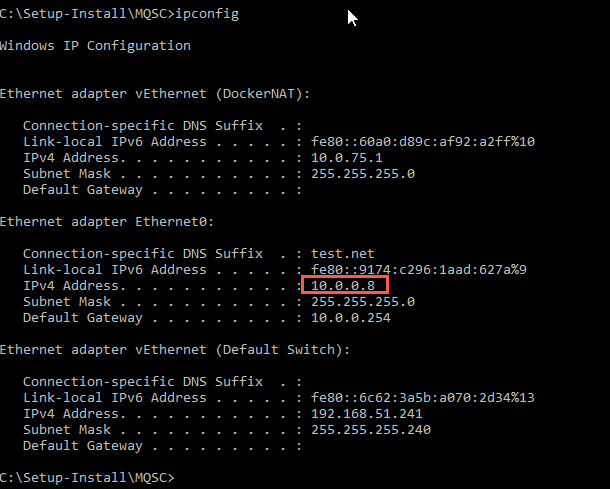
-
Make note of the IPv4 Address for the Ethernet adapter Ethernet0.
-
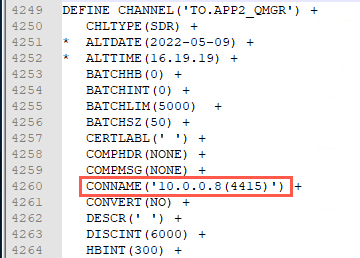
Go to the Notepad++ application and find the DEFINE CHANNEL(‘TO.APP2_QMGR’) command, and then the line with the CONNAME attribute (line 4260). Change localhost to the IP address you obtain above. In this example, you would change it to read:
CONNAME(‘10.0.0.8(4415)’) +
 Note:
Note:
Note that normally this is not something you would need to change in this situation. It is only necessary because you are using a virtual image that can change IP addresses. -
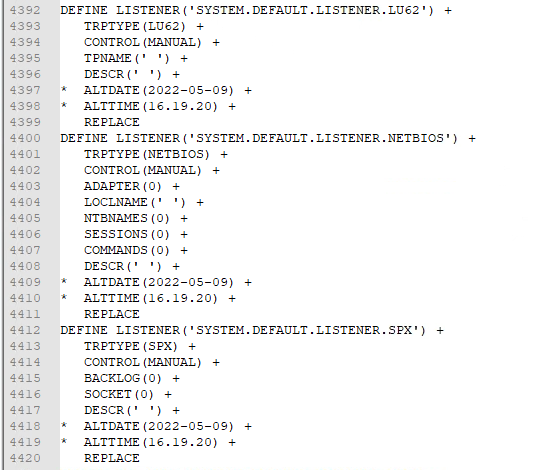
You need to delete the listeners for the Netbios, LU62, and SPX protocols. These three definitions are grouped together. Move to line 4392, and then mark lines 4392 through 4420 to include these three DEFINE commands. Press the Delete key to remove these lines. Be sure to delete any blank lines left by this deletion so the line numbers match in the following steps.
-
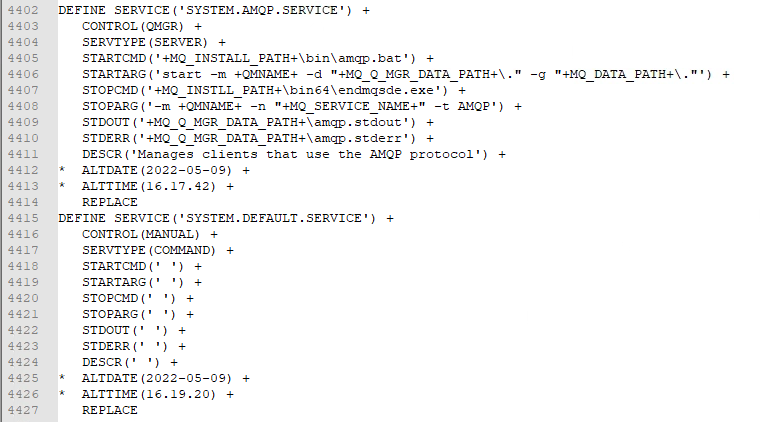
You also need to delete the Service definitions because the MQ Appliance does not support services. Find the first DEFINE SERVICE command, just below the listener definitions (now at line 4402). Highlight the entire two DEFINE SERVICE definitions, lines 4402 through 4427, and delete it by pressing the Delete key. Again, be sure to delete any blank lines left by this deletion so the line numbers match in the following steps.
-
Now you can remove most of the SET AUTHREC commands because almost all of them are for default authorities (you did limit how many SET AUTHREC records you exported, but there are still more than what you want). You have two SET AUTHREC statements relating to a Principal of ‘potuser’ that you must handle. In a later step, you will add a user ID on the appliance to accommodate these records and change the SET AUTHREC commands accordingly. Everything else will then default to the right values for the new queue manager on the appliance.
Note:
When thinking about migrating from Windows queue managers, the Principal names and group names will include the Windows domain (in the form of name@domain). This format is not supported on the appliance, so any such user IDs must be mapped to new user IDs on the appliance and the domain name removed. Also, note that MQ supports a maximum user name length of 12 characters on UNIX and Linux platforms, so longer names such as Administrator need to be shortened or changed on the appliance. Also, note that if you are indeed migrating from Windows using domain users to the appliance, then you could configure Active Directory to service LDAP requests for the domain, and (on the appliance) use an IDPWLDAP AUTHINFO object for CONNAUTH checking, and (optionally) object authorisation. -
Find the beginning of the SET AUTHREC definitions that start at line 4762.
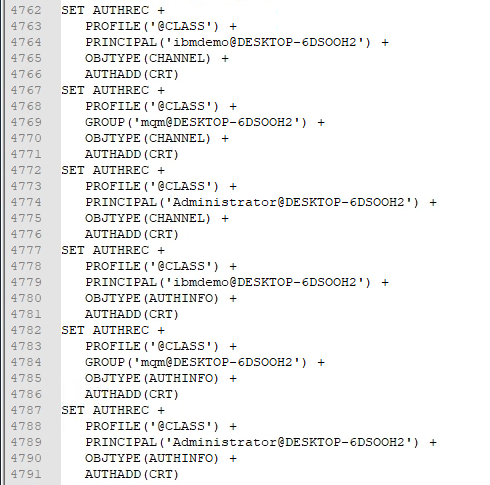 Note:
Note:
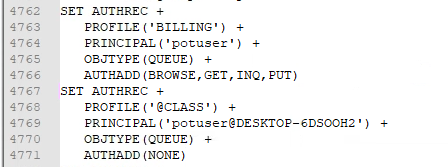
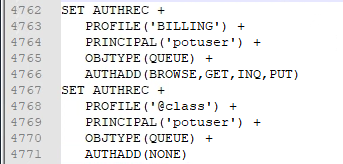
Note that depending on the exact configuration of the queue manager, you may end up with a different number of SET AUTHREC definitions generated by the dmpmqcfg command. For our lab, we only want to keep two. These are the two AUTHREC definitions that we want to leave, after editing:
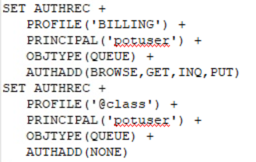
-
Now select all lines, starting at 4762 through 4866 (you can hold down the left mouse button starting at the “S” on the first line and then move the cursor down and to the right to keep selecting lines while you scroll down). Then hit the Delete key to remove these lines. Be sure to delete any blank lines left by this deletion so the line numbers match in the following steps.
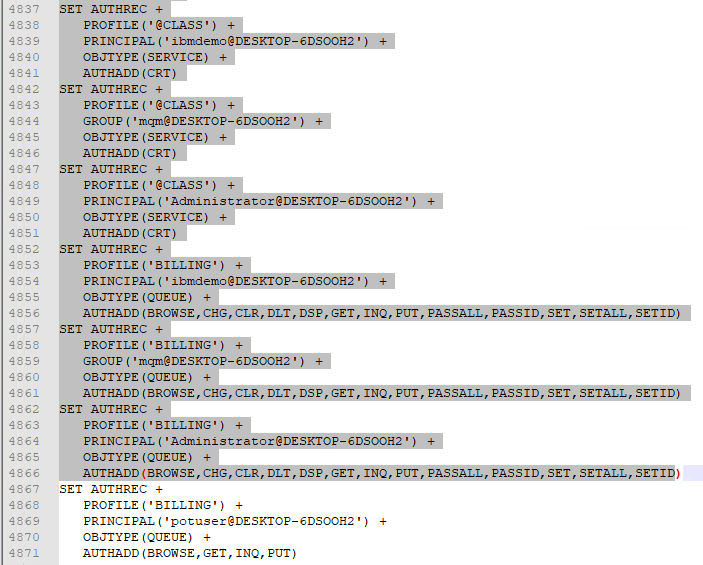
-
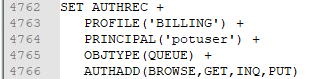
You should now be at line 4762 and the first SET AUTHREC definition that references potuser, as seen below.
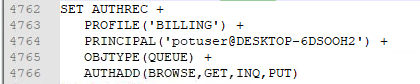
-
We need to remove the @DESKTOP-6DSOOH2 domain from the PRINCIPAL attribute. Edit line 4764 removing @DESKTOP-6DSOOH2 so the line now reads PRINCIPAL(‘potuser’) + as seen below:
-
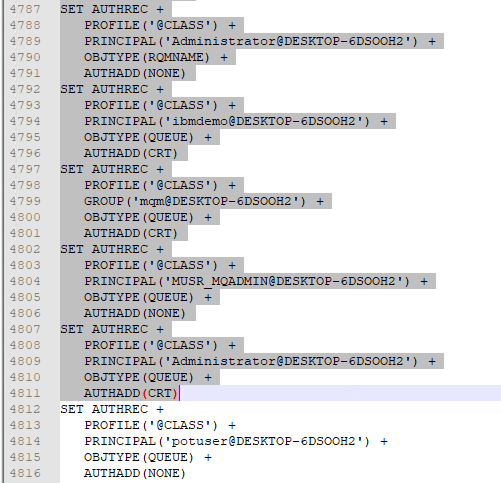
Now skipping over the first SET AUTHREC we want to keep, select lines 4767 through 4611 (use the technique in the previous step). Hit the Delete key to remove these lines and be sure to delete any blank lines left by this deletion.
-
Starting now at line 4762, we should have our two Authority records referencing potuser.
-
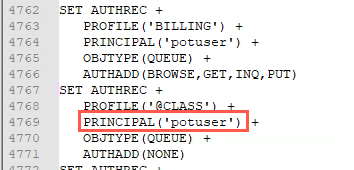
We again need to remove the domain name from the Principal in the second record. Edit line 4769, removing @SDESKTOP-6DSOOH2 so the line now reads PRINCIPAL(‘potuser’) + as seen below:
-
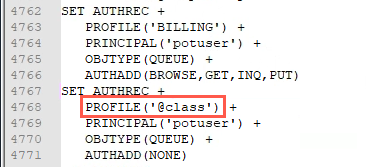
We also need to change the Profile name of @CLASS to be @class on the MQ Appliance (it is lowercase on Linux and UNIX systems). Edit line 4768, changing @CLASS to @class, so the line reads PROFILE(‘@class’) + as seen below:
-
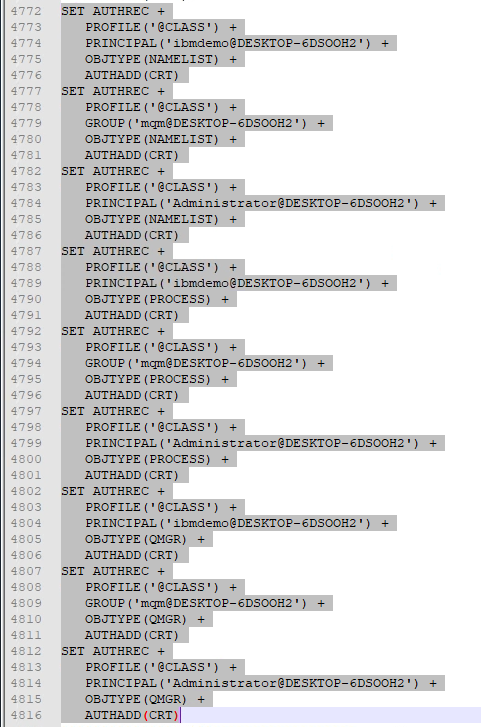
Finally, we need to remove the remaining unneeded Authority records. Highlight lines 4772 through 4816 and hit the Delete key. Be sure to delete any blank lines left by this deletion.
-
The section of the file with the two SET AUTHREC commands should look like the below:
-
Now that all changes have been made, save the file by pressing CTRL-S.
-
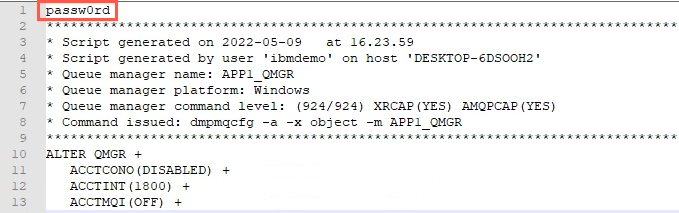
There is one more thing you must do to the file to prepare to be able to execute these commands from the Windows runmqsc command line. You will need to place the password for the userid that is passed from the Windows client to the queue manager as the first line of this file. Scroll back to the top of the file. Add a blank line at the top of the file, and then enter passw0rd on that line. The top of the file should now look like the following:
 Note:
Note:
You will be running the runmqsc command with the -c flag on the Windows system, to connect to the APP1_QMGR queue manager on the Appliance, so that you can run this mqsc script to migrate the queue manager from Windows. Because you are running with MQ V9 security, the client must authenticate to the queue manager. The userid and password are checked because the queue manager connection authority (CONNAUTH) configuration refers to an authentication information (AUTHINFO) object named ‘SYSTEM.DEFAULT.AUTHINFO.IDPWOS’ with CHCKCLNT(REQDADM). Currently there is a deficiency in MQ that prevents you from providing the password interactively when you also want to use an mqsc script file to redirect into the runmqsc command line. If you simply want to run the runmqsc command line remotely and interactively, you can enter the password. The IBM lab is aware of this issue and a fix hopefully will be provided in a future Fix Pack. So for this lab, while obviously not a desired practice, you get around this by placing the password as the first line of the file that is redirected into the runmqsc command, and that first line is used to satisfy the password prompt. -
Again, save the file by pressing CTRL-S.
-
You must also typically check the configuration file (qm.ini) for the source queue manager and make a note of any non-default attributes that cannot be set by the ALTER QMGR command, and so are not recorded in the output from dmpmqcfg.
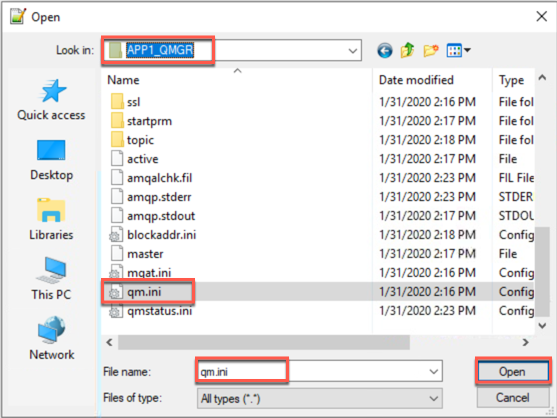
Click File > Open…, navigate to C:\ProgramData\IBM\MQ\qmgrs\APP1_QMGR and select the qm.ini configuration file. Click Open.
-
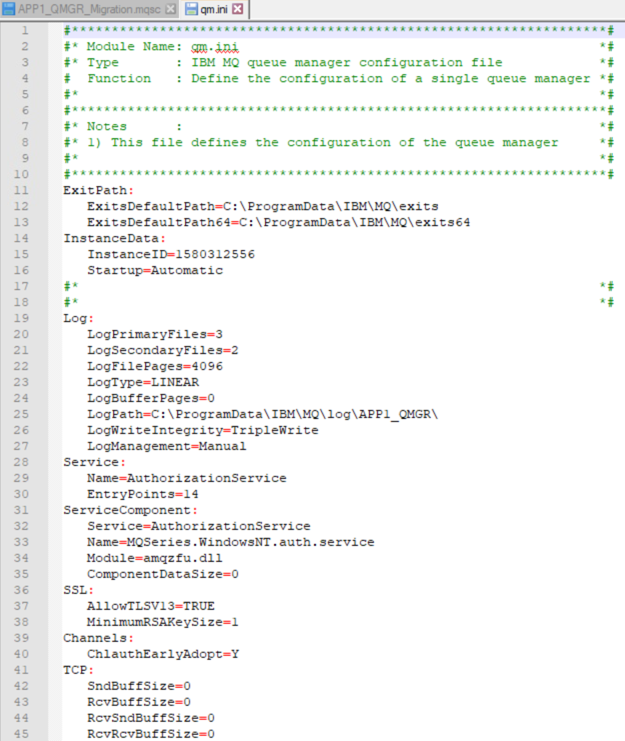
Review the file. In this example, the only change will be that this queue manager used linear logging on Windows, and must use circular logging on the MQ Appliance. When the queue manager is created on the MQ Appliance, this change will be handled automatically. Therefore, you have nothing to be concerned about this time. Of course, the authentication service will change too, so again we will ignore that.
-
Close the qm.ini file but leave Notepad++ open.
Creating the queue manger on the MQ Appliance
You will now create the target queue manager, still named APP1_QMGR, on the MQ Appliance. You also need to create the principals that the queue manager authority records name. Any group or principal named in any DEFINE command must be in existence.
You are only creating the queue manager shell right now, meaning you will truly have it defined with all your required MQ objects after you “migrate” it by running the mqsc script against the queue manager. Some attributes you might normally include at creation time, such as naming the queue manager’s dead letter queue (the DEADQ attribute), you will not include and allow the script to update.
-
Login in to the MQAppl1 MQ Appliance. Use userid admin and password passw0rd
-
At the mqa# command line, enter mqcli to enter mq command mode.
-
Enter the following command to create the queue manager on the Appliance:
crtmqm -c "Migrated from Windows" -p 4444 -fs 1 APP1_QMGR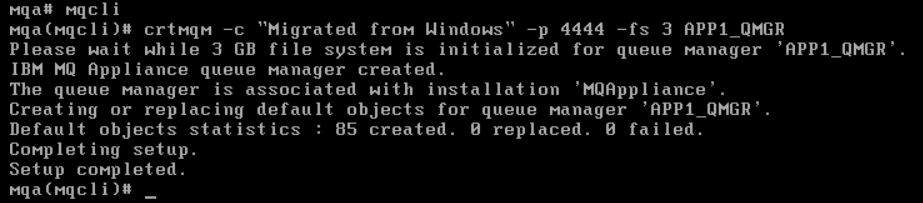
You should see the queue manager be created successfully. You need a listener so you can connect to the queue manager remotely to execute the mqsc script, so you have defined a listener on port 4444.
Note:
Note that due to the limited size of the virtual image, you are creating the queue manager with a 1 GB (using the ‘-fs’ parameter) file system size. -
A normal, non-HA queue manager does not start automatically after it is created on the Appliance at command line, so you must start it now. Issue the following command to start the queue manager:
strmqm APP1_QMGR
You should see the queue manager start successfully.
-
Now you must add any userids used in MQ object definitions or authorities to the MQ Appliance. You will need to add one messaging user, potuser. Enter the following command:
usercreate -u potuser -p passw0rd
The user should be created successfully.
-
You need to create the SVRCONN channel that is used for remote administration and define the channel authentication records to allow access from a client. Enter the following command to enter the mqsc command line on the appliance:
runmqsc APP1_QMGR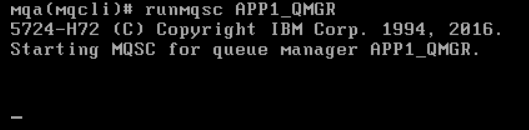
-
Now enter the following commands at the runmqsc command line:
 DEFINE CHANNEL('SYSTEM.ADMIN.SVRCONN') CHLTYPE(SVRCONN)

 SET CHLAUTH('SYSTEM.ADMIN.SVRCONN') TYPE(BLOCKUSER) USERLIST('*whatever')

 ALTER AUTHINFO('SYSTEM.DEFAULT.AUTHINFO.IDPWOS') AUTHTYPE(IDPWOS) ADOPTCTX(YES)

 REFRESH SECURITY TYPE(CONNAUTH)

 END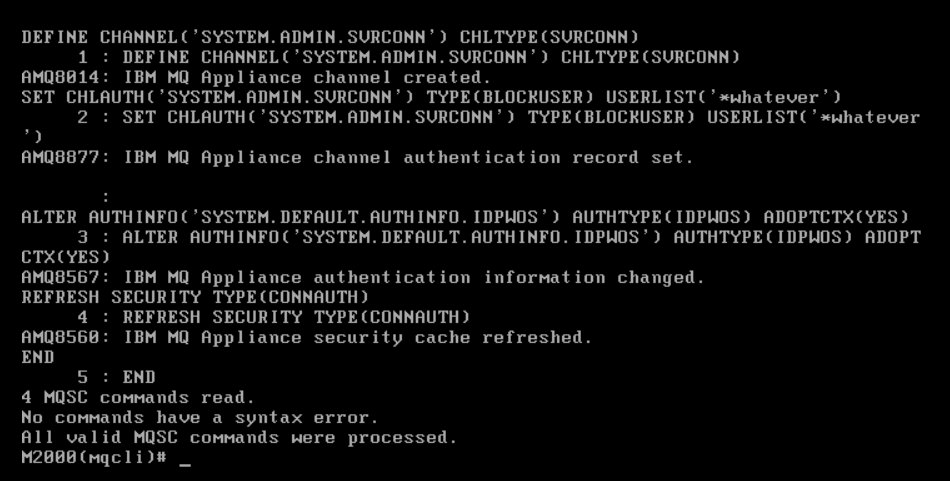
Running the mqsc script on the MQ Appliance queue manager
Now that the queue manager is created, it is time to actually migrate the queue manager by running mqsc remotely with the edited output from the dmpmqcfg command.
-
In the Windows VM, return to the Command Prompt.
-
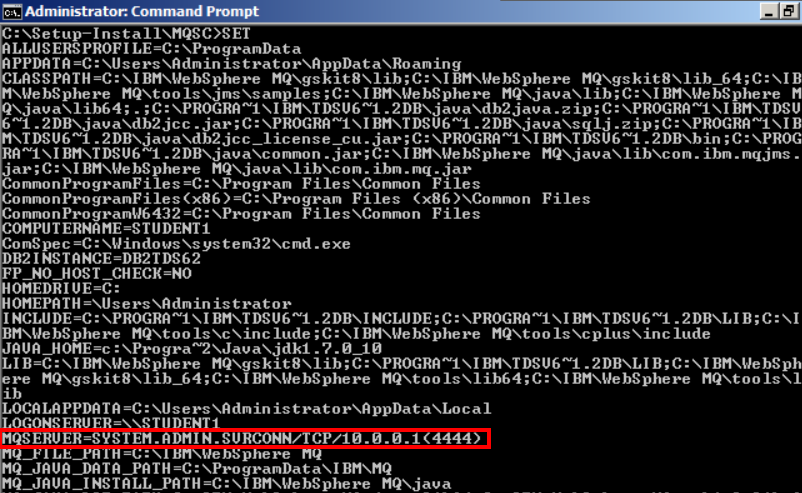
You must set the MQSERVER environment variable to define the MQ channel you will use to connect to the queue manager on the MQ Appliance. Issue the following command, using the correct IP address for your MQ appliance image:
SET MQSERVER=SYSTEM.ADMIN.SVRCONN/TCP/10.0.0.1(4444)
-
You can validate that this variable is set by issuing a SET command and reviewing the list of variables to find the MQSERVER variable.
-
Now you are ready to execute the updated, migration ready, mqsc script. Issue the following command:
runmqsc -c -u ibmdemo APP1_QMGR < APP1_QMGR_Migration.mqsc > APP1_QMGR_Results.txt
You will see it display the request for a password, which is being fed in as the first line of the file. You are redirecting the output to another file - APP1_QMGR_Results.txt. You do this so you can review the execution of the commands to validate each command’s success.
-
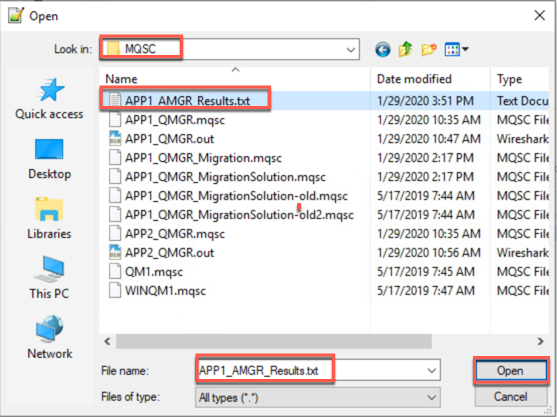
In Notepad++, click File > Open and navigate to C:\Setup-Install\MQSC if necessary. Select the APP1_QMGR_Results.txt file and click Open.
-
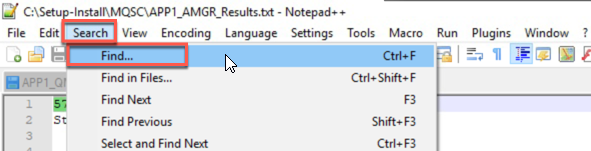
You want to check that each command was successful. You can use the Find dialog in Notepad++, because there will be a message starting with “AMQ” informing you of the command result. Press CTRL-F, or click Search > Find… on the Notepad++ menu to open the Find dialog.
-
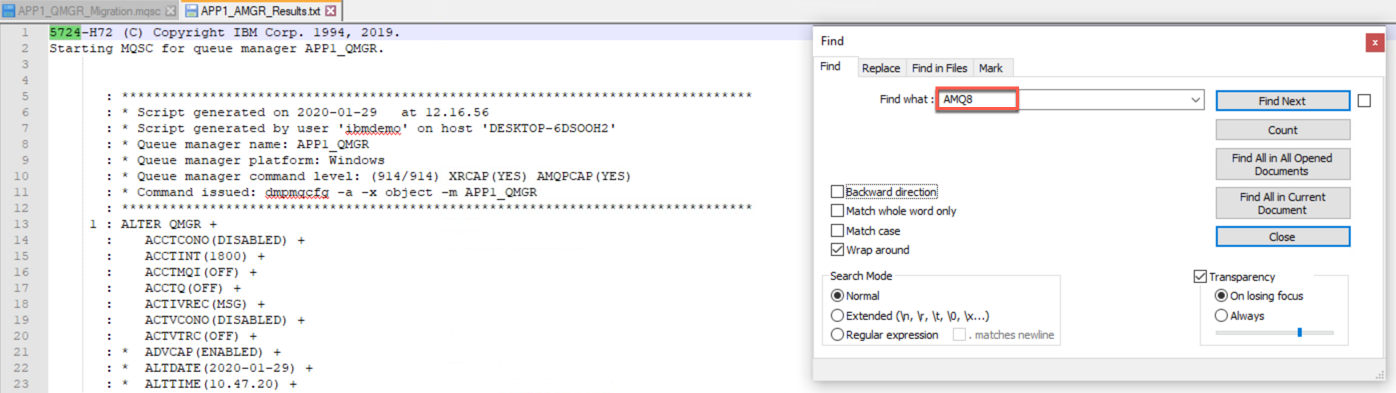
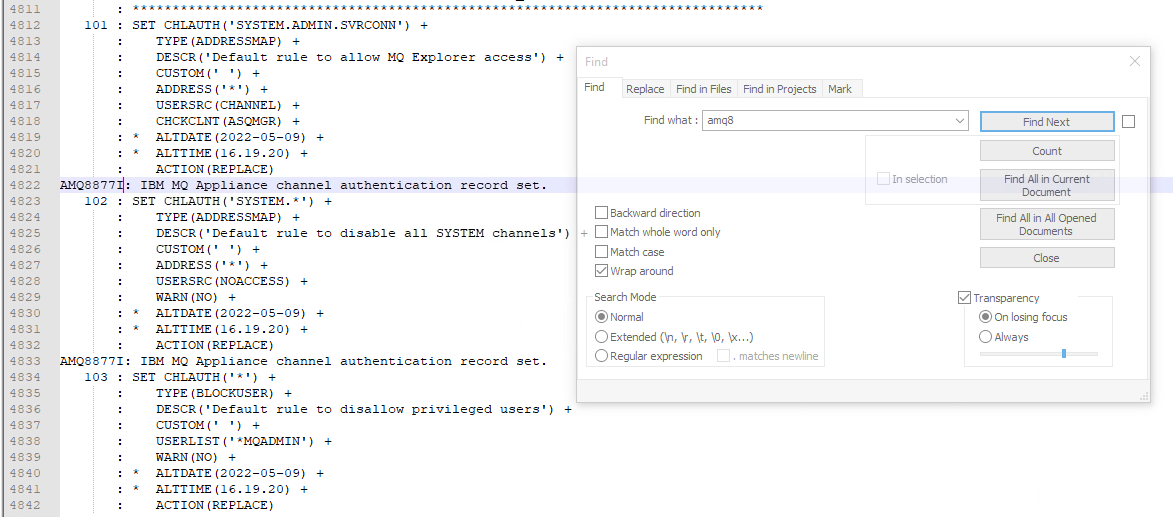
Move the Find dialog box to the right side of your screen, so you can leave it where it is and just keep checking each AMQ line. Enter AMQ8 (so we skip AMQP related names and attributes and only get our AMQ messages) in the Find what field, then click Find Next.
-
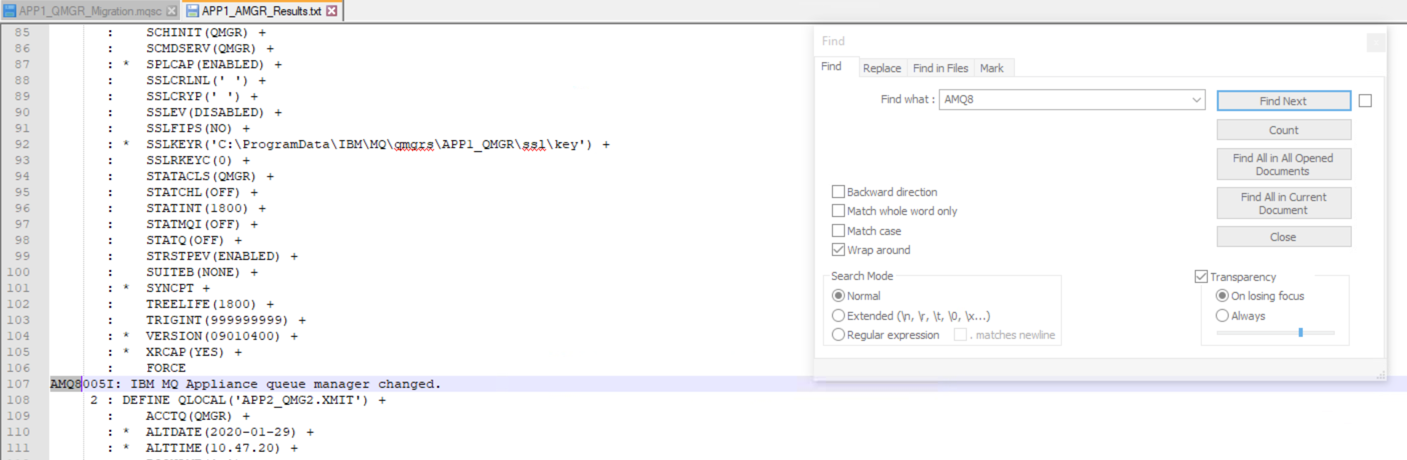
The Find should stop at line 107, showing you that you successfully executed the ALTER QMGR command, with a line that reads AMQ8005I: IBM MQ Appliance queue manager changed.
 Note:
Note:
If you get an error message, for this or any of the 210 commands that get executed by the script, you will have to go back and correct the command in the APP1_QMGR_Migration.mqsc file in Notepad++, save the file, and then start again at Step 4 in this section. -
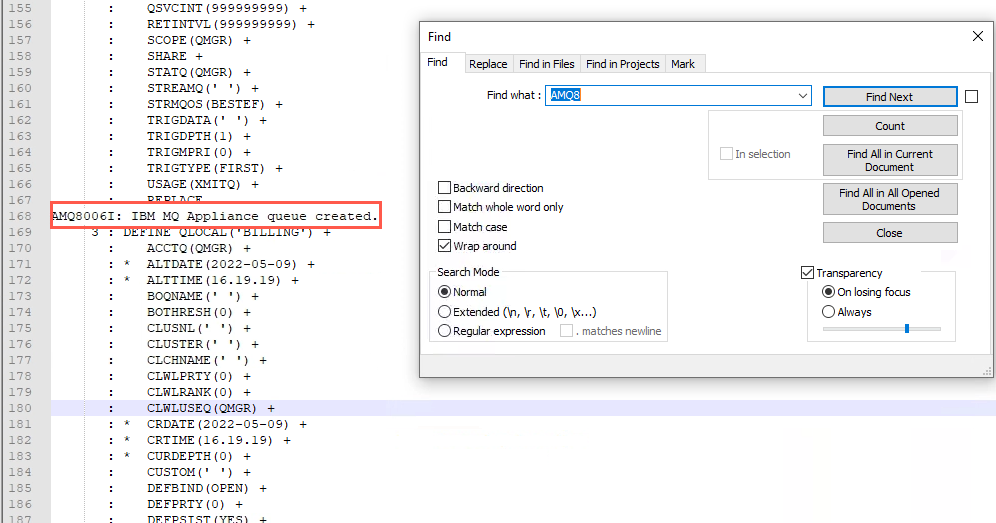
Click Find Next to move to the next response message. This time, you should be at line 168, and you should see AMQ8006I: IBM MQ Appliance queue created as the response to the first DEFINE QLOCAL command.
-
The script defines 65 queues. Keep clicking Find Next in the Find dialog and checking for the AMQ8006 response.
Note:
HINT: Most of the commands in this script file are for objects that you did not change when editing the script file. You only touched and changed a few of these commands, in the Reviewing the exported queue manager configuration for compatibility with the target IBM MQ Appliance Section. Therefore, you should be sure to check the response to the execution of those commands that you altered. The rest of them you can probably skip, assuming you were careful in Notepad++ and did not accidentally change something else. -
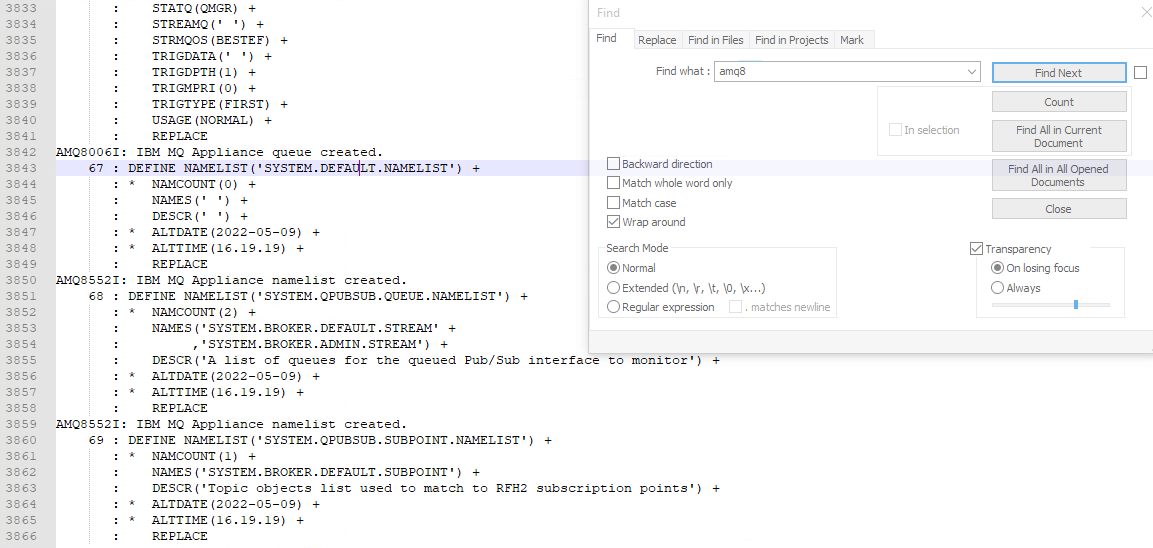
After all of the queue definitions, the next Find stop will be at line 3843, after a DEFINE NAMELIST command. You should see AMQ8552I: IBM MQ Appliance namelist created. There are three namelists. Click Find Next to review each of the other two namelists.
-
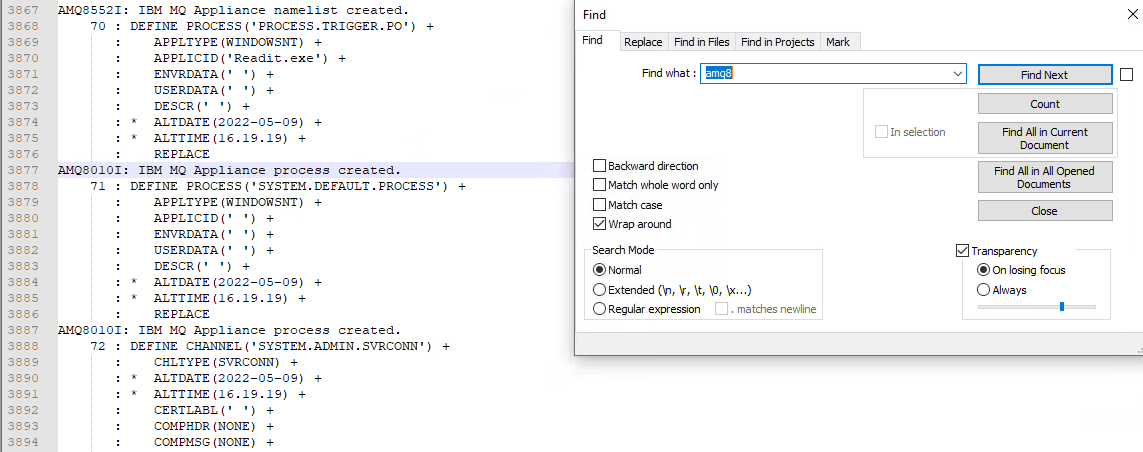
Click Find Next again, and you should be at line 3877, the end of the first process definition. You should see AMQ8010I: IBM MQ Appliance process created. Click Find Next again to review the other process definition.
-
Click Find Next again and you will be at the end of the first channel definition (line 3916). These should have an AMQ8014I: IBM MQ Appliance channel created response.
-
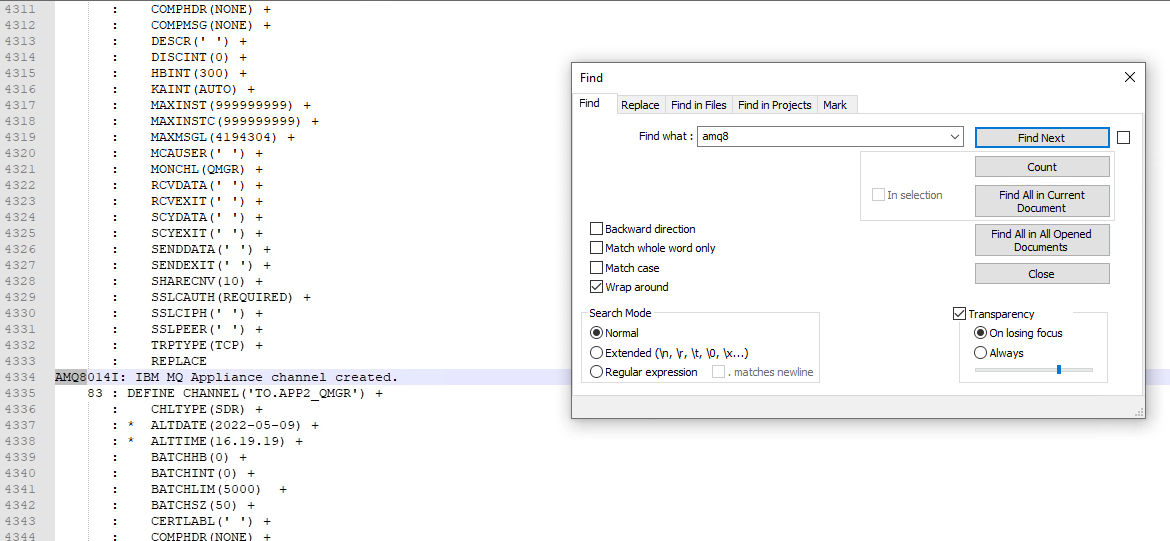
The 12th channel definition is the one you altered, the TO.APP2_QMGR channel. Therefore, click Find Next 10 more times, checking the responses, until you get to line 4334. The next line should be DEFINE CHANNEL(‘TO.APP2_QMGR’).
-
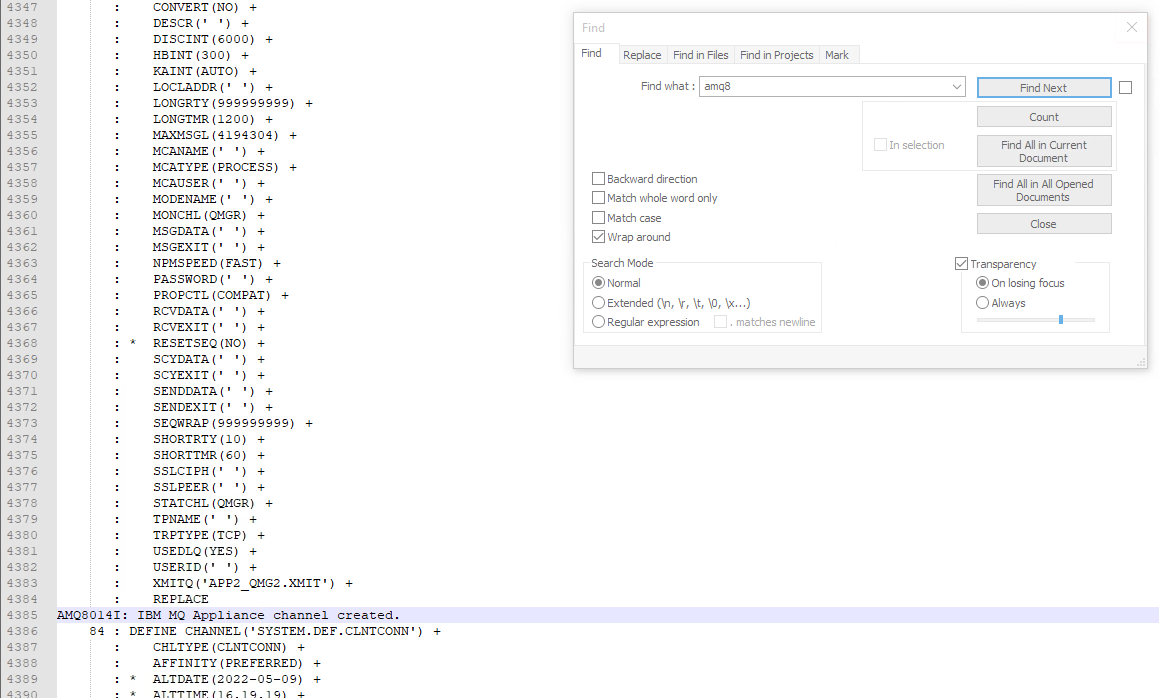
Click Find Next to advance to line 4385. This will be the response for your channel. Validate that it was created successfully.
There is one more channel definition after this one so click Find Next to review.
-
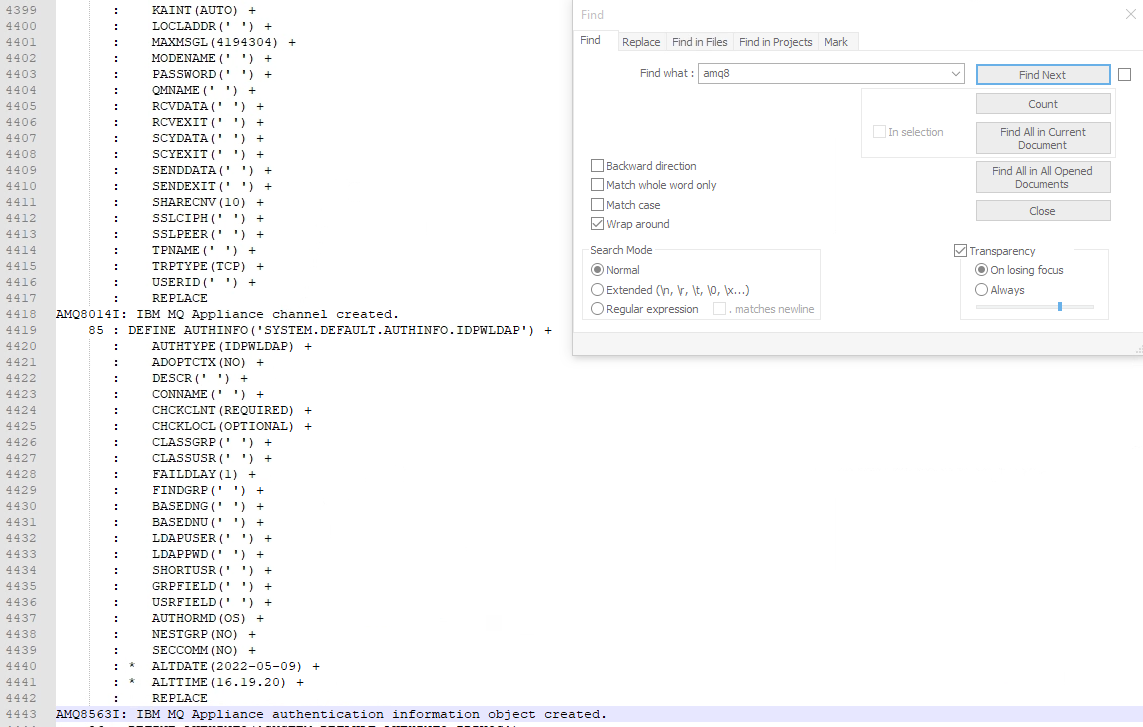
Click Find Next again, and you should be at line 4443 and the end of the first AUTHINFO record definition. You should see AMQ8563I: IBM MQ Appliance authentication information object created. There are three more AUTHINFO definitions, so use Find Next to click through and review.
-
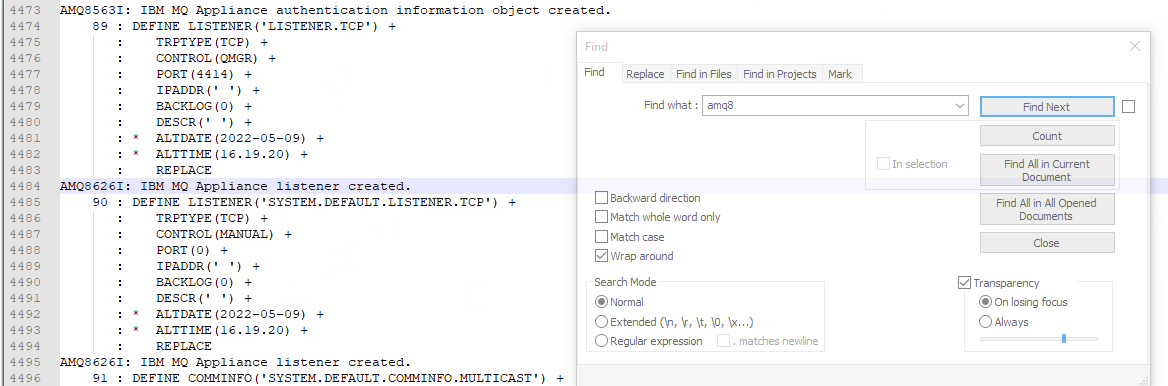
The next Find Next will take you to line 4484, the first listener definition. You should see AMQ8626I: IBM MQ Appliance listener created. There is one additional listener definition to check after the next Find Next.
-
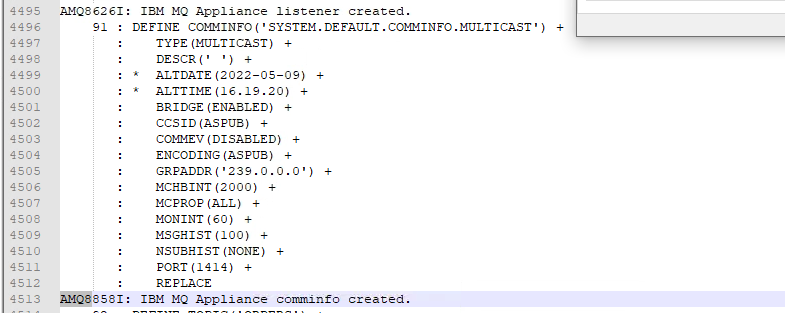
Another Find Next should bring you to line 4513 and a COMMINFO definition. You should see AMQ8858I: IBM MQ Appliance comminfo created.
-
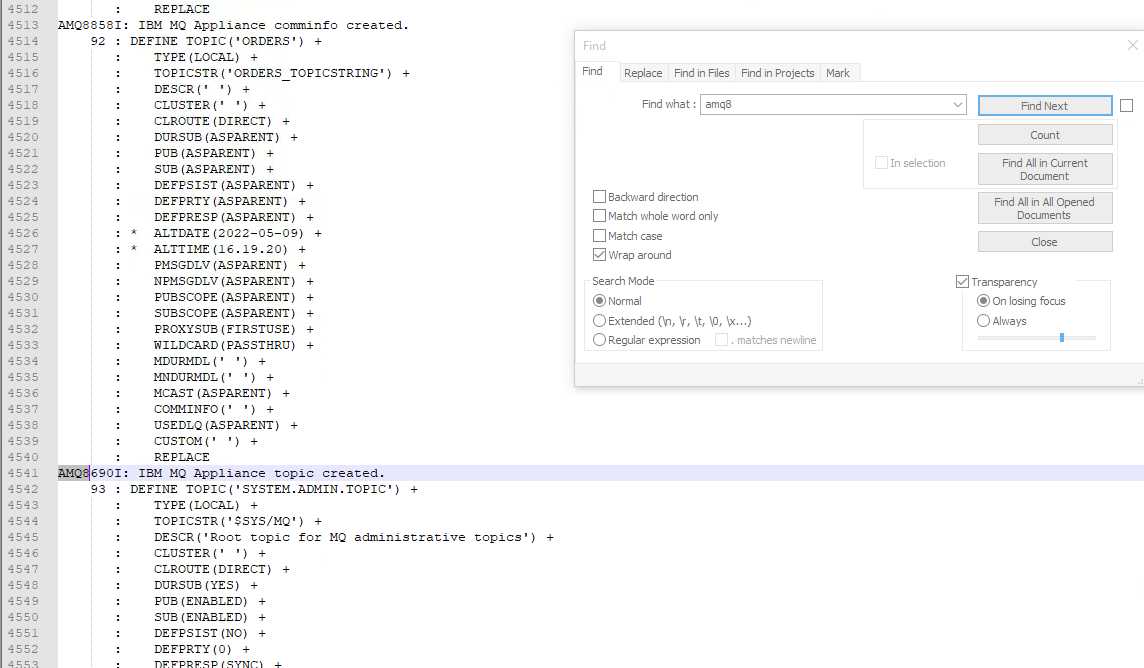
Click Find Next again, and you will find the topic definition (line 4541. You should see AMQ8690I: IBM MQ Appliance topic created. There are six more topic definitions. Click Find Next and validate through these.
-
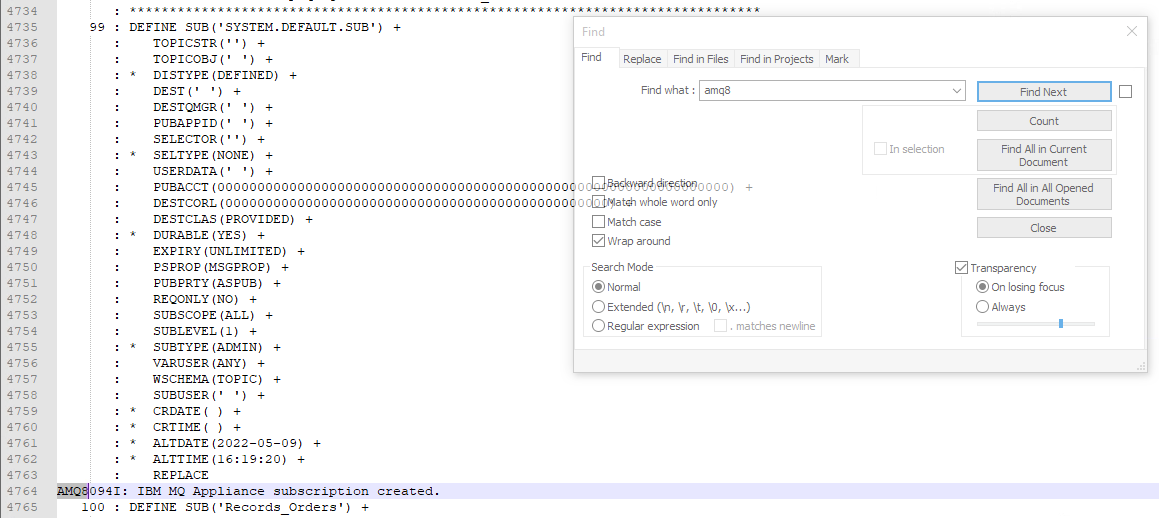
Click Find Next again and you will be at the end of the first subscription definition, at line 4764. You should see AMQ8094I: IBM MQ Appliance subscription created. Click Find Next again and you can review the second subscription definition.
-
Click Find Next again and you will be at the end of the first channel authentication definition, at line 4822. You should see AMQ8877I: IBM MQ Appliance channel authentication record created. Click Find Next twice and validate the two remaining channel authentication definitions.
-
Finally, click Find Next again, and you will be at the end of the first AUTHREC definition, at line 4874. You should see AMQ8862I: IBM MQ Appliance authority record set. There is only one more AUTHREC definition. Review it, and then close the Find dialog by clicking the Close button.

-
At the very bottom of the file, you see the final response from runmqsc that 210 command responses received. Close Notepad++.
Note:
Note that as previously mentioned, the number of commands that are generated by the dmpmqcfg command might be different depending on the exact configuration of the queue manager. As long as all of the commands worked, especially those commands that you had to edit and which you should have just verified, the number does not matter.
Validating the MQ Appliance queue manager
At this point, you should have the APP1_QMGR running, and are truly migrated from the Windows platform to the MQ Appliance. You have validated that the migration script completed successfully. Now you can do some checking to validate that it works as the Windows queue manager did.
-
We will use the MQ Console to review everything that our mqsc script created. Open the MQ Console for MQAppl1 if not already open. Log in as admin. You should see the home page Manage which shows your queue managers.
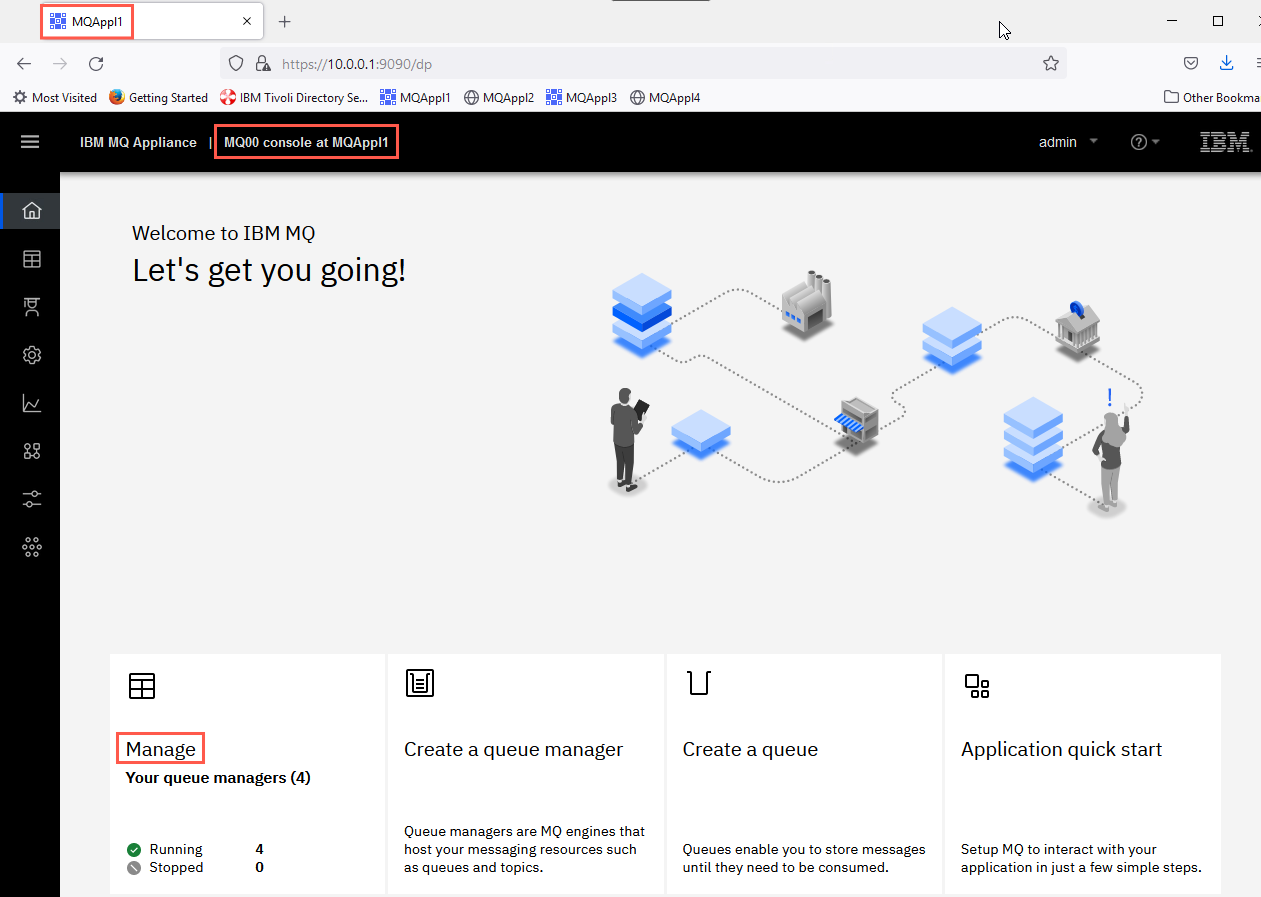
Click the Manage tile.
-
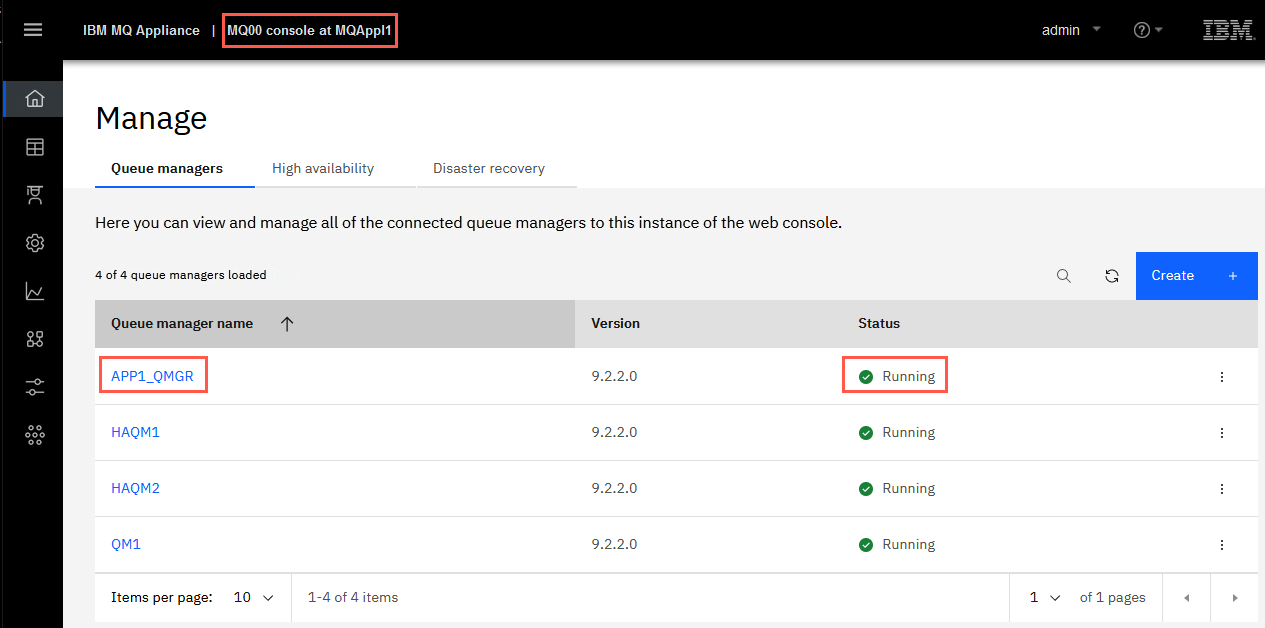
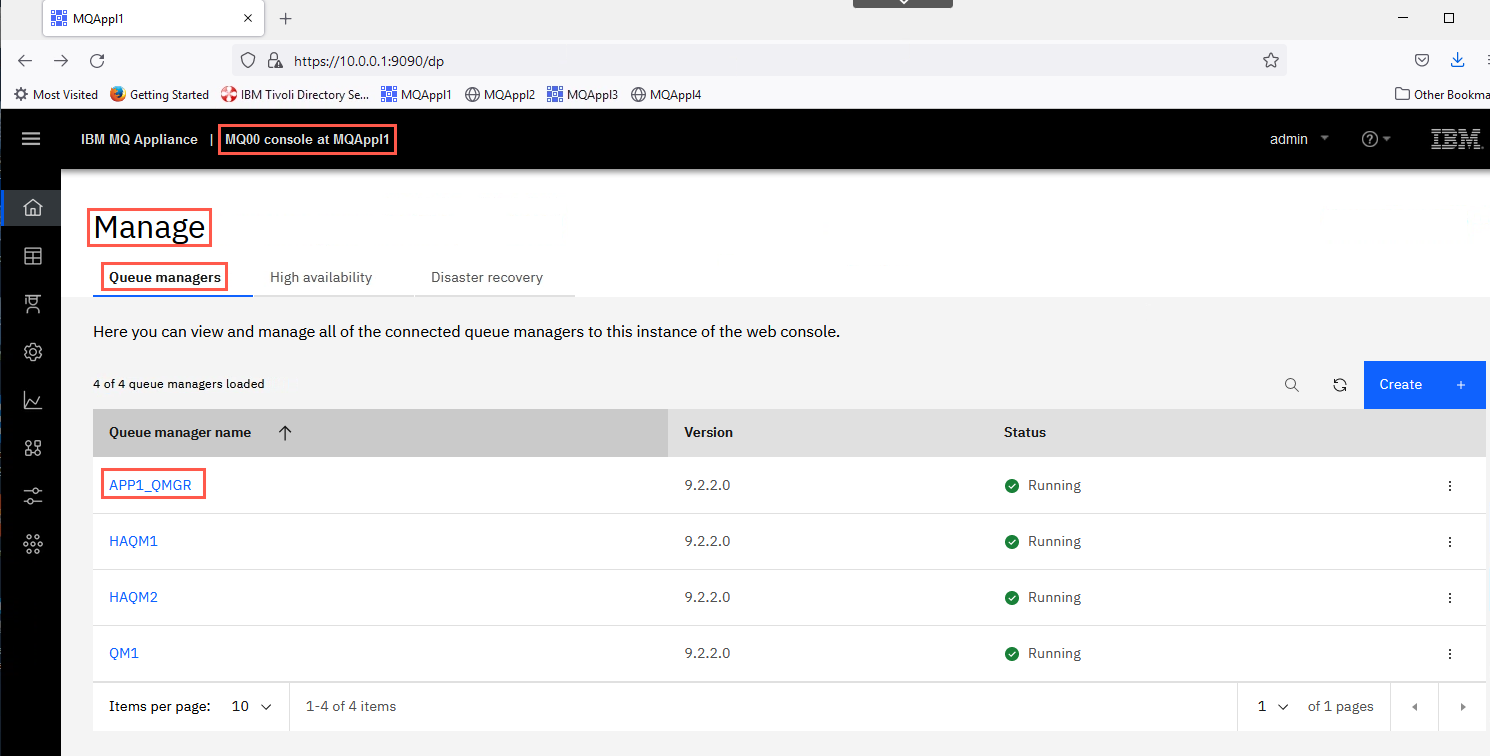
You will see the queue managers on the appliance. The status of the queue managers be different than this screenshot depending on which labs you have done previously. But queue manager APP1_QMGR should be Running.
-
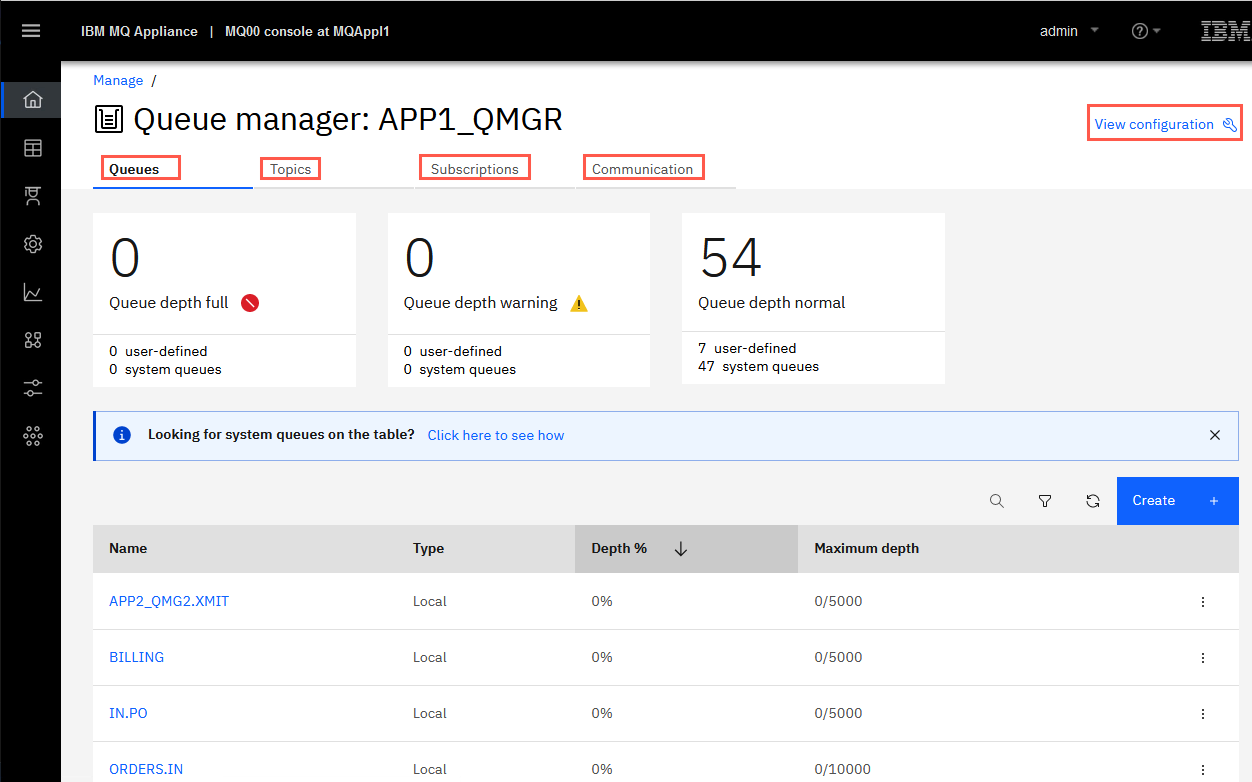
Click the hyperlink for queue manager APP1_QMGR. The Manage > Queue manager: APP1_QMGR page opens. By default, the Queues display appears first. Notice there are tabs for each type of MQ object; Topics, Subscriptions, and Communication. By default Queues appears first. Client-connection channels, channels, and listeners will appear under Communication. Authentication information records and channel authentication records will appear when you click View configuration.
First, look at the Queues page. You should see all of the queues that the mqsc script defined as shown below. Scroll down to see all of them.
-
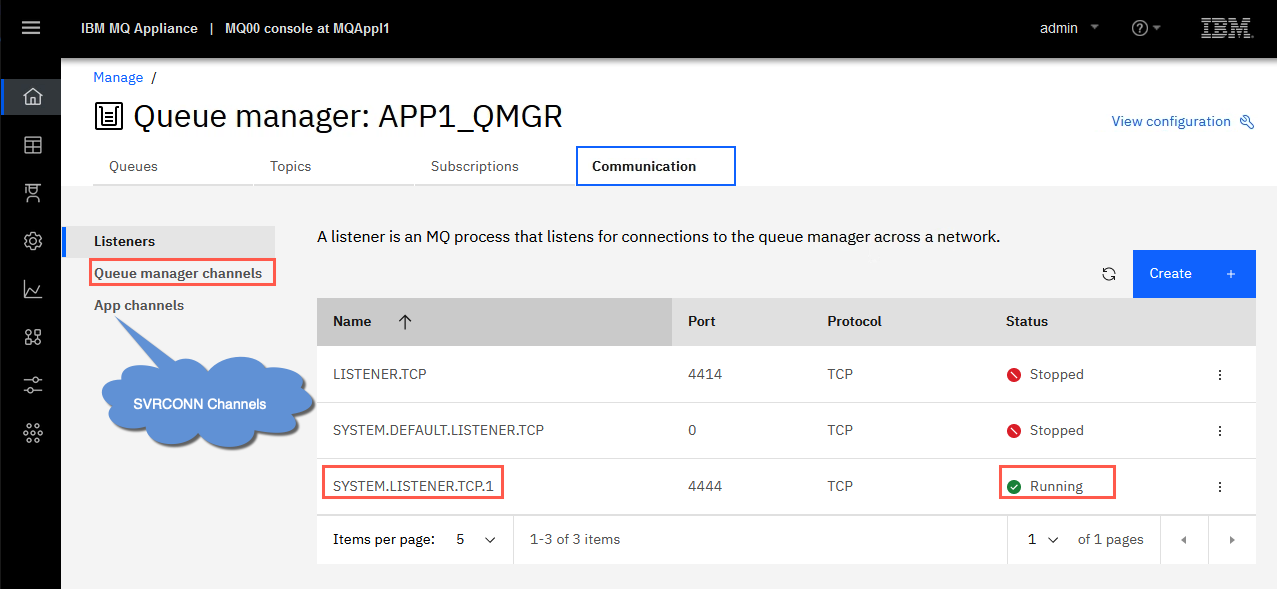
Click Communication. Listeners, Queue manager channels, and App channels are included. Listeners is the first to appear and you can view the listeners the mqsc script created. You added a listener using the same port the queue manager used on Windows, in addition to the system listener that was created when the queue manager was created on the appliance.
-
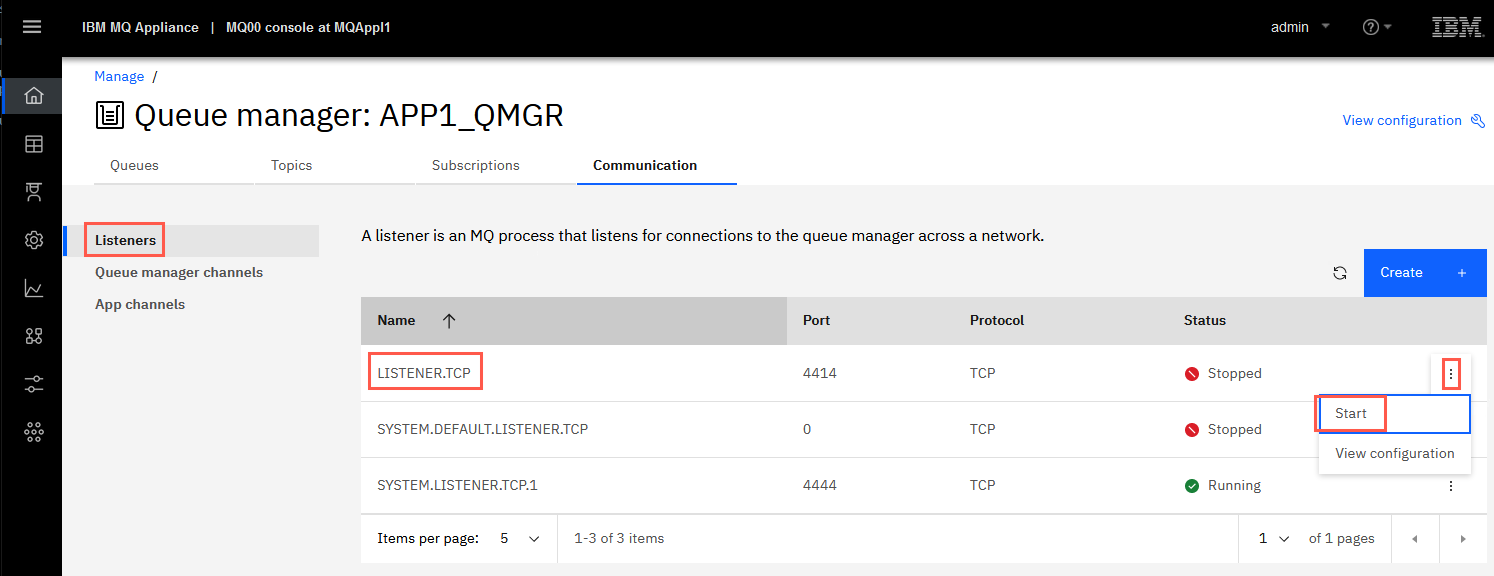
Click the elipsis for the LISTENER.TCP listener, and then select Start to ensure your listener works correctly.
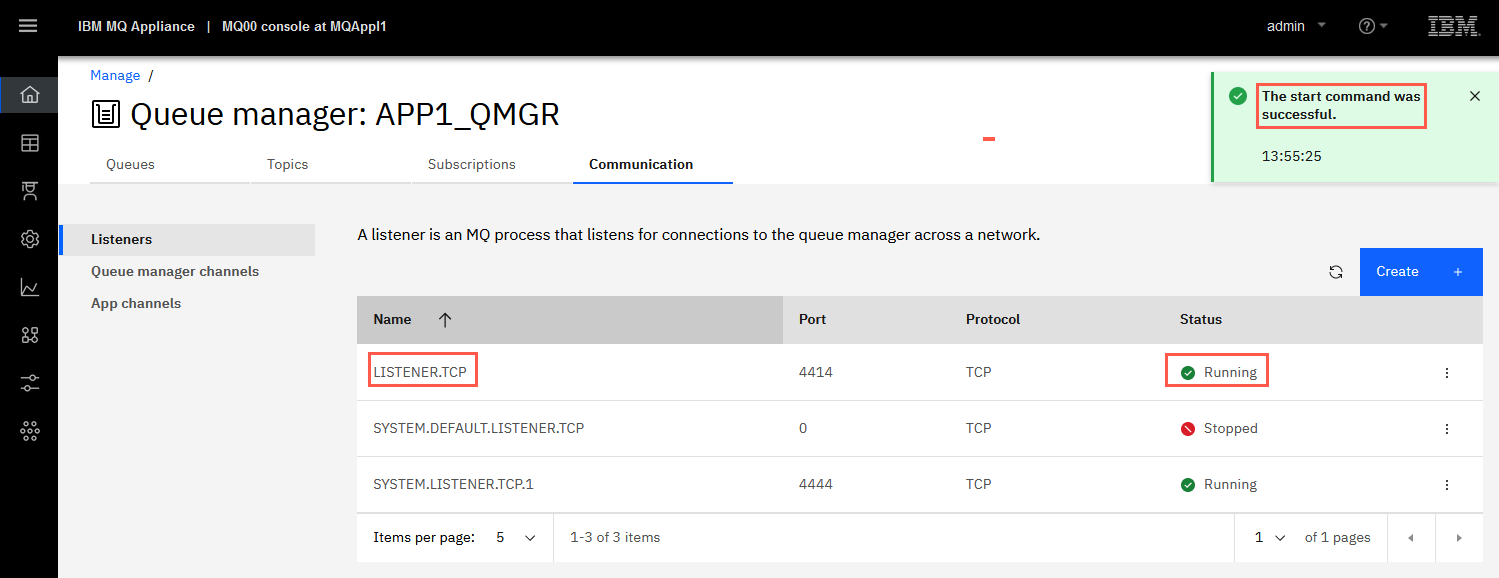
You receive the green success pop-up. Your listener should be running.
Click Queue manager channels.
-
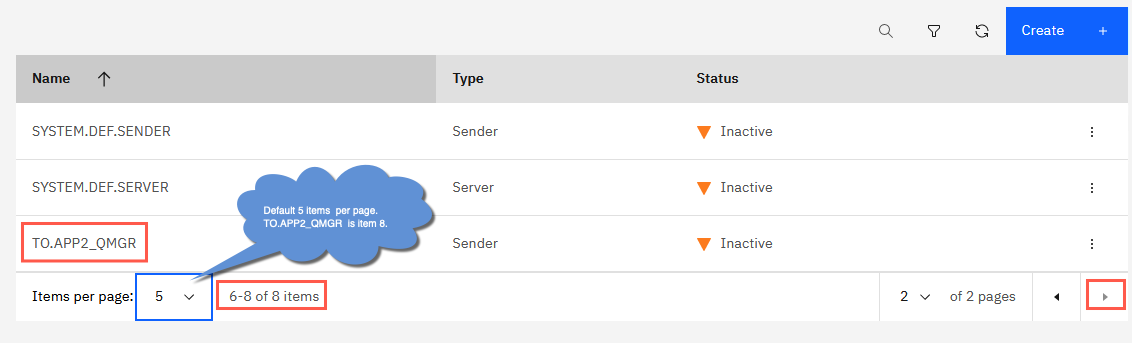
Scroll down to view the channel that the mqsc script created. The Items per page defaults to five so you will need to change it to 8 or page to the second page.
-
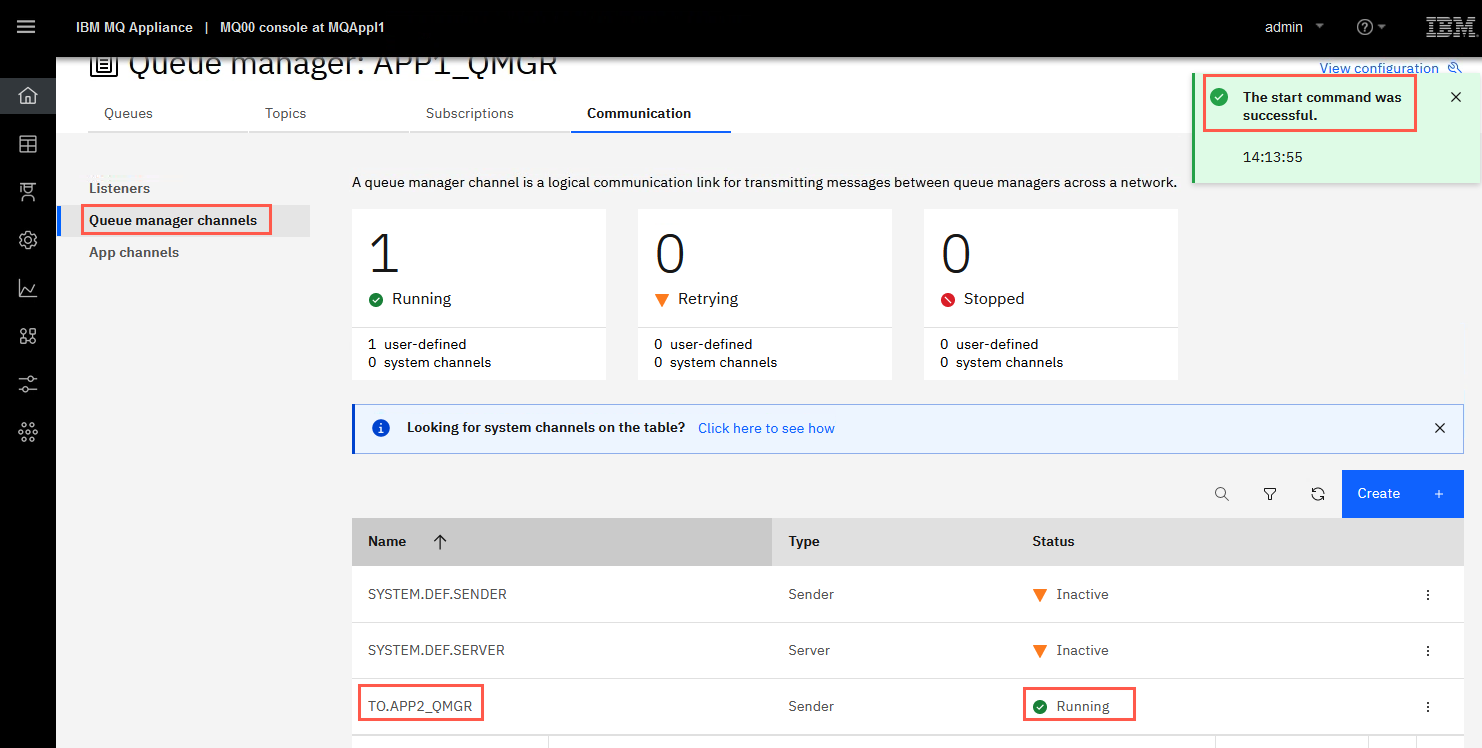
Click the elipsis for TO.APP2_QMGR and select Start to ensure the channel communicates with the APP2_QMGR, which is still running on Windows.

-
The channel should move to a Running status. Although you may see the intermediate status of Binding before it turns to Running. This means your channel definition and transmission queue definition are good.
-
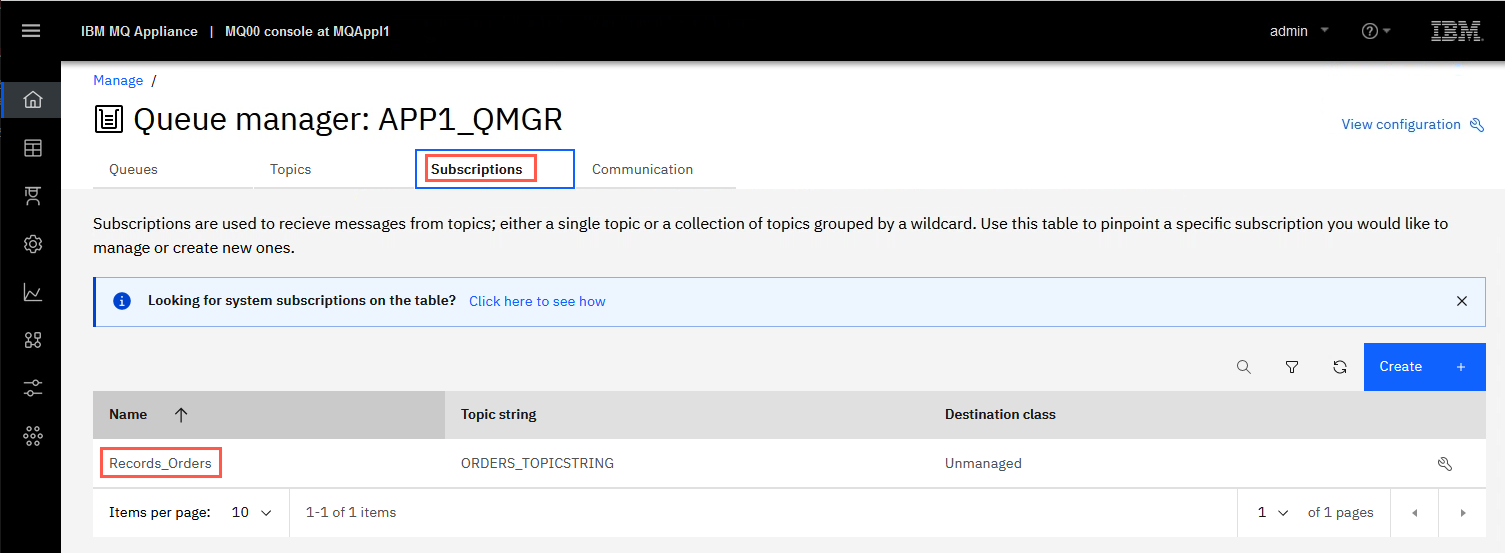
Click Subscriptions to view the subscription that the mqsc script created.
-
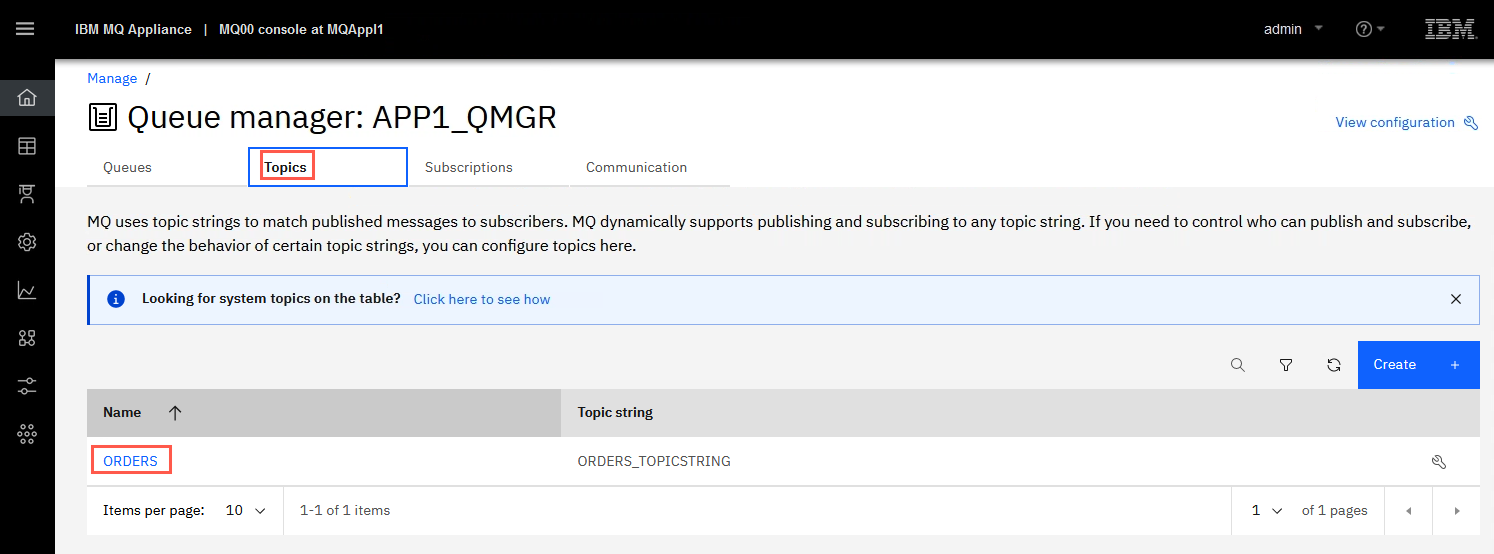
Click Topics to view the topic that the mqsc script created.
-
Click View configuration on the far right of the Manage page.

-
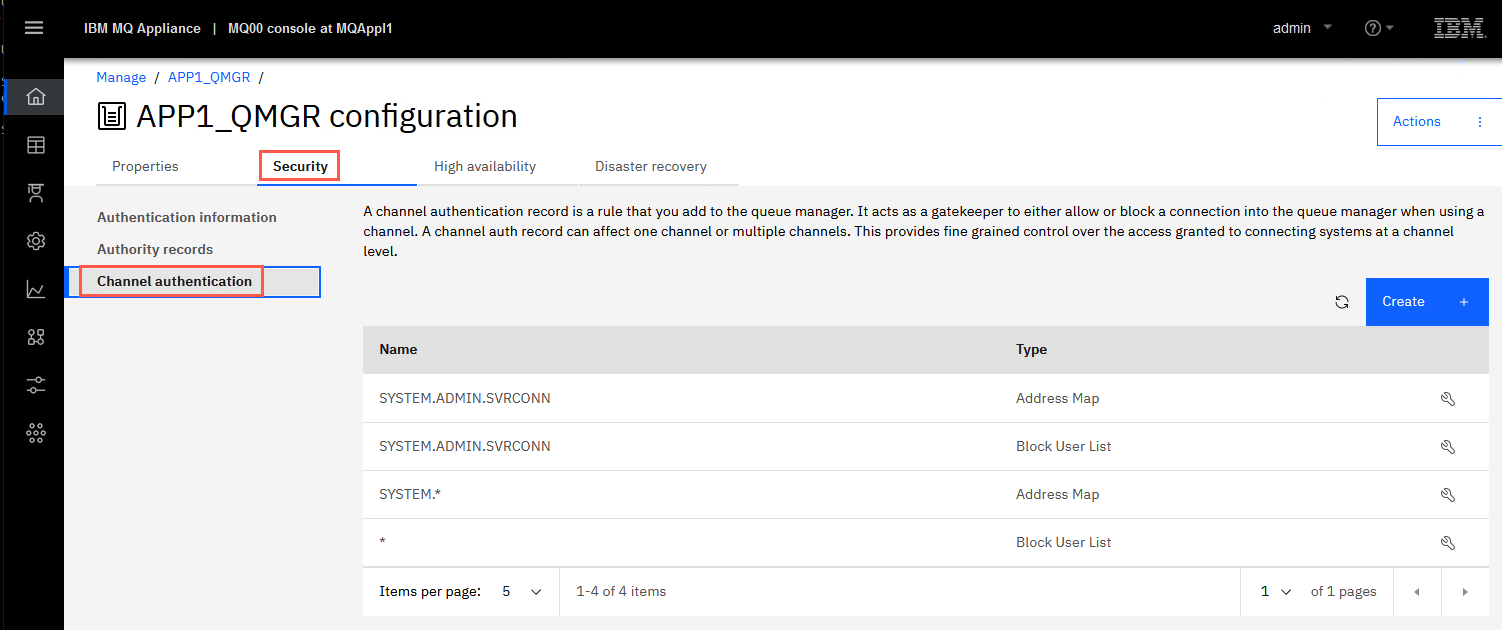
Click the Security tab then Channel authentication to view the channel authentication records the mqsc script created.
 Note:
Note:
Note to see the Process Definition created in the mqsc script, you need to use MQ Explorer. If you want to see this, open Explorer and add the APP1_QMGR on the appliance. You can then see the definition.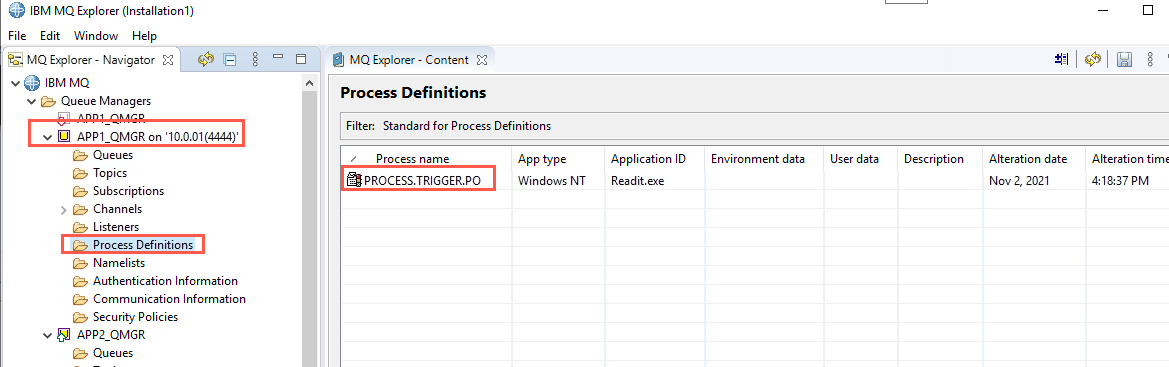
Testing the migrated queue manager
-
Now you can test running a client application. You will use the amqsputc sample MQ program (this is the PUT with client bindings sample). Before you can run the sample, you must set another environment variable that the samples use for security. You need to set the userid that you want to pass to the queue manager for authentication.
Return to the Command Prompt and enter:
SET MQSAMP_USER_ID=ibmdemo
-
Now you can run amqsputc. The directory where the compiled sample is located is in the PATH, so simply enter the following at the Command Prompt:
amqsputc IN.ORDERS APP1_QMGR
-
You will be prompted for the password for ibmdemo. Enter passw0rd and press Enter. The amqsputc program will connect to the APP1_QMGR and open the IN.ORDERS queue. Note that the IN.ORDERS queue is actually an alias queue for the ORDERS.IN queue.

-
Now you can enter anything you want as a message to be sent to the queue. Enter your message, and press Enter to PUT it to the queue. Press Enter a second time, on the blank line, and this will terminate the program.
For example:

-
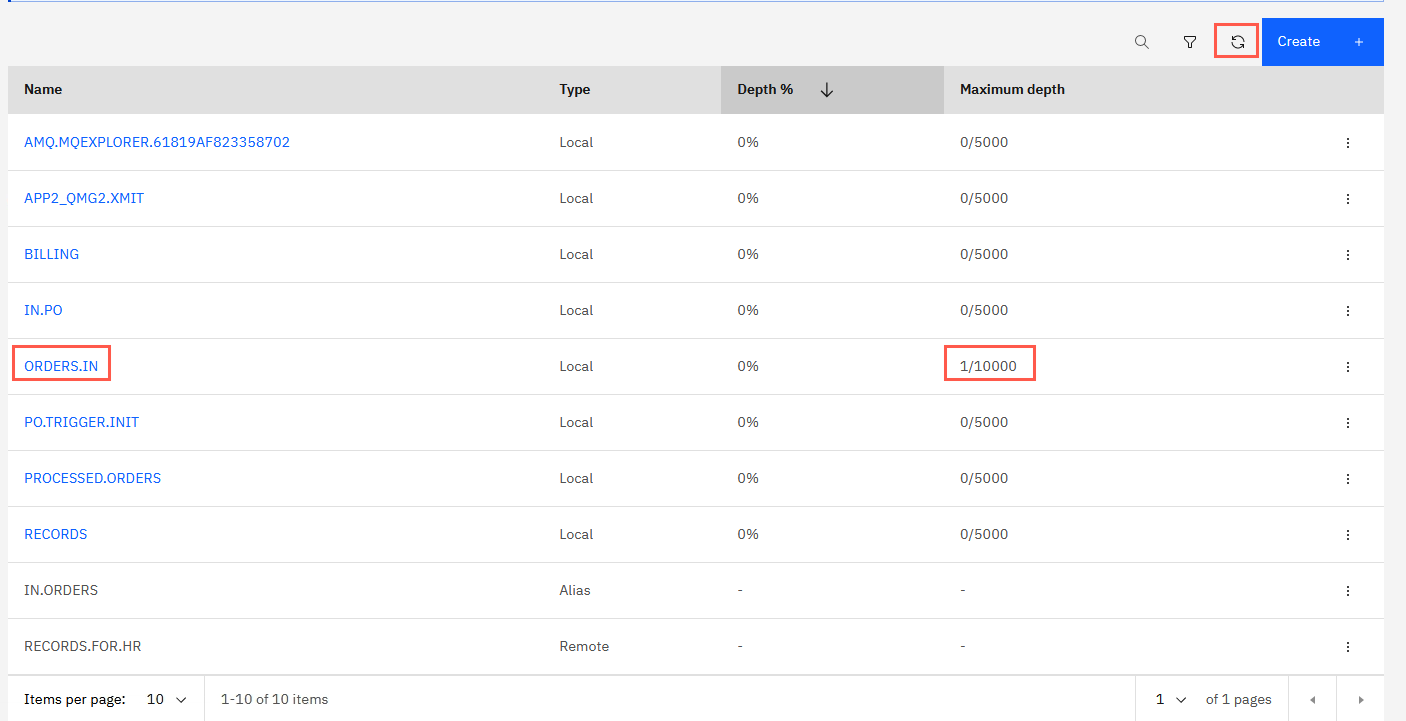
Now check the queue for your message. Return to the MQ Console Manage > Queue mangers > APP1_QMGR then scroll down to find the ORDERS.IN queue. You should see the depth of the ORDERS.IN queue (this is the base object for the IN.ORDERS queue alias that you used) is now 1. You may have to click the refresh button.
-
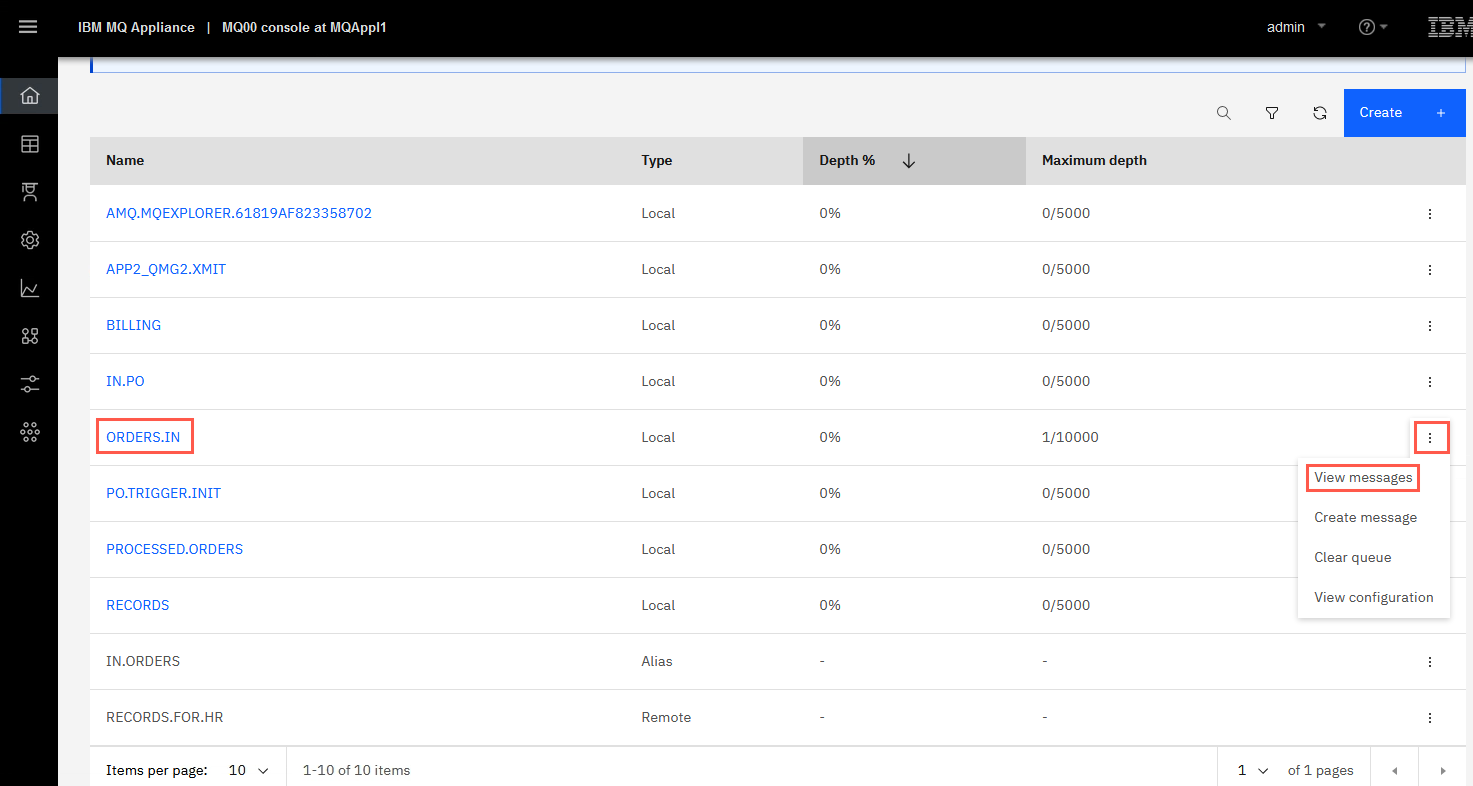
Click the elipsis for ORDERS.IN queue and select View messages.
-
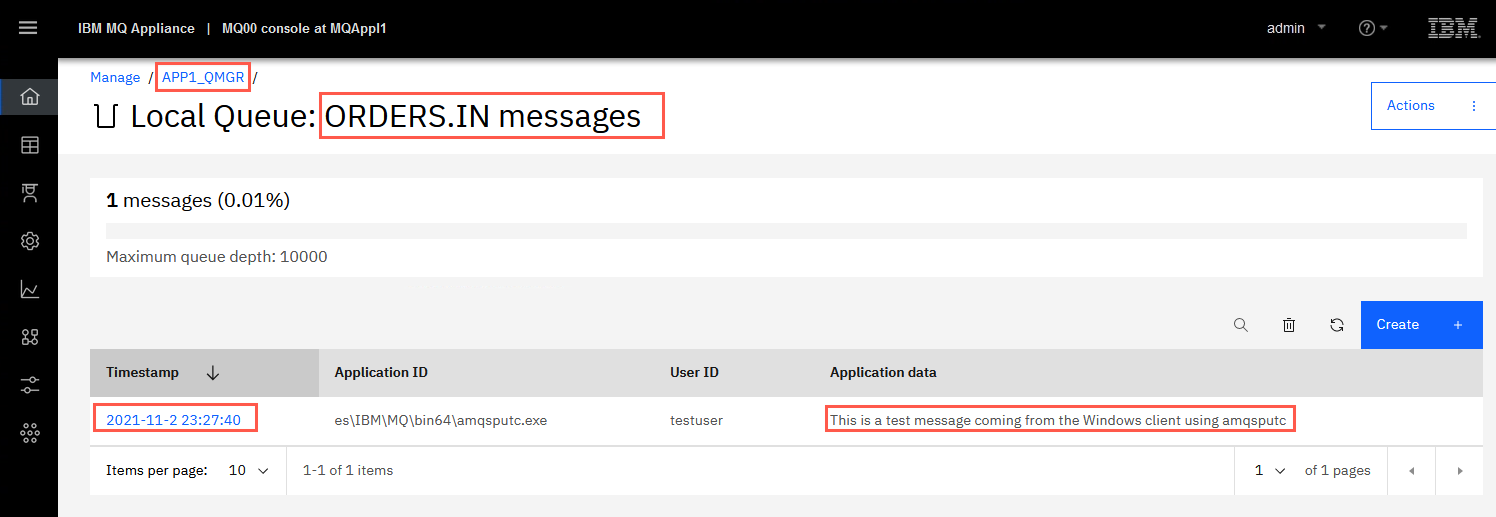
Look at the message in the Application data column, and make note of the Timestamp to validate that this is the message that you just sent from the client application on Windows, sitting on the ORDERS.IN queue on the MQ Appliance. Click the APP1_QMGR breadcrumb to return.
-
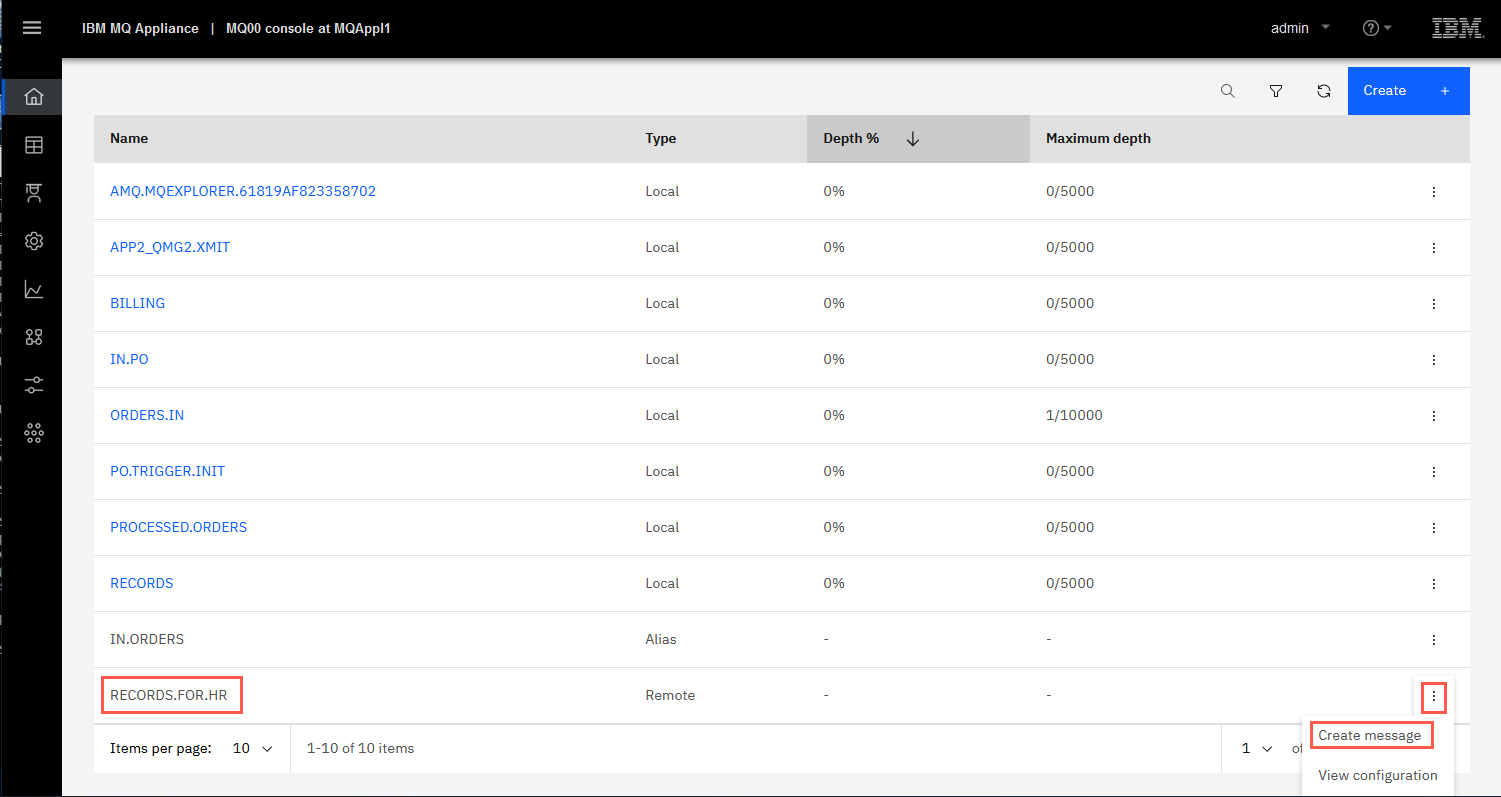
Test sending a message from the APP1_QMGR on the MQ Appliance to the APP2_QMGR on Windows. Scroll to the bottom of the window. Click the elipsis for the RECORDS.FOR.HR queue and select Create message.
-
Type a message in the Application data field, and click Create. For example:
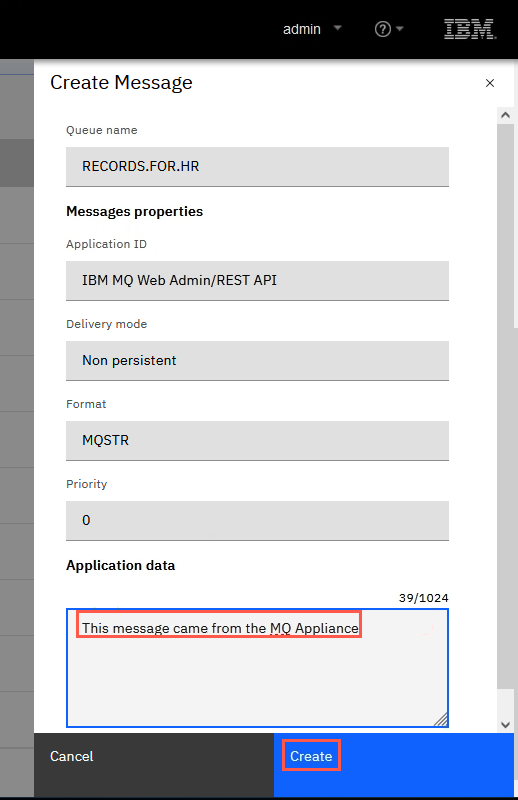
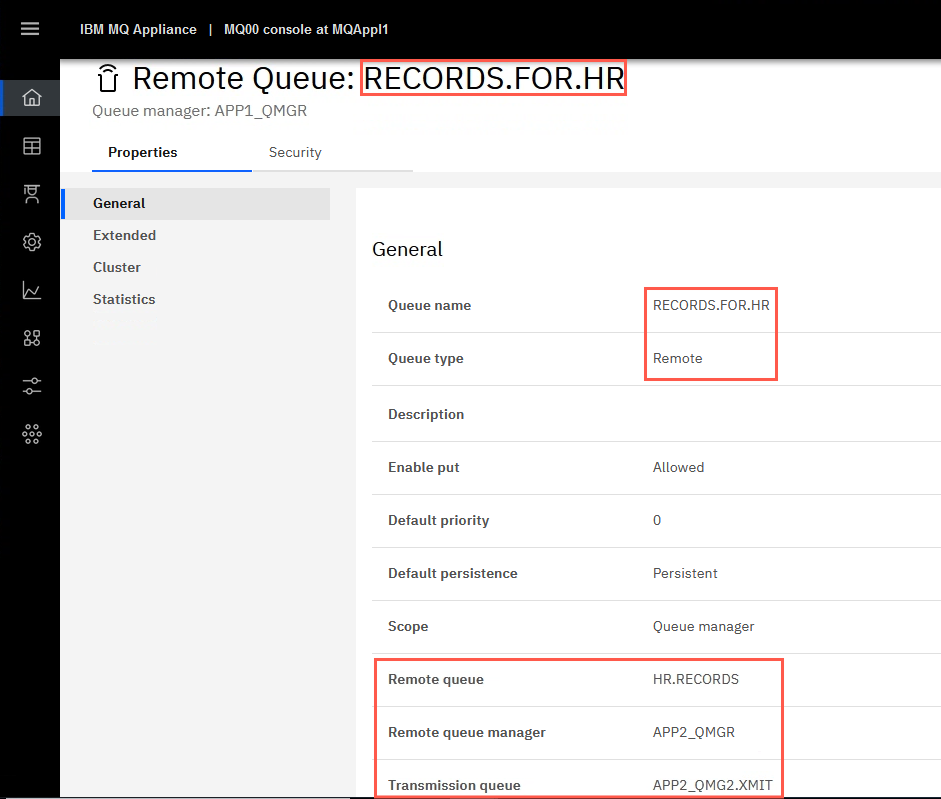
This will PUT a message on the RECORDS.FOR.HR remote queue definition, which will result in the message being sent to the HR.RECORDS queue on APP2_QMGR, as you can see from the queue properties.
Click “X” to close the create message pane. Click the elipsis for RECORDS.FOR.HR Remote queue and select View configuration to view the properties.
-
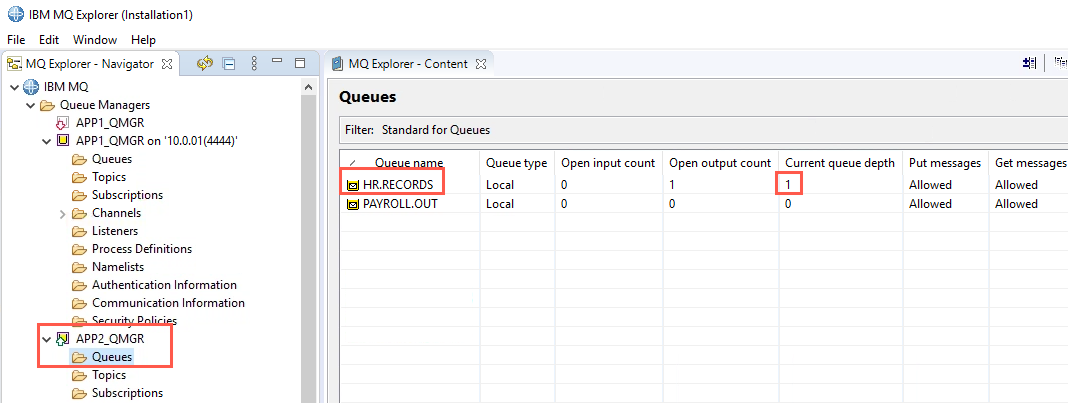
Return to MQ Explorer. Open it if you had closed it. Click the > icon next to the APP2_QMGR queue manager, and then click Queues under it. Notice that you now have one message in the HR.RECORDS queue.
-
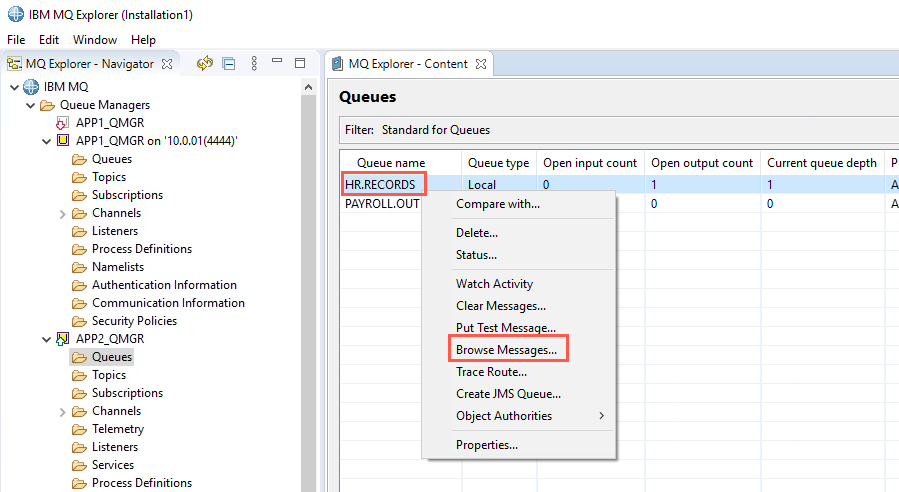
Right-click the HR.RECORDS queue and click Browse Messages… from the menu.
-
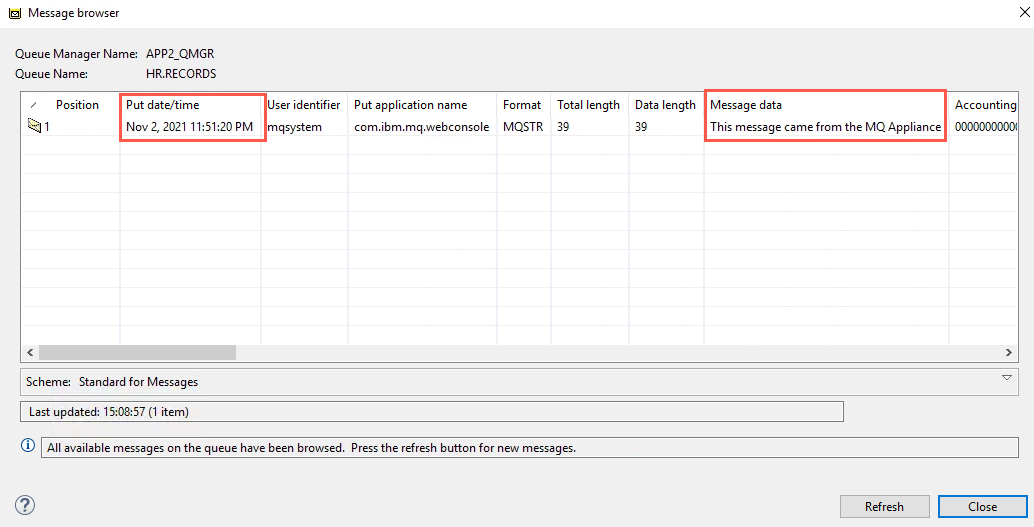
Look at the message in the Message data column, and make note of the Put date/time to validate that this is the message that you just sent from the MQ Appliance.
-
Click Close.
-
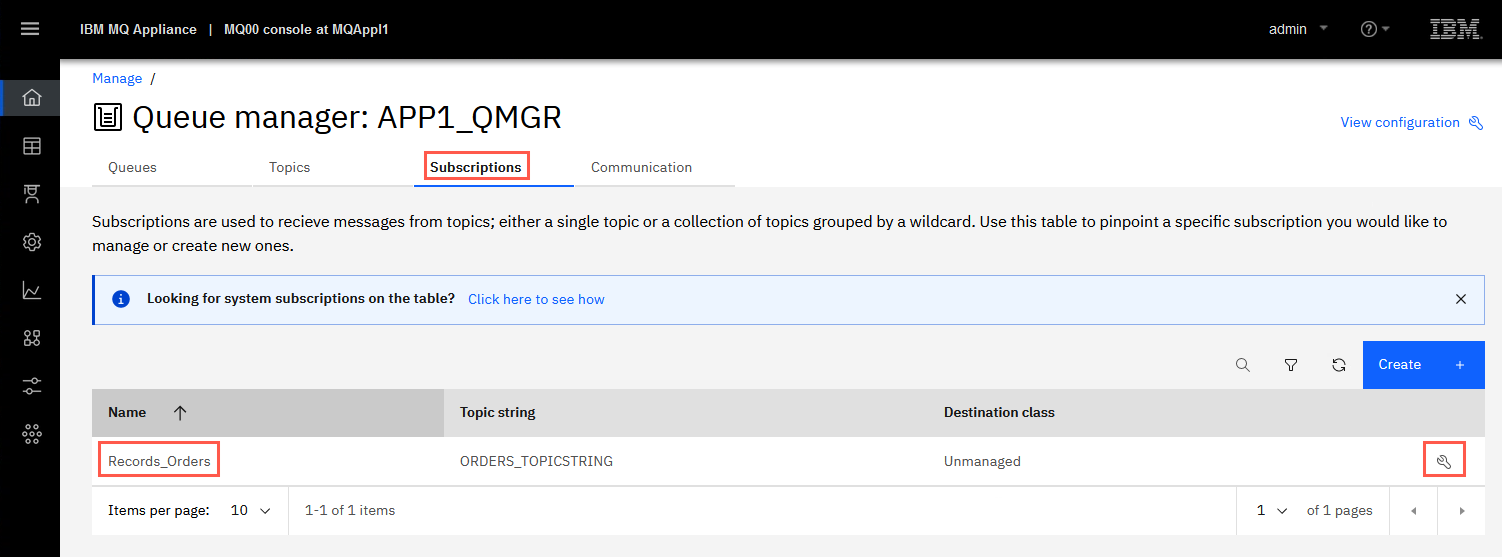
Now test pub/sub. You will do a test publication. First, review the subscription in the MQ Console. Click Subscriptions on the Manage page. Then click the wrench for *Records_Orders to see the properties.
-
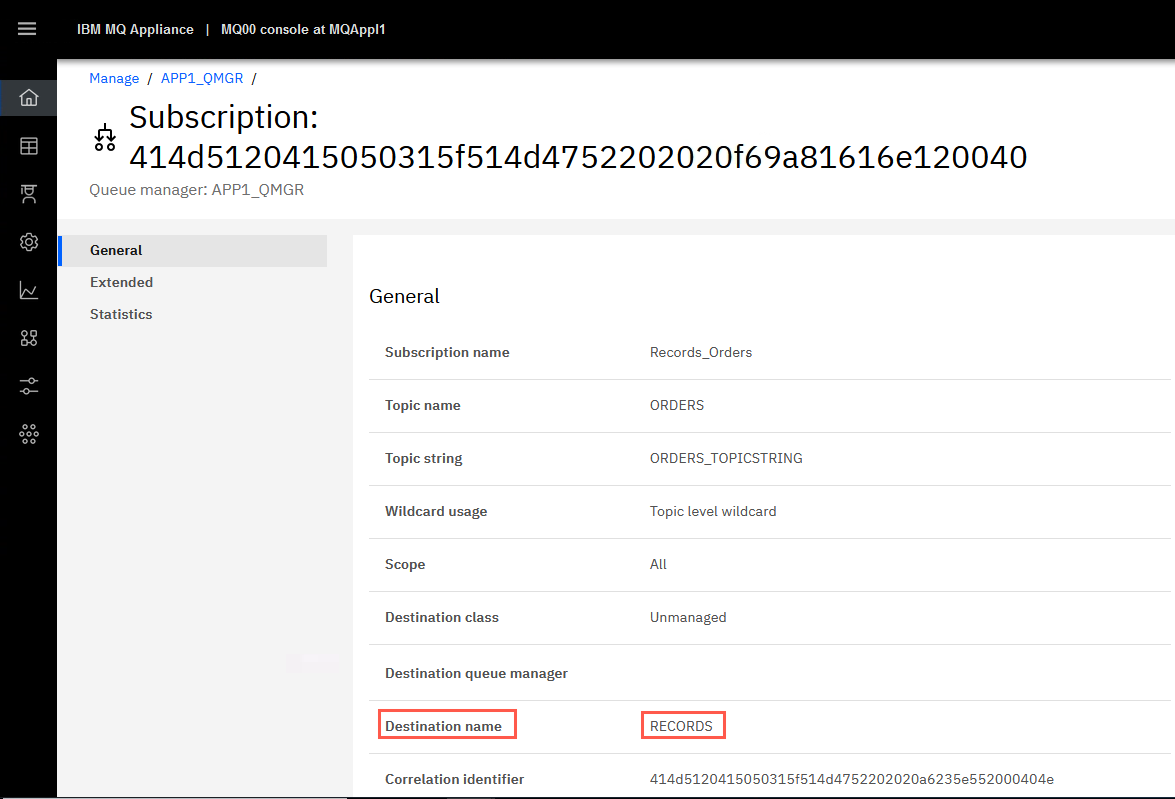
Notice the Destination name for your subscription: a queue named RECORDS.
-
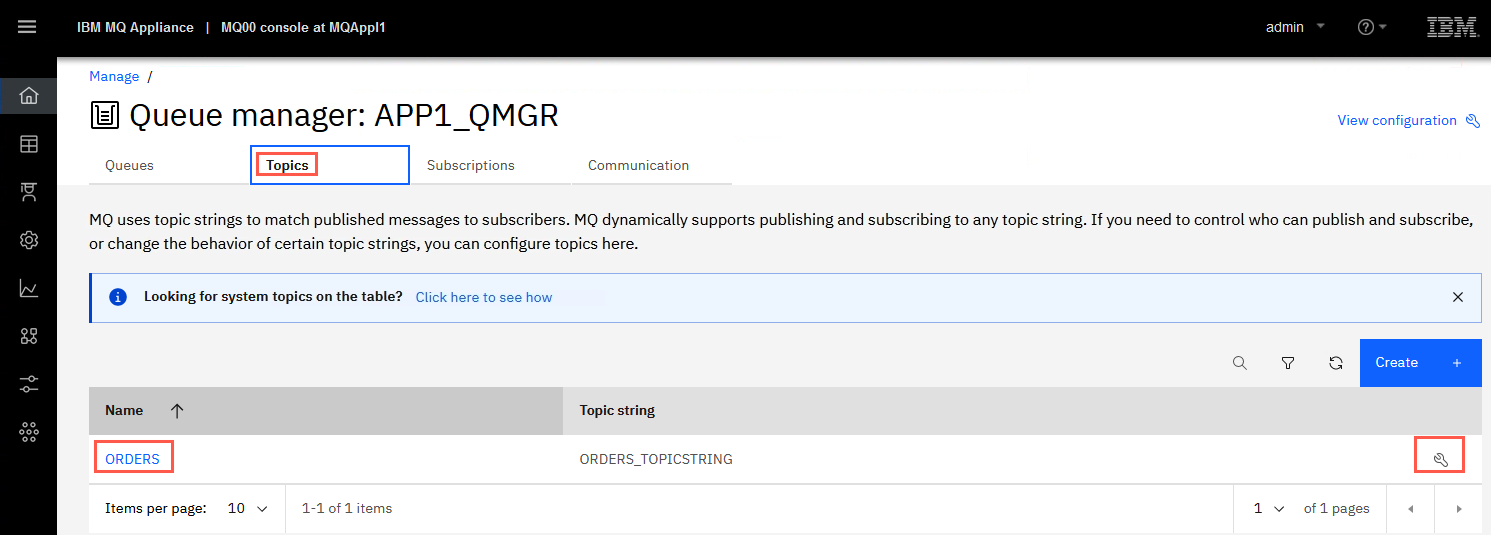
Click the APP1_QMGR breadcrumb, then click Topics.
-
Click the wrench for ORDERS topic to view the properties.
-
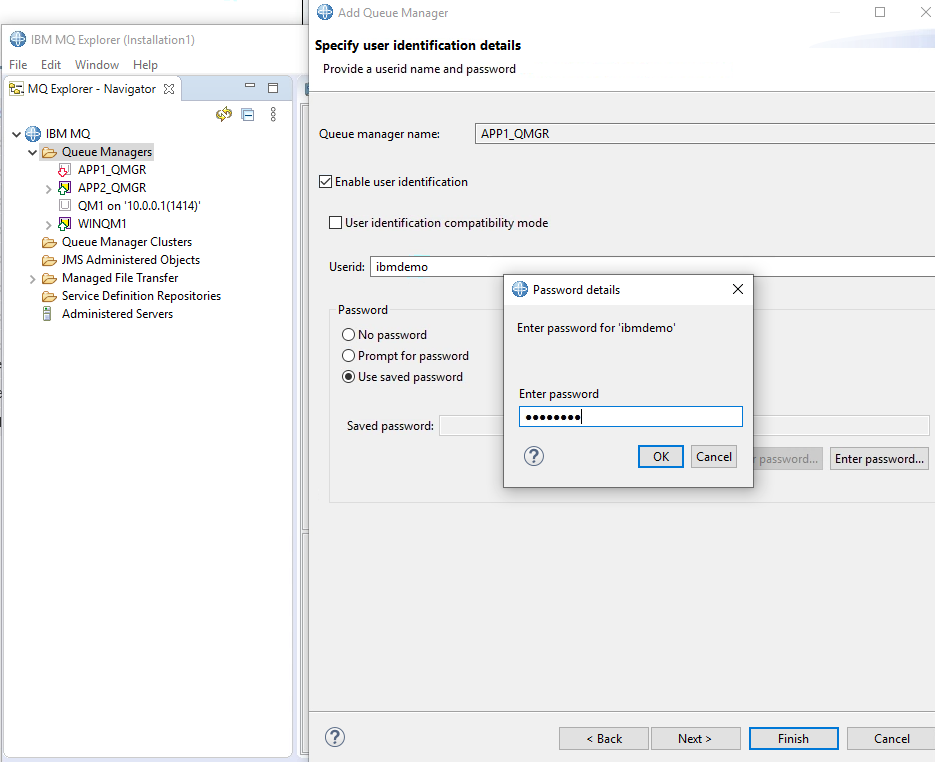
You can publish messages using the pub/sub utility in MQ Explorer. Return to MQ Explorer. Right-click Queue Managers then Add remote queue manager. Use the following properties to connect:
Queue manager name:      APP1_QMGR
Host name or IP address: 10.0.0.1
Port number:             4444
Userid:                  ibmdemo
Pasword:                 passw0rd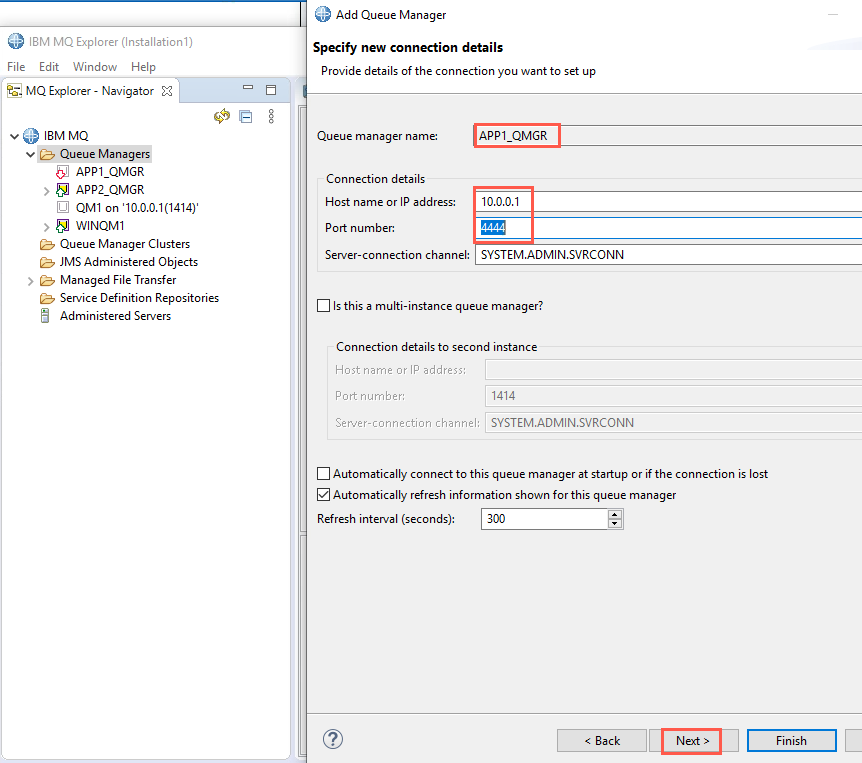
-
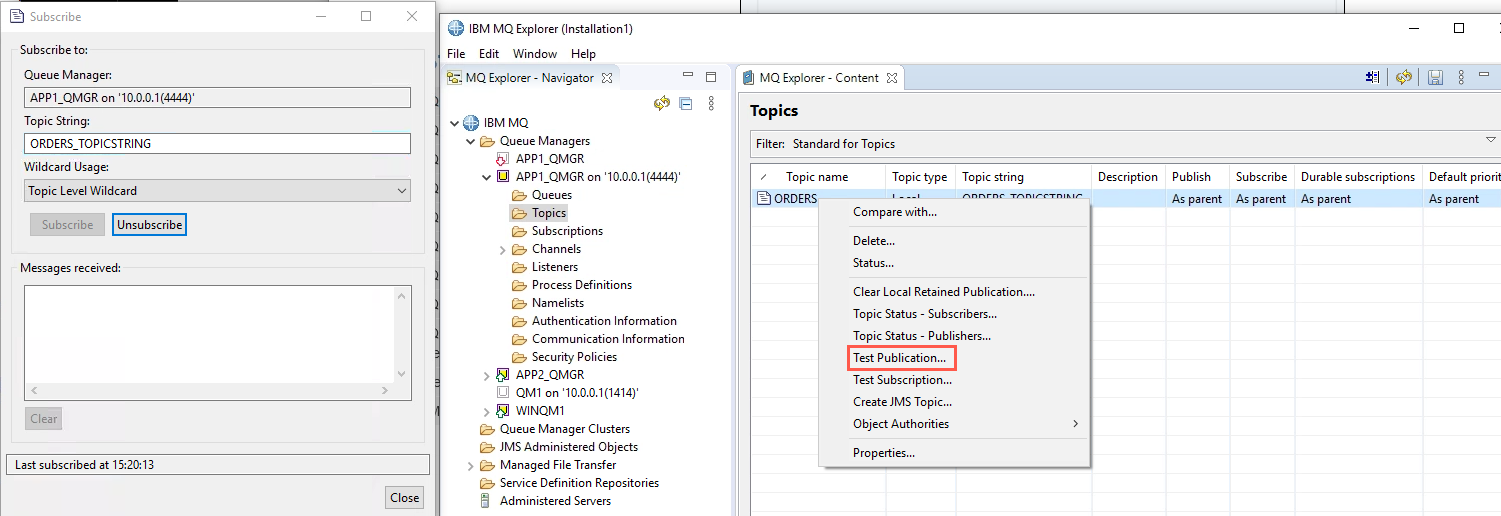
Expand APP1_QMGR > Topics. Right-click Orders > Test Subscription. You receive a Subscribe pop-up for Topic String ORDERS_TOPICSTRING. Right-click Orders again and select Test Publication. You receive another pop-up for publishing.
-
In the Publish Test Message pop-up, type some test messages and watch them appear in the Subscribe pop-up.
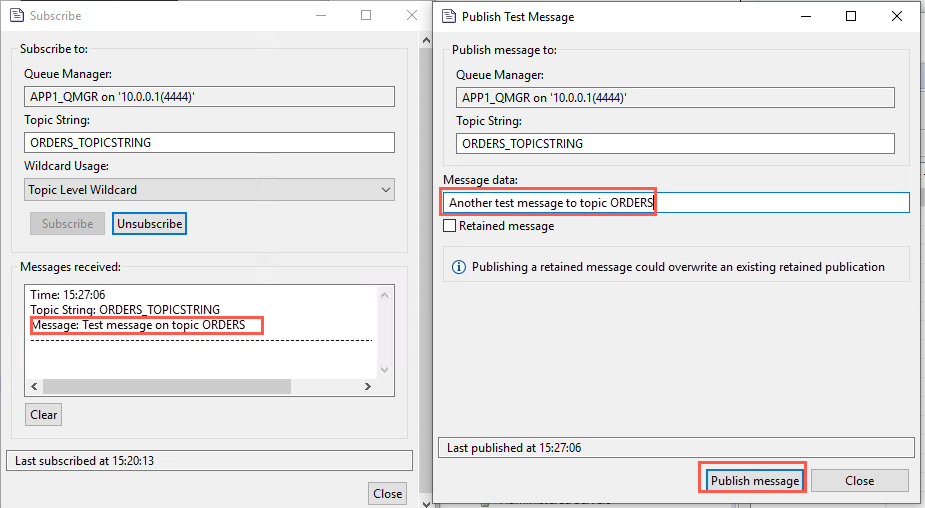
-
When finished, close the pop-ups. Click queues under APP1_QMGR and you will see the messages you published.
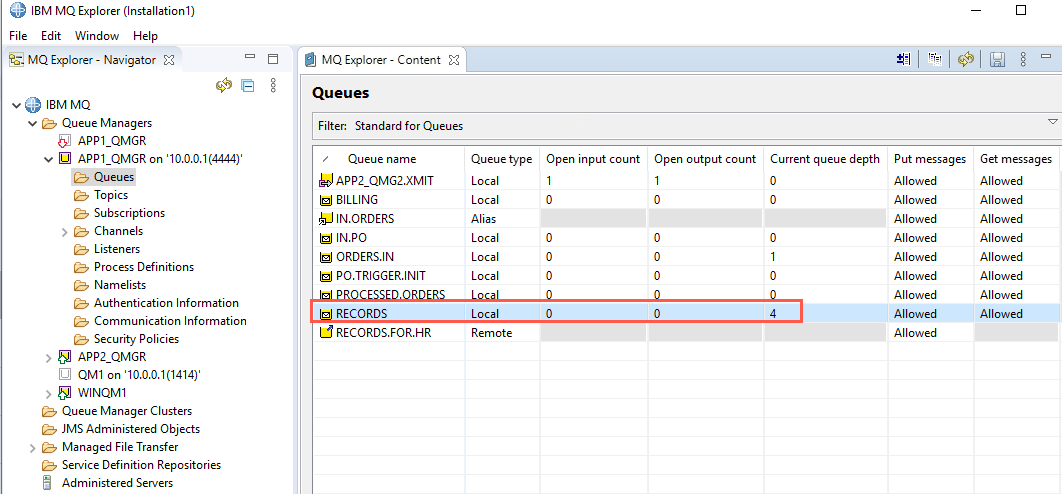
-
Return to the Manage > Queues page in your browser and you will notice the queue depth for the RECORDS queue. You may need to click Refresh to update the queue depth.
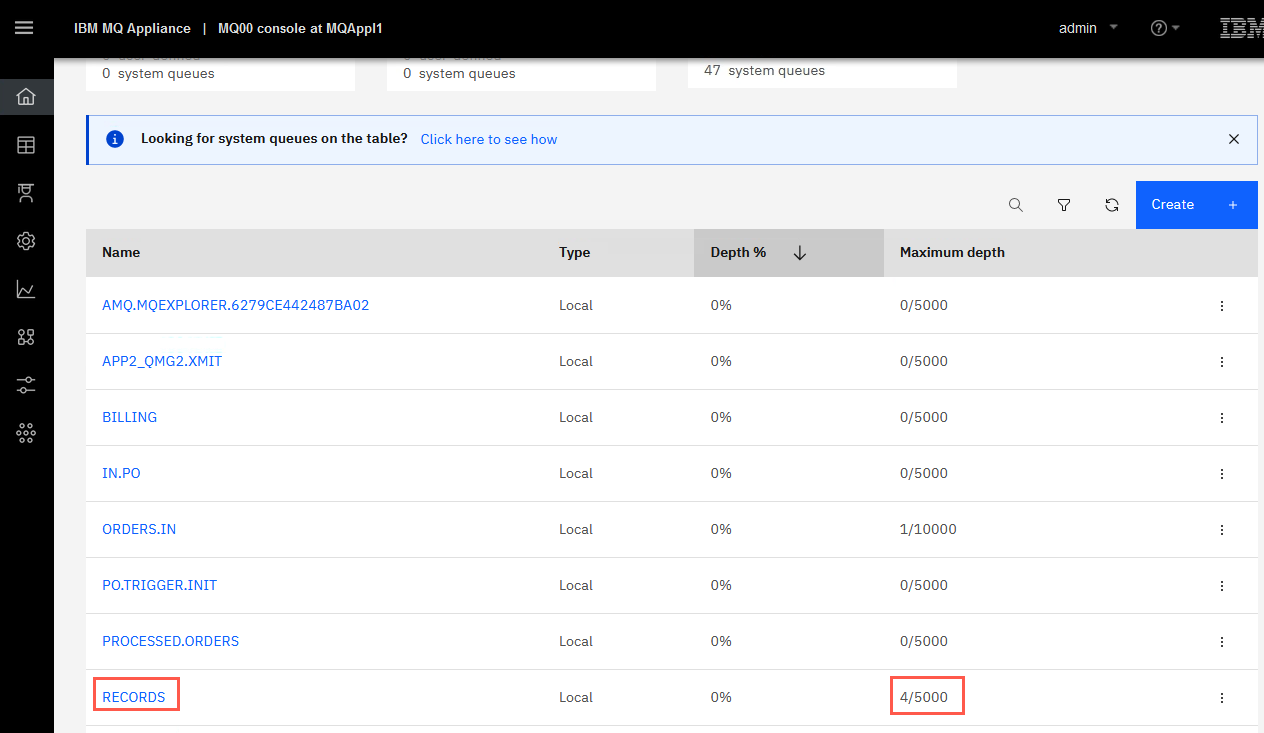
View the messages if you want to verify they are what you published.
OPTIONAL: Validating user authorities on the MQ Appliance queue manager
This step is optional, and demonstrates testing the authorities that “potuser” has to access a queue on the queue manager migrated to the MQ Appliance.
Recall that you migrated a user named potuser, who had limited access to the BILLING queue. You will test that this user’s authorities migrated successfully. You will need to switch to be the potuser.
-
Return to the running Command Prompt, and enter the following command: exit
This will close the command prompt to help avoid confusion.
-
On the Windows desktop, double-click the potuser shortcut. This opens up a Command Prompt window running with the userid of potuser.

-
You need to set the right MQSERVER environment variable for this command prompt.
Enter the following, using the right eth0 IP address for your appliance
SET MQSERVER=SYSTEM.ADMIN.SVRCONN/TCP/10.0.0.1(4444)
-
Now try the amqsputc again with potuser. Note that since you are running as potuser, you will not set the MQSAMP_USER_ID variable.
Enter the following:
amqsputc BILLING APP1_QMGR
-
Notice that you get a 2035 on the MQCONNX call – a reason code that you may be familiar with already: MQRC_NOT_AUTHORIZED. Look at the authority records.
Return to the MQ Console for MQAppl1. Navigate to Manage > Queue managers. Click the hyperlink for APP1_QMGR.
-
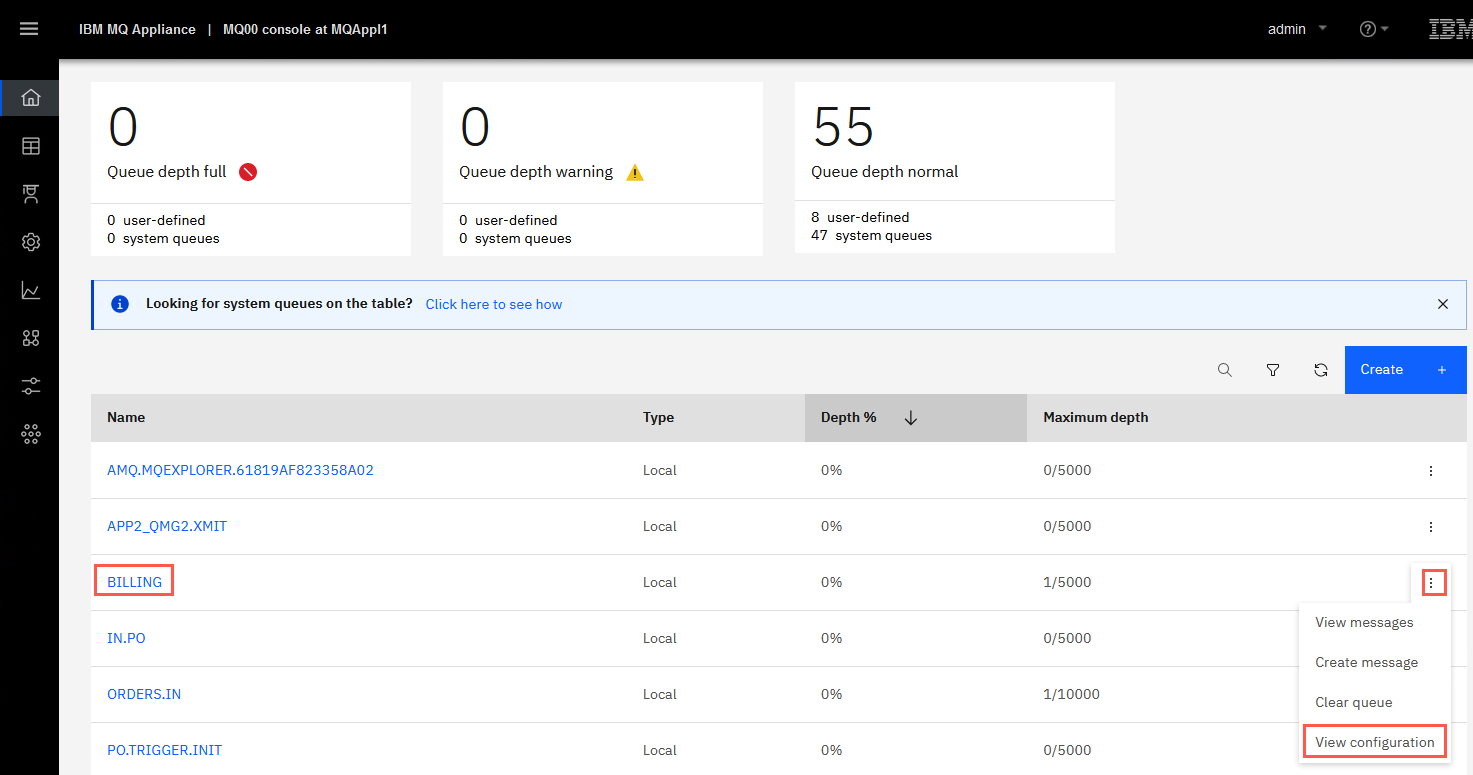
Click the elipsis for queue BILLING and select View configuration.
-
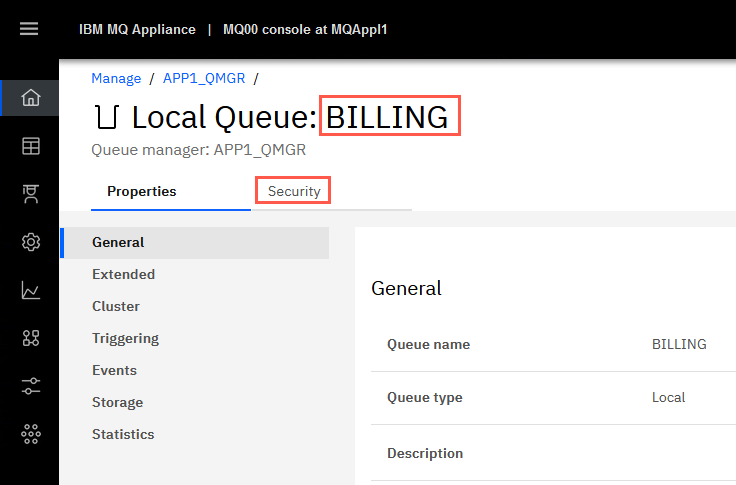
Click Security.
-
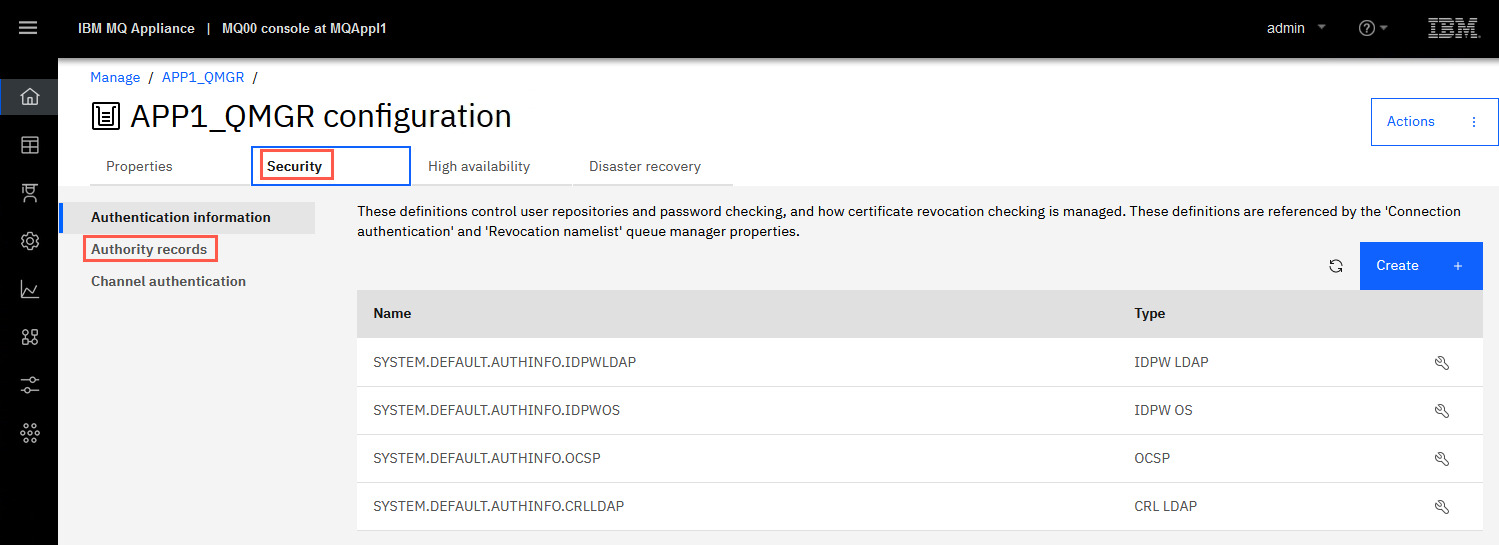
Click Authority records.
-
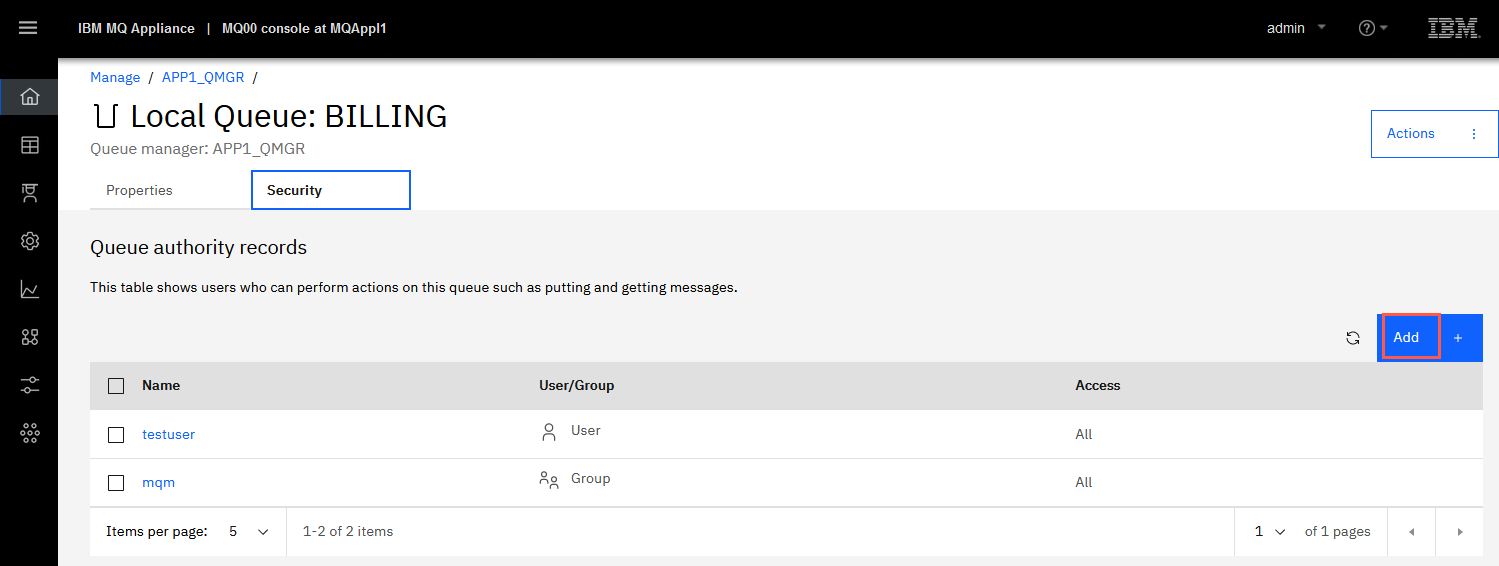
Here you see those users which have access to the BILLING queue. As expected user potuser does not have access. Click Add.
-
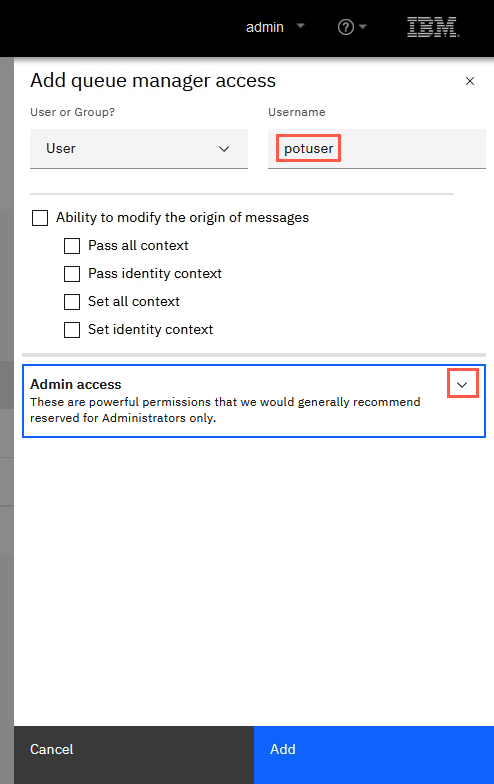
Leave the default for User. Type potuser in the Username field. Then click the drop-down for Admin access.
-
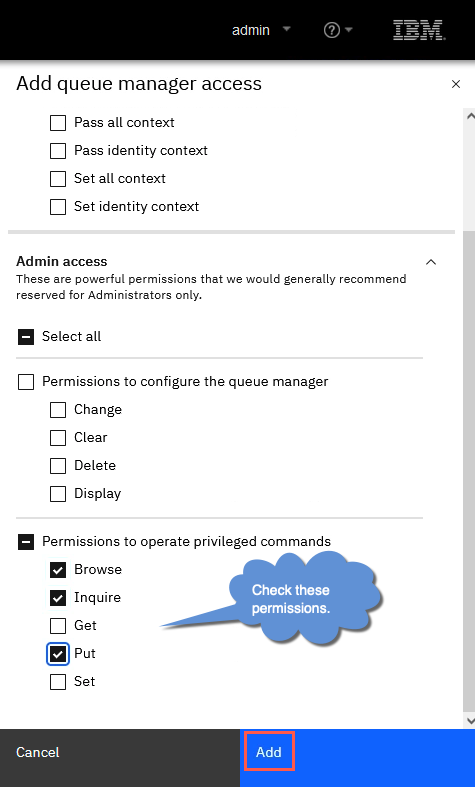
Scroll down to Permissions to operate privileged commands and check the boxes next to Browse, Inquire, and Put. Then click Add.
-
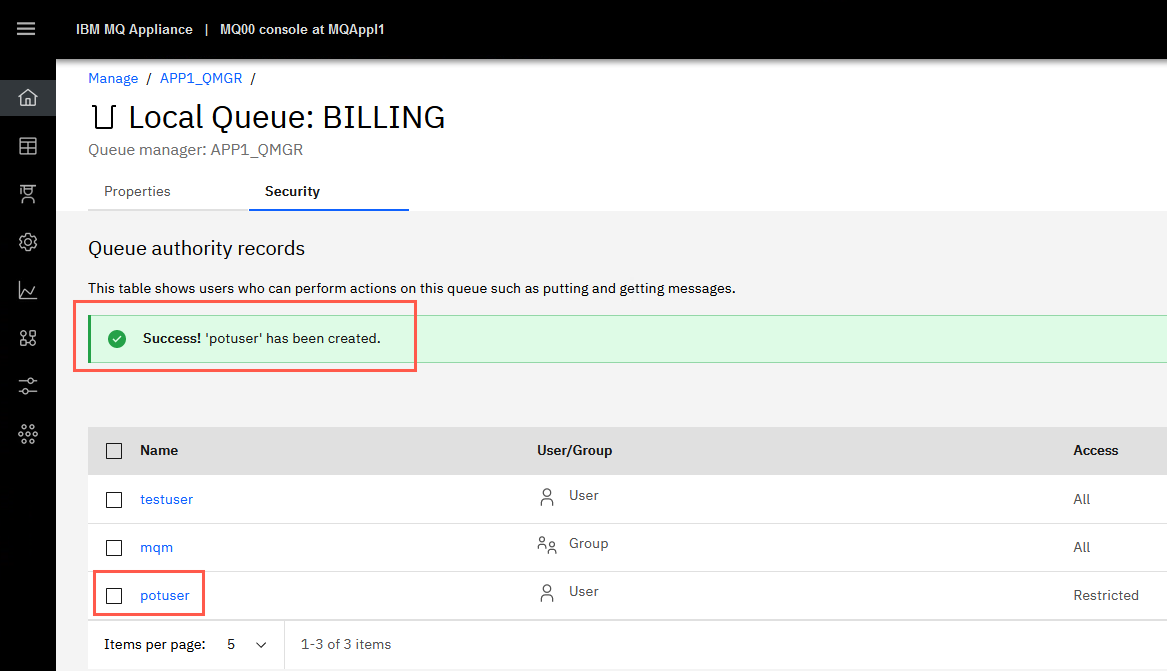
You receive the success pop-up and there is a new Queue authority record for potuser. Click the “X” to close the pop-up.
-
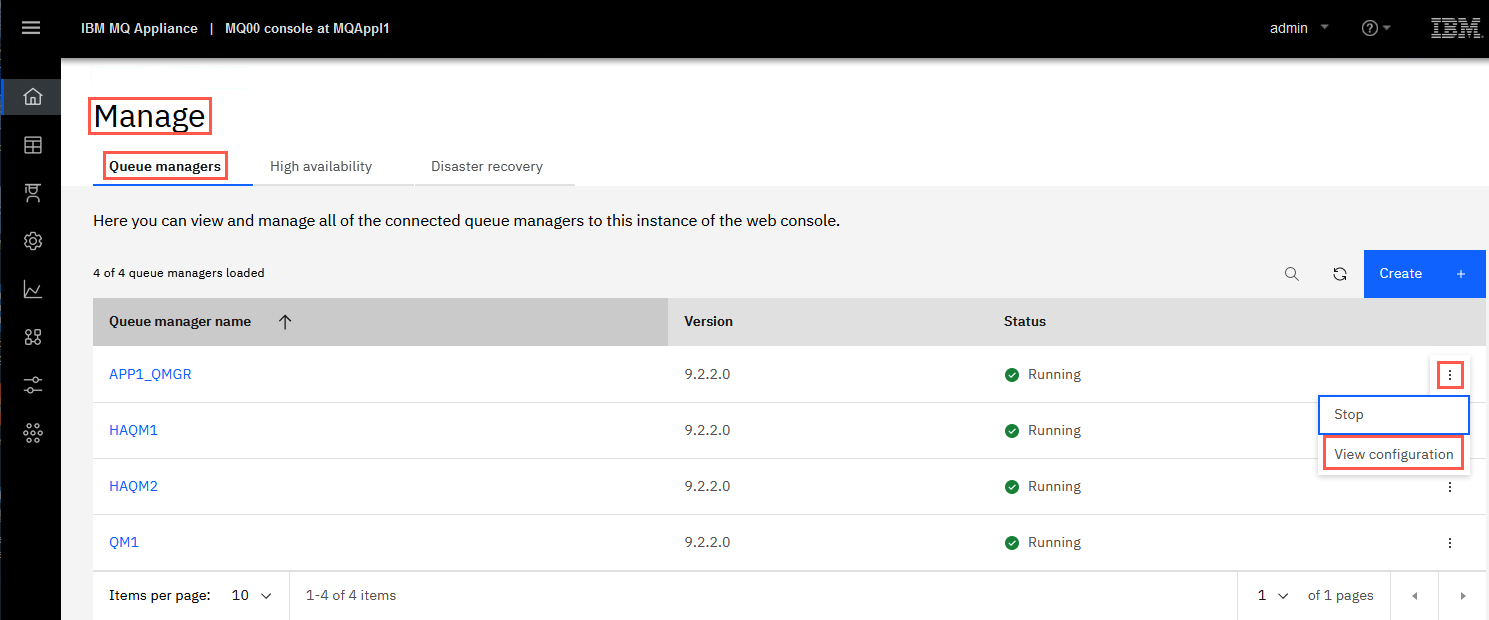
potuser now has access to the BILLING queue, but also needs to be able to connect to the queue manager. Click the Manage breadcrumb to return to Queue managers. Click the elipsis for APP1_QMGR and select View configuration.
-
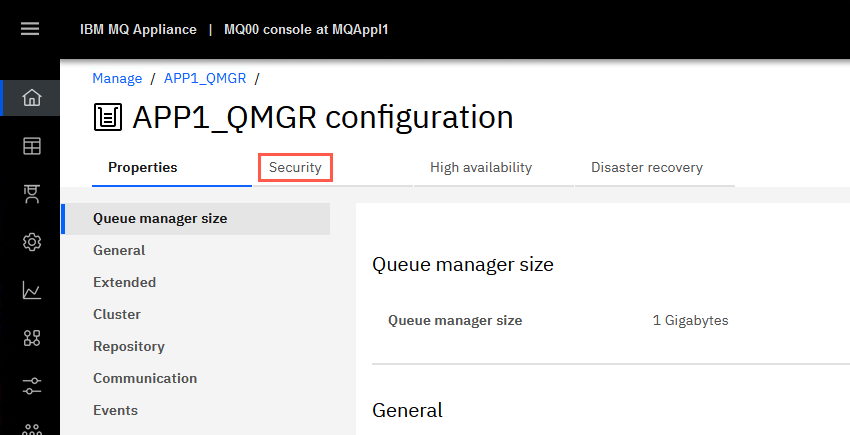
Click Security.
-
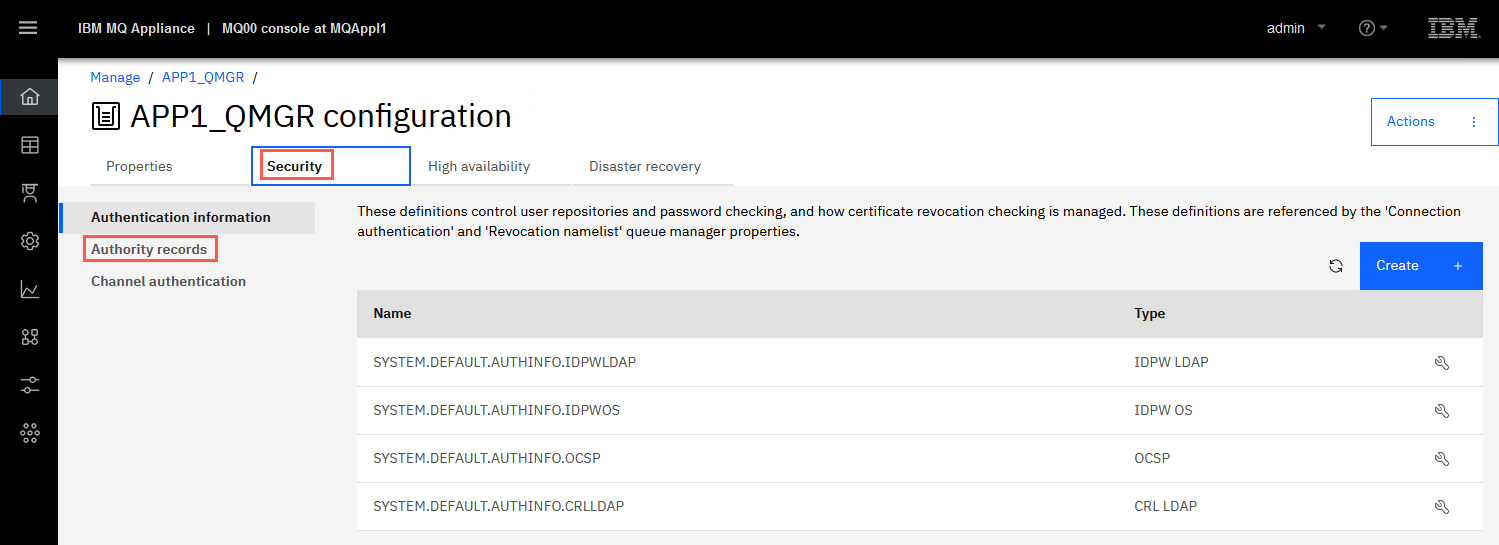
Click Authority records.
-
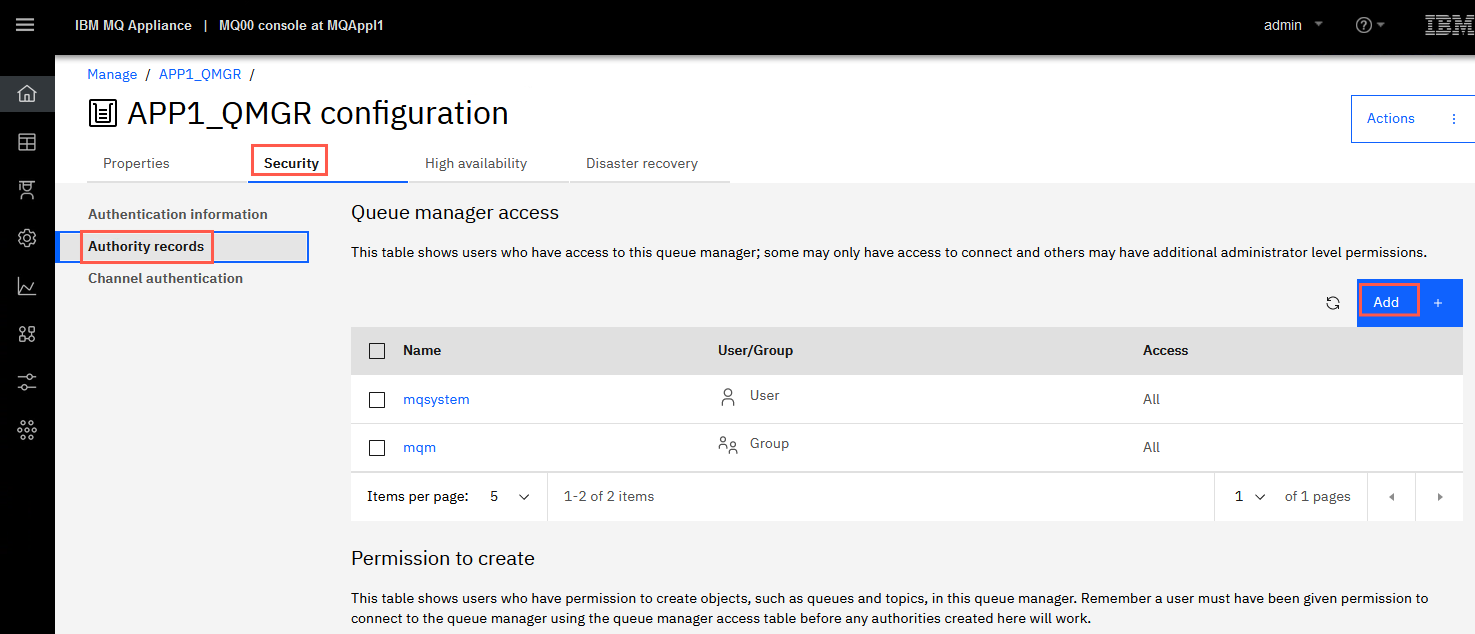
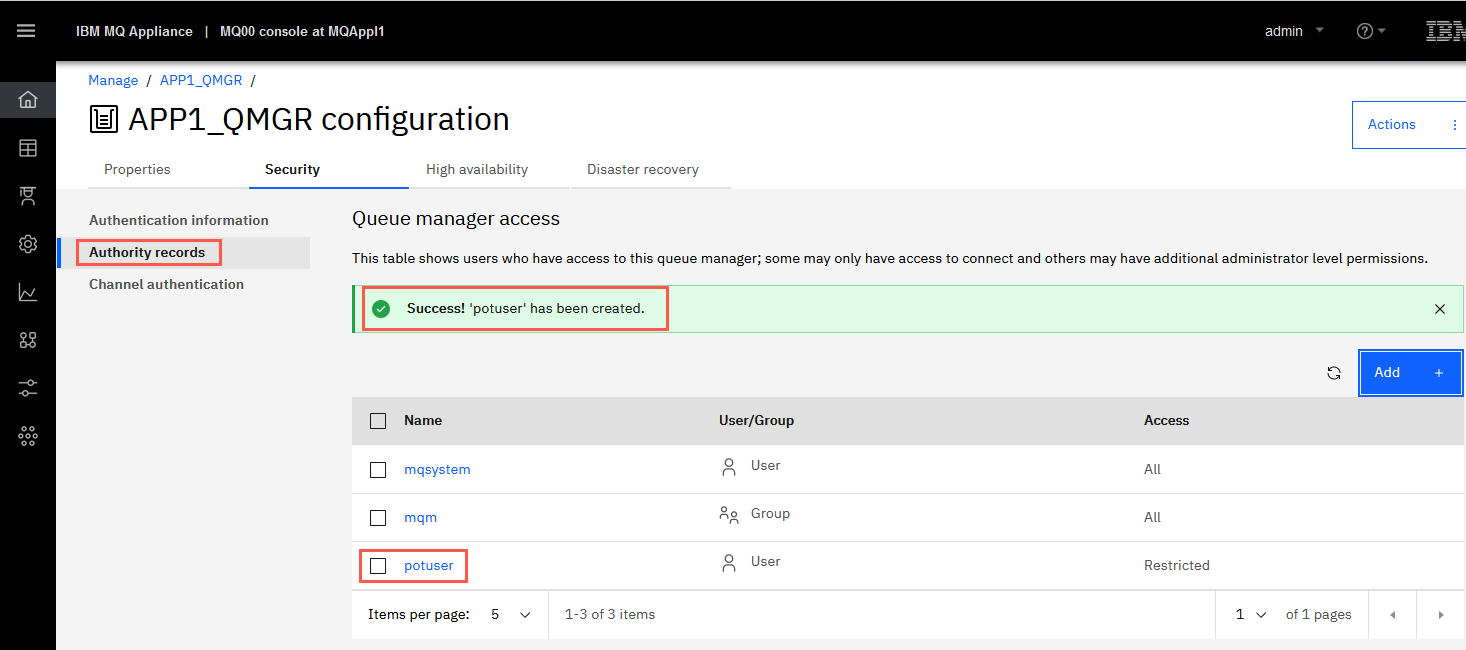
Again you can see that potuser does not have access to the queue manager. Click Add.
-
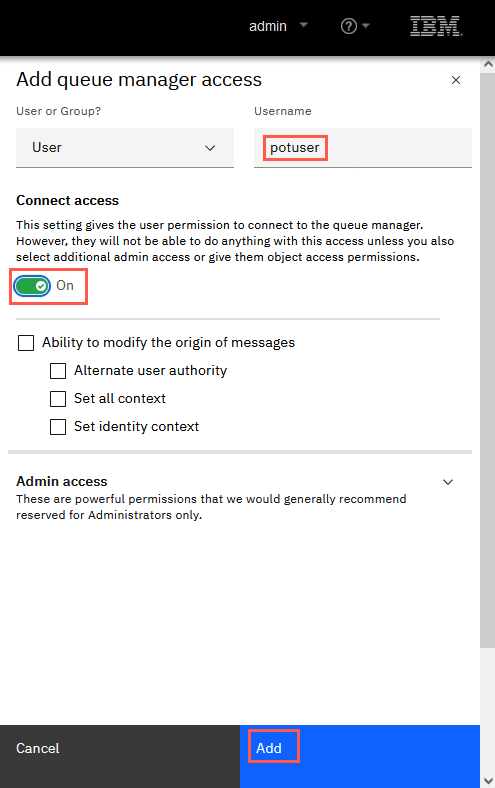
Leave the default for User. Type potuser in the Username field. Click the Connect access switch to turn it On. Then click Add.
-
You receive the success pop-up and there is a new Authority record for potuser. Click the “X” to close the pop-up.
-
Now return to the Command Prompt again.
Enter the following:
amqsputc BILLING APP1_QMGR
-
This time it connects to APP1_QMGR successfully, and opens the BILLING queue. Now enter a message and press Enter. For example:
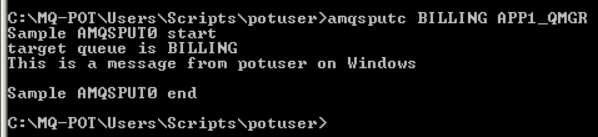
Press Enter a second time on the blank line to terminate the amqsputc program.
-
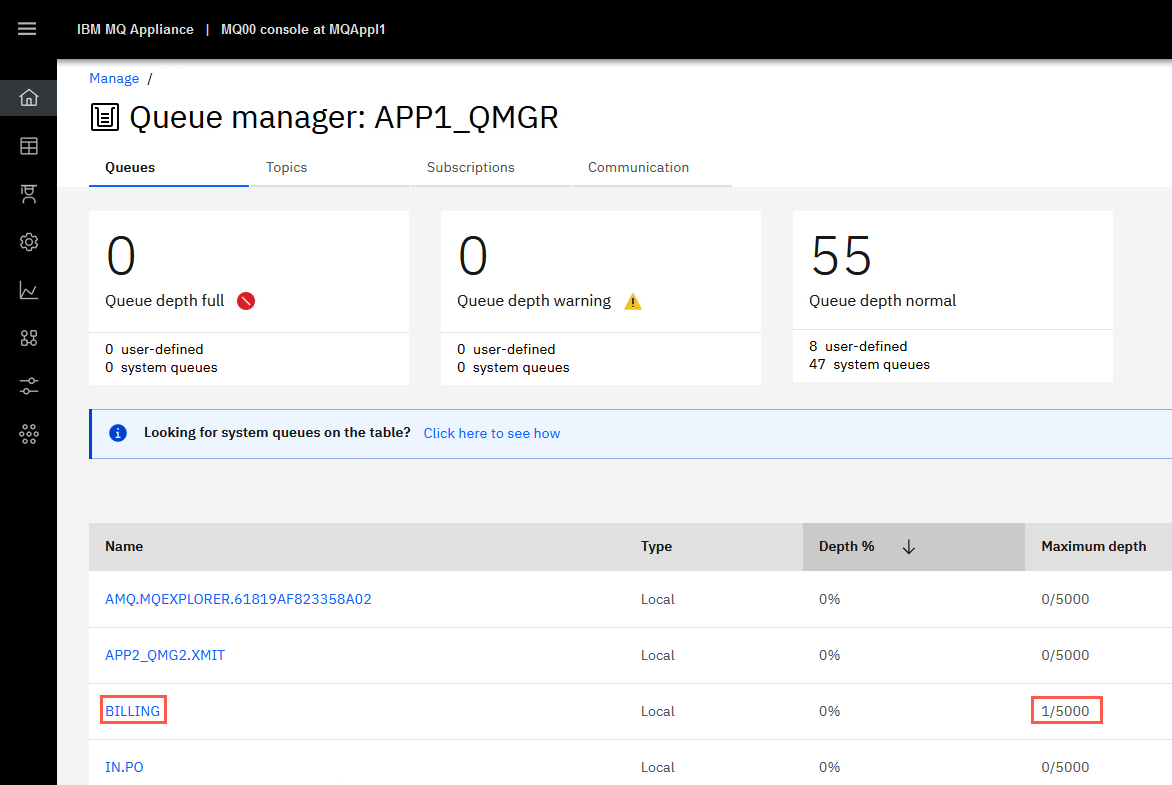
Click the breadcrumb for APP1_QMGR. Notice that the BILLING queue has one message (refresh if necessary).
-
Now from the Windows client, try to GET the message.
Return to the Command Prompt and enter:
amqsgetc BILLING APP1_QMGR
You get a 2035 again; this time because potuser does not have GET authority, therefore, when you try to OPEN the queue, you get the failure.
-
Try to browse the message.
Return to the Command Prompt and enter:
amqsbcgc BILLING APP1_QMGR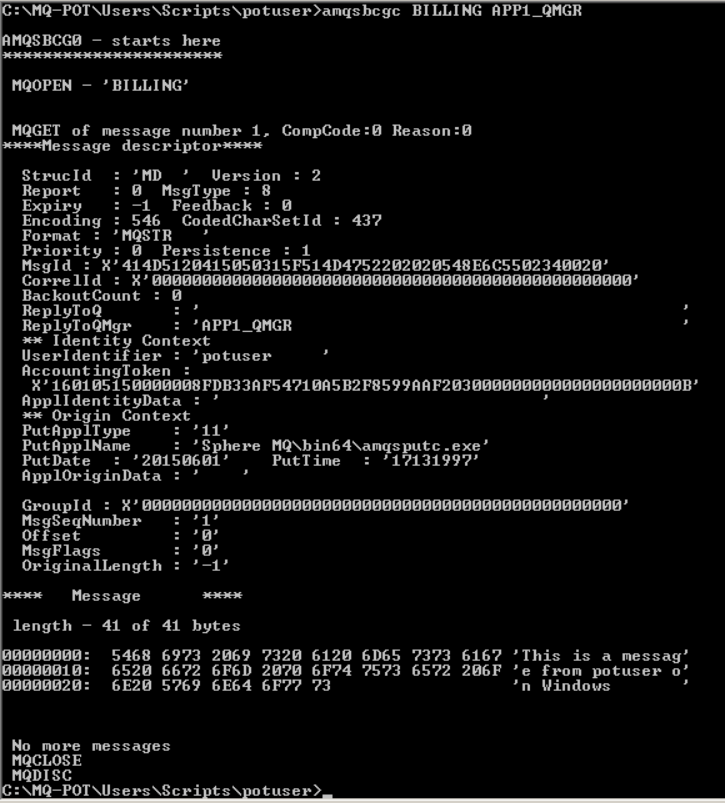
-
This works, and you see the message you sent to the queue, because potuser does have Browse authority.
That concludes this test.
Cleanup
You have successfully migrated a queue manager from Windows to the MQ Appliance, and you have completed the lab.
-
To clean up, you can enter exit at the command prompt. If you did the optional step, you will have to enter exit twice: the first to exit the potuser level, and then to close the command prompt.
-
Close MQ Explorer.
-
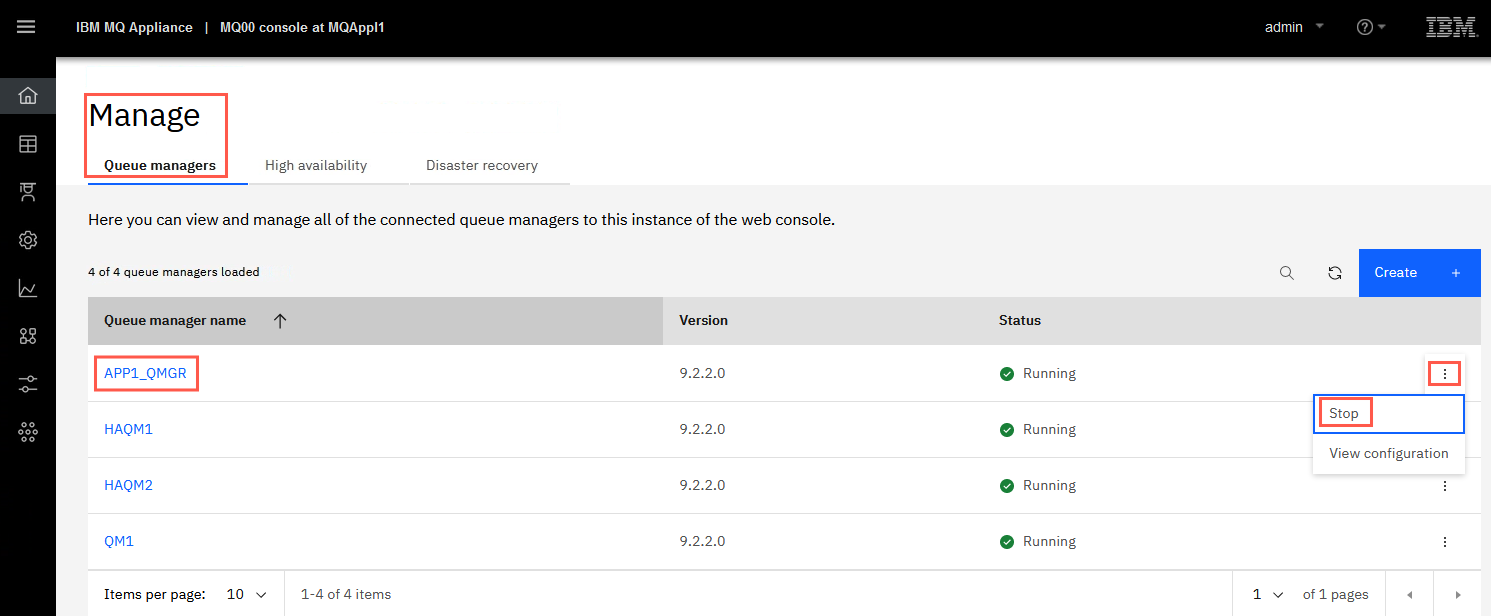
You need to remove the migrated queue manger to make room for further labs. In the MQ Console click the Manage breadcrumb, then click the elipsis for APP1_QMGR queue manger and select Stop.
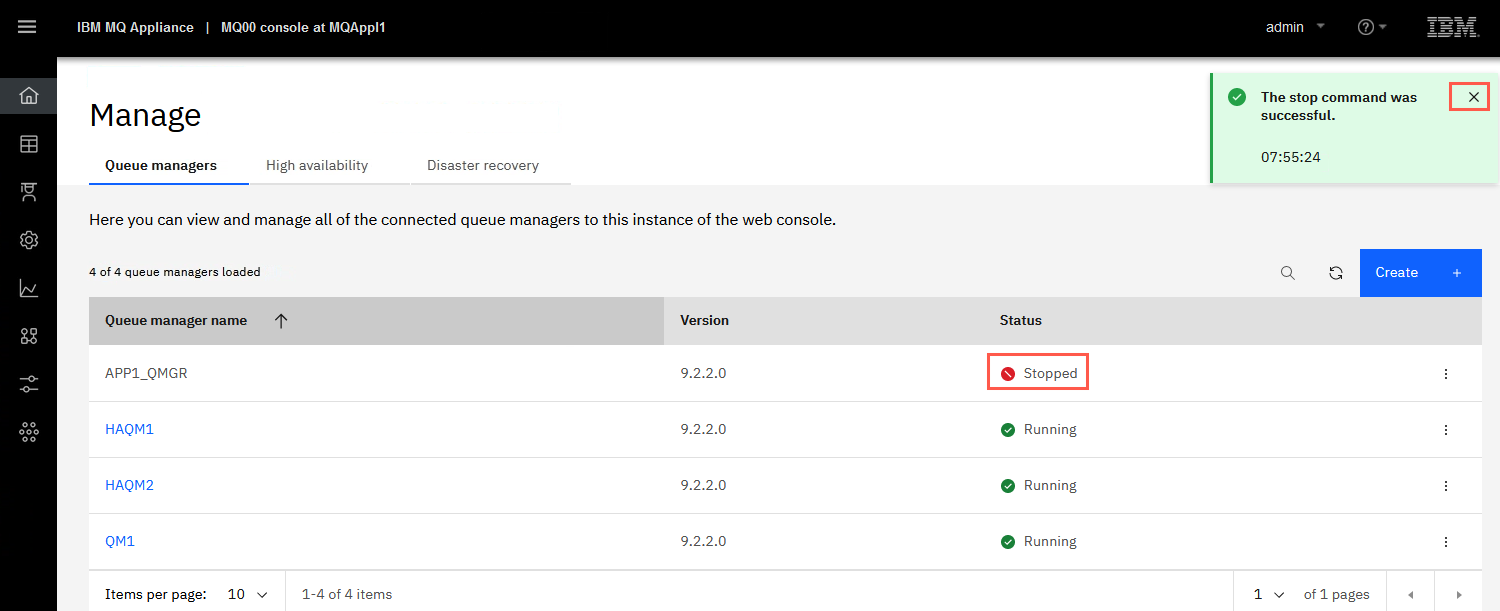
The queue manager is stopped. You receive the success pop-up. Click the “X” to dismiss the pop-up.
-
After APP1_QMGR is stopped, return to the putty session. Run the following command to delete the queue manager APP1_QMGR.
dltmqm APP1_QMGR
Congratulations, this concludes the migration lab.