Lab 6 Implementing Channel Security in IBM MQ
Course Objectives
The material presented in this course is intended to accomplish the following:
- Familiarize you with the IBM MQ authorization commands.
- Familiarize you with some of the security-related IBM MQ SupportPacs.
- Gain hands-on experience configuring a security exit to perform authentication.
- Gain hands-on experience configuring SSL to perform authentication.
- Walk through the base hardening tasks for a queue manager.
View an overview of using Channel Authentication
VMWare Image Public
The lab is set up to run on a Windows 10 64-bit system on CSIDE with the following components already installed:
- IBM MQ Server and Client
- IBM MQ Explorer with supportpac MS0P installed
- IBM Global Security Kit (GSKit)
In addition, the following supportpacs have been downloaded and installed
- MA01 – Q Program
- MO04 – TLS Wizard
- MS0P – IBM MQ Explorer Configuration and Display Extension Plug-ins
Accounts and Groups
Several user-ids have been pre-configured for use in this course and are listed along with the groups they belong to:
- ibmdemo administrators
- mqm mqm
- mqlab mqm, administrators
- mqadmin (disabled, non-login account)
- mqmmca (disabled, non-login account)
- mqmmqi (disabled, non-login account)
The password for all active accounts is listed in the tables below.
| User-ID | Group | Purpose |
|---|---|---|
| ibmdemo | Administrators, mqm | Windows and MQ administrator |
| msgsend | mqusers | IBM MQ application user-id |
| msgrecv | mqusers | IBM MQ application user-id |
| msgspy | mqusers | IBM MQ application user-id |
| MQ Admin Privileged Accounts | Password |
|---|---|
| ibmdemo | passw0rd |
| mqlab | passw0rd |
| mqm | N/A |
| Non-privileged Accounts | Password |
|---|---|
| mqadmin | N/ A |
| Channel Service Accounts | Password |
|---|---|
| mqmmca | N/A |
| mqmmqi | N/A |
| Naming Conventions | |
|---|---|
| Supporting Files | C:\PoT-Messaging\MQ-POT\MQ71-Lab |
| Modules | Each module has a supporting directory with a leading numerical prefix to match the module number. |
| File system shortcuts | |
|---|---|
| Path | The $PATH variable has been modified to include C:\Program Files\IBM\MQ\bin64;C:\Program Files\IBM\MQ\tools\c\samples\bin64 |
| Names and locations of server processes, workspaces, etc. | ||
|---|---|---|
| MARS | C:\ProgramData\IBM\MQ\qmgrs\MARS | |
| VEUNUS | C:\ProgramData\IBM\MQ\qmgrs\VENUS | |
| QMgr keystores | C:\ProgramData\IBM\MQ<qmgr name>\ssl | |
| User keystores | C:\PoT-Messaging\MQ-POT\Users\MQLab\ssl |
Sign-in as mqlab
When starting the VM image, you may be logged in as iibadmin or ibmdemo. You need to log off and login as mqlab.
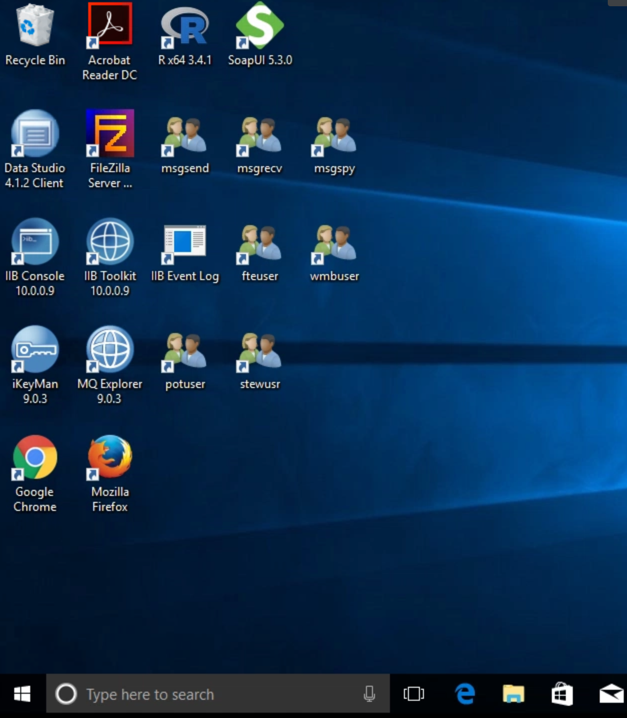
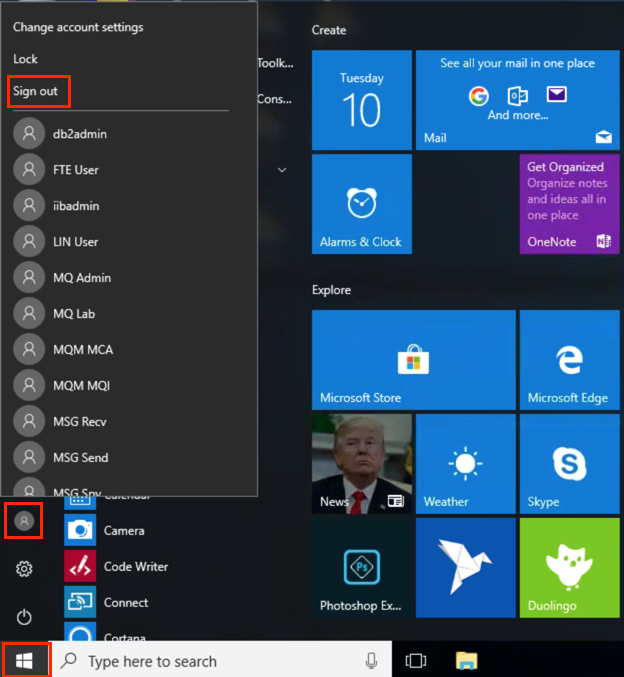
- Click Start.
- Click the user icon.
-
Click Sign Out.
-
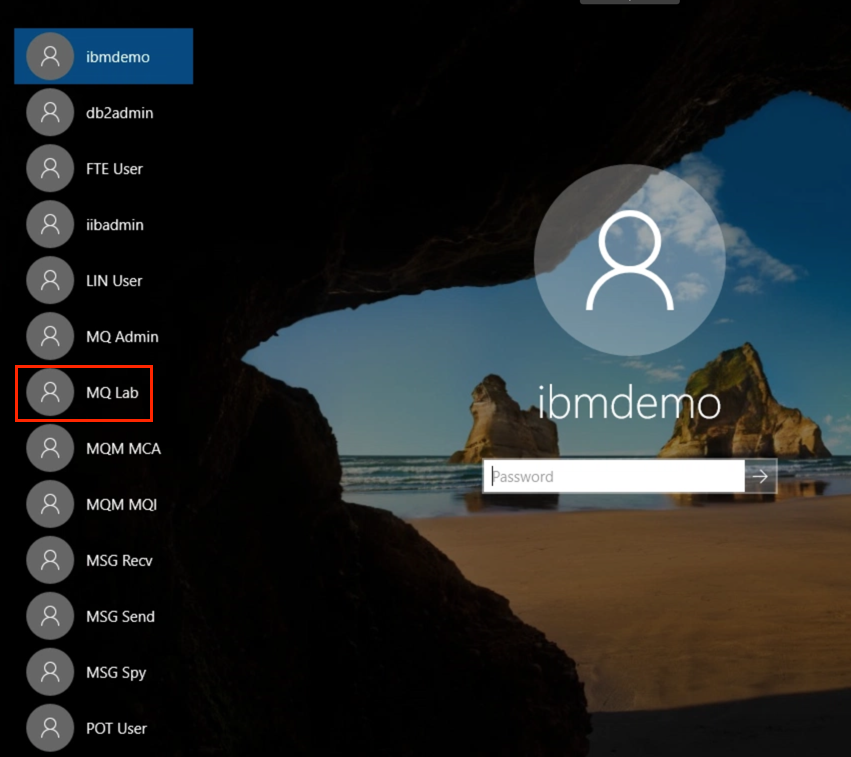
Hit enter or click the mouse on the desktop. You are taken to the sign on screen.
-
Select MQ Lab and enter password for the password.
-
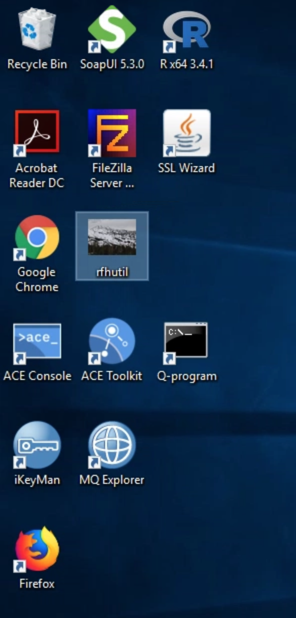
Once signed on, take a moment to locate the various software assets described above.
-
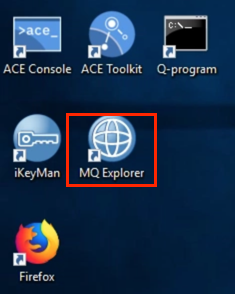
Double click MQ Explorer icon on the desktop. Wait for MQ Explorer to start.
-
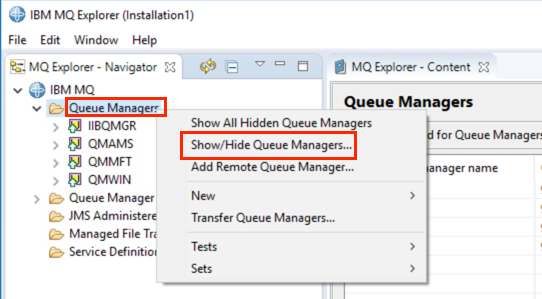
You will not see the queue managers required for this exercise in the Queue Manager list. You must “unhide” them.
-
Right click Queue Managers and select Show / Hide Queue Managers.
-
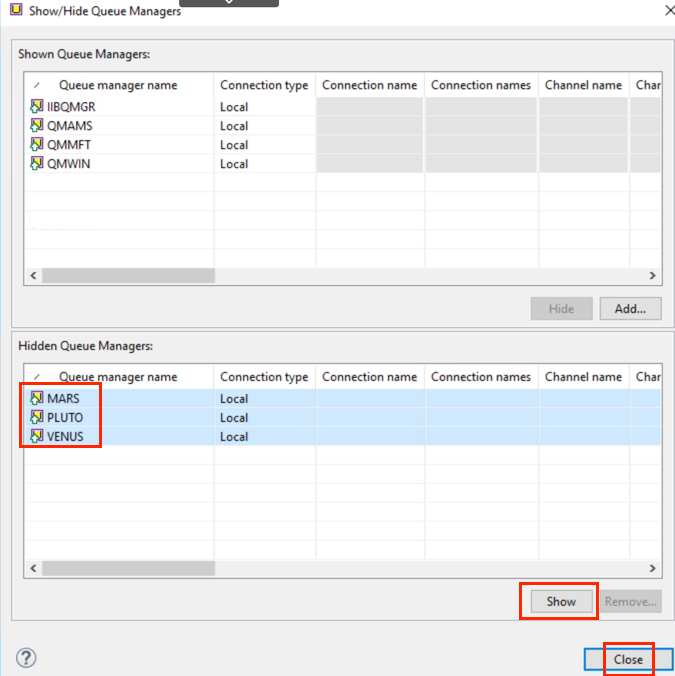
In the Show / Hide Queue Managers dialog box, under Hidden Queue Managers, select MARS, PLUTO, and VENUS and click Show.
-
Click Close to close the dialog box.
-
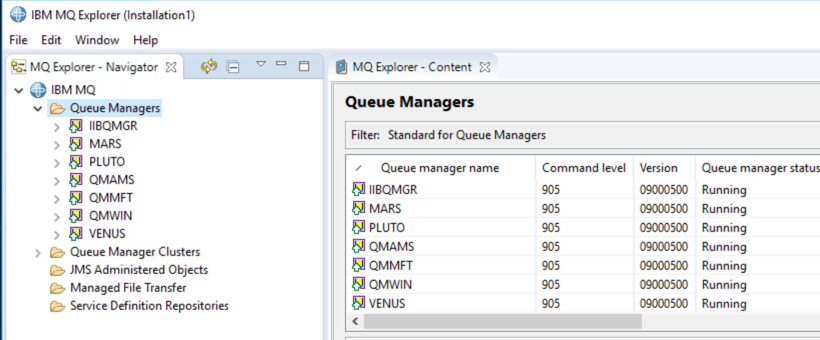
The MQ Explorer should now look like this:
Using TLS Wizard to Connect Two Queue Managers
This module will connect the MARS and VENUS queue managers using the TLS Wizard, former SupportPac MO04 - SSL Wizard. The wizard is a Java application that prompts for details about the connection and then constructs the commands necessary to build the TLS/SSL keystores, certificates and channel definitions. You just logged on as mqlab which is a user in the mqm group.
Running the Wizard
-
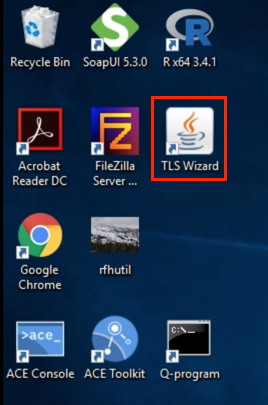
To get started, double-click the TLS Wizard icon on the desktop.
-
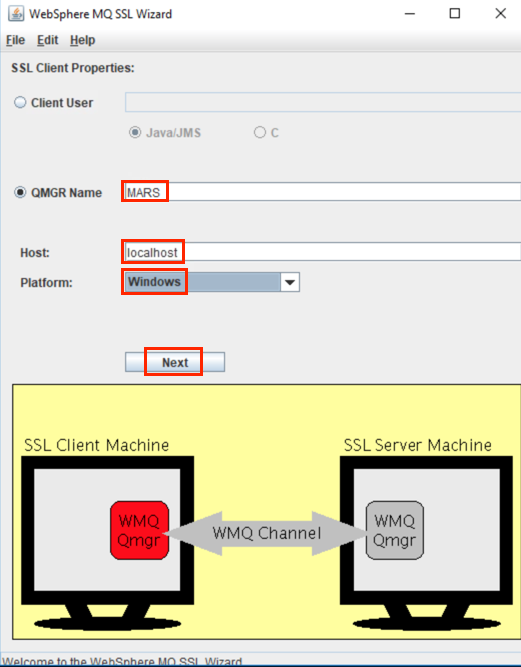
ln TLS/SSL terms, the “client” is the thing that initiates the connection. In this case, we are going to connect MARS to VENUS so MARS is the client. Fill in the details and click Next.
-
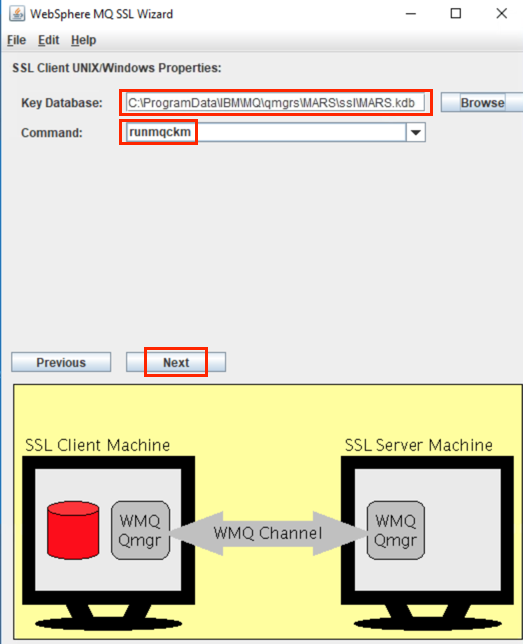
For the Key Database, enter the path to create the key database C:\ProgramData\IBM\MQ\Qmgrs\MARS\ssl.
Enter MARS.kdb for the File Name then click Open.
-
Choose runmqckm from the command drop down.
-
Click Next.
-
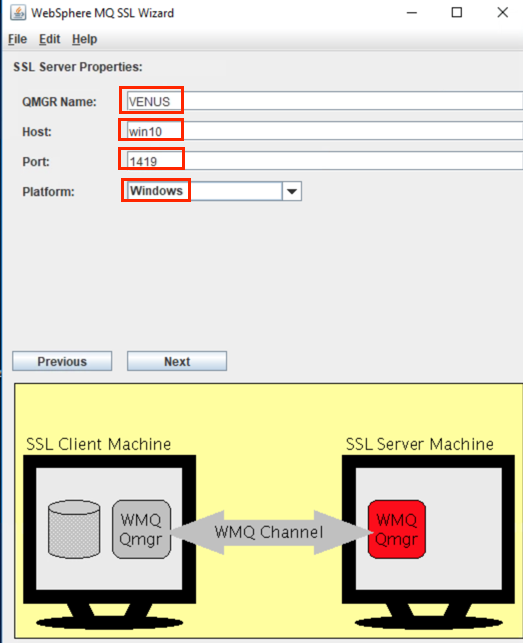
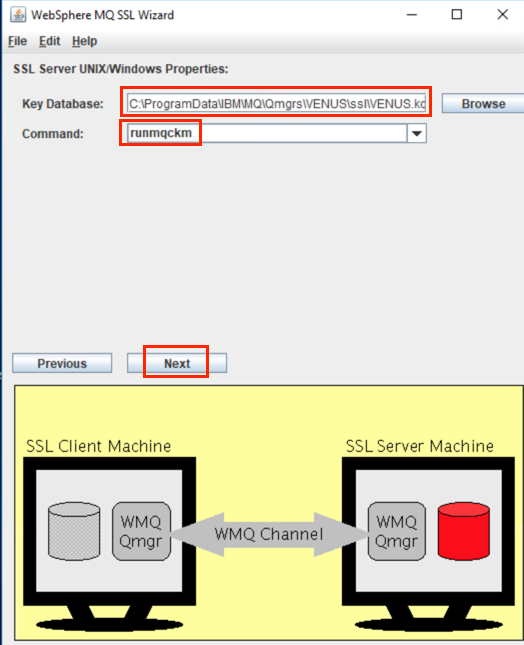
In SSL terms, the server is the thing to which a connection is being requested. In this case VENUS is the server. For simplicity we will use the host name win10 in the demo. In practice you would put an actual DNS name here. The VENUS QMgr has a listener of port 1419. Select Windows from the drop-down list.
-
After filling in the necessary fields, click Next.
-
For the Key Database, enter the path to create the key database - C:\ProgramData\IBM\MQ\Qmgrs\VENUS\ssl\VENUS.kdb. (Should be pre-filled)
-
It is worth mentioning that there are several tools available to manage keystores and certificates. The runmqakm is a compiled C program that runs very quickly and is FIPS capable. You could also use the iKeyman GUI (used in Lab 1). This wizard also allows the choice of the V9 command names (commands beginning with “gsk8”).
-
Ensure that runmqckm is selected and click Next.
-
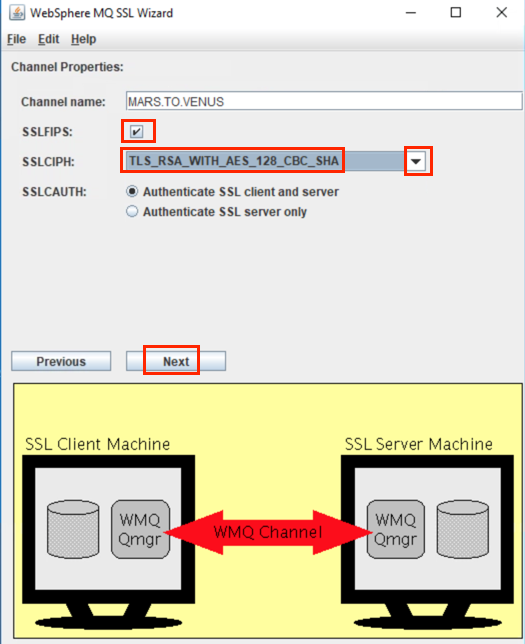
Check the SSLFIPS box.
-
This screen allows you to select from among several different cipher-specs. These values do affect interaction at run time and must match on both queue managers. I have enabled the FIPS option which limits your selection to a few of the strongest encryption choices. From these, select the one option named TLS_RSA_WITH_AES_128_CBC_SHA.
-
Click Next when done making your selections.
-
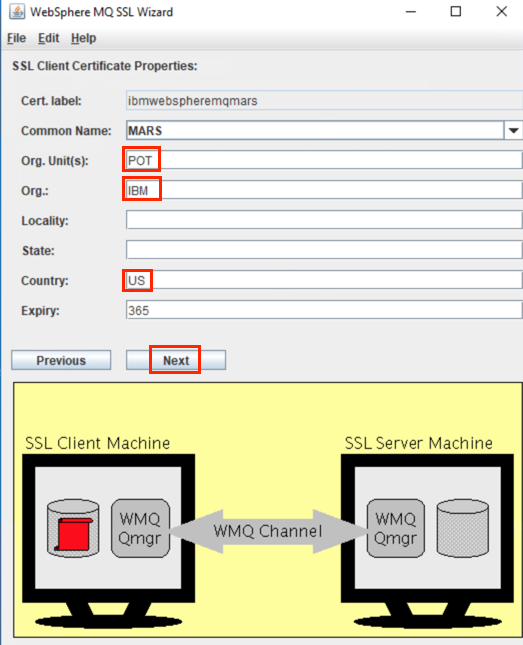
This screen contains the fields required for the Distinguished Name of a certificate. The choice of a naming convention determines the level of granularity that can be achieved in filtering connection requests. Note that it is possible to enter multiple Organization Unit or OU fields in a comma-separated list. The order and case of these fields is important so pick a standard and do not vary from it. Here we have used all UPPERCASE for consistency.
-
Enter POT for Org. Unit., enter IBM for Org, and US for Country.
-
Enter the requested information and click Next.
-
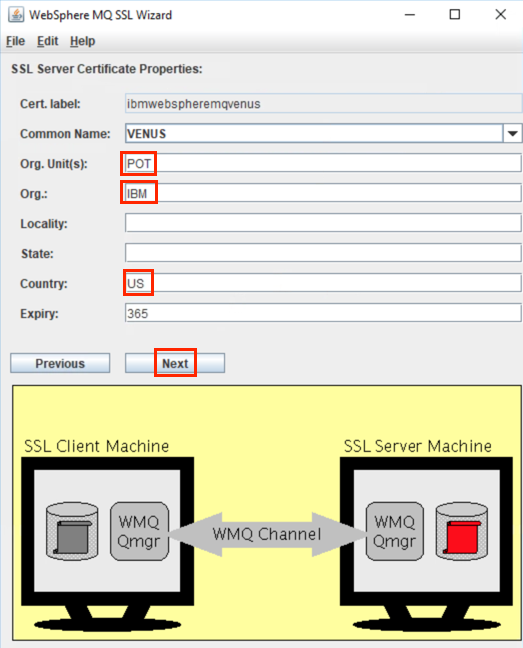
Enter the same information for the VENUS queue manager and click Next.
-
This screen allows you to choose between self-signed certificates versus using a Certificate Authority. In practice this would be determined by your company’s policies or the size of the network. Performance and resource consumption are impacted as the size of the keystore grows. Self-signed certificates are useful in smaller networks but do not scale well.
-
For the lab we will be using self-signed certificates which is the default. Click Next.
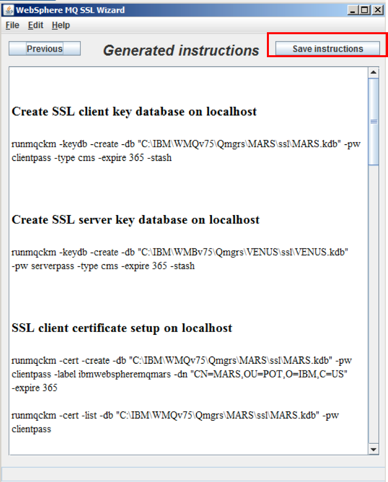
Output from SSL Wizard
-
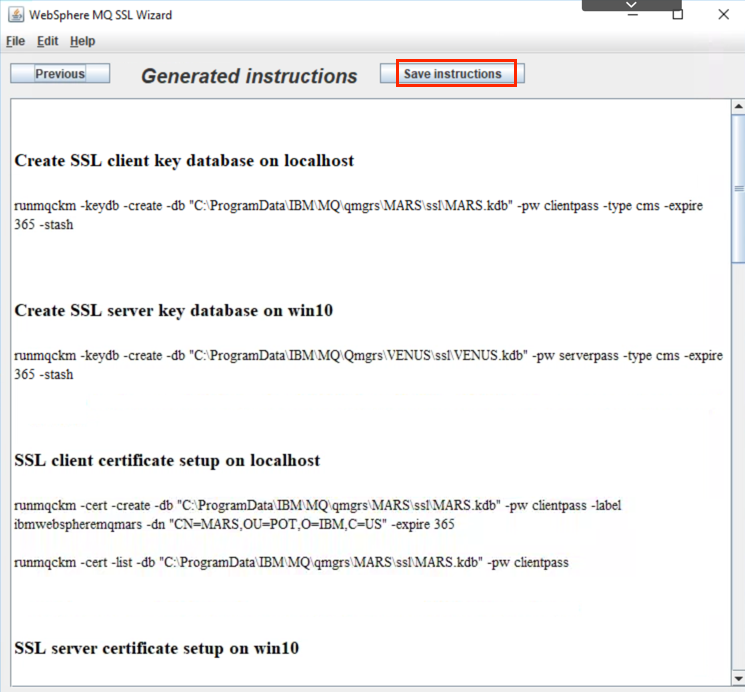
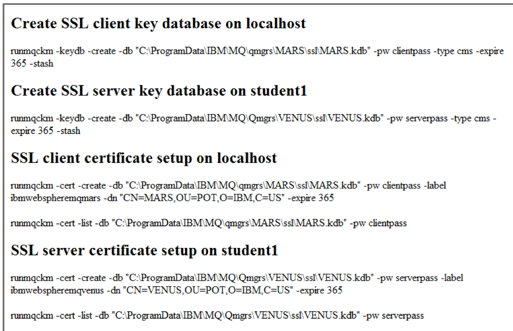
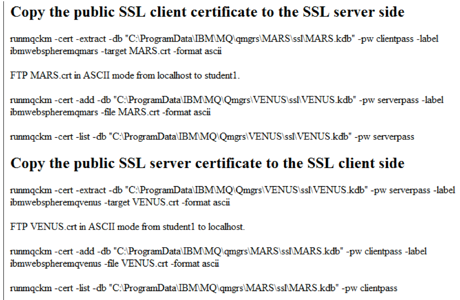
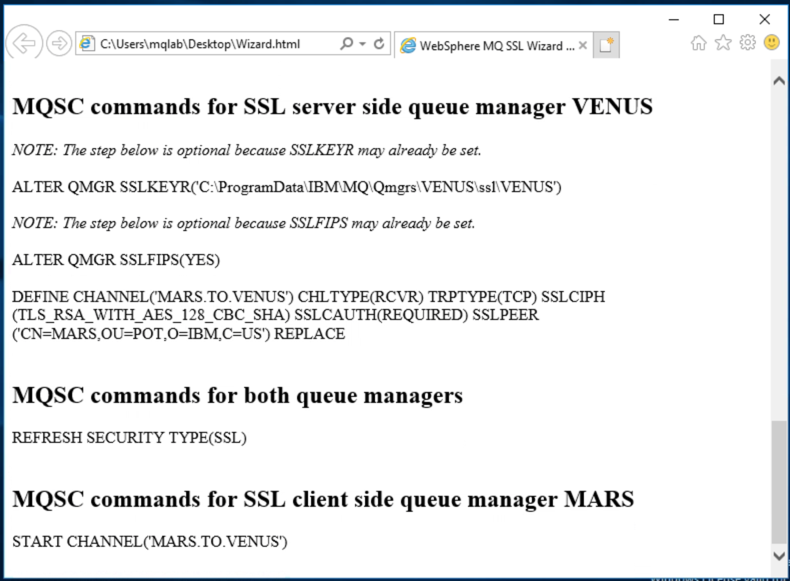
The wizard will generate all of the commands to create the keystores, certificates and channels. The commands are listed below. Take a few moments to review them here or in the wizard’s output window. Note that the passwords for the keystores have defaulted to ‘clientpass’ and ‘serverpass’. In practice you would want to use a stronger password.
-
Click Save Instructions.
-
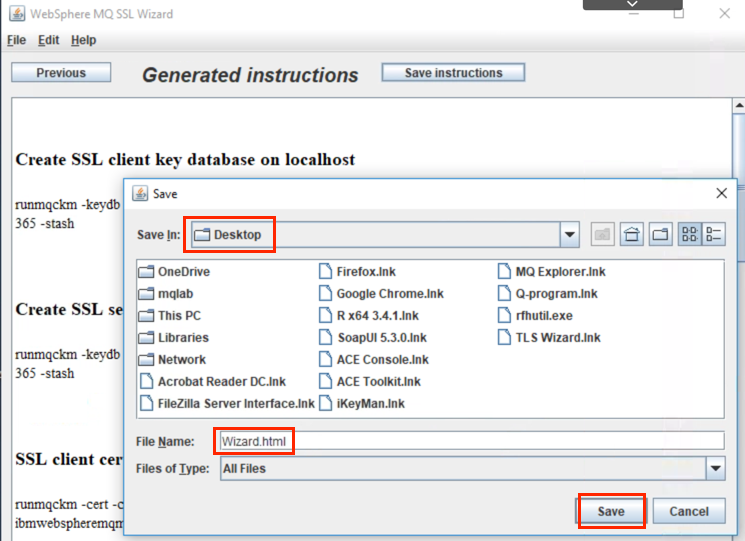
Click the Up arrow to navigate to the Desktop. Save the instructions to File Name Wizard.html.
-
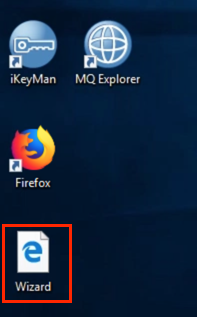
You will see a new Internet Explorer shortcut labeled Wizard appear on the Desktop.
-
Now double-click the Wizard.html document to open it in Internet Explorer.
For reference, the output of the SSL wizard from the previous dialogs is listed below:
Executing the Wizard
-
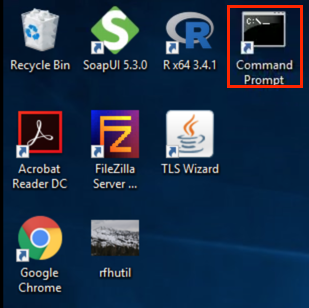
Double-click the Command Prompt shortcut on the desktop.
-
You should be in directory C:\Users\MQLab. Enter the following command to change the subdirectory ssl.
cd ssl
-
Copy each of the commands from the browser and paste it into the command-line. You can use
to paste while in the command line terminal. Ignore the FTP commands as both client and server files are on the same machine. -
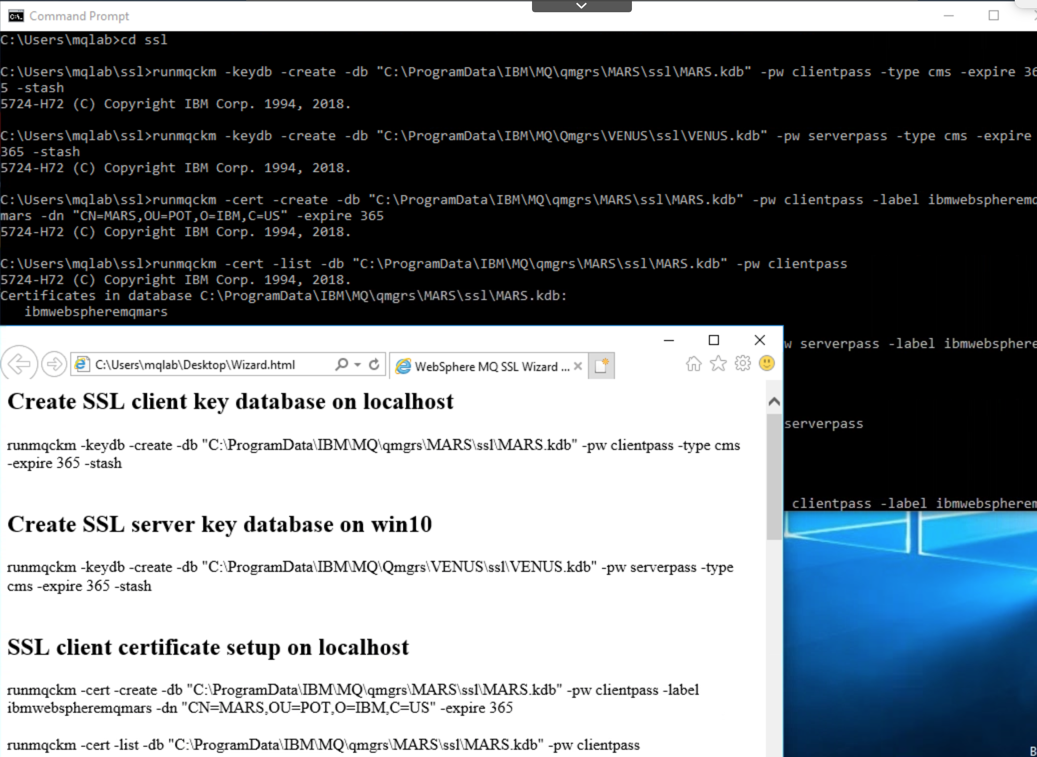
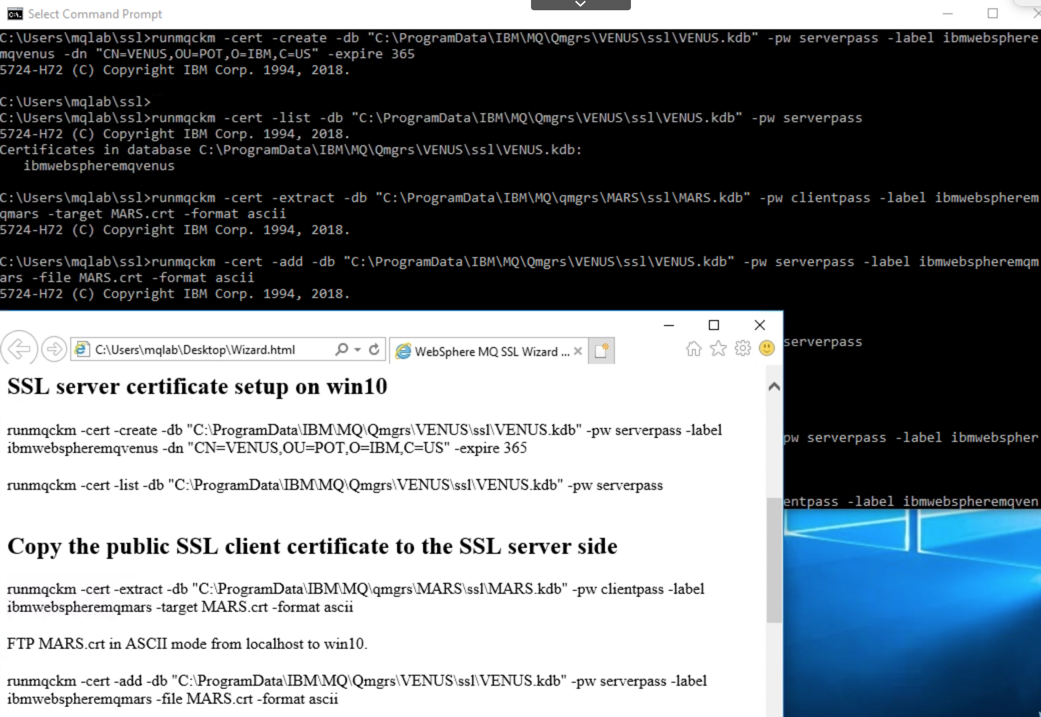
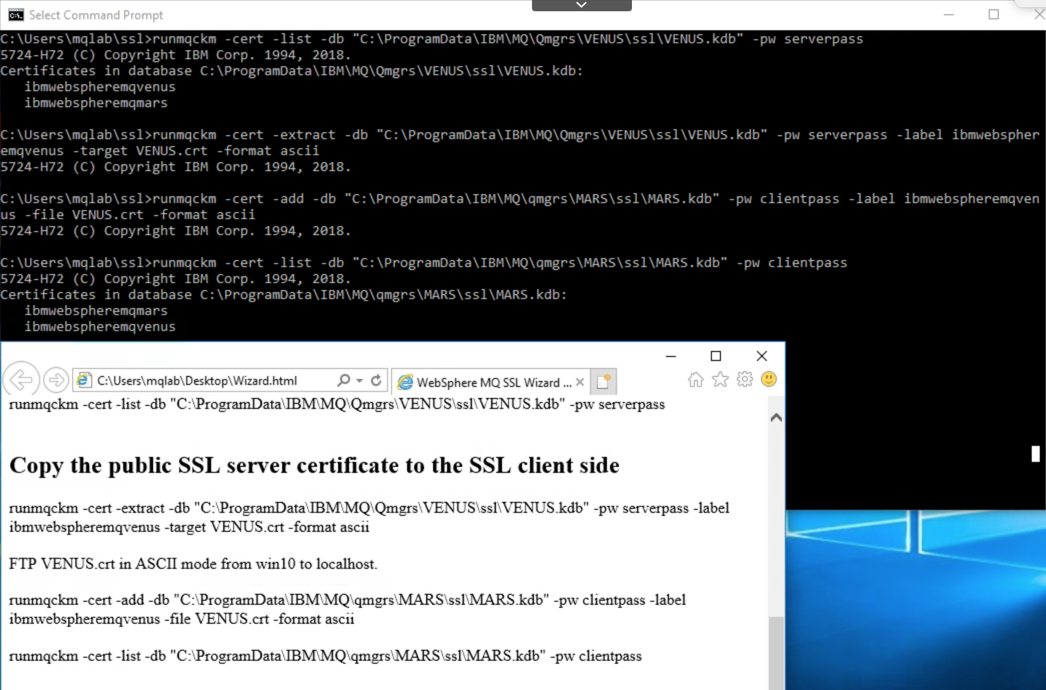
Continue copying runmqckm commands from the browser and pasting into the terminal window. Take a moment to read and understand the commands. In order for each queue manager to authenticate the other one, both need their own private key and both need the public key of the other one. The steps involved are:
- Build the keystore files and generate the queue manager certificates.
- Export the public keys to certificate files.
- Exchange the public keys.
- The public keys are then imported into the keystores of the corresponding queue managers.
-
The first six commands build the keystores and create the certificates for client and server. In the screen shot below you can see the result of the first six commands.
-
The next six commands exchange the keys between client and server. In the screen shot below you can see the result of the second six commands.
-
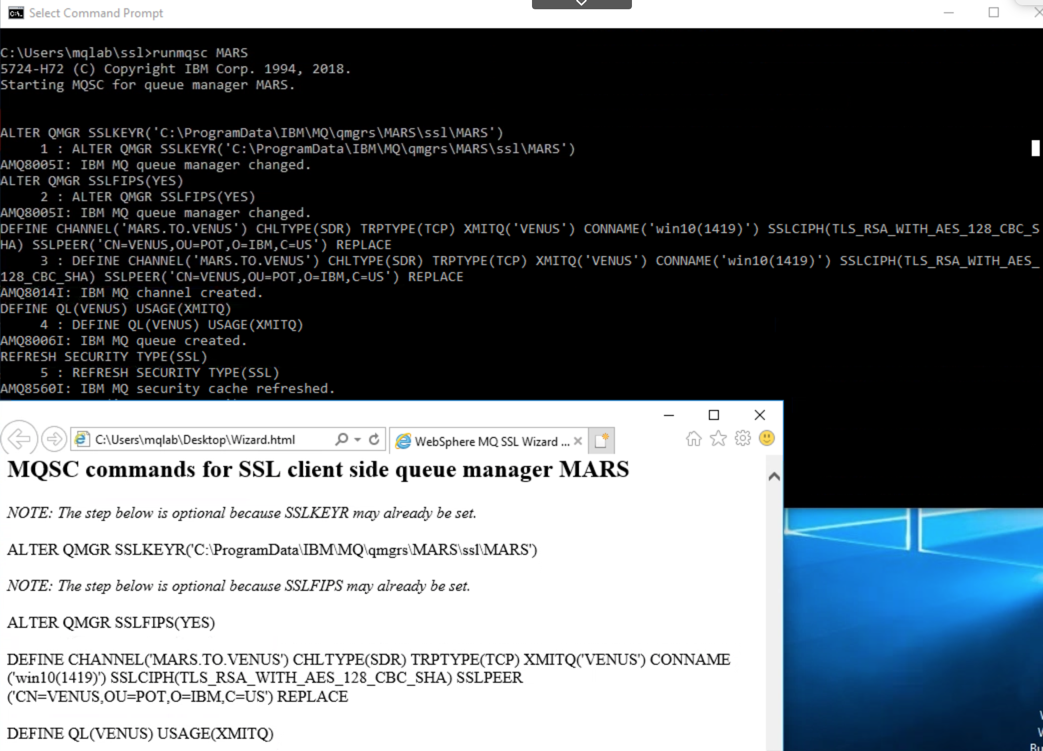
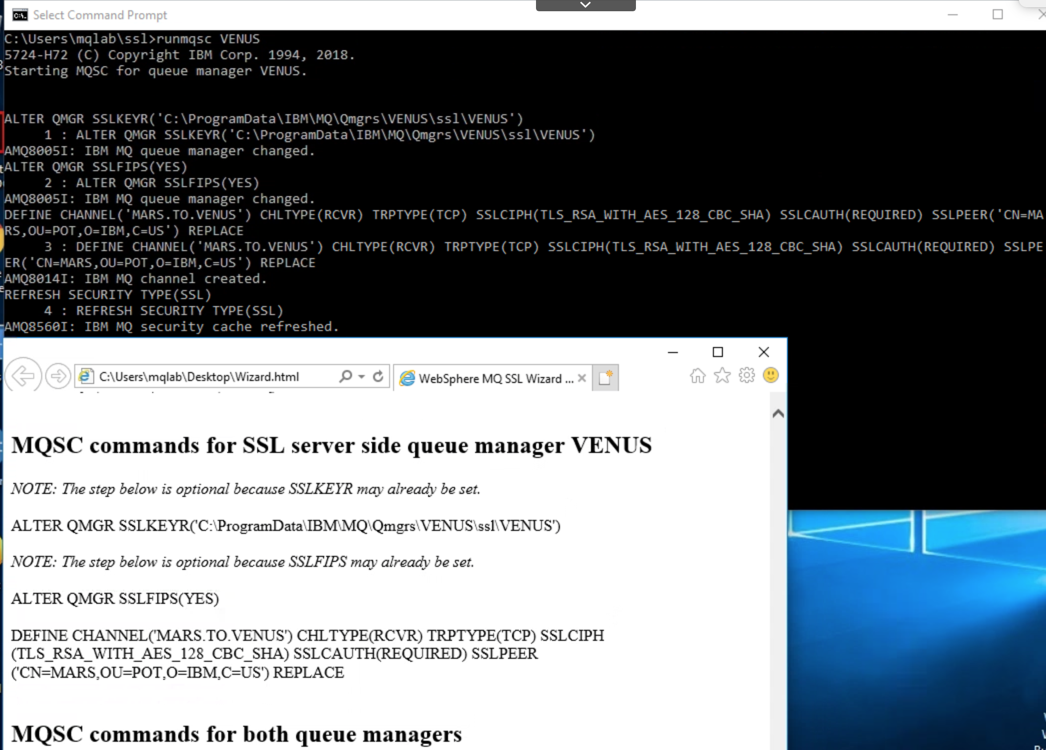
Next the channels and queues must be defined. Start a runmqsc session for the MARS queue manager with the command:
runmqsc MARS
-
Copy and paste the commands in one at a time.
-
Type end to exit the runmqsc interpreter when done.
Important:
Although the SSL Wizard lists some steps as optional, they must be executed for the lab to work. When performing maintenance on a live queue manager where SSL has already been configured, these steps will have already been executed. But here in the lab where we are setting up SSL keystores for the first time, the queue manager alterations are required. -
Repeat this step on the VENUS queue manager using the commands tailored specifically for it.
-
Run the REFRESH SECURITY TYPE(SSL) command on both queue managers. This causes them to flush the cache and reload the certificates from the keystore.
-
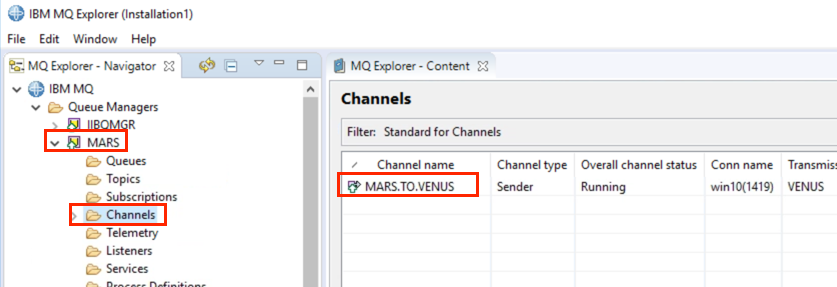
The channel should now be running. If not, right-click the channel and select Start. The channel should now go into Running state.
Summary
In this module you configured two queue managers with certificates, exchanged the public keys and then set up SSL channels between the queue managers.
In SSL terms, the thing making the connection request is considered the client and the thing responding to the request is called the server. The server always presents a certificate on the connection request. Because you specified SSLCAUTH(REQUIRED) on the RCVR channels, the client (in this case the queue manager initiating the connection) is required to present its certificate as well. When both sides are required to present certificates, this is known as mutual authentication.
Although the channels now authenticate one another, they still allow administrative access. In order to address this, it is necessary to link authentication to authorization in a meaningful way. In a later module we will see how this is accomplished with the use of channel authentication records to set the channel’s runtime MCAUSER.
But first, we will see how to authenticate interactive sessions from human users. This will provide a restricted access path for administrators as well the means to apply granular security to non-administrators. In the next module you will configure SSL connections between the queue managers and MQ Explorer.
Use iKeyman GUI to configure remote administrative access
You should already be logged in as mqlab user. This userid has been configured as a member of the mqm group.
Module Objectives
The objective of this module is to provision an authenticated access path for IBM MQ administrators. When access to the default and application channels is restricted, the administrators will require some other way to access the queue manager. The administrative channel should meet the following criteria:
- The channel is authenticated. Mere assertion of an identity must not be sufficient to obtain access.
- In addition to allowing administrators, the channel must demonstrate that connection requests from non-administrators are rejected.
Provisioning secure access for administrators would normally be among the first steps taken to perform base hardening of a IBM MQ Queue Manager.
Background
Authentication is the verification of an identity – who are you?. Authorization is the enforcement of access policies – what actions are you allowed to perform?
Authorization without authentication – enforcing access controls without verifying the ID that is presented – gives a false sense of security and therefore may be worse than having no authorization controls at all.
Authentication without authorization – going to the trouble of verifying identities but granting blanket administrative access to all users – is only useful in the rare case that all users are truly administrative.
These statements apply to any information processing system. They are not unique to IBM MQ. However, as you will see in this module, both of these situations can be present in a queue manager. The module will demonstrate first how to authenticate a remote connection using SSL certificates, then how to tie the authenticated identity to a specific user ID so that authorization can be enforced in a meaningful way.
The previous module used the TLS Wizard to generate the commands to build a keystore for the queue manager in KDB format. MQ Explorer is a Java application and therefore uses the Java standard format for keystores rather than the KDB. This module will use the iKeyMan GUI to build the Java Keystore (.jks file ) and generate the personal certificate for the administrator. Next, the queue manager’s and administrator’s public keys are exchanged and added to each other’s keystores.
Create the keystore
-
Double-click the iKeyMan icon on the desktop to start the iKeyMan GUI.
-
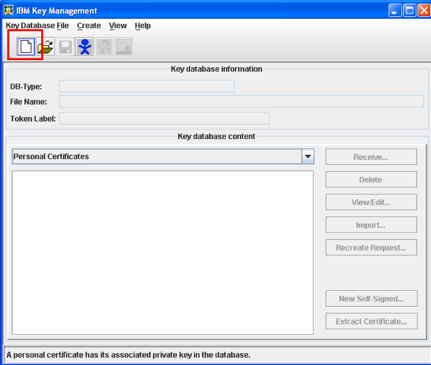
When iKeyMan starts, click the “New” icon.
-
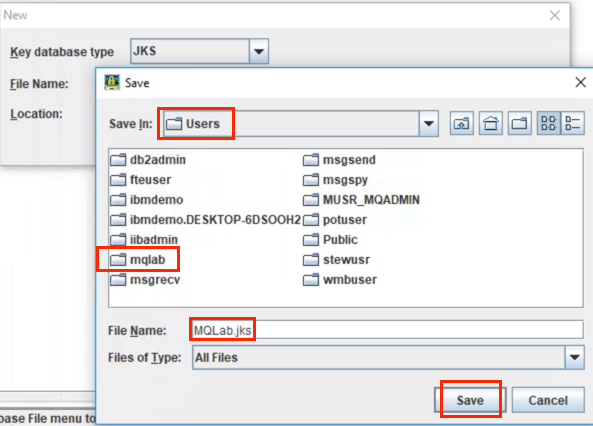
Make sure that the Key Database Type is set to JKS before continuing. Select Browse to open the file chooser dialog. Navigate to C:\Users\MQLab\ssl home space.
-
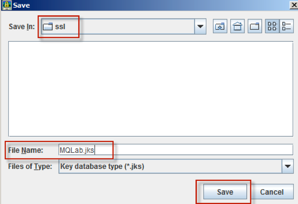
Type in the file name MQLab.jks and click the “Save” button. Note that there is nothing special about the name of the Java keystore. Any valid file name would suffice.
-
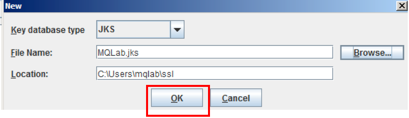
Review the settings and click OK.
-
Enter ‘passw0rd’ when prompted for a password. Enter ‘passw0rd’ again in the confirmation field.
-
Click OK.
 Note:
Note:
During the lab, several keystores will be created with default file permissions. In real-world deployments, a Java keystore would be placed into a directory accessible only by its owner. Normally ‘group’ and ‘other’ read and write permissions are denied on keystores.
Loading QMgr keys into the user’s keystore
-
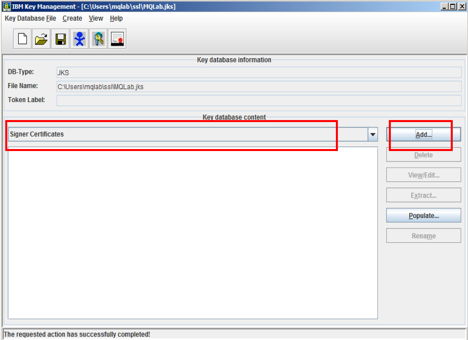
In order to connect to the queue managers, it is necessary to first load their keys into the keystore. Choose Signer Certificates, and click the Add button.
 Note:
Note:
Many systems and applications support the use of separate databases for private keys and public keys. In this context, the database for public keys is called a Trust Store. This arrangement facilitates the sharing of a single Trust Store among several users or applications, each of which in turn stores its own private keys in a dedicated keystore that is not accessible to anyone else. The lab exercises will use a single keystore file as both the trust store and the key store. -
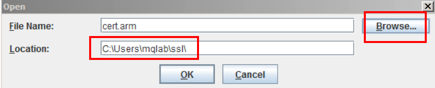
Enter C:\Users\MQLab\ssl\ in the Location field.
-
Click Browse.
-
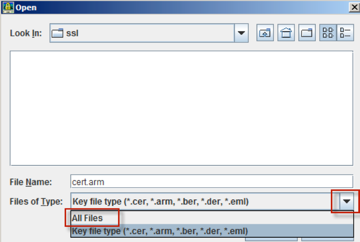
Change the Files of Type to All Files.
-
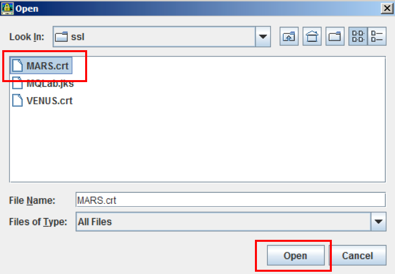
You will now see the jks keystore for MQLab as well as the queue manager certificates you created in the first part of the lab.
-
Select MARS.crt.
-
Click Open.
-
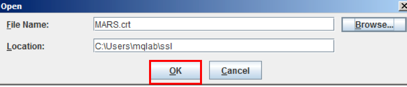
Review your selections.
-
Click OK.
 Note:
Note:
The *.crt files will have been saved in the current working directory that was set when you ran the extract commands in the previous module. Usually this is C:\Users\MQLab, but you should have changed to a different directory (ssl). -
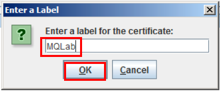
You are prompted for a certificate label. The labels for signer certificates are for your convenience in managing the keystore and you can select any meaningful value. We will be using the names of queue managers or accounts in the lab. In practice you might include other details in the label, such as the certificate expiration date. Devising a naming convention and using it consistently can reduce the overhead involved in certificate management. Note: that file names are case-sensitive on UNIX systems.
-
Type MARS in the label field.
-
Click OK.
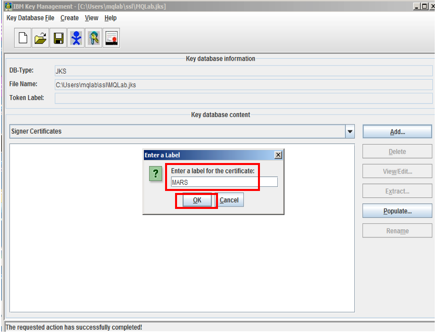
-
After clicking OK, the MARS queue manager’s certificate will be visible.
-
Add the certificate for the VENUS queue manager using the same procedure repeating the previous steps 1 – 13.
Make sure the certificates for both queue managers are visible before continuing.
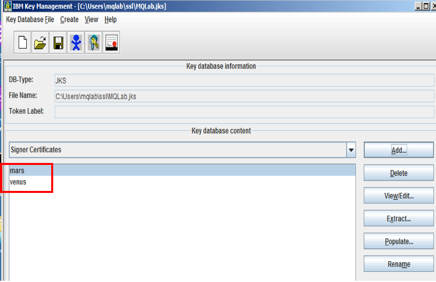
Generate your personal certificate
-
It is now time to generate your personal certificate. Click the drop-down and select Personal Certificates. The Key Database content controls will change and a button for New Self Signed certificate will appear. Click it.
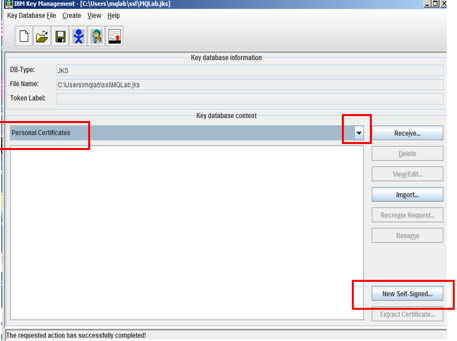
-
Enter the details of the new certificate as shown in the screen shot below. Although the key label is not significant for signer certificates, there are cases where it is for personal certificates. When the name is significant, the required format is the literal string ibmwebspheremq followed by the queue manager or account name. We will follow that convention for the lab exercises. Enter the name ibmwebspheremqmqlab for the label.
-
Click OK.
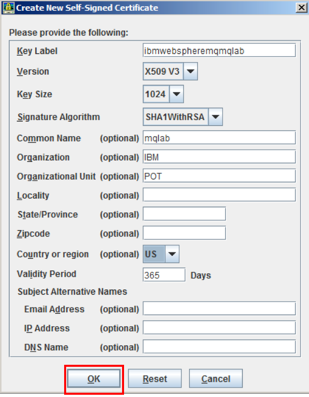
The Distinguished Name (DN) of the certificate is comprised of several fields. On this dialog they begin with Common Name and continue through Country. It is advisable to spend some time developing a DN naming convention. For example, the Organization Unit (OU) illustrated here includes a node for the environment. This facilitates enforcement of isolation between TEST, QA, PROD and so forth.
Extract the public key
-
Click the Extract Certificate button.
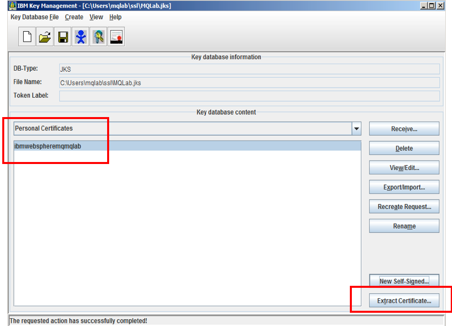
-
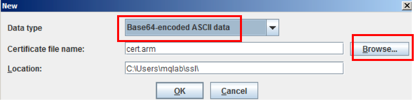
On the Extract dialog, select Base 64-encoded ASCII data from the drop-down.
-
Select Browse.
-
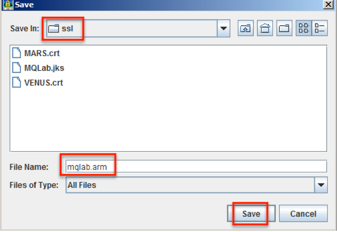
Navigate to C:\Users\MQLab\ssl.
-
Enter mqlab.arm for the File Name.
-
Click Save.
-
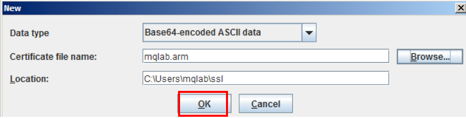
Click OK.
Import the key into the QMgr’s KDB
-
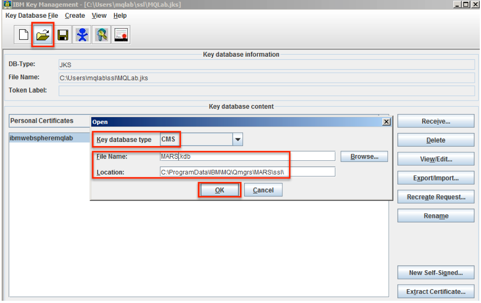
The next step is to open the queue manager’s kdb file and add the new public key to it. Click the Open icon at the top left of the iKeyman GUI.
-
In the Open dialog, specify a database type of CMS, the file name MARS.kdb and a Location of C:\ProgramData\MQ\Qmgrs\MARS\ssl.
-
Click OK.
-
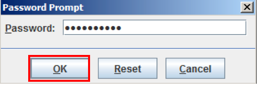
Enter the password and click OK. The password for the MARS KDB is clientpass. The password for the VENUS KDB is serverpass.
 Note:
Note:
Don’t read too much into the passwords, they are generated by the TLS Wizard based on MARS queue manager being the client and VENUS queue manager being the server, but of course we may use them for other things too. -
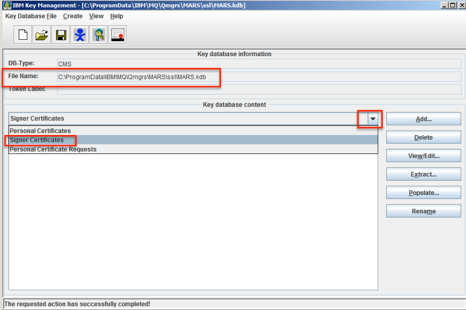
The File Name field will change to indicate that the queue manager’s KDB is now loaded into iKeyman. Select Signer Certificates from the Content drop-down. The signer certificate in the keystore at this point is the one previously added and belonging to the other queue manager.
-
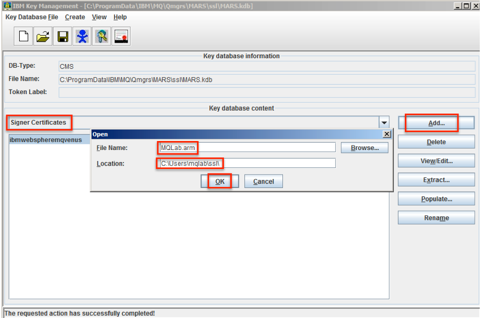
Click the Add button. In the Open dialog, enter a file name of MQLab.arm and a Location of C:\Users\MQLab\ssl\ then click OK.
- Enter the label for the certificate. As noted earlier, there are no restrictions on the label of a public key, however using the account or queue manager name helps with key management.
-
Click OK.
-
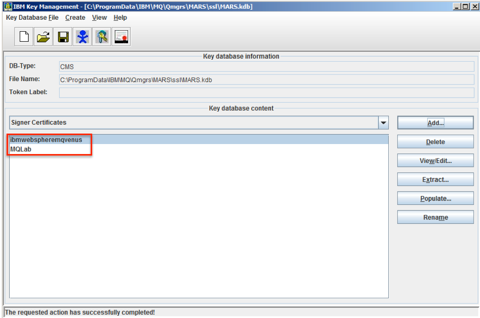
The certificate will now be visible in the Signers section of the KDB and a success message is displayed in the status line.
-
Repeat steps 1 through 9 in this section for the VENUS queue manager before continuing. Remember the password for VENUS.kdb? (Hint: serverpass).
-
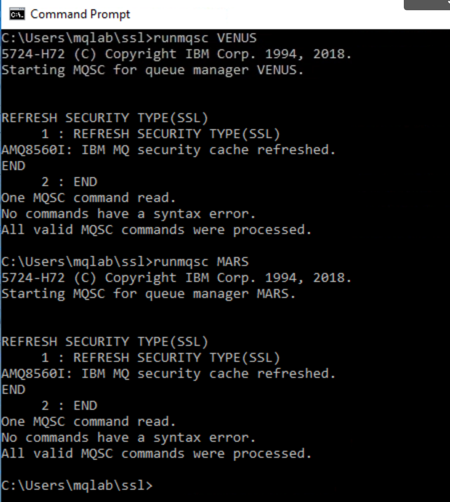
Issue REFRESH SECURITY TYPE(SSL) on both queue managers before continuing.
Configuring MQ Explorer
-
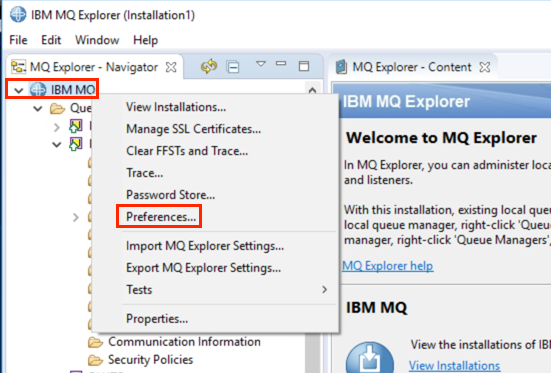
The lab will proceed much quicker if we enable MQ Explorer’s password store. Start the MQ Explorer if it is not already running. Right-click IBM MQ and select Preferences. (Consider any stored password policies your organization may have before enabling this feature on your own copy of MQ Explorer).
-
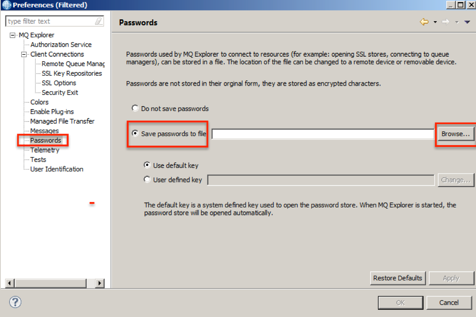
In the Preferences dialog, select Passwords on the panel from the navigation tree on the left. Then select “Save passwords to file.”
-
Click Browse.
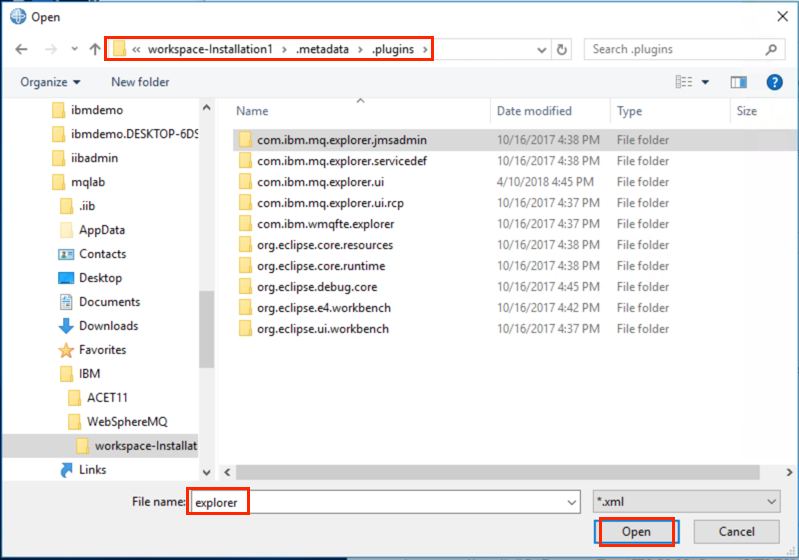
- Navigate to C:\Users\mqlab\IBM\WebSphereMQ\workspace-Installation1.metadata.plugins.
-
Enter “explorer” in the File name field.
-
Click Open.
-
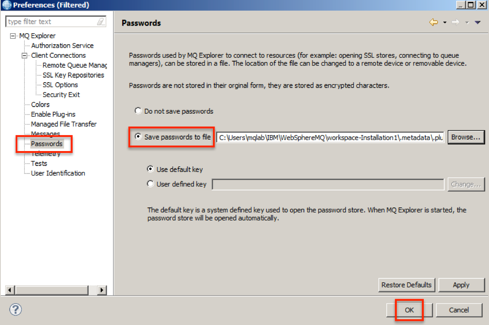
Click OK.
-
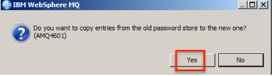
Click Yes to the pop-up window for copying entries.
-
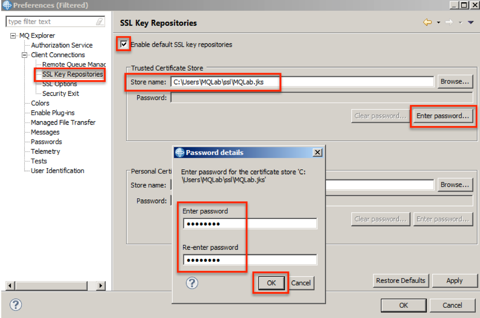
Return to Preferences and select “SSL Key Repositories” from the navigation tree. In the resulting panel, check the box to enable the default SSL key repositories. In the Store Name field enter C:\Users\MQLab\ssl\MQLab.jks and click the Enter password button. Type the password (passw0rd) in each of the fields. When both passwords are entered and match, the OK button will be enabled. Click it.
-
Repeat Step 9 for the “Personal Certificate Store” section on the same dialog.
-
Click OK to close Preferences.
-
The administrator will require a secure channel. It is often convenient to leave SYSTEM.ADMIN.SVRCONN in place with restricted permissions for non-administrative users and create a new channel for administrators. That is the approach taken here. Double-click the Command Prompt on the desktop to get a command-line prompt.
-
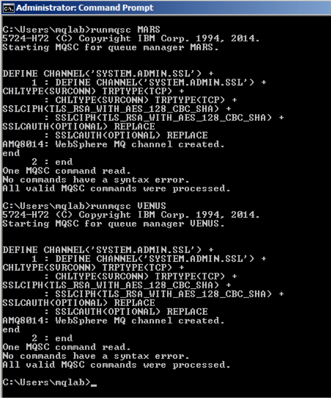
Type runmqsc MARS to start runmqsc. Enter the following channel definition:
DEFINE CHANNEL(‘SYSTEM.ADMIN.SSL’) + CHLTYPE(SVRCONN) TRPTYPE(TCP) + SSLCIPH(TLS_RSA_WITH_AES_128_CBC_SHA) + SSLCAUTH(REQUIRED) REPLACE
-
Type end to exit runmqsc.
-
Type runmqsc VENUS to start runmqsc. Enter the following channel definition:
DEFINE CHANNEL(‘SYSTEM.ADMIN.SSL’) + CHLTYPE(SVRCONN) TRPTYPE(TCP) + SSLCIPH(TLS_RSA_WITH_AES_128_CBC_SHA) + SSLCAUTH(REQUIRED) REPLACE
-
Type end to exit runmqsc.
-
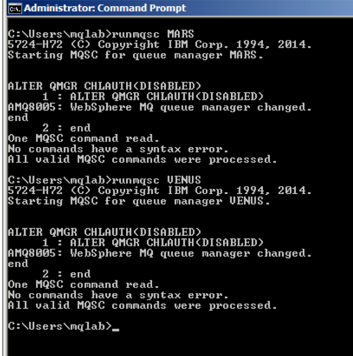
In a later module we will illustrate channel authentication records, but for now we will disable them until we get to that part of the lab. On each queue manager, start runmqsc and type the following command:
ALTER QMGR CHLAUTH(DISABLED)
-
Now it’s time to add the queue managers to Explorer.
-
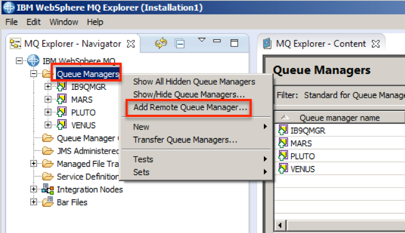
Right-click Queue Managers in the Explorer navigation tree and then select Add Remote Queue Manager.
-
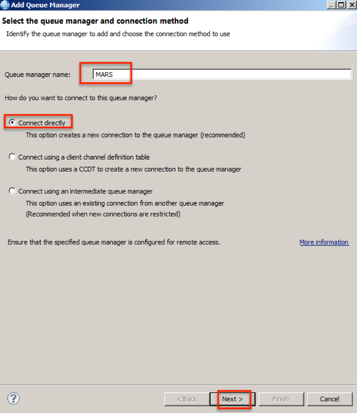
On the next dialog, type in the queue manager’s name - MARS. Leave the selection as ‘Connect directly’ and click Next.
-
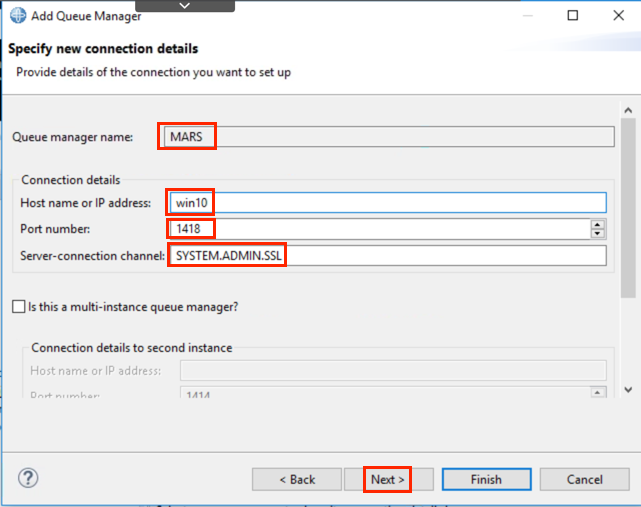
In the Connection Details dialog, enter win10 as the host name, the appropriate port (1419 for VENUS or 1418 for MARS) and SYSTEM.ADMIN.SSL as the channel name. Leave the remaining defaults and click Next.
-
Click Next in the “Specify security exit details” panel.
-
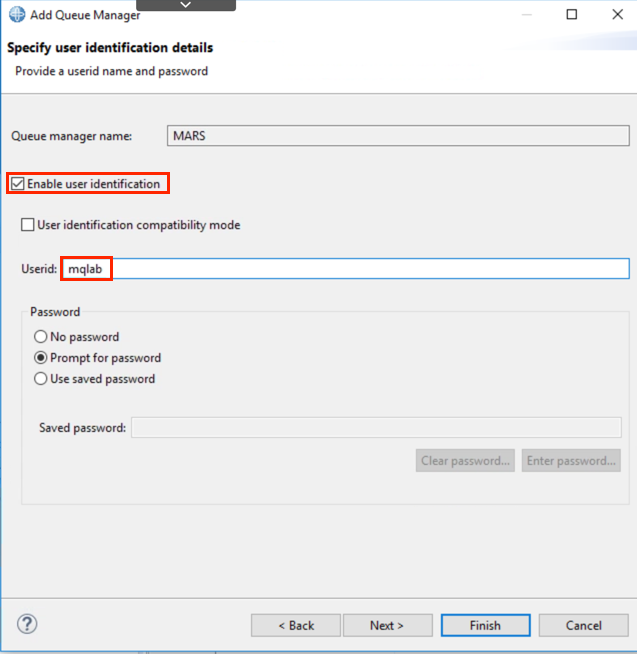
On the “Specify user Identification details” panel, click the “Enable User Identifiation” checkbox and enter mqlab in the Userid field. Leave the Prompt for password radio button checked.
Click Next.
-
Note that the fields on the “Specify SSL certificate key repository details” panel are pre-filled from the values previously entered in the Preferences.
-
Click Next to advance to the SSL Settings panel.
-
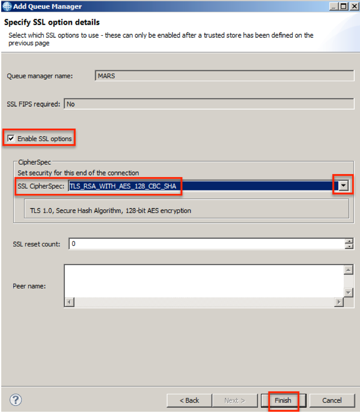
On the “Specify SSL option details” panel, select the checkbox to Enable the SSL Options. Select TLS_RSA_WITH_AES_128_CBC_SHA from the CipherSpec drop-down. Leave the remaining fields at their defaults and click the Finish button.
-
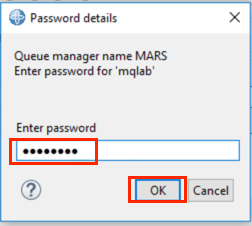
You are prompted for mqlab’s password. Enter “password” for the password.
-
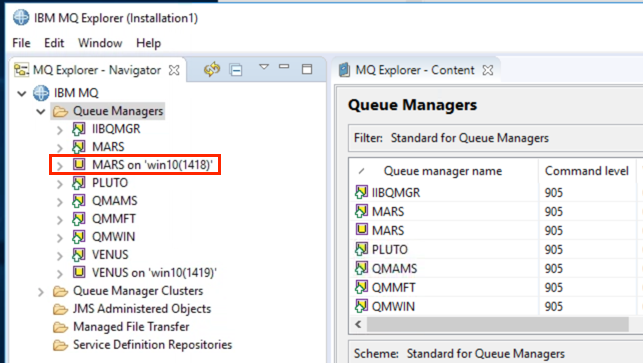
The Queue Managers list will now contain the new entry for MARS. Note that the new entry lists a host name next to the queue manager name. Clicking it brings up the connection details in the content pane. Confirm that the connection is using the SSL channel.
- Repeat steps 19 through 28 to add a connection for the VENUS queue manager on port 1419 before continuing.
Module Summary
This module demonstrated one way to configure administrative access from MQ Explorer to queue managers. A dedicated administrative channel was created for this connection. Personal certificates were generated for the user and both of the queue managers’ public keys were exchanged. When self-signed certificates are used (as demonstrated here in this lab), the queue manager’s public key must be in the user’s Trust Store in order to make the connection. When CA-signed certificates are used it is not necessary for the queue manager’s public key to exist in the user’s trust store, however it is necessary that the CA root certificate and any intermediate signer certificates exist in the user’s trust store. This is because the SSL protocol always requires at least the server to authenticate.
When the client is also required to present a certificate, the configuration is said to be “mutually authenticated.” Setting the SVRCONN channel’s SSLCAUTH attribute to REQUIRED results in a mutually authenticated connection. The queue manager will not allow the connection unless MQ Explorer presents the user’s certificate and the queue manager is able to validate it. The connection is only successful when the certificates of both parties are cross-validated and trusted.
This is one of the basic steps in hardening a queue manager, however additional configuration is required. Currently, there is no correlation between certificates in the Trust Store and the channels they are intended to be used with. In other words, the user’s certificate that was configured in the previous module to connect to SYSTEM.ADMIN.SSL would also validate and successfully connect to the RCVR channels on MARS and VENUS. The next module will configure the channels to be more selective about which certificates are allowed to connect.
Fine Grained Authentication
Module Objectives
This module will configure fine-grained authentication on the SYSTEM.ADMIN.SSL channel using channel authentication records which were a new feature in IBM MQ V7.1. These will be configured to map specific certificate Distinguished Name values to corresponding user accounts.
Background
In the first three modules, certificates for MARS and VENUS queue managers and the MQLab user account were generated and exchanged. As currently configured, any of these certificates can connect to the SYSTEM.ADMIN.SSL channel. Recall that the RCVR channels on MARS and VENUS used the SSLPEER channel attribute to select specific certificates which would be allowed to connect. This technique can be used when there is only one certificate that is allowed to connect to a given channel and is well suited use with RCVR channels.
Channels for interactive users present a much different use case, however. Usually there are many users grouped into a number of roles – administrator, project teams, operations, and so forth. It would be possible but impractical to provide a dedicated channel and fully-qualified SSLPEER value for each user. A more practical approach would be to provide a small number of SVRCONN channels and map users to the channels based on user roles.
One way to do this would be to specify a generic SSLPEER value. This method relies on having a certificate Distinguished Name standard that maps the company’s organizational structure into multiple OU values. For example, if the Distinguished Name contains the department and team it might be possible to devise an SSLPEER value that selects only the MQ administrators. If you are fortunate enough to have anticipated this need prior to generating all your certificates then SSLPEER may be sufficient. However, this is the exception rather than the rule. Many shops need to use existing certificates which do not have sufficient granularity in the DN, or else their organization topology changes enough to invalidate the existing DN names. In these cases channel authentication records can provide an explicit mapping of individual certificates to specific channels.
Another consideration when setting up channel authentication is that a generic SSLPEER selects for a subset of certificates but cannot be changed to revoke access to individual certificates within that subset. A certificate revocation list or OCSP (Online Certificate Status Protocol) can provide per-certificate revocation capabilities but there is nothing the MQ administrator can do to a generic SSLPEER that does not affect all users. Channel authentication records can address this either by specifying which are the acceptable certificates, and/or which certificates are to be rejected.
Whichever method is selected, the goal is to restrict on a per-channel basis the certificates that are allowed to connect. Channels that allow administrative access must allow only administrators to connect. Channels that are dedicated to a specific application must not allow other applications to connect. Channels that are dedicated to an adjacent queue manager must not allow connections from other queue managers.
Without channel authentication records
Channel authentication records were a new feature in IBM MQ V7.1. They can be turned on and off with an ALTER QMGR command. In the previous module we turned channel authentication records off. Later in this module we will turn them on and make use of them. We will start by running without them to illustrate why you need to secure your queue manager. Brand new MQ queue managers on MQ V7.5 or later are created with channel authentication records enabled. Queue managers migrated from an earlier release start with them disabled.
-
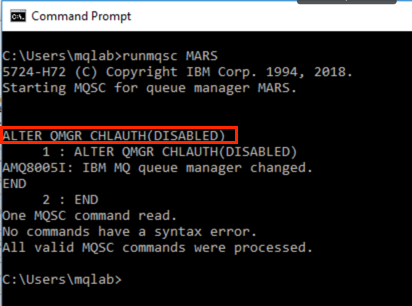
Ensure that channel authentication records are still turned off. Start runmqsc on the MARS queue manager and alter the queue manager as follows:
ALTER QMGR CHLAUTH(DISABLED)
-
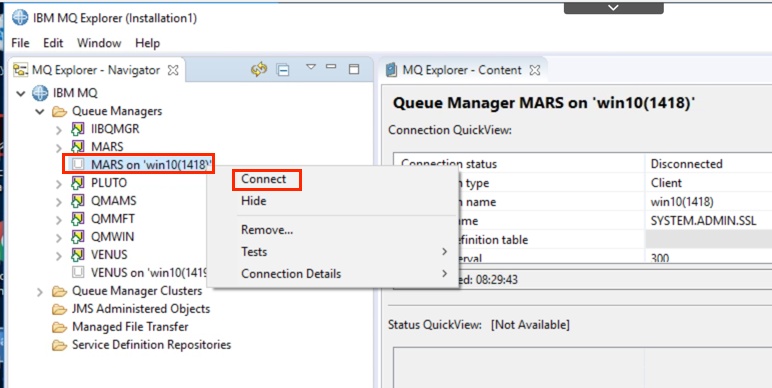
Make a connection to the SSL channel on MARS. Start MQ Explorer if it is not already running. If the MARS on “student1(1418)’ is not connected, right-click it and select Connect. Enter the password “password” when prompted.
-
Expand the queue manager and click Channels. Make sure the SYSTEM.** objects toggle is set to show the *SYSTEM.** channel names. Right-click Channels and select *Status > Channel Status.
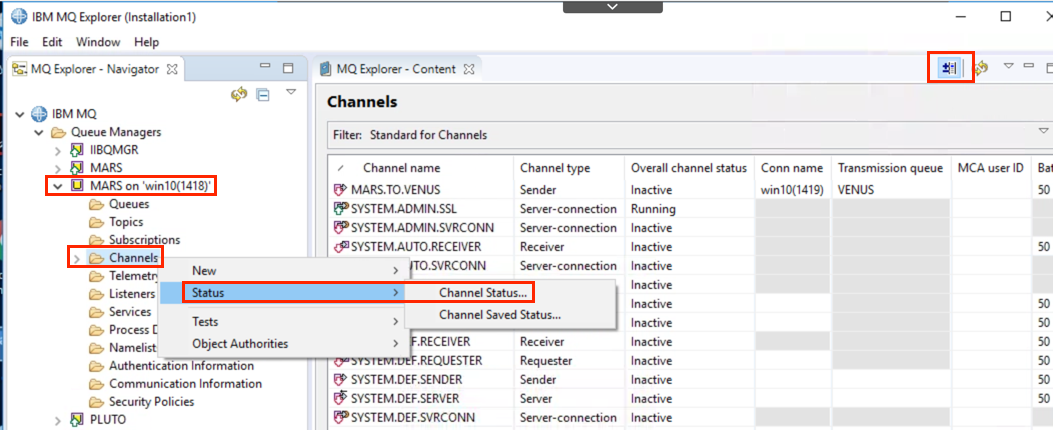
-
The SYSTEM.ADMIN.SSL channel will be running with the MQLab user ID since that is the user ID presented by the client (i.e. the user ID the MQ Explorer is running under).
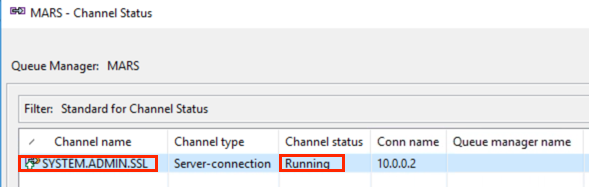
-
Scroll to the right until the MCA user ID comes into view. It will show mqlab.
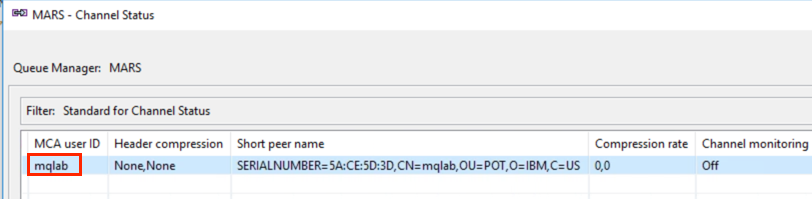
Scroll even further right to see the SSL columns.
-
This user ID is in the mqm group and has privileges to do anything to the queue manager which is not what we want to allow.
- Click the Close button to close the Channel Status display.
- Now disconnect from MARS.
Default authorization rules
With channel authentication records enabled, IBM MQ V7.5+ queue managers come with a few default rules. We will now enable channel authentication records and investigate the default rules.
-
On both MARS and VENUS queue managers, start runmqsc and alter the queue manager as follows:
ALTER QMGR CHLAUTH(ENABLED)
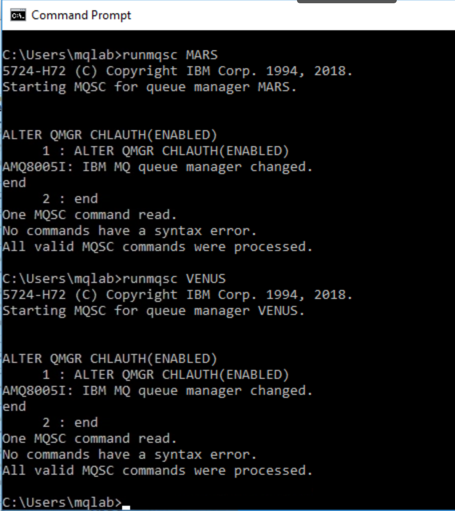
-
Make a connection to the SSL channel. Start MQ Explorer if it is not already running. Right click the disconnected MARS entry and select connect. This connection will fail reporting that you are not authorized.
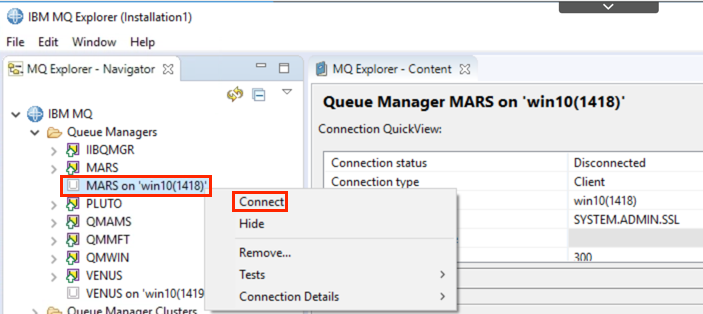
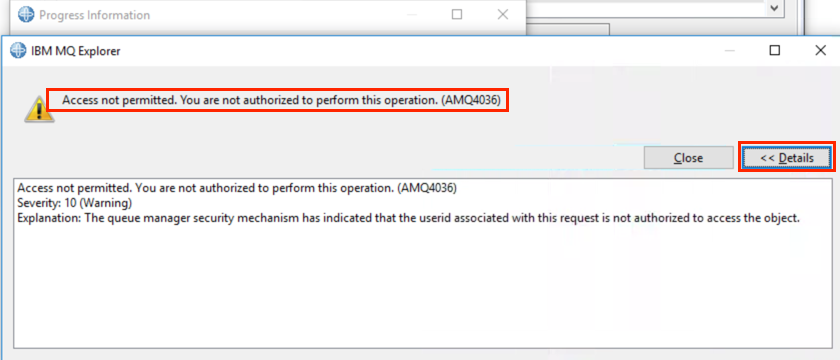
-
Click Close.
- We will now investigate why the connection failed.
-
Open Windows Explorer on the desktop.

-
Navigate to the MARS queue manager directory - C:\ProgramData\IBM\MQ\qmgrs\MARS\errors.
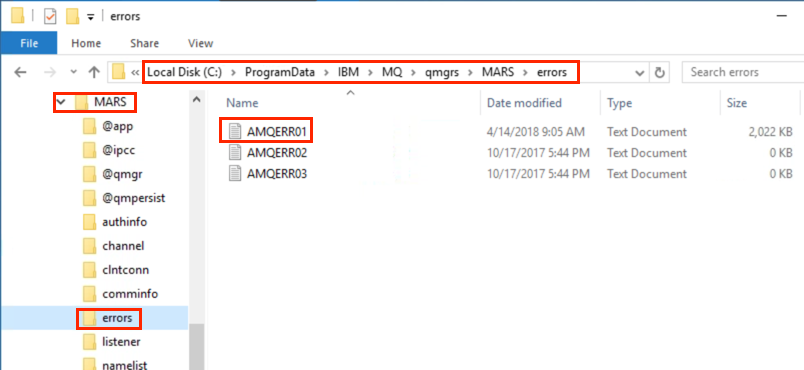
- Double-click the file AMQERR01 to list the log messages.
-
Scroll to the bottom. The output should look like the screen shot below. The error tells us that the connection has been blocked due to matching one of the channel authentication rules.
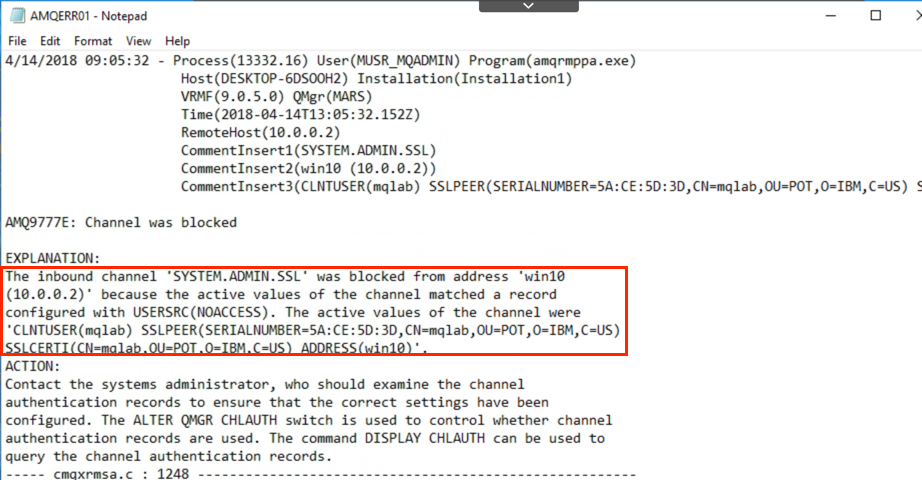 Note:
Note:
The IP address in the message will be the host’s IP address if the hostname or IP address is used in the channel definition. If the connection name is defined with “localhost” instead of the real host name, the IP address will appear as 127.0.0.1. -
Start runmqsc on the MARS queue managers and list all the channel authentication rules as follows: DISPLAY CHLAUTH(‘’) ALL*
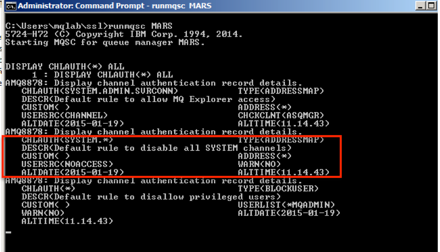
We have matched the default rule that bans the use of SYSTEM channels. All the SYSTEM channels are disabled for use by the 2nd rule. The channel which the MQ Explorer uses by default, SYSTEM.ADMIN.SVRCONN, is enabled for use by the 1st rule, but if a privileged user id is asserted, such as our mqlab user id, this will be blocked by the 3rd rule. The special value of *MQADMIN equates to any privileged user id on this platform.
Configuring channel authentication records
Now that we have channel authentication records enabled we will configure a rule to allow our MQ Explorer to connect. We are going to allow the MQ Explorer to run with a user that is not in the mqm group, but that we will grant administrative rights to directly. First we grant that user the access we want, then we will map the SSL certificate MQ Explorer is using to that user ID.
-
Start MQ Explorer If it is not already running. Right-click the MARS queue manager and select ‘Object Authorities’; and then ‘Add Role Based Authorities…’.
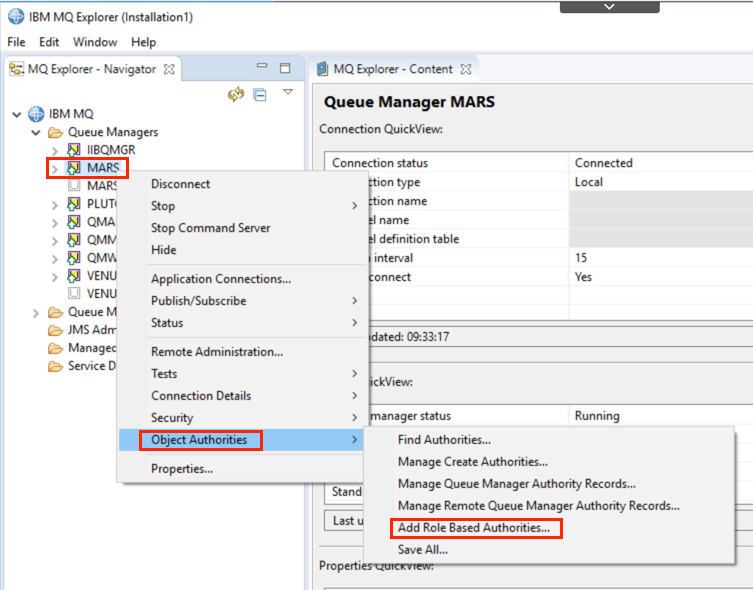
-
We will give user id ‘mqadmin’ full admin access. Select User and type in mqadmin and choose the ‘Full administrative access’ option. Also check ‘Permit reading of messages on a queue’. Review the commands that are going to be issued in the box at the bottom of the wizard before pressing OK.
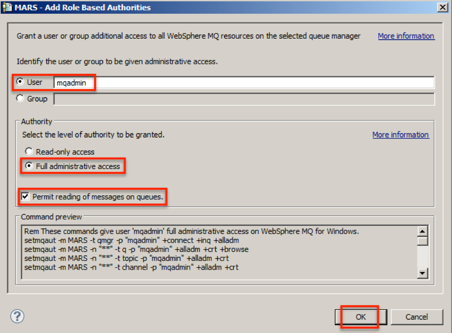
-
Click Yes to grant mqadmin full administrative authority.
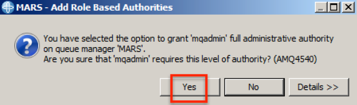
-
Click OK to end the dialog.
-
Repeat steps 2 - 4 for the VENUS queue manager before continuing.
-
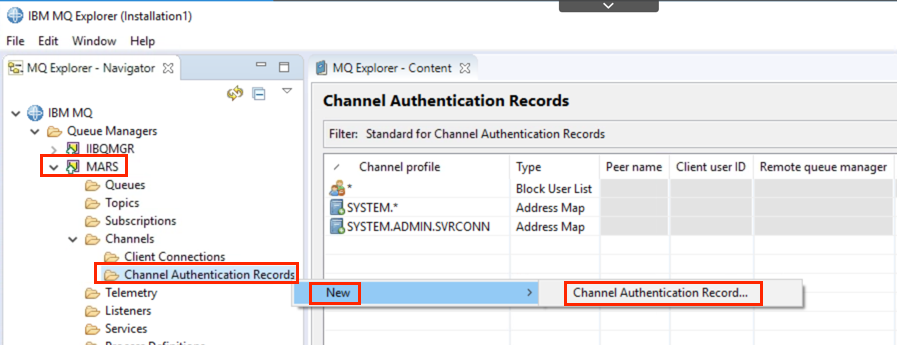
Now we will map the certificate DN to the mqadmin user id using a channel authentication record. Open the Channels folder under queue manager MARS, right-click the Channel Authentication Records folder and select New Channel > Authentication Record.
The wizard that is shown will walk you through the process of creating the mapping that we need.
-
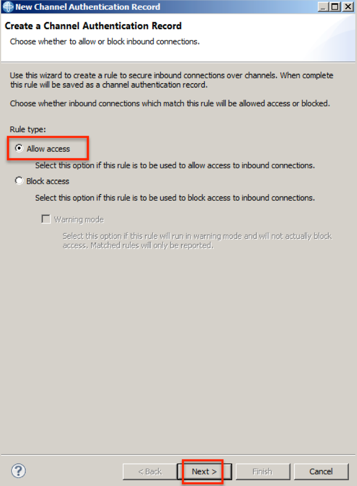
On the first panel, choose a Rule Type of Allow access, and press Next.
-
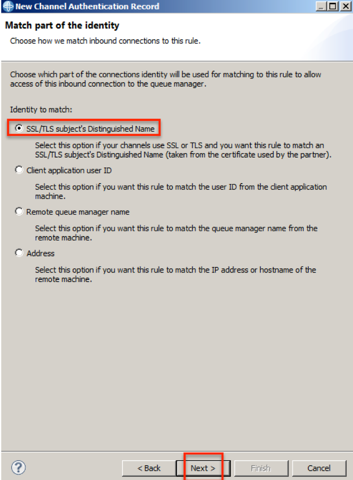
The part of the client’s identity we want to use for this mapping is the SSL/TLS subject’s Distinguished Name, so ensure that option is selected on the next panel and press Next.
-
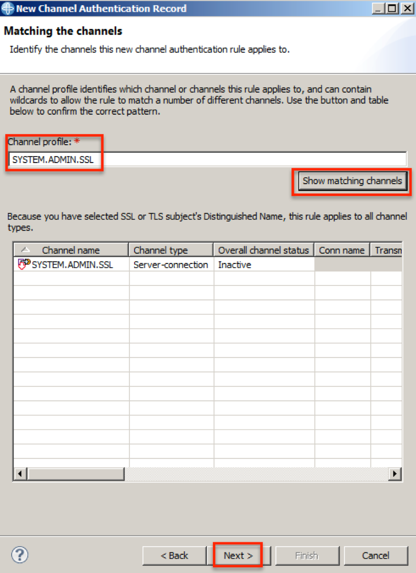
Now we select the channel or channels we want this rule to apply to. In our example, we will use the specific channel name of SYSTEM.ADMIN.SSL. Feel free to try out some patterns, and use the Show matching channels button to see how that works before moving on. Press the Next button to move to the next panel.
-
Enter the DN we wish to allow into the first box on this panel: CN=mqlab,O=IBM
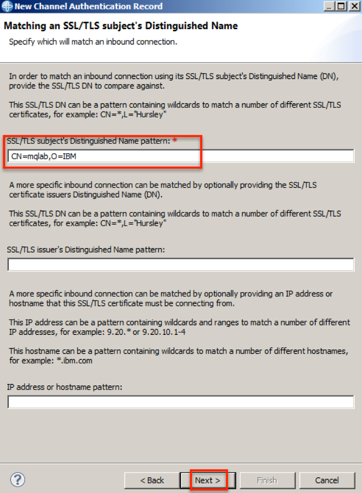
Note: you can restrict this rule further by mandating that it only matches if the client also comes from a specific IP address. We will not be using this in the lab today.
-
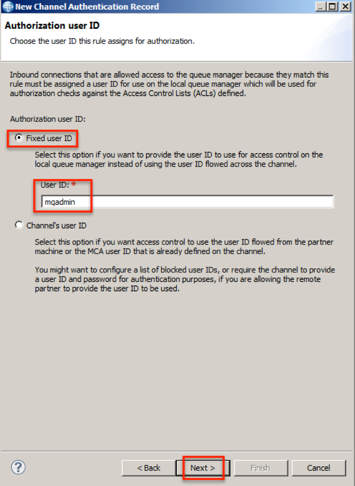
Now we indicate that this certificate DN will be mapped to a user id. Provide mqadmin as the user id to be used.
-
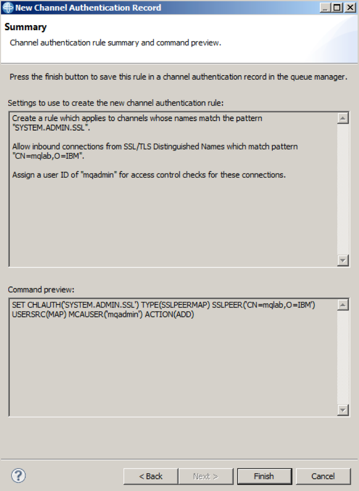
Press Next until you get to the Summary page. Review the description of the rule you are creating and the MQSC equivalent command in the lower box. Then press Finish.
-
We can do the same task via an MQSC command as indicated in the summary panel. We will use this method for the VENUS queue manager.
-
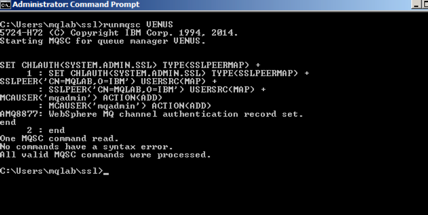
Start runmqsc on the VENUS queue manager and create a channel authentication record as follows:
SET CHLAUTH(SYSTEM.ADMIN.SSL) TYPE(SSLPEERMAP) + SSLPEER(‘CN=mqlab,O=IBM’) USERSRC(MAP) + MCAUSER(‘mqadmin’) ACTION(ADD)
-
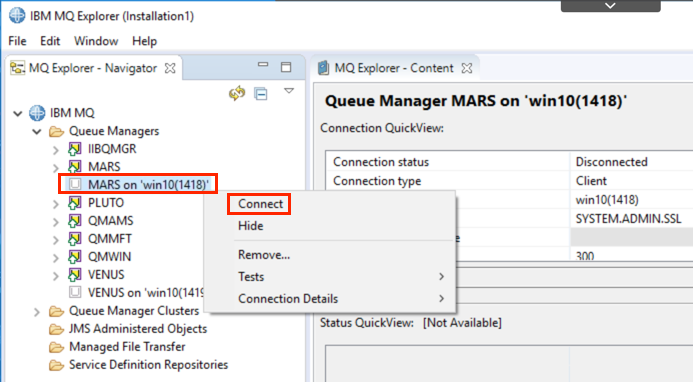
Test the configuration by making a connection to the SSL channel. Start MQ Explorer if it is not already running. Right-click the disconnected MARS entry and select Connect. Enter the password when prompted.
-
Repeat Step 15 for the VENUS queue manager before continuing. If VENUS on ‘student1(1419)’ is still connected from the previous exercise, disconnect it and reconnect.
-
The channel now accepts only the certificate specified in the channel authentication records we set earlier and maps certificate name to a specific account.
-
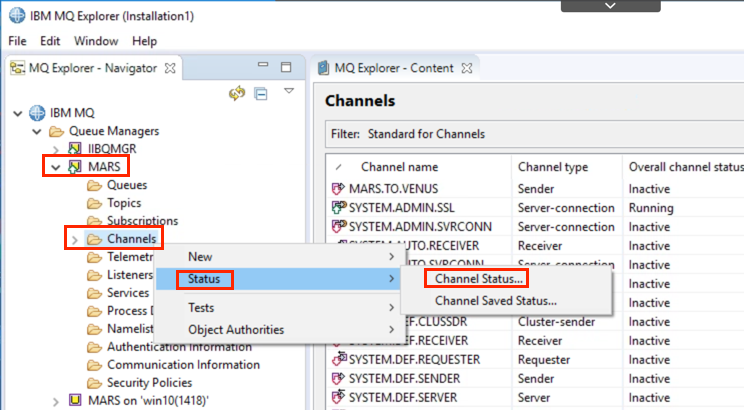
Return to the local entry for queue manager MARS, right-click Channels and select Channel Status.
-
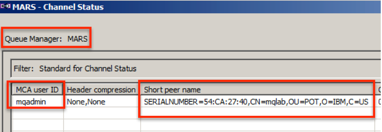
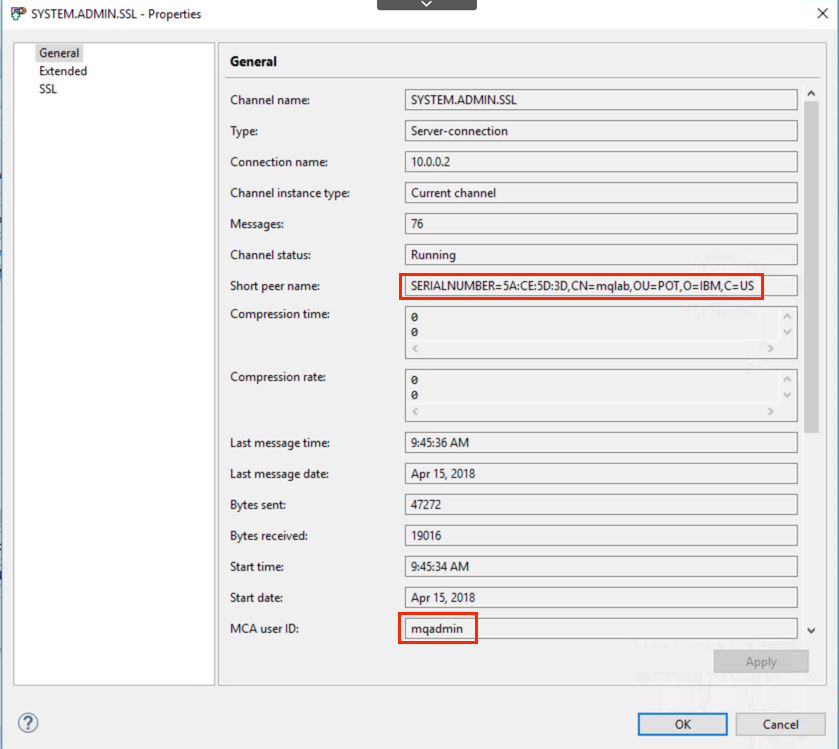
The SYSTEM.ADMIN.SSL channel will now be running with the mqadmin user ID configured in MQ Explorer. The channel authentication record has overridden the ID presented by MQ Explorer.
-
Scroll to the right until MCA user ID comes into view. You can also see the Short peer name from the certificate with the mqlab label.
Channel authentication records can be set for each user. Some shops may find it convenient to map users to roles. For example, all administrators may be mapped to mqadmin, all users in Project XYX may be mapped to a prj_xyz account, and so on. Alternatively, it is possible to map each user’s certificate to their actual user ID on the local system. Although this incurs more administrative overhead, it is useful when regulatory or internal requirements dictate that connections be traceable back to specific users.
Whichever method is chosen, creating channel authentication records to set the MCAUSER of the channel at run time allows a single channel to serve many users while still enforcing authorizations on a per-user basis.
-
Click Close to end the channel status display.
-
By default the MCAUSER of all channels is blank. As we have seen, this allows the user ID to be specified in the connection request, but if that ID is a privileged administrative ID it is blocked by the default rules. To address this, it is necessary to set the MCAUSER value of the channel to the desired user ID. Now that channel authentication rules are dynamically setting the value at connect time, it is no longer necessary to have a useable value in the channel’s object definition. In fact, it is useful to have a non-working value in the object definition so that if the channel authentication records are configured improperly, the channel fails to a safe state.
-
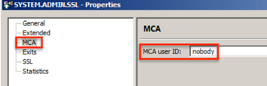
From MQ Explorer, connect to MARS and select the Channels panel from the navigation tree. Double-click the SYSTEM.ADMIN.SSL channel and select MCA from the navigation tree.
-
Enter the value nobody and click the OK button.
-
Disconnect and reconnect the win10 connection to the MARS queue manager. Verify that the channel’s MCAUSER is set to nobody in the channel definition. Then verify that the MCAUSER in the channel status reports mqadmin.
-
Click Close to end channel status display.
-
Follow the same procedure to change the MCAUSER of the SYSTEM.ADMIN.SSL channel on VENUS to nobody before continuing.
Module 4 Summary
This module used channel authentication records to map certificate distinguished names to user IDs. This is the means by which authentication can be meaningfully tied to authorization.
As an added security measure, the MCAUSER of the channel was set to nobody. This insures that the channel can only be activated if channel authentication rules are correctly configured and validate the requestor’s distinguished name.
Configure authorizations
Module Objectives
The goal of this module is to configure the channels in a way that enforces authorizations for non-administrative users. This will include MCA channels (those of type RCVR, RQSTR and CLUSRCVR) as well as MQI channels (those of type SVRCONN).
Background
Authorization is the aspect of IBM MQ security that is usually performed first and, unfortunately, is frequently the only security configuration that is performed. As we have seen in the previous lab modules, enforcing authorization without authentication does not effectively protect the queue manager. When authorization is configured without authentication a security façade is created. It provides the appearance of security because legitimate users who connect using the prescribed credentials are locked out if they connect to the wrong channel or queue manager. However, a malicious attacker would simply connect to one of the unauthenticated channels or present an administrative user ID and gain access.
A system configured without authentication is arguably worse than one that is wide open. When a network has no controls by design or due to a lack of resources to secure it, users are wary of trusting the network with valuable data. However when the network has ineffective controls, users believing it to be secure do not exercise the same level of caution. Similarly, a network believed to be secure may not be subject to the same level of testing or review as one that is known to be vulnerable.
It is for this reason that the lab is structured to configure the authentication steps in the previous modules. Authentication should be the first priority when hardening the MQ network. This module will build on that foundation by enforcing authorization profiles which will restrict the actions which may be executed by an authenticated user ID.
Authorizing Adjacent Queue Managers
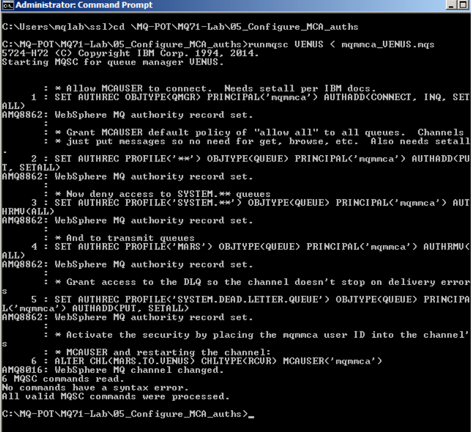
By default, an adjacent queue manager can put messages to any local queue and administer the local queue manager. The most basic security improvement is to continue to allow messages to be put to any queue, with the exception of those queues that confer administrative rights. The set of commands below will restrict the queues on the VENUS queue manager to which the MARS queue manager is allowed to put messages.
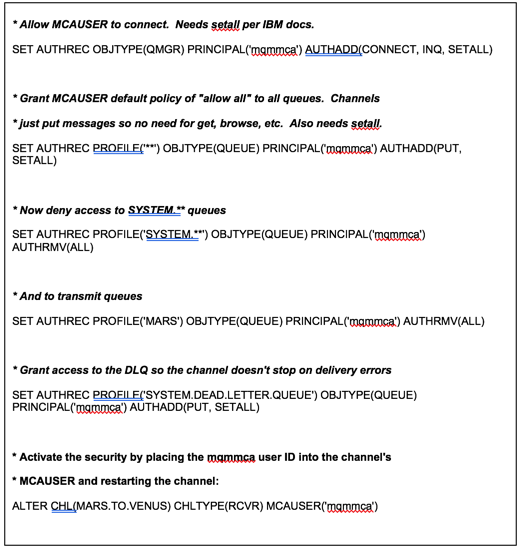
In the commands above, we are authorizing a userid ‘mqmmca’. The parameter for a userid is principal. On Unix, we would authorize a group instead of a user. In that case, the parameter would be group instead of principal.
-
Double-click command prompt icon on the desktop to open a command prompt.
-
Start runmqsc on the VENUS queue manager and paste the lines above into the runmqsc window. Alternatively, pipe the MQSC script into runmqsc. It can be found in the C:\PoT-messaging\MQ-POT\MQ71-Lab\05_Configure_MCA_auths folder for this module. The sub-folder for Module 5 contains several scripts including the one above which is filed as mqmmca_VENUS.mqs.
-
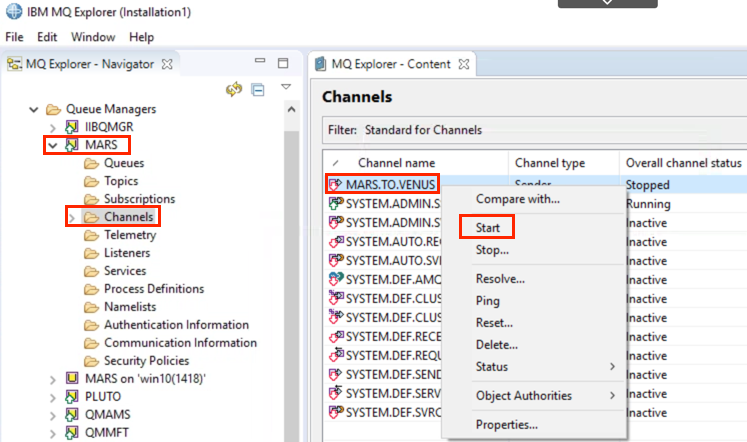
Using MQ Explorer for Installation1, stop and restart the sender channel called MARS.TO.VENUS on queue manager MARS.
Test the authorizations
-
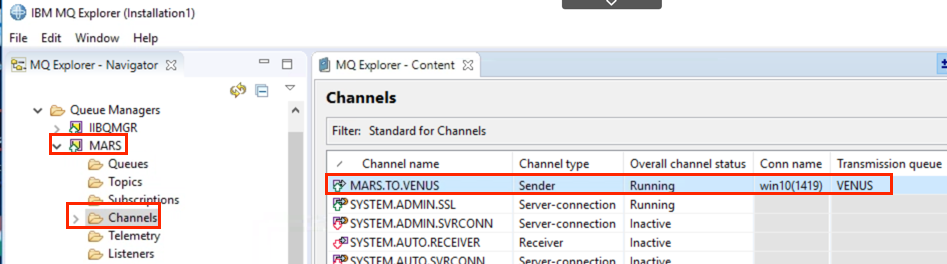
Ensure channel MARS.TO.VENUS is running.
-
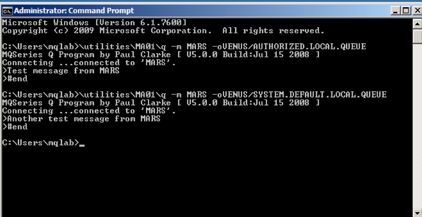
Use the Q program from SupportPac MA01 to send messages from MARS to VENUS. This exercises the authorization profiles associated with the mqmmca ID in the MARS.TO.VENUS channel’s MCAUSER. In a terminal window, type:
\utilities\MA01\q -m MARS –oVENUS/AUTHORIZED.LOCAL.QUEUE
Type in a message and hit ENTER followed by #end to exit the program.
-
Repeat the exercise above but this time send the message to the SYSTEM.DEFAULT.LOCAL.QUEUE on VENUS.
-
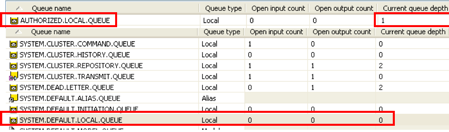
Open MQ Explorer and navigate to the Queues panel for the VENUS queue manager. Note that the queue depth has increased in AUTHORIZED.LOCAL.QUEUE but that the queue depth of SYSTEM.DEFAULT.LOCAL.QUEUE remains at zero. This is because the channel, running as mqmmca, failed authorization on the put to the SYSTEM.DEFAULT.LOCAL.QUEUE. We can verify this using the MS0P Event Message Formatter plug-in.
-
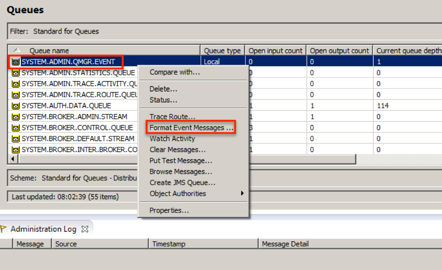
Right-click the SYSTEM.ADMIN.QMGR.EVENT queue in MQ Explorer. In the context menu, select Format Event Messages.
-
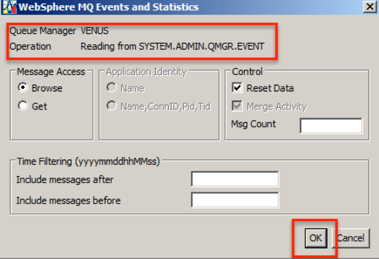
Click OK to take the defaults for selection criteria.
-
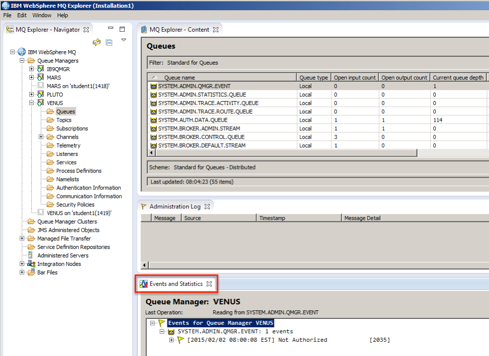
Click the Events and Statistics tab at the bottom of the screen.
-
Click past the selection dialog to arrive at the message detail screen. Click the twistie to expand the event message.
-
We can see that the event was generated by an authorization error on the open call for the SYSTEM.DEFAULT.LOCAL.QUEUE. We can also tell that the application that failed was the channel agent (amqrmppa), the user ID which executed the failing API call and the exact options that were used in the call.
-
It is often useful to know which authorization profiles contributed to an authorization failure. To display these, start runmqsc on the VENUS queue manager and issue the following command: DISPLAY AUTHREC + PROFILE(‘SYSTEM.DEFAULT.LOCAL.QUEUE’) + OBJTYPE(QUEUE) PRINCIPAL(‘mqmmca’)
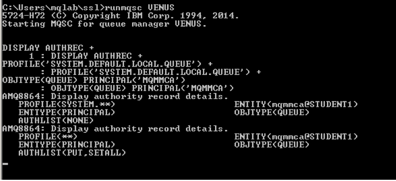
According to the event message, the queue was opened for output and setall. The result of the command shows that the generic profile of ‘*’ granted these rights to the mqmmca userid (principal), but that they were overridden by the more specific profile which revokes all rights to SYSTEM.* objects for the mqmmca userid.
Authorizing MQ Explorer
In earlier modules, the SYSTEM.ADMIN.SVRCONN channel was left allowing any non-privileged user able to connect and a dedicated SVRCONN channel was created for the administrators. The administrative channel is authenticated and allows full access. The opposite end of the continuum would be a channel that allows anonymous connections but very little access. Since SYSTEM.ADMIN.SVRCONN is a well-known channel name, it is a good candidate for such a channel. We are going to use the Role Based Authorities wizard to grant a user read-only access to the queue manager and use that user ID on the SYSTEM.ADMIN.SVRCONN channel.
-
Start runmqsc on the VENUS queue managers and alter the channel as follows:
ALTER CHANNEL(SYSTEM.ADMIN.SVRCONN) + CHLTYPE(SVRCONN) MCAUSER(‘mqmmqi’)
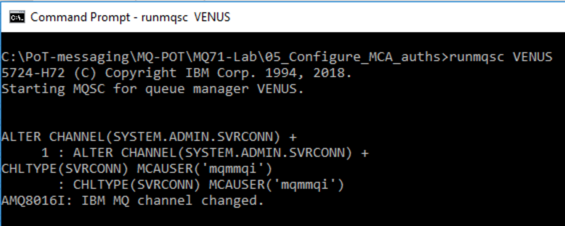
-
Start MQ Explorer If it is not already running. Right-click the VENUS queue manager and select ‘Object Authorities; and then ‘Add Role Based Authorities…’.
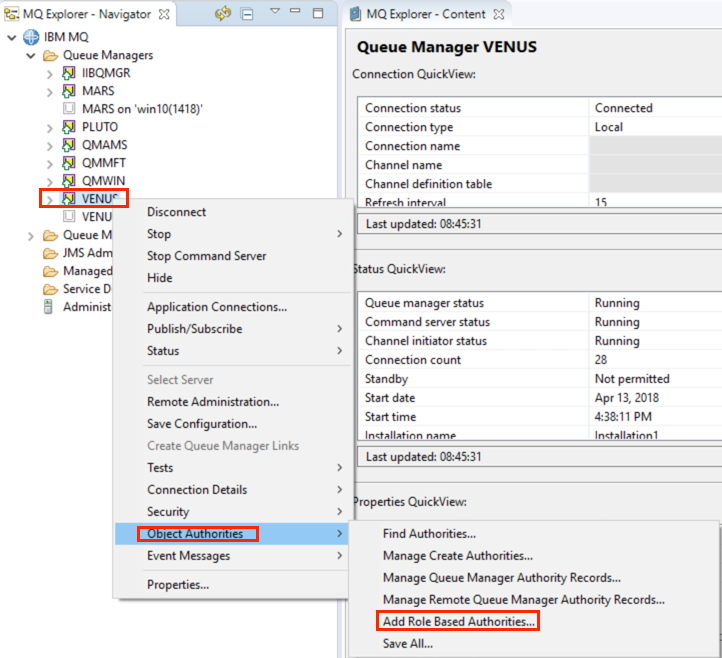
-
We will give user id ‘mqmmqi’; read-only access. Select User and type in mqmmqi and choose the ‘Read-only access’ option. Also check ‘Permit reading of messages on a queue’. Review the commands that are going to be issued in the box at the bottom of the wizard before pressing OK.
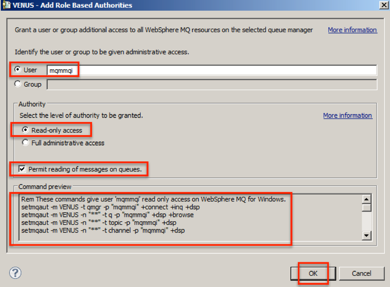
-
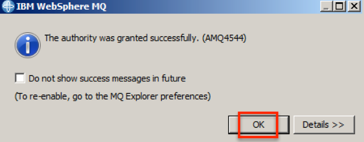
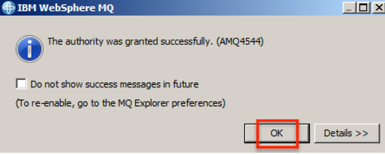
The authority is granted. Click OK.
-
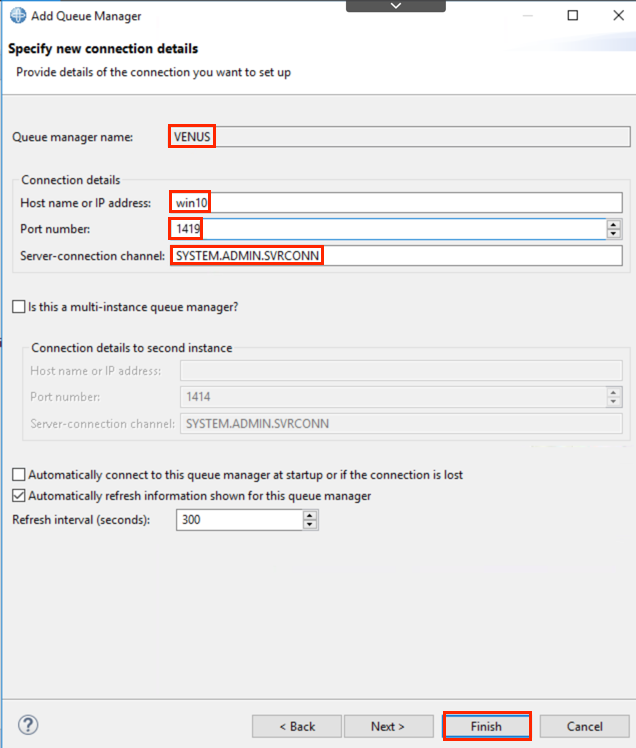
To test the new profiles, make a new connection to the VENUS queue manager using the SYSTEM.ADMIN.SVRCONN channel. Right-click Queue Managers and select Add Remote Queue Manager. In the dialog, enter VENUS and click Next. In the Details dialog, enter win10 as the host name, 1419 as the Port number and click Finish.
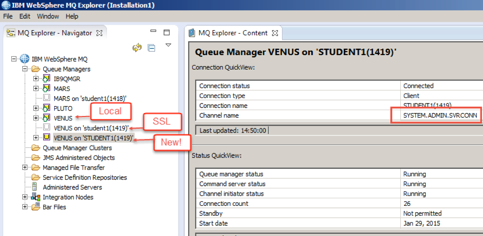
Of the three entries for the VENUS queue manager, the restricted one is identified by the channel name.
-
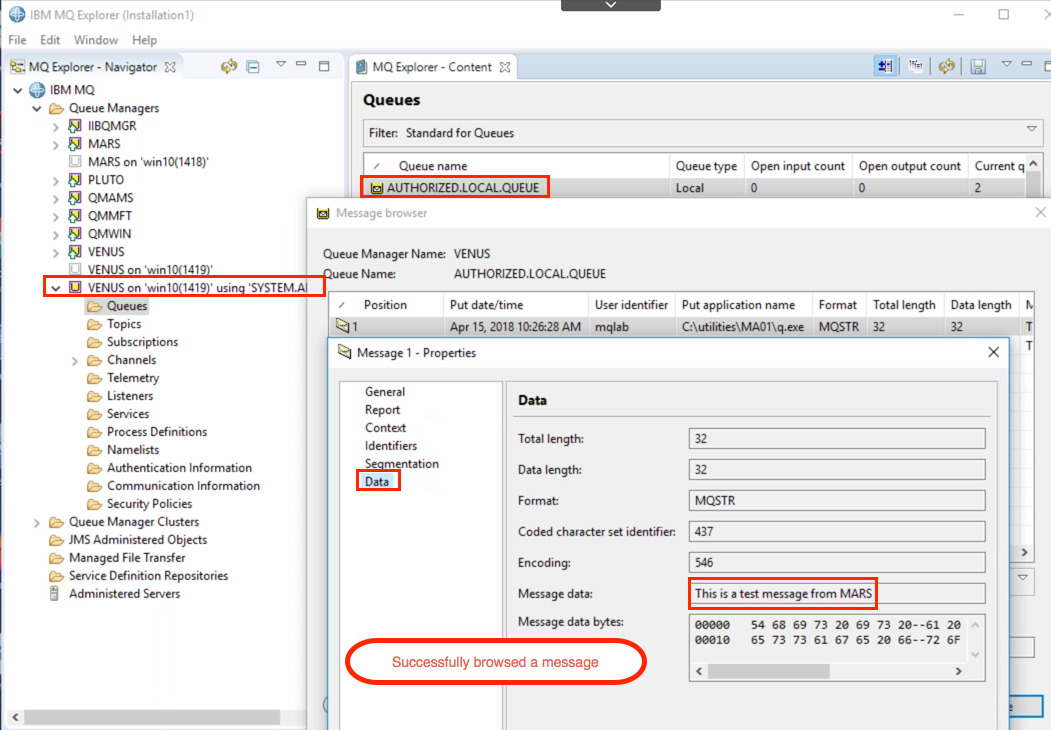
Try to display various objects on the queue manager. Look at channel statuses. Browse the message that you left on the AUTHORIZED.LOCAL.QUEUE.
-
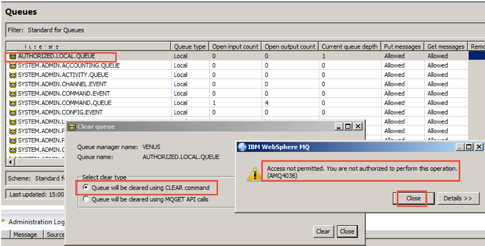
Now try to clear the messages on the queue. Note that any attempt to put or destructively get a message or to change an object setting will fail.
Summary
This has been a brief overview of hardening an MQ queue manager. The high-level steps involved were:
- Configure SSL between queue managers.
- Configure SSL for administrative SVRCONN connections.
- Lock down any unused channels.
- Map SSL Distinguished Names to user accounts using channel authentication records.
- Map SSL Distinguished Names to user accounts using SSLPEER.
- Provision a channel for non-administrative access.
- Restrict authority of the MCA channels (adjacent queue managers).
- Restrict authority of non-administrative SVRCONN channels.
Remediation of an MQ network would include several more roles, such as developers, testers, instrumentation, end users, and so on. However the high-level process to implement the configurations would remain the same: provide authentication, then provide authorization.
The tools that were used included:
- SupportPac MQ TLS Wizard
- SupportPac MS0P MQ Explorer Configuration and Display Plug-In
- SupportPac MA01 Q Program
- A variety of scripts
You are encouraged to branch off from this point and extend the lab. The obvious next step is to fill in the middle ground between the administrative access that you configured and the read-only MQ explorer. Just remember that the following rights implicitly grant administrative authority so do not grant them out to ordinary users or applications:
- The ability to create a queue other than from a model queue.
- The ability to set attributes of the queue manager.
- The +all +alladm +allapi +setid rights.
- The +setall right (except for RCVR, RQSTR or CLUSRCVR channels).
- The ability to read the SSL keystore files.
- The ability to write to the qm.ini file.
- The ability to write to the exits directory.
Clean-up
Log off mqlab user.
CONGRATULATIONS! You have completed this hands-on lab 7.