File transfer requests using IBM MQ Explorer and the command line
You should already have both VMware images running and logged on each as ibmdemo. The MFT4AGT1 and CSM1AGT1 agents should still be running. In this scenario you will create a file transfer from the student (MFT client) system to the teacher (MFT server) system.
The transfer will be made by an agent on the Windows 10 student machine (MFT Client) that will read the file, cut into chunks and put in a queue that is processed by the target agent on the Windows 2016 teacher machine (MFT Server). The target agent reconstructs the file on the target server at the location specified in the transfer request.
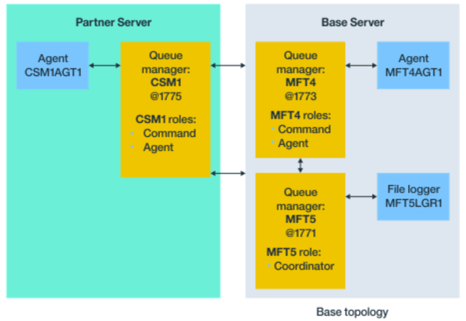
Using MQ Explorer to create transfers
-
On the student system, return to MQ Explorer. Expand Managed File Transfer and click Connect.
-
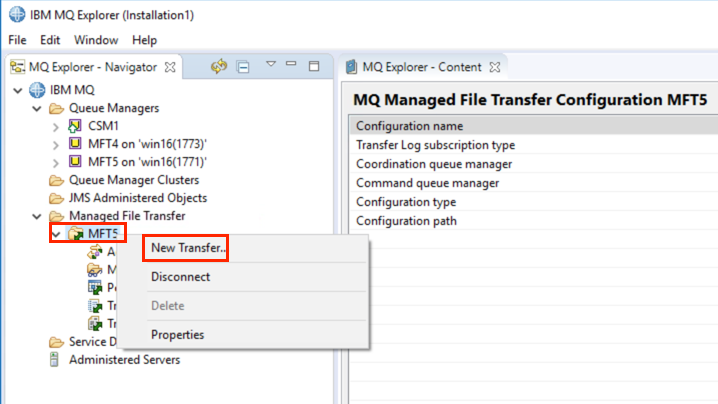
Expand MFT5 which is the coordination queue manager defined earlier. You will see the subfolders for Agents, Monitors, etc. Right click MFT5 under the Managed File Transfer folder. Select New Transfer.
-
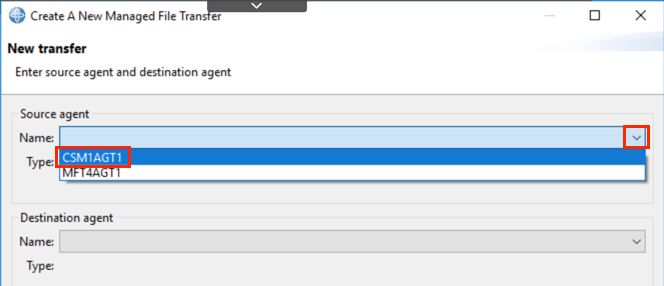
Click the pull-down for Source agent, and select CSM1AGT1.
-
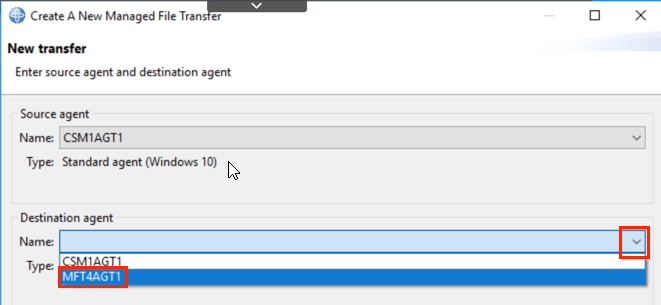
Click the pull-down for Destination agent, and select MFT4AGT1.
-
Click Next.
-
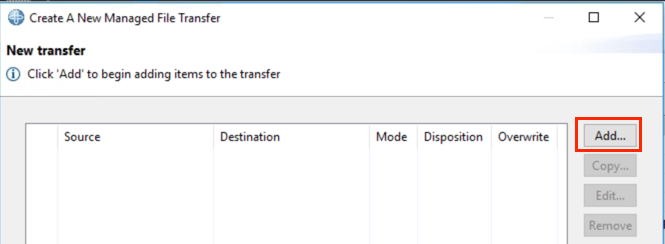
On the New Transfer panel, click Add.
-
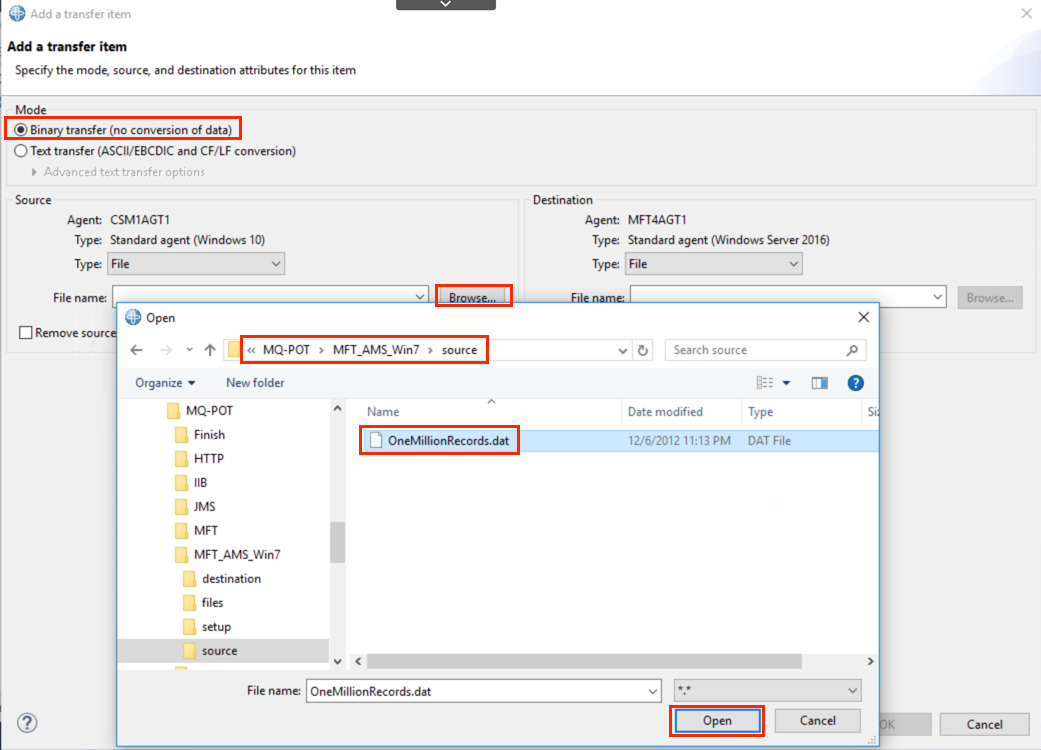
On the Add a transfer item panel, leave Mode default to Binary transfer.
-
In the Source section, click Browse and navigate to C:\PoT-messaging\MQ-POT\MFT_AMS_Win7\files and select OneMillionRecords.dat.
Click Open.
-
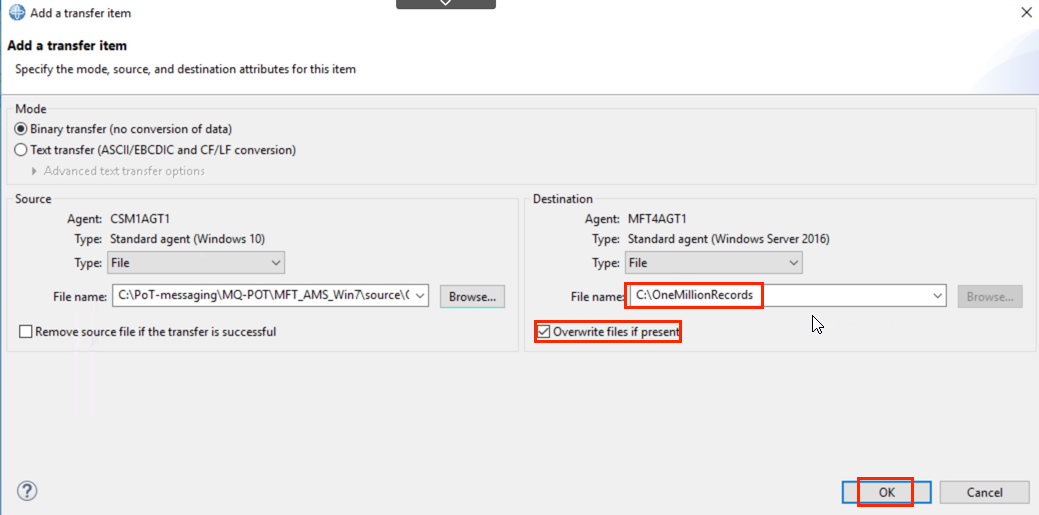
In the Destination section, type in the path C:\OneMillionRecords.
-
Note that you can select to overwrite the file if it is present. Click the checkbox for Overwrite files if present.
-
Click OK.
-
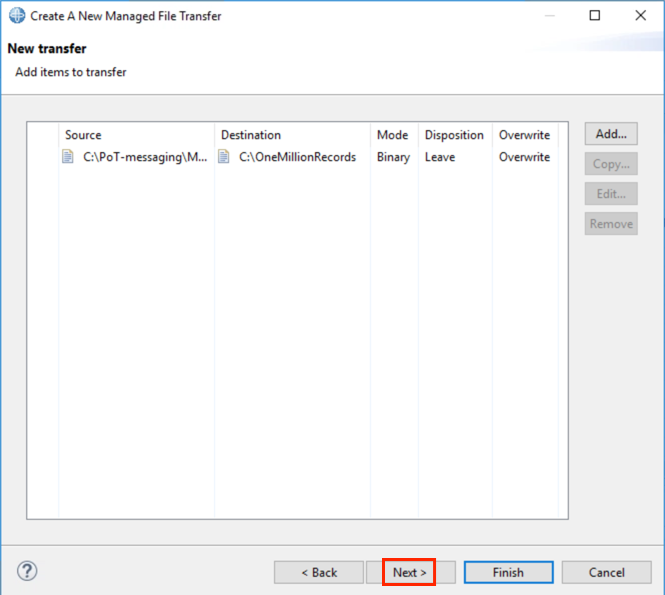
Your are presented with a summary screen. Click Next.
-
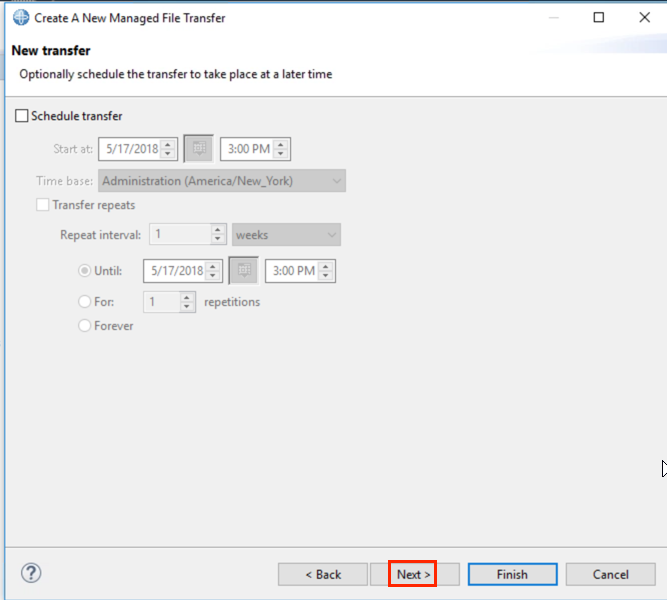
The next window gives you the ability to schedule the current transfer. We will not use scheduling at this time, but you can review the options. Click Next.
-
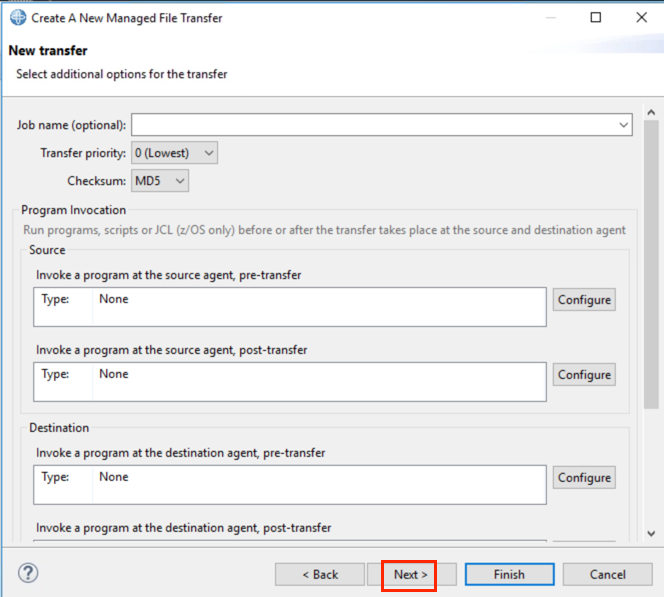
The next window gives you the ability to provide a Job name for the logging. Priority can also be defined as well as a check for the file integrity using a check sum. It is also possible to configure the source or target agent to call a program before or after the transfer. For example to call a program to process the file at the destination once it is transferred. Review the options then click Next.
-
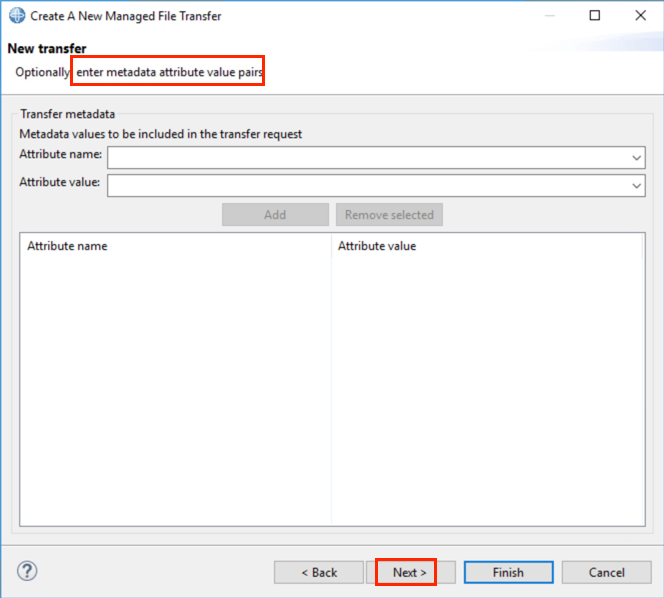
The next page gives you the ability to create your own metadata using name-value pairs. You can define your own attribute and assign a value to it. This metadata is carried along in the transfer request and will appear in the the transfer log. This is completely optional. Click Next.
-
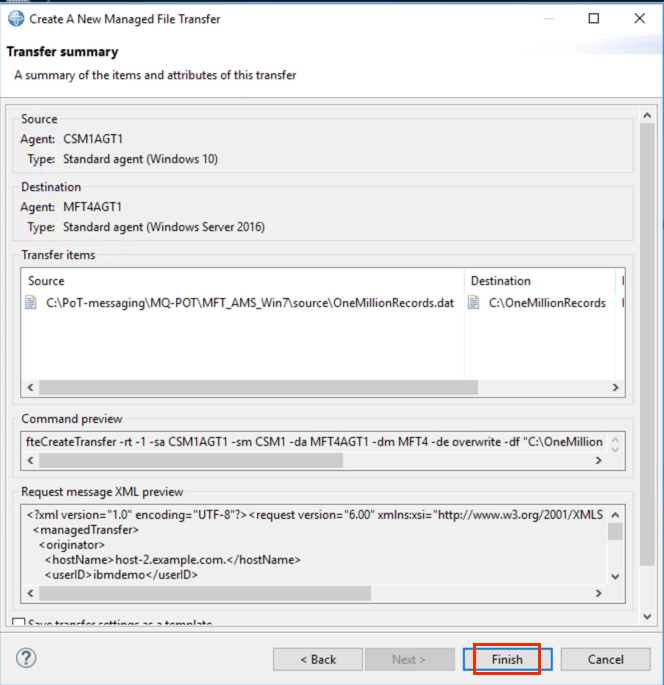
Finally, you arrive at the summary page where you will submit the request. You could have clicked Finish on the previous pages where we did not enter any values.
On the summary page, you are presented with several sections – Source, Destination, files to be transferred, Command preview, and Request message XML preview. In Command preview you see the equivalent command line command. This can be copy and pasted for easy scripting.
In the Request message XML preview, the message that is actually put on the Source agent’s command queue is displayed.
Click Finish to submit the request.
-
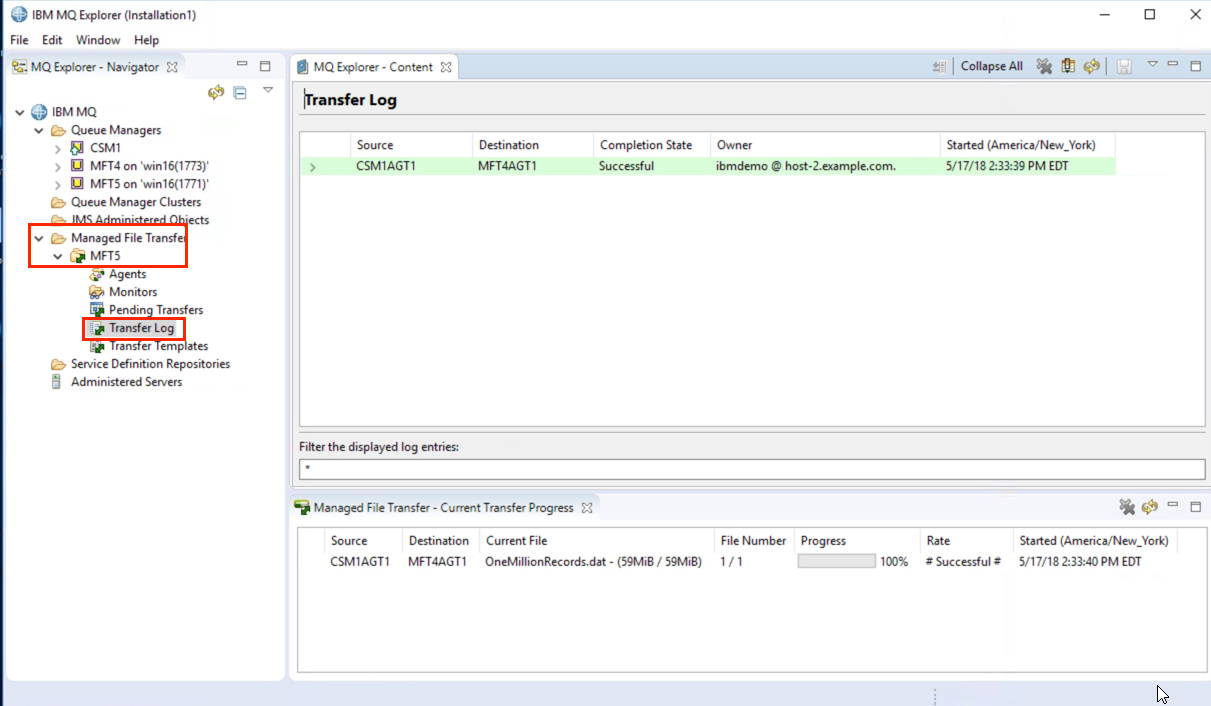
Click Transfer Log under Managed File Transfer > MFT5. You will see a Successful Complete State for the transfer. At the bottom of the display you will see a row for the completion status. There is a progress bar where you can see the status as it progresses. It also shows the files if there are multiple files in the request and the number of bytes transferred.
-
Expand the transfer by clicking the drop-down sign.

-
Switch to the teacher (MFT server) machine, where MQ Explorer should still be running.
-
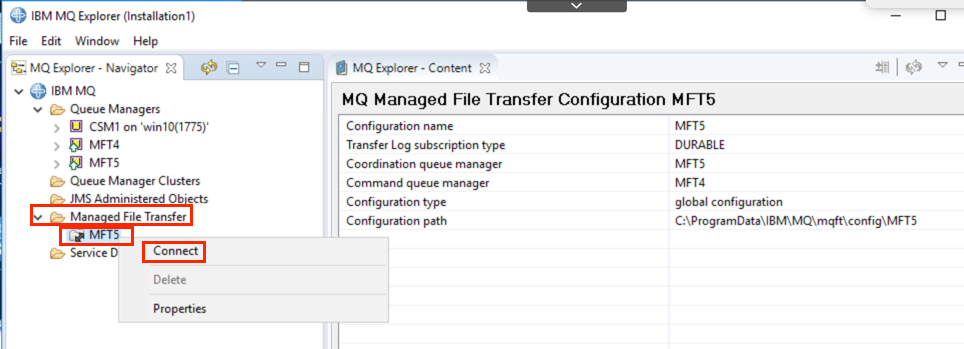
In the same manner as before, expand Managed File Transfer > MFT5. You will see the same results displayed on this explorer.
If MFT5 is greyed out, it is not connected. In which case, right-click MFT5 and click Connect.
-
Now expand MFT5 > Transfer log and you will see the same successful transfer.
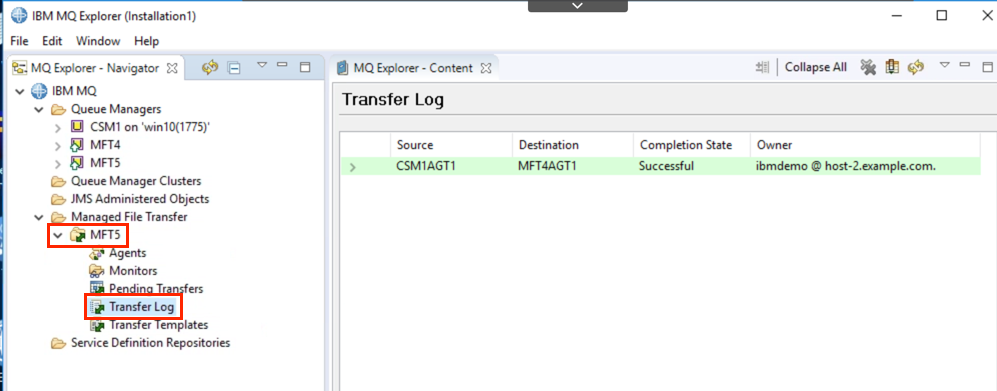
All status messages are sent to the queue manager MFT5 which publishes the records. MQ Explorer is subscribing to those messages and displays them here.
-
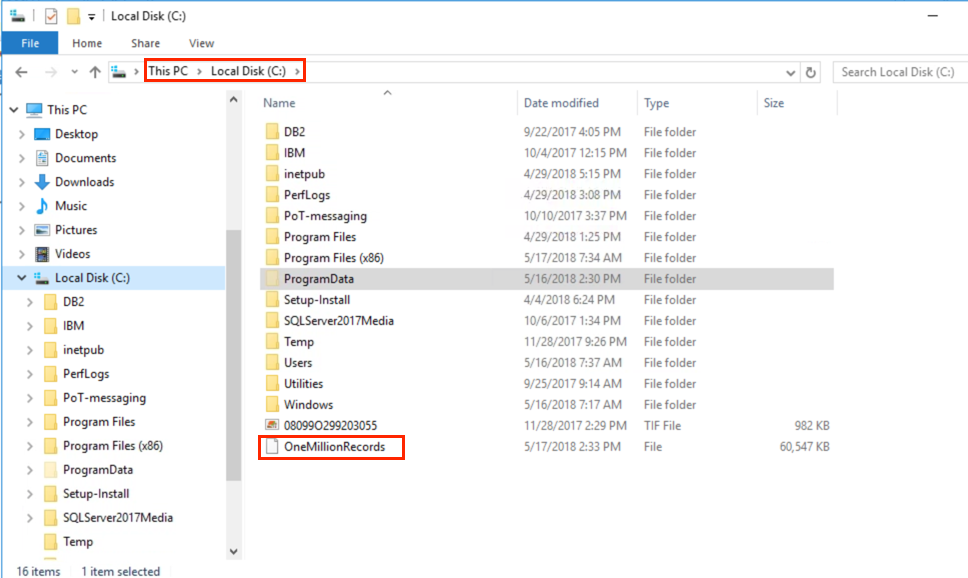
Still on the teacher machine, open Windows Explorer and navigate to the root directory C:\.
-
You will find the file OneMillionRecords on the root directory C:\.
Creating a Template using the IBM MQ Explorer
In this scenario you will discover how to reuse a transfer that has already been created. This can be useful in situations where you need to run repeated or complex transfers.
-
Return to the MFT client machine and MQ Explorer.
-
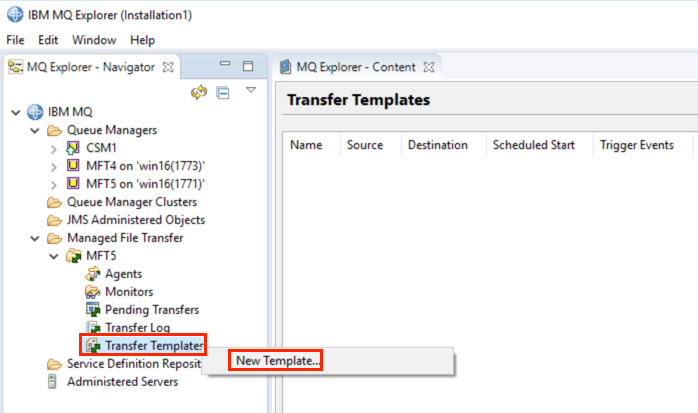
Right click Transfer Templates and select New Template.
-
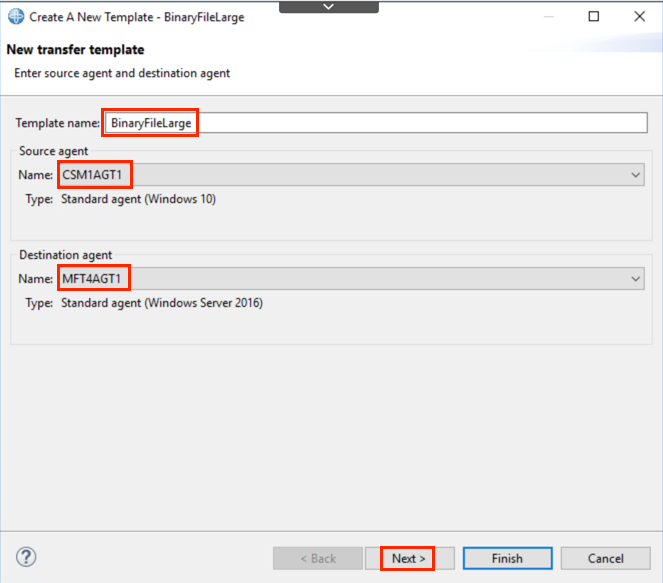
Give the template a name – BinaryFileLarge.
-
Use the pull-downs to select the CSM1AGT1 as the Source agent and MFT4AGT1 as the Destination agent.
-
Click Next.
-
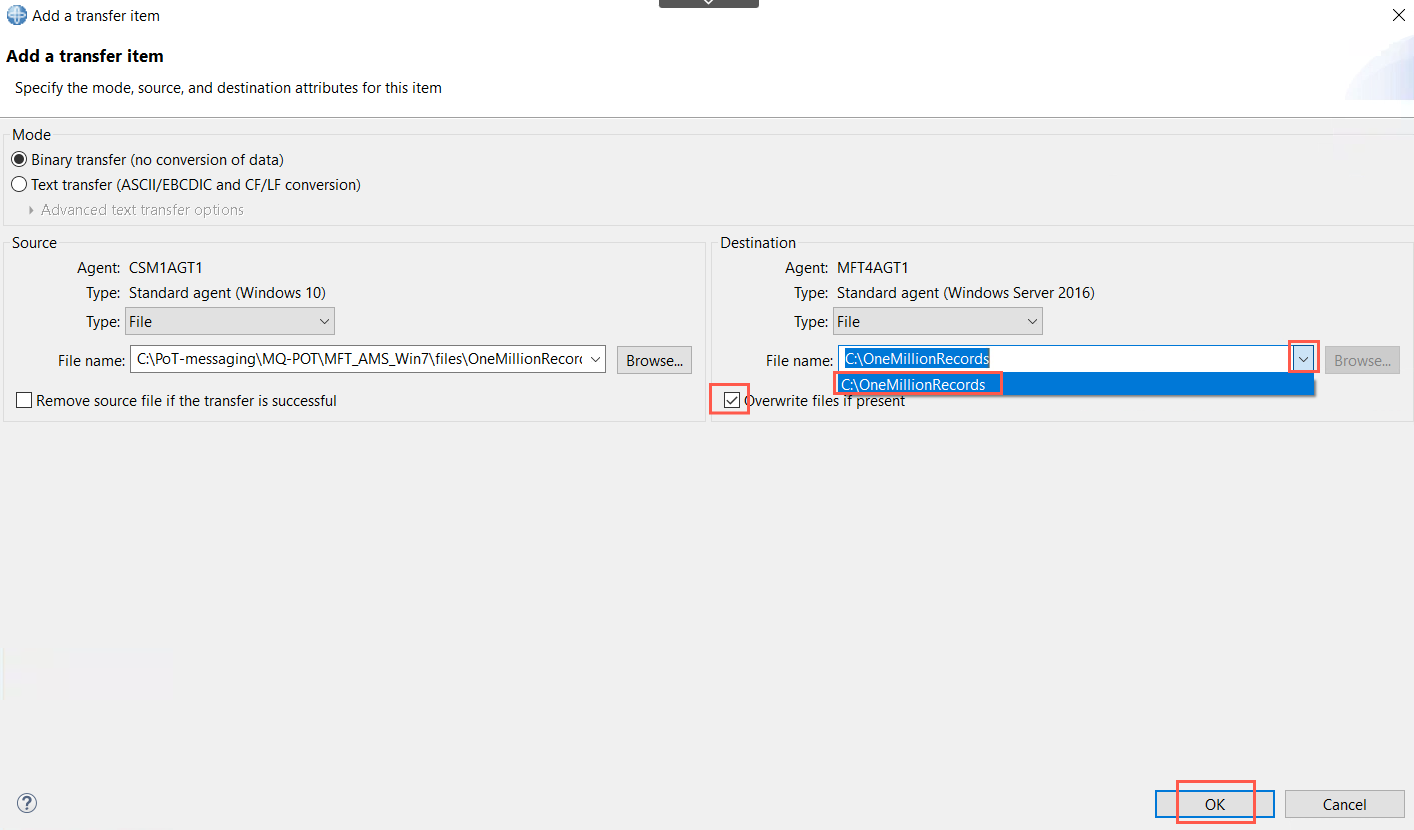
Click Add and provide the same information as you did previously. Hint: Use the pull-down to select the previously entered file names.
-
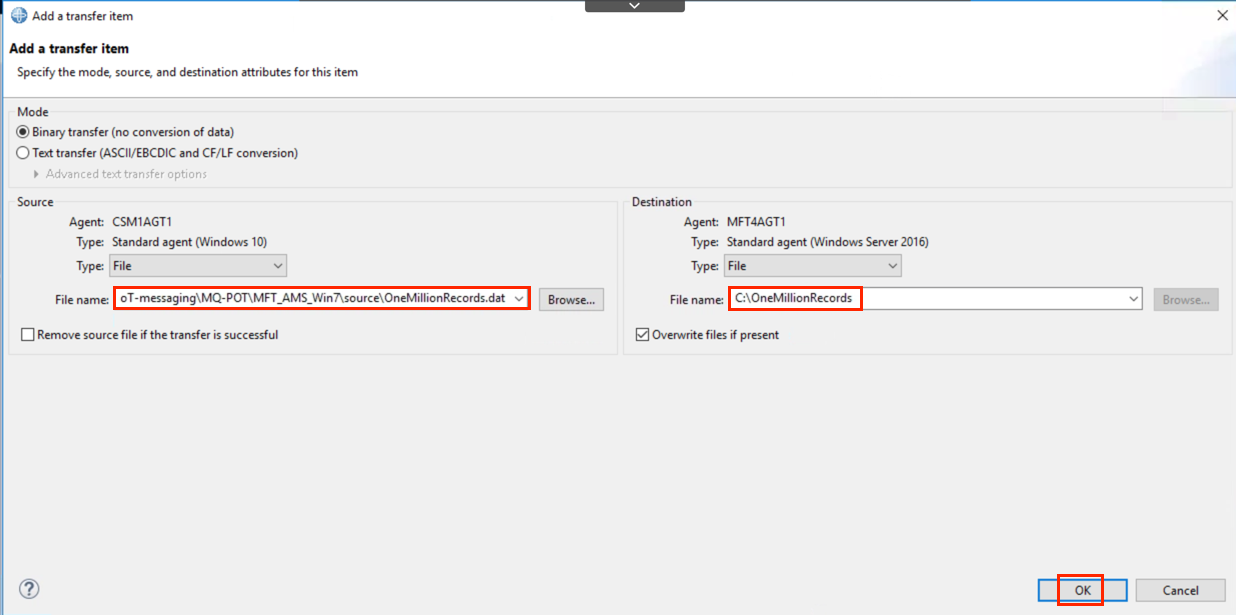
Click OK.
-
Click Finish.
-
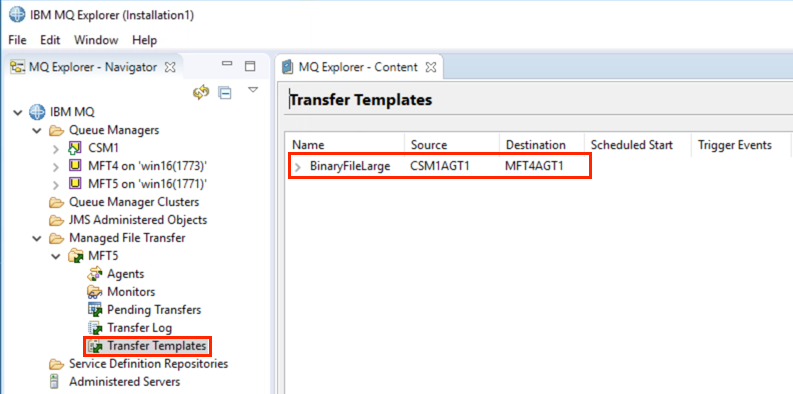
Note that the template has been created.
-
The new template can be used to initiate a new transfer. Click Transfer Templates.
-
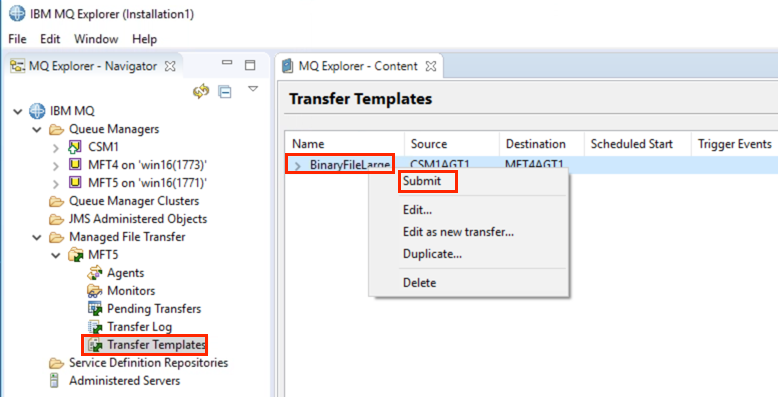
Right-click the saved template “BinaryLargeFile” and select Submit to start the transfer.
-
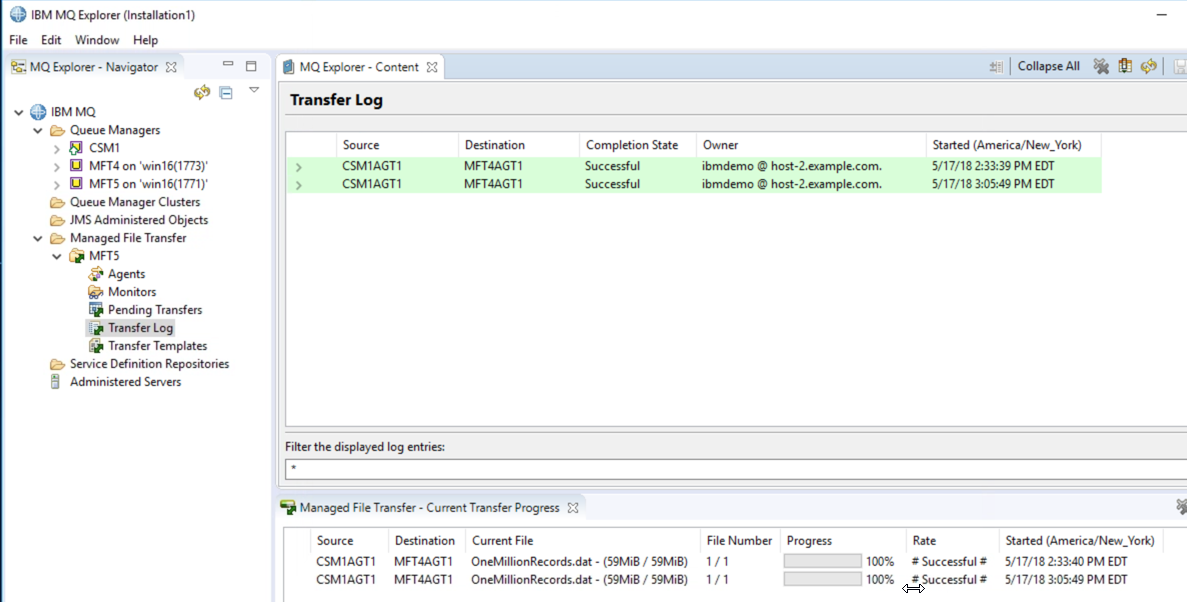
Click Transfer Log to check the status. You will see the status is Starting and then you can view the progress bar. Of course, by the time you check it, the status may already be Successful indicating a complete transfer.
-
You can submit the same request repeatedly using the template.
Duplicate a template to create a new transfer based on an existing template
You can reuse an existing template to create a new template with the same attributes then alter it as necessary.
-
In IBM MQ Explorer: Select Transfer Templates.
-
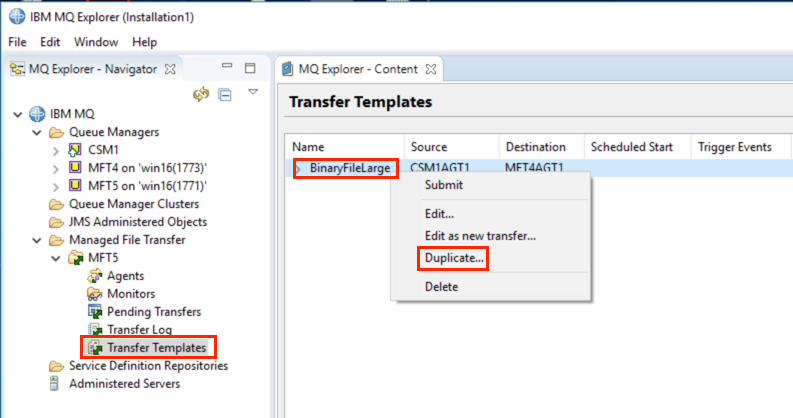
Right click the template named BinaryLargeFile. Select Duplicate to create a new transfer based on the existing one.
-
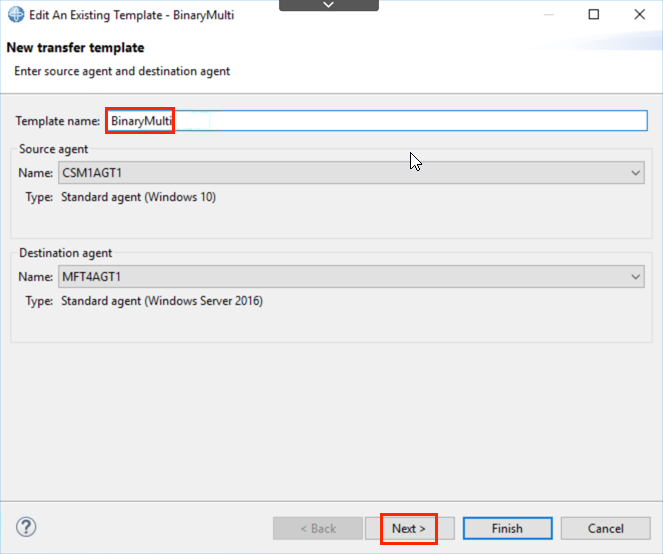
On the New transfer template editor, change the name in Template name to BinaryMulti.
Click Next.
-
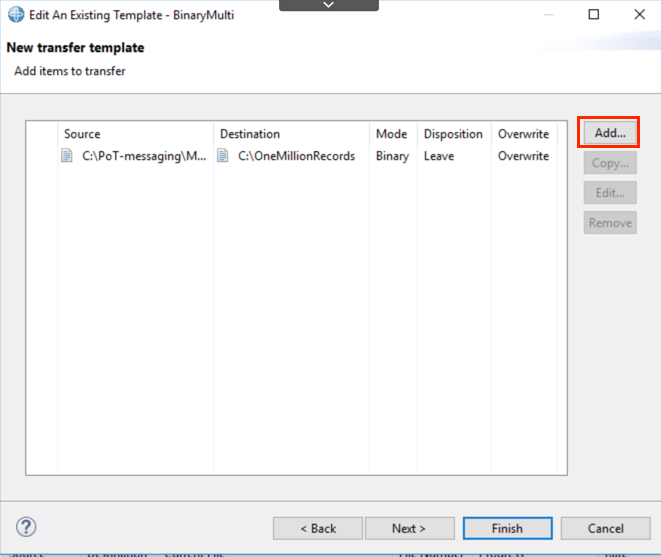
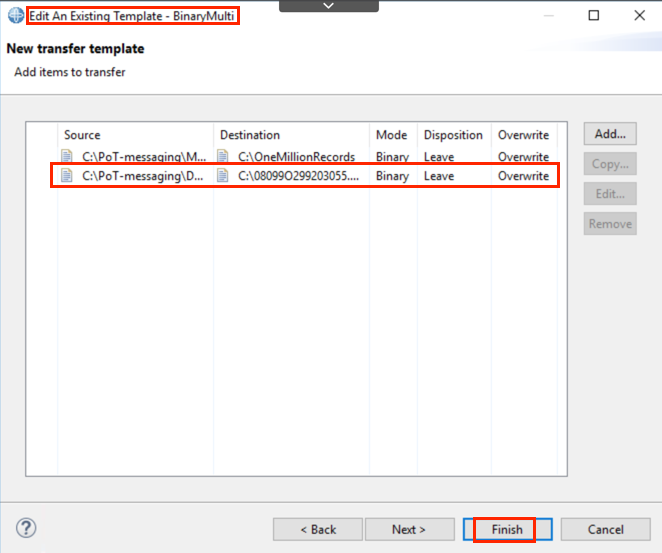
Edit the template to add a new file to the existing group of files. Click Add.
-
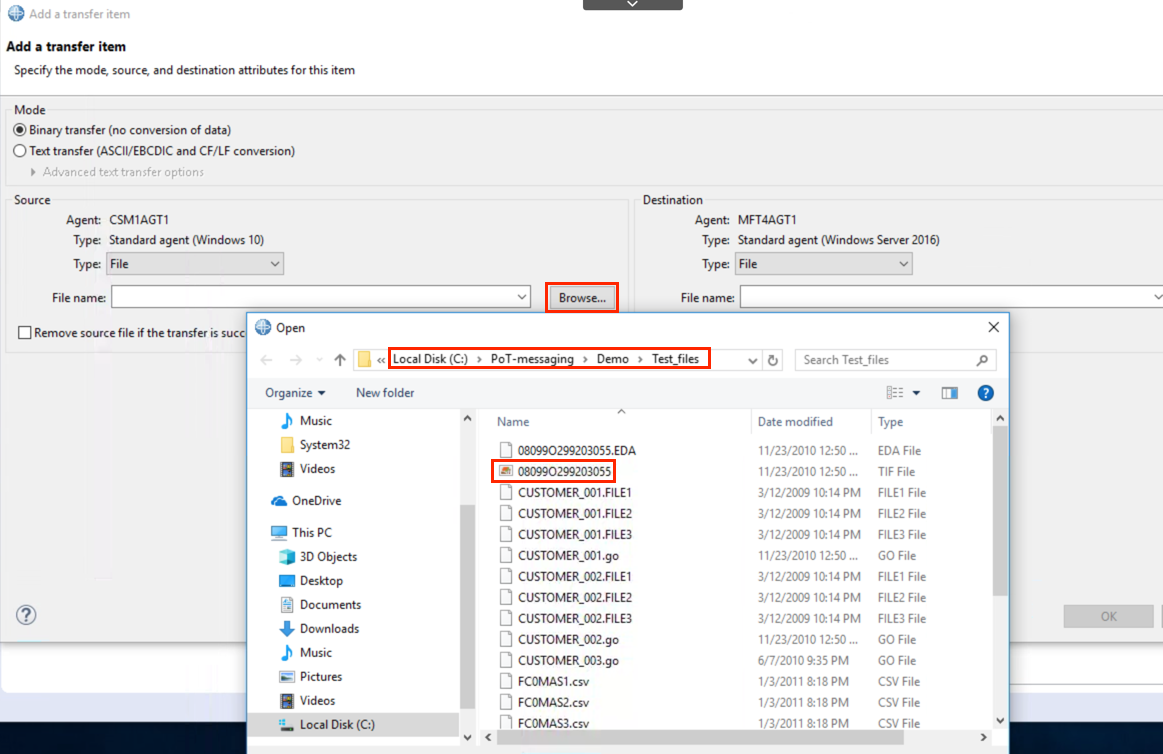
On the Add a transfer item panel, click Browse and navigate to C:\PoT-messaging\Demo\Test_files.
-
Selete the TIFF file 08099O299203055. Click Open.
-
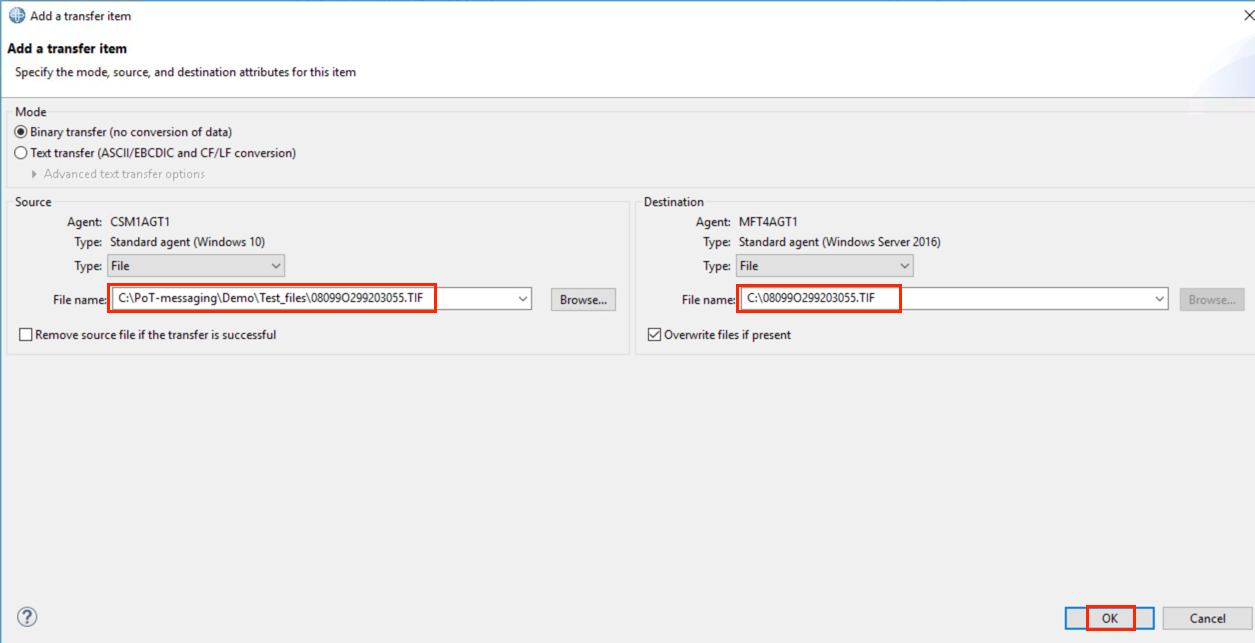
Type C:\08099O299203055.TIF in the Destination File name.
Check Overwrite files if present box.
Click OK.
-
Click Finish to create the new template.
-
Back on the Transfer Templates panel, select the newly created template BinaryMulti.
-
Right click BinaryMulti and select Submit.
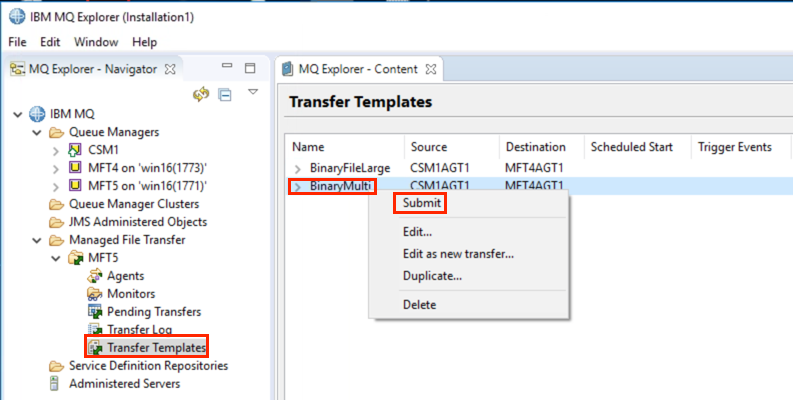
This transfer is now going to transfer both files identified in the template from agent CSM1AGT1 to MFT4AGT1 which is running on the MFT server machine. Both files will be over-written if they exist on the MFT server machine.
-
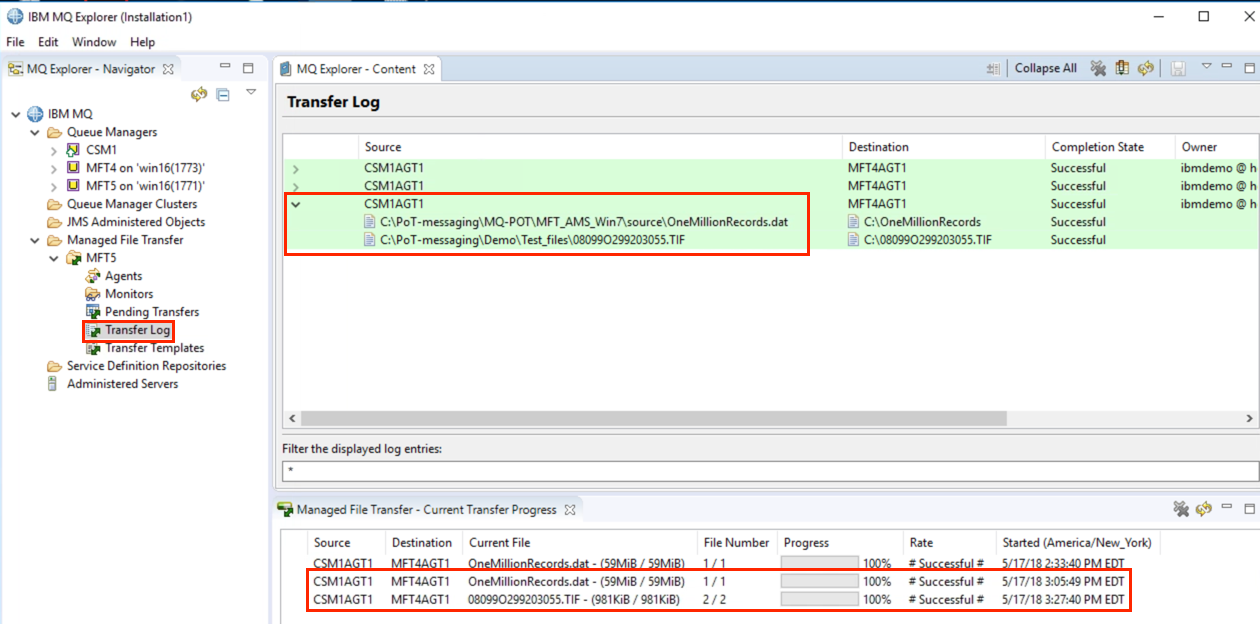
Watch the progress bar as it progresses. Notice the source and destination agents, the current file (1 of 2, 2 of 2) and the number of bytes transferred.
-
When the transfer is finished, expand the transfer to see the files that were transferred.
-
Switch to the MFT server machine.
-
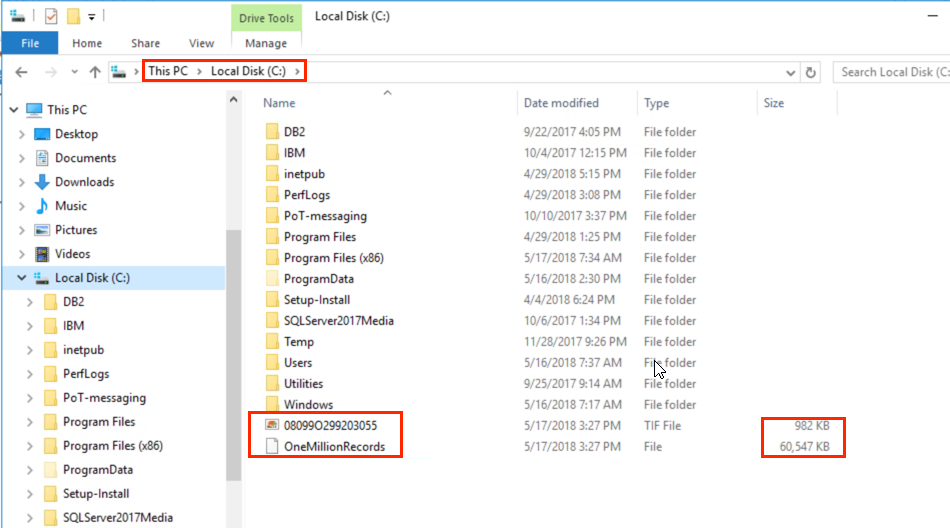
Open Windows Explorer and navigate to C:\.
-
Verify that both files arrived successfully with the correct number of bytes.
Working with Monitors
You can monitor IBM MQ Managed File Transfer resources; for example, a queue or a directory. When a condition on this resource is satisfied, the resource monitor starts a task, such as a file transfer. You can create a resource monitor by using the fteCreateMonitorcommand or the Monitors view in the IBM MQ Managed File Transfer plug-in for MQ Explorer.
A common scenario is to monitor a directory for the presence of a trigger file. An external application might be processing multiple files and placing them in a known source directory. When the application has completed its processing, it indicates that the files are ready to be transferred, or otherwise acted upon, by placing a trigger file into a monitored location. The trigger file can be detected by a IBM MQ Managed File Transfer monitor and the transfer of those files from the source directory to another IBM MQ Managed File Transfer agent is initiated.
Trigger file transfer based on an event
In this scenario you will configure MFT to trigger a file transfer when an event occurs. In this case, the event will be the presence of a file that follows a specific pattern.
-
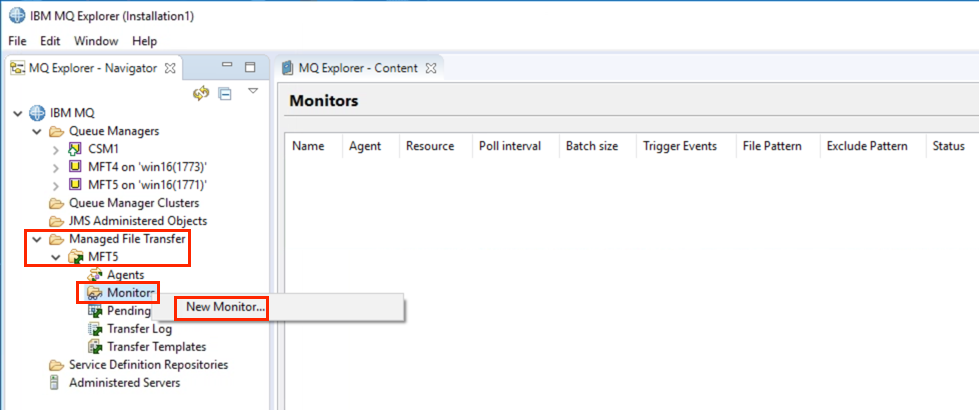
From the MQ Explorer on the MFT client machine find the Monitors folder. Right click and then select New Monitor.
-
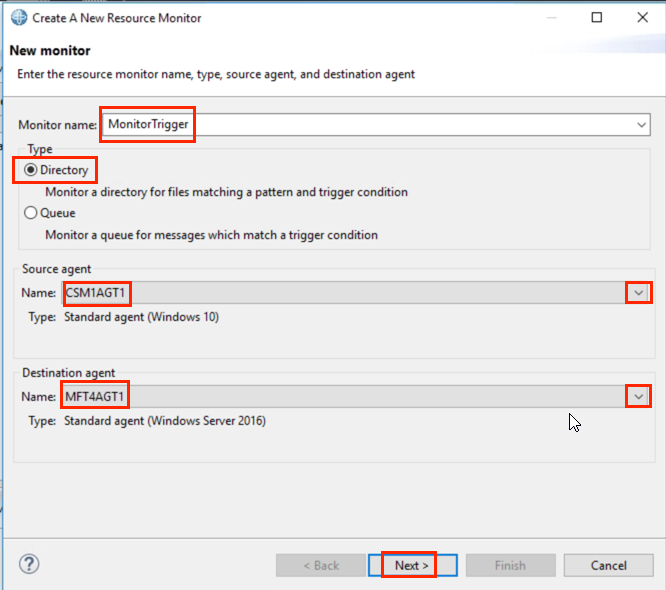
In the New monitor panel, enter MonitorTrigger as the Name. Leave the Type set to Directory.
Click the pull-down for Source agent Name and select CSM1AGT1 as the Source agent. Click the pull-down for Destination agent Name and select MFT4AGT1 as the Destination agent.
Click Next.
-
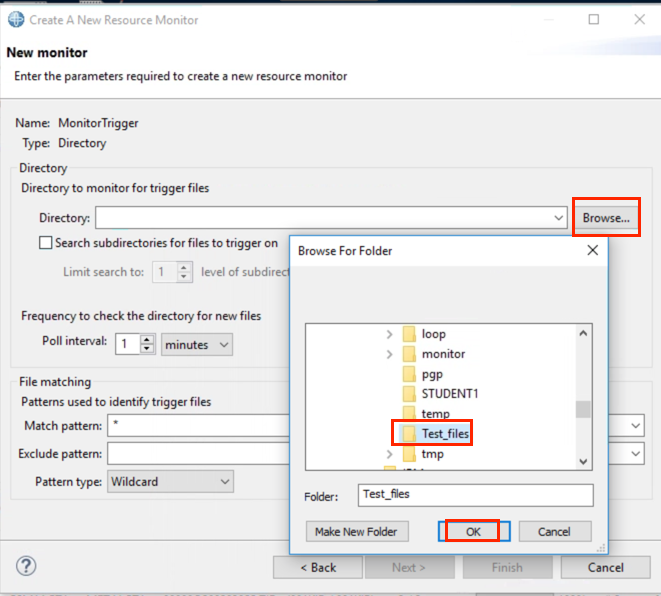
Click Browse and navigate C:\PoT-messaging\Demo\Test_files as the directory name that will be monitored. Click OK.
-
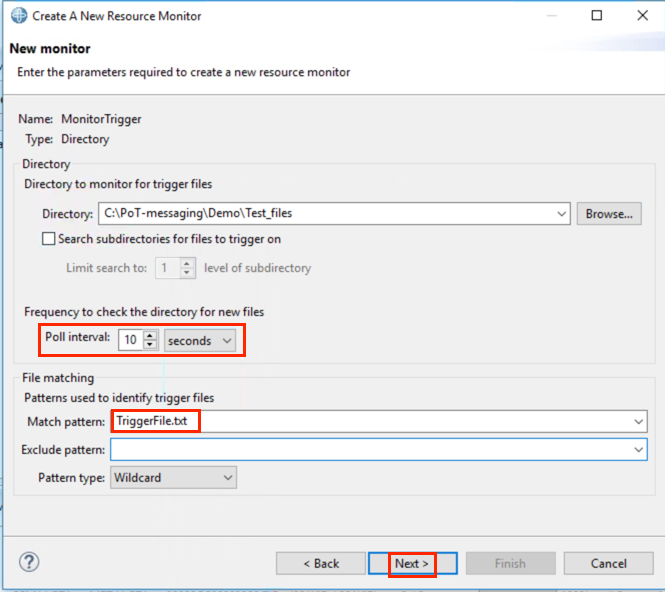
Change the Poll interval to 10 seconds. Enter TriggerFile.txt as the Match pattern for File matching.
Click Next.
-
By selecting Match pattern, when a file with the name of “TriggerFile.txt” arrives in C:\PoT-messaging\Demo\Test_files, a file transfer request will be initiated.
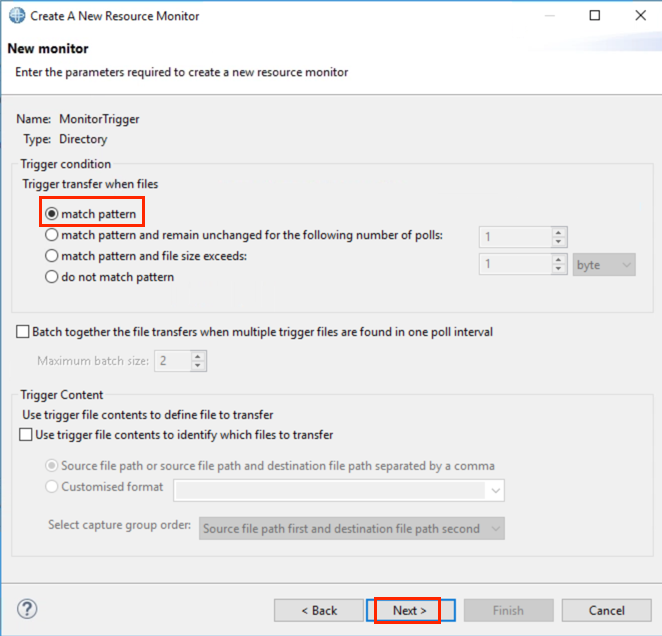
Click Next.
-
The next step is to define a file transfer request that will be triggered when the monitor detects the existence of the trigger file.
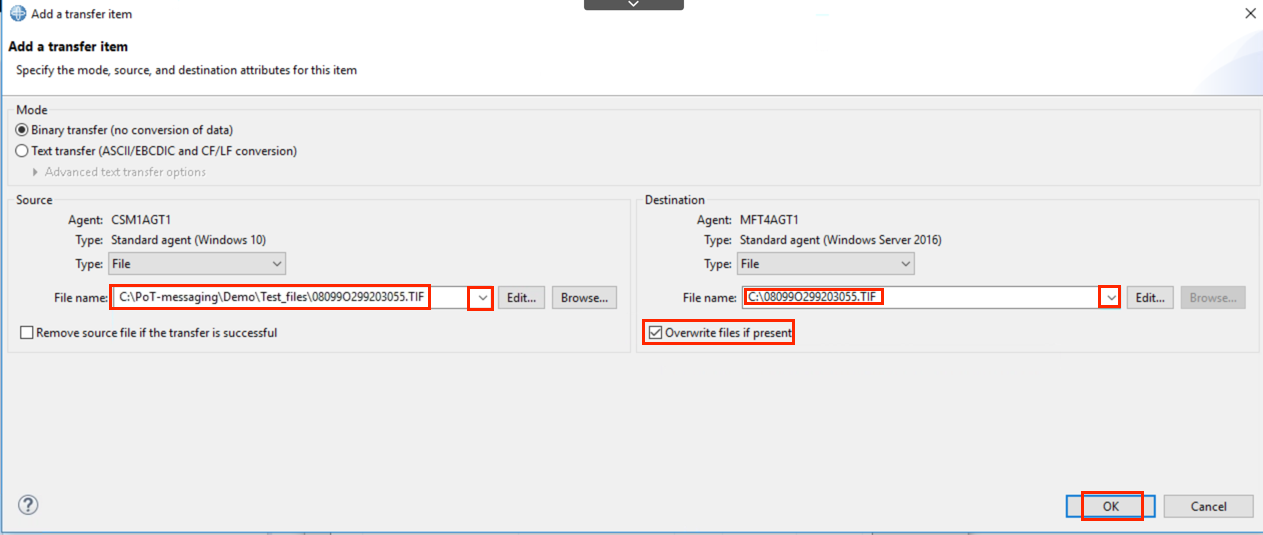
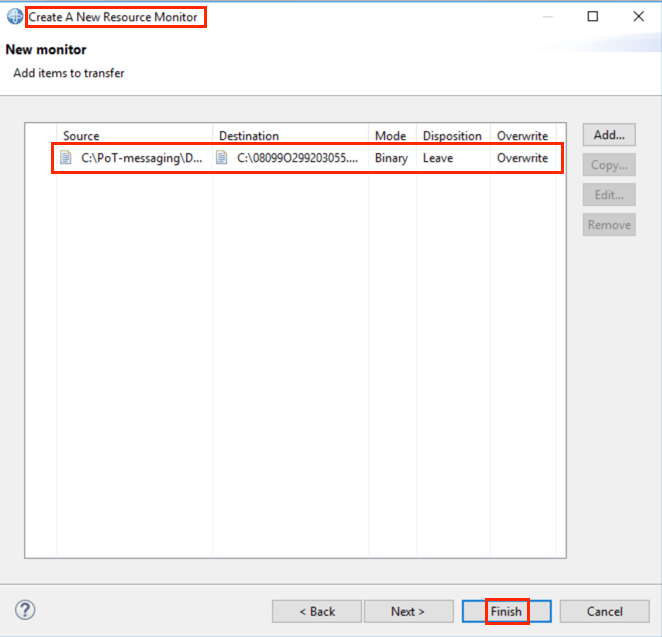
This panel is the same as the one you filled out for the template. You must add the files you want transferred in this request. Click Add and complete the fields as you did previously. Don’t forget to check the Overwrite files if present box.
Click OK.
-
Click Finish to create the monitor.
-
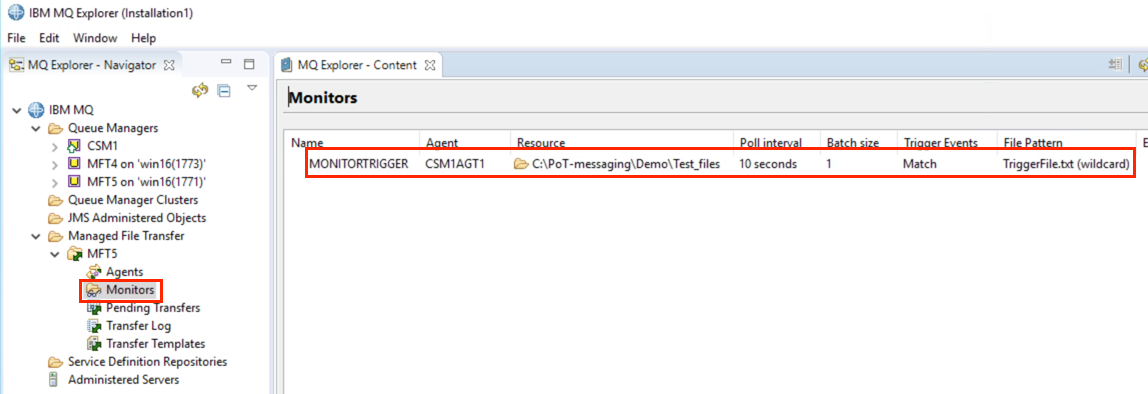
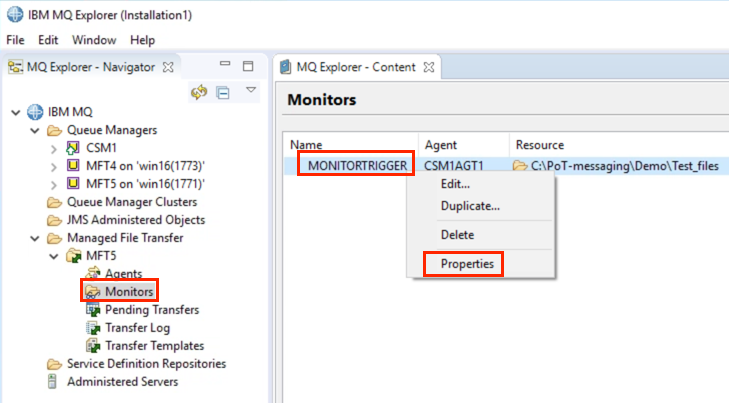
Click Monitors under the Managed File Transfer folder.
Click the monitor you just created – MONITORTRIGGER. Review the attributes of the monitor, such as the agent, source, trigger events, and file pattern. You may need to scroll to the right to view all of the attributes. Alternatively you can double-click the MQ Explorer – Content tab to get a full-screen view. Double-click the tab again to return to normal view.
-
Right-click the monitor and select Properties.
-
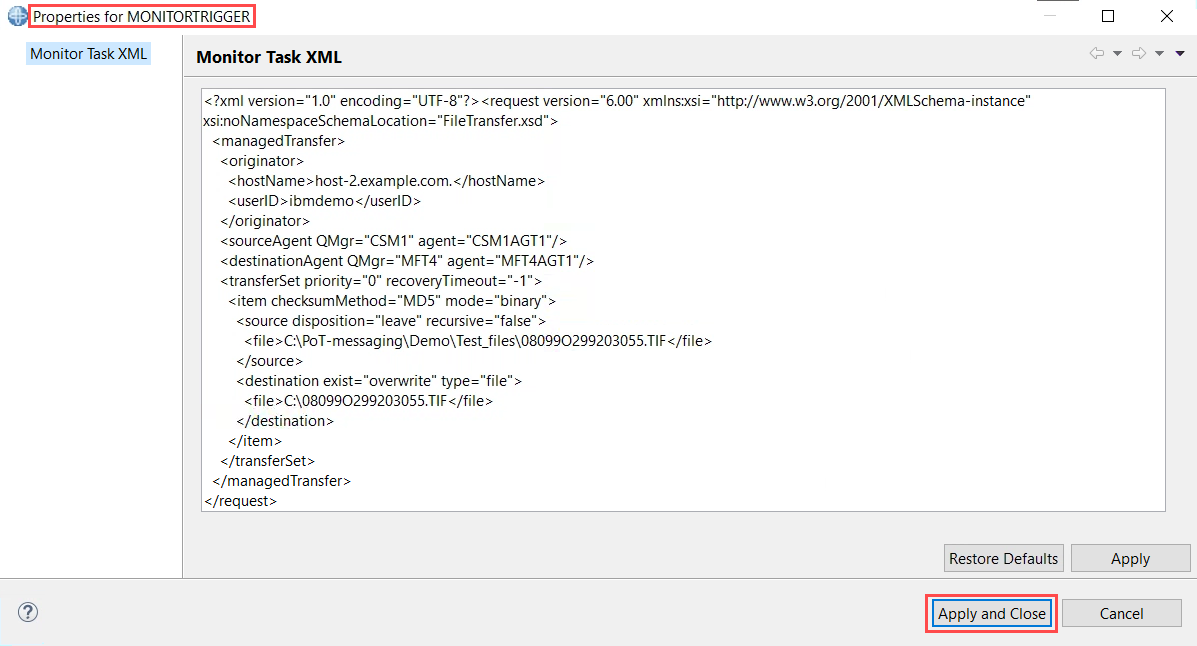
The properties view displays the Monitor Task XML file. Review the xml contents that are displayed. This will make up the file transfer request that will be triggered when the trigger file arrives on the monitored directory.
This is a very simple sample of moving a single file from one directory to another. The Monitor supports much more complex processing, such as pattern matching, and also the ability to run an ant script or an executable when a file arrives on a directory.
Click Apply and Close to close the XML window.
Test the monitor
-
Still on the MFT client machine, launch the Windows Explorer by clicking the icon on the taskbar.

-
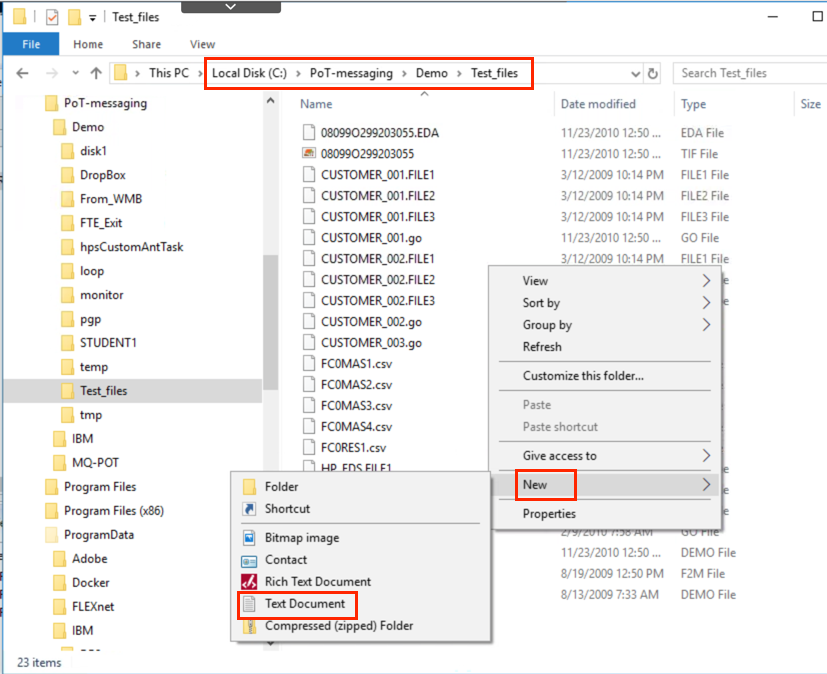
Navigate to C:\PoT-messaging\Demo\Test_files.
-
Right-click in an empty white space in the directory display.
-
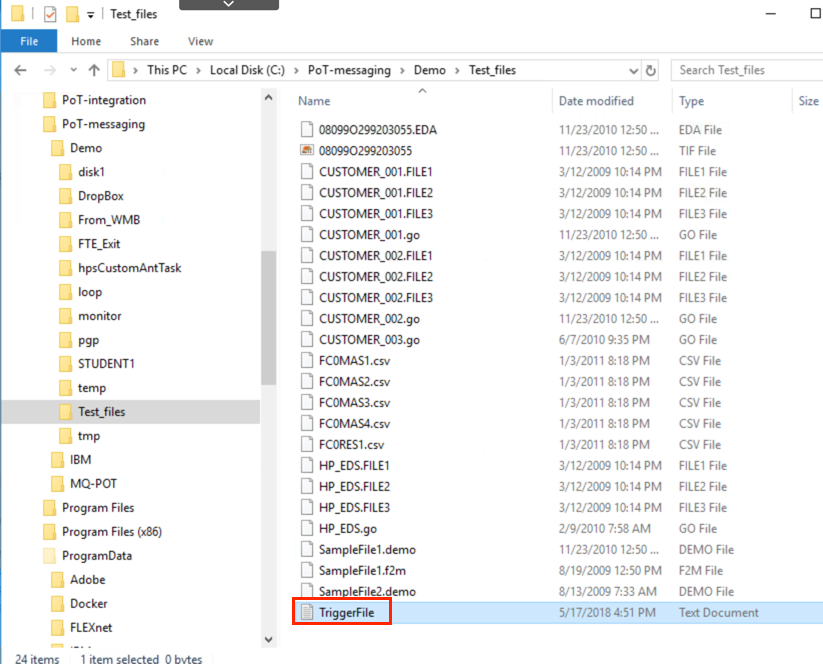
Select New > Text Document.
-
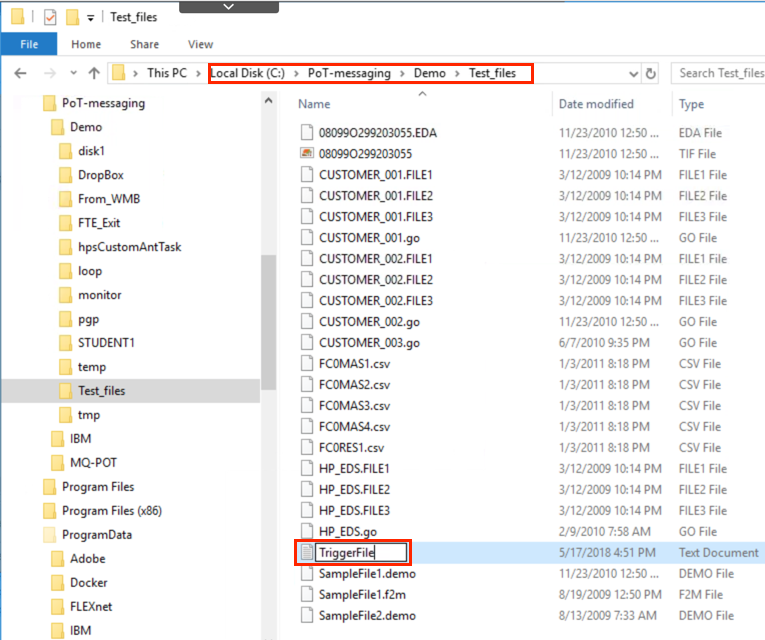
Over type “New Text Document” with “TriggerFile”.
-
Press the Enter key to complete the rename.
-
In a few seconds the monitor will detect the existence of the trigger file and submit the file transfer request.
-
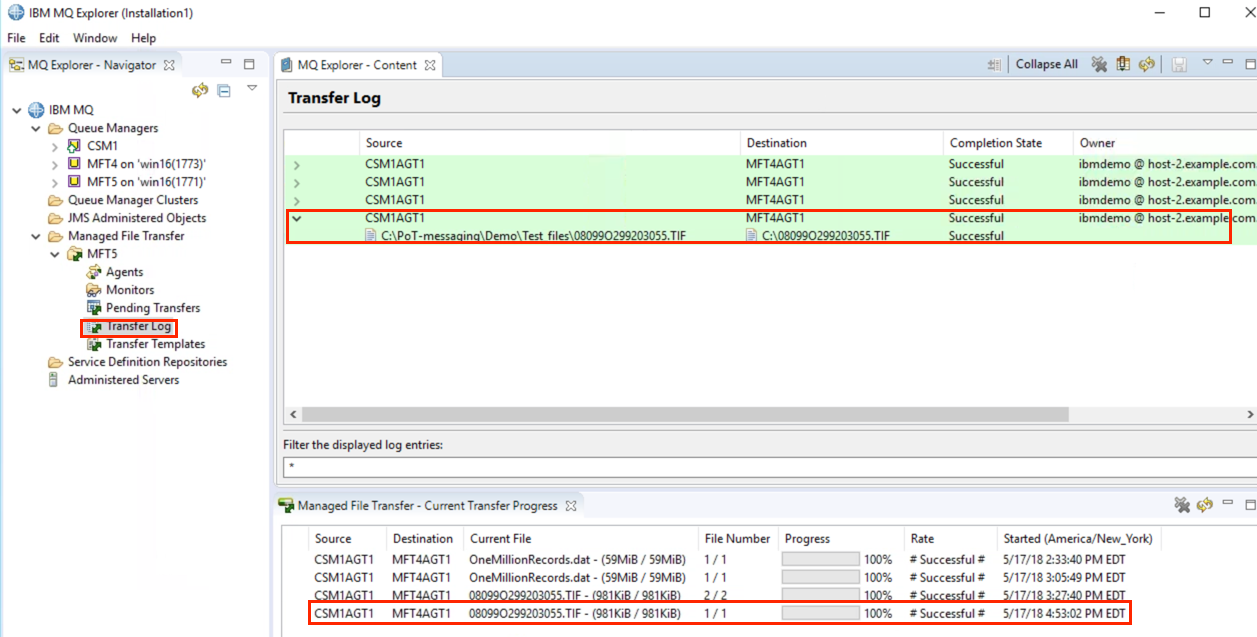
Switch to the IBM MQ Explorer and select the IBM MQ Managed File Transfer Transfer Log. You should see the results of the completed file transfer. Verify the file names and time and date.
Trigger specific file transfer based on event and using variable substitution
In this next exercise you will create a monitor that is very similar to the previous exercise, except that you will be using variable substitution in this exercise. This concept will be explained in more detail in the exercise. The monitor will detect the existence of a new file in the “C:\PoT-messaging\Demo\Test_files” directory that ends with “_toProcess.txt”. A file transfer request will be submitted to move this file from Windows 10 (MFT Client) to Windows 2016 Server (MFT Server).
-
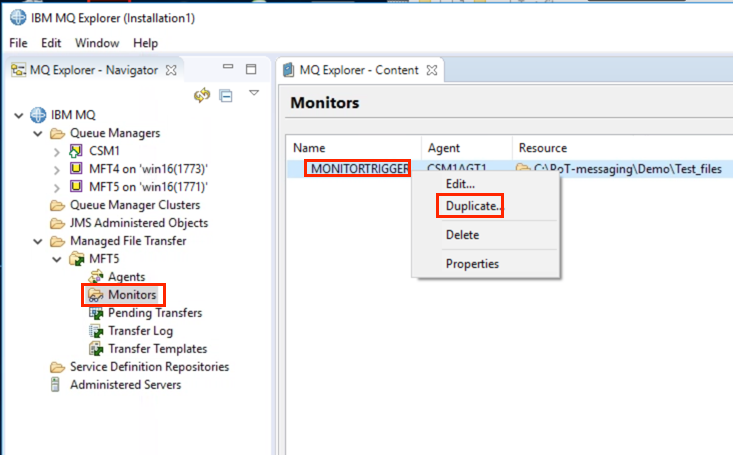
In MQ Explorer, click Monitors, then right-click the previously created monitor and select Duplicate.
-
Change the name of the monitor to MONITORPROCESS.
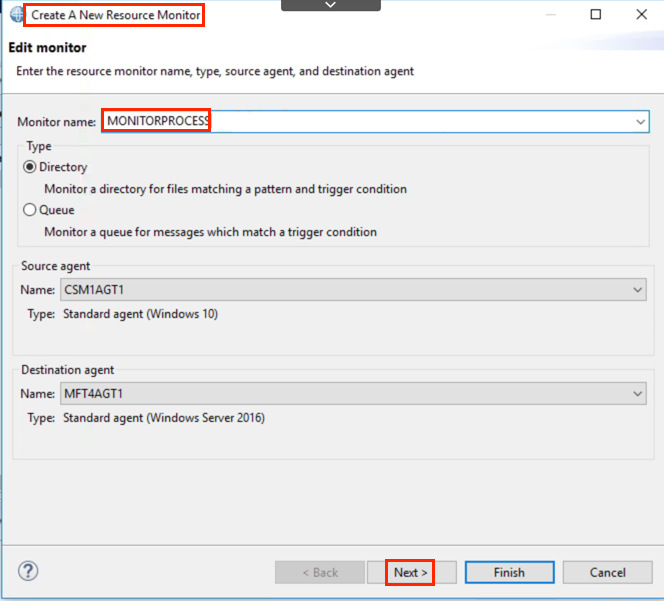
Click Next.
-
Change the Match pattern: to *_Process.txt.
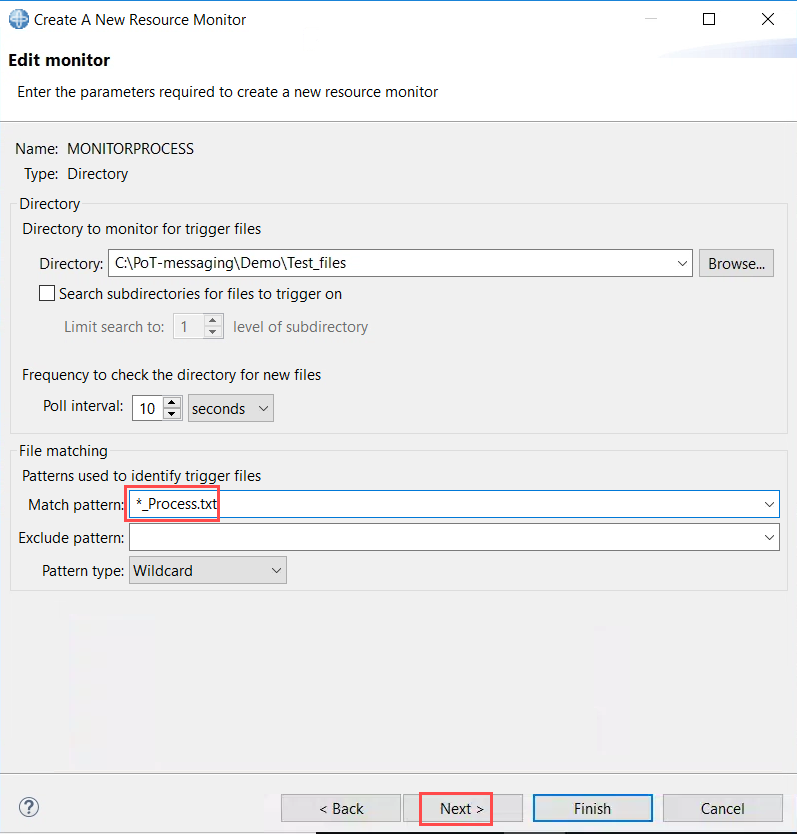
Click Next.
-
Do not change the Trigger condition. Click Next.
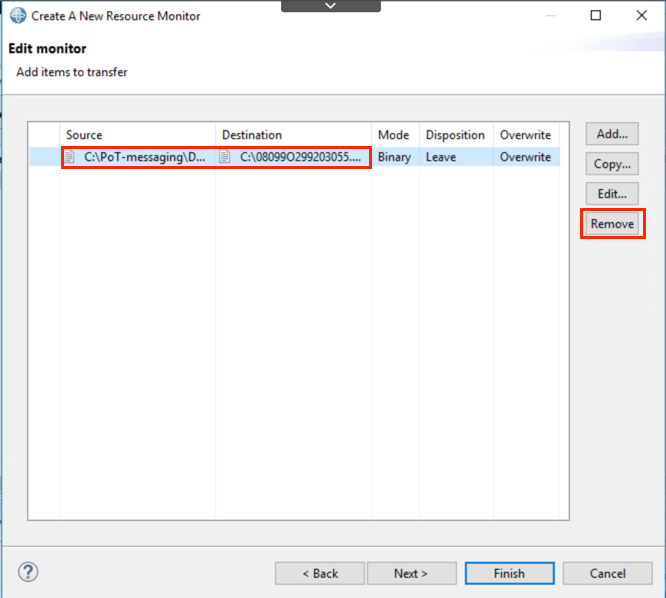
Select the item to transfer and click Remove.
-
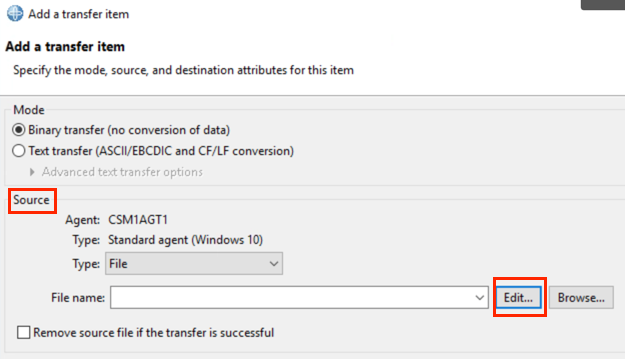
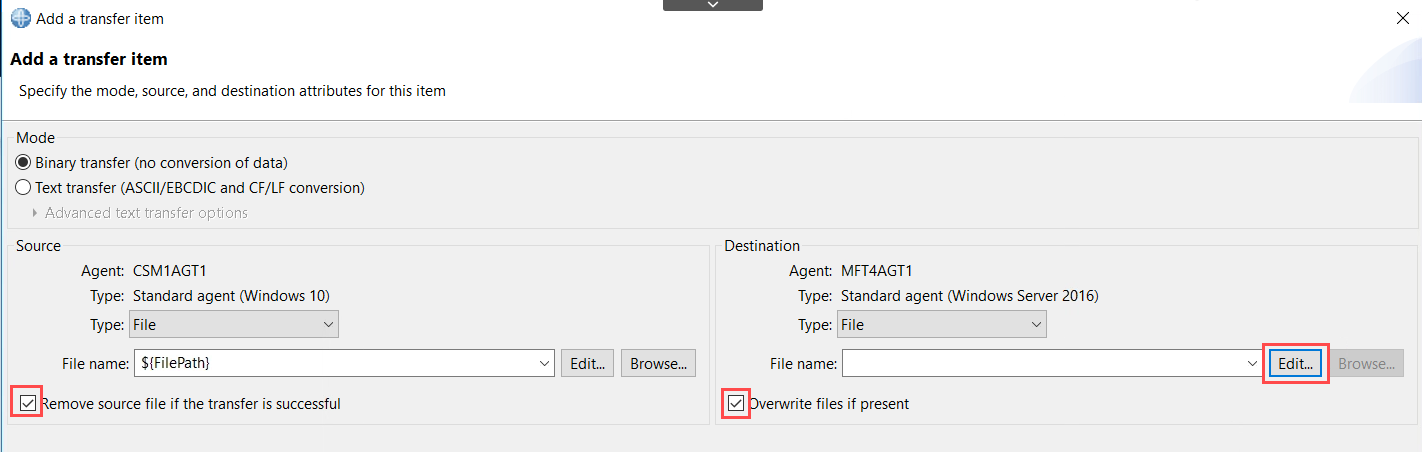
Click Add to add a new item to transfer.
On the Add a transfer item panel, under Source, click Edit.
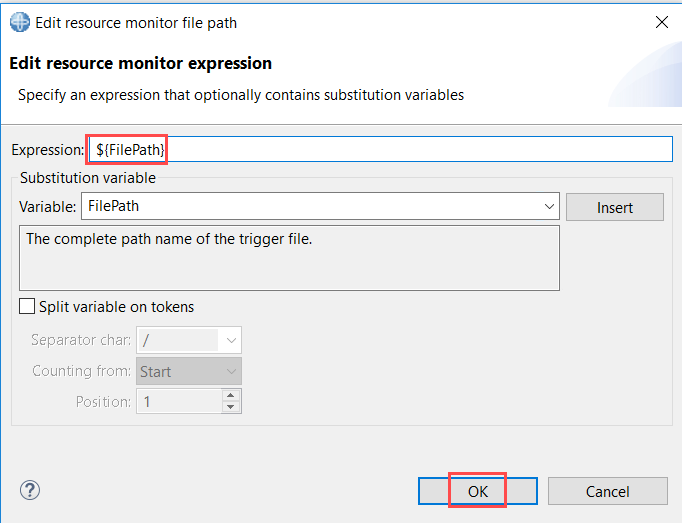
-
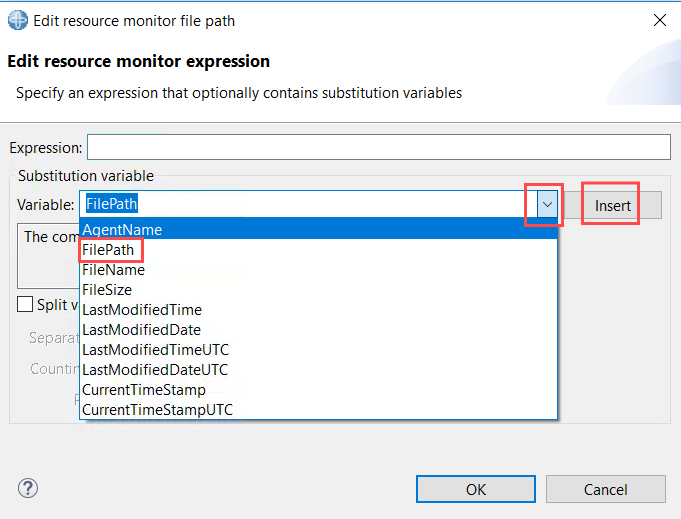
Click the pull-down for Variable and select FilePath.
-
Click Insert, then OK.
-
Check the box to Remove source file if the transfer is successful.
On the Destination side, select Edit.
-
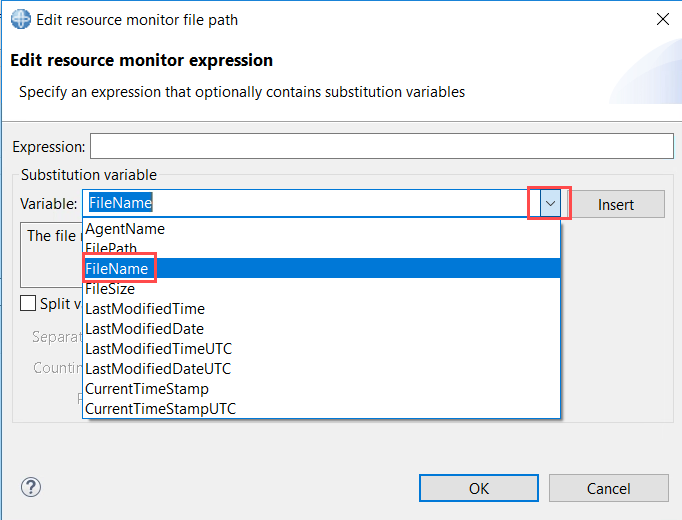
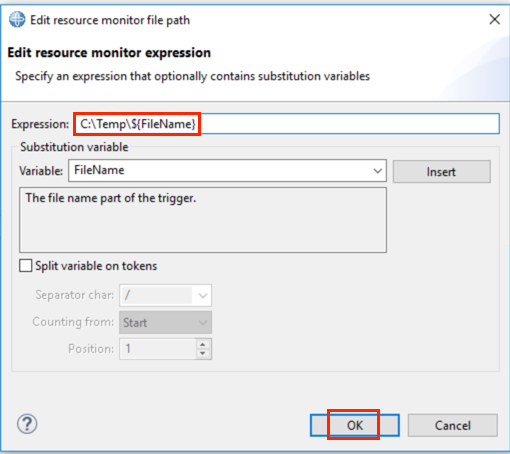
Click the pull-down for Variable and select FileName.
-
In the Expression field, type C:\Temp\ then click Insert.
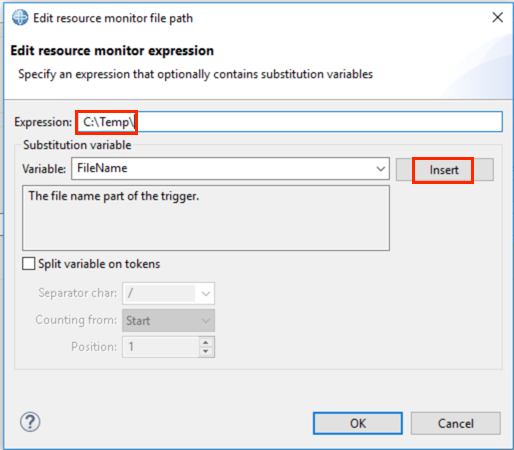
Click OK.
-
Check the box to Overwrite files if present.
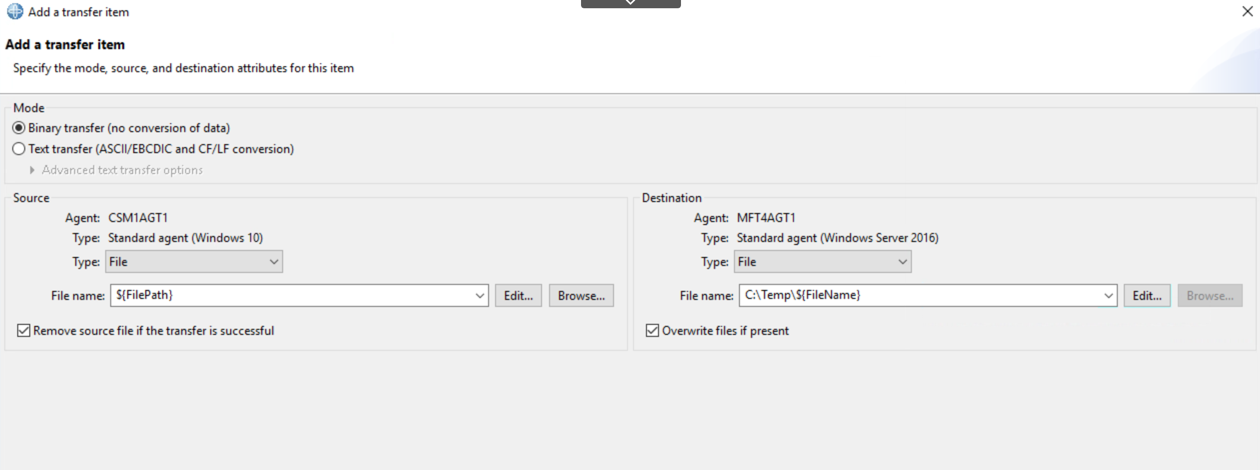
Click OK.
-
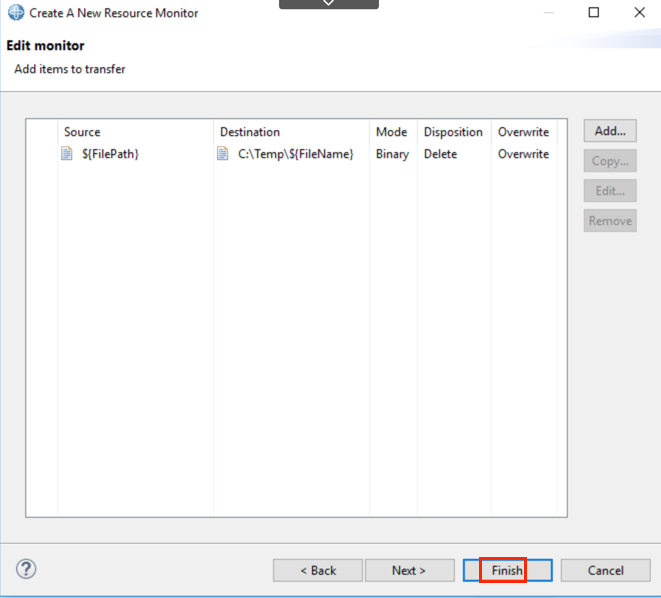
Click Finish to create the monitor.
-
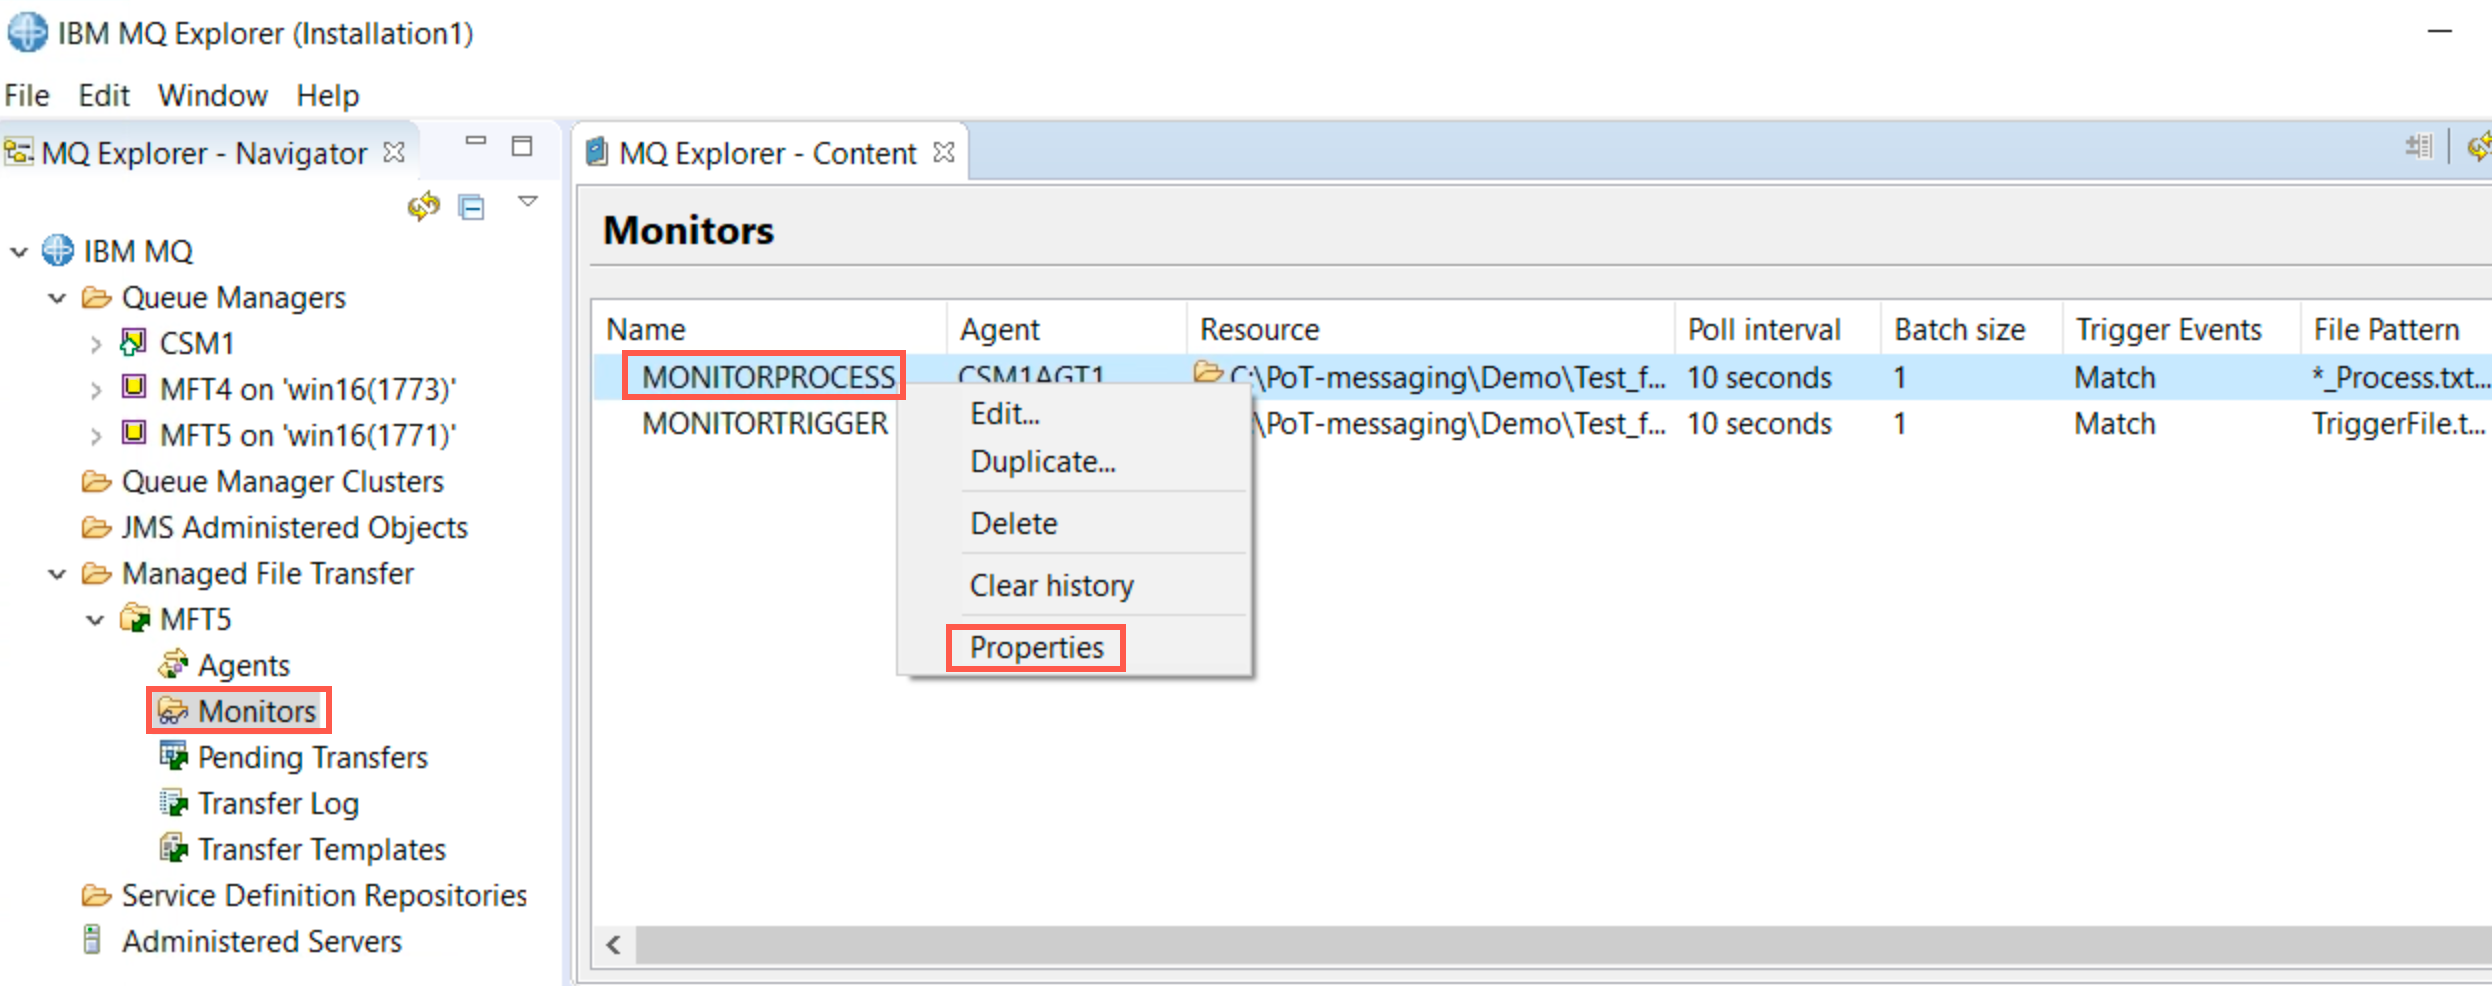
Select the newly created monitor. Right-click and select properties.
-
This is the XML instance that describes to the monitor what it is supposed to do when a file is deposited in the monitored directory. This file is called a “Task Definition File” and is created either manually, or by using the fteCreateTransfer command.
The sourceAgent and destinationAgent tags should be familiar to you by now. The <file> tags below contain variables that are automatically created and updated by the IBM MQ Managed File Transfer Agent at runtime.
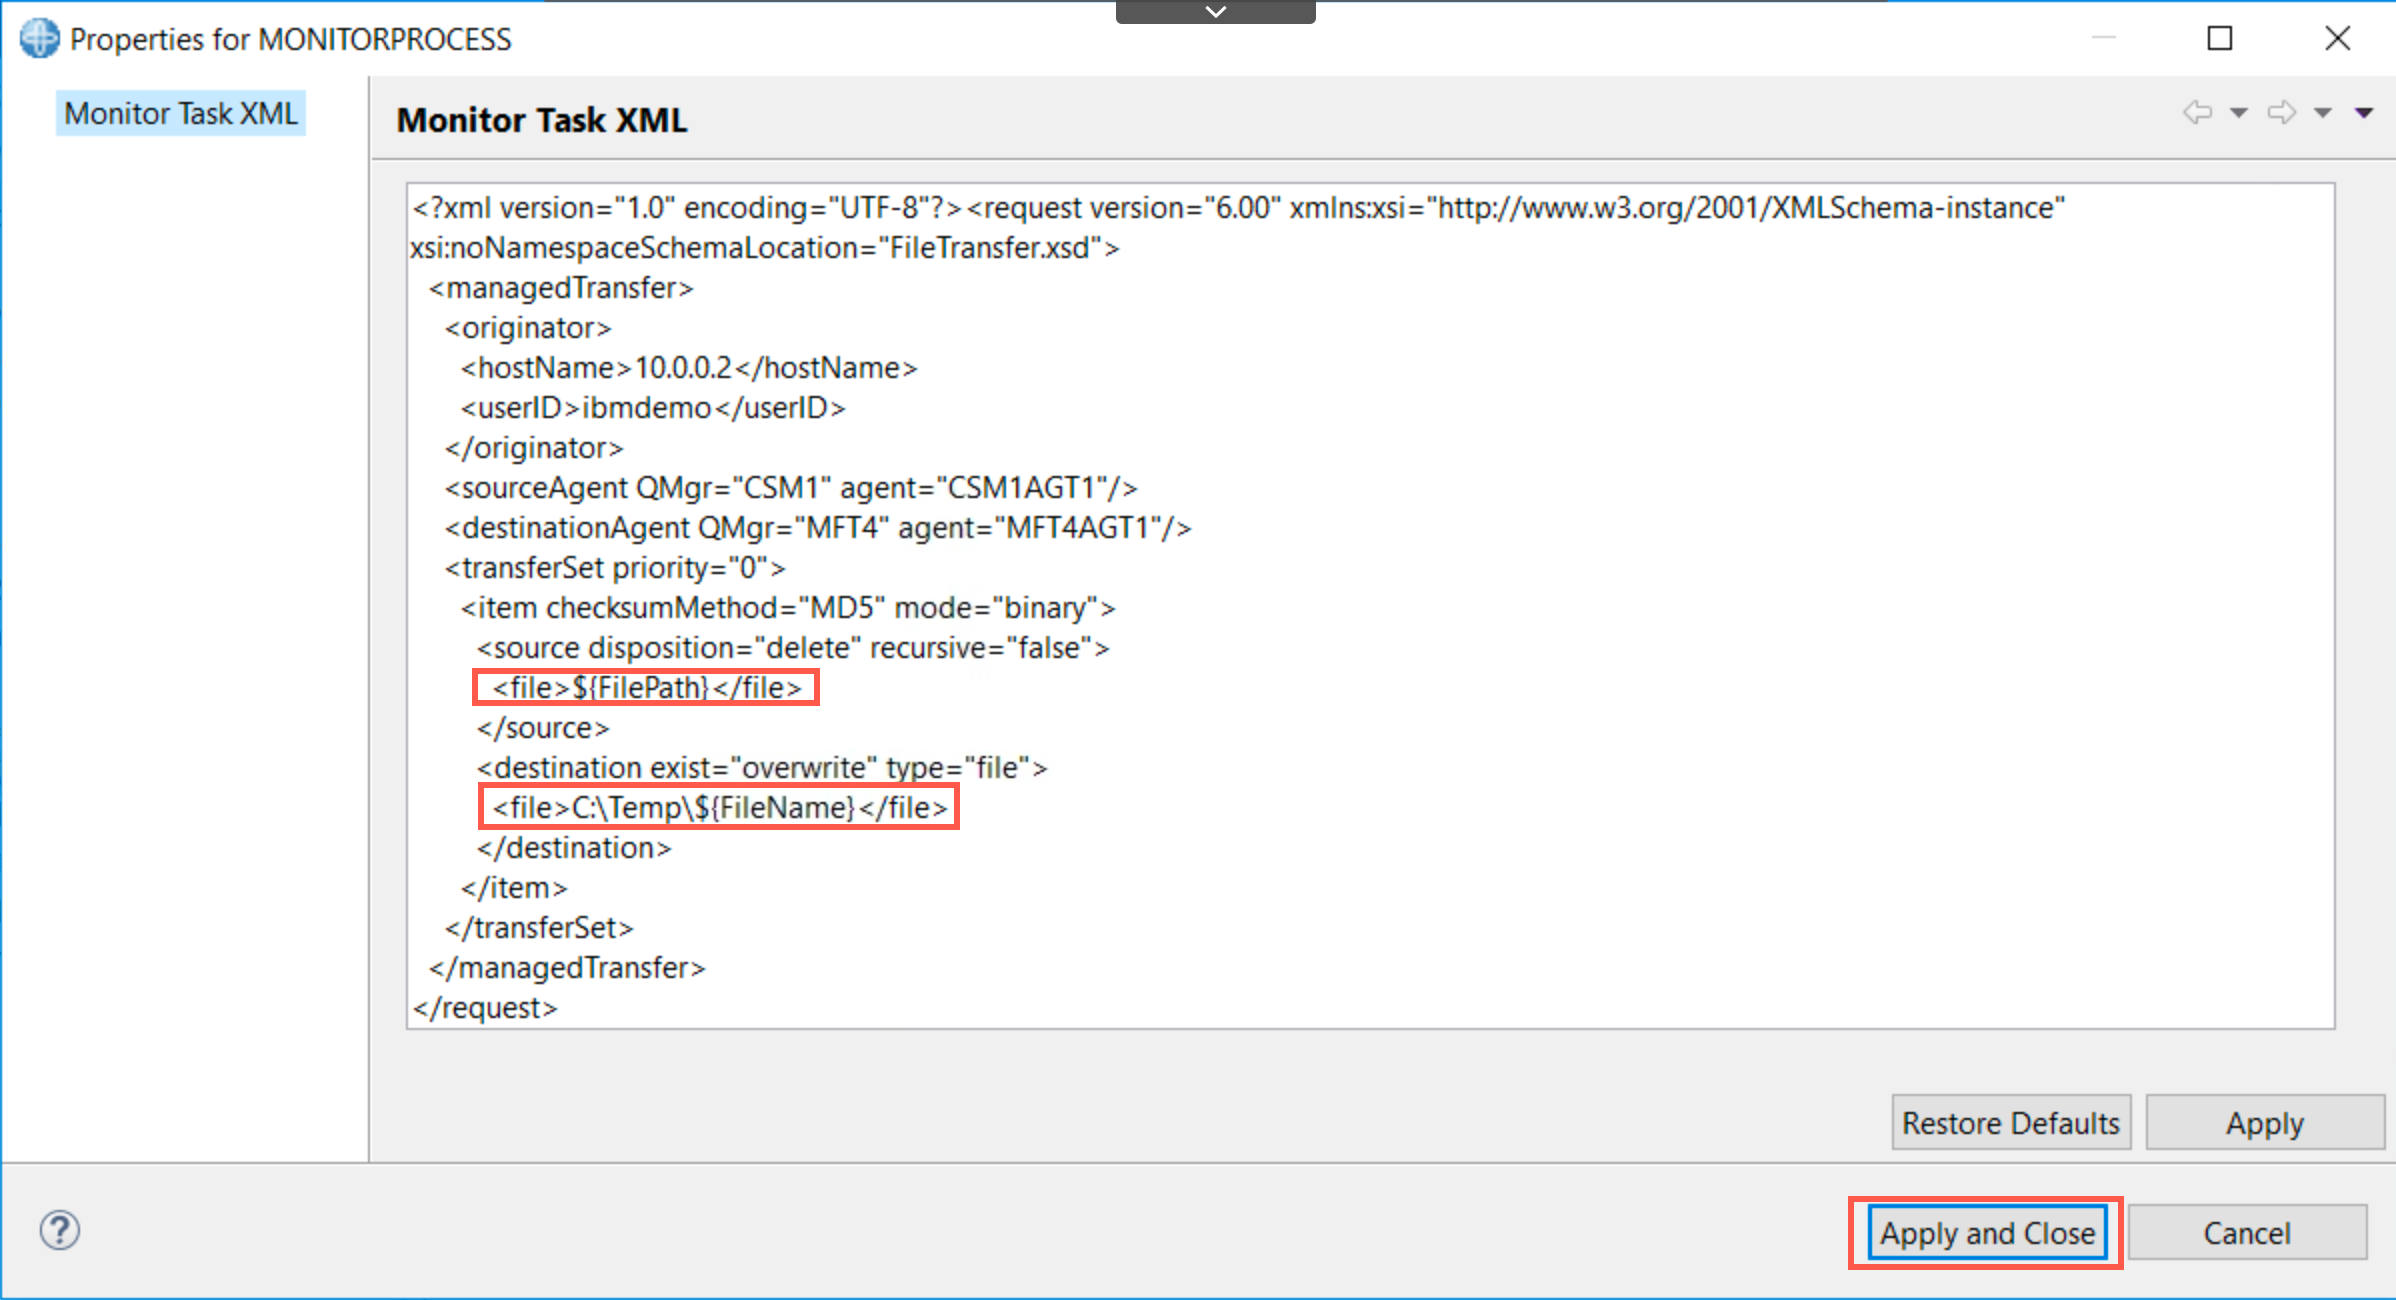
The following table describes some of the variables that are available:
This is a handy feature, as you can use this XML transfer file as a template for other directory monitor instances.
Click Apply and Close to dismiss the XML.
-
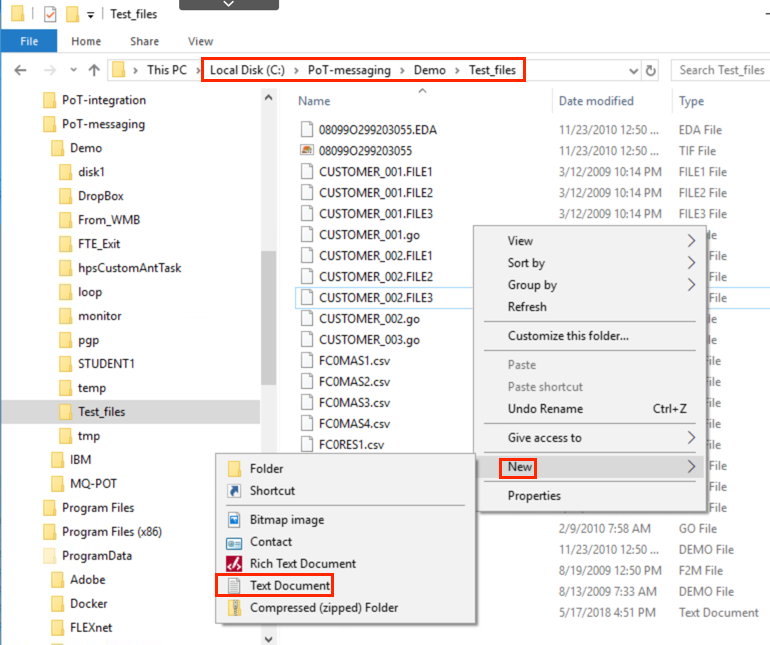
To test the monitor, navigate to C:\PoT-messaging\Demo\Test_files in Windows Explorer.
-
Right-click in the empty white space area and select New > Text Document.
-
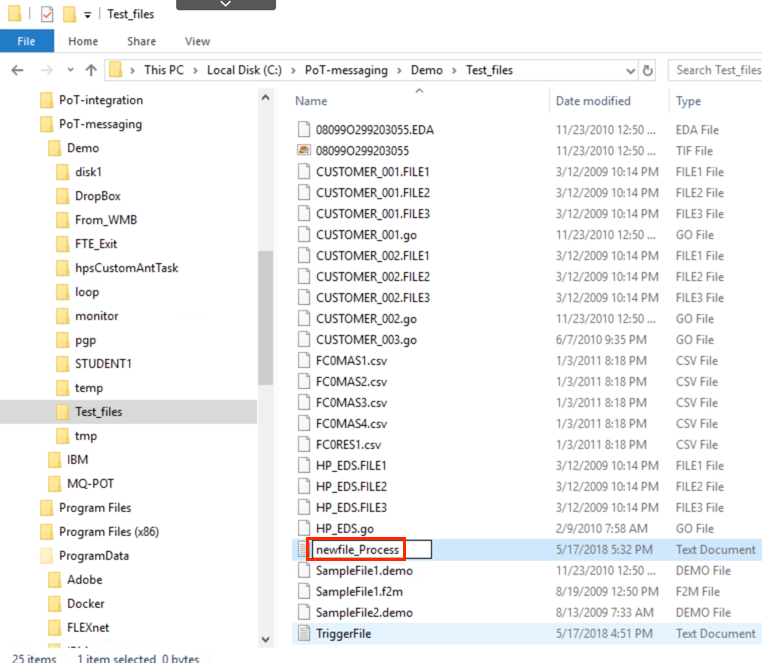
Over type “New Text Document” with “newfile_Process”.
-
Press the Enter key to complete the rename.
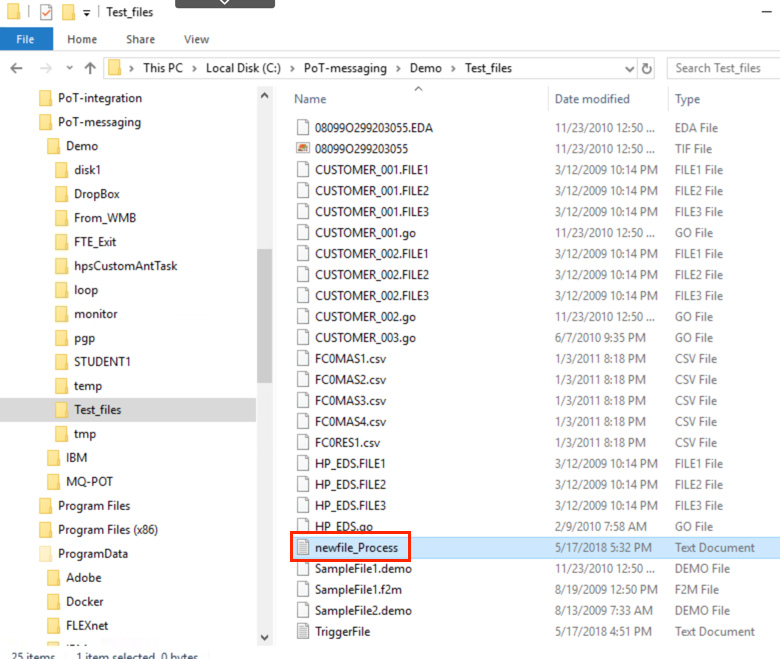
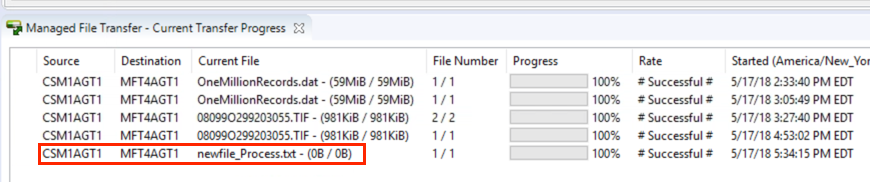
As soon as you press the enter key, you should see the transfer under the Managed File Transfer - Current Transfer Progress tab.
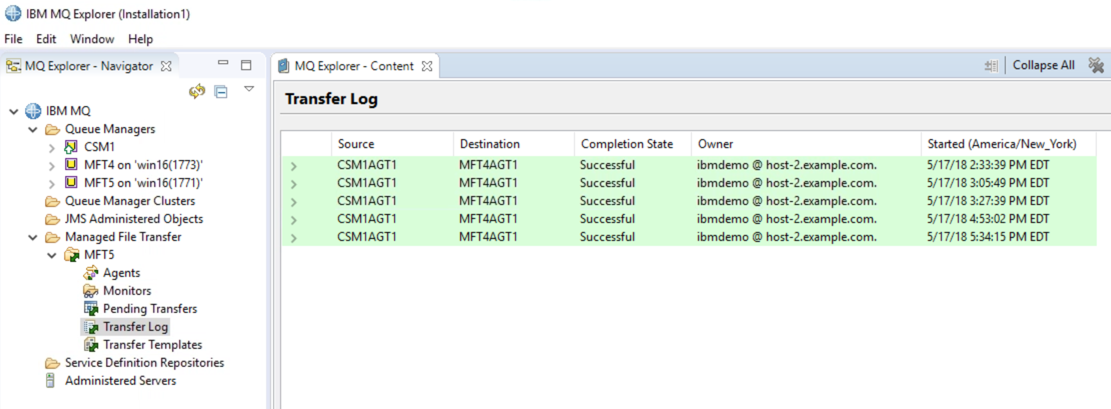
You should also see a successful transfer in the Transfer Log.
-
Switch to the MFT server machine and start the Windows Explorer.
-
Navigate to C:\Temp where you will find the file newfile_Process.txt.
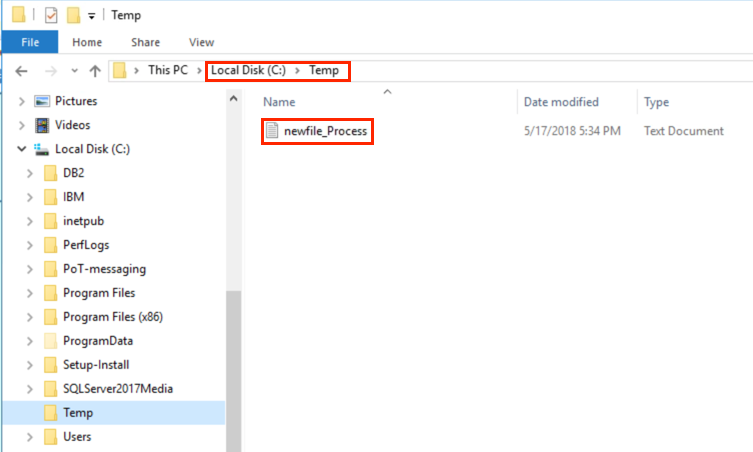
This is the expected result. When the monitor recognized the file pattern *_Process.txt in directory C:\Demo\Test_Files, it initiated the transfer request for the agent CSM1AGT1 on the MFT client machine to send the file to agent MFT4AGT1 on the MFT server machine and store it in the directory C:\Temp. This is exactly what we expected the monitor to do.
This concludes Lab 2. You may now continue with Lab 3.