Creating MQTT Applications
Developing a simple MQTT application in Java
This section will demonstrate the basics of writing an MQTT application using the MQTT version 3 Java client. This is the “classic” version of the MQTT protocol, as previously supplied with WebSphere Message Broker (WMB) and IBM Integration Bus (IIB), now IBM App Connect Enterprise (ACE). Those familiar with other messaging APIs such as the Java Messaging Service (JMS) will notice that the MQTT syntax has been simplified to accommodate the demands of the typical MQTT environment. In summary, the primary characteristics of the MQTT version 3 protocol are:
-
Publish and subscribe only
-
Asynchronous delivery of messages i.e. applications receive messages via callbacks in a listener pattern
-
Raw byte array payload only, equivalent to a JMS Bytes message
-
No application headers
-
Durability on a per client basis
- i.e. a client’s subscriptions are either all durable or all non-durable, unlike JMS that allows subscriptions to be durable on a per-subscription basis.
Writing a MQTT publishing application
For our scenario, we will write and run a Java application in the Eclipse tooling environment to simulate the serial adapter component shown in the earlier diagram. In a real situation, this component would be mapping primitive serial communications with sensors onto MQTT messages, and sending them back to the broker in the head office.
-
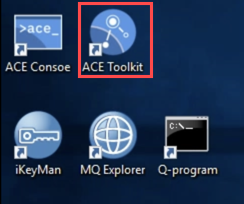
We will use the Java perspective in the IBM App Connect Enterprise Toolkit to develop the Java application. Open Eclipse using the icon on the Windows desktop.
-
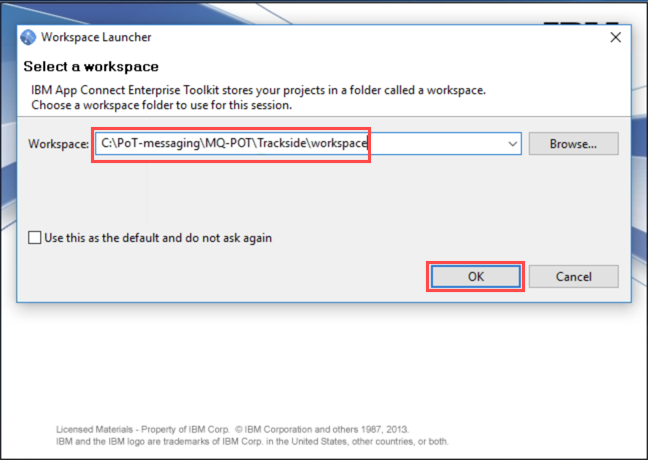
You will now see the Workspace Launcher dialog box. Change the Workspace to C:\PoT-messaging\MQ-POT\TrackSide\workspace.
-
Click OK to accept the workspace setting.
-
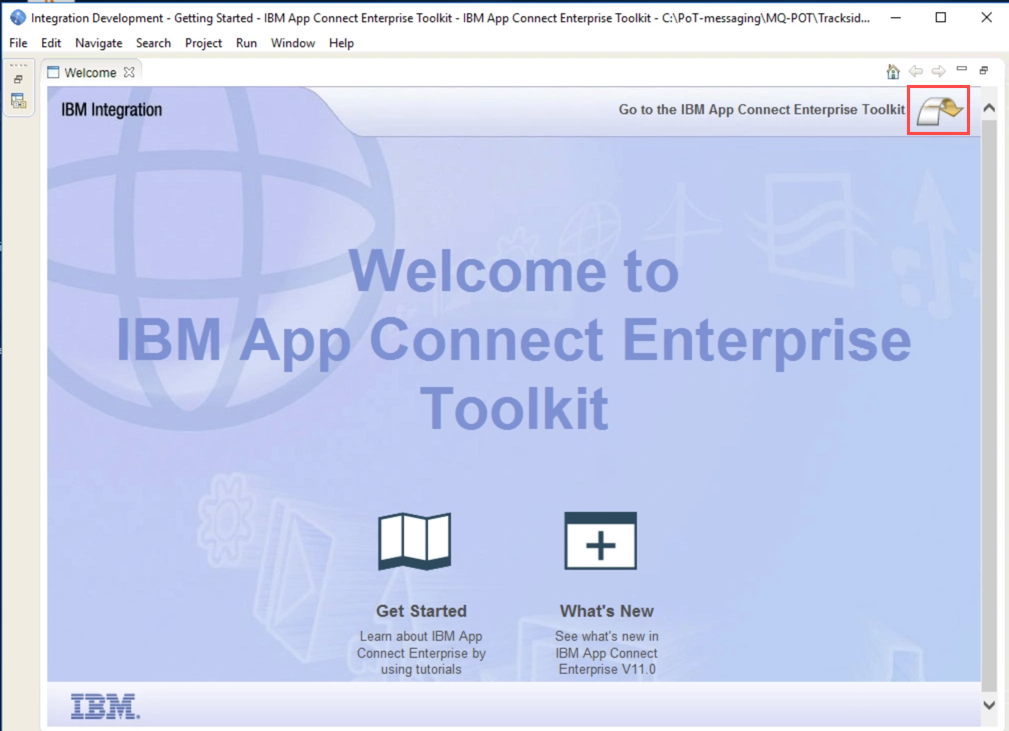
Click the arrow in the top right corner to leave the Welcome Window.
-
Click the Change perspective icon and select Java. Click OK.
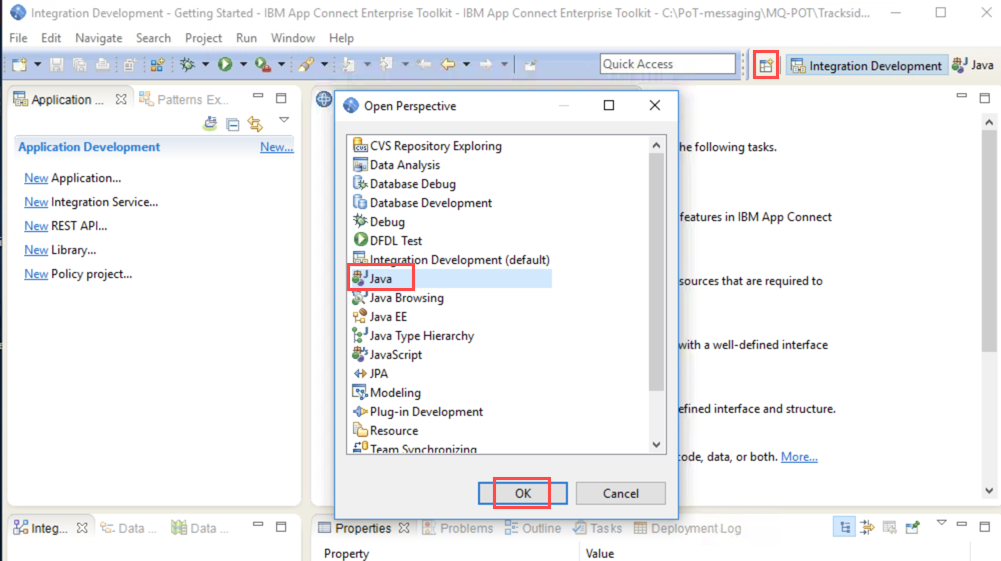
Eclipse will now be open with the Java perspective visible.
-
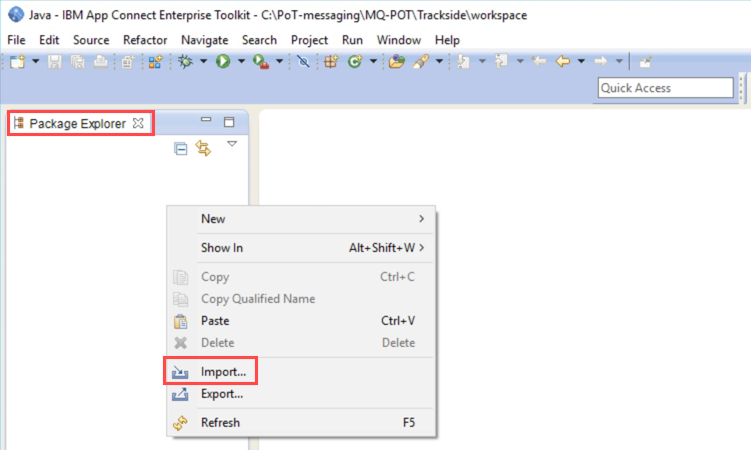
Right-click the white space in the Package Explorer and select Import.
-
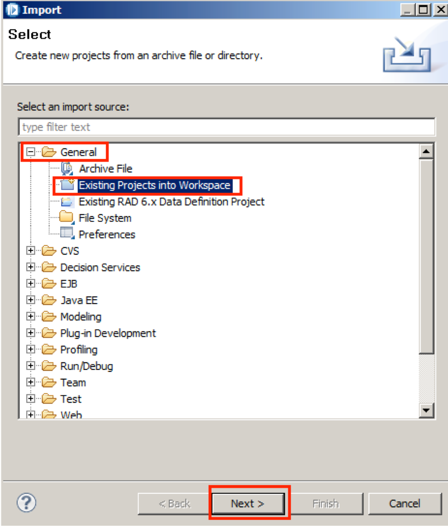
Expand General and select Existing Projects in Workspace.
-
Click Next.
-
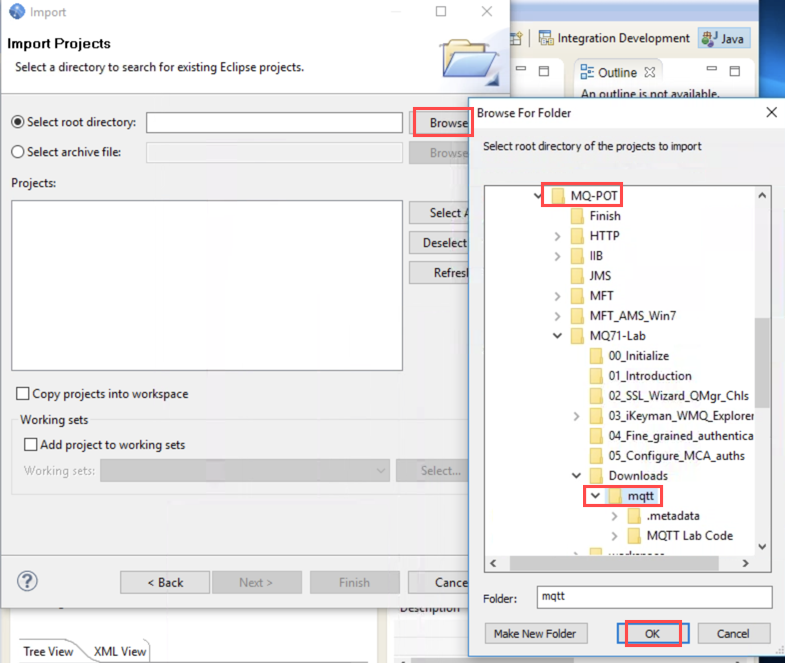
Click browse and navigate to C:\PoT-messaging\MQ-POT\MQ71-Lab\Downloads\mqtt.
-
Click OK.
-
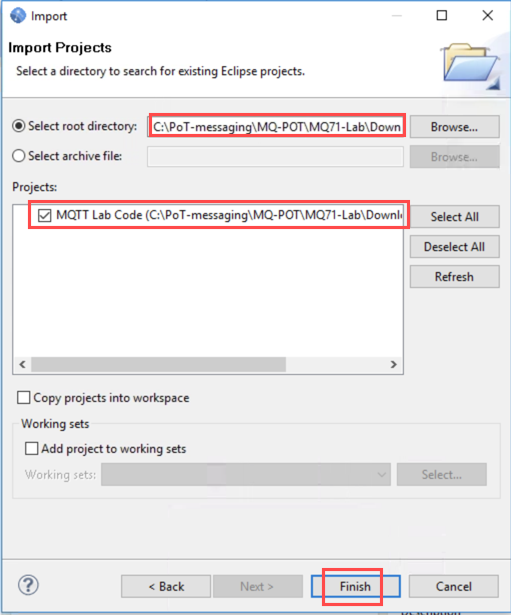
Click Finish on the Import Projects window.
-
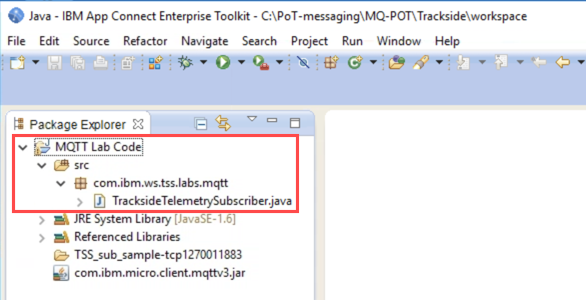
Using the Package Explorer on the left hand side, navigate using the tree to the com.ibm.ws.tss.labs.mqtt package inside the MQTT Lab Code folder.
-
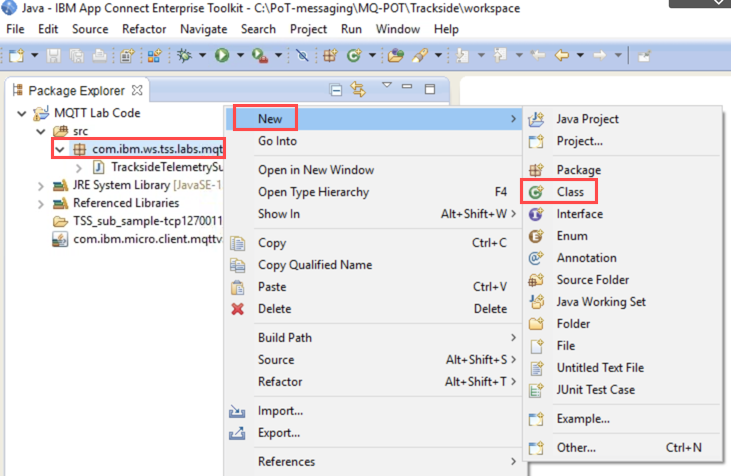
We are now going to create a very simple Java application that publishes a message using the MQTT client when it is run. Create a new Java class by right-clicking the com.ibm.ws.tss.labs.mqtt package on the Package Explorer and selecting New > Class from the menu.
-
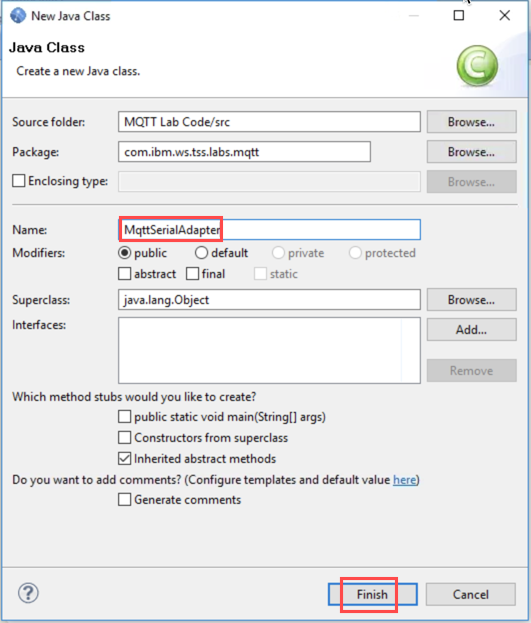
On the New Java Class dialog, set the Name field to MqttSerialAdapter and click the Finish button.
-
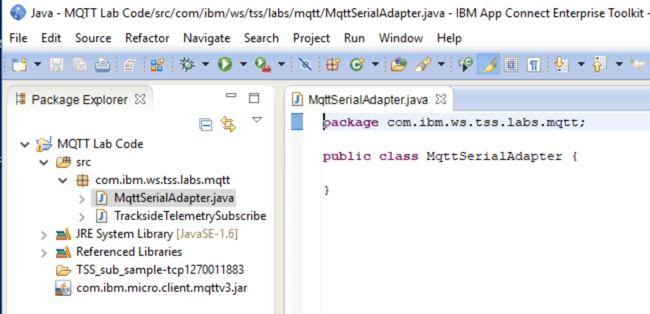
The empty class appears in the Java editor and on the Package Explorer on the left.
-
For the purposes of illustration, we will simply put our logic in a main method, such that it will be invoked when the application is run. Create the empty main method as follows:
public static void main (String[] args) { }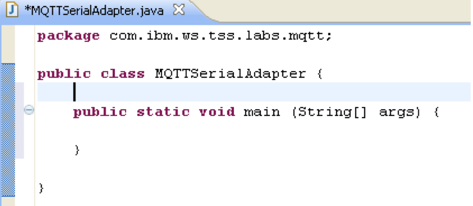 Note:
Note:
If you do not wish to type this, you may use the copy button here for easy copy-and-paste. -
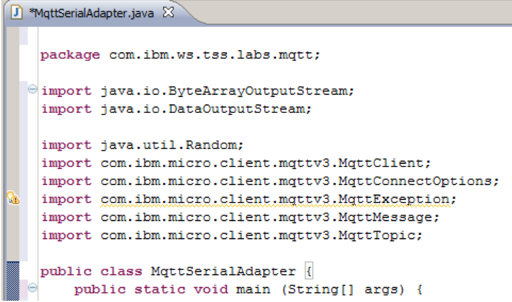
Add the following import statements to the Java class under the package declaration shown above.
import java.io.ByteArrayOutputStream; import java.io.DataOutputStream; import java.util.Random; import com.ibm.micro.client.mqttv3.MqttClient; import com.ibm.micro.client.mqttv3.MqttConnectOptions; import com.ibm.micro.client.mqttv3.MqttMessage; import com.ibm.micro.client.mqttv3.MqttTopic; -
The top of the class should now look like this (initially some warnings will be shown as we are not yet using the imported classes):
-
Within the application the first thing to do is connect to the MQTT endpoint, in this case the Telemetry channel on port 1883 at localhost. Add the lines shown below (including the try/catch block) to the main method created previously to complete the first step which is the creation of an MqttClient object.
try {
      MqttClient mqttClient = new MqttClient("tcp://localhost:1883", "tracksideTelemetry");

} catch (Exception ex) {
    ex.printStackTrace();
    }
Notice that the two parameters in the constructor are a URI string and a client identifier. The URI string in this case defines a TCP-based connection to the local WMQ installation.
-
To complete the connection, we need to specify additional characteristics for the connection. This is done using an MqttConnectOptions object.
Add the following lines to the main method after the construction of the MqttClient instance to complete the connection.
MqttConnectOptions connectOptions = new MqttConnectOptions();
connectOptions.setCleanSession(true);
mqttClient.connect(connectOptions);
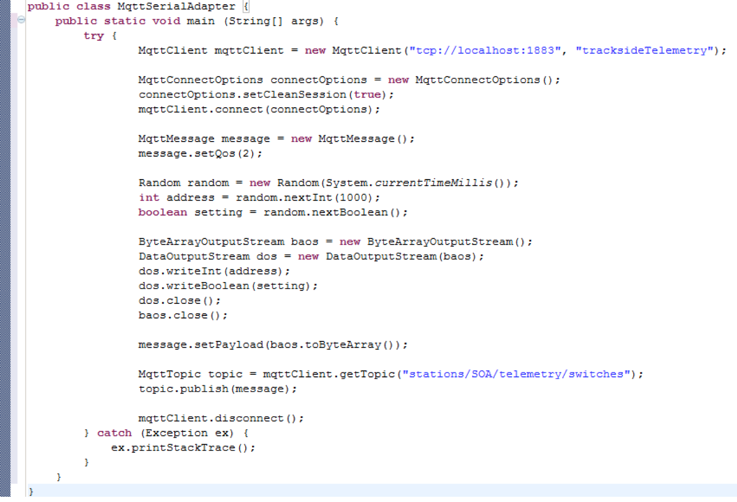
The main method should now look as follows:

A number of characteristics are available. In this case we are specifying that all state related to our client session will be cleaned up when we disconnect (CleanSession). This means that any subscriptions we create will be non-durable. If the clean session flag had been set to false, any subscriptions created by our client would have remained in place – any messages received whilst we were disconnected would then be delivered on our return.
-
An MQTT message is described using an MqttMessage object that specifies the various properties associated with a given MQTT message. Add the following lines immediately after the connect call we added previously.
MqttMessage message = new MqttMessage();
message.setQos(2);
Note that the setQos method indicates the Quality of Service (QoS) to be used for sending the message. MQTT defines three qualities of service:
-
QoS 0 – the lowest quality of service which consumes fewest resources but may cause messages to be lost in the event of a system crash. Messages are not persisted by the server and delivered at most once. QoS 0 is similar to JMS non-persistent.
-
QoS 1 – uses more system resources than QoS 0 as messages are persisted by the server to assure delivery but messages may be repeated.
-
QoS 2 – the highest quality of service that consumes most resources but assures delivery once and once only. QoS 2 is similar to JMS persistent.
We have specified QoS 2 as we want to assure the delivery of the message.
-
-
The data we will send consists of an integer address and a boolean flag indicating the setting of a given switch at the track side. We will use a random generator to generate a variety of addresses and settings. Add the following three lines after setting the QoS of the message object.
Random random = new Random(System.currentTimeMillis()); int address = random.nextInt(1000); boolean setting = random.nextBoolean(); -
To specify the payload for the message we need to encode our data into a byte array for transmission via MQTT. Whilst specific applications may define their own encode/decode schemes for typed data, we shall use the in-built Java encoding schemes provided by the DataOutputStream class. Now add the following lines to encode the values into a byte array:
ByteArrayOutputStream baos = new ByteArrayOutputStream();
DataOutputStream dos = new DataOutputStream(baos);
dos.writeInt(address);
dos.writeBoolean(setting);
dos.close();
baos.close();
Notice that you may now see an error about an unhandled IOException (if you previously were catching just the MqttException). If so, simply change the code to catch a generic Exception which will handle both.
-
Using the underlying byte array of the ByteArrayOutputStream, we can now set the payload of the MqttMessage object. Add the following line to complete this step:
message.setPayload(baos.toByteArray()); -
Finally, the message can be sent to the chosen topic in IBM MQ. To do this, we use the MqttClient object to create an MqttTopic class for the topic we would like to send the message to and then invoke its publish method with our MqttMessage object. Add the following lines to do this:
MqttTopic topic = mqttClient.getTopic("stations/SOA/telemetry/switches"); topic.publish(message); -
Disconnect from the Telemetry channel by adding the following line:
mqttClient.disconnect();The main method should now look as follows:
-
Enter Ctrl-S to save the the class.
-
The publishing client application is now ready for testing.
Testing using a MQTT subscriber application
For testing the publishing client application, a subscribing application has been provided in the same Eclipse project. The application simply subscribes to the stations/*/telemetry/switches topic tree, decodes any messages received, and writes the results out to the console. Note that whilst we have split publisher from subscriber for this example, a single Java class can of course be both a publisher and a subscriber.
This section will first examine the subscribing application, then use the Eclipse environment to test the two applications in tandem.
-
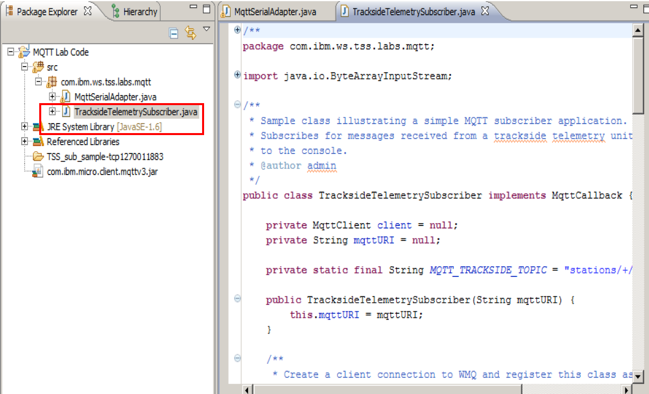
Using the Package Explorer in Eclipse, navigate to the com.ibm.ws.tss.labs.mqtt package in the MQTT Lab Code project used previously and double-click the TracksideTelemetrySubscriber.java class. The class should open in the editor area of Eclipse.
-
Within the editor, examine the Java type declaration.
public class TracksideTelemetrySubscriber implements MqttCallbackYou will see that the type implements the MqttCallback interface. It is by implementing this interface that client applications can listen for important MQTT-related events from the client, such as a new message arriving, or the connection being lost.
-
Navigate to the start method in the class. Just as with the publishing application, you will see an MqttClient object being created to connect the subscribing application to IBM MQ.
client = new MqttClient(mqttURI, "TSS_sub_sample");
client.setCallback(this);
client.connect();
client.subscribe(MQTT_TRACKSIDE_TOPIC, 2);
Notice that the class is registered as the callback for MQTT-related notifications.
You will notice also that as well as a topic string (supplied here using a constant), the subscribe method also takes a second operand which is the maximum QoS supported by the client. In particularly constrained environments, certain clients may be so restricted in terms of their capabilities that they can only handle the most basic QoS protocol, and therefore require the server to send it messages at lower QoS than published. This means that whilst a message may be sent QoS 2 to IBM MQ, it will be delivered only at the maximum QoS supported by the subscriber, which might be 0.
The following table indicates the QoS that messages will arrive with, based on the publisher and subscriber QoS settings:
Publisher QoS Subscriber QoS Subscriber message delivery QoS 0 0 0 1 0 0 2 0 0 0 1 0 1 1 1 2 1 1 0 2 0 1 2 1 2 2 2 -
Now navigate to the connectionLost method.
public void connectionLost(Throwable arg0) {
    System.err.println(
    "The connection to IBM MQ was lost. Closing down the connection.");
}
This method allows applications to specify what to do in the event that the connection to the server is lost. Note that in general traditional messaging client APIs do not provide this capability since the network is considered to be reliable in enterprise scenarios. In our scenario we are not expecting the connection to drop but if it does, we will put a message onto the console.
-
Scroll down to the messageArrived method. This method is the core of the class since it handles the receipt of messages from our subscription. In this case we simply take the message, decode its payload using a DataInputStream and write the decoded switch state to the console.
You will notice that just as with the publishing of a message, a corresponding MqttMessage instance wraps the received message for the subscriber too.
-
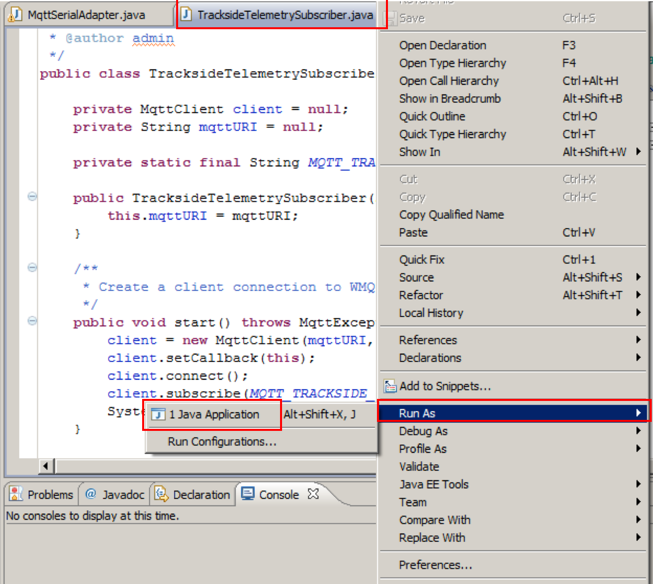
We will now test the two applications working together. Start the subscriber application first by right-clicking the editor area and selecting Run As > Java Application from the context menu.
-
Verify the application is running by checking the Console view on the Eclipse workbench. It should look as follows:

-
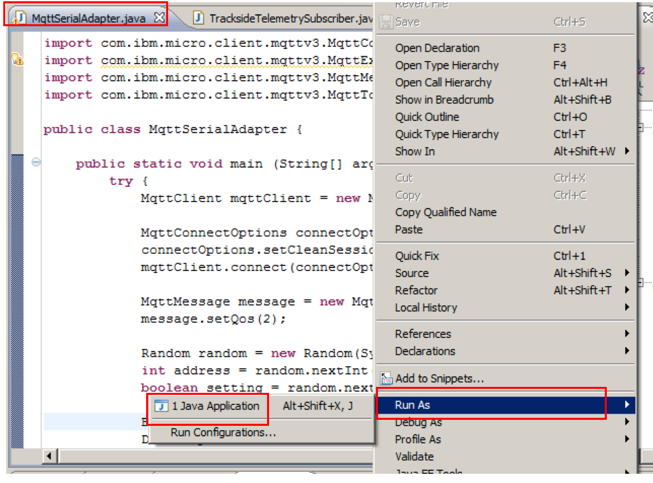
Now run the publishing application by right-clicking the MqttSerialAdapter.java class in the Package Explorer and selecting Run As > Java Application.
-
You should see the Console view refresh and then return with additional console output similar to the following:

The message has been received from the publisher and decoded by the subscriber. In the above example, switch numbered 38 has been set to its OFF setting.
If you receive the message “The connection to IBM MQ was lost. Closing down the connection.”, simply restart the TracksideTelemetrySubscriber.java class again. Then repeat the test.
-
This section is now complete as we have successfully shown the publisher and subscriber communicating with each other.
CONGRATULATIONS!
You have completed this hands-on lab.