Lab 5 - NativeHA: Deploying a Cloud Native HA persistent IBM MQ Queue Manager on the Cloud Pak for Integration
These instructions will document the process to deploy a NativeHA highly available (HA) persistent IBM MQ on the Cloud Pak for Integration (CP4I) 2021.1.1.
A Native HA configuration provides a highly available queue manager where the recoverable MQ data (for example, the messages) are replicated across multiple sets of storage, preventing loss from storage failures. The queue manager consists of multiple running instances, one is the leader, the others are ready to quickly take over in the event of a failure, maximizing access to the queue manager and its messages.
A Native HA configuration consists of three Kubernetes pods, each with an instance of the queue manager. One instance is the active queue manager, processing messages and writing to its recovery log. Whenever the recovery log is written, the active queue manager sends the data to the other two instances, known as replicas. Each replica writes to its own recovery log, acknowledges the data, and then updates its own queue data from the replicated recovery log. If the pod running the active queue manager fails, one of the replica instances of the queue manager takes over the active role and has current data to operate with.
A Kubernetes Service is used to route TCP/IP client connections to the current active instance, which is identified as being the only pod which is ready for network traffic. This happens without the need for the client application to be aware of the different instances.
Three pods are used to greatly reduce the possibility of a split-brain situation arising. In a two-pod high availability system split-brain could occur when the connectivity between the two pods breaks. With no connectivity, both pods could run the queue manager at the same time, accumulating different data. When connection is restored, there would be two different versions of the data (a ‘split-brain’), and manual intervention is required to decide which data set to keep, and which to discard. Native HA uses a three pod system with quorum to avoid the split-brain situation. Pods that can communicate with at least one of the other pods form a quorum. A queue manager can only become the active instance on a pod that has quorum. The queue manager cannot become active on a pod that is not connected to at least one other pod, so there can never be two active instances at the same time:
-
If a single pod fails, the queue manager on one of the other two pods can take over. If two pods fail, the queue manager cannot become the active instance on the remaining pod because the pod does not have quorum (the remaining pod cannot tell whether the other two pods have failed, or they are still running and it has lost connectivity).
-
If a single pod loses connectivity, the queue manager cannot become active on this pod because the pod does not have quorum. The queue manager on one of the remaining two pods can take over, which do have quorum. If all pods lose connectivity, the queue manager is unable to become active on any of the pods, because none of the pods have quorum.
If an active pod fails, and subsequently recovers, it can rejoin the group in a replica role.
The following figure shows a typical deployment with three instances of a queue manager deployed in three containers.
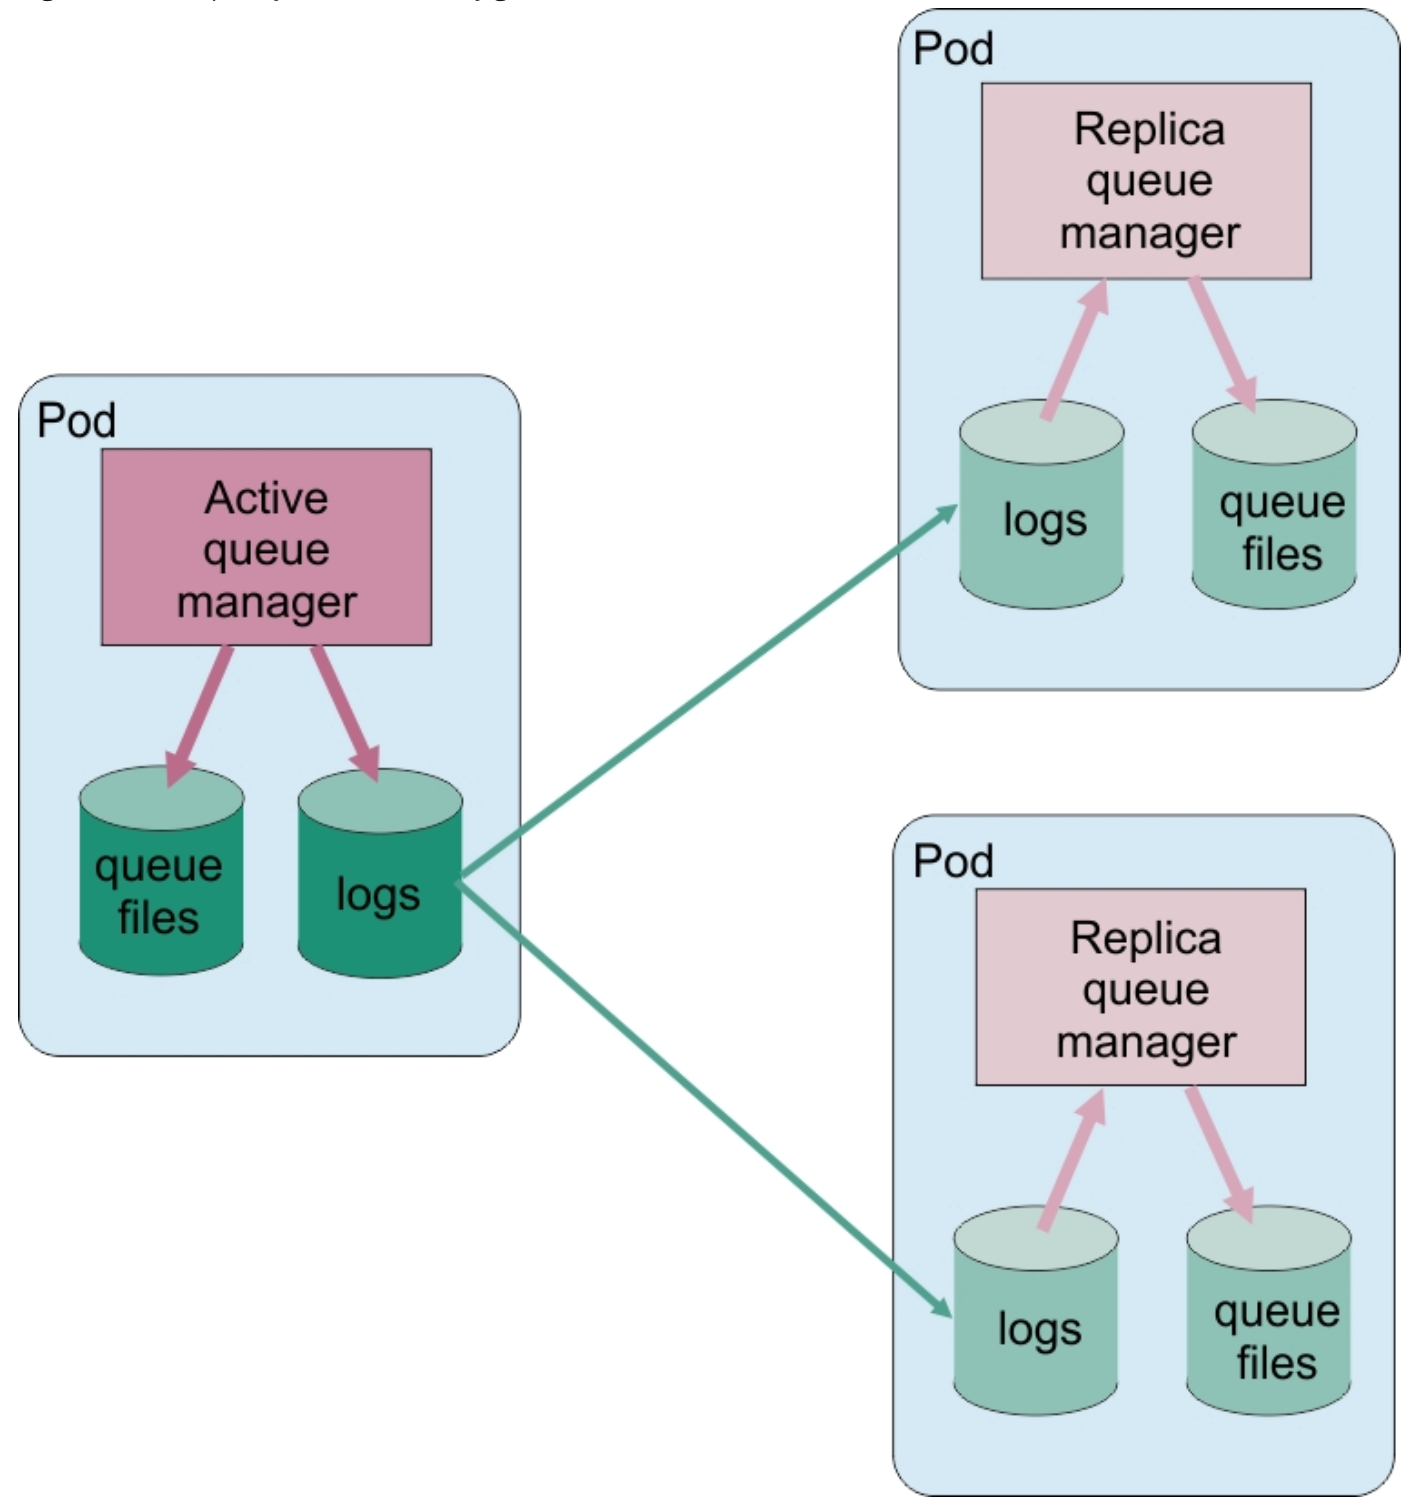
For more information see: Evaluating the Native HA feature in IBM Cloud Pak for Integration 2021.1.1
Pre-reqs
You should have already downloaded the artifacts for this lab in the lab Environment Setup from GitHub MQonCP4I.
If you are doing this lab out of order return to Environment Setup to perform the download. Then continue from here.
Important points to note
The lab guide assumes you are using the RHEL Virtual Desktop Image (VDI) VM from the IBM Technology Zone. If you are using another platform, you can download the necessary artifacts from the github repo. The instructor will provide directions.
If running as part of a PoT, you will only see your project (namespace). The name will be of the form clustername + your student number. For instance if the cluster name is chopper and your student number is 10, your namespace will be chopper10. So each attendee has a unique namespace and will only be authorized to see that namespace. Within your namespace you will only find your queue manager mq10mi in this example. You will also find a previously configured queue manager qmgrxx, where xx = your student number. That queue manager will not be used in this PoT and can be ignored.
You will see other projects such as cp4i-ace, cp4i-api, cp4i-mq. Since this cluster will be shared with other PoTs those have been predefined. They are not to be used for this PoT and can be ignored. You will only use your assigned namespace and at times cp4i. cp4i-mq was used to document part of this lab. Where you see cp4i-mq, you will substitute your assigned namespace.
The screen shots were taken on a test cluster and many will not match what you see when running the lab. Particularly URL values will be different depending on the cluster where CP4I is running. Projects (Namespaces) may also vary. It is important to follow the directions, not the pictures.
Further information
Deploy the MQ Queue Manager with associated resources
-
Open a terminal window and navigate to the nativeHA directory with the following command:
cd /home/student/MQonCP4I/nativeha/deploy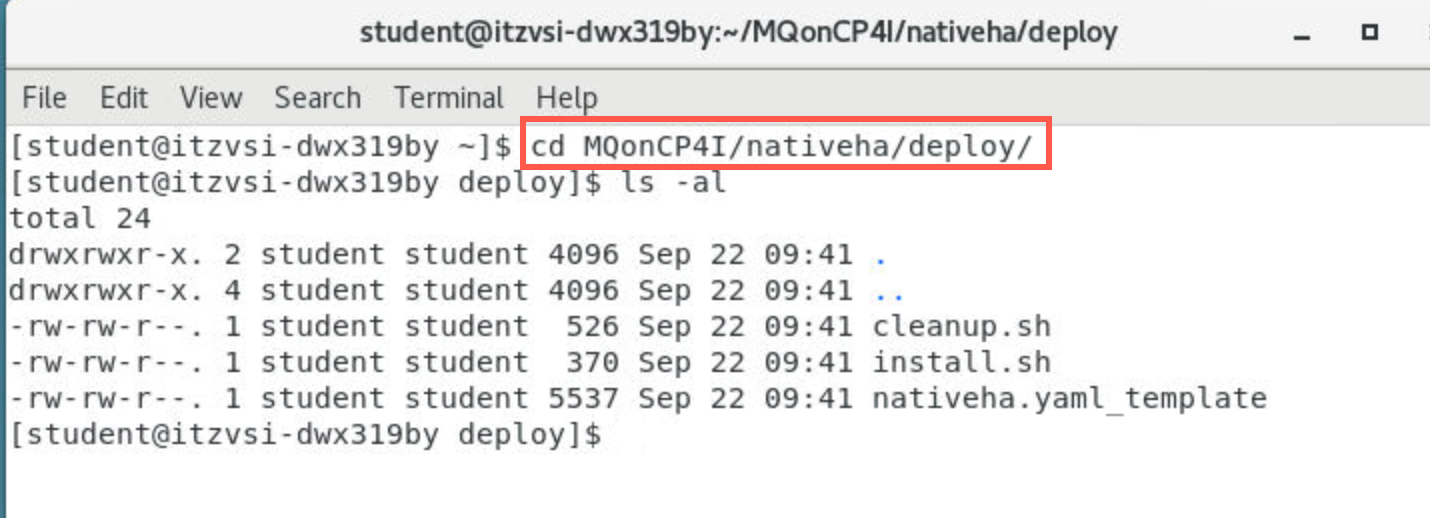
-
Edit install.sh with following command:
gedit install.sh &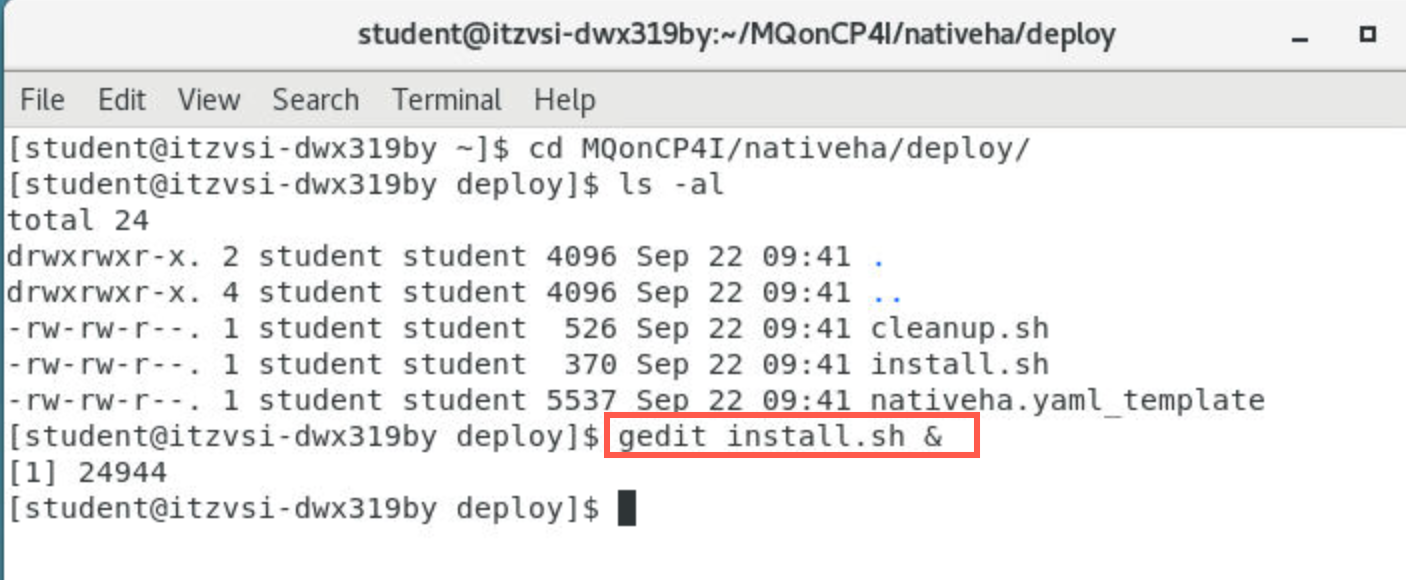
Make sure to add the “&” at the end of the command to run gedit in the background. Otherwise the terminal window cannot be used while gedit is open. If you close the window, gedit will end.
-
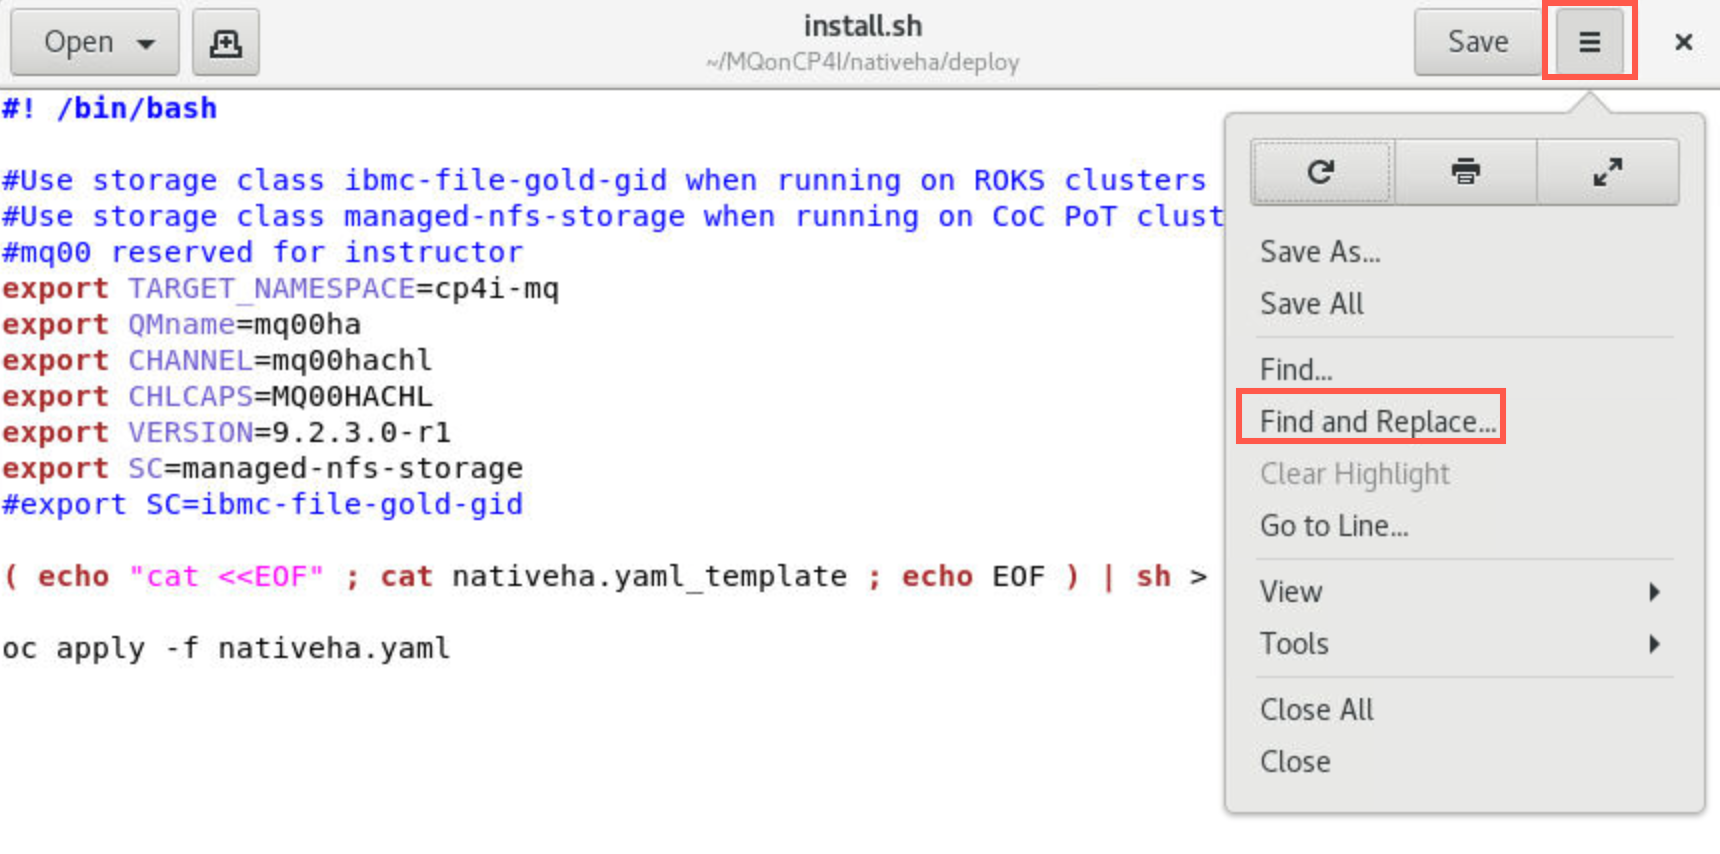
Click the hamburger menu in the top right corner and select Find and replace.
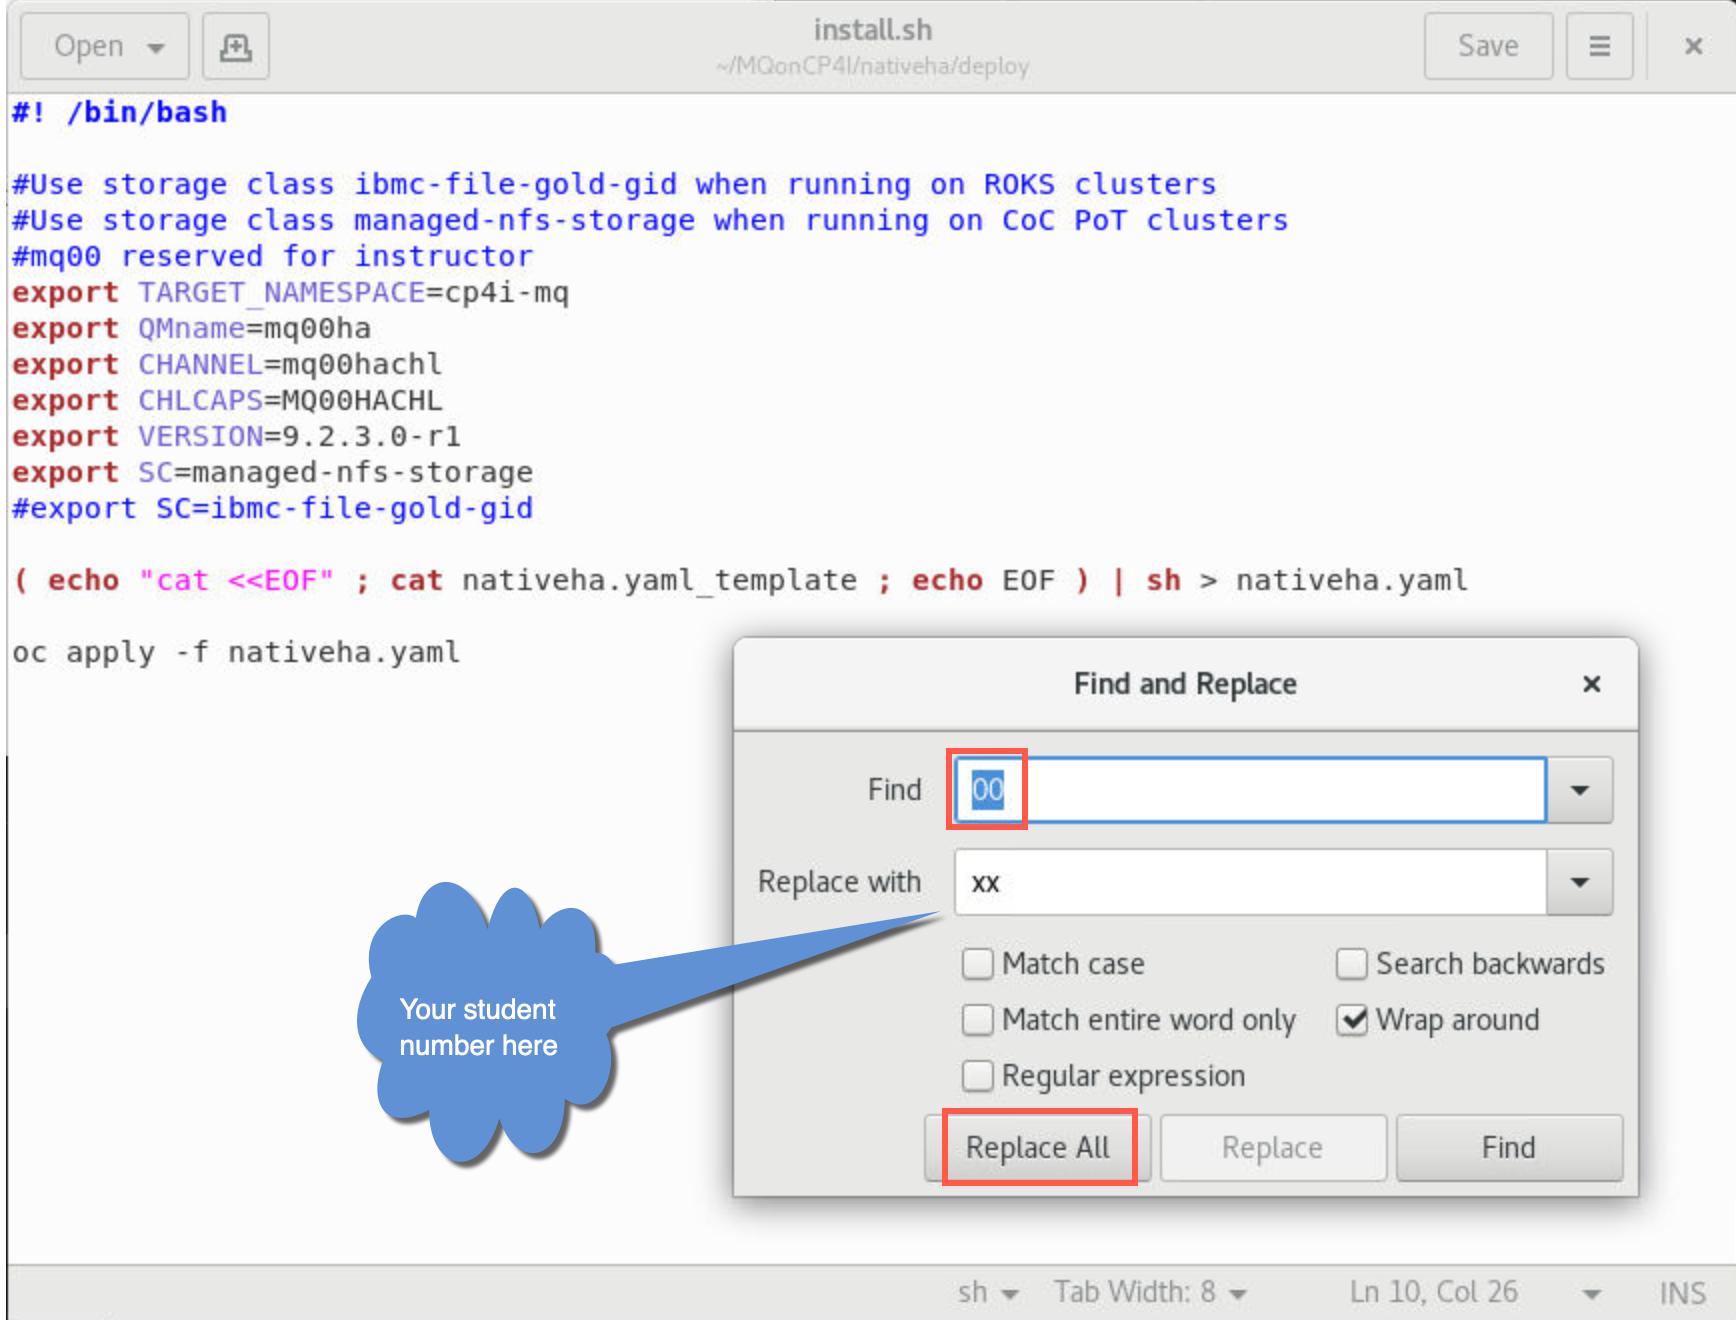
Enter 00 in Find field and your student number in the Replace with field for xx. Click Replace all.
-
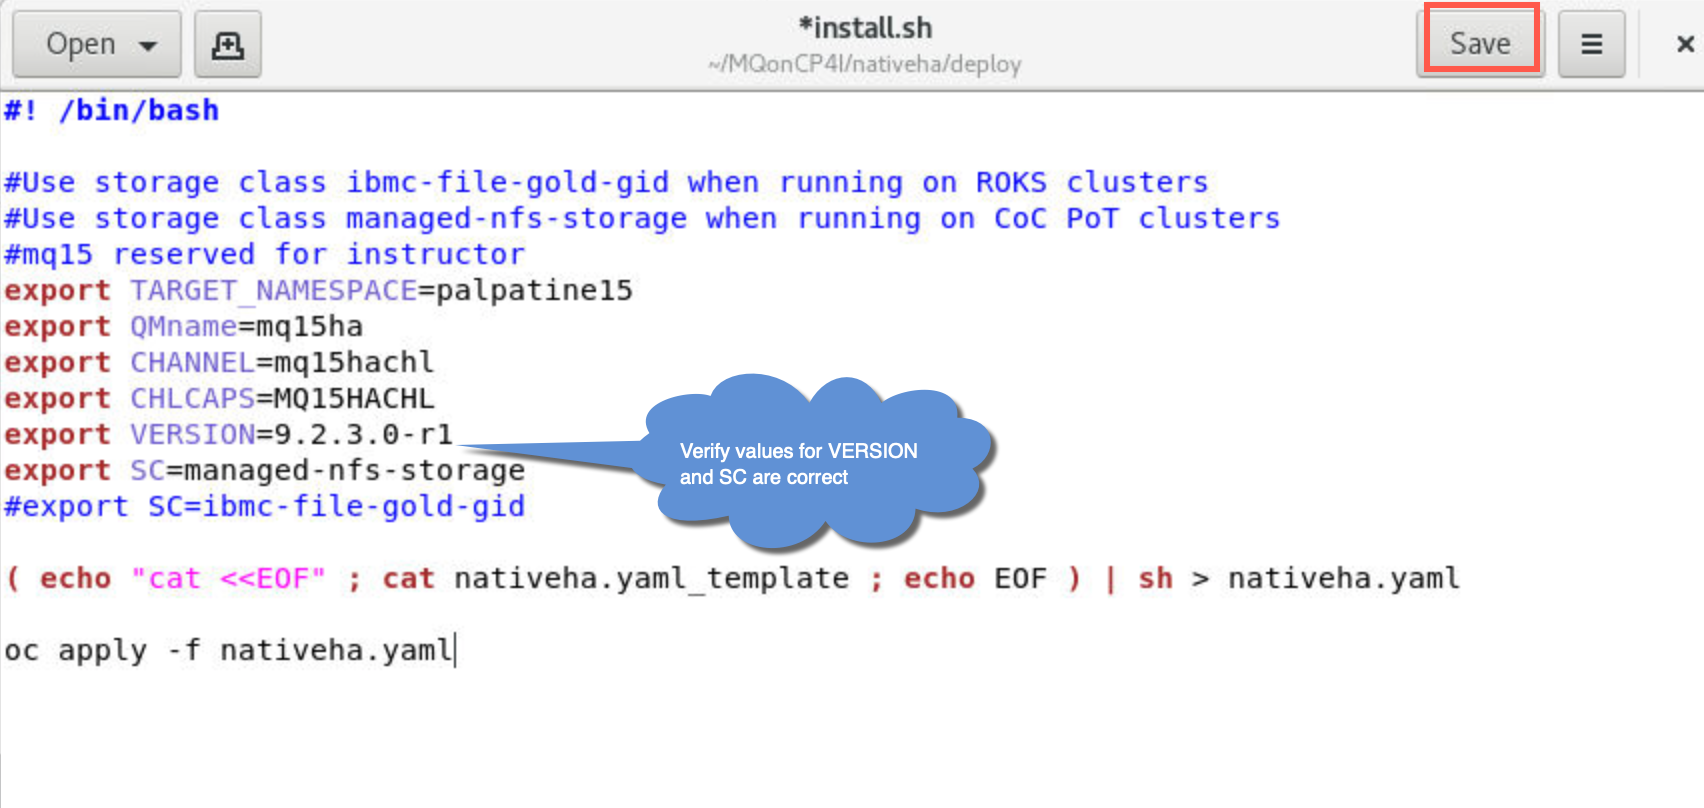
Change TARGET_NAMESPACE to your assigned project/namespace. NativeHA was introduced as a tech preview in CP4I verion 9.2.2.0, and is now GA in 9.2.3.0. So make sure the value for VERSION is set 9.2.3.0-r1. Make sure the export for storage class (SC) is correct; managed-nfs-storage for CoC cluster, ibmc-file-gold-gid for ROKS cluster. If you are not sure, ask your instructor.
Click Save.
 Note:
Note:
palpatine15 is the namespace used to document this lab. When working in a PoT, you will have been assigned a userid and namespace such as palpatine15.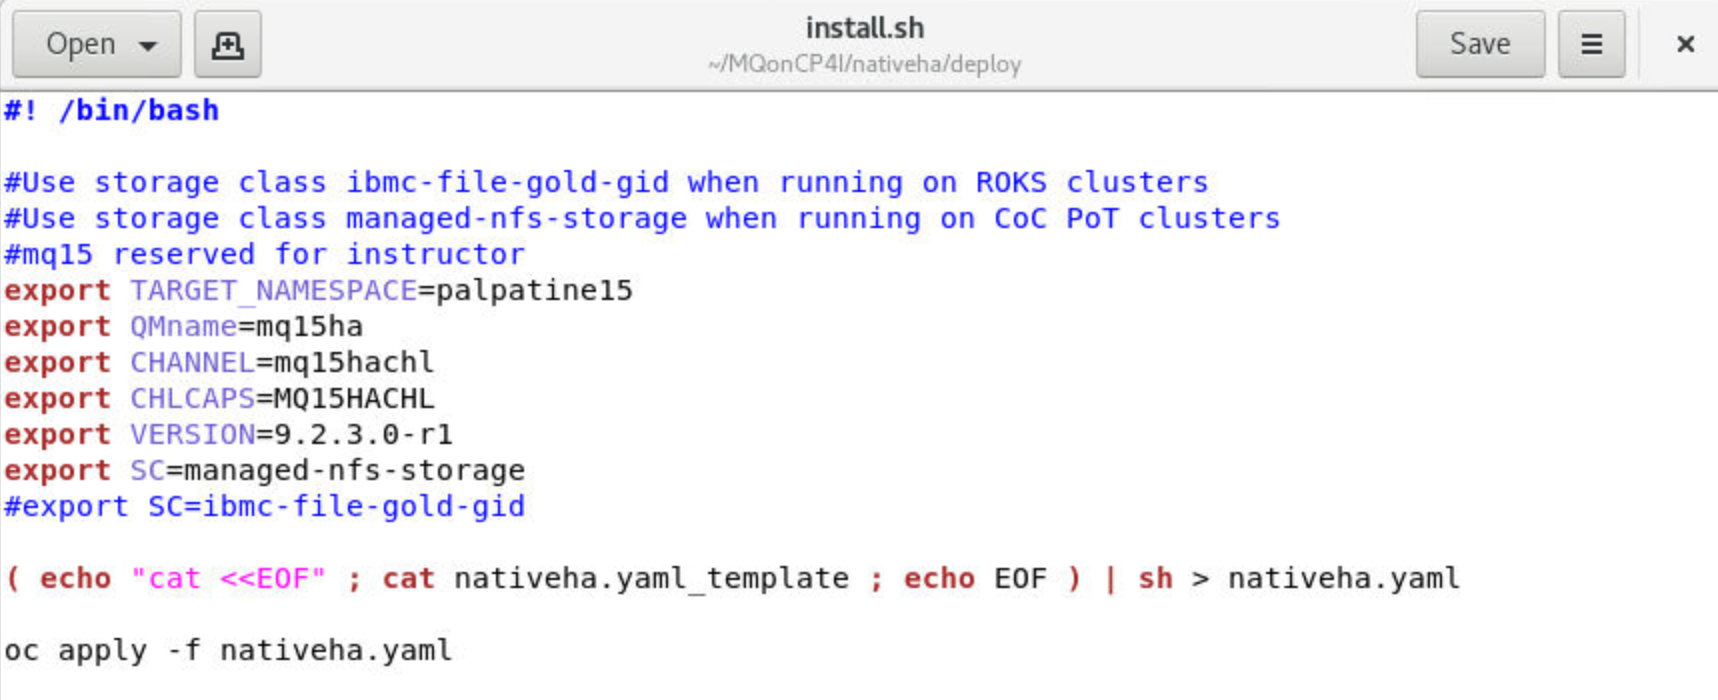 Important:
If you are an IBMer running this lab on a ROKS cluster, use storage class ibmc-file-gold-gid. -
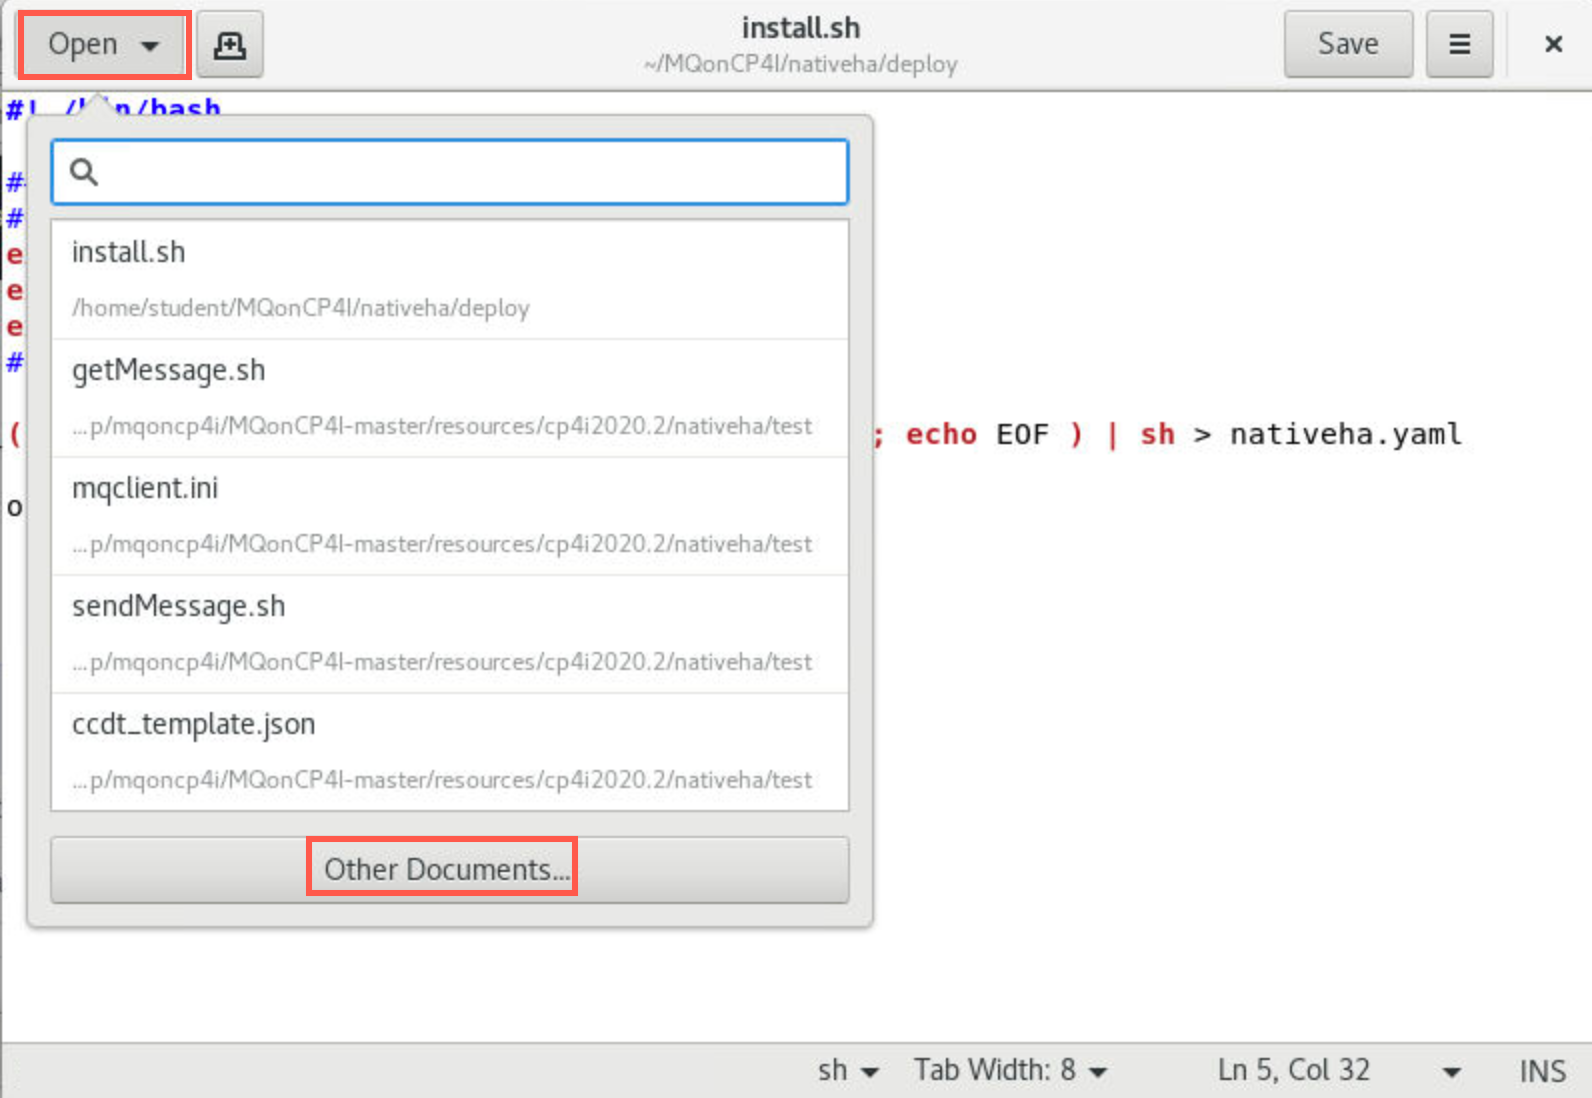
Click the drop-down next to Open, then click Other documents.
-
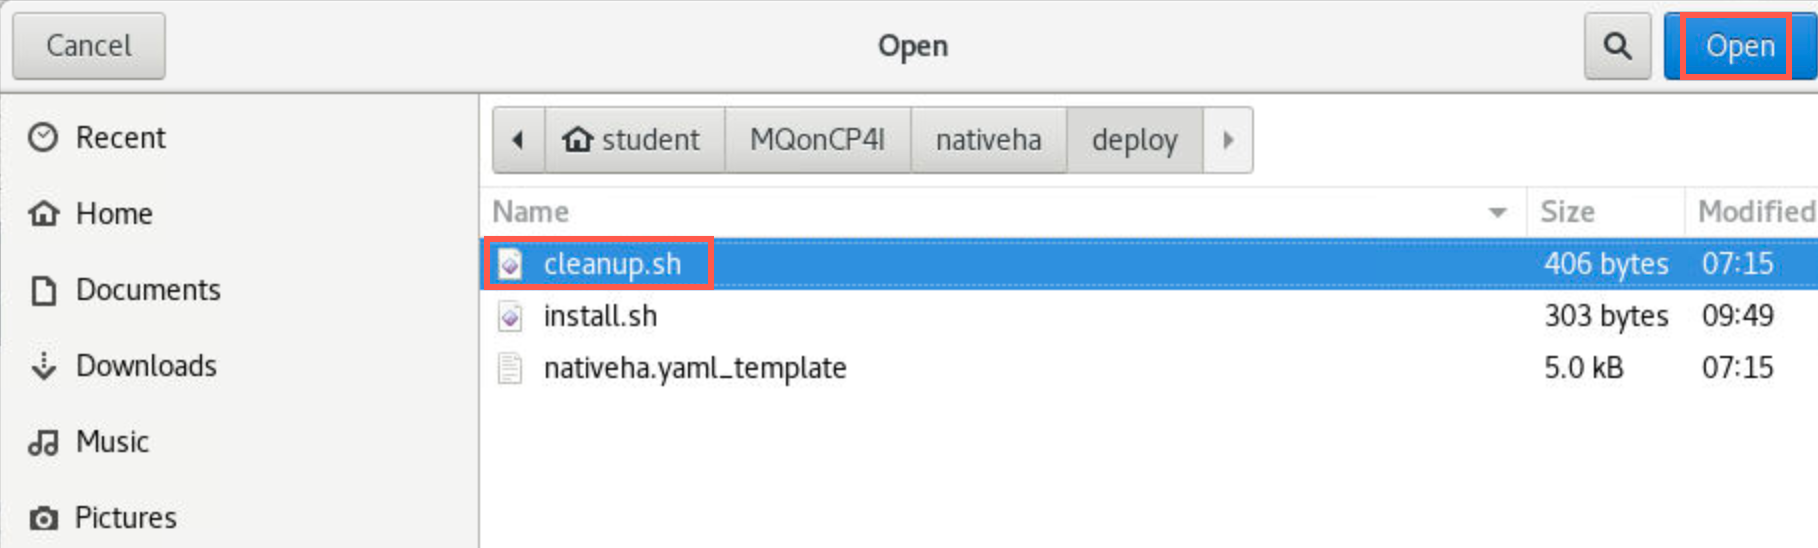
The current directory opens showing all the files in the directory. You also need to update cleanup.sh, so select it and click Open.
-
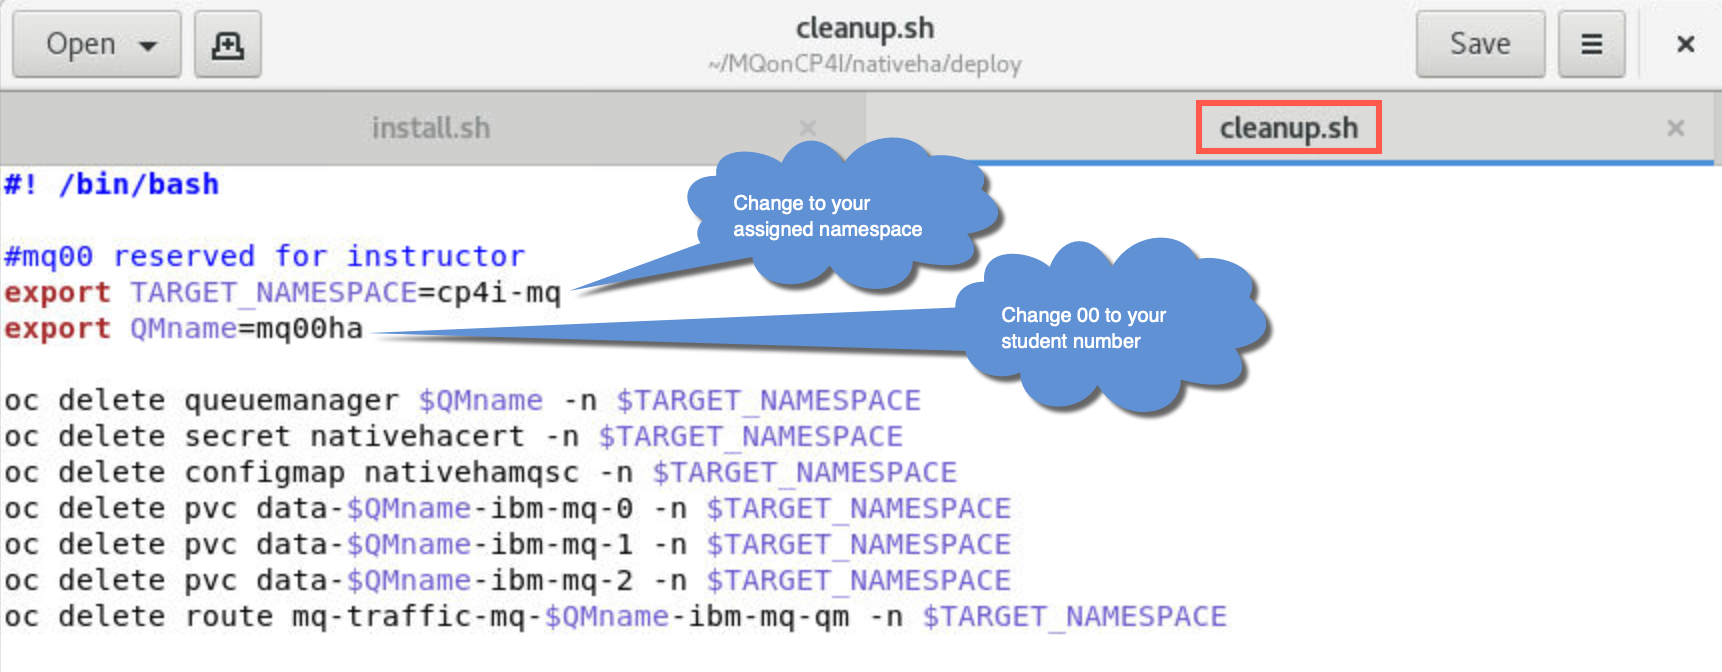
Change TARGET_NAMESPACE to your assigned project. Change 00 in QMname to your student number.
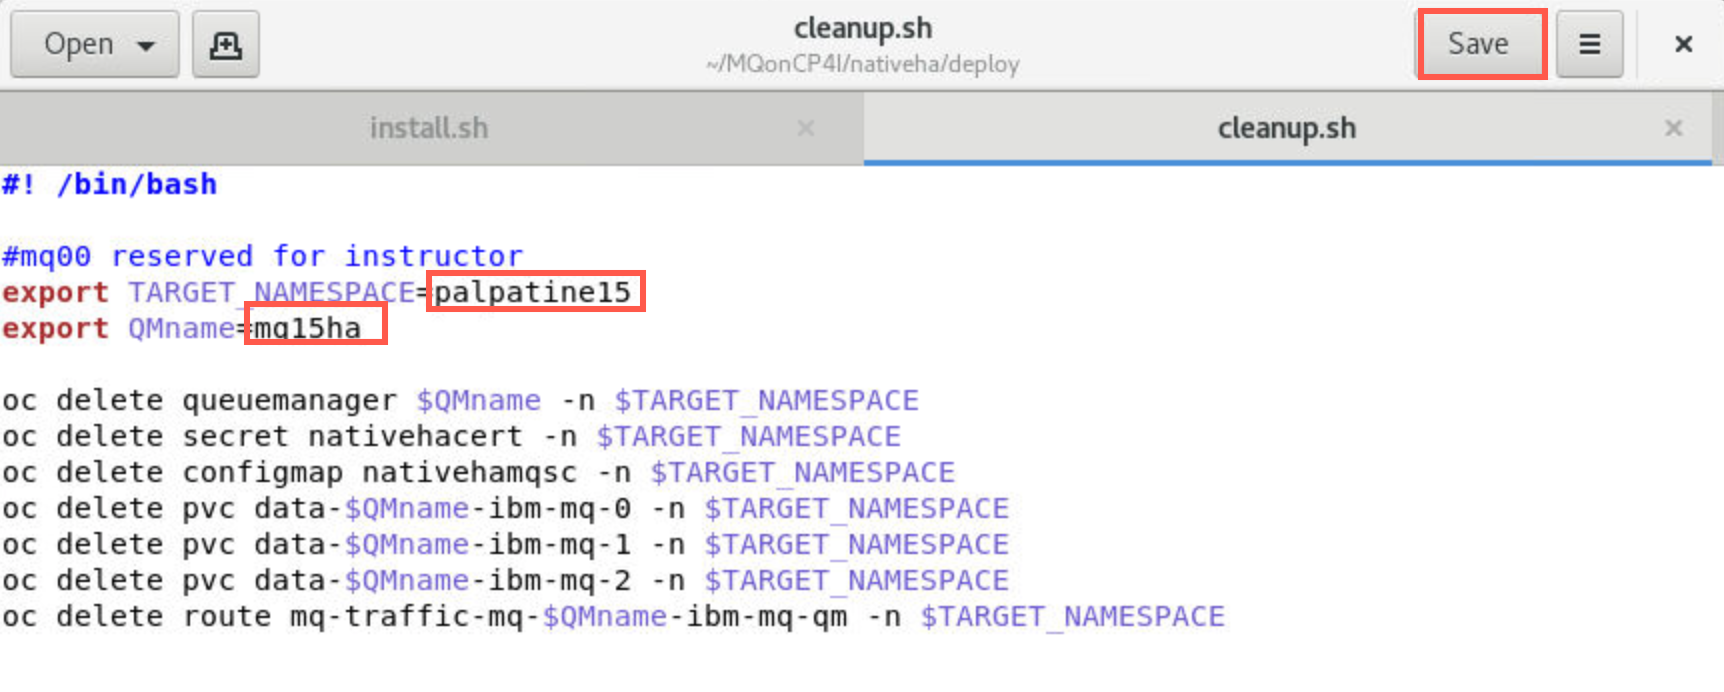
Click Save to save cleanup.sh.
-
Repeat the above steps to open nativeha.yaml_template.
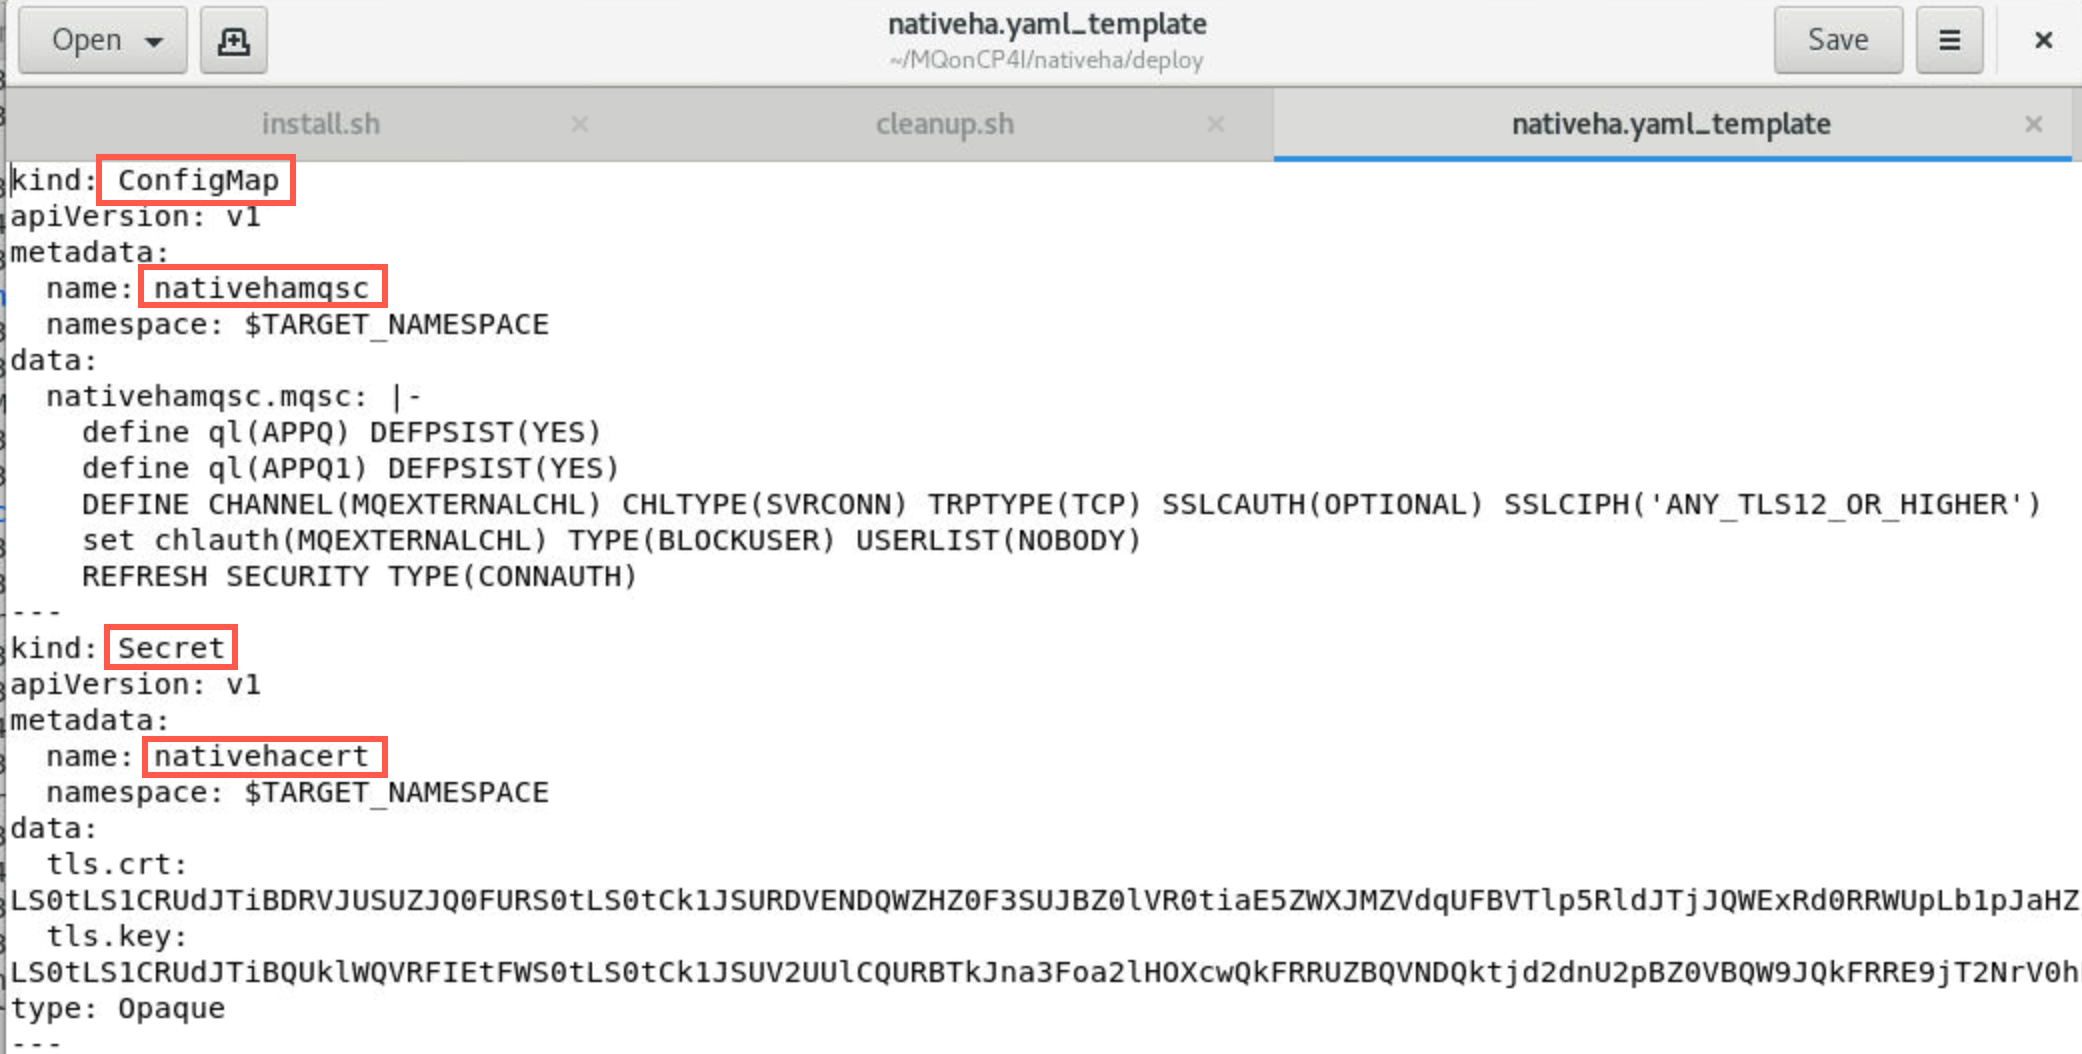
There is nothing to change here, but it is necessary to review the how the queue manager is created by the yaml code. The first Kubernetes API is a ConfigMap named nativehamqsc. This creates a file of mqsc commands to define MQ objects in the queue manager. The second Kubernetes API is a Secret called nativehacert. This includes two files to build the secret. tls.crt is the signer certificate for the queue manager and tls.key is the queue manager’s private key. nativehamqsc and nativehacert will be used to define the third Kubernetes kind, the queue manager itself.
-
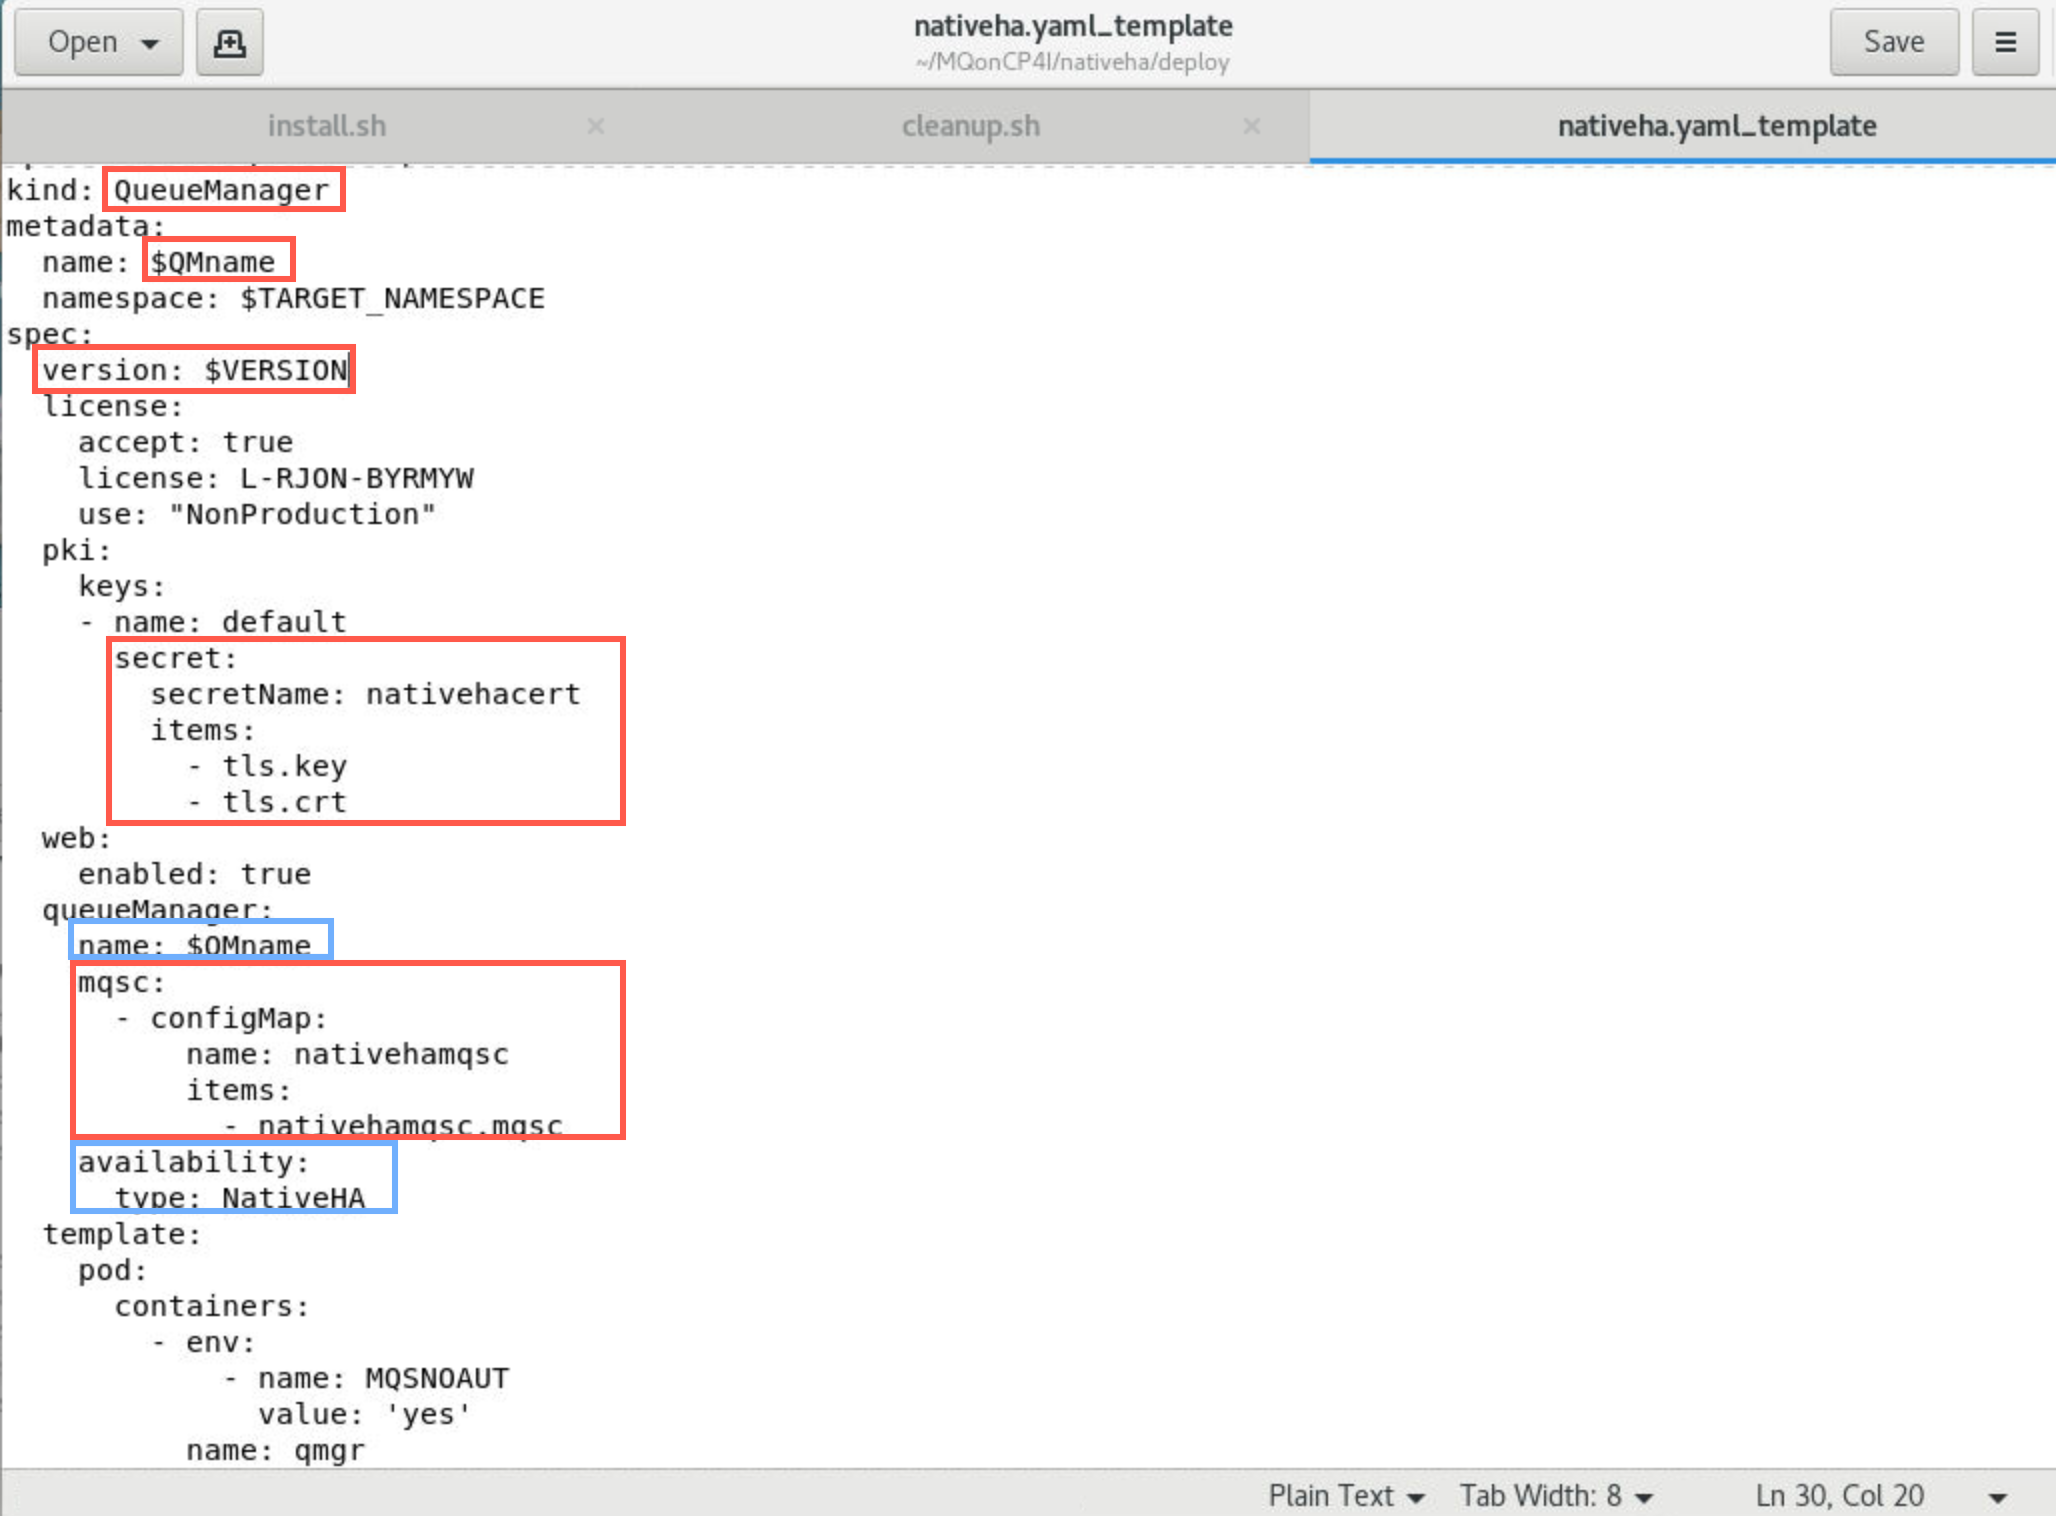
Native HA is configured using the .spec.queueManager.availability of the QueueManager API. Scroll down to the kind: QueueManager. QMname takes the value from the install.sh script so mqxxha (substituted with your student number) will be the name of the deployment and the name of the queue manager. Under spec, version is being substituted by the variable defined in install.sh and includes the license value. pki pulls in the secret defined earlier. queuemanager pulls in the mqsc definitions defined earlier and availability shows type NativeHA. This tells the MQ Operator to implement the native HA pattern and will create three pods running the same queue manager with replicated data.
There is nothing to change so just close the yaml file.
-
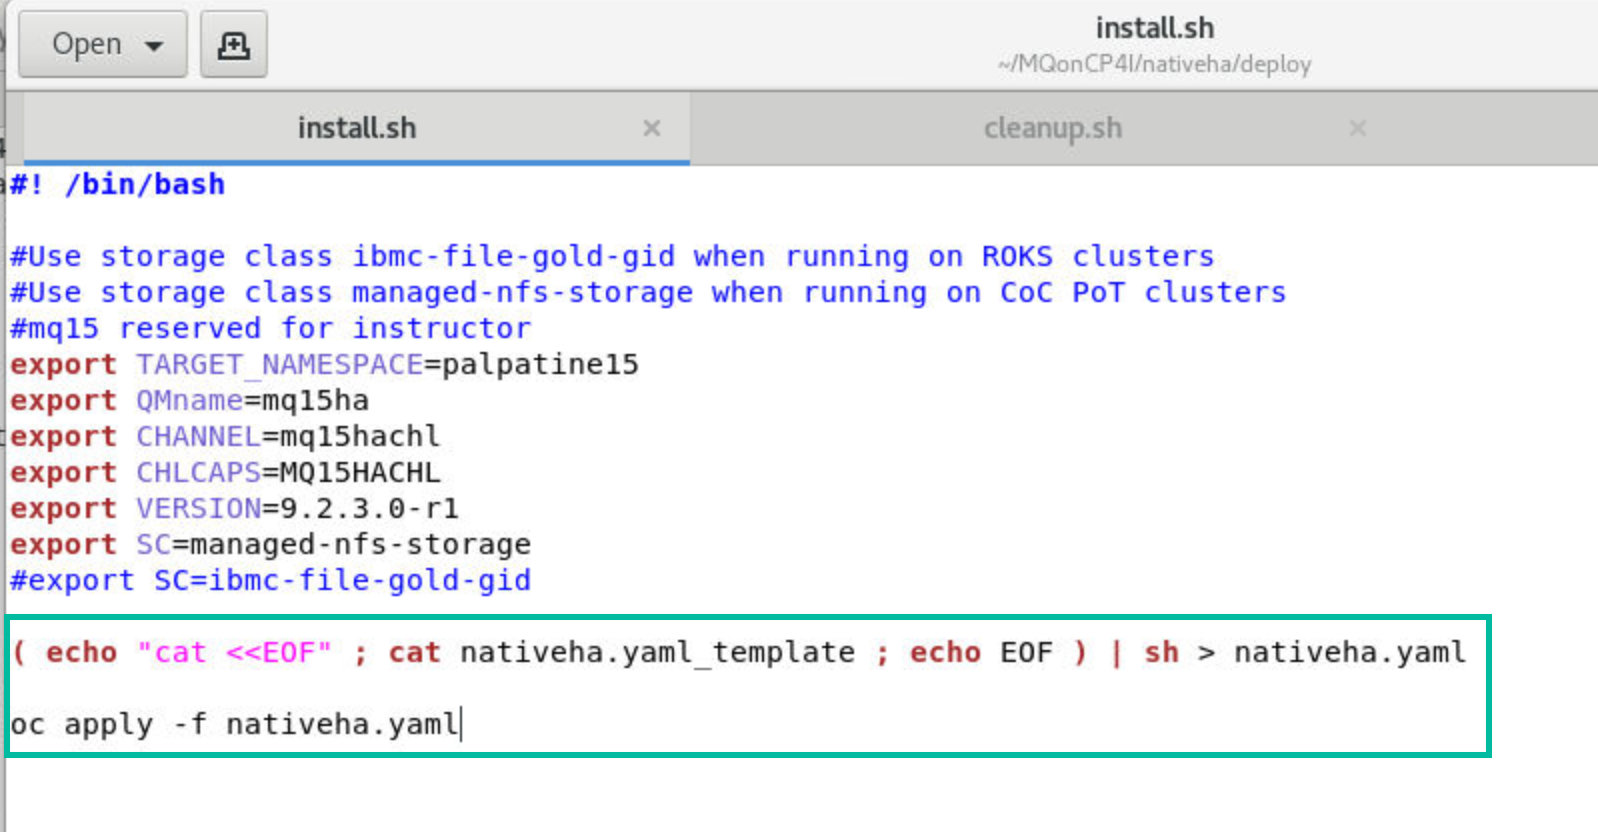
Looking again at install.sh, the last statement copies the yaml template to nativeha.yaml and applies that it to create the queue manager.
You can now close the gedit utility.
-
You now need to make install.sh and cleanup.sh executable using the following commands:
 chmod +x install.sh
 chmod +x cleanup.sh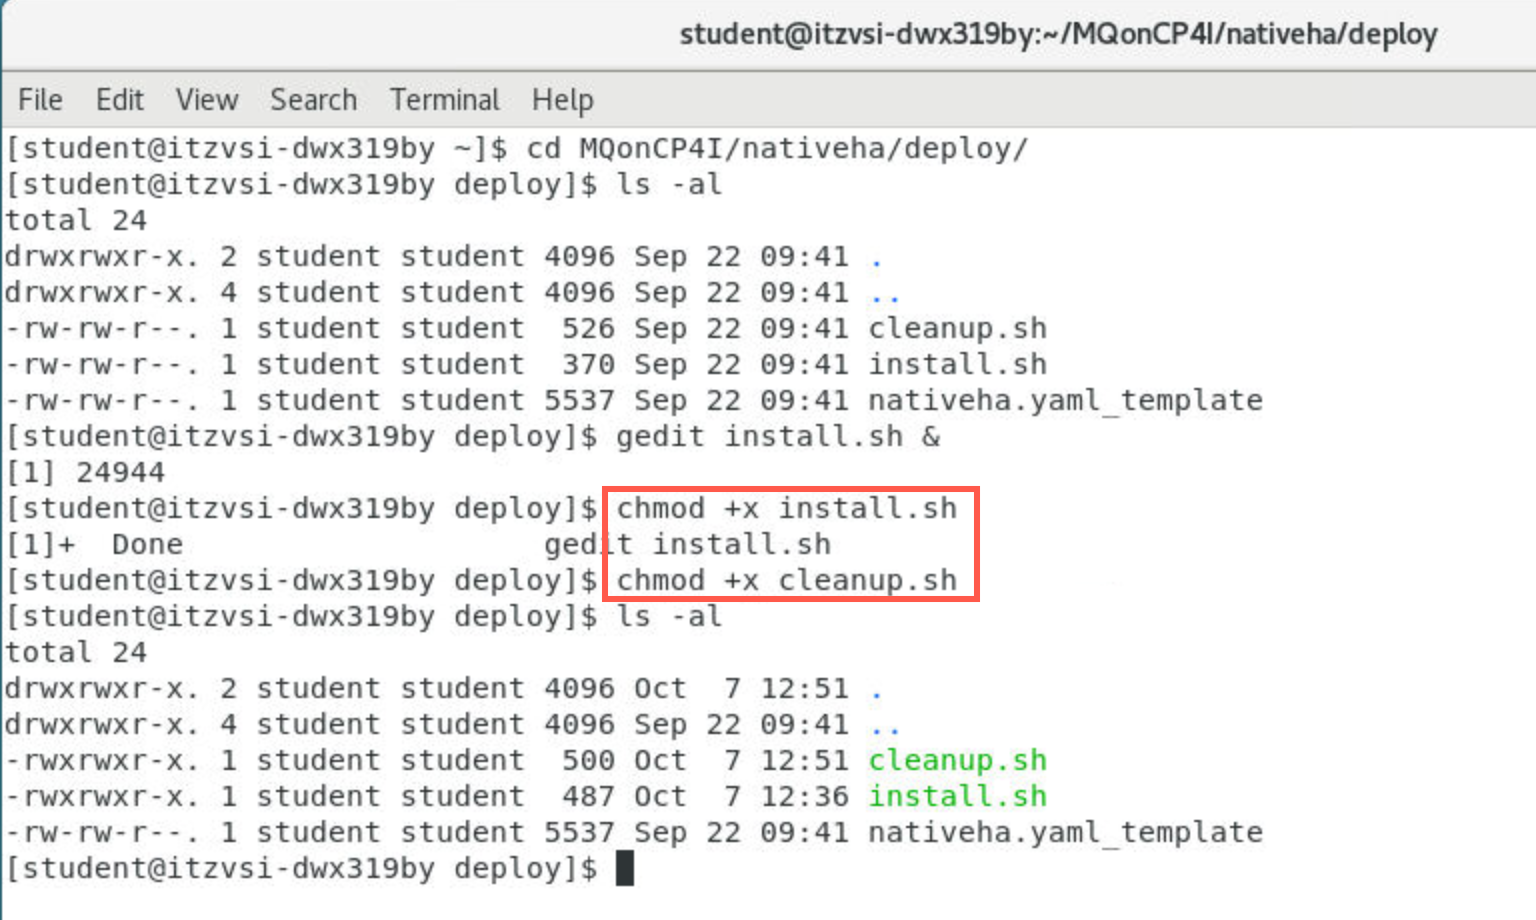
-
Run the install.sh script with the following command:
./install.sh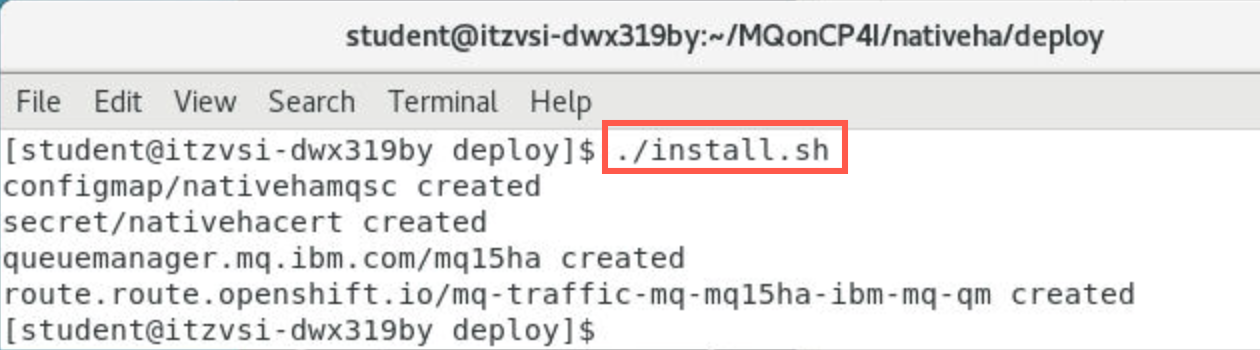
The response is that the configmap, secret, and queue manager were successfully created.
-
If you receive an unauthorized message, your session may have timed out. You will need to sign-on again as you did in the Environment Setup.
Make sure you are in your assigned project:
oc project <your assigned namespace>
Explore the queue manager
MQ Console
The hyperlink to the OpenShift Console for the cluster should be included in your email. Navigate to the OCP console now.
-
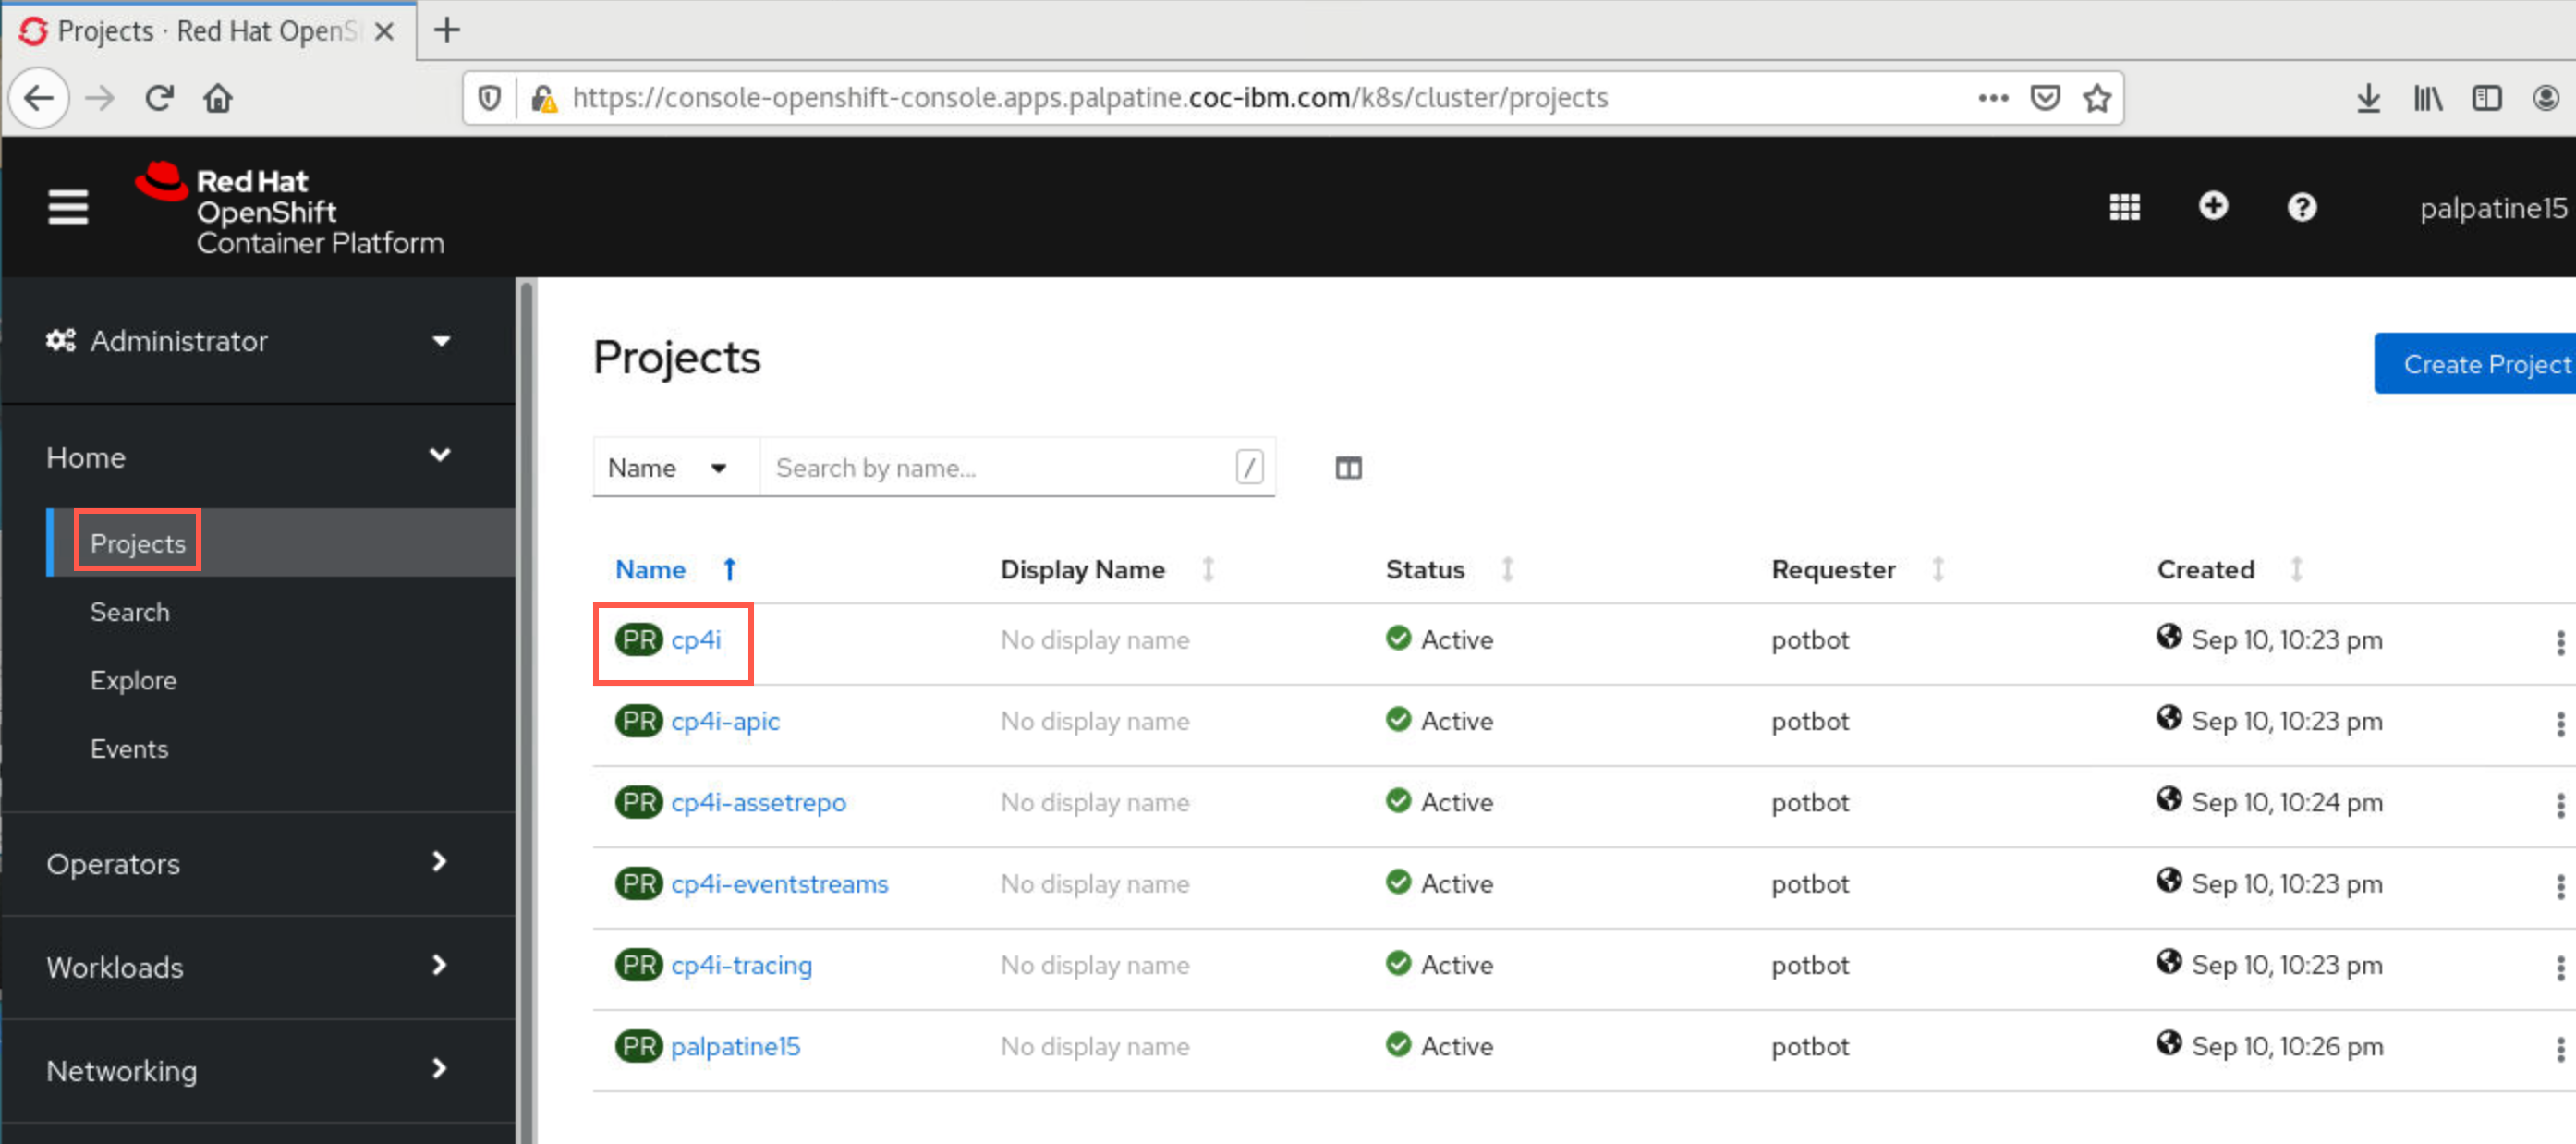
The OCP Console opens at the Overview page. You can explore the various information about the cluster details here. When ready, click Projects and select your cp4i.
-
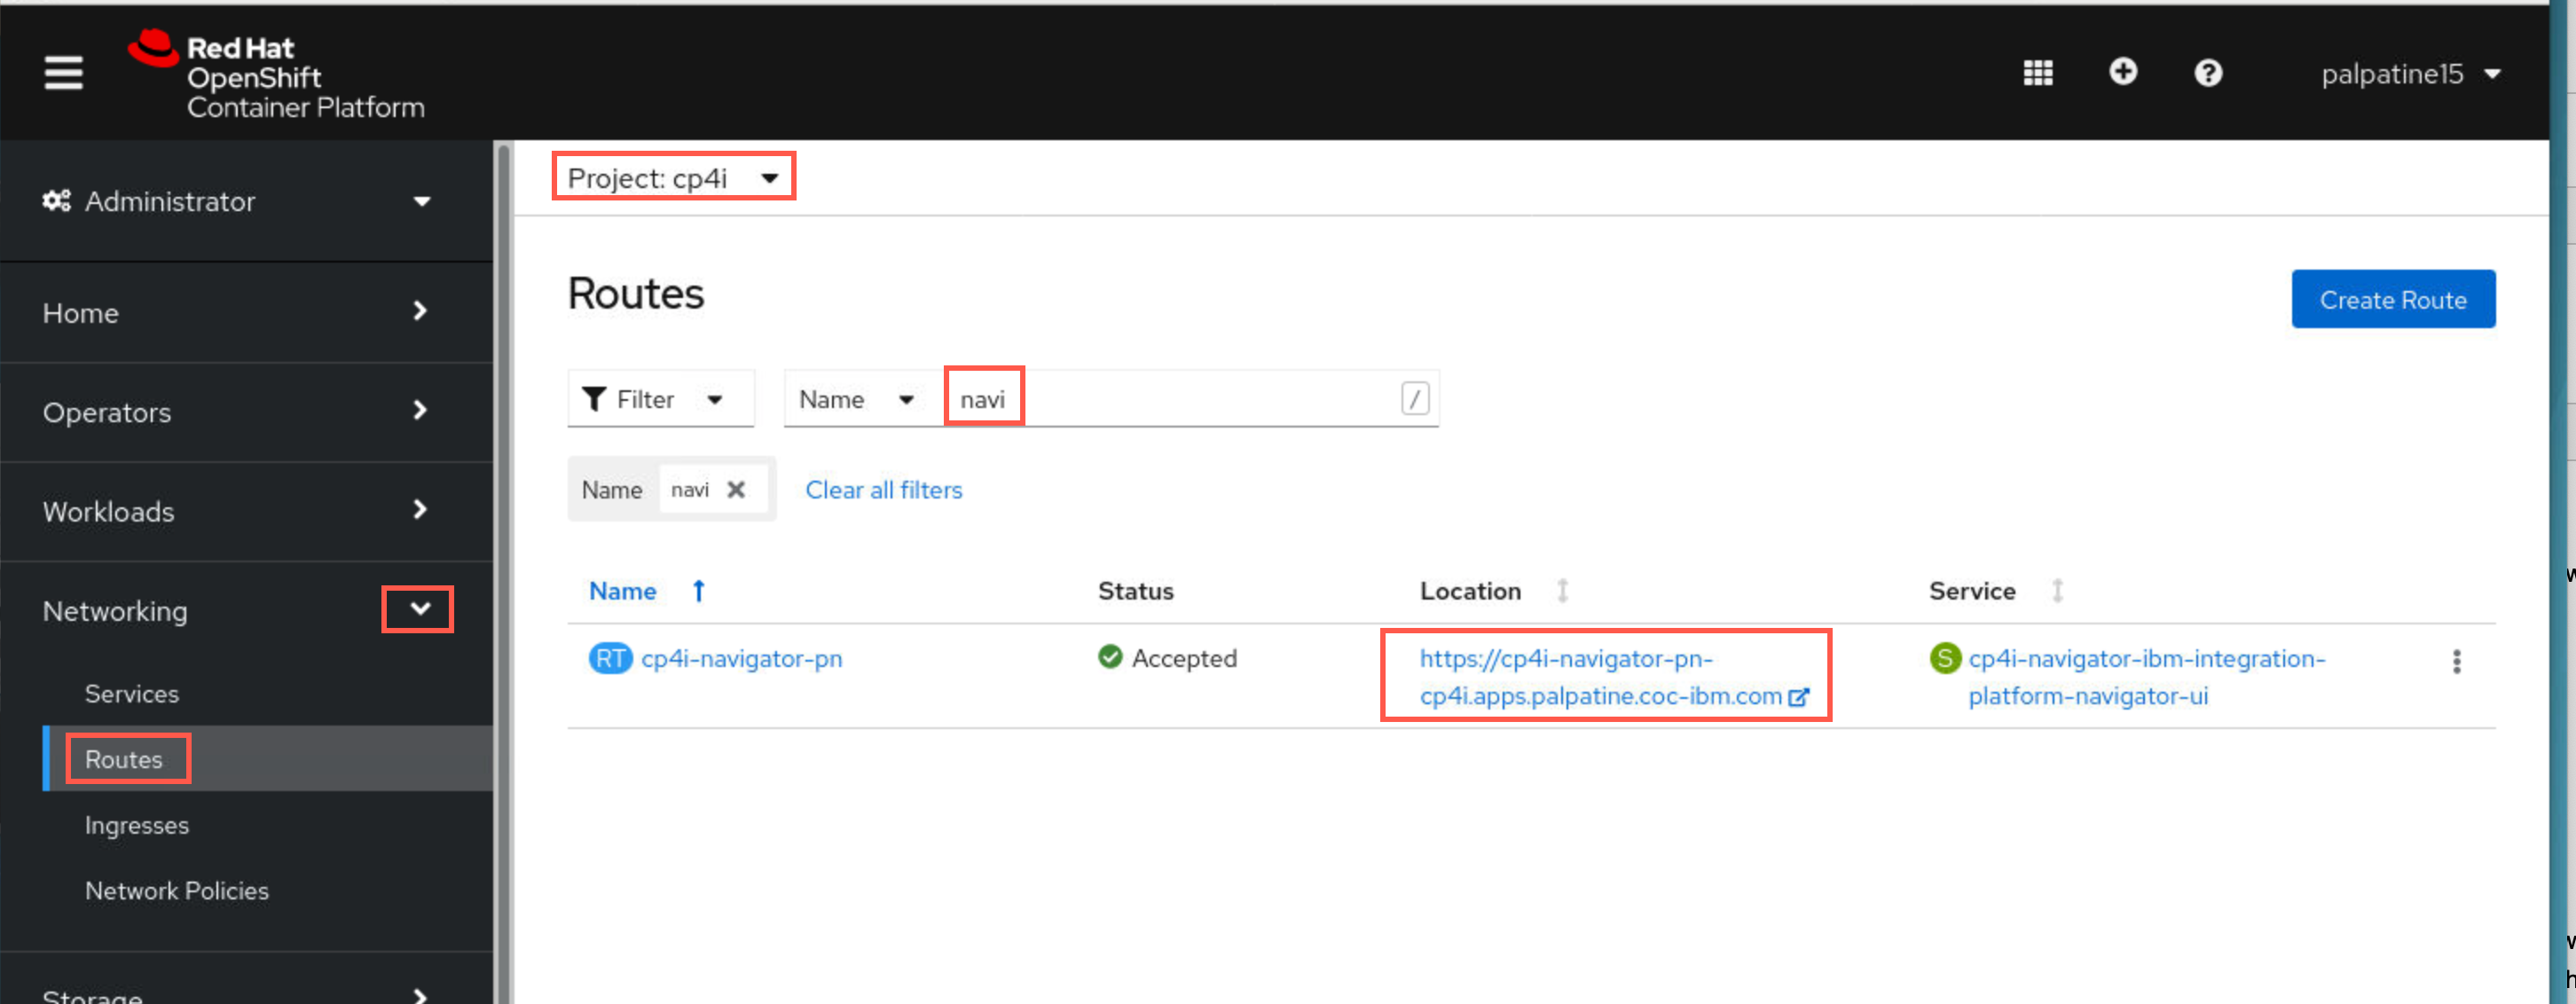
To access the queue manager and the MQ Console, you need to open the CP4I Platform Navigator. Click the drop-down for Networking and select Routes. Type navigator in the filter, then click the location hyplerlink for route cp4i-navigator-pn.
Accept any security warnings and continue.
-
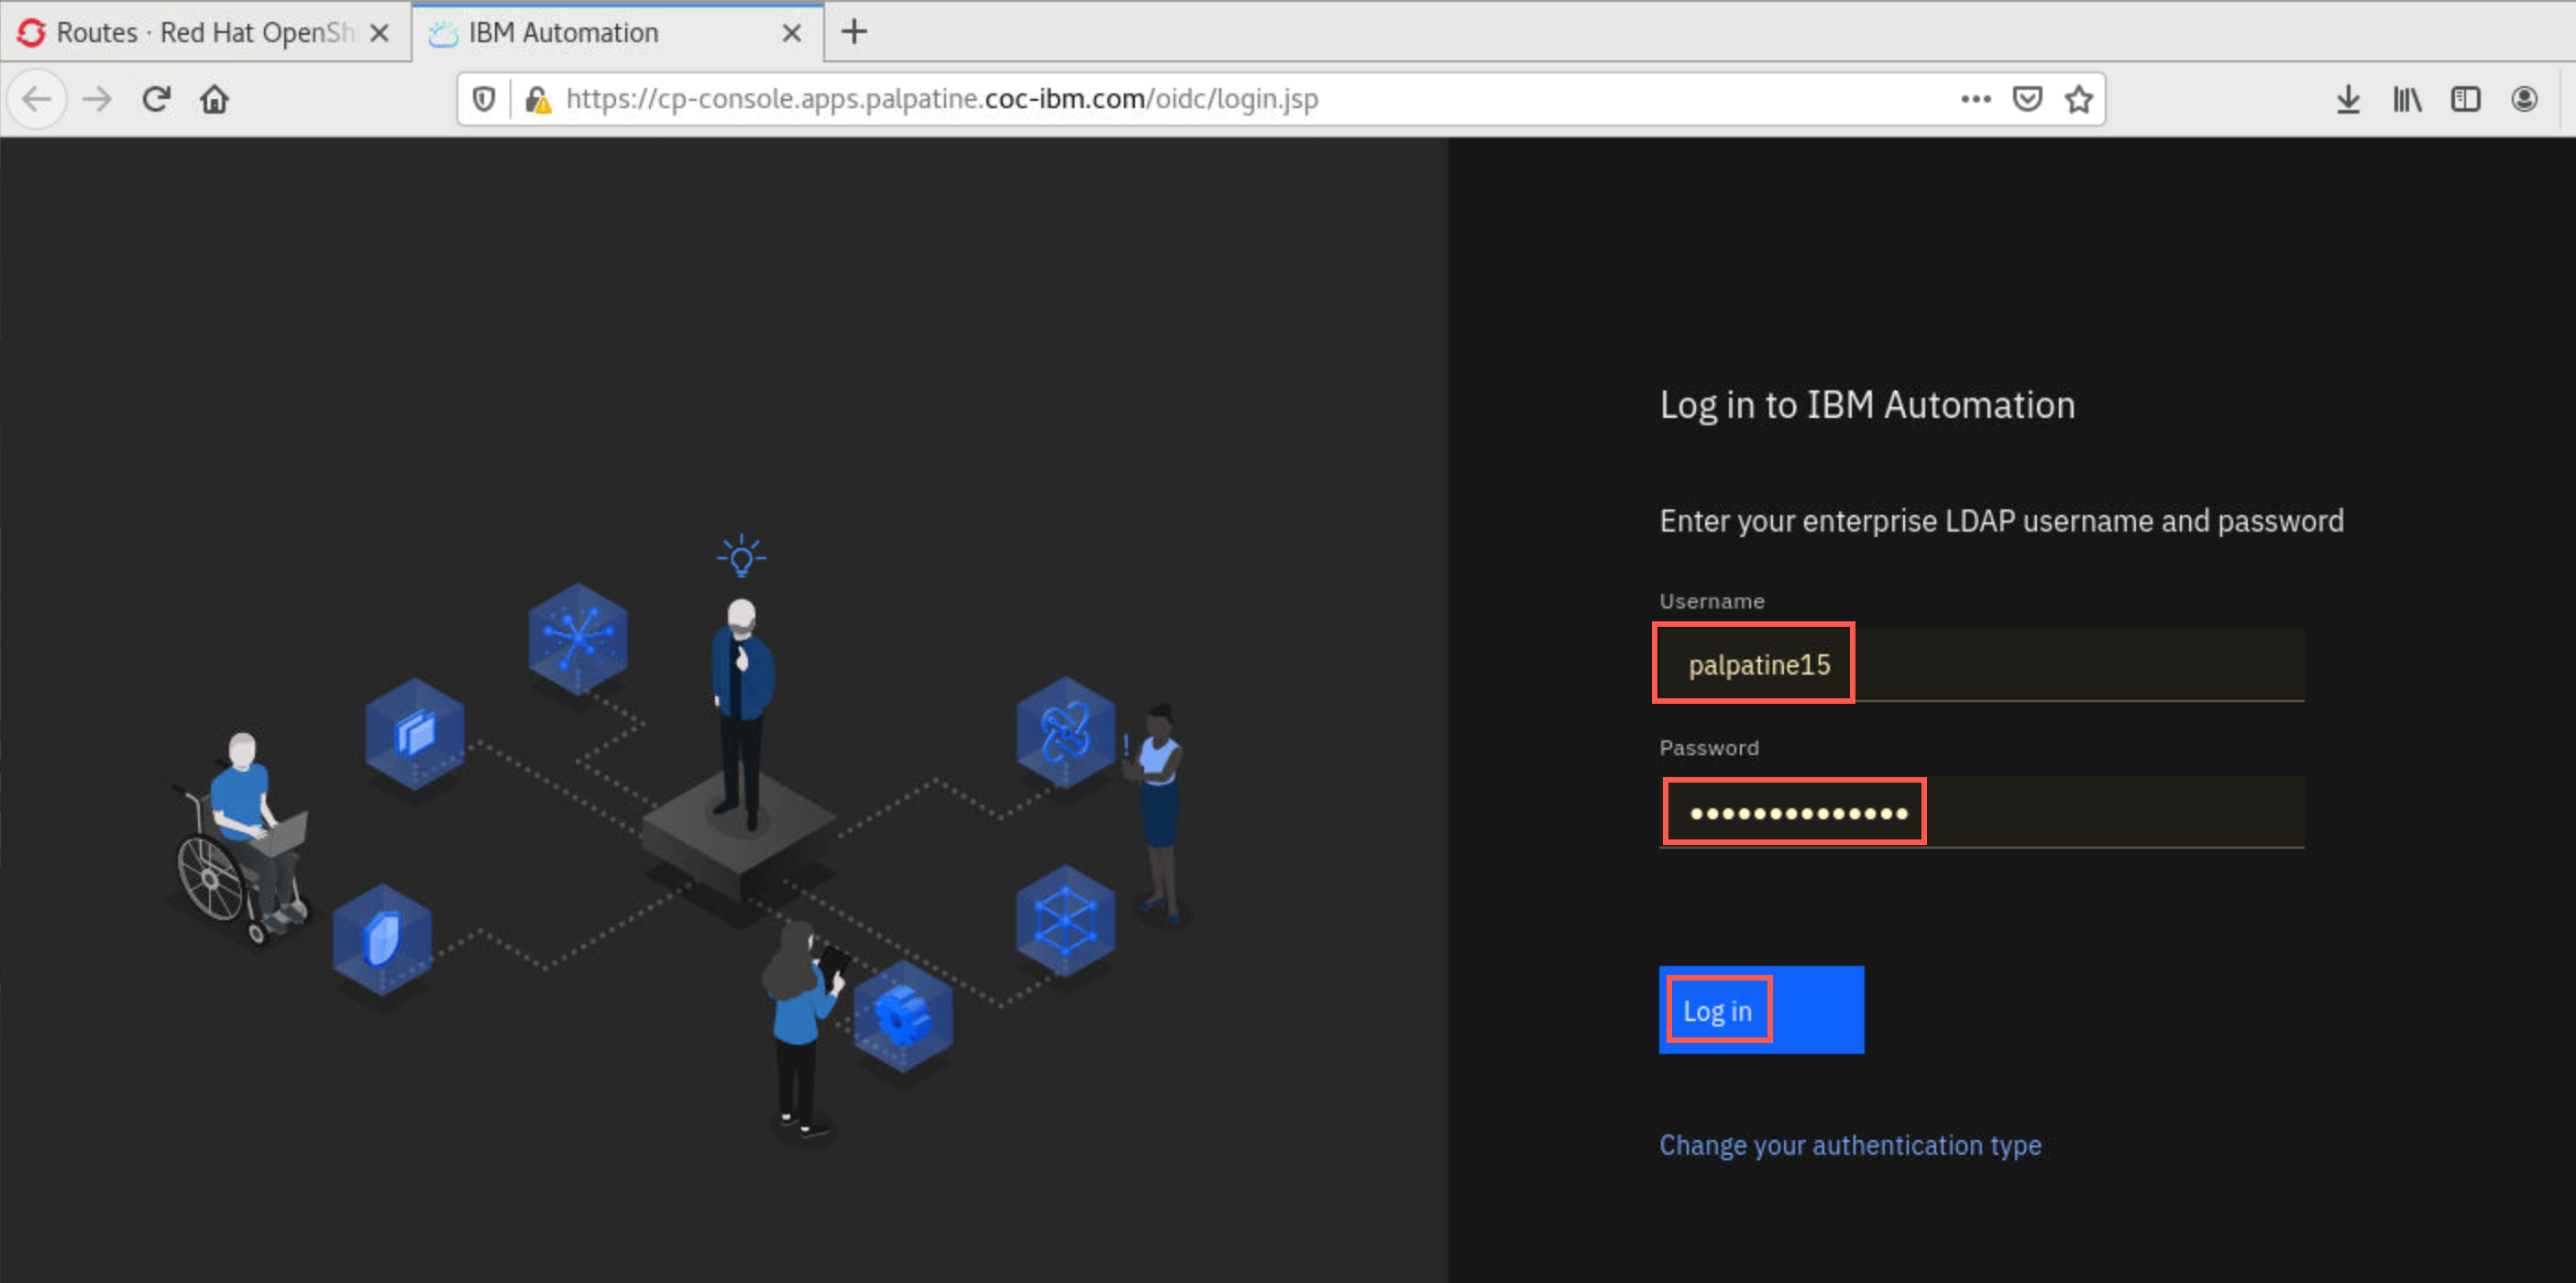
IBM Automation opens in a new browser tab. If you are presented with the “Log in to IBM Automation”, click Enterprise LDAP. Enter the userid and password that you received in your email and click Login. Remember to use your credentials, not the ones in the screen shot.
-
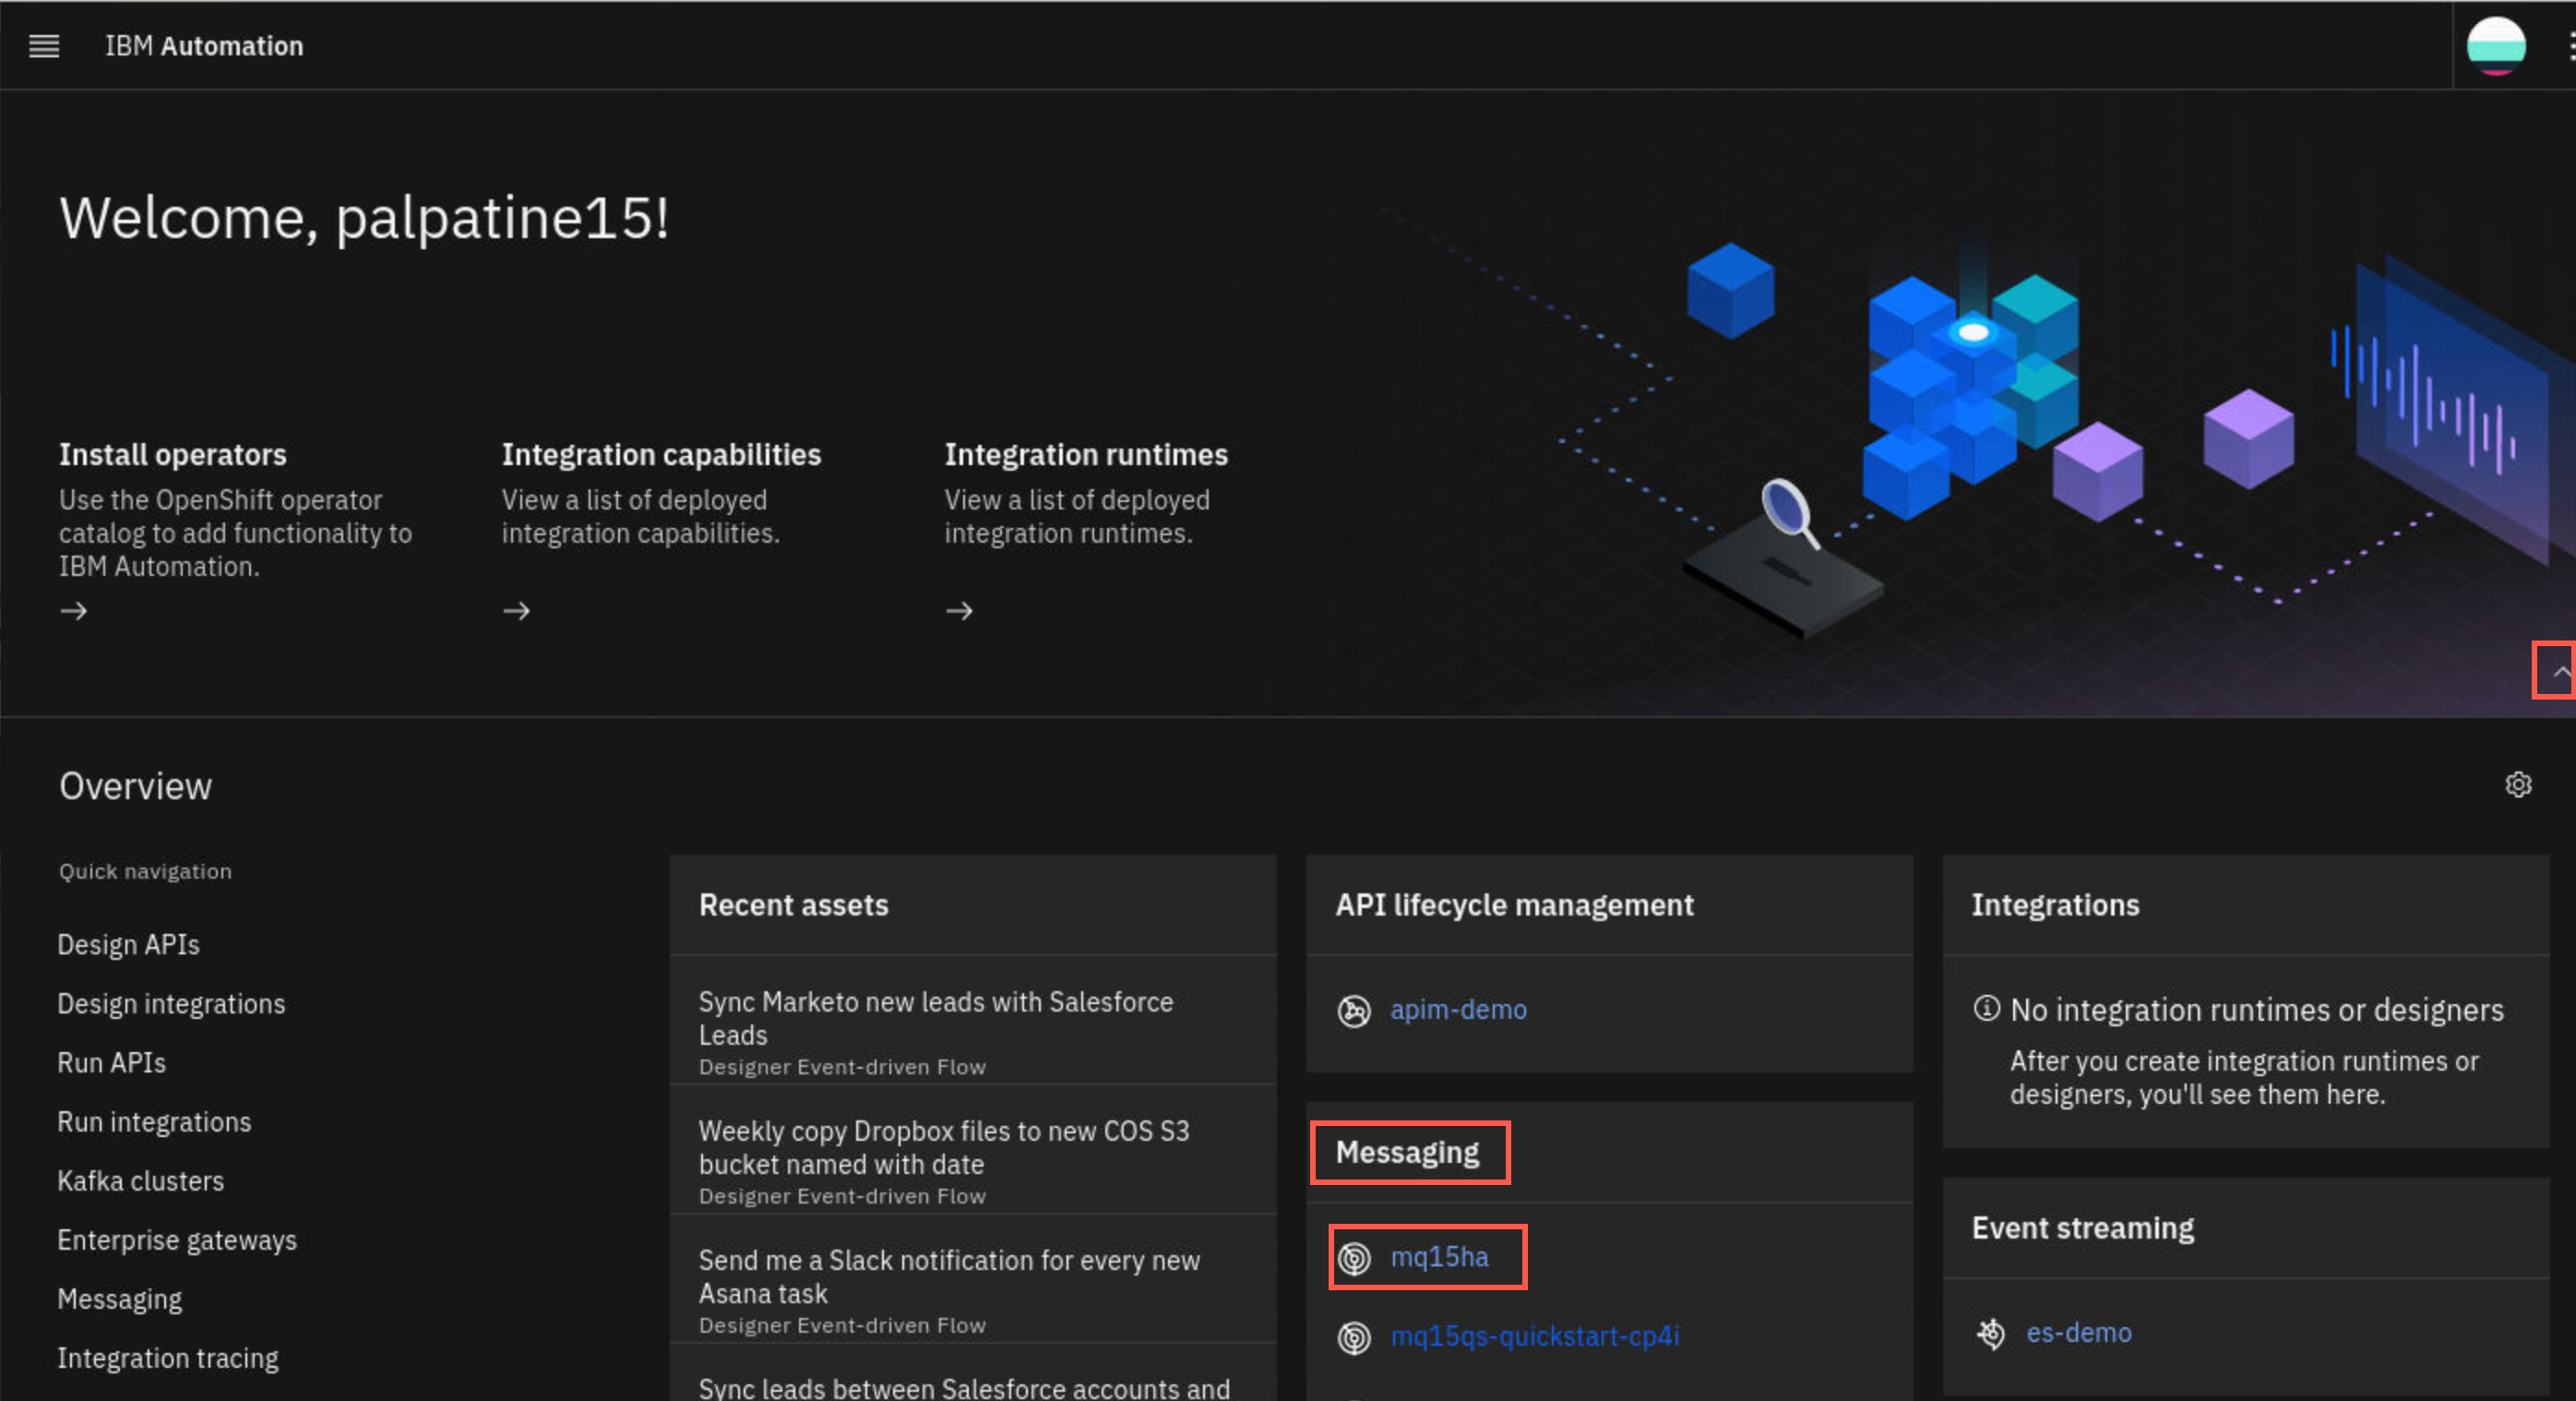
Under Messaging you will see your namespace and the mqxxha queue manager. You can click the up arrow on the far right of the window to close the top portion and conserve screen space. You can use the arrow as a toggle.
-
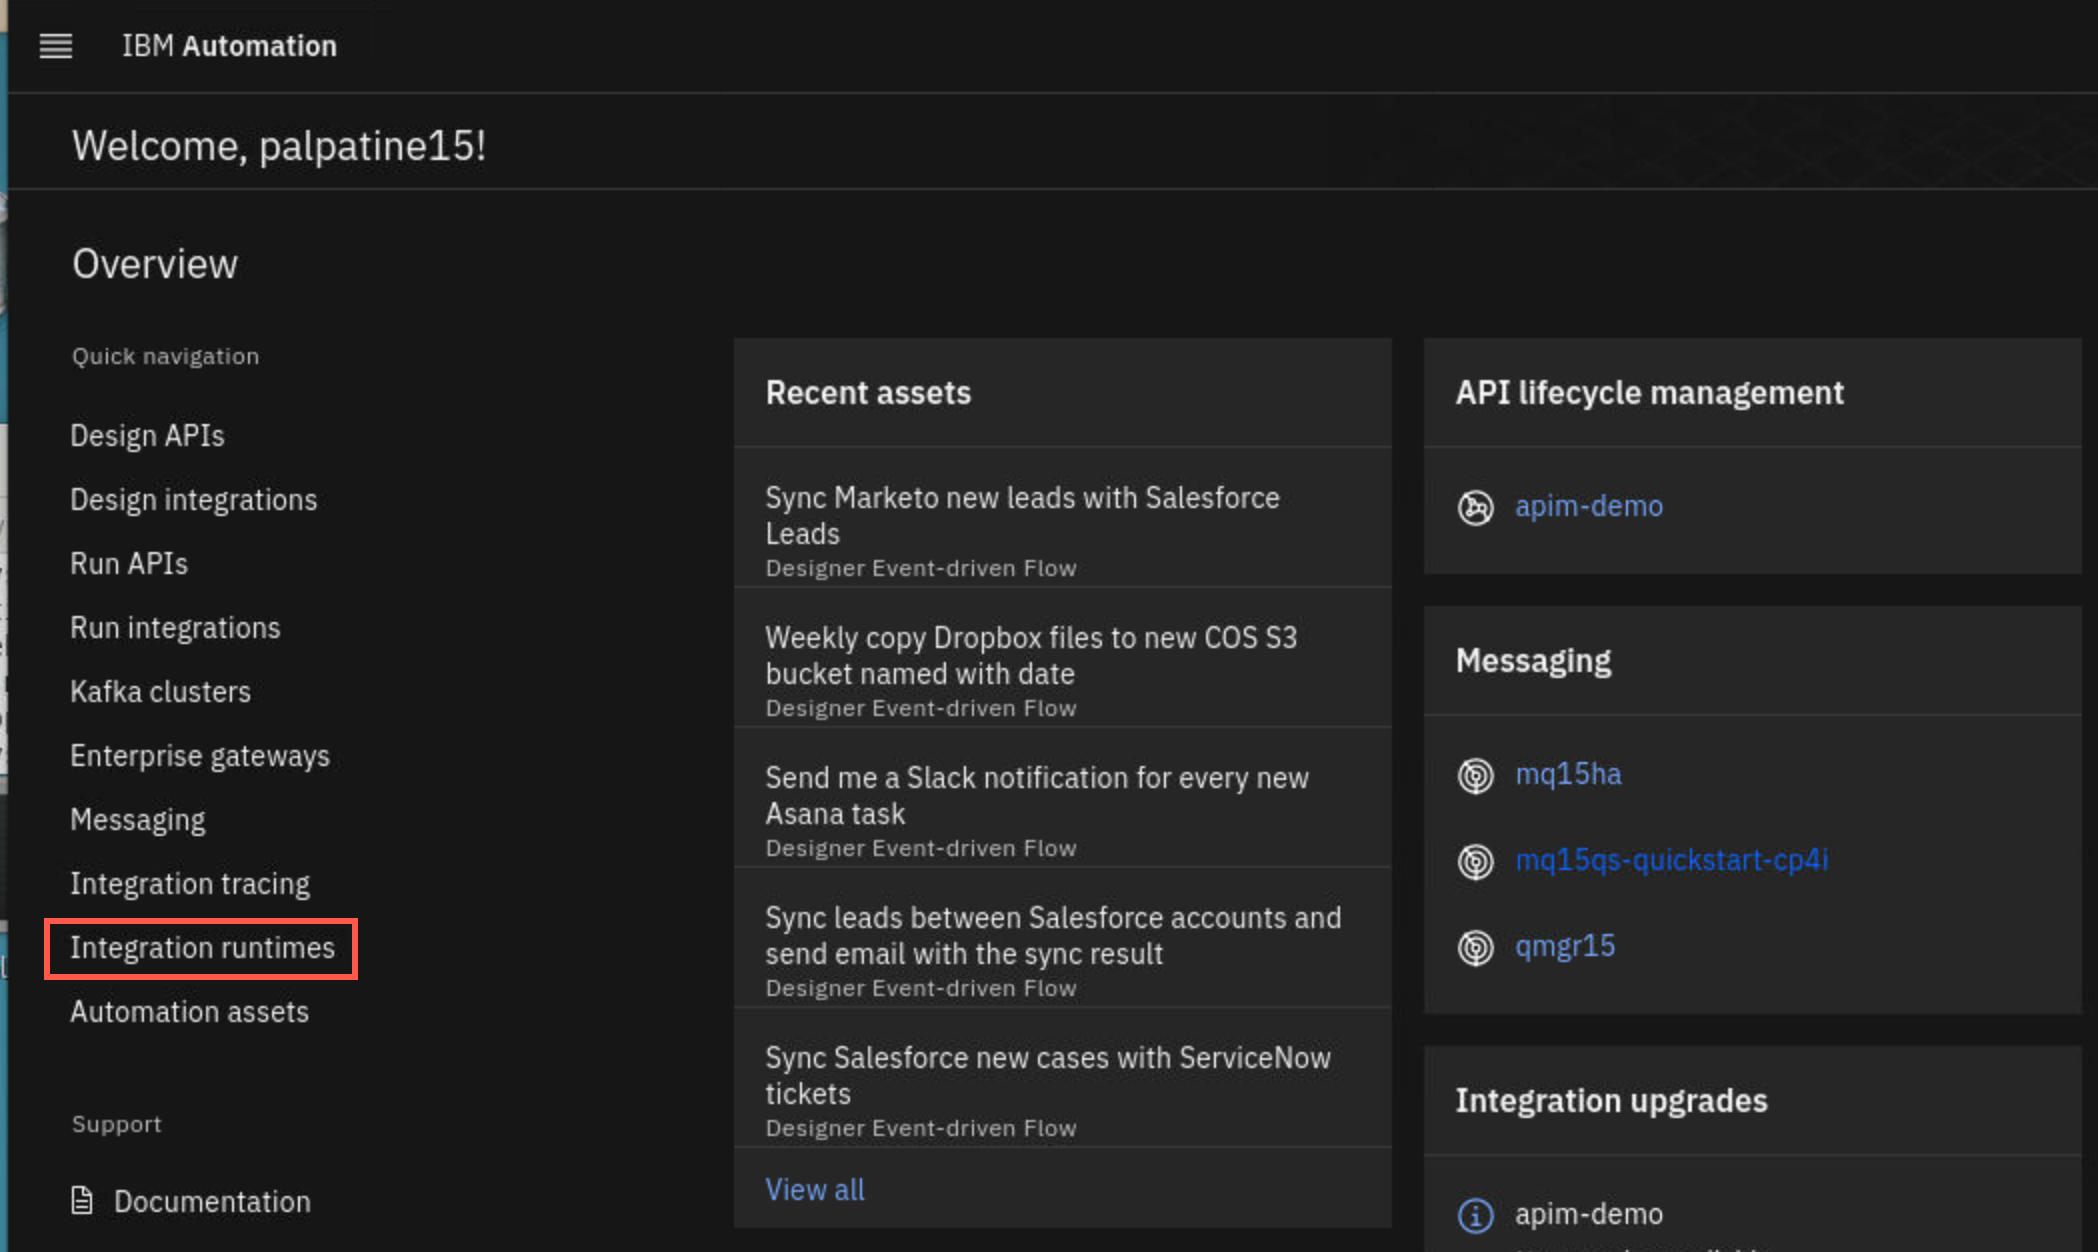
Click Integration runtimes on the left side bar.
-
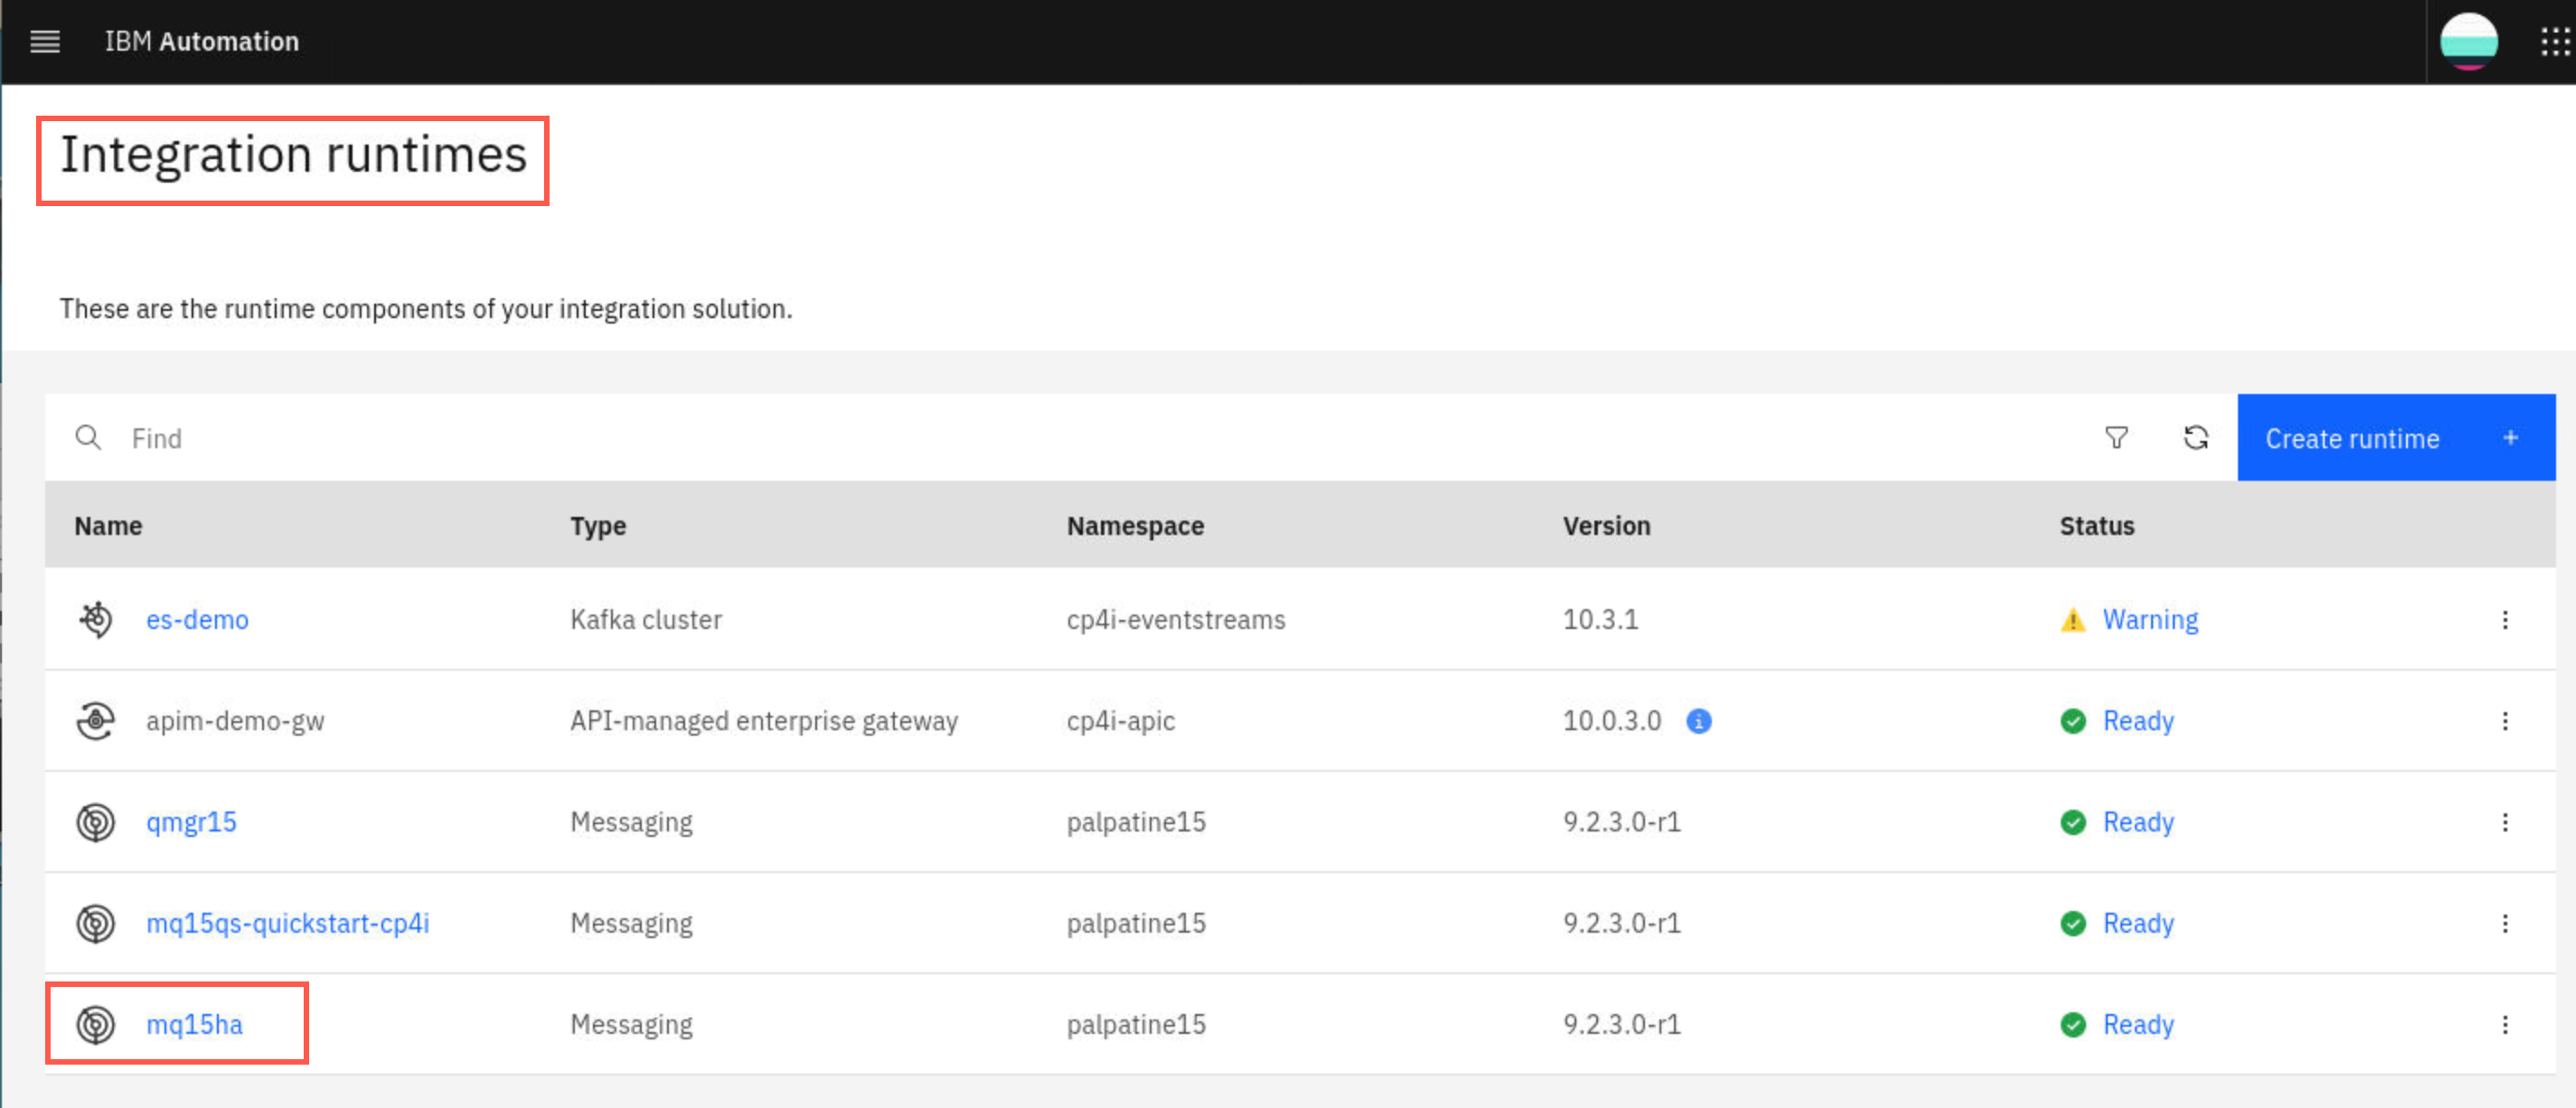
The Platform Navigator changes to the Integration runtimes display where you will see your queue manager instance mqxxha. Click the hyperlink for your queue manager to open the MQ Console.
-
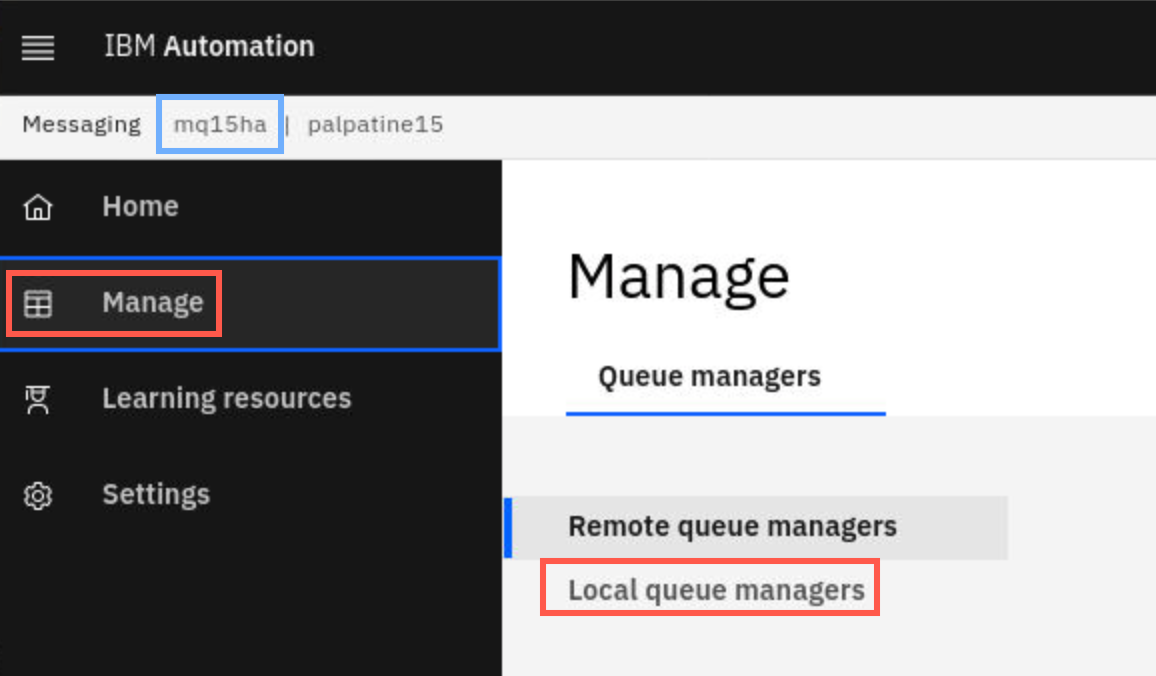
The MQ Console is now opened for queue manager mqxxha. Click the Manage icon.
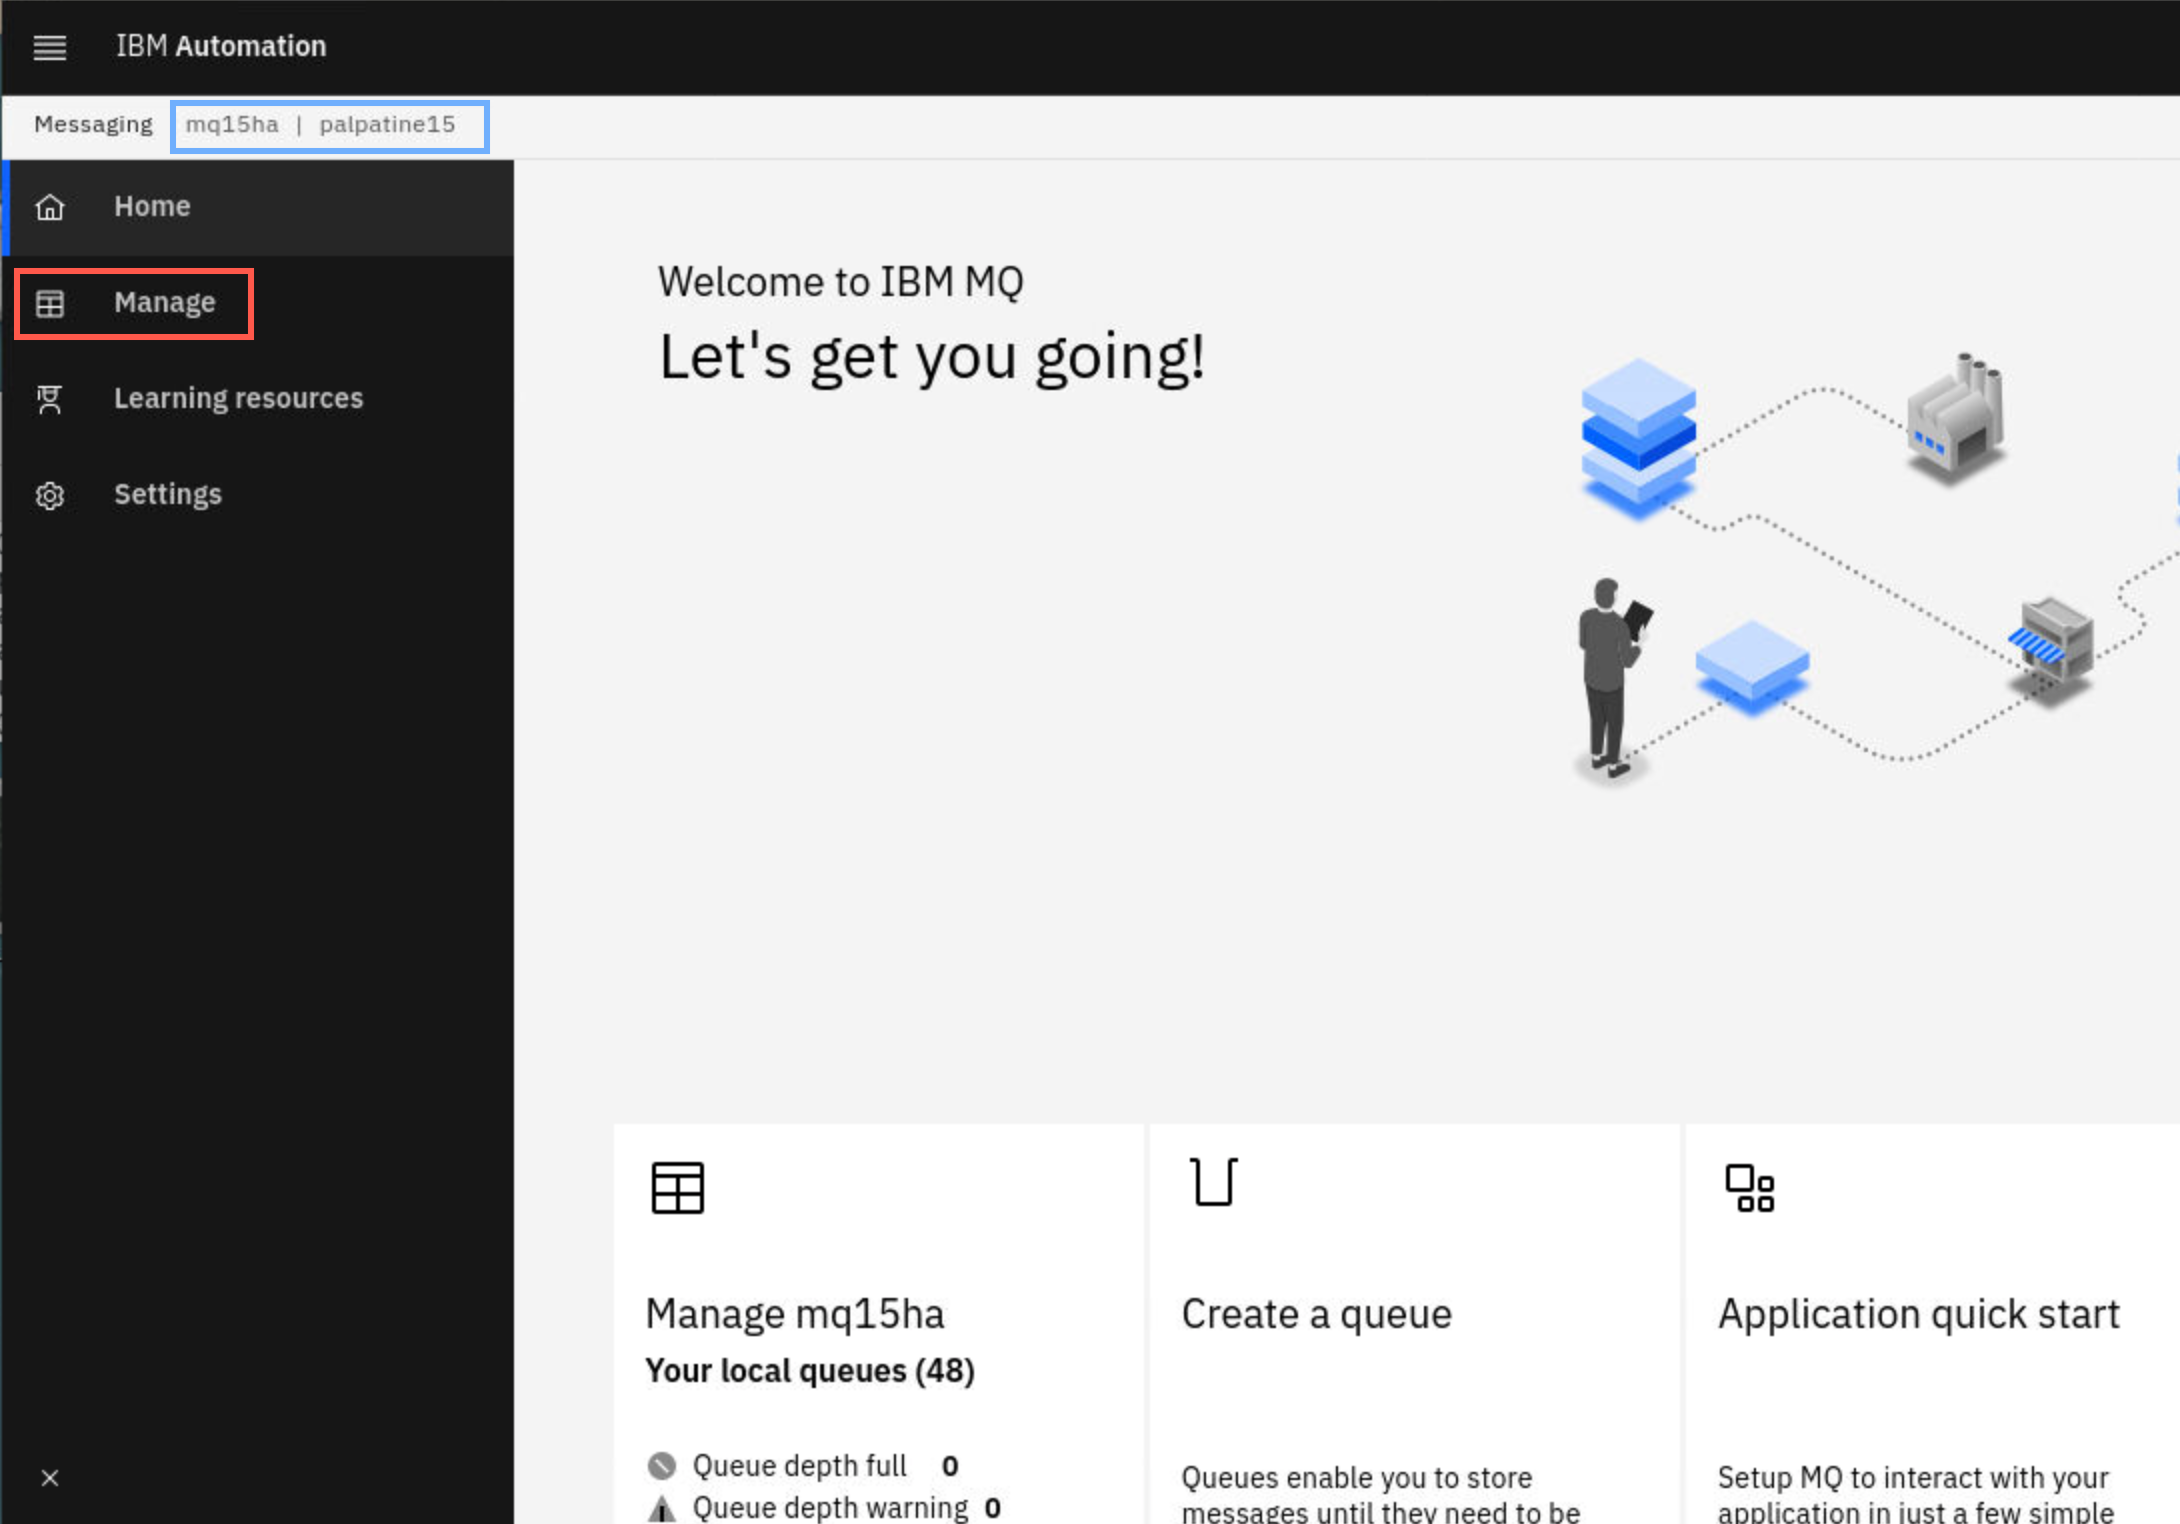
Then select Local queue managers.
-
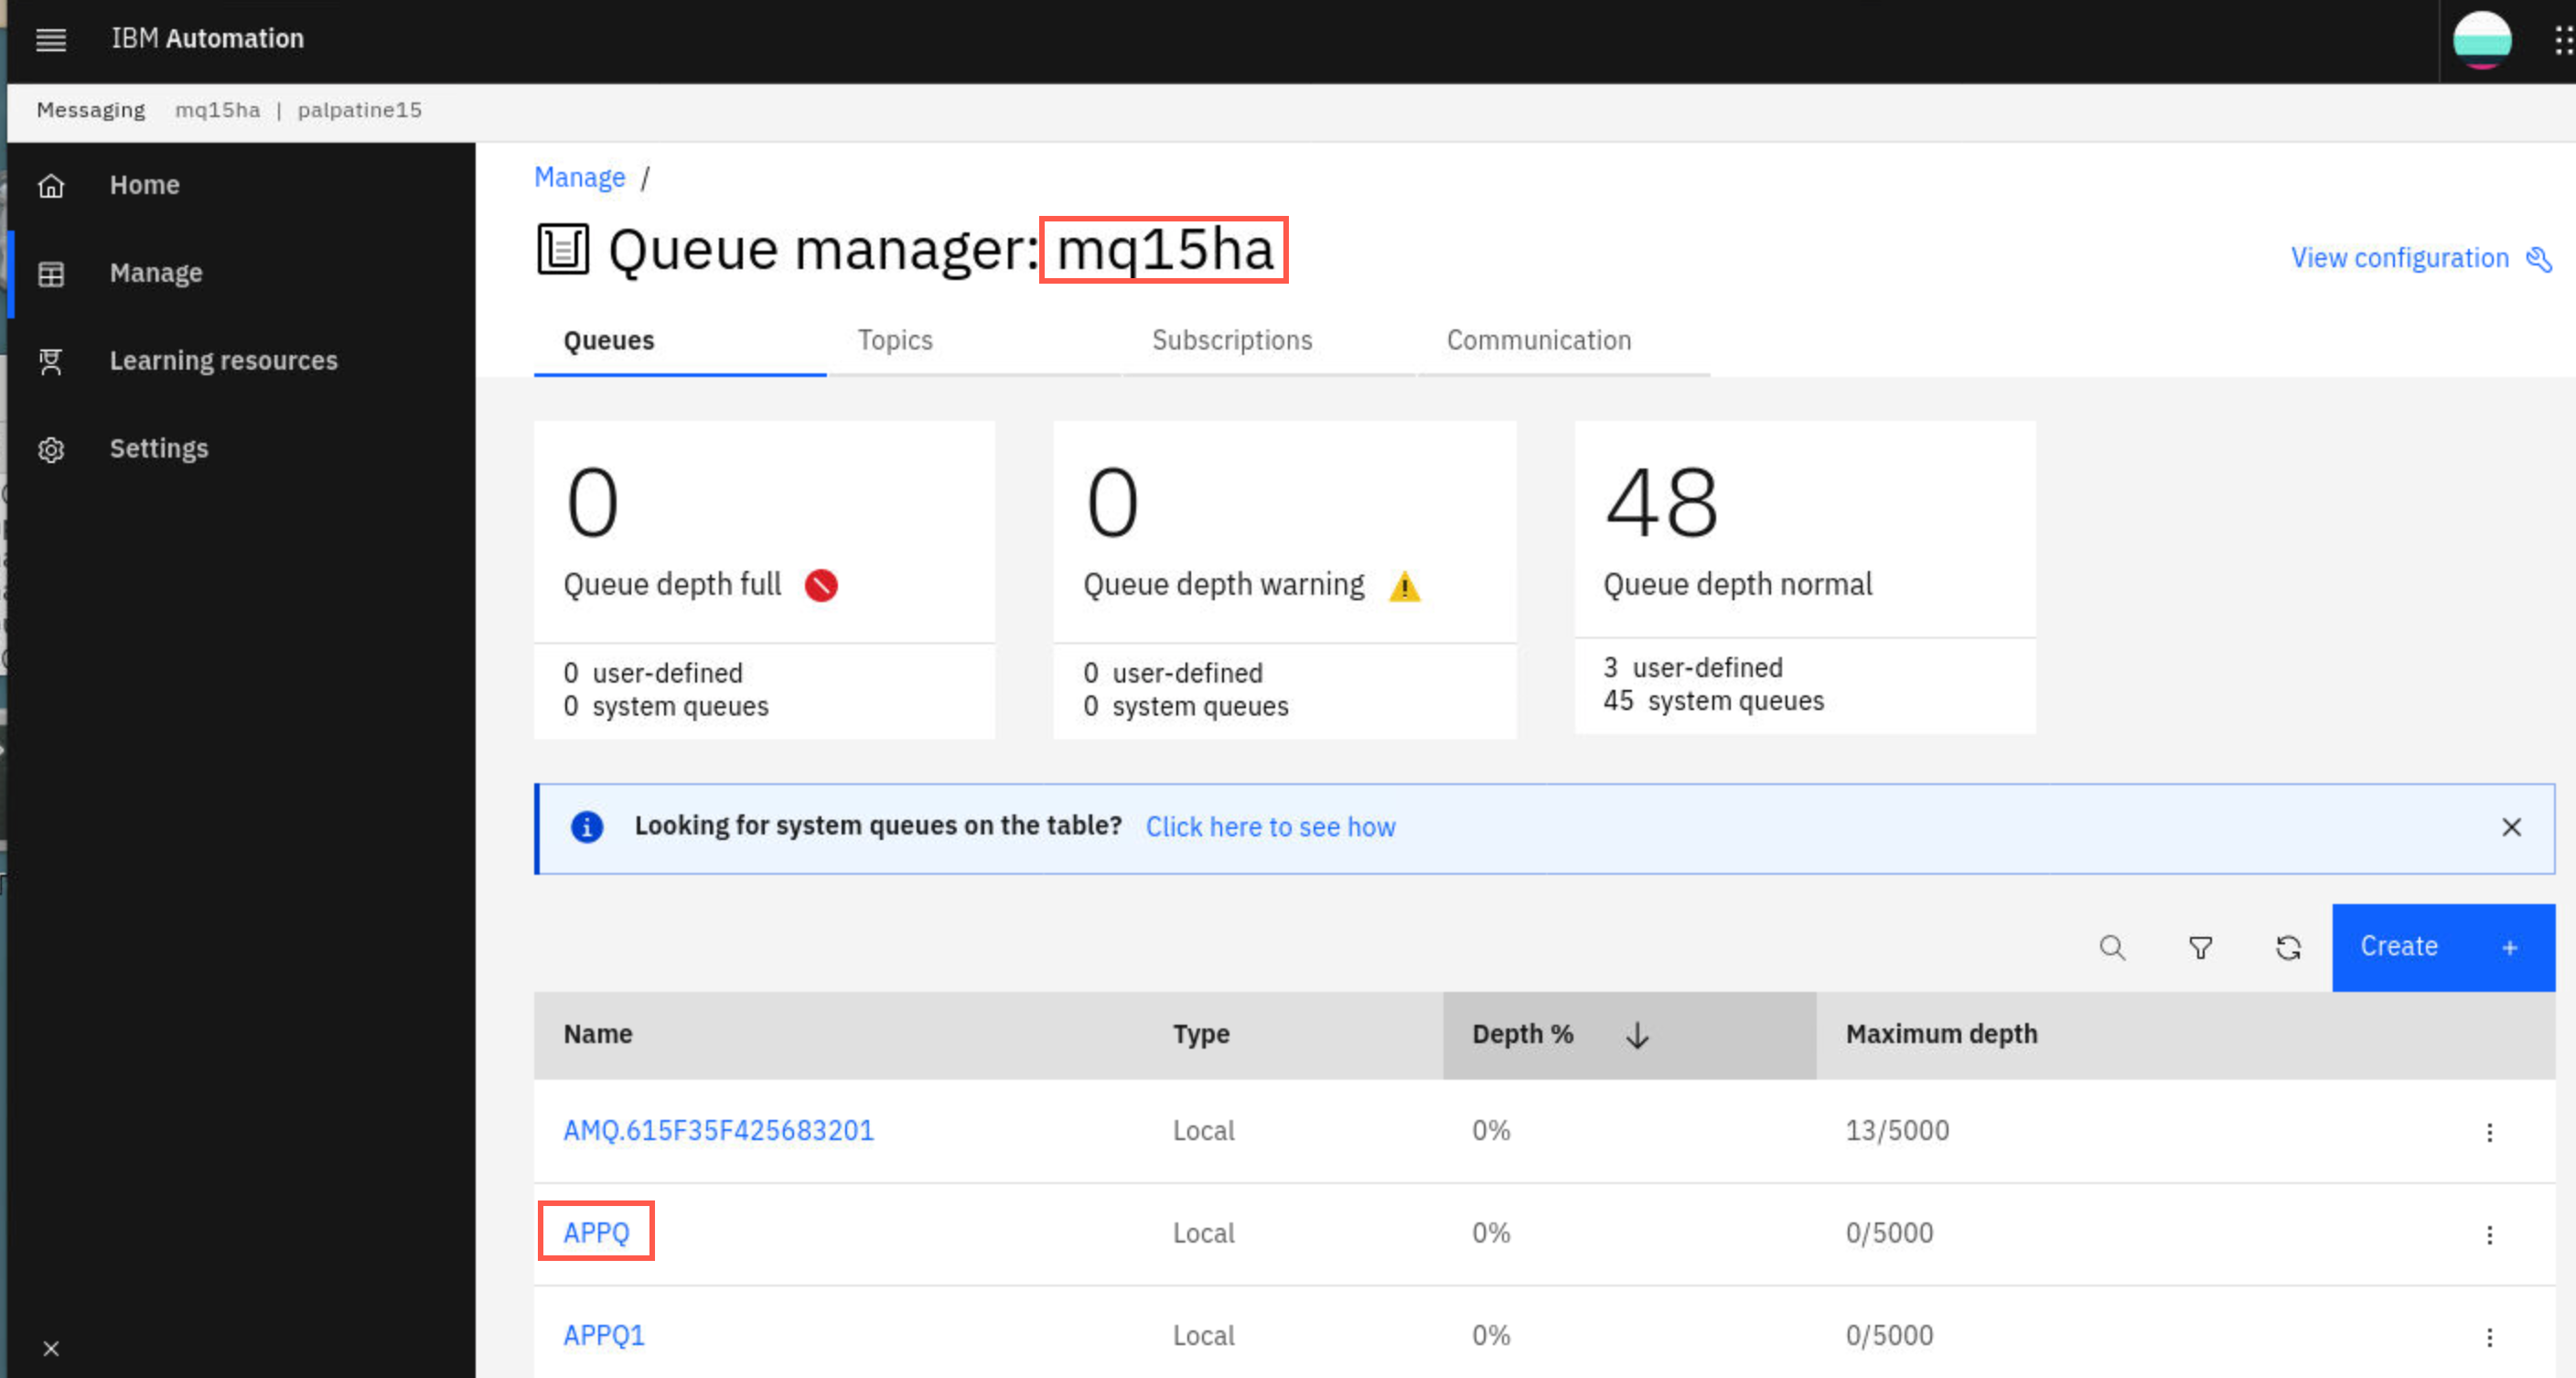
The Manage page has tabs for Queues, Topics, Subscriptions, and Communication (Channels). You see queue APPQ which was defined in the ConfigMap (mqsc) stanza of the install.sh yaml file.
-
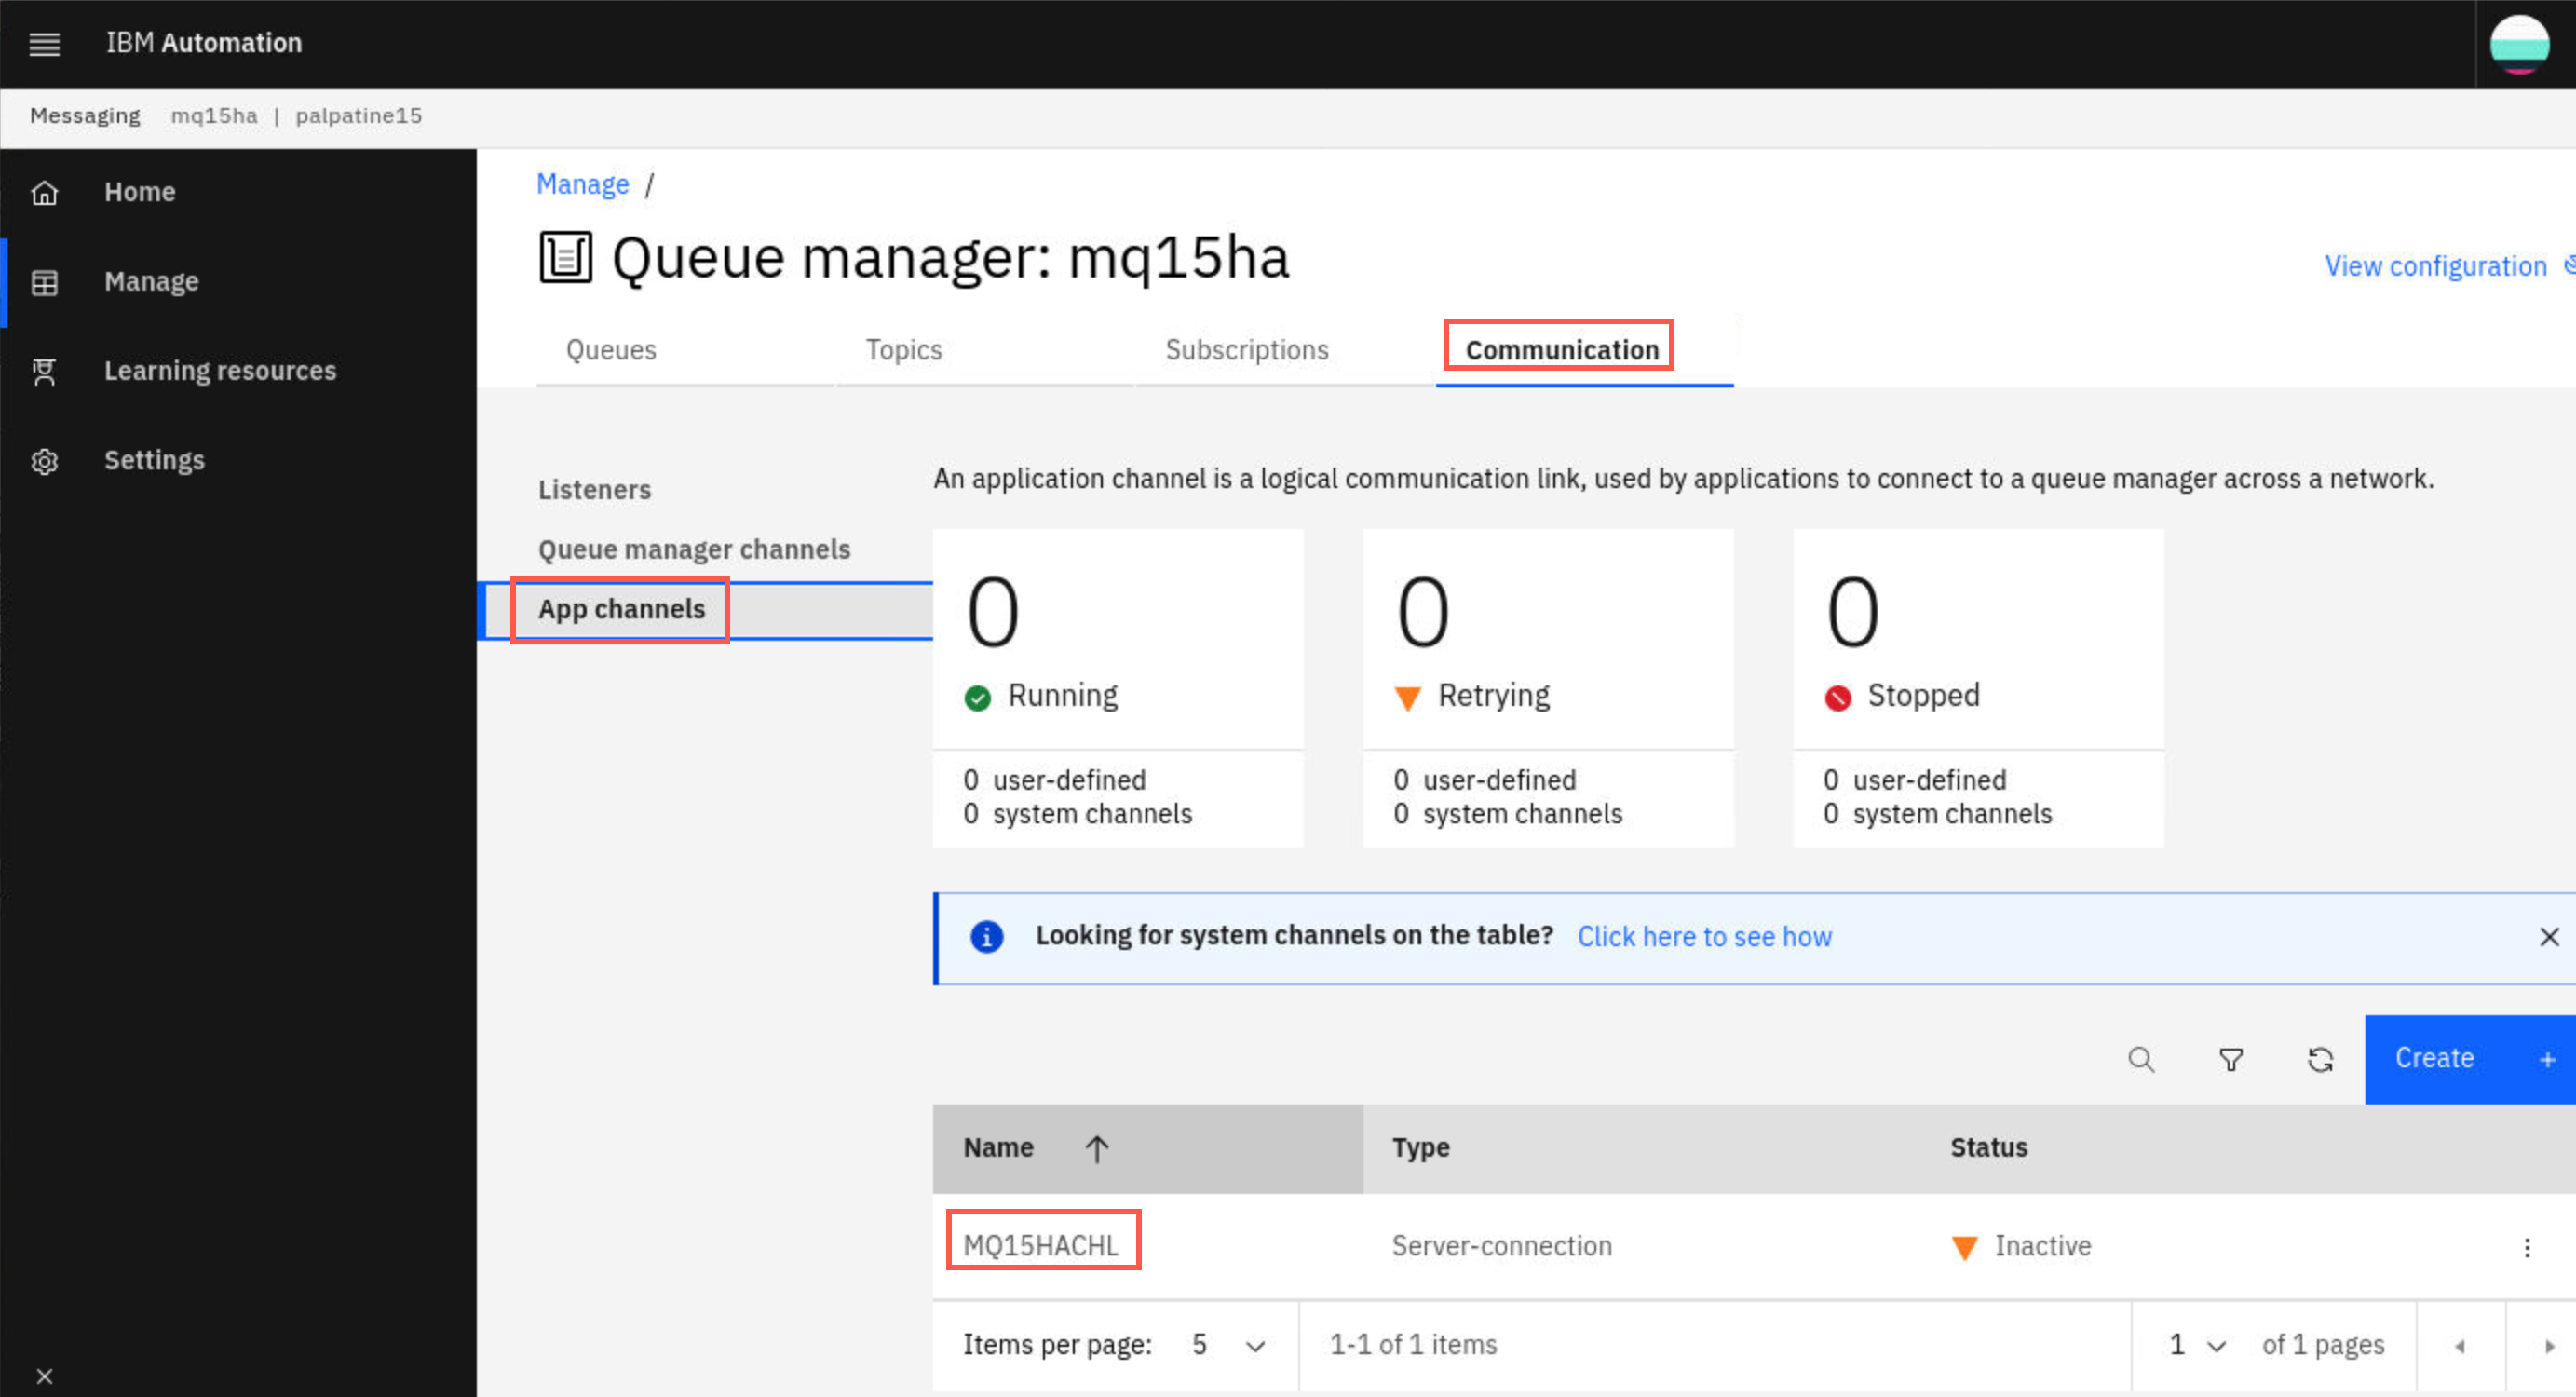
Click Communication > App channels. App channels are better known as SVRCONN channels. Here you see MQxxHACHL which was defined in the Queue Manager stanza of the yaml.
-
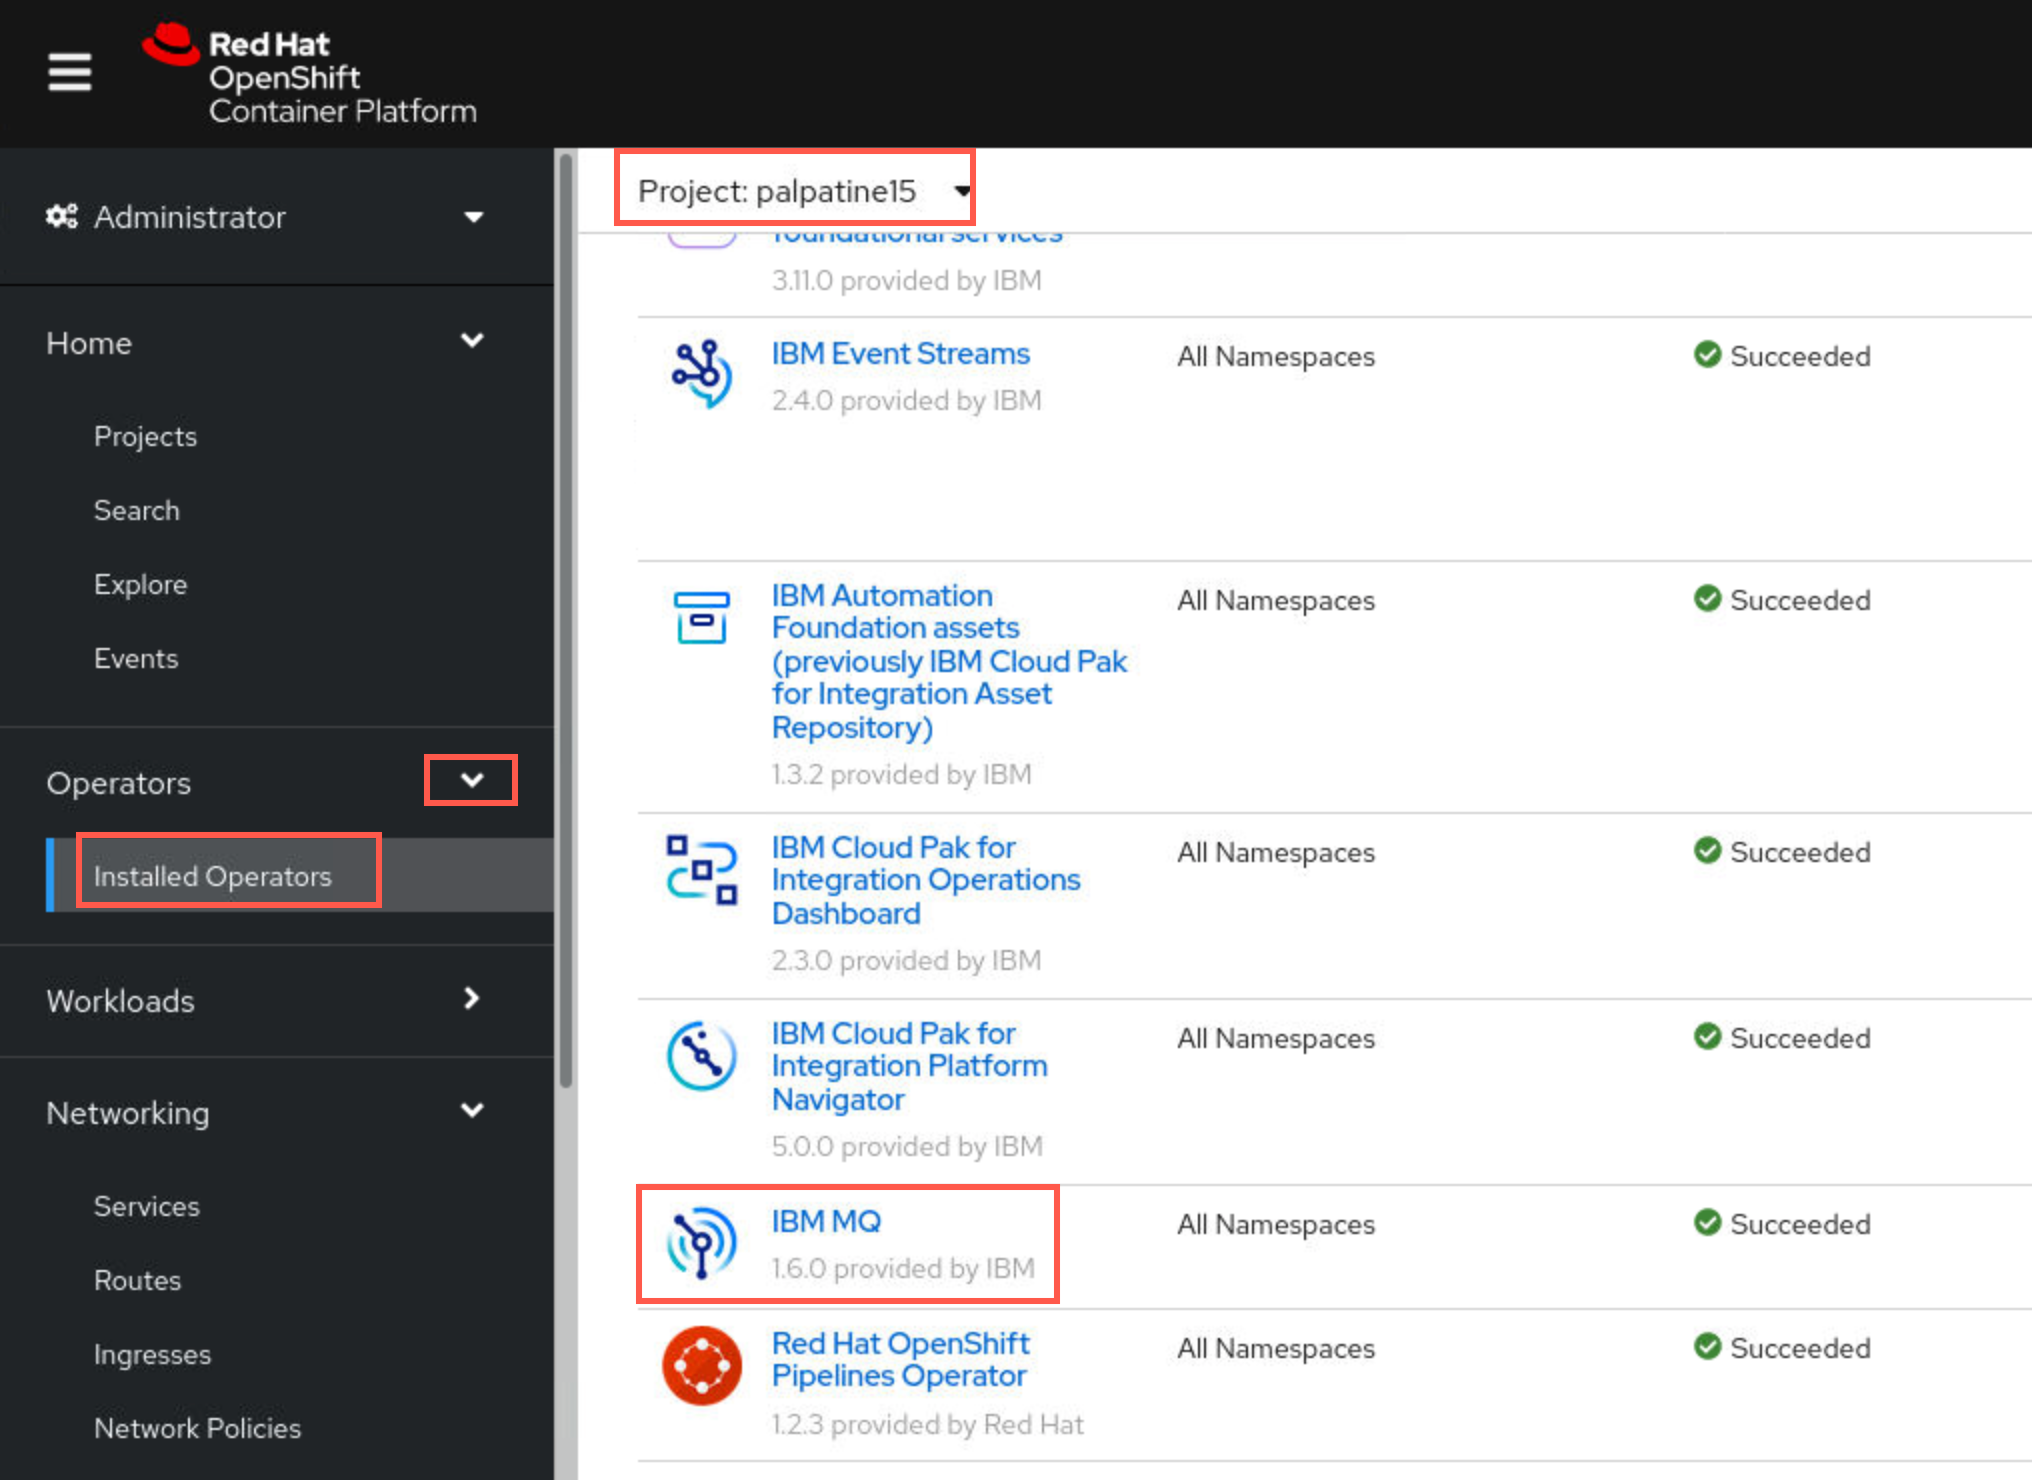
In the OCP Console, change the project to your namespace, for example palpatine15. Click the drop-down for Operators then select Installed Operators. Scroll to the bottom and click the hyperlink for IBM MQ.
-
You can browse the details about the MQ Operator, then click Queue Manager. You see your queue manager mqxxha and it is Running. Any other queue managers running in the namespace will also be displayed.
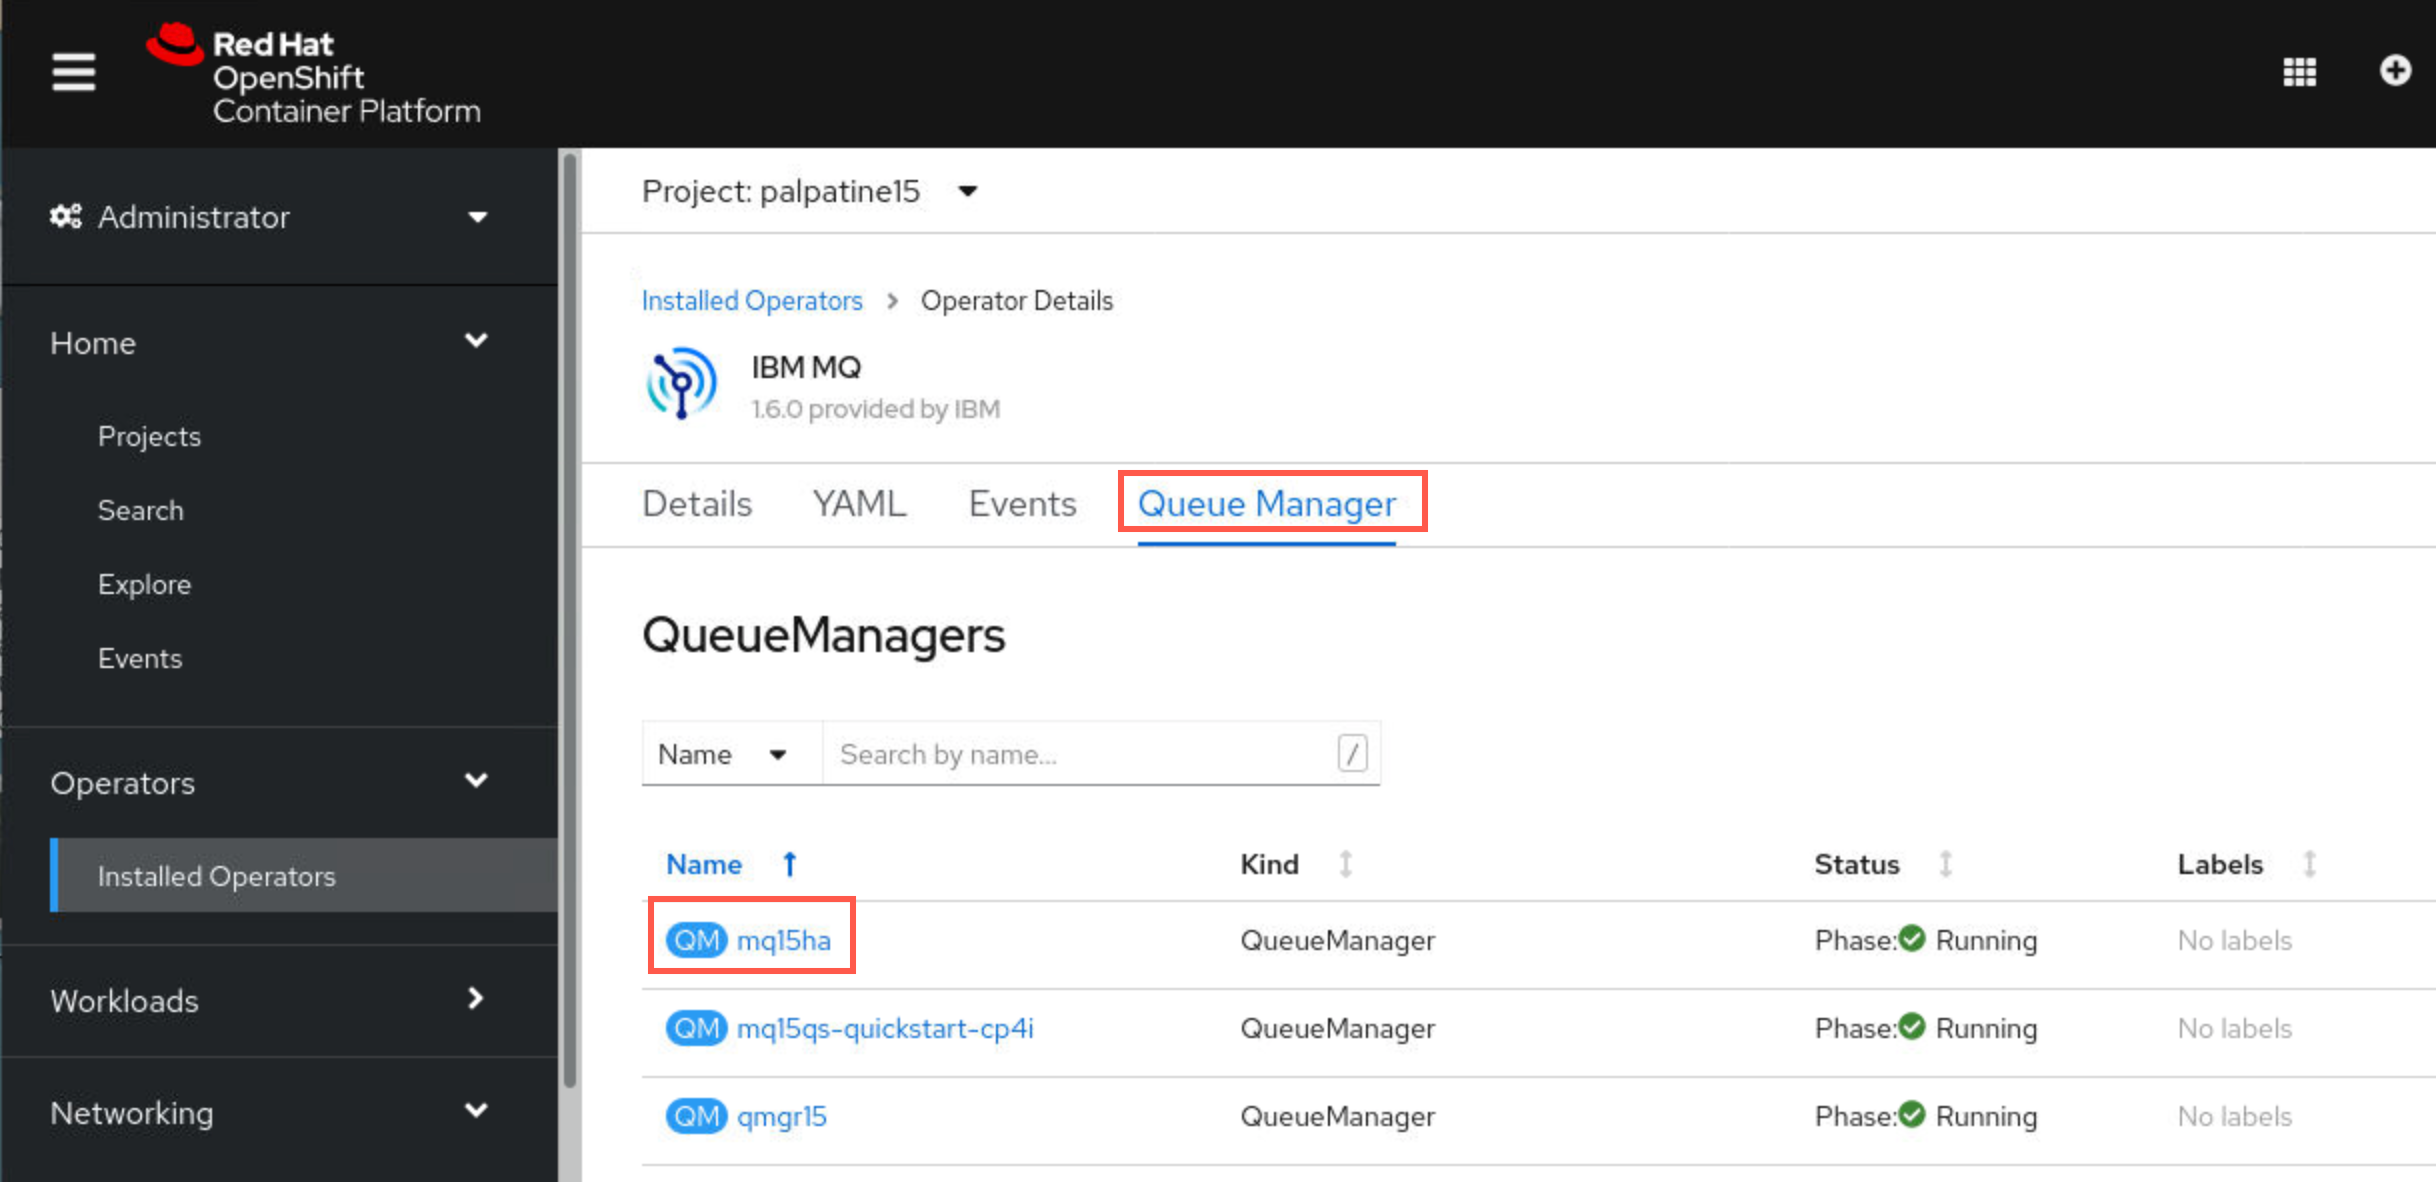
Click the hyperlink for mqxxha.
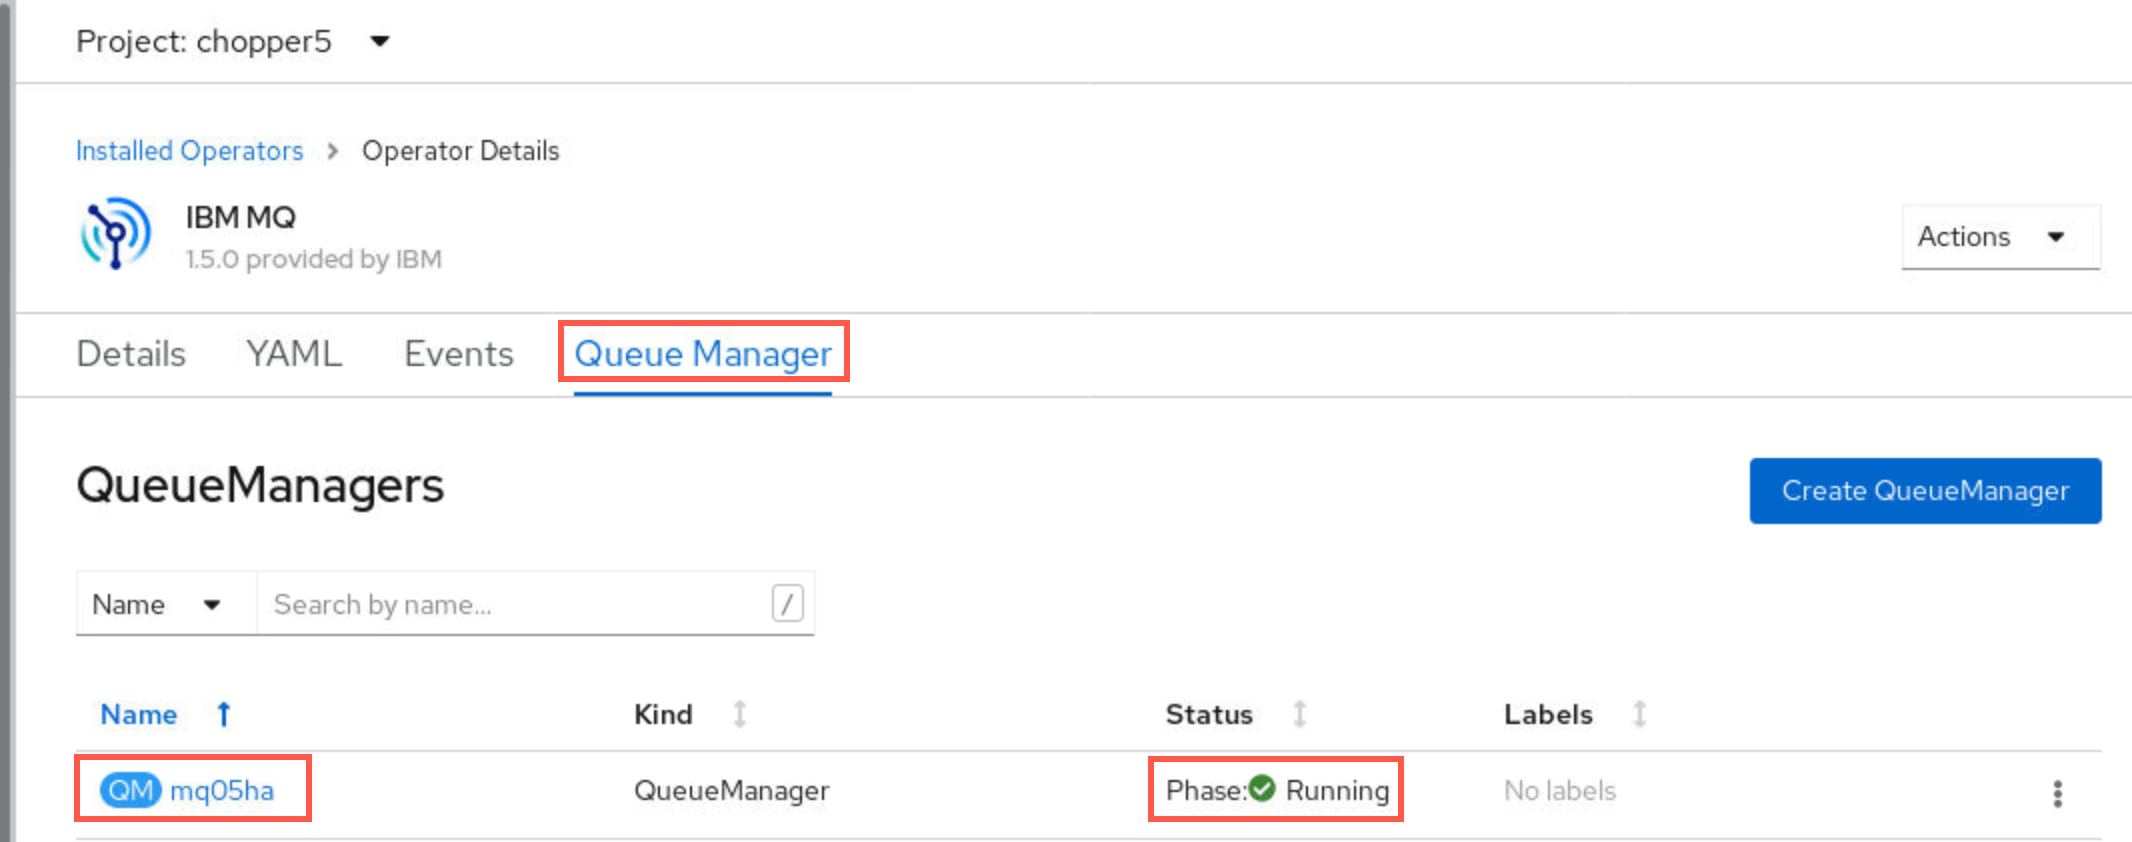
-
The details and properties for the queue manager are displayed. Review by scrolling through the details. You can also see the yaml for that queue manager object.
After reviewing, click the drop-down for Workloads and select Pods.
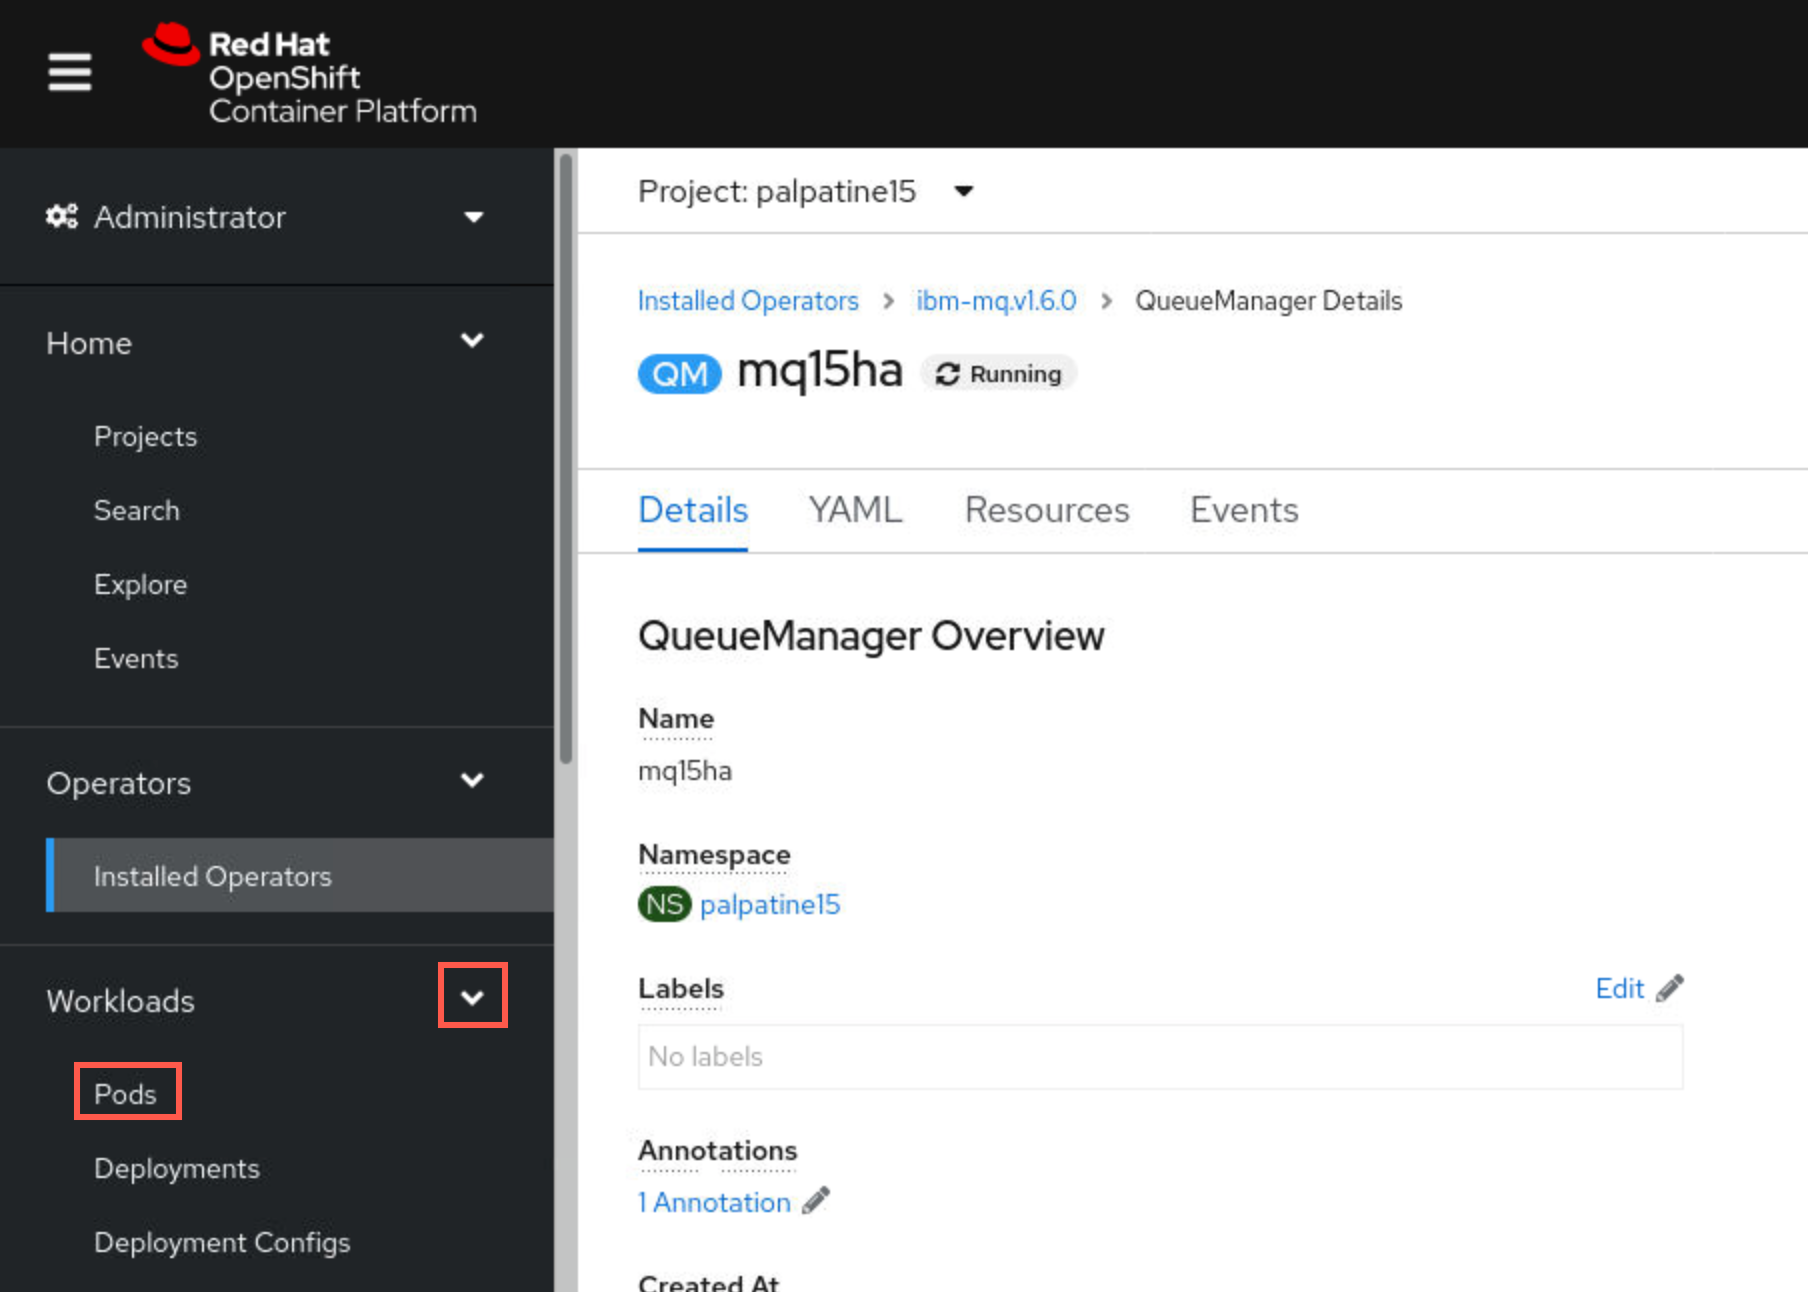
Type mqxx (your student number in place of xx) in the filter so you will only see the pods for queue manger mqxxha.
-
As expected you will see three pods for the nativeha queue manager. One of the pods has 1 of 1 containers running. Two of the pods have 0 of 1 containers running. This is the nature of nativeHA, one pod running the queue manager and data being replicated to the other two pods which are in standby mode.
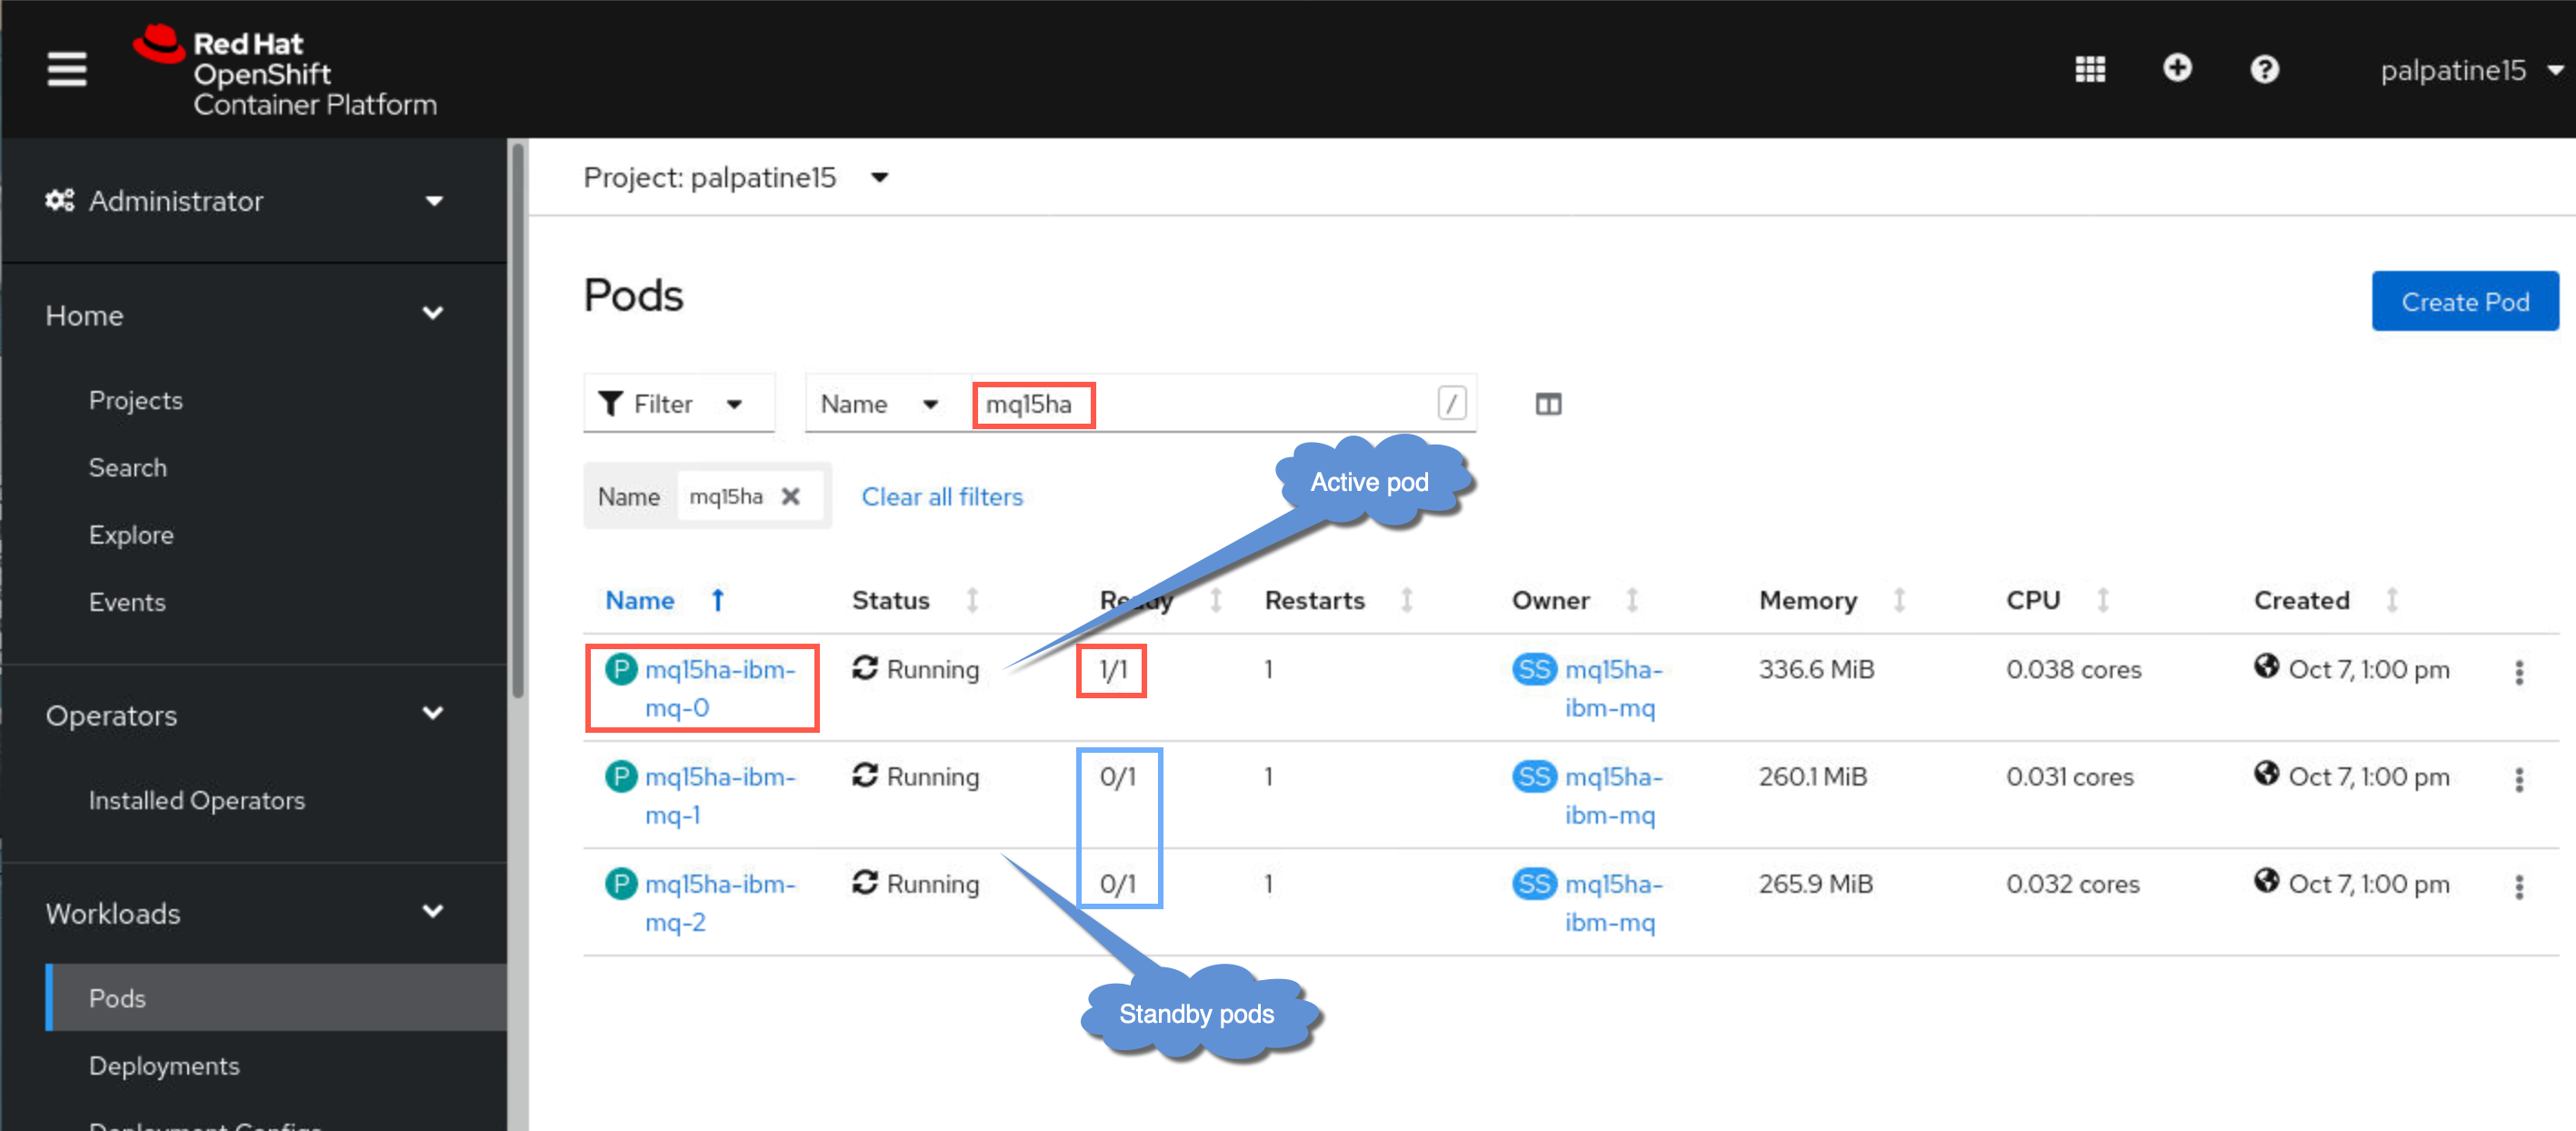
-
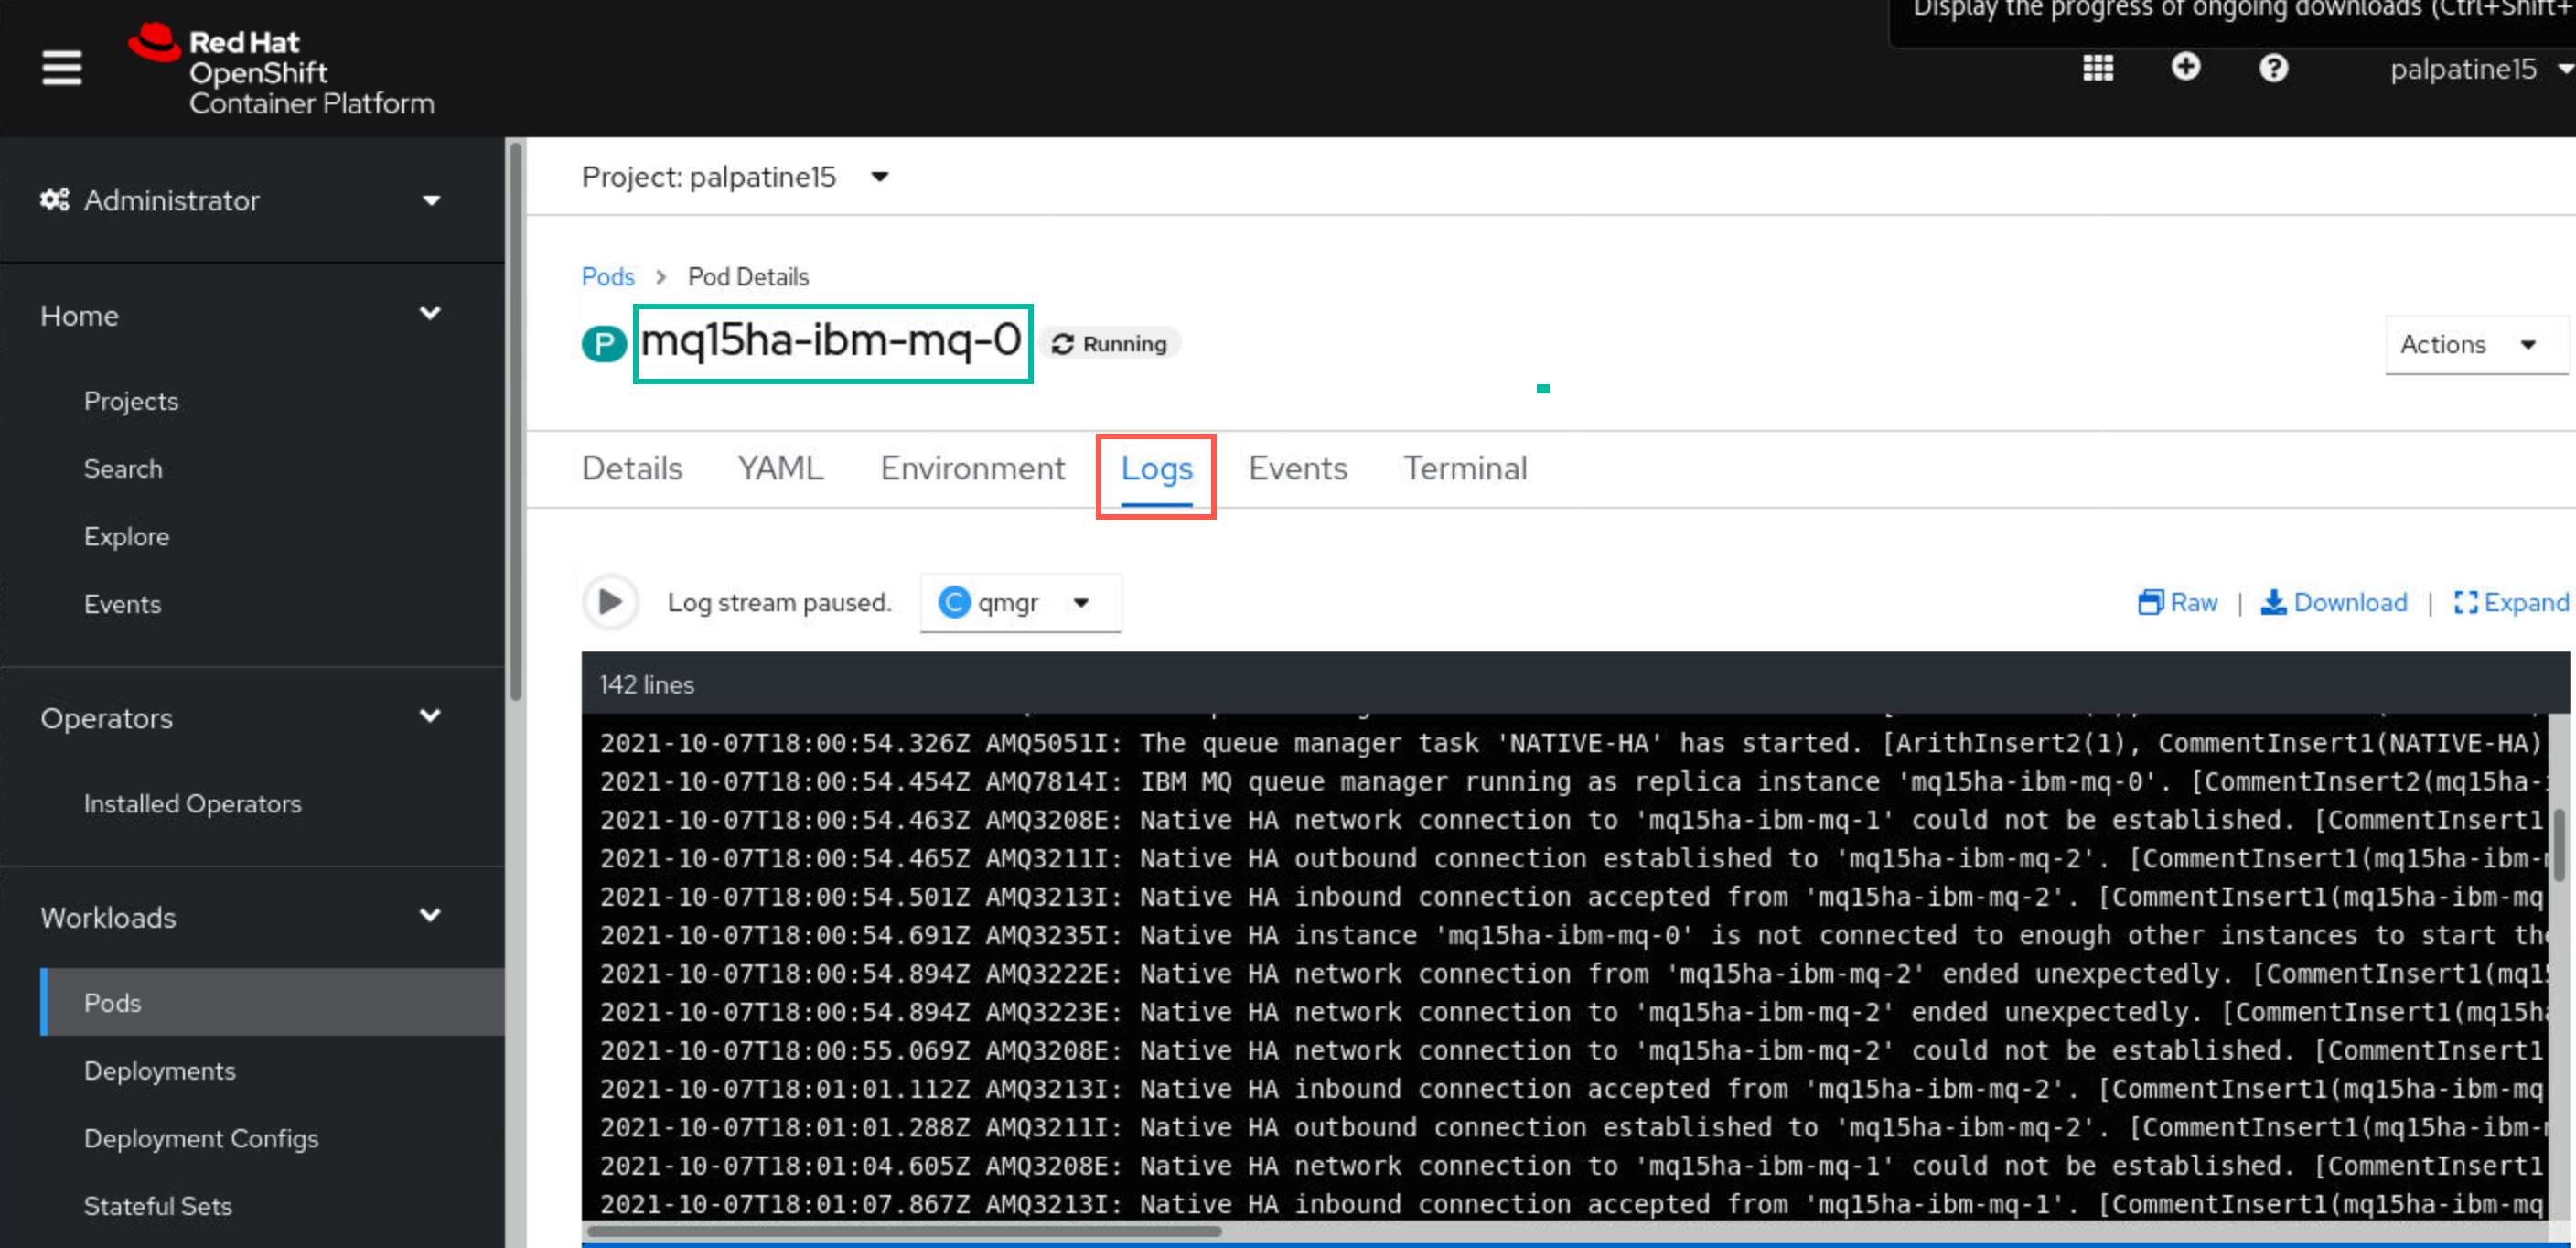
If you click the hyperlink for the running pod, you will see its details and the logs. Click Logs to review the messages. Below is a sample from pod mq15ha-ibm-mq-0 where you can see the messages involved with HA.
-
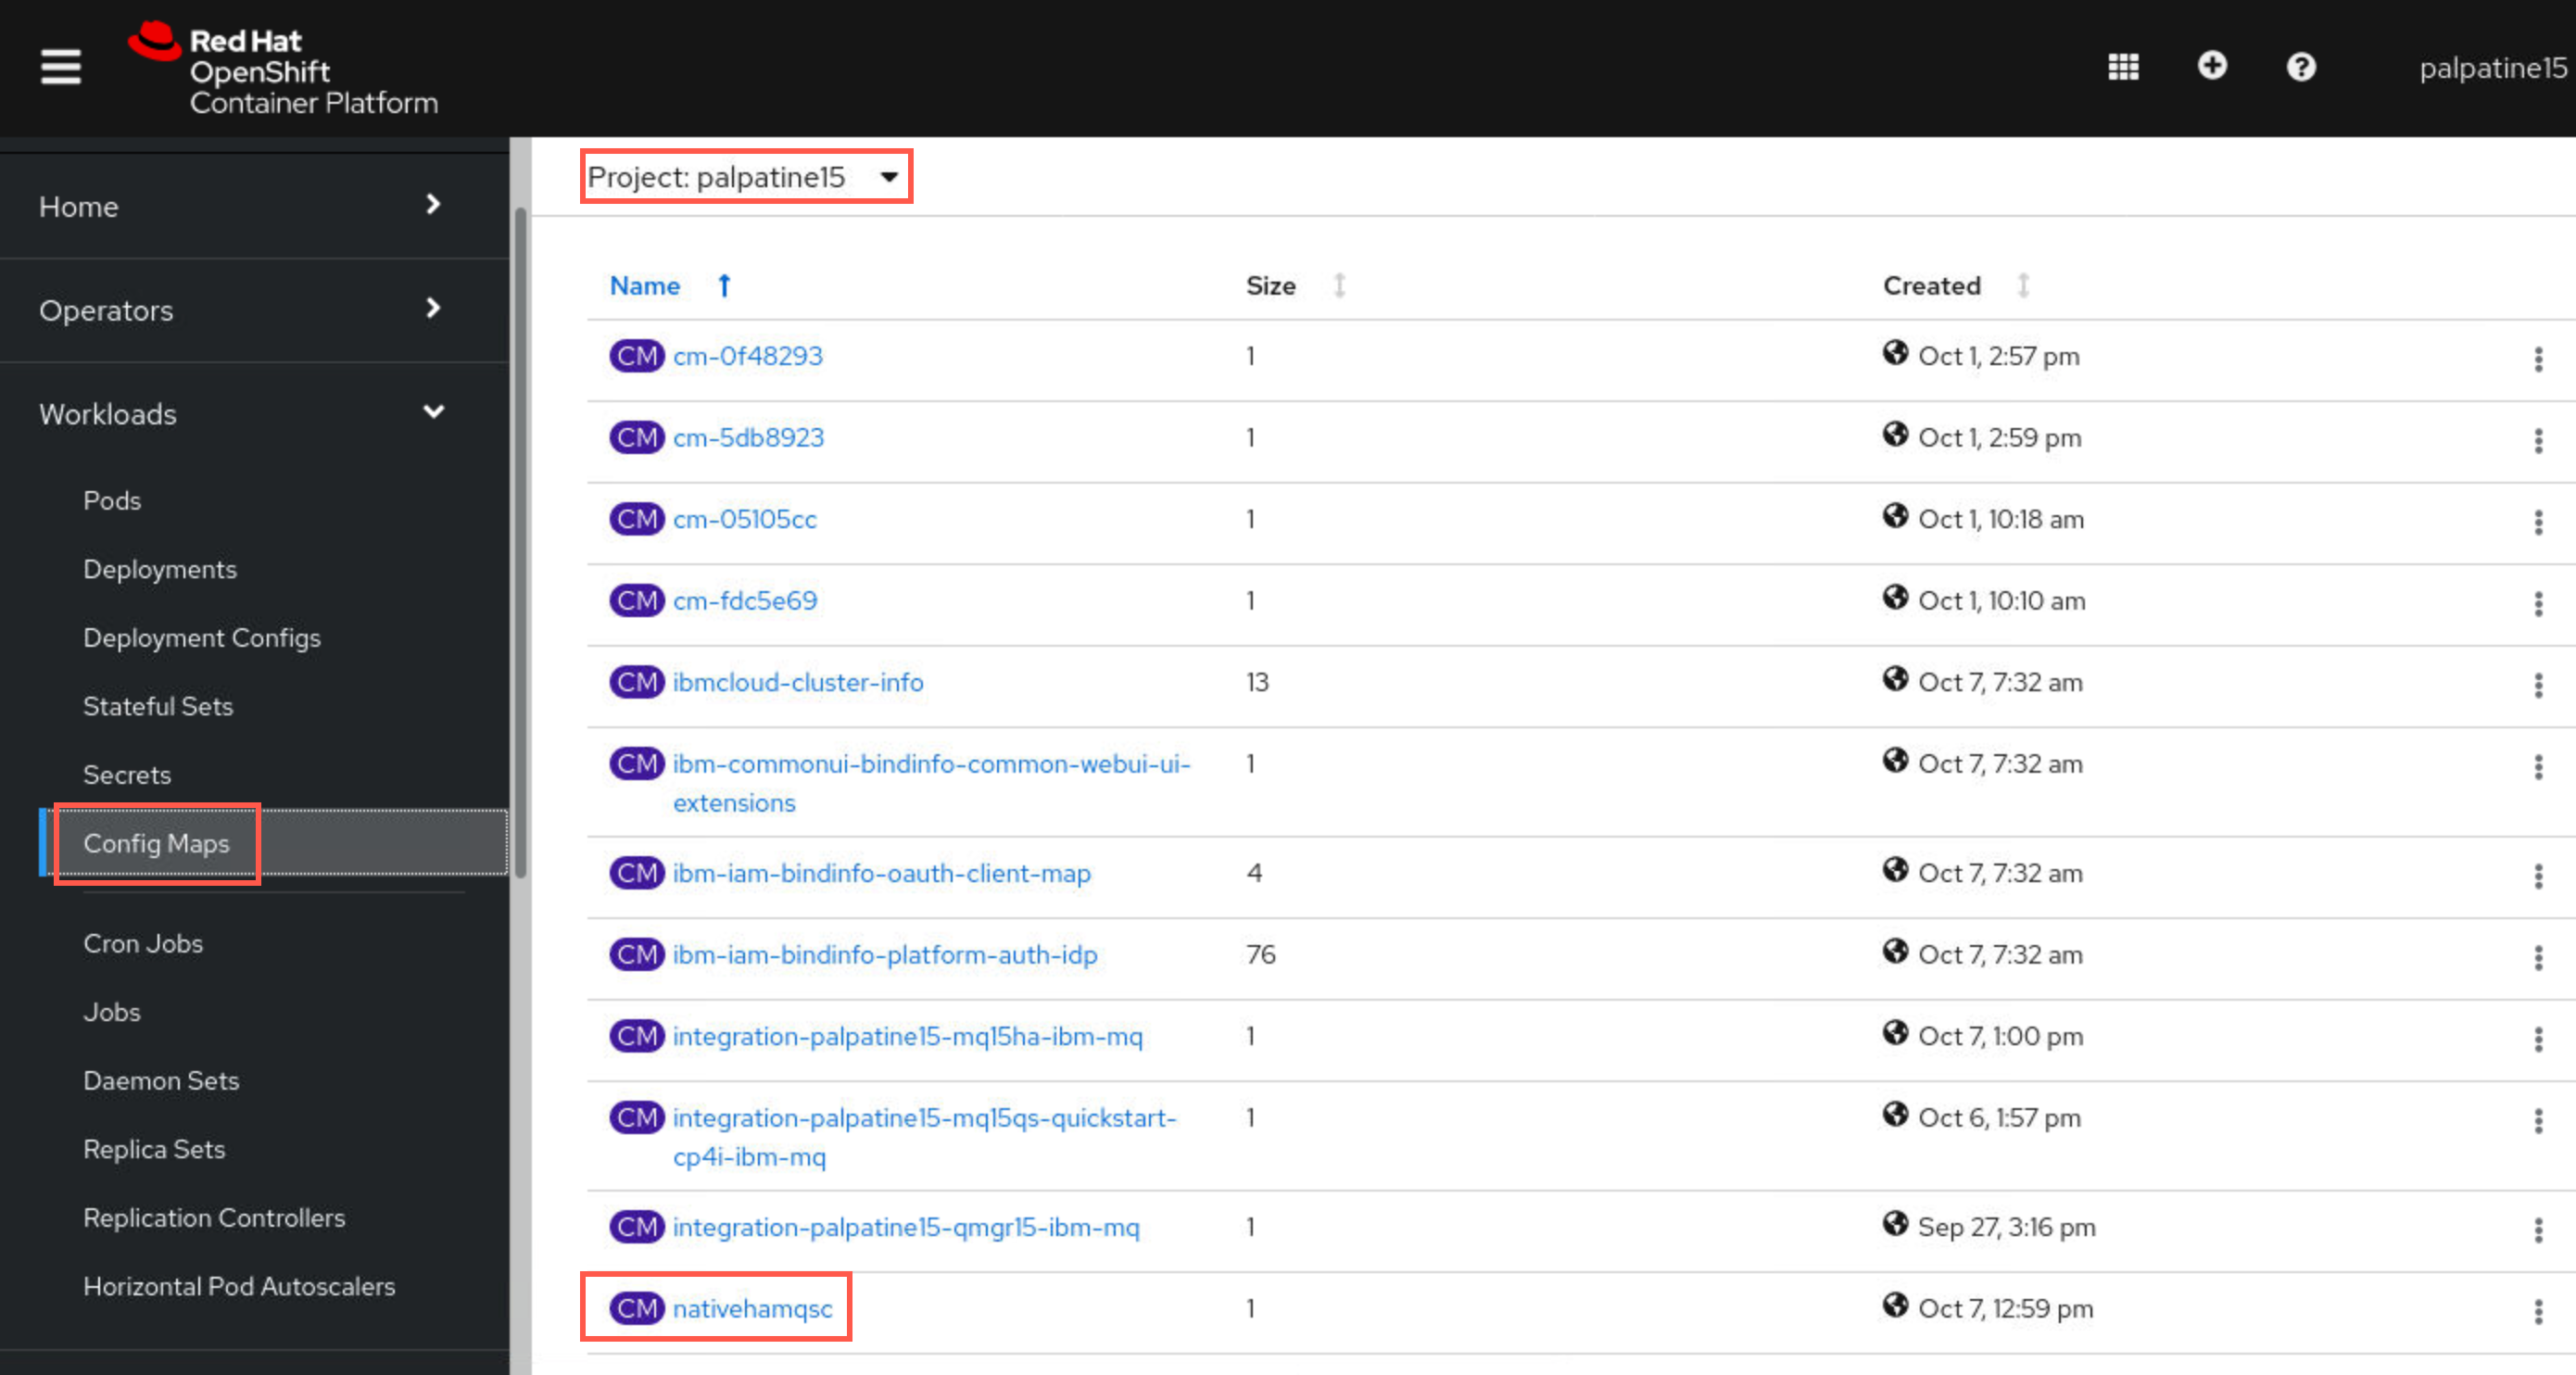
Under Workloads click ConfigMaps then scroll to bottom and select nativehamqsc.
-
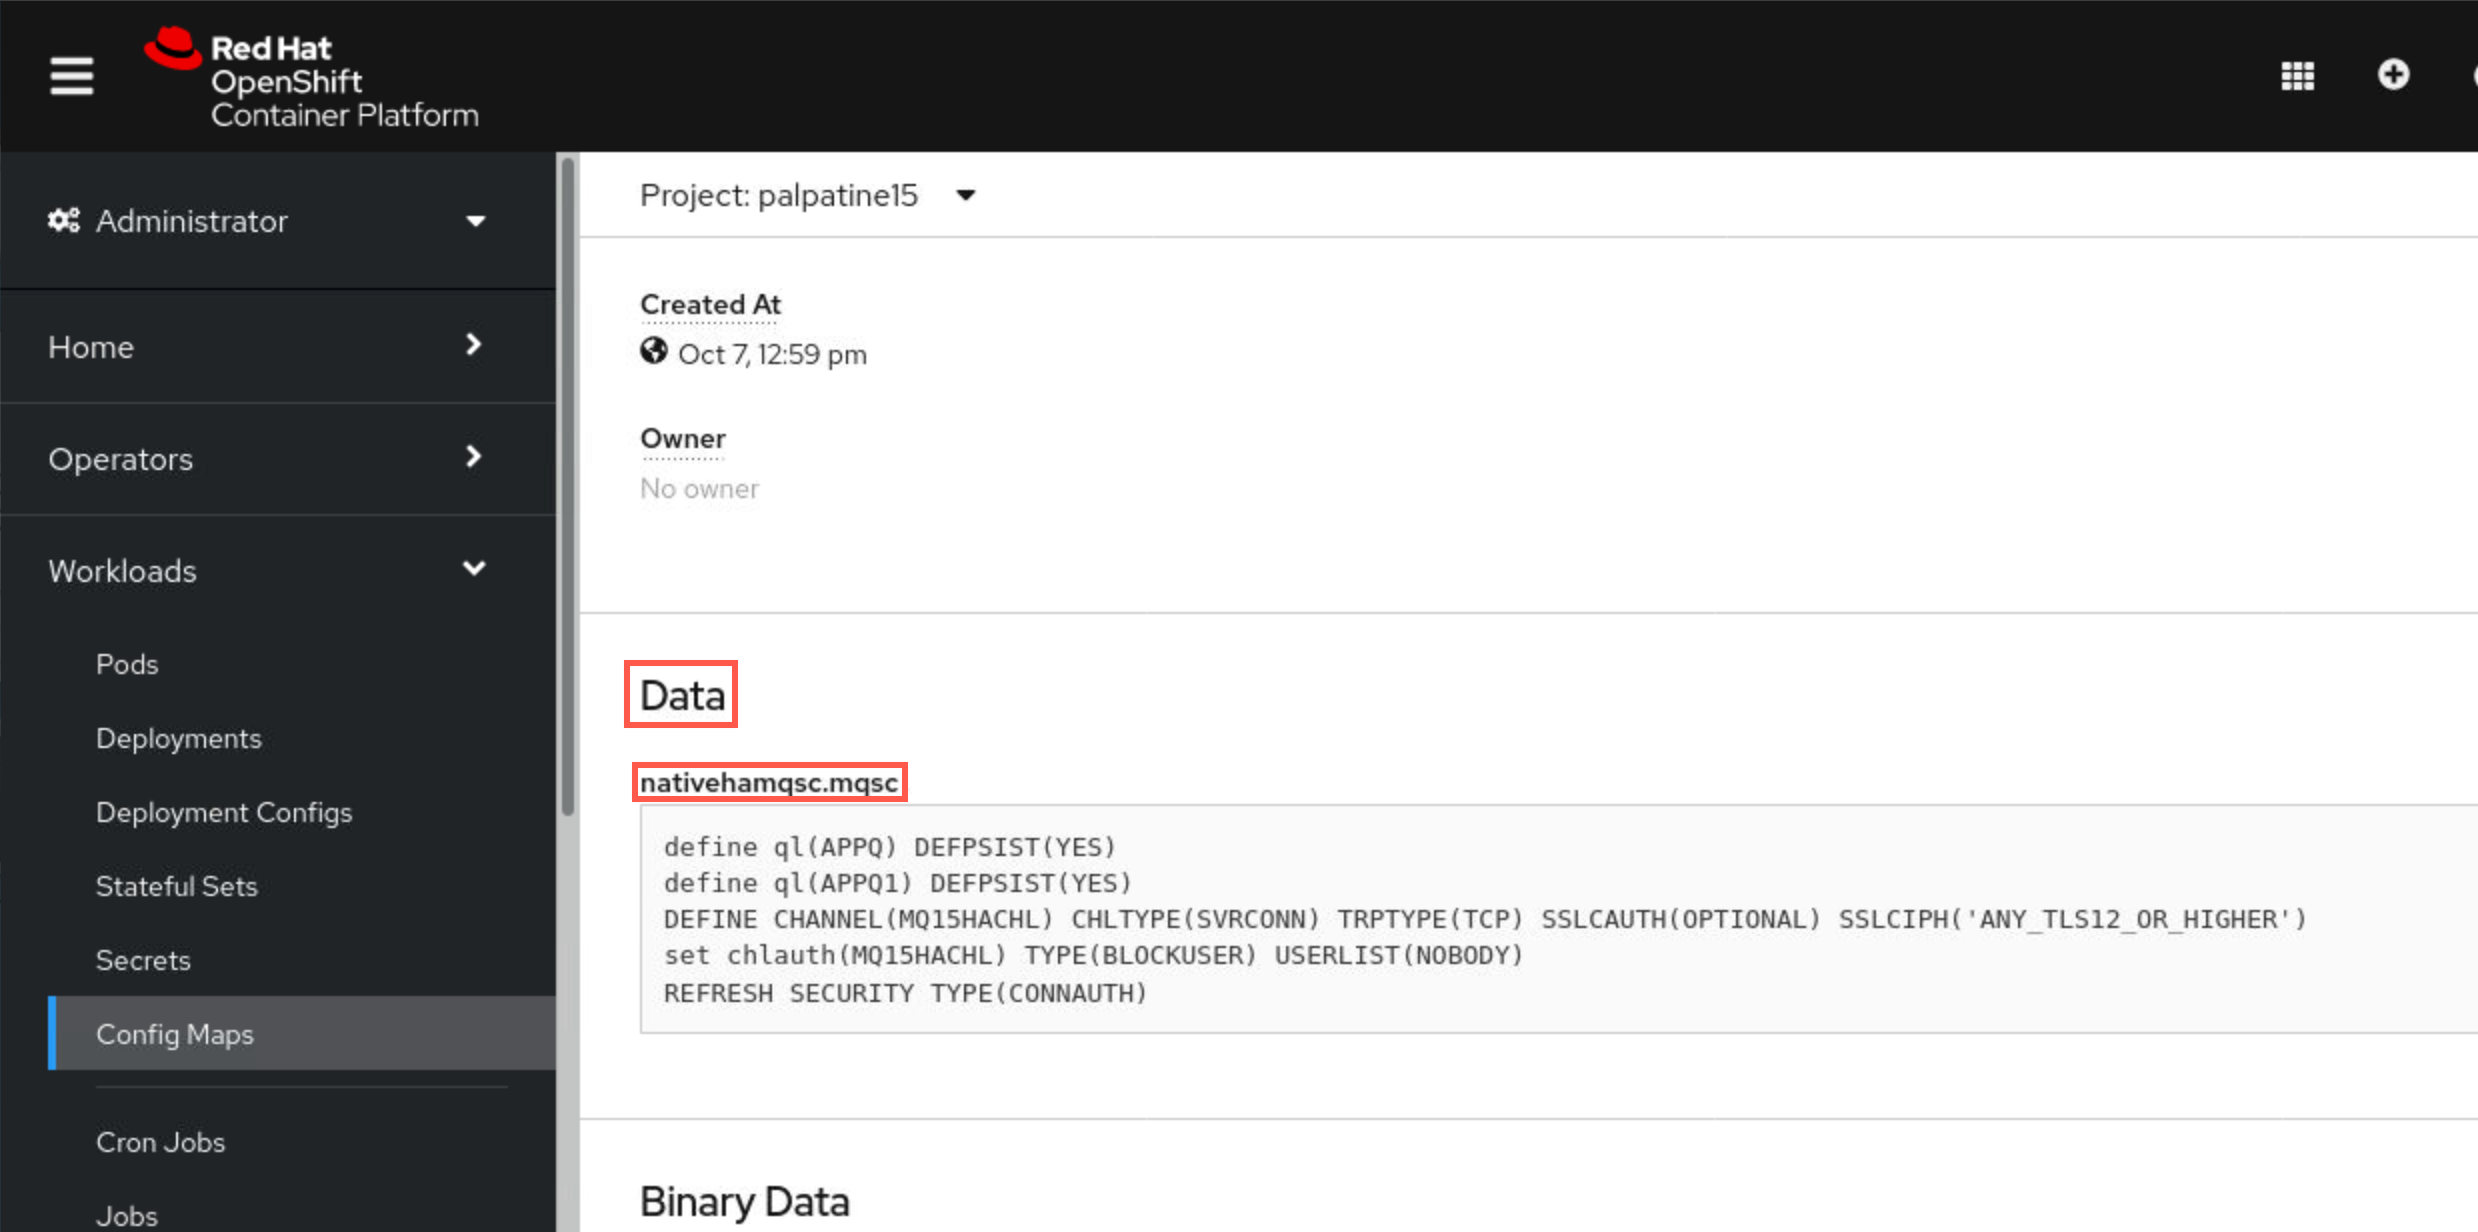
Scroll down to Data and you will see the mqsc statements to define the queue manager objects.
-
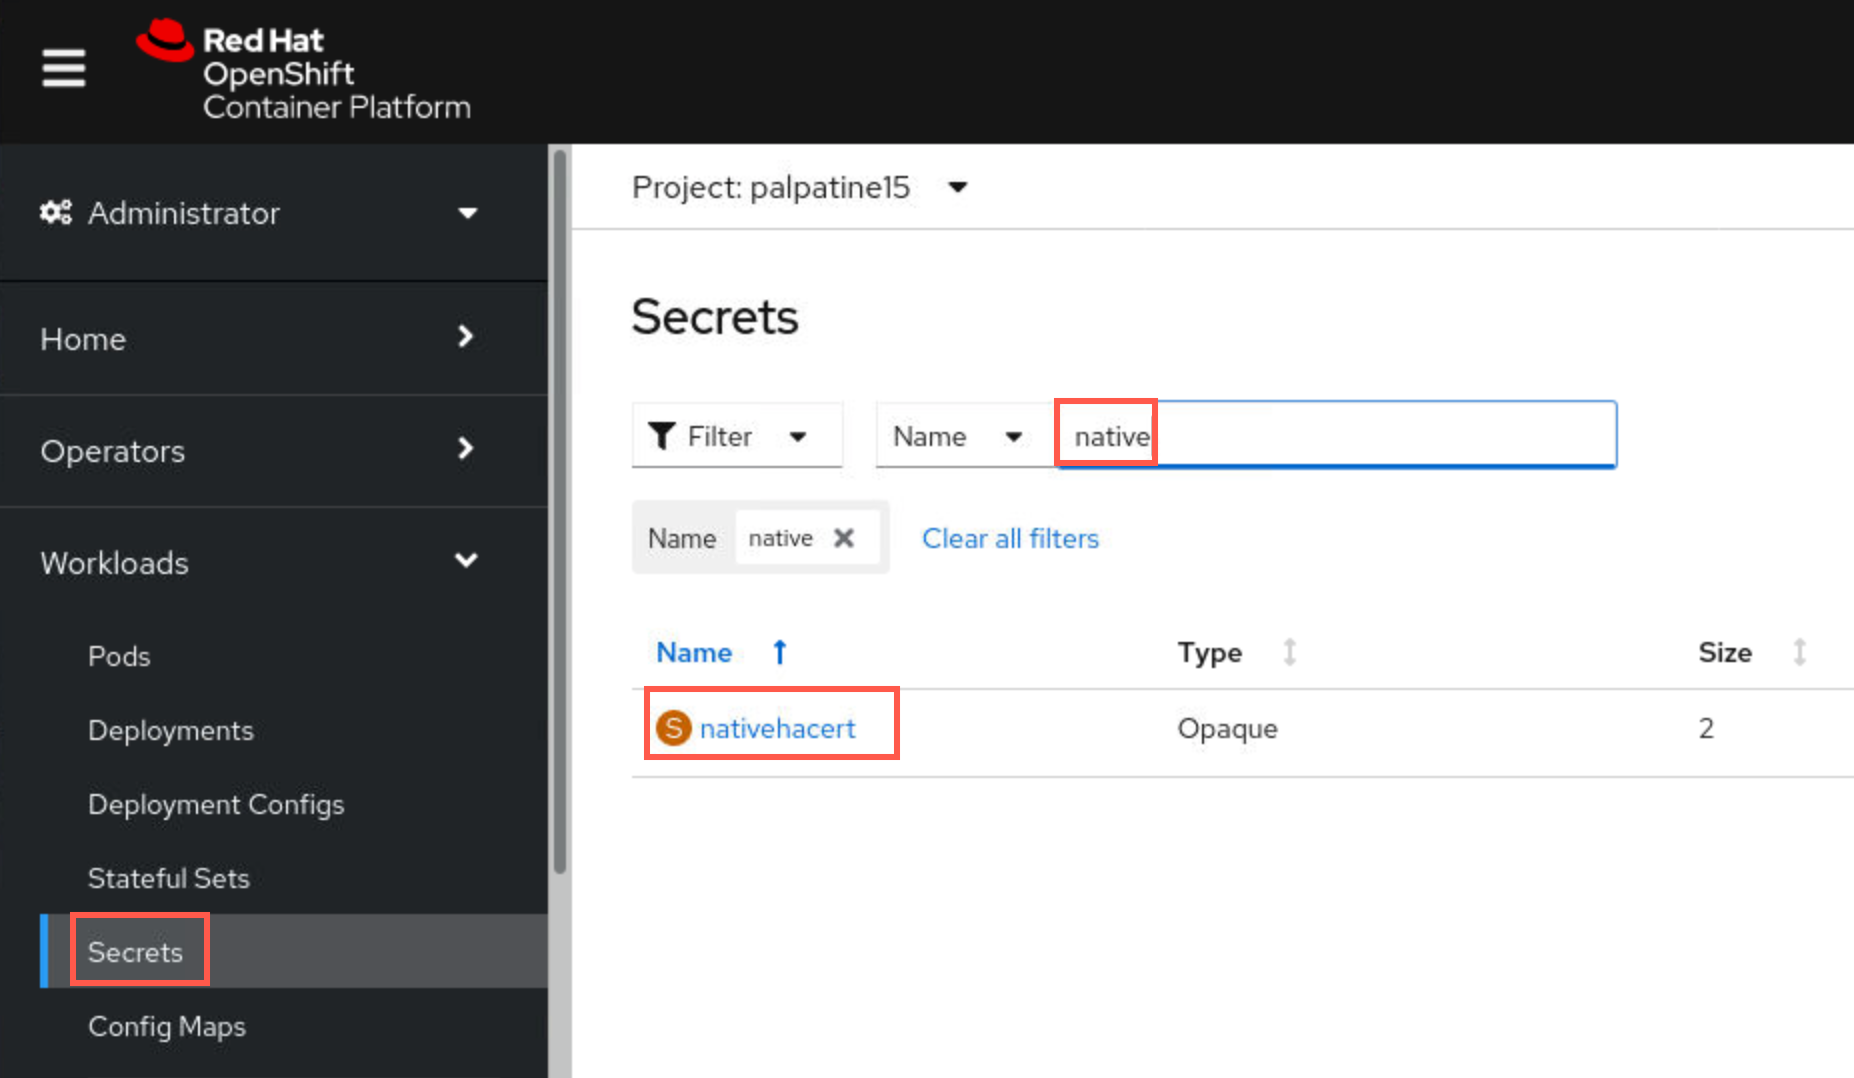
Under Workloads click Secrets. There are numerous secrets, so enter native to filter then select nativehacert .
-
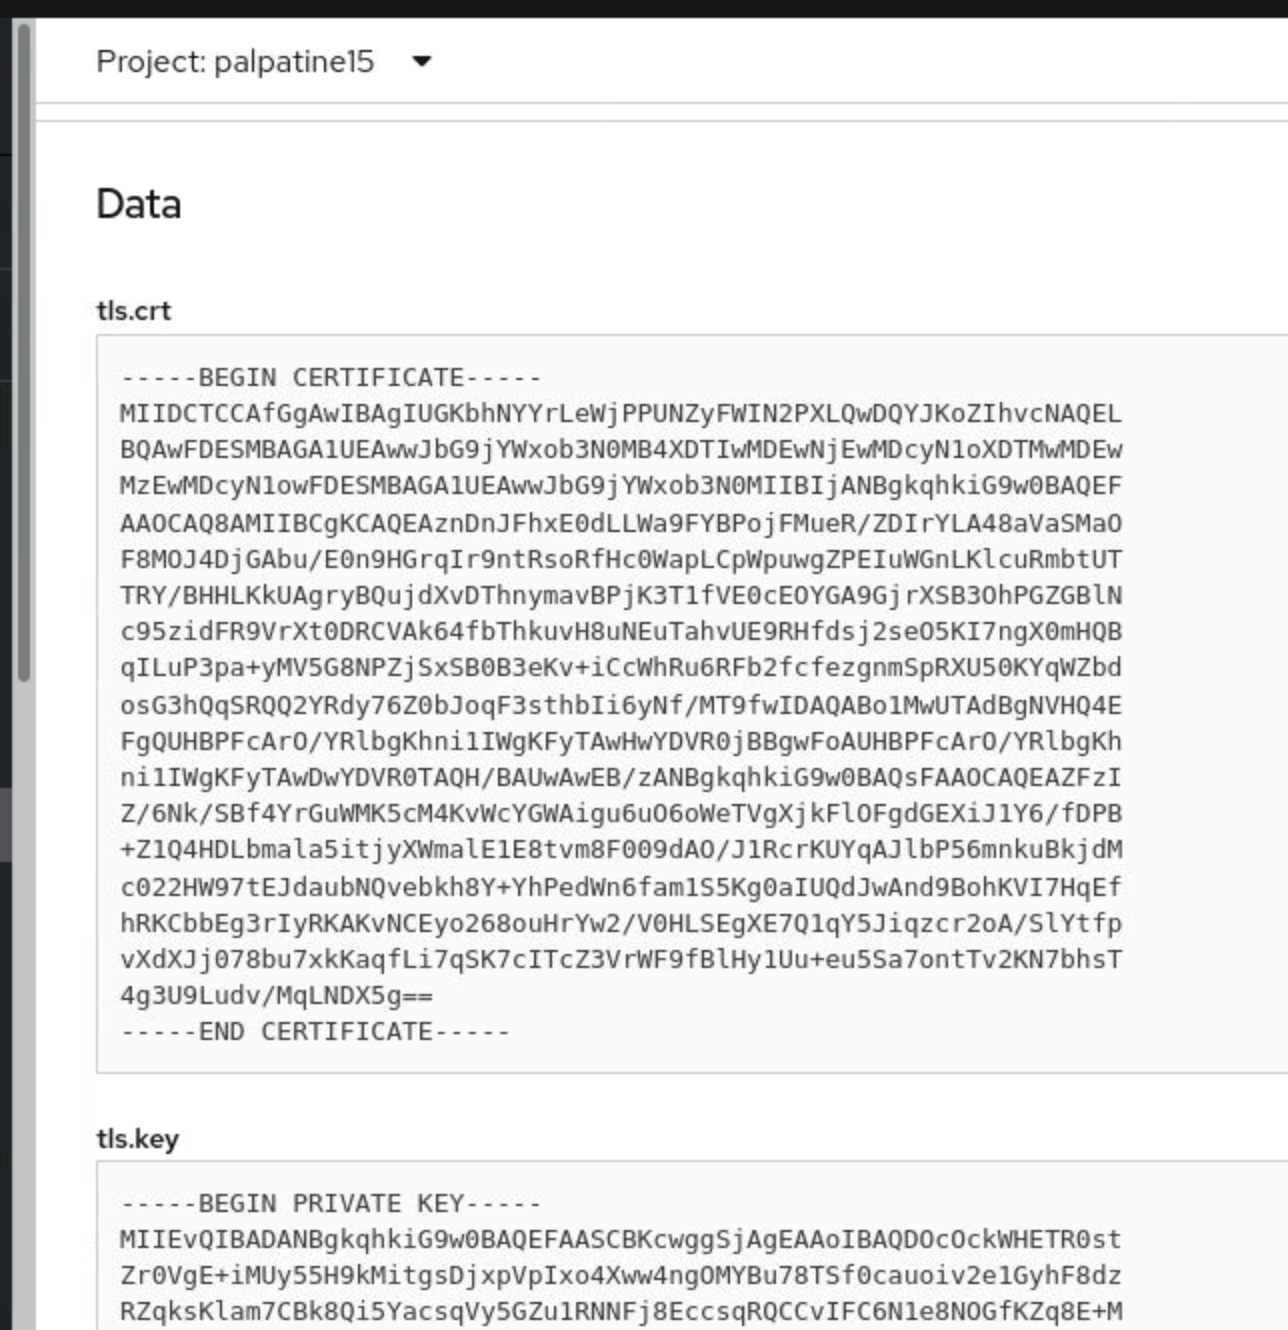
Scroll down to Data and you will find the files for the certificate and key.
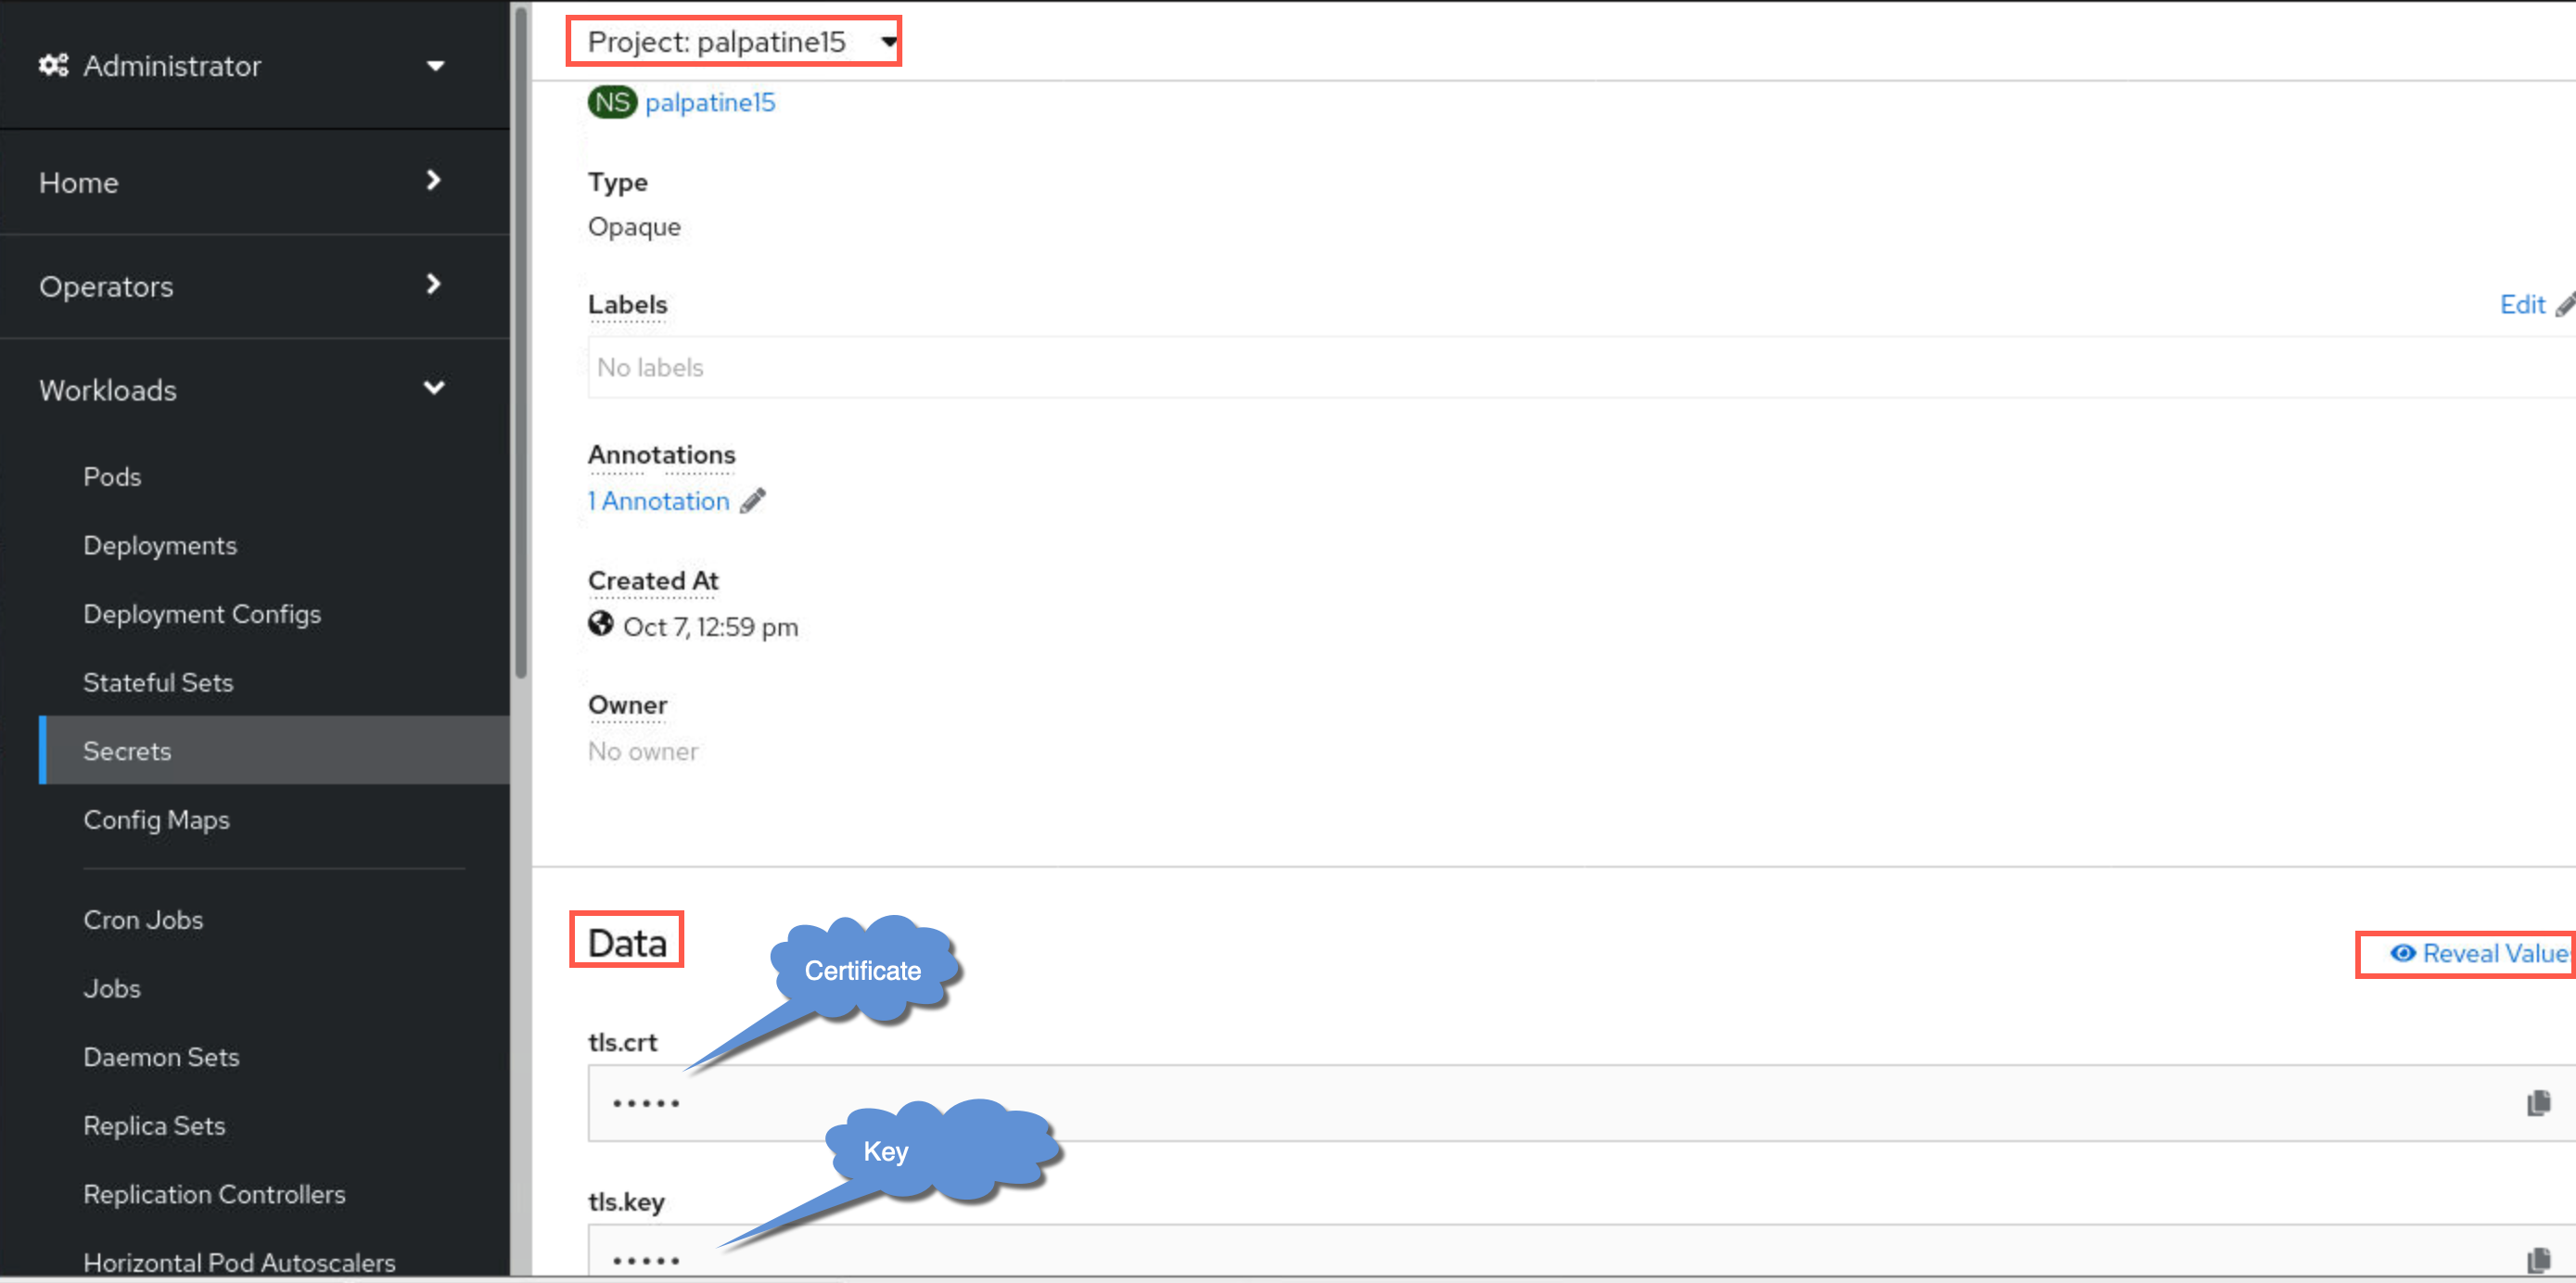
Click Reveal values to see the cert and key.
Viewing the status of Native HA queue managers
You can view the status of the Native HA instances by running the dspmq command inside one of the running Pods.
You can use the dspmq command in one of the running Pods to view the operational status of a queue manager instance. The information returned depends on whether the instance is active or a replica. The information supplied by the active instance is definitive, information from replica nodes might be out of date. You can perform the following actions:
- View whether the queue manager instance on the current node is active or a replica.
- View the Native HA operational status of the instance on the current node.
- View the operational status of all three instances in a Native HA configuration.
The following status fields are used to report Native HA configuration status:
- ROLE Specifies the current role of the instance and is one of Active, Replica, or Unknown.
- INSTANCE The name provided for this instance of the queue manager when it was created using the -lr option of the crtmqm command.
- INSYNC Indicates whether the instance is able to take over as the active instance if required.
- QUORUM Reports the quorum status in the form number_of_instances_in-sync/number_of_instances_configured.
- REPLADDR The replication address of the queue manager instance.
- CONNACTV Indicates whether the node is connected to the active instance.
- BACKLOG Indicates the number of KB that the instance is behind.
- CONNINST Indicates whether the named instance is connected to this instance.
- ALTDATE Indicates the date on which this information was last updated (blank if it has never been updated).
- ALTTIME Indicates the time at which this information was last updated (blank if it has never been updated).
-
Find the pods which are part of your queue manager with the following command replacing xx with your student number:
oc get pods --selector app.kubernetes.io/instance=mqxxha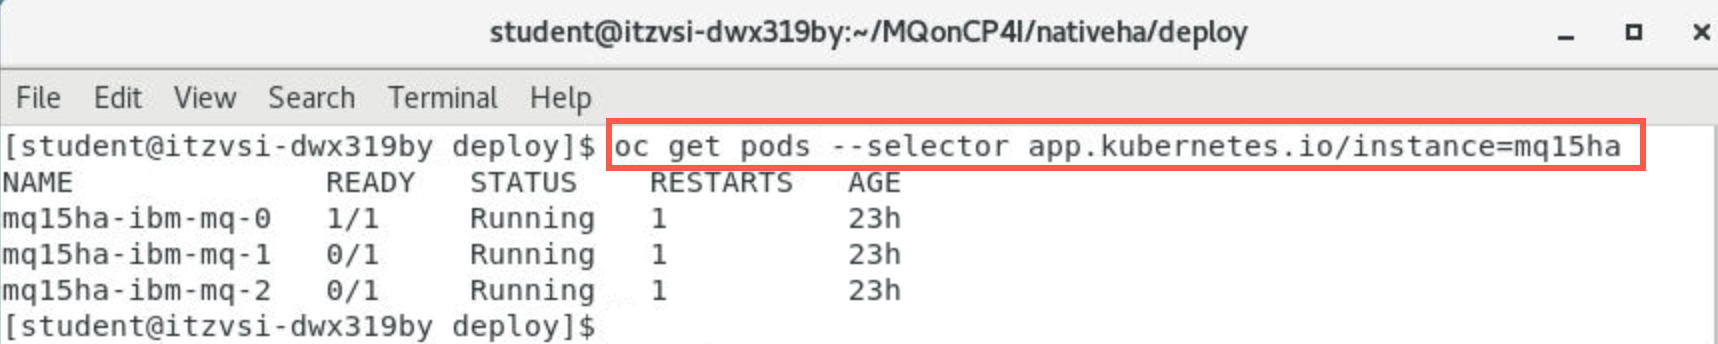
-
Use the following command to run the dspmq command in the active pod:
oc exec -t mqxxha-ibm-mq-0 dspmq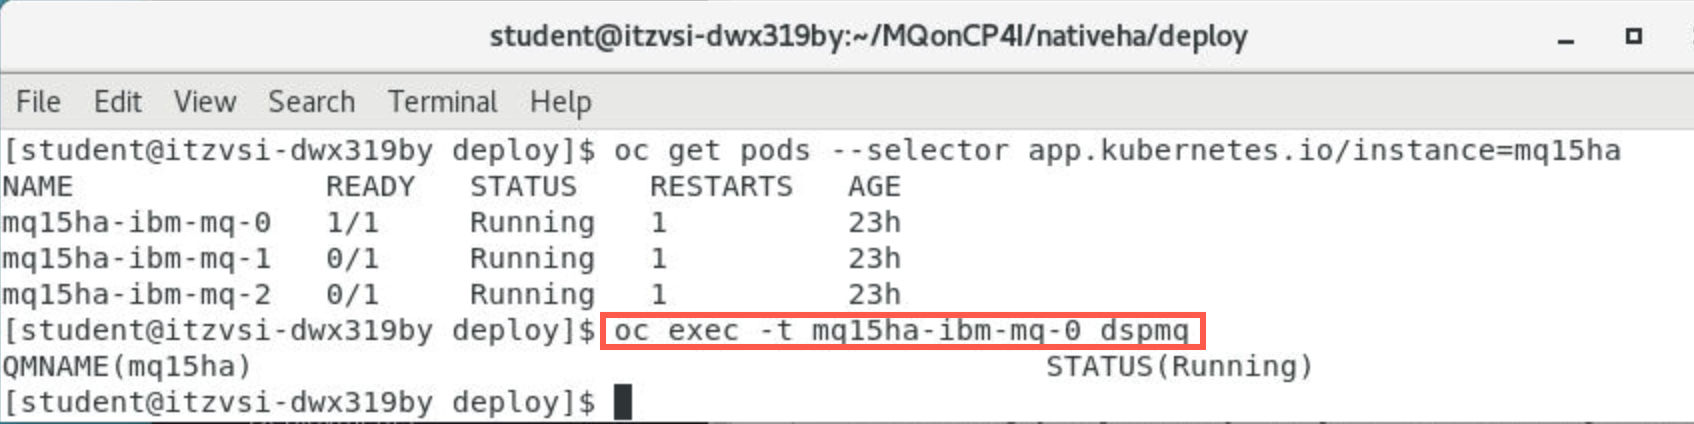
In the active pod the queue manager shows Running.
-
Run the command again but this time in a replica pod.
oc exec -t mqxxha-ibm-mq-1 dspmq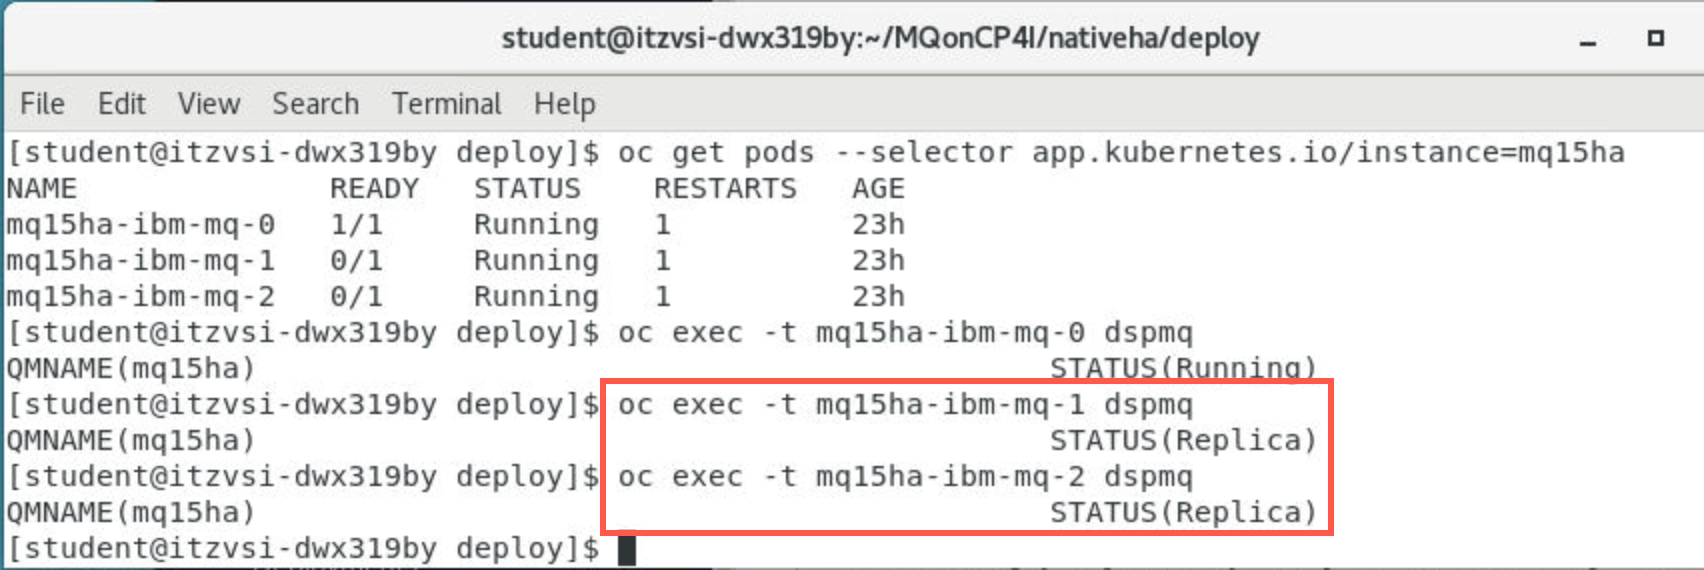
In a replica pod the queue manager shows Replica.
We will not test every possibility, but the following are possible displays to expect. Review the possibilities.
-
An active instance of the queue manager named mq15ha would report the following status:
QMNAME(mq15ha) STATUS(Running) -
A replica instance of the queue manager would report the following status:
QMNAME(mq15ha) STATUS(Replica) -
An inactive instance would report the following status:
QMNAME(mq15ha) STATUS(Ended Immediately)
-
-
To determine Native HA operational status of the instance in the specified pod:
oc rsh mqxxha-ibm-mq-0 dspmq -o nativeha -m mqxxha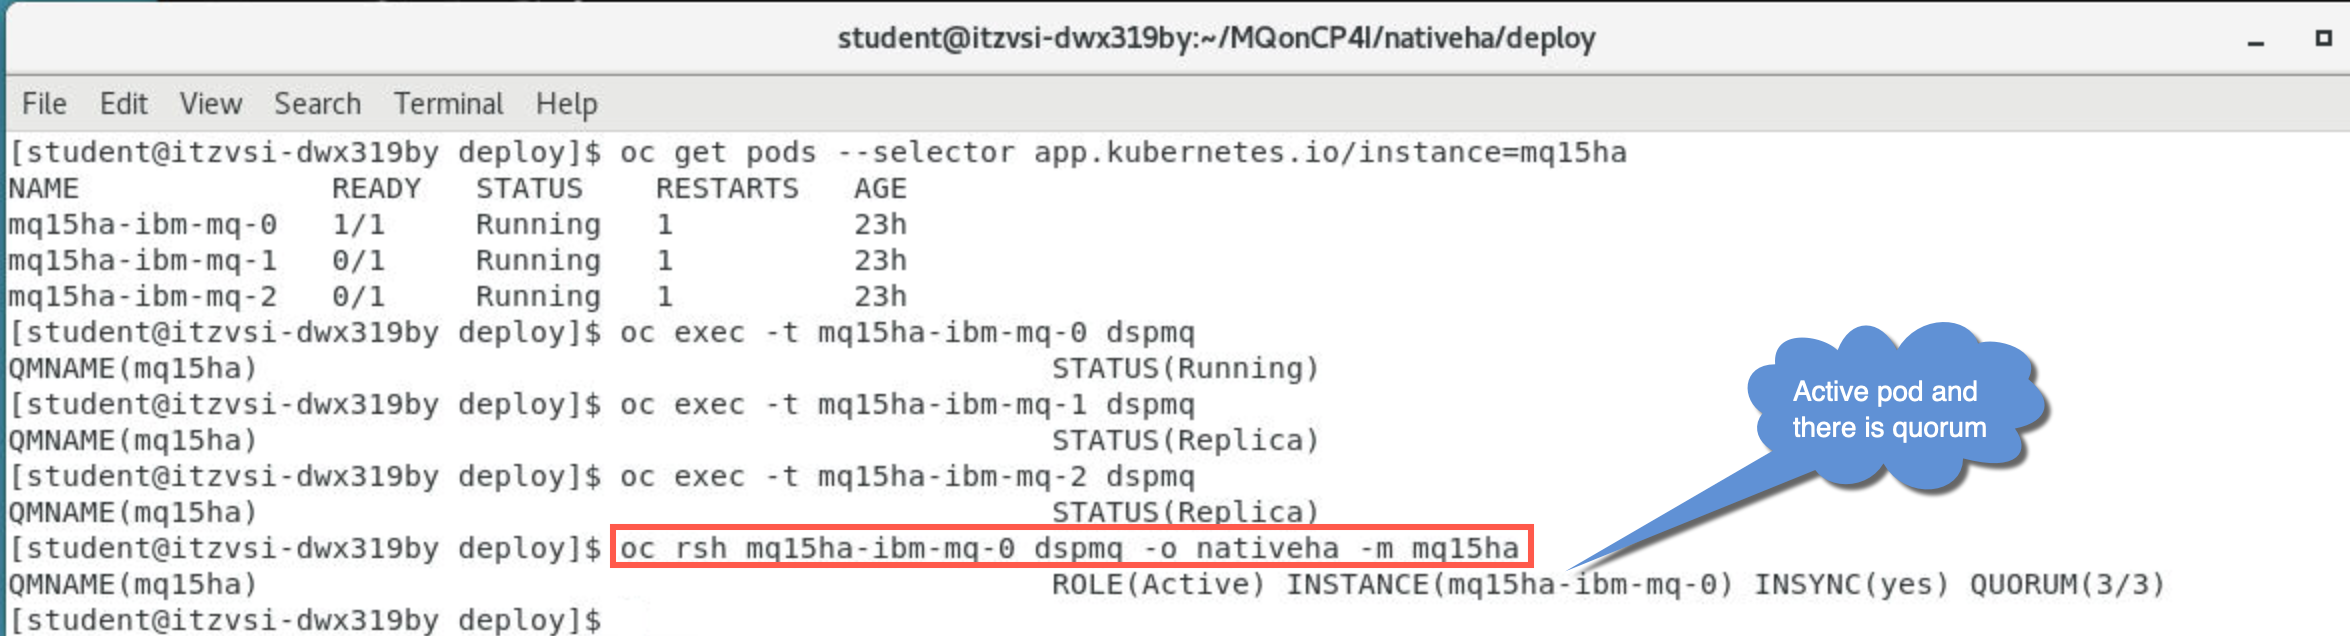
We will not test every possibility, but the following are possible displays to expect. Review the possibilities.
-
The active instance of the queue manager named mq15ha might report the following status:
QMNAME(mq15ha) ROLE(Active) INSTANCE(inst1) INSYNC(Yes) QUORUM(3/3) -
A replica instance of the queue manager might report the following status:
QMNAME(mq15ha) ROLE(Replica) INSTANCE(inst2) INSYNC(Yes) QUORUM(2/3) -
An inactive instance of the queue manager might report the following status:
QMNAME(mq15ha) ROLE(Unknown) INSTANCE(inst3) INSYNC(no) QUORUM(0/3)
-
-
To determine the Native HA operational status of all the instances in the Native HA configuration:
oc rsh mqxxha-ibm-mq-0 dspmq -o nativeha -x -m mqxxha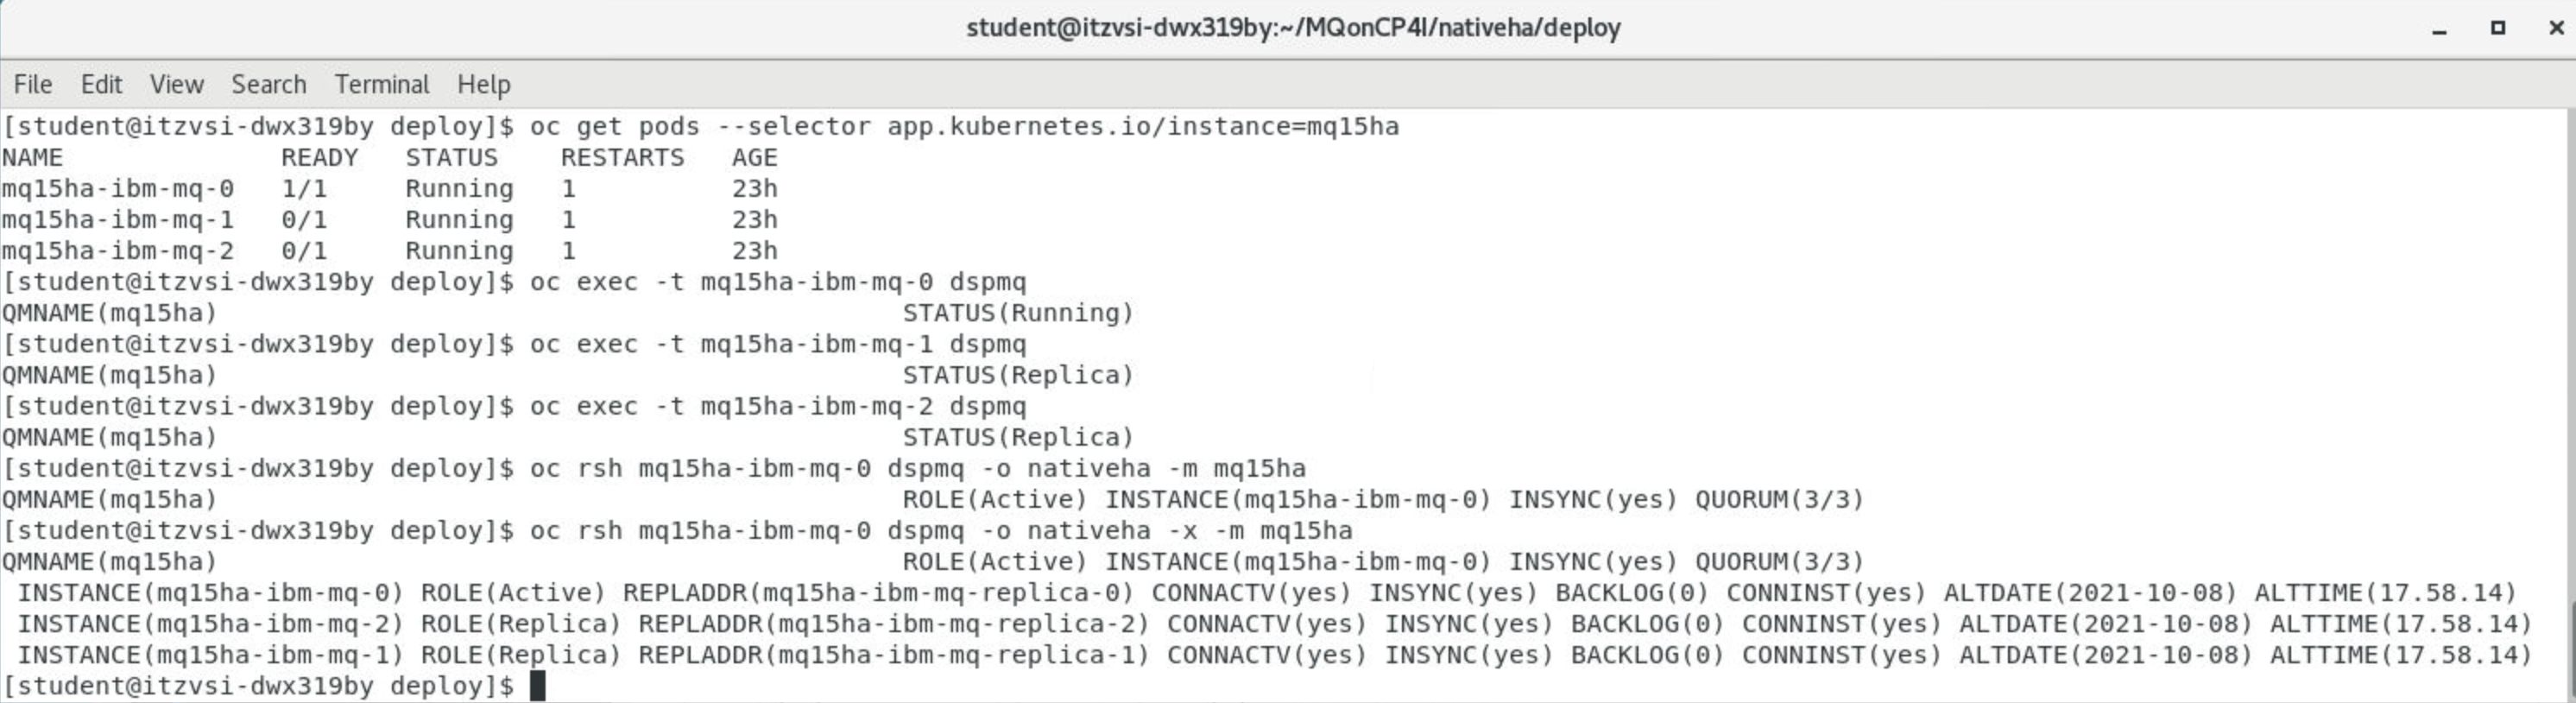
We will not test every possibility, but the following are possible displays to expect. Review the possibilities.
-
If you issue this command on the node running the active instance of queue manager mq15ha, you might receive the following status:
QMNAME(mq15ha) ROLE(Active) INSTANCE(inst1) INSYNC(Yes) QUORUM(3/3) INSTANCE(mq15ha-ibm-mq-0) ROLE(Active) REPLADDR(mq15ha-ibm-mq-0) CONNACTV(Yes) INSYNC(Yes) BACKLOG(0) CONNINST(Yes) ALTDATE(2021-01-12) ALTTIME(12.03.44) INSTANCE(mq15ha-ibm-mq-1) ROLE(Replica) REPLADDR(mq15ha-ibm-mq-1) CONNACTV(Yes) INSYNC(Yes) BACKLOG(0) CONNINST(Yes) ALTDATE(2021-01-12) ALTTIME(12.03.44) INSTANCE(mq15ha-ibm-mq-2) ROLE(Replica) REPLADDR(mq15ha-ibm-mq-2) CONNACTV(Yes) INSYNC(Yes) BACKLOG(0) CONNINST(Yes) ALTDATE(2021-01-12) ALTTIME(12.03.44) -
If you issue this command on a node running a replica instance of queue manager mq15ha, you might receive the following status, which indicates that one of the replicas is lagging behind:
QMNAME(mq15ha) ROLE(Replica) INSTANCE(inst2) INSYNC(Yes) QUORUM(2/3) INSTANCE(mq15ha-ibm-mq-2) ROLE(Replica) REPLADDR(mq15ha-ibm-mq-2) CONNACTV(Yes) INSYNC(Yes) BACKLOG(0) CONNINST(Yes) ALTDATE(2021-01-12) ALTTIME(12.03.44) INSTANCE(mq15ha-ibm-mq-0) ROLE(Active) REPLADDR(mq15ha-ibm-mq-0) CONNACTV(Yes) INSYNC(Yes) BACKLOG(0) CONNINST(Yes) ALTDATE(2021-01-12) ALTTIME(12.03.44) INSTANCE(mq15ha-ibm-mq-1) ROLE(Replica) REPLADDR(mq15ha-ibm-mq-1) CONNACTV(Yes) INSYNC(No) BACKLOG(435) CONNINST(Yes) ALTDATE(2021-01-12) ALTTIME(12.03.44) -
If you issue this command on a node running an inactive instance of queue manager mq15ha, you might receive the following status:
QMNAME(mq15ha) ROLE(Unknown) INSTANCE(inst3) INSYNC(no) QUORUM(0/3) INSTANCE(mq15ha-ibm-mq-0) ROLE(Unknown) REPLADDR(mq15ha-ibm-mq-0) CONNACTV(Unknown) INSYNC(Unknown) BACKLOG(Unknown) CONNINST(No) ALTDATE() ALTTIME() INSTANCE(mq15ha-ibm-mq-1) ROLE(Unknown) REPLADDR(mq15ha-ibm-mq-1) CONNACTV(Unknown) INSYNC(Unknown) BACKLOG(Unknown) CONNINST(No) ALTDATE() ALTTIME() INSTANCE(mq15ha-ibm-mq-2) ROLE(Unknown) REPLADDR(mq15ha-ibm-mq-2) CONNACTV(No) INSYNC(Unknown) BACKLOG(Unknown) CONNINST(No) ALTDATE() ALTTIME() -
If you issue the command when the instances are still negotiating which is active and which are replicas, you would receive the following status:
QMNAME(mq15ha) STATUS(Negotiating)
-
-
If necessary, use these commands while testing the deployment.
Test the deployment
-
Open a new terminal window and navigate to /home/student/MQonCP4I/nativeha/test directory using the following command:
cd ~/MQonCP4I/nativeha/testOpen getMessage.sh in gedit:
gedit getMessage.sh &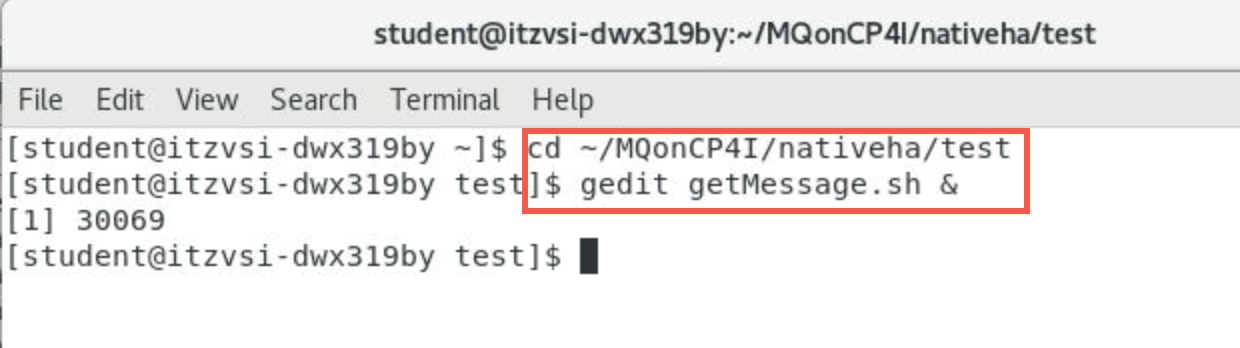
-
Change TARGET_SPACE to your assigned namespace. Change the zeroes in QMpre, QMname, and MQ00CHL to your student number. Then click Save.
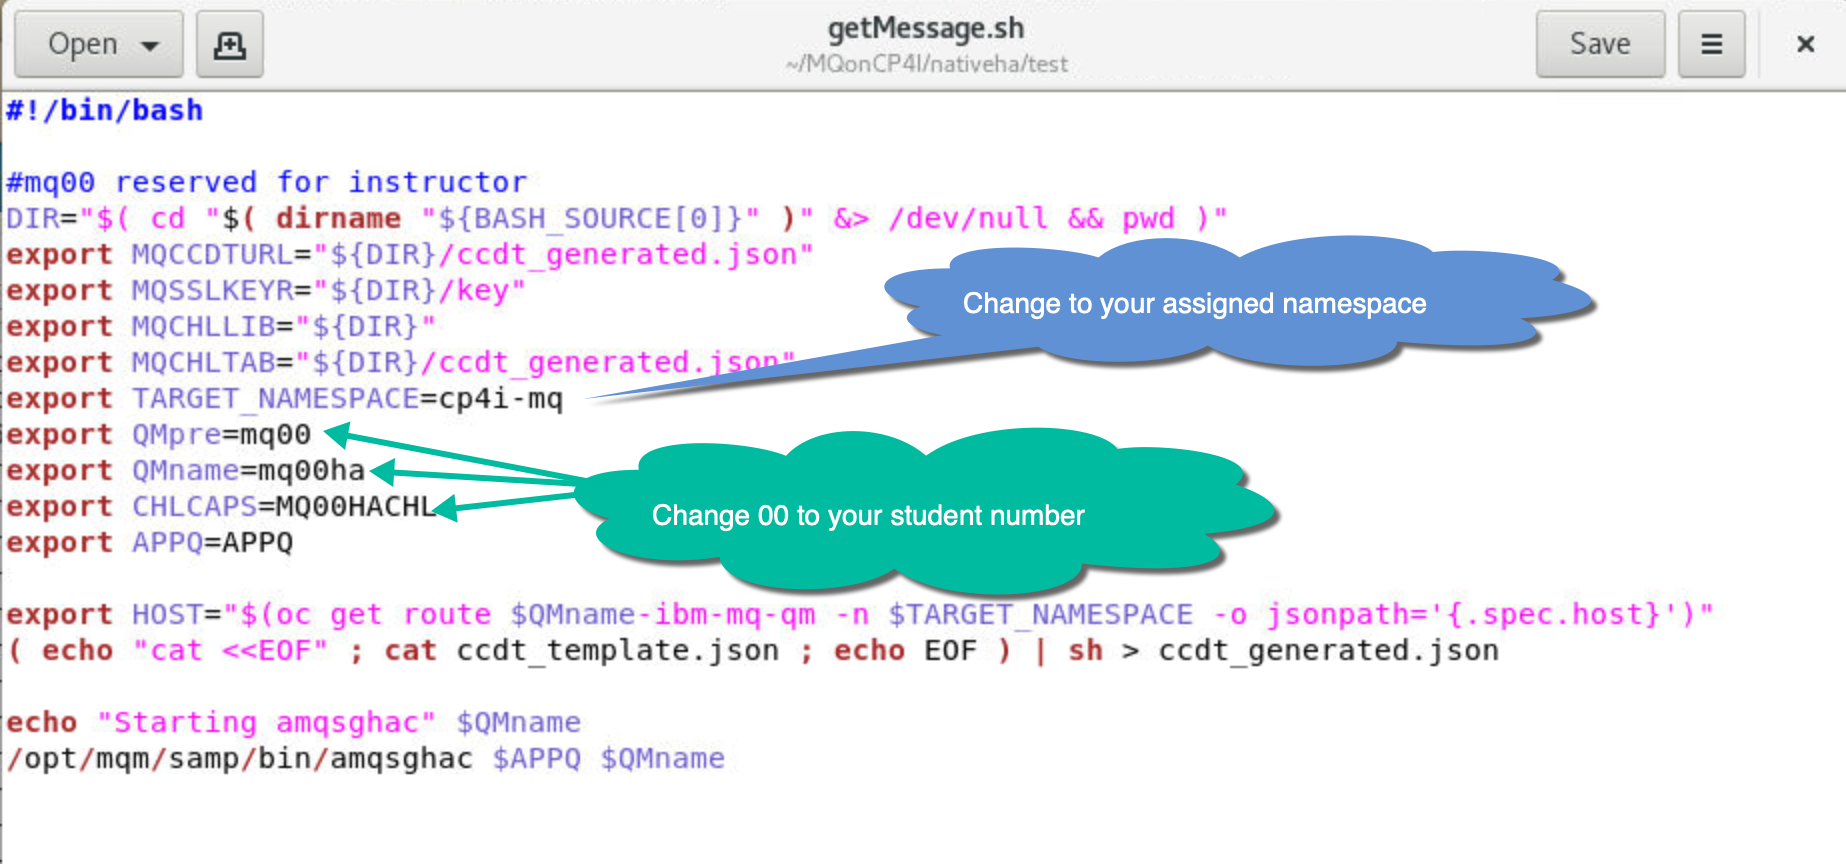
-
Still in gedit, open sendMessage.sh, make the same changes for TARGET_NAMESPACE, QMpre, QMname, and click Save.
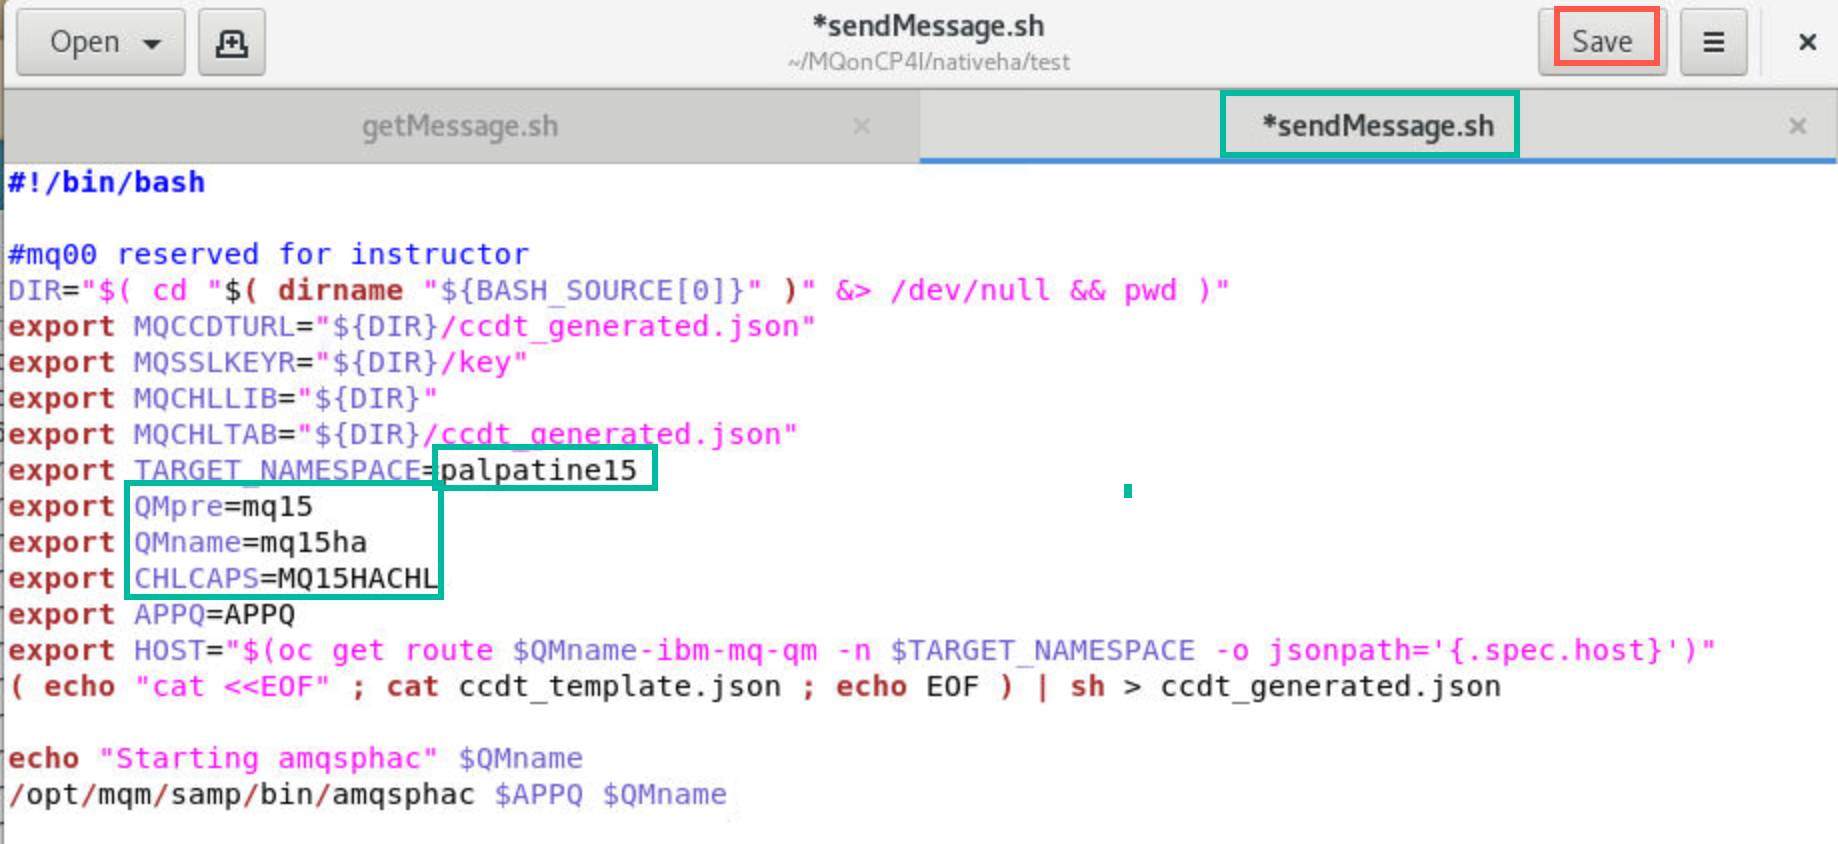
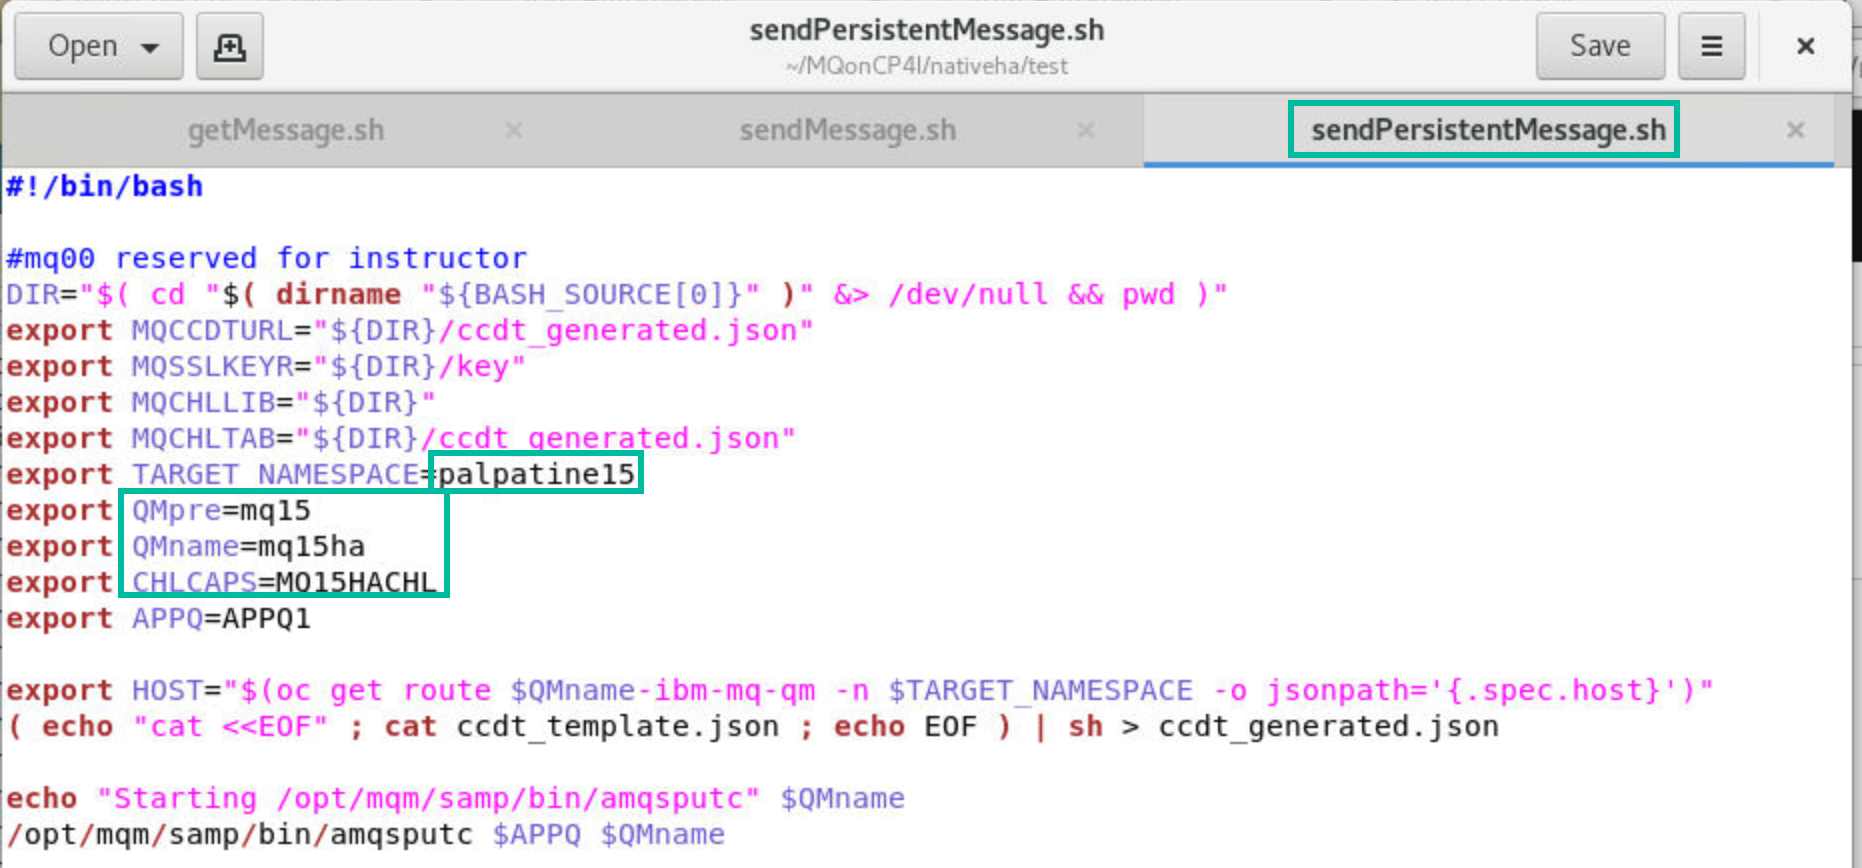
Repeat the edit again for sendPersistentMessage.sh and click Save.
 Tip:
Tip:
Observe that getMessage.sh and sendMessage.sh are using queue APPQ. sendPersistentMessage.sh is using queue APPQ1. -
Still in gedit, open ccdt_template.json. Do NOT change anything in this file. Notice that at run time the highlighted fields will substituted with values from the shell files you just edited. The shell scripts will substitute the values and copy this file to ccdt_generated.json which will be used with the sample programs.
-
Close gedit.
-
Make each of the above files executable with the following commands:
chmod +x getMessage.shchmod +x sendMessage.shchmod +x sendPersistentMessage.sh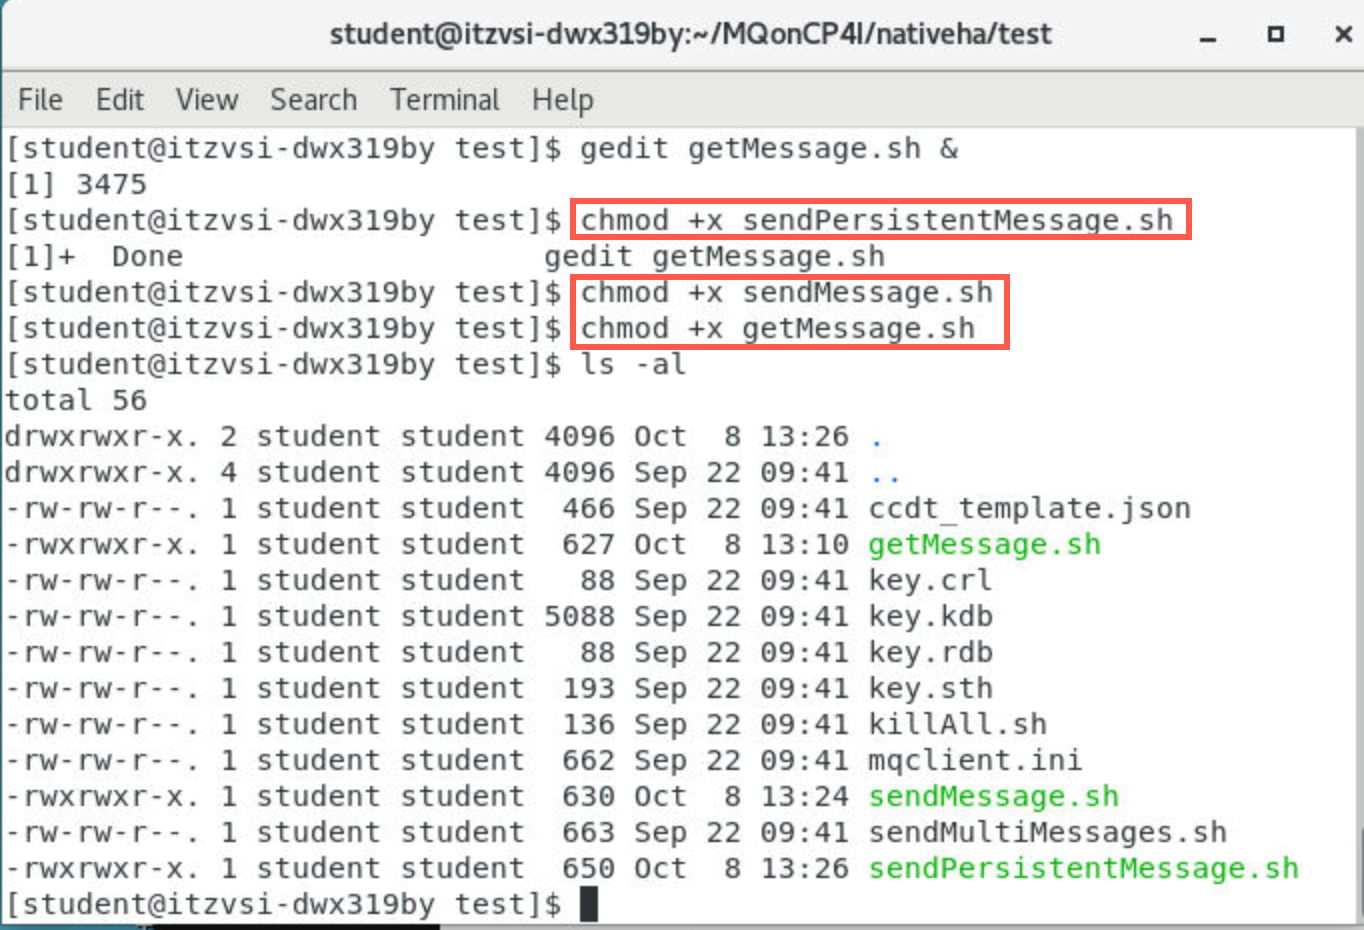
-
Run the sendPersistentMessage.sh command:
./sendPersistentMessage.shEnter a few random messages and hit enter after each message. Hit enter when finished to end the program.
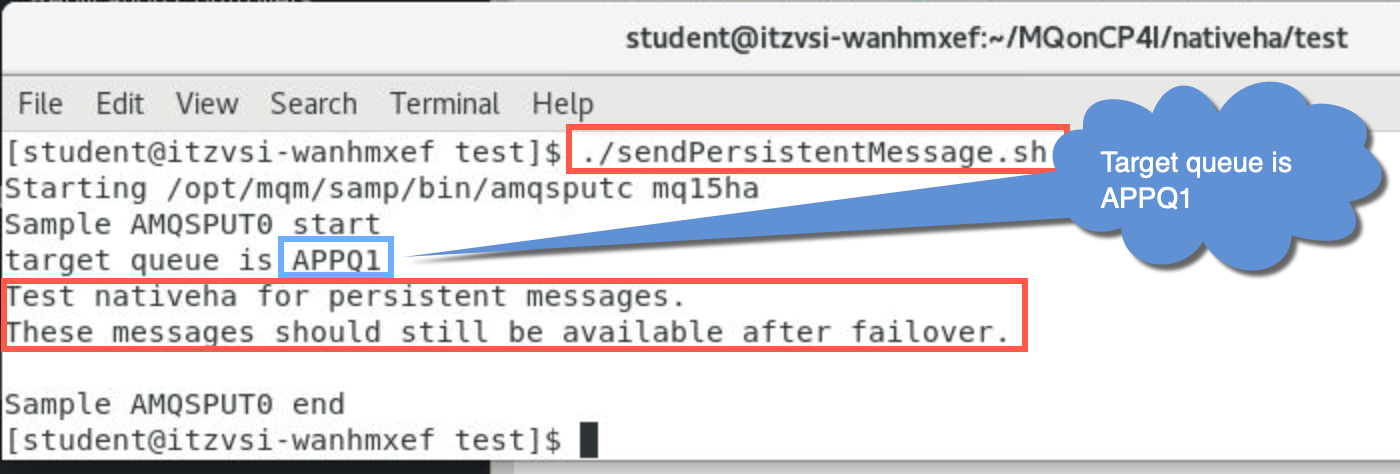
The sample program amsputc will put the messages to queue APPQ1 which has a default persistence defined as persistent. These messages should still be available after a failover.
-
Now start the getMessage shell with the following command:
./getMessage.sh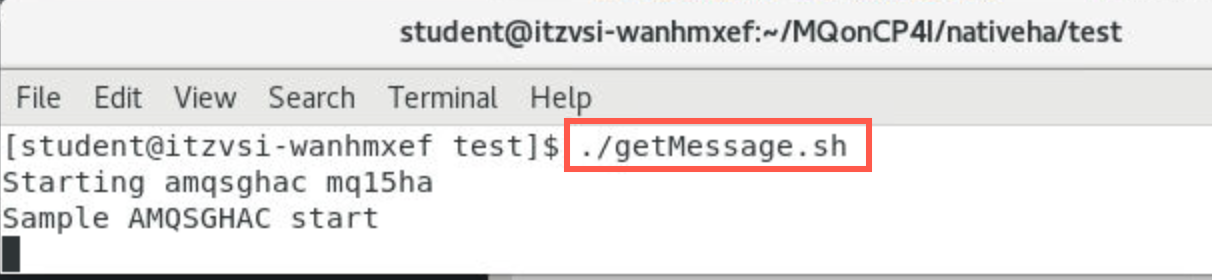
The sample program amqsghac starts running and will wait for messages to arrive on queue APPQ.
-
Open another terminal window and navigate to /home/student/MQonCP4I/nativeha/test as you did previously. Start the sendMessage shell with the following command:
./sendMessage.sh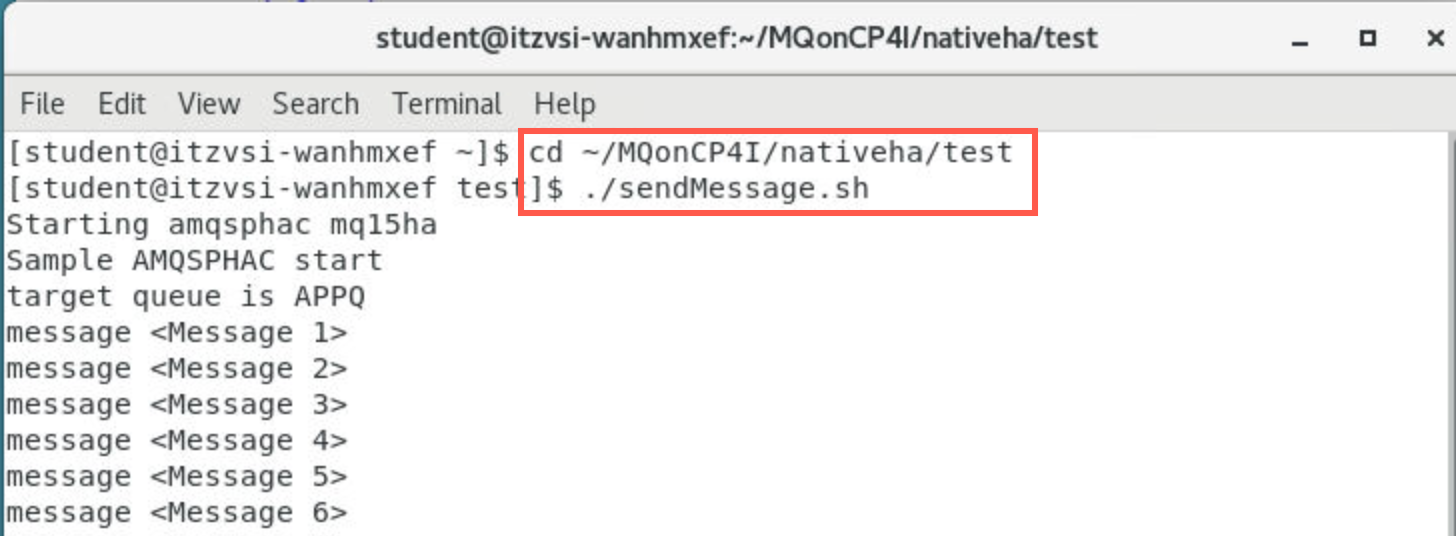
-
The sample program amqsphac will connect to MQ and start sending messages incessantly to queue APPQ.
-
Return to the window where getMessage.sh is running. You should get a list of all the messages that may have been previously sent before running the command and the ones that are being sent after.
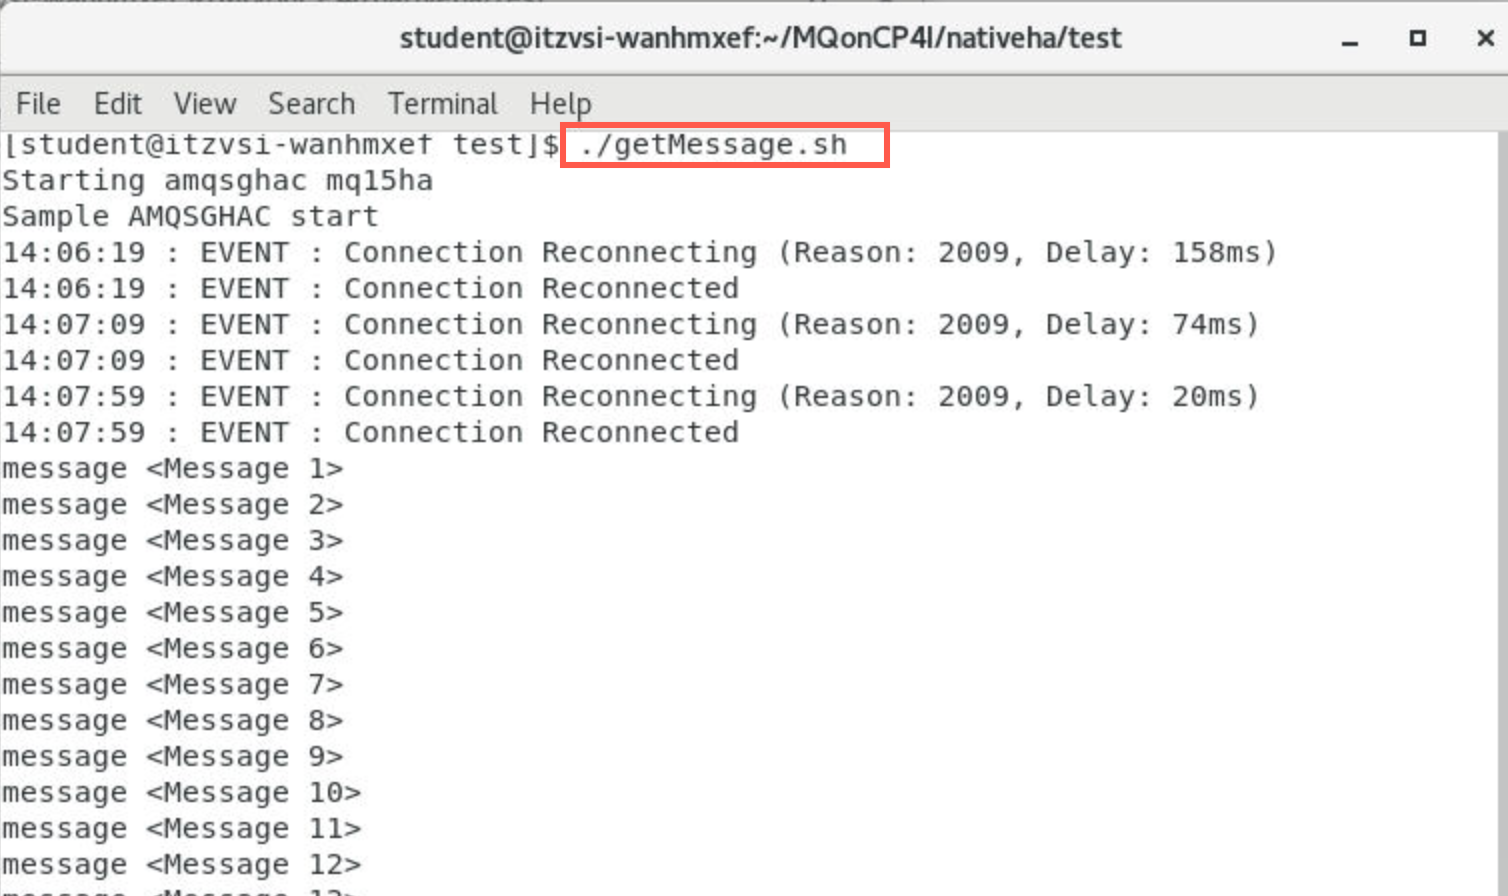
-
Open a new terminal window. To see how the pods work together in action, run the following command (substitute your student number for xx) to view the current pods:
oc get pod | grep mqxxha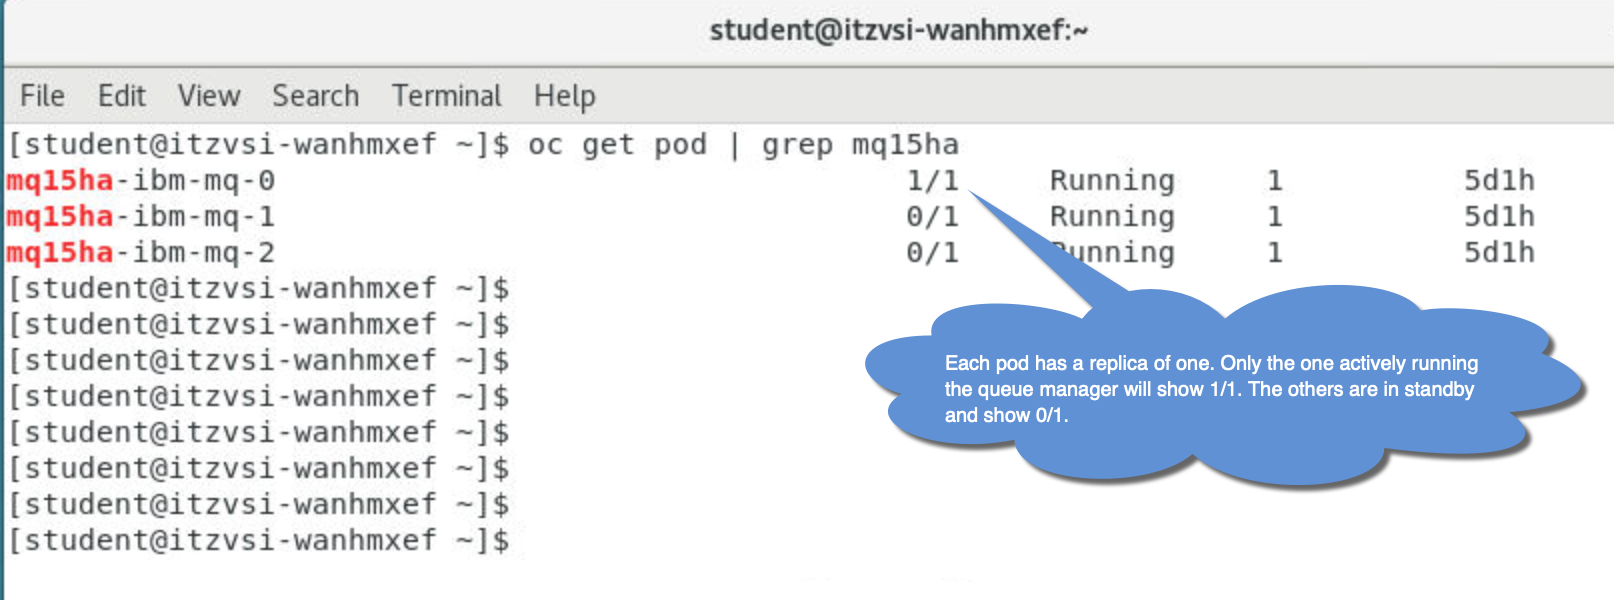
The MQ Operator was configured to run three pods each with a replica of 1. The pod running the queue will show the pod is active. The other two pods are in standby (0/1) and waiting to take over. The queue manager data is being replicated to the local storage of each node.
-
Delete the running pod by issuing the command (substitute your student number for xx):
oc delete pod mqxxha-ibm-mq-0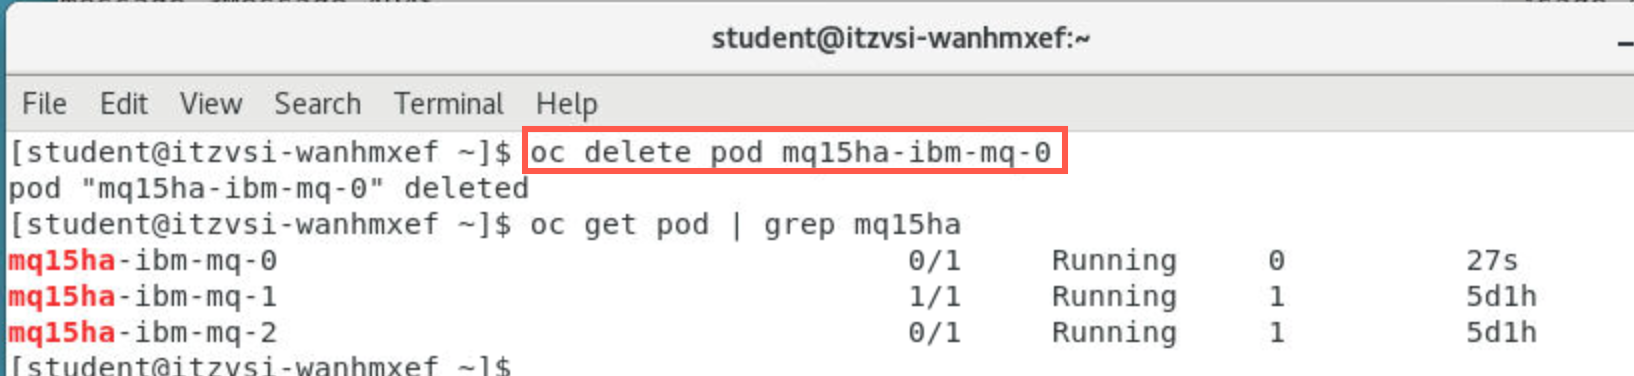 Once the active pod is deleted, the running programs will then reconnect to the other pod for it to take over.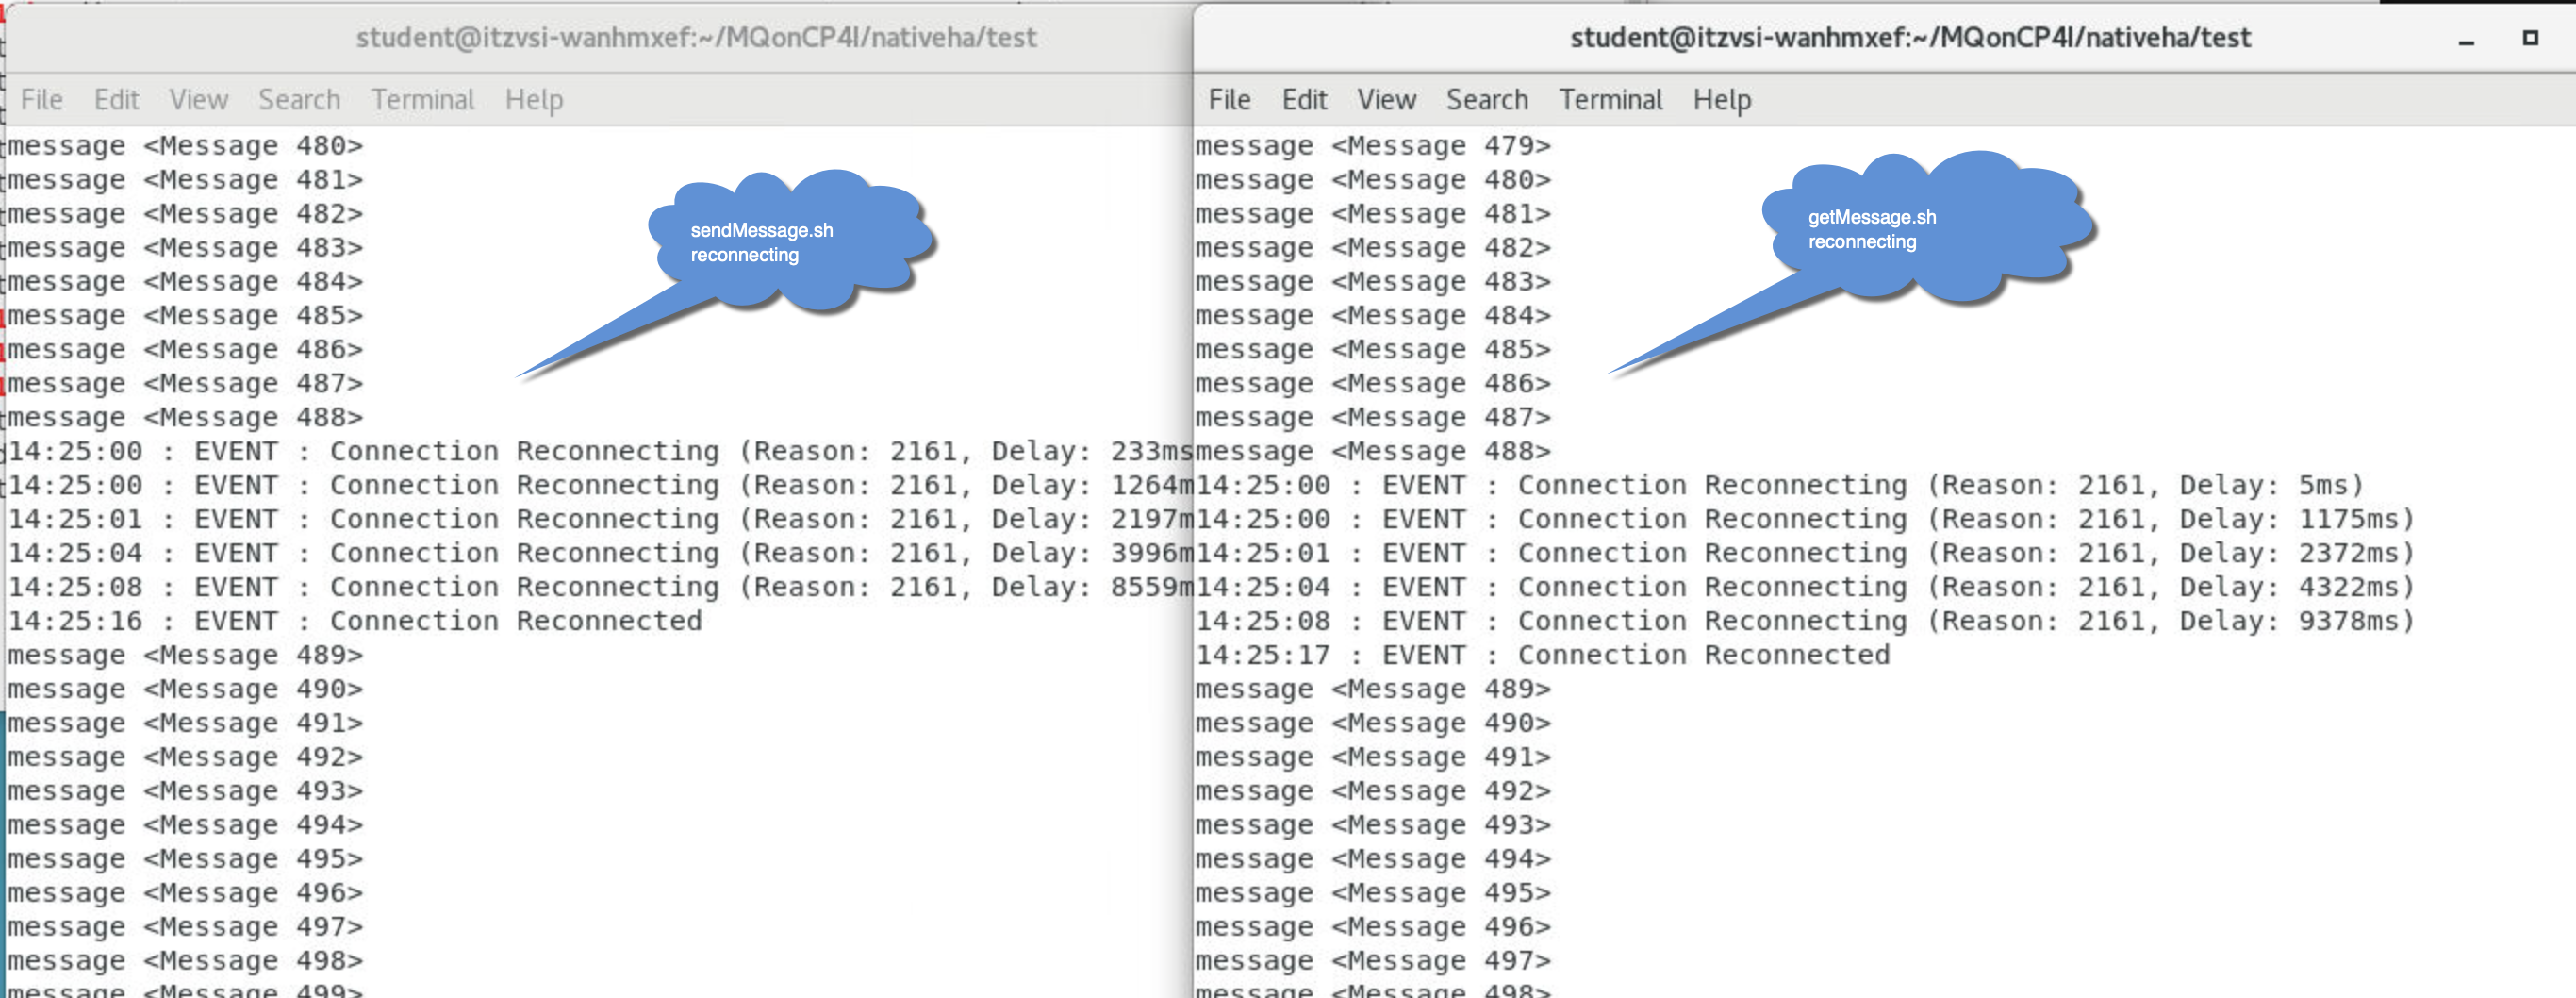
-
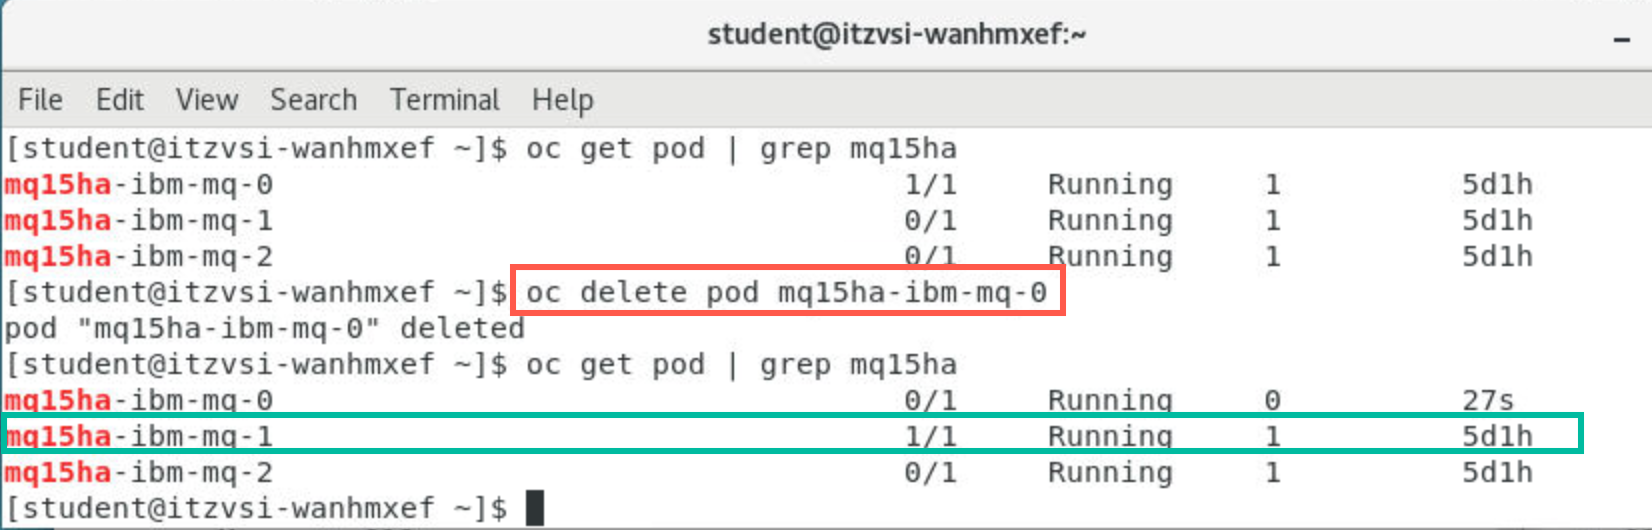
To verify that the other pod is now running, return to the terminal where you ran the “oc” command and issue the “get pods” again.
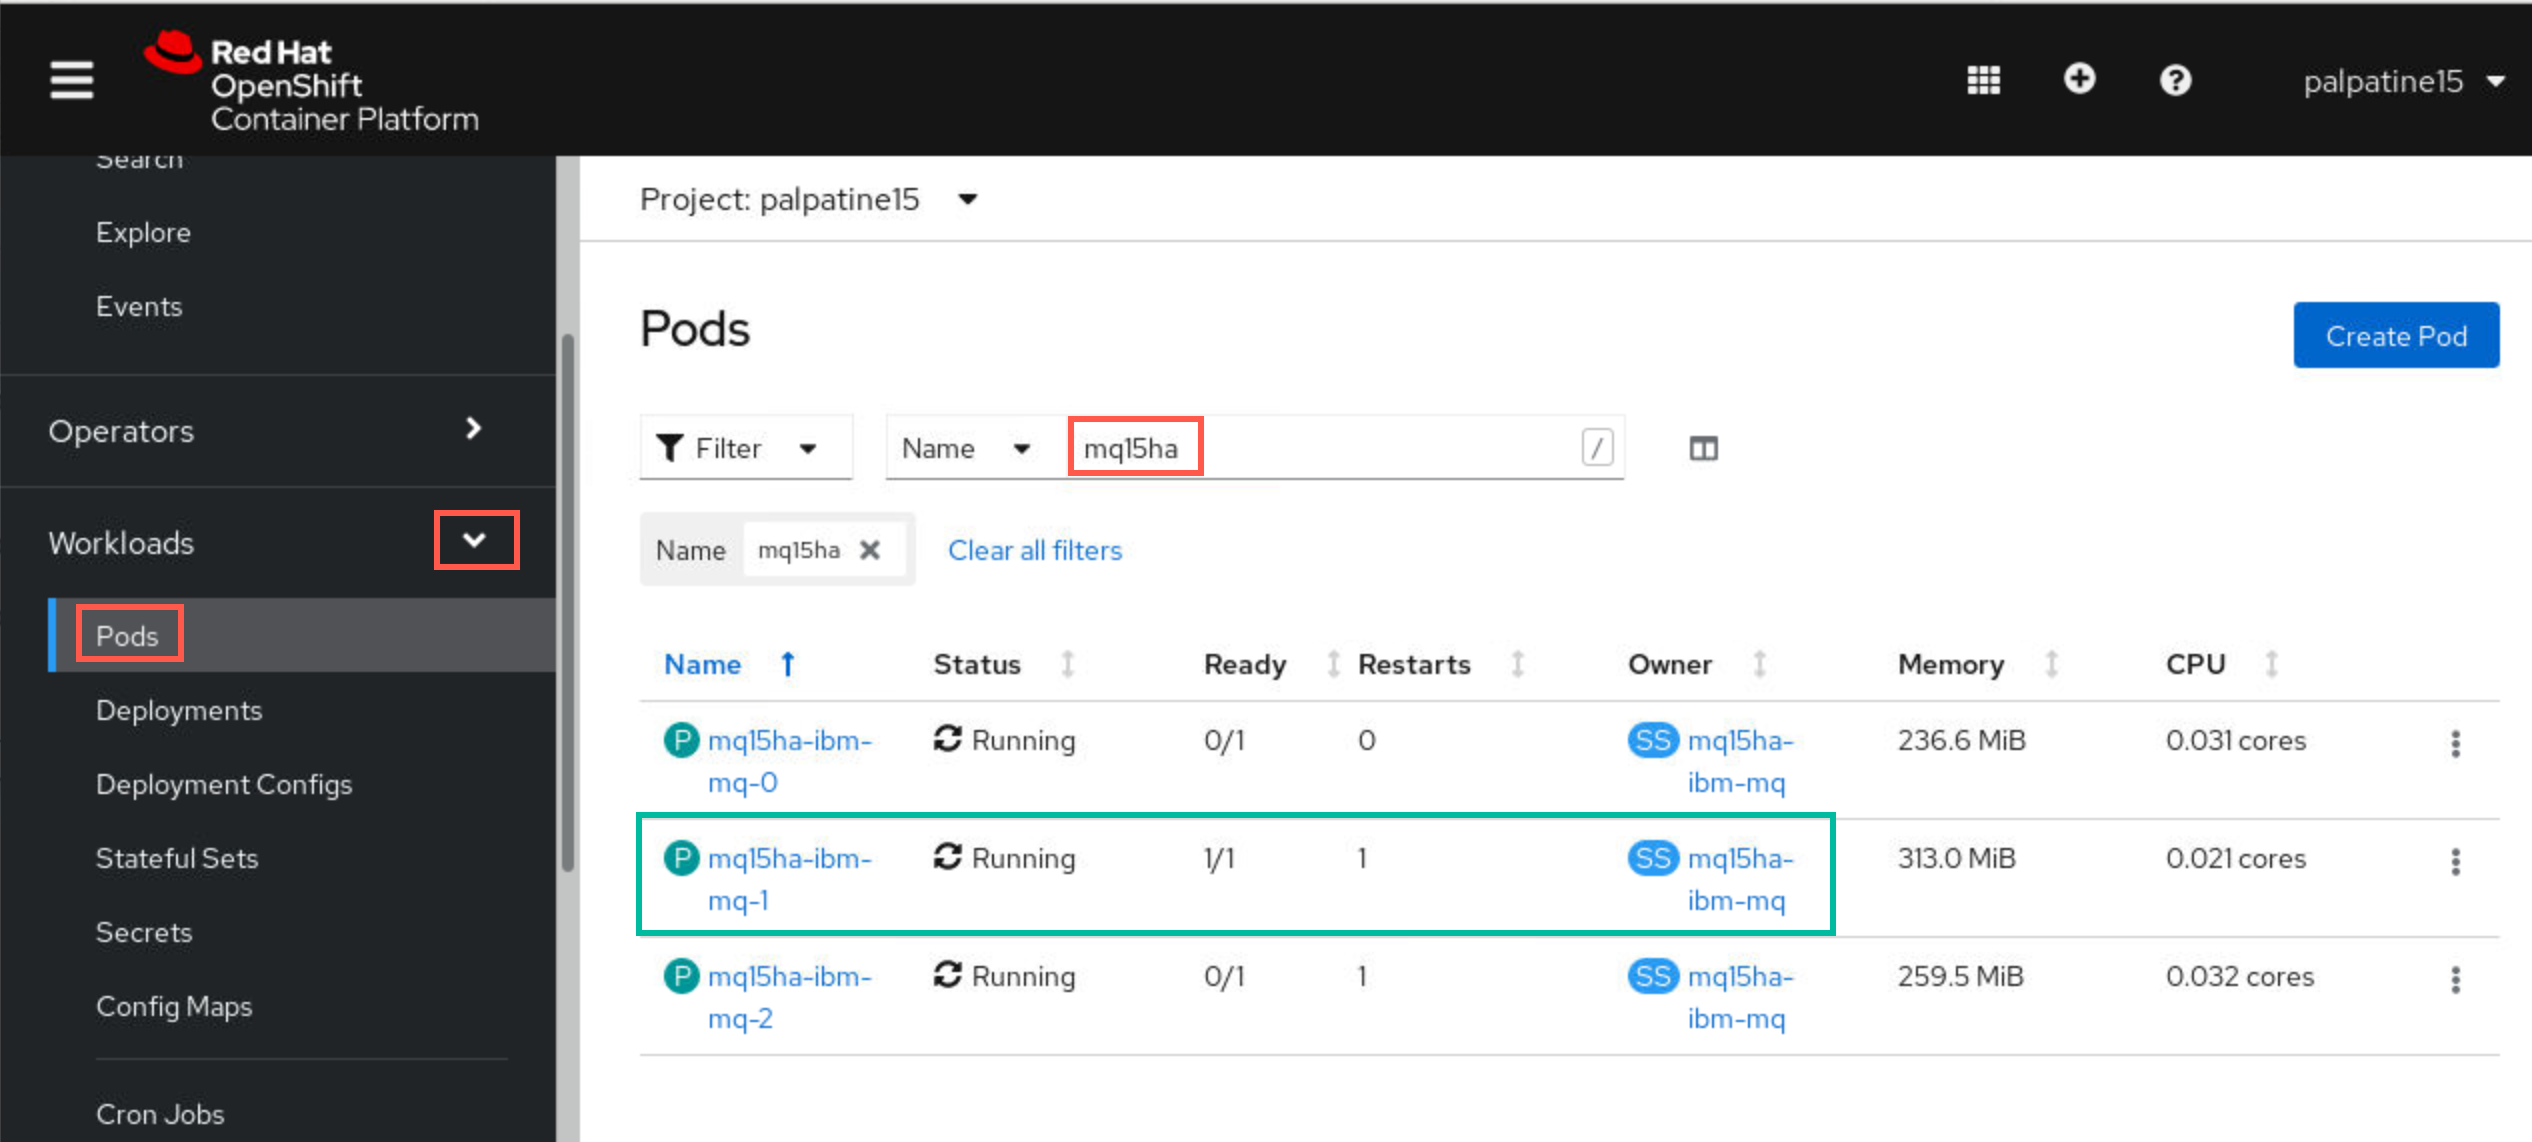
oc get pods | grep mqxxhaYou will see that pod mqxxha-ibm-mq-1 is now the active pod and the other two are in standby. This is indicated by the Ready column which shows 1 of 1 containers is running. The other pods have 0 of 1 containers running.
-
Return to the browser tab where OCP is open. In your project, click the drop-down for Workloads and select Pods. Enter your queue manager name in the Name field to filter out the rest. You will see the same information - mqxxha-ibm-mq-1 is currently running.
-
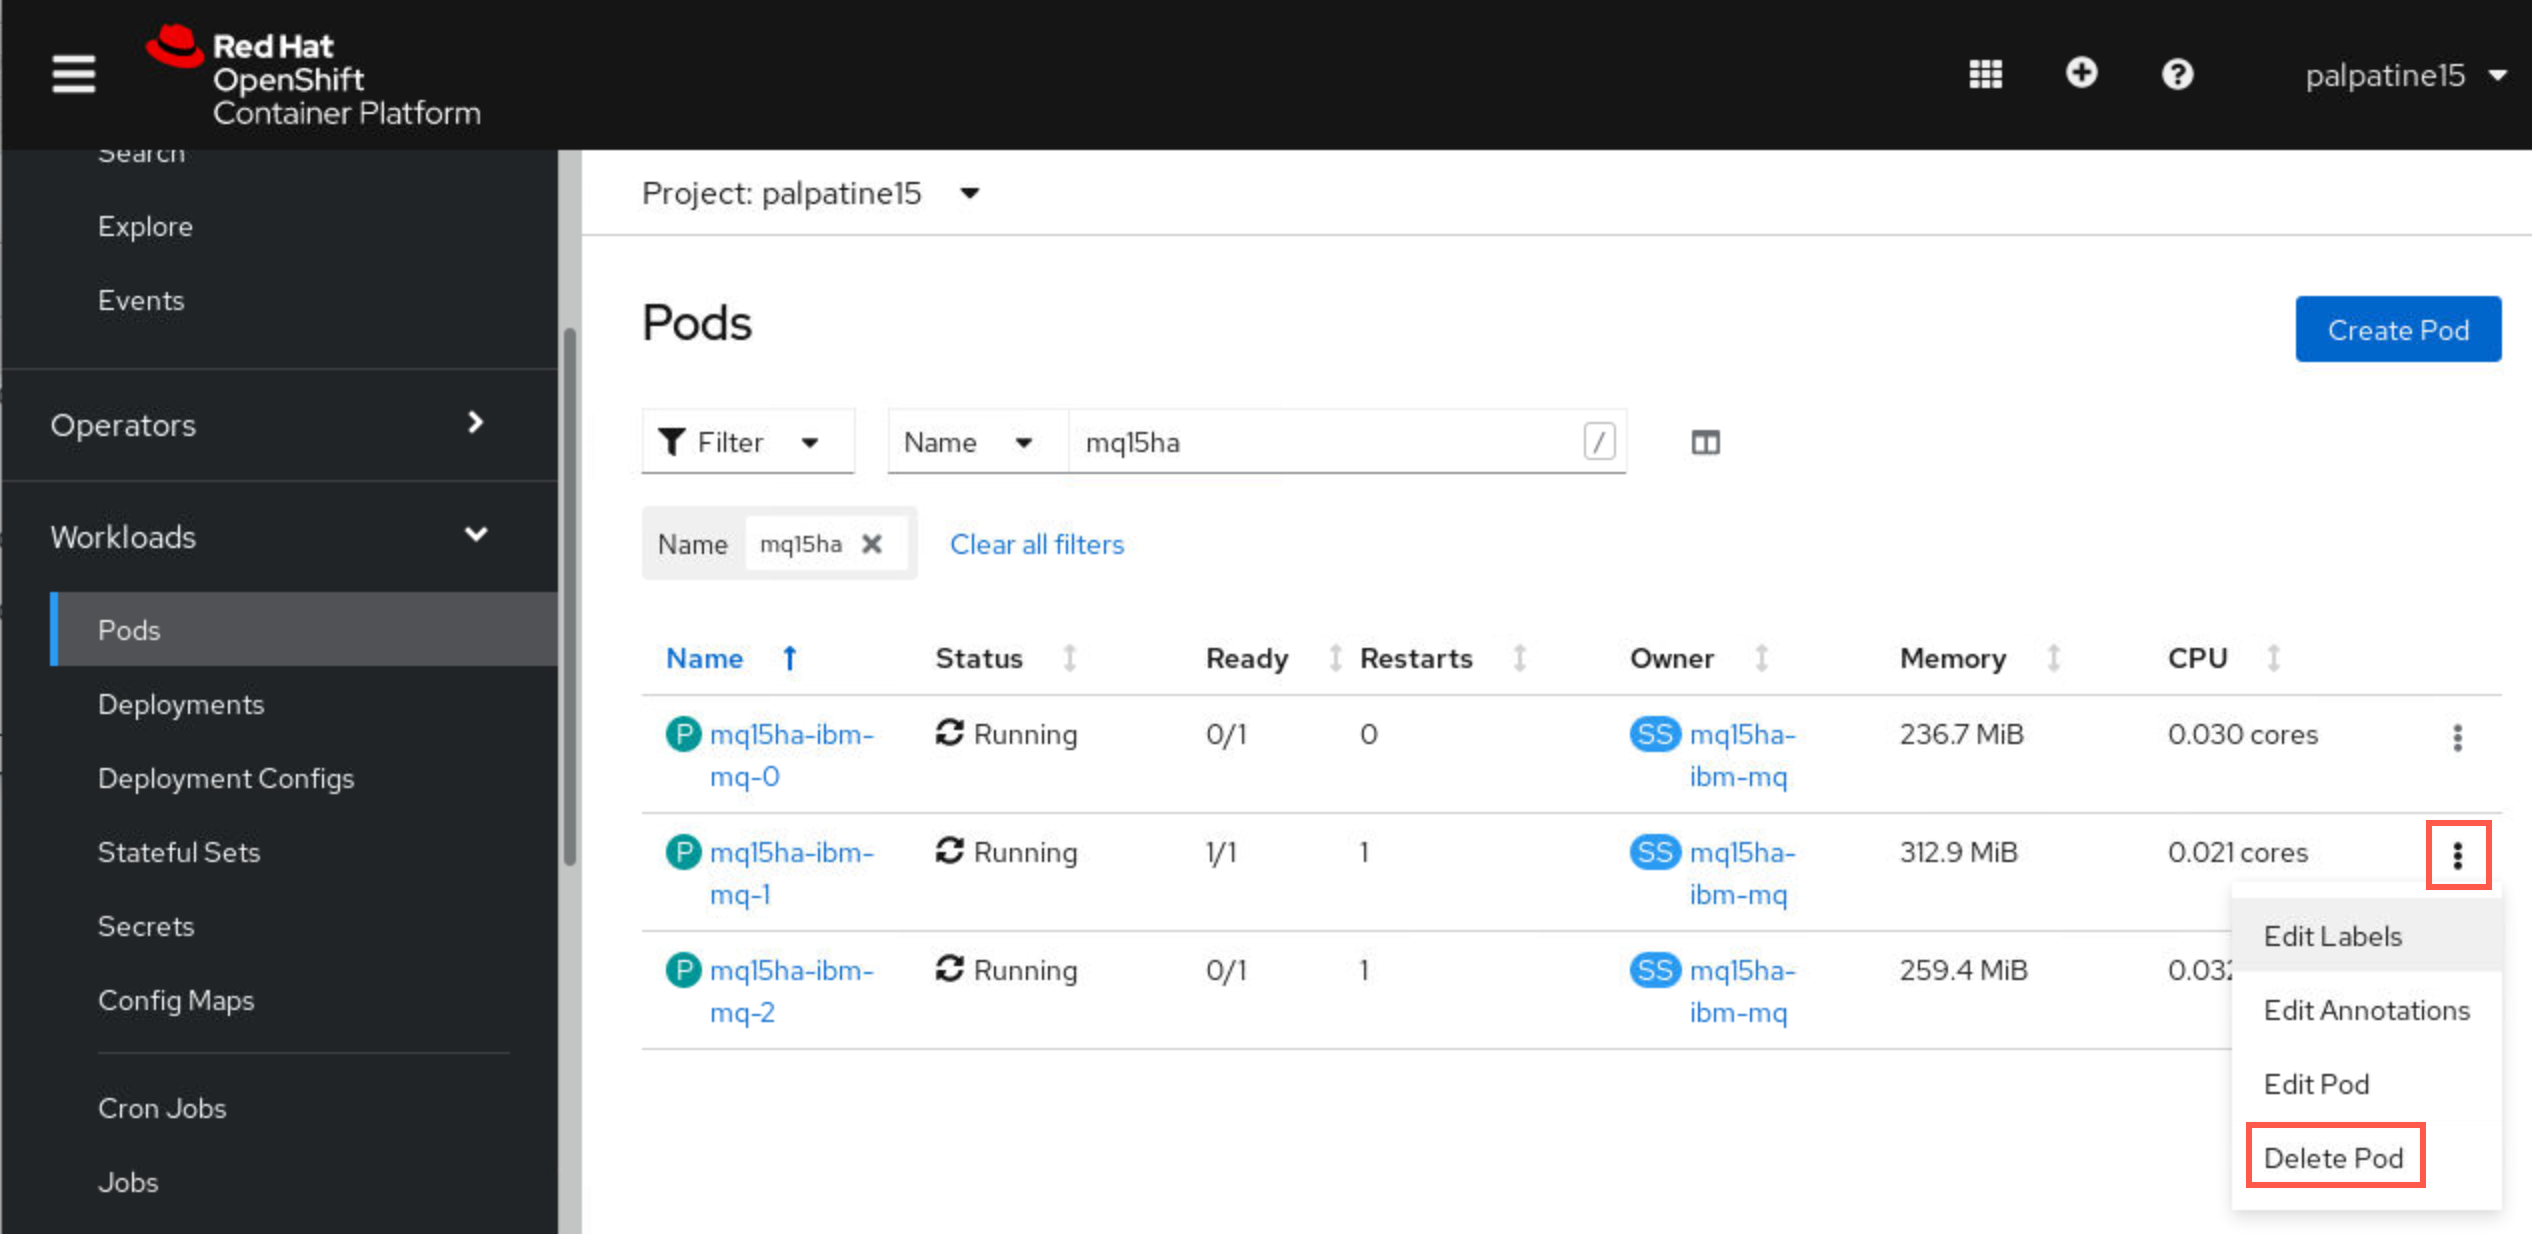
Still in OCP, kill the running pod and watch one of the standbys take over. Click the elipsis on the far right and select Delete Pod.
-
In the pop-up, click Delete to confirm the deletion.
-
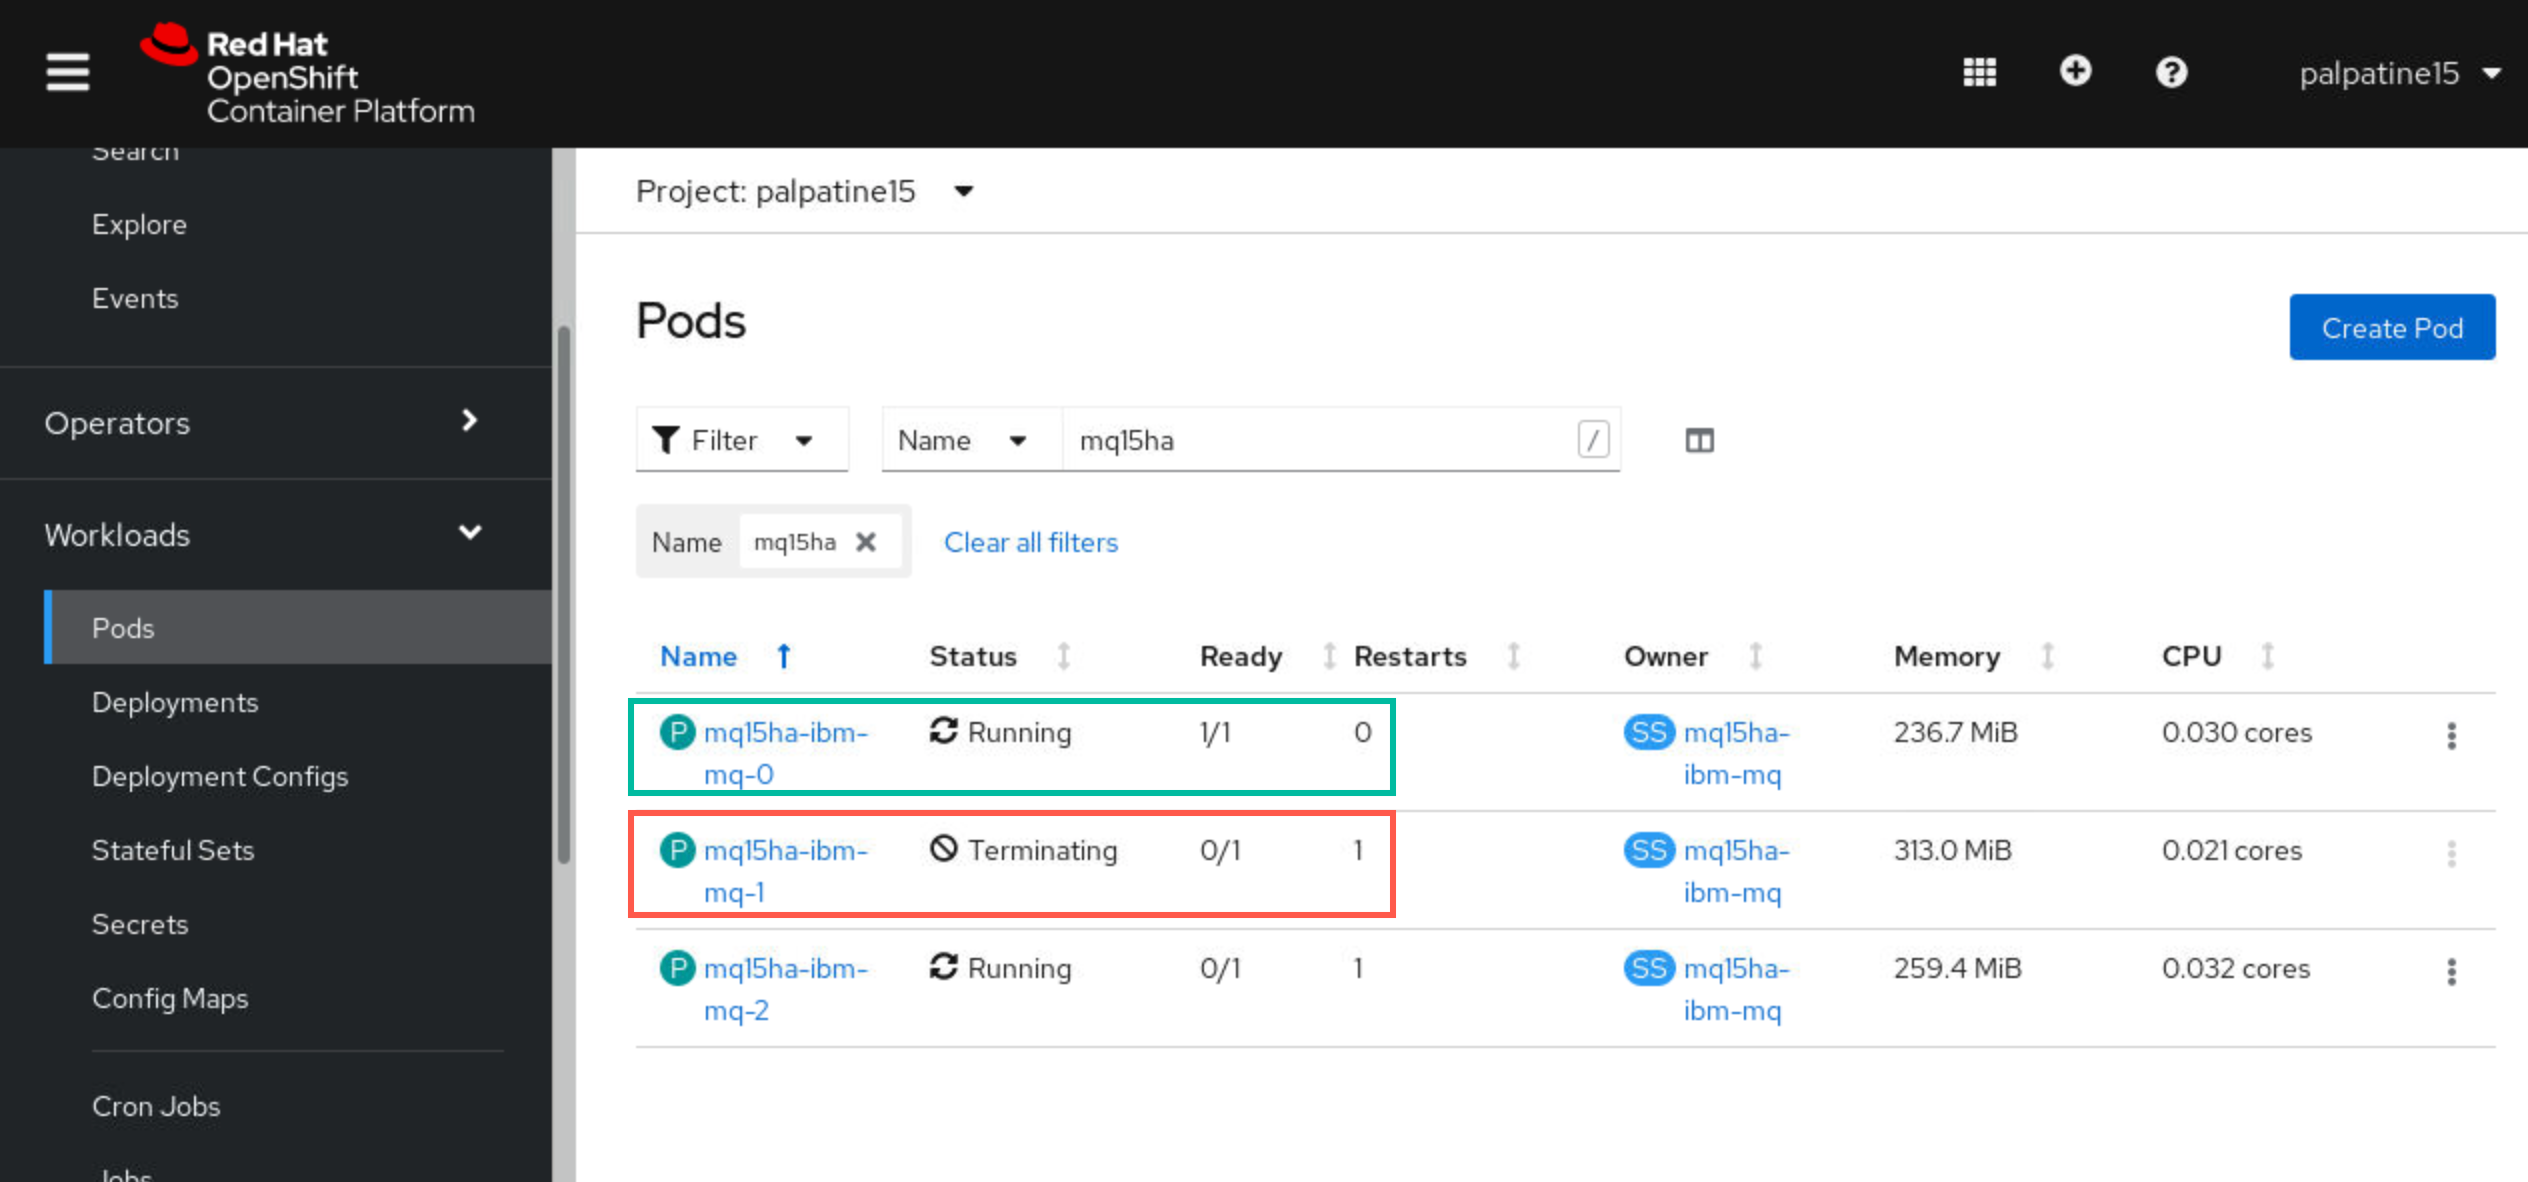
You will see pod mqxxha-ibm-mq-1 status change to Terminating immediately and within seconds, mqxxha-ibm-mq-0 becomes Running. Pod mqxxha-ibm-mq-2 could also have taken over.
 Note:
Note:
For those with sharp eyes, you may notice that the rest of this guide’s screen shots are using mq00ha and namespace cp4i-mq. At the time of writing this guide cluster palpatine was no longer available and was completed on cluster chopper. The effect was the same. -
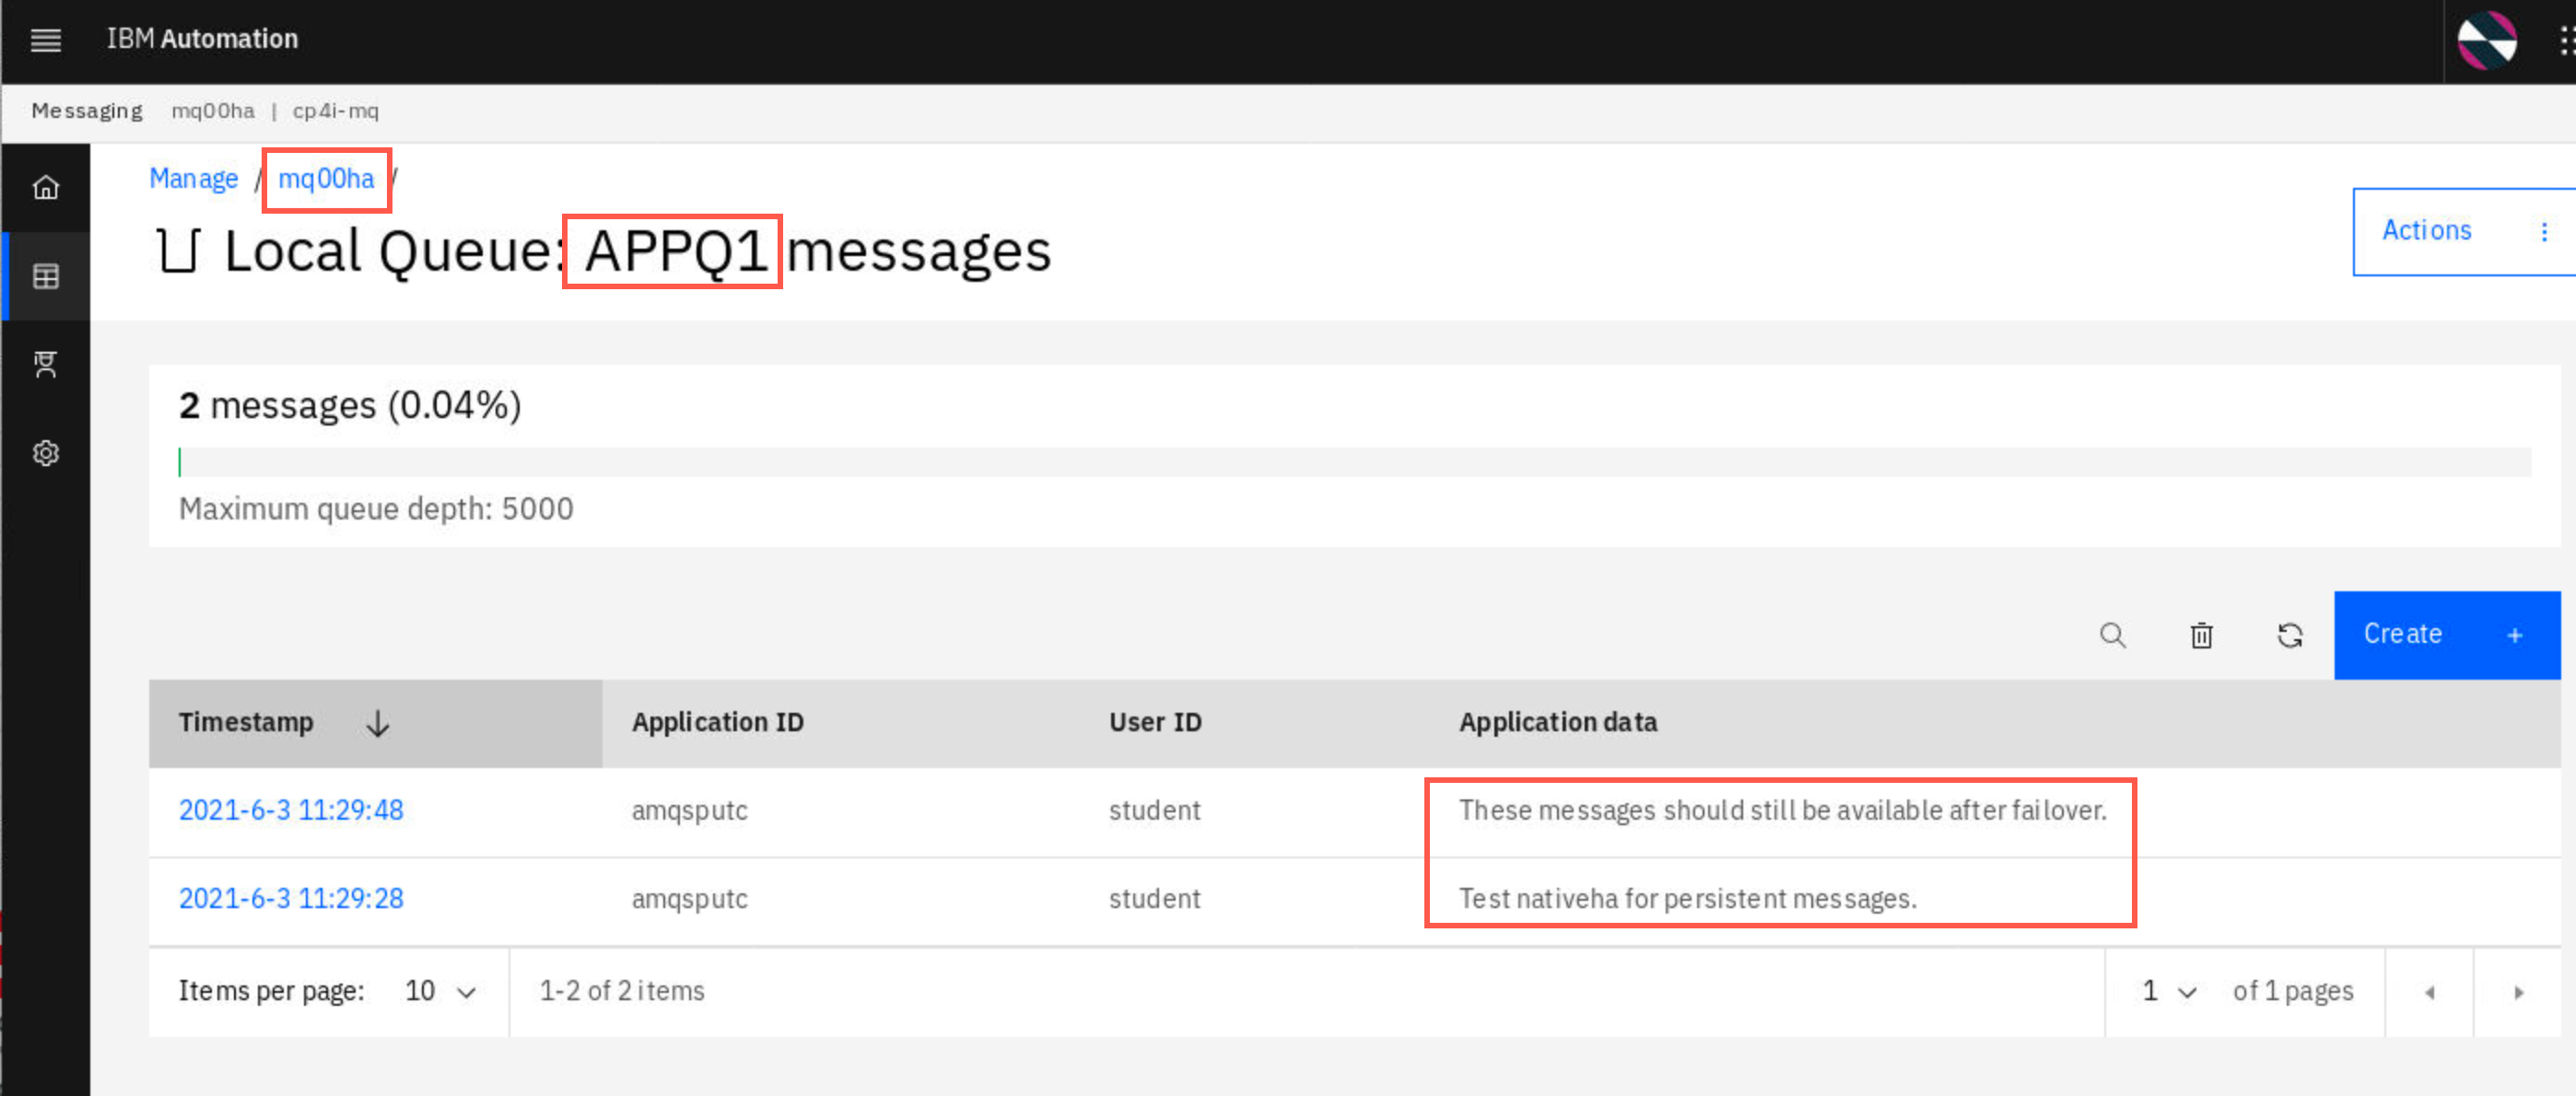
Return to the browser tab where MQ Console is running. Refresh the page and click Manage. Verify that queue APPQ1 still has the number of messages you put to the queue earlier.
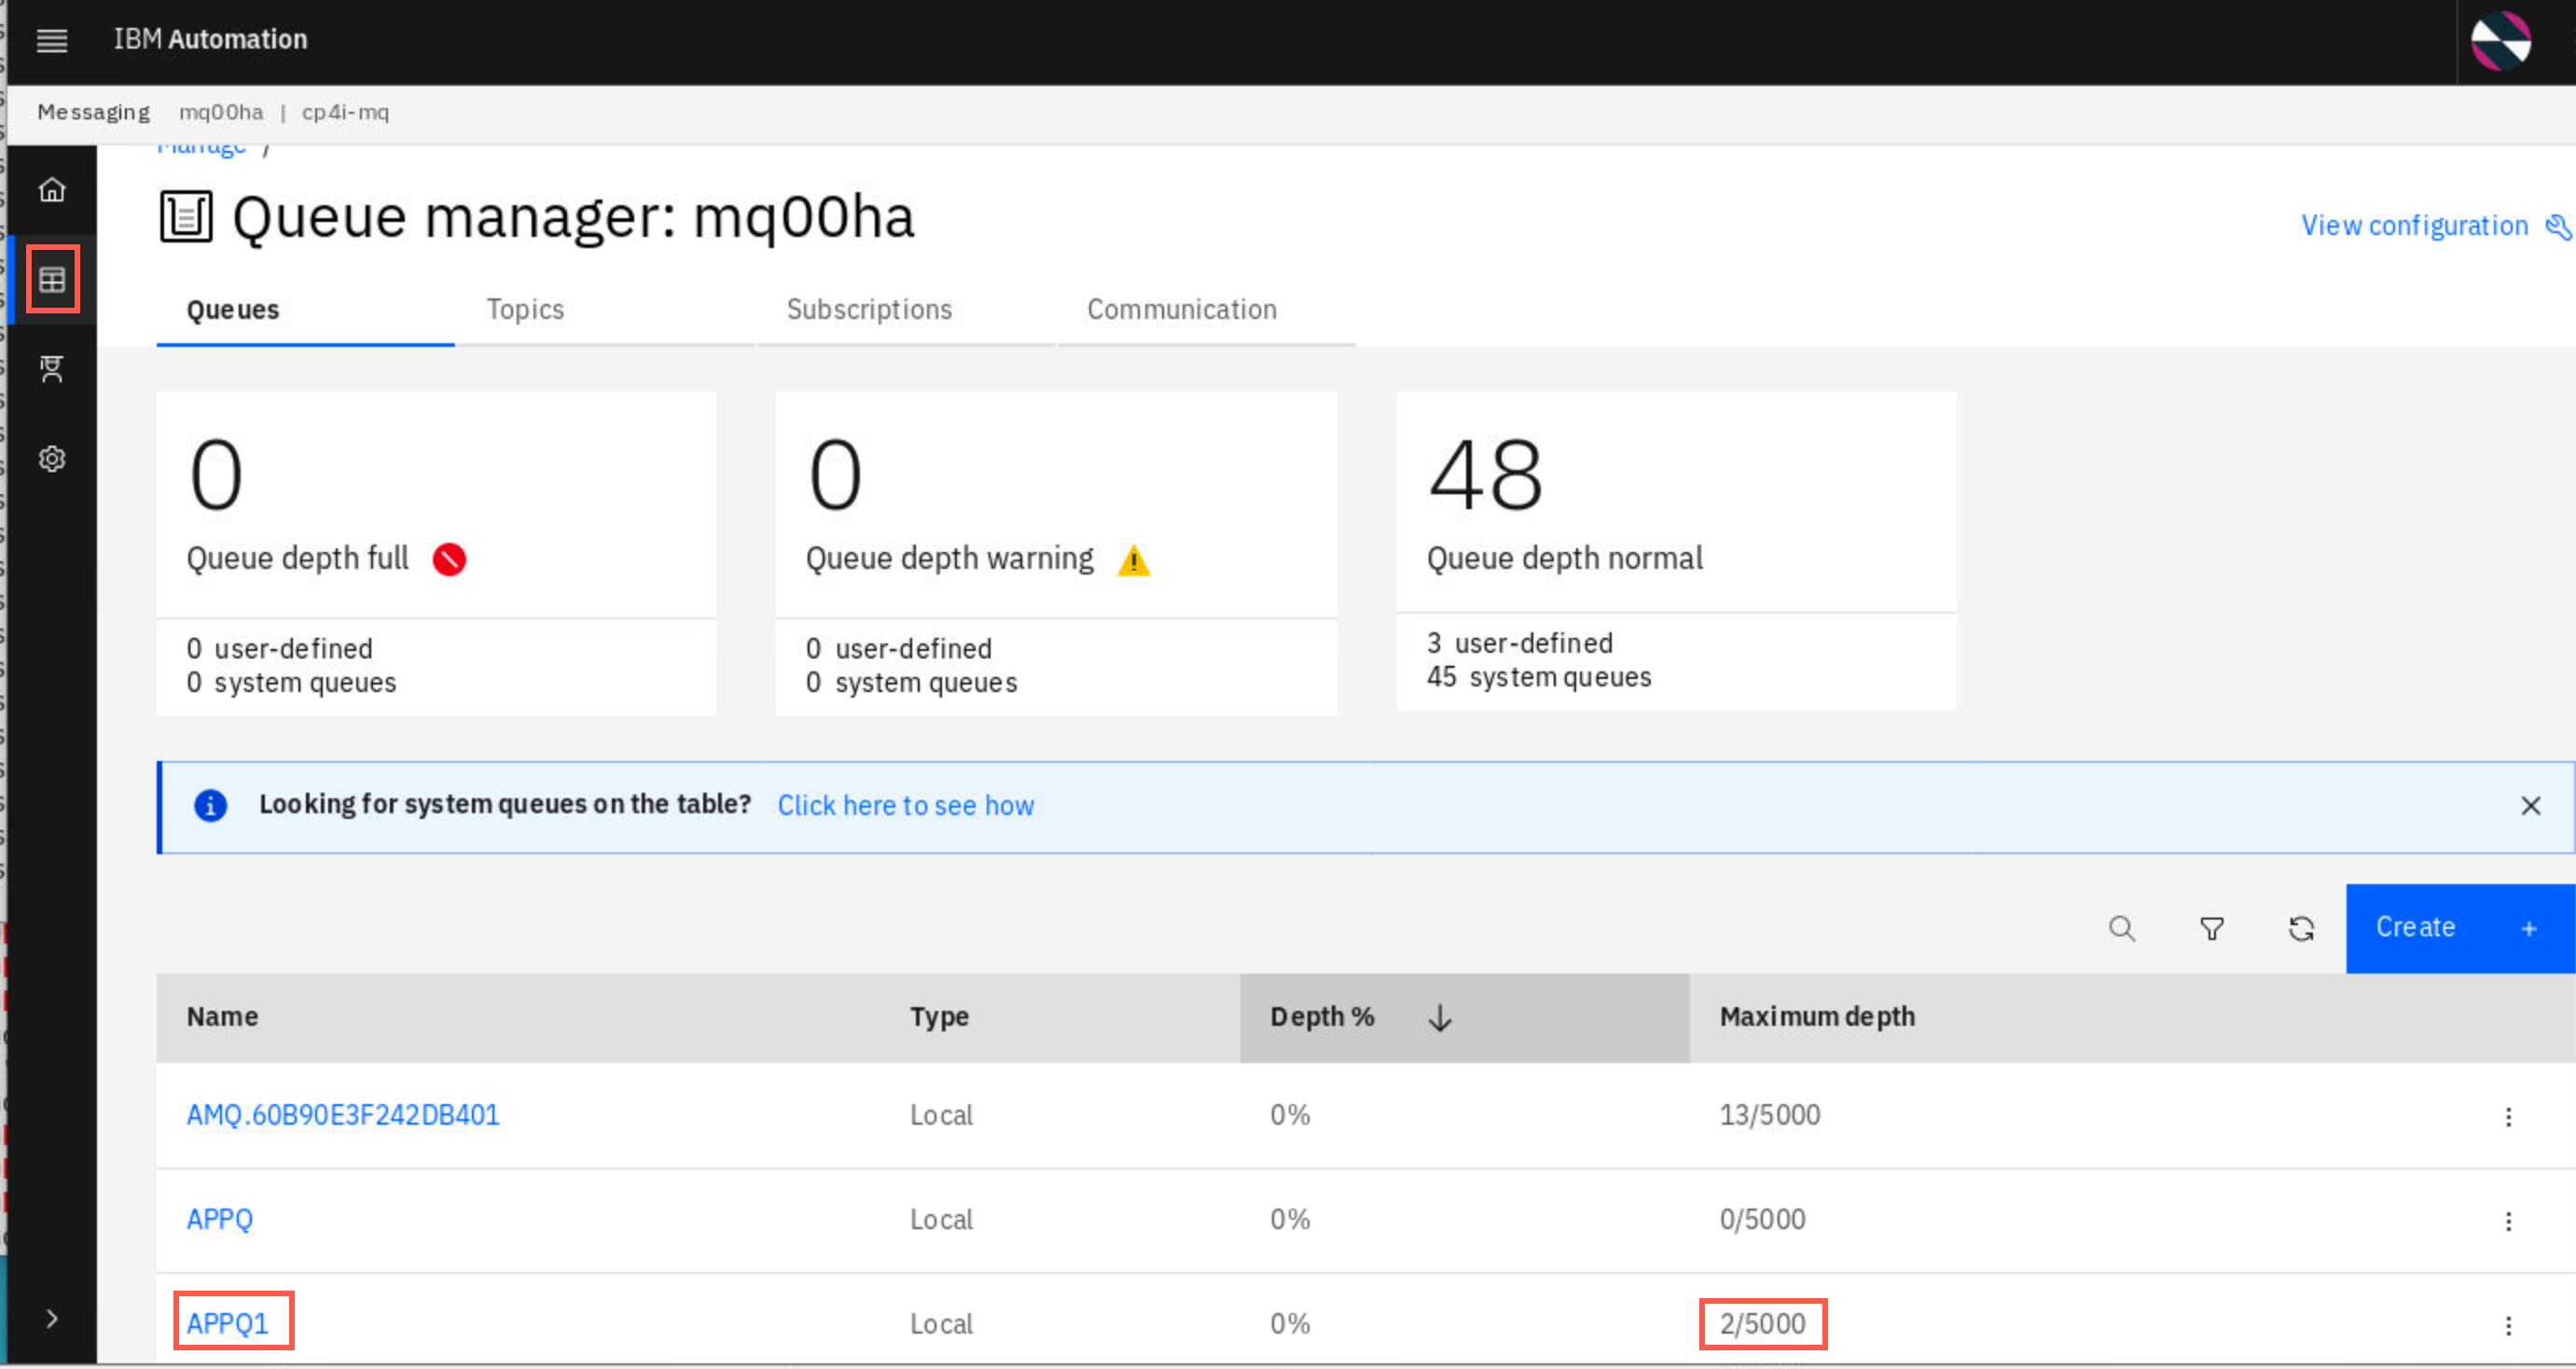
Click the hyperlink for the queue to verify that those are the messages you created.
Congratulations
You have completed this lab nativeHA for MQ on CP4I.
Cleanup
-
Close all the applications and terminal windows.
-
In a terminal navigate to /home/student/MQonCP4I/deploy:
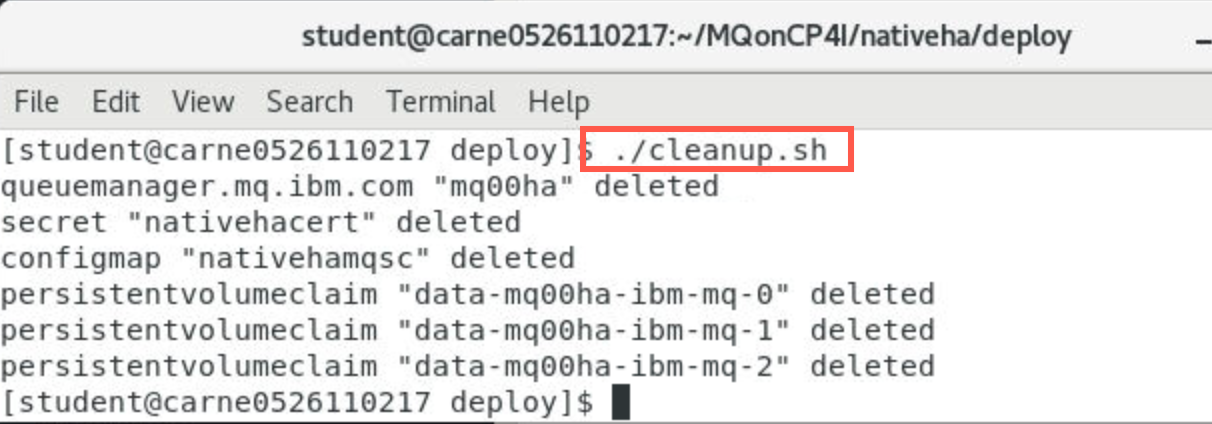
cd ~/MQonCP4I/nativeha/deployYou should have updated the cleanup.sh script earlier in the lab. Run it now to delete the nativeHA queue manager.
./cleanup.sh