MQ-Advanced-pot
IBM MQ NativeHA Cross Region Replication on RHEL
Table of Contents
- 1. Introduction
- 2. Workshop Environments
- 3. Recovery Environment Setup
- 4. Enable Cross Region Replication
- 5. Switching Roles
- 6. Summary
1. Introduction
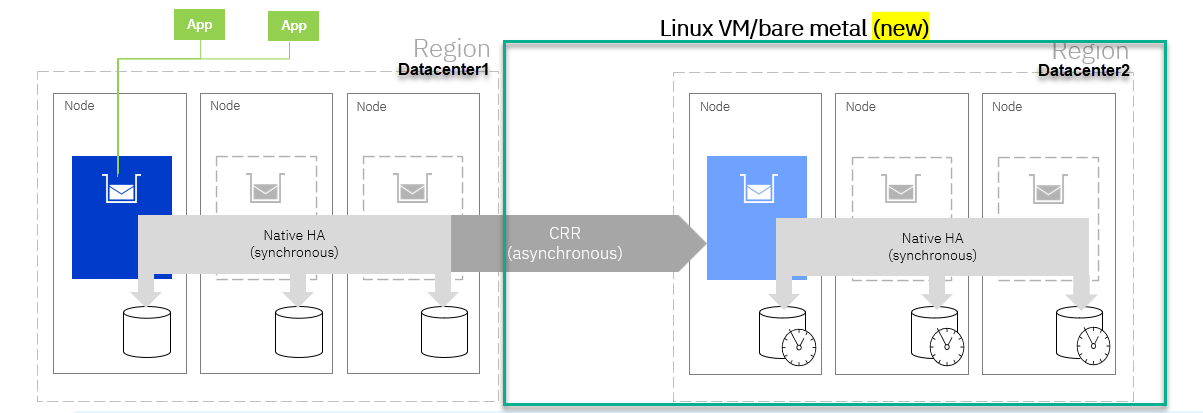
In this lab, you will investigate the process of configuring the NativeHA Cross Region Replication (CRR) Queue Manager on RHEL Virtual Machines. Additionally, you will conduct High Availability testing in the Live environment, subsequently performing a failover to the Recovery environment and monitoring the transition of client connections from Live to Recovery.
2. Workshop Environments
You need to reserve Techzone environment which will have 6 RHEL VMs, and 1 WIndows VM.
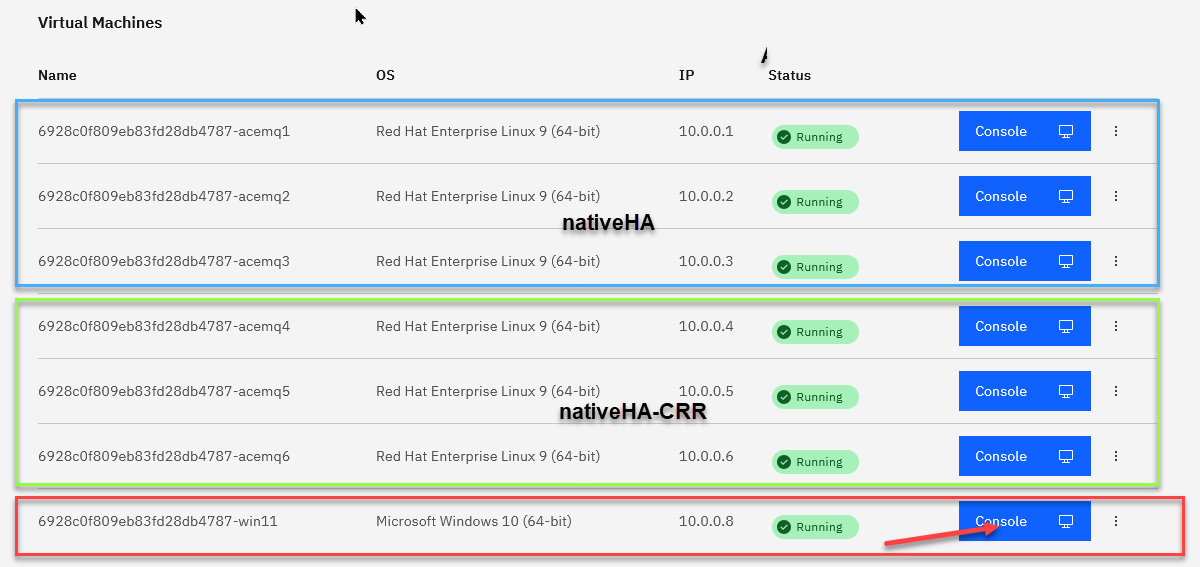
For this lab we will be using acemq1,acemq2,acemq3 that we setup in the nativeha lab and also the following acemq4,acemq5,acemq6 for doing the MQ nativeHA/CRR.
We will launch everything from the Windows image.
Click on the Windows image console to open it.
3. Recovery Environment Setup
Note: You should have completed the nativeha-rhel lab before continuing with this lab.
-
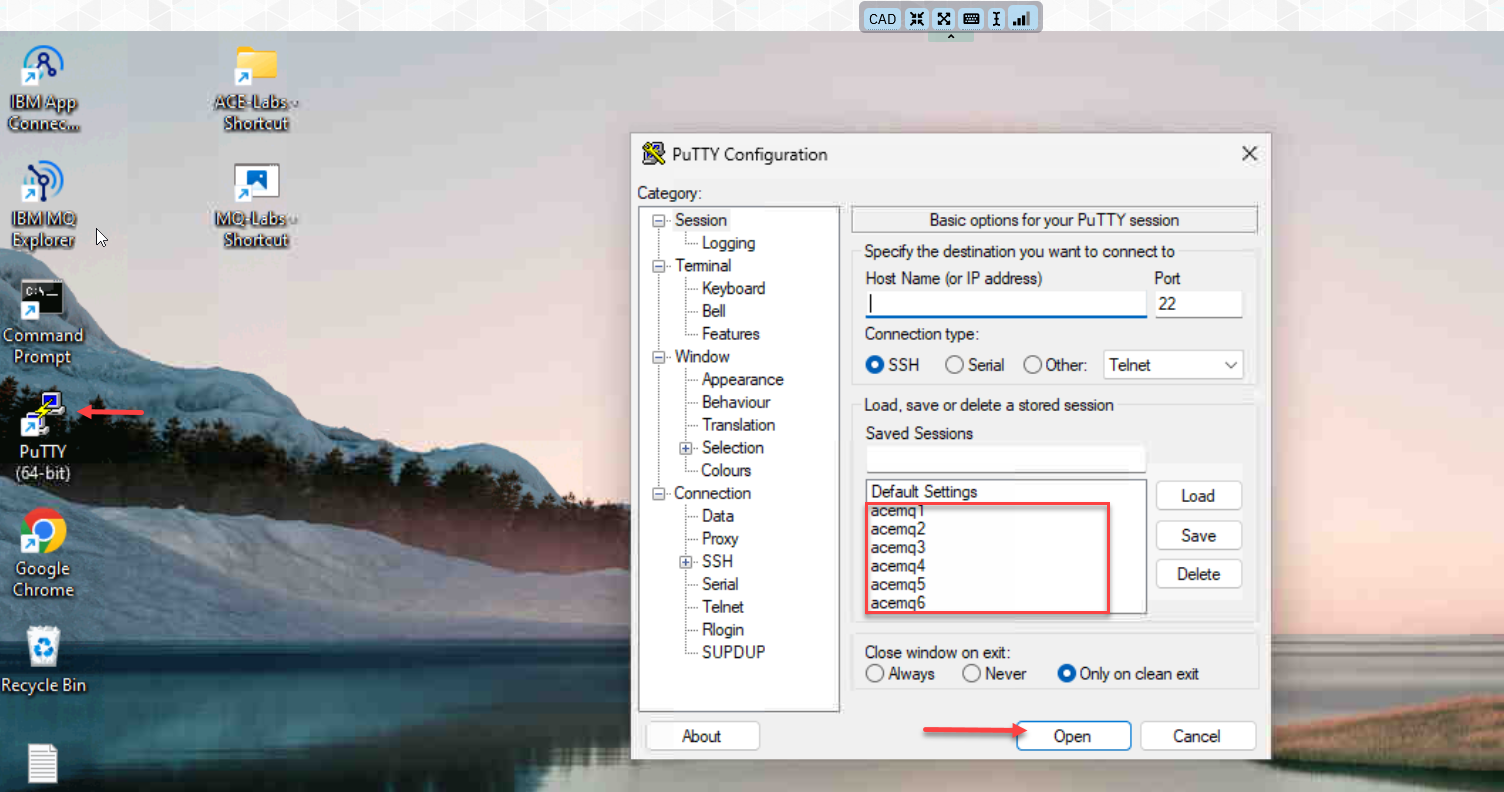
From the Windows console click on the CAD to get to the login page. Click on OK for the Business Use Notice

-
Login to the windows using techzone/IBMDem0s

-
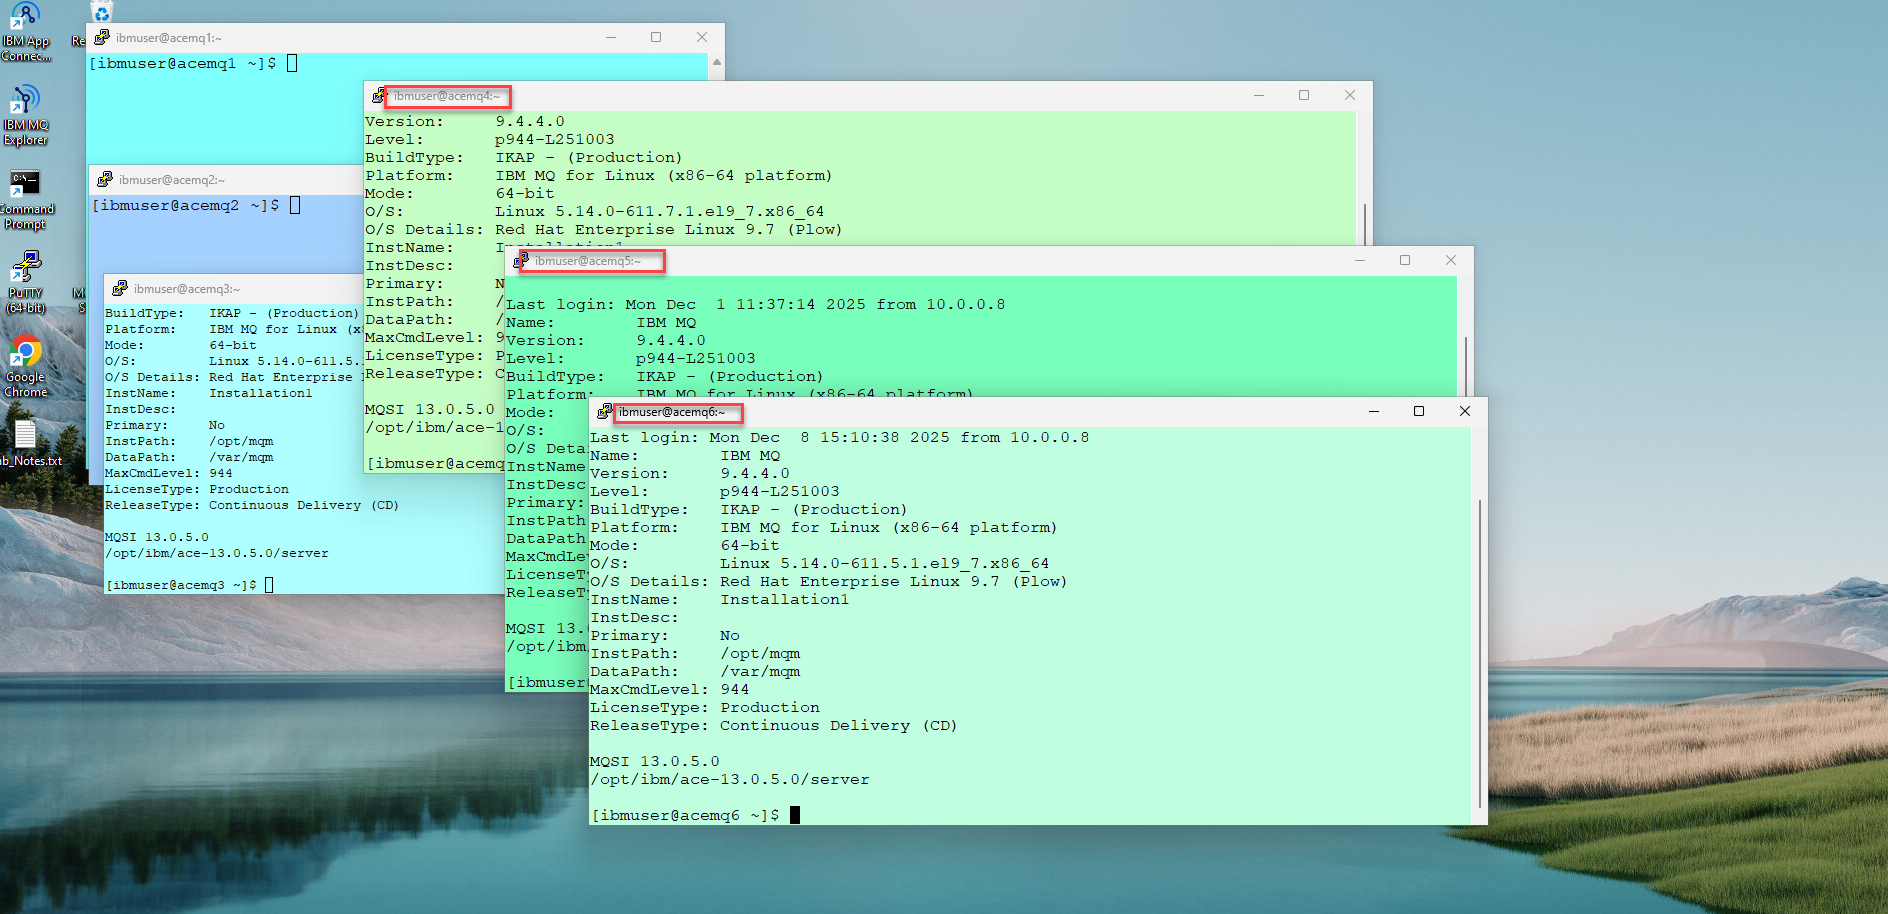
From the Windows VM’s Console, open Putty program and open acemq1, acemq2, acemq3, acemq4, acemq5, acemq6 Virtual Machine sessions.
-
Arrange the windows on your desktop and you should have the all 6 RH vms.
Login to each VM using ibmuser/engageibm.
We will focus in this lab setting up 4,5,6 for CRR
3a. Create Recovery Queue Manager
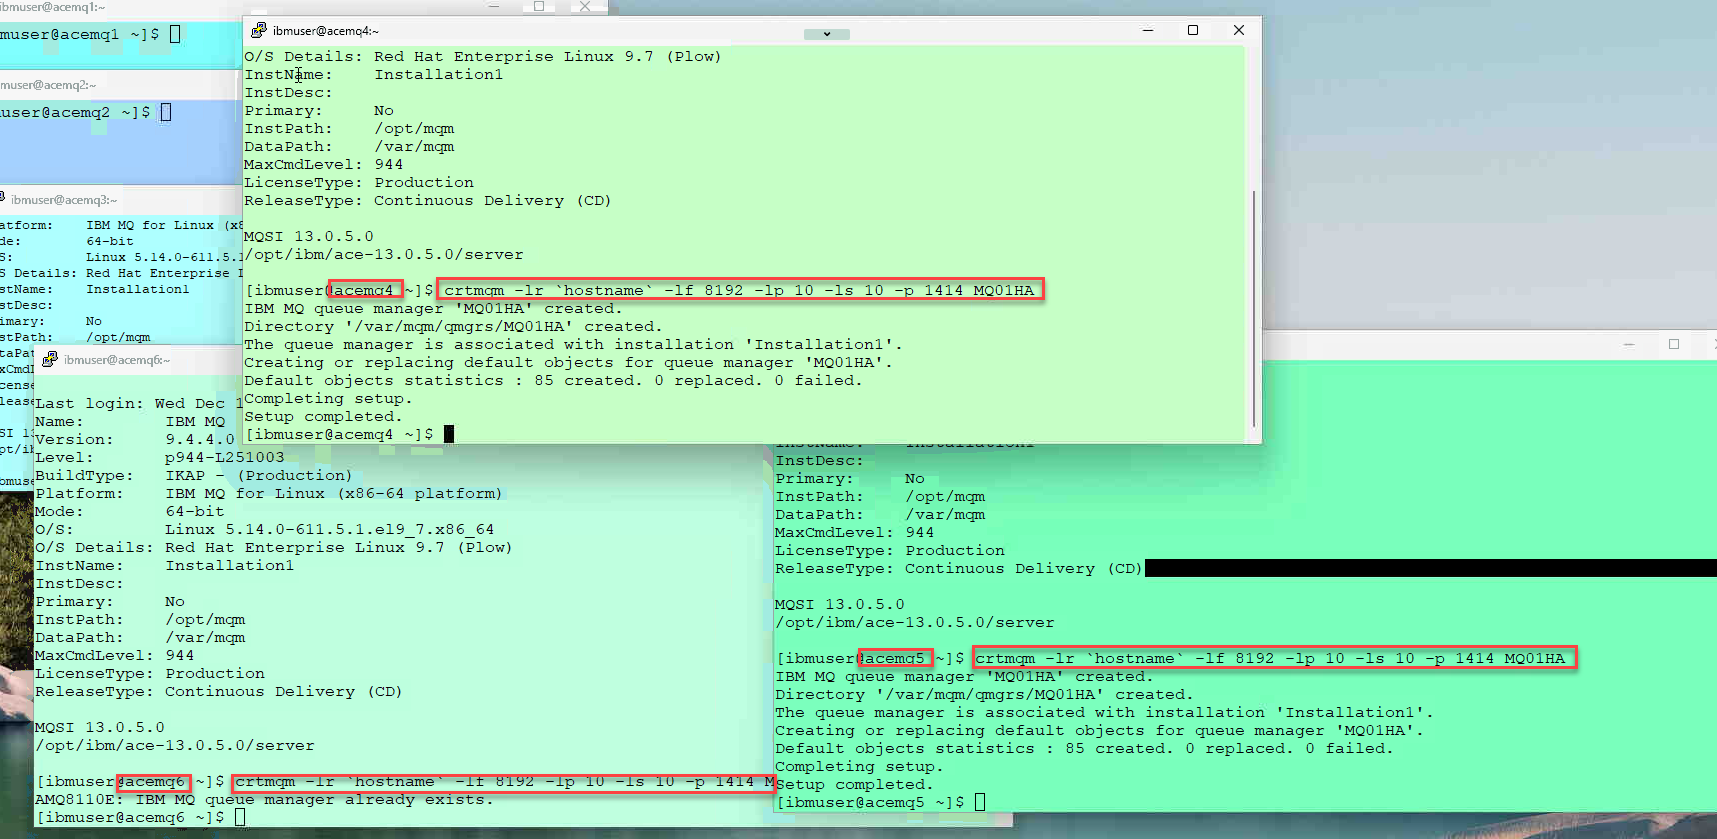
- Run the following commands on each of the Virtual Machines (acemq4,acemq5, acemq6).
Create Queue Manager MQ01HA
crtmqm -lr `hostname` -lf 8192 -lp 10 -ls 10 -p 1414 MQ01HA
3b. Copy TLS Certificates
Copy (sftp) all key.* files from Live Environment (acemq1) to Recovery VMs acemq4, acemq5, acemq6.
From acemq1
-
Copy all key.* files to acemq4 Virtual Machines using sftp. Login to acemq4 using password engageibm
sftp ibmuser@acemq4mput /var/mqm/qmgrs/MQ01HA/ssl/key.* /var/mqm/qmgrs/MQ01HA/sslquit - Copy all key.* files to acemq5 Virtual Machines using sftp. Login to acemq5 using password engageibm
sftp ibmuser@acemq5mput /var/mqm/qmgrs/MQ01HA/ssl/key.* /var/mqm/qmgrs/MQ01HA/sslquit - Copy all key.* files to acemq6 Virtual Machines using sftp. Login to acemq6 using password engageibm
sftp ibmuser@acemq6
Enter password
mput /var/mqm/qmgrs/MQ01HA/ssl/key.* /var/mqm/qmgrs/MQ01HA/sslquit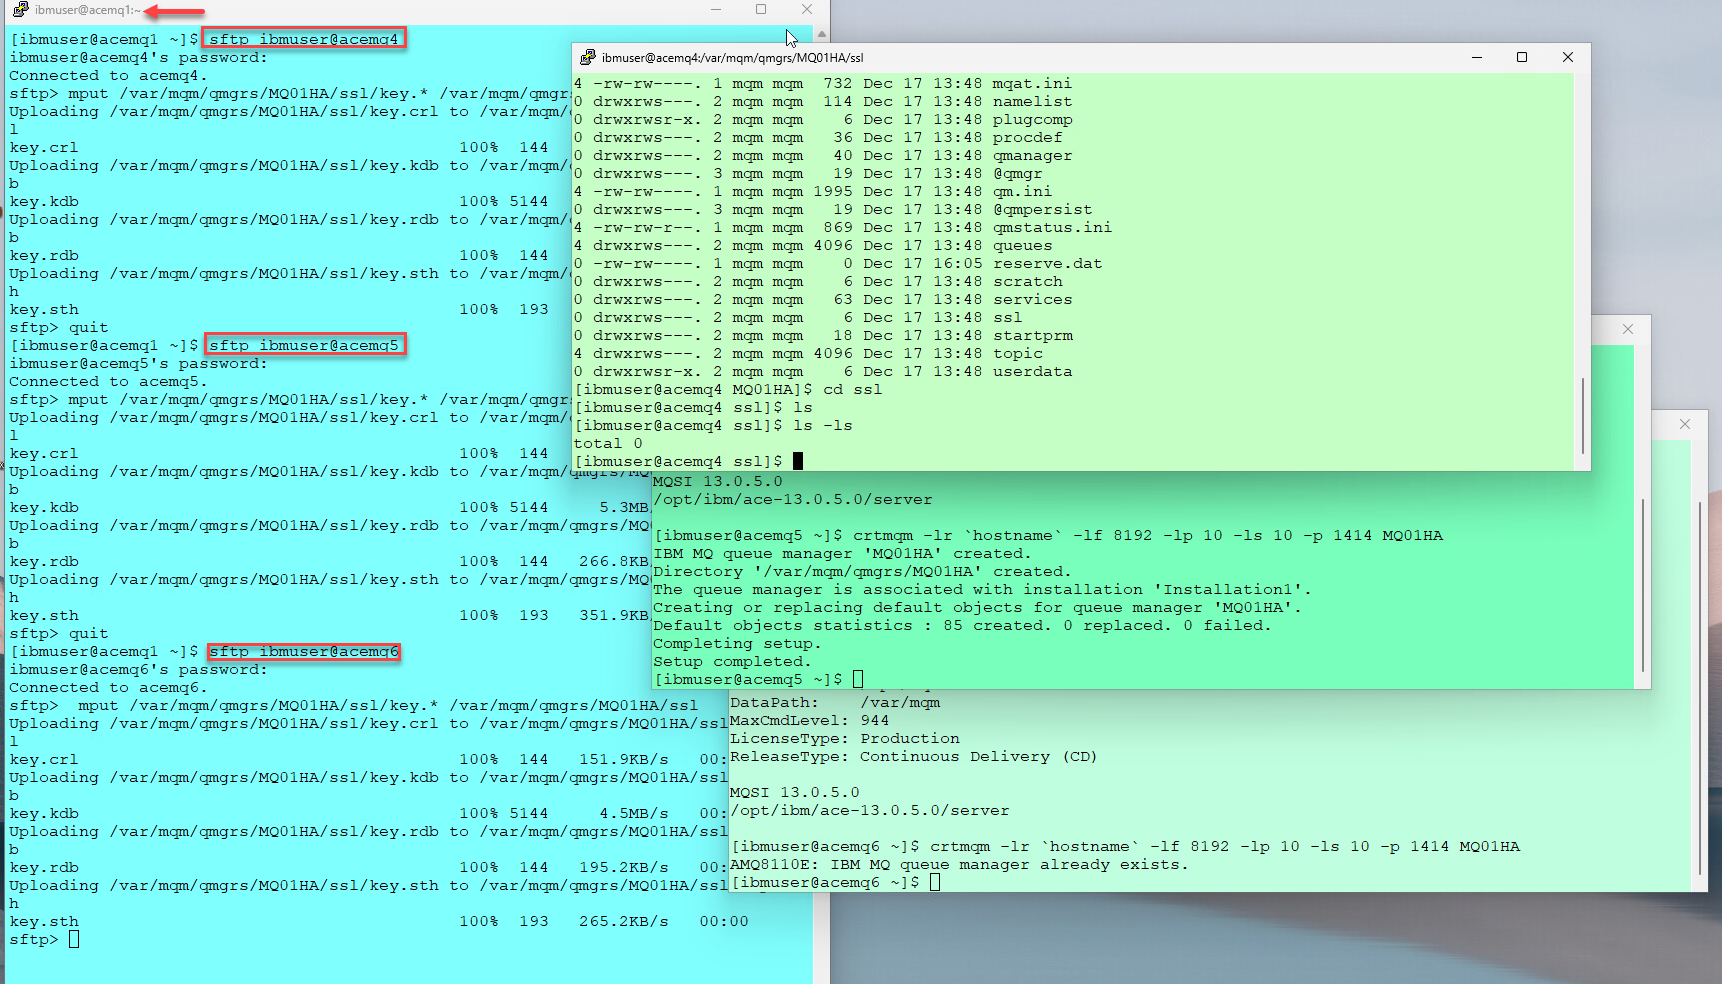
-
Change TLS key.* file Permissions
On acemq4, acemq5, acemq6 run the following commands.
sudo chown -R :mqm /var/mqm/qmgrs/MQ01HA/ssl/key.*
sudo chmod g+r /var/mqm/qmgrs/MQ01HA/ssl/key.*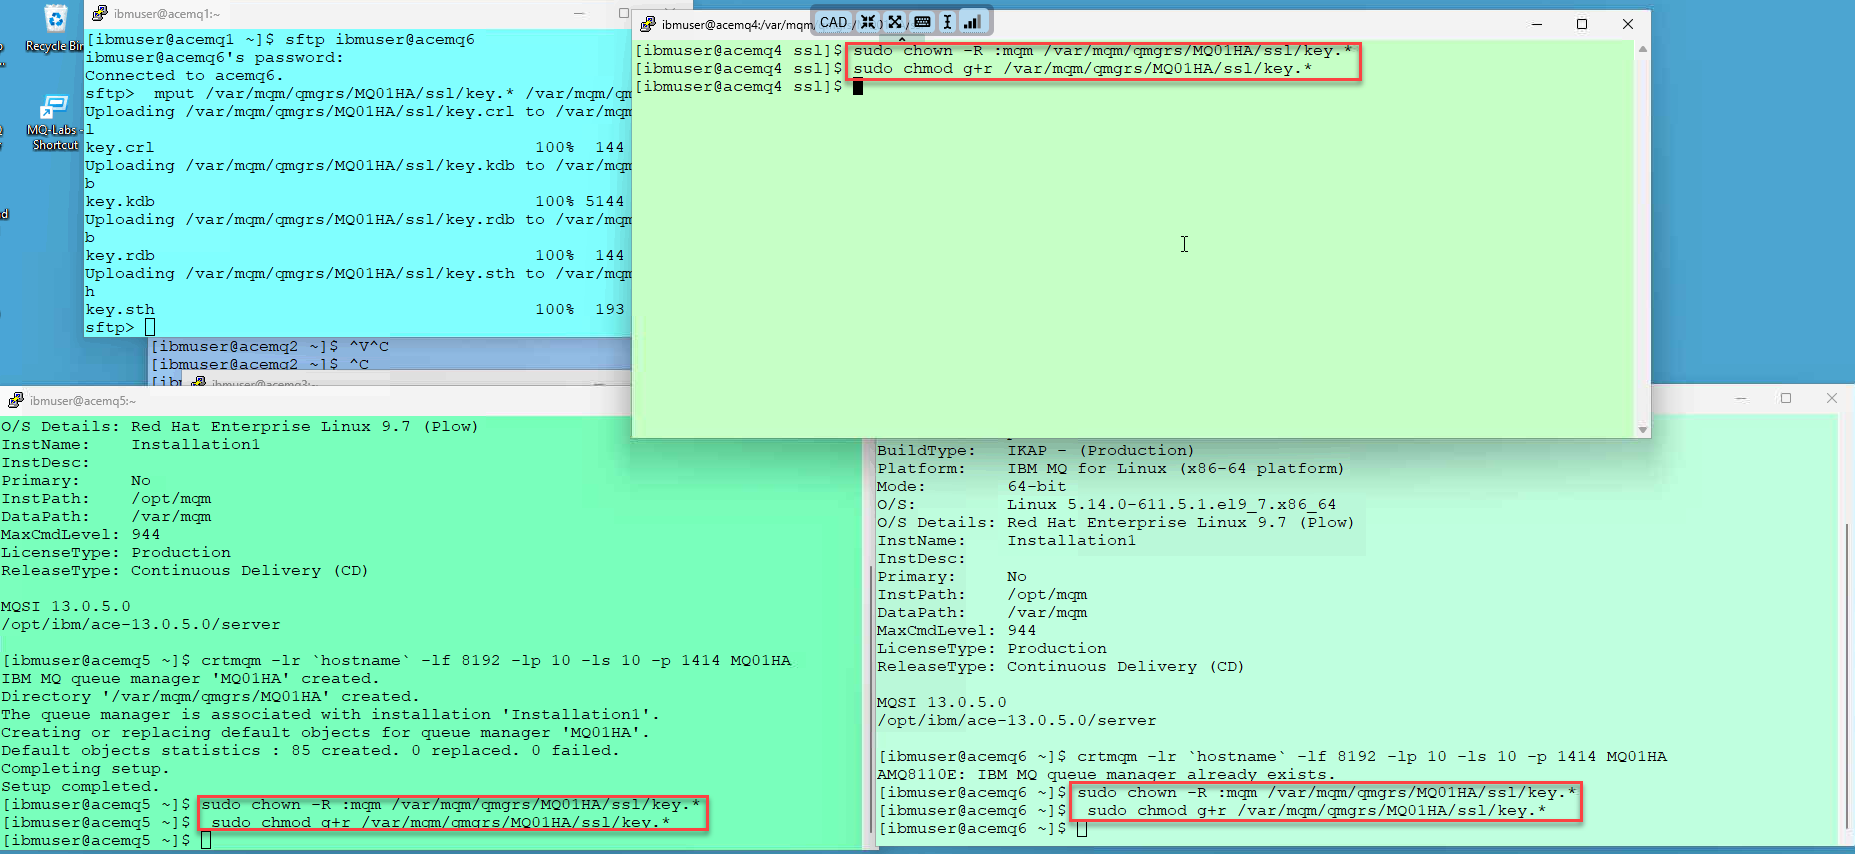
3c. Update qm.ini
-
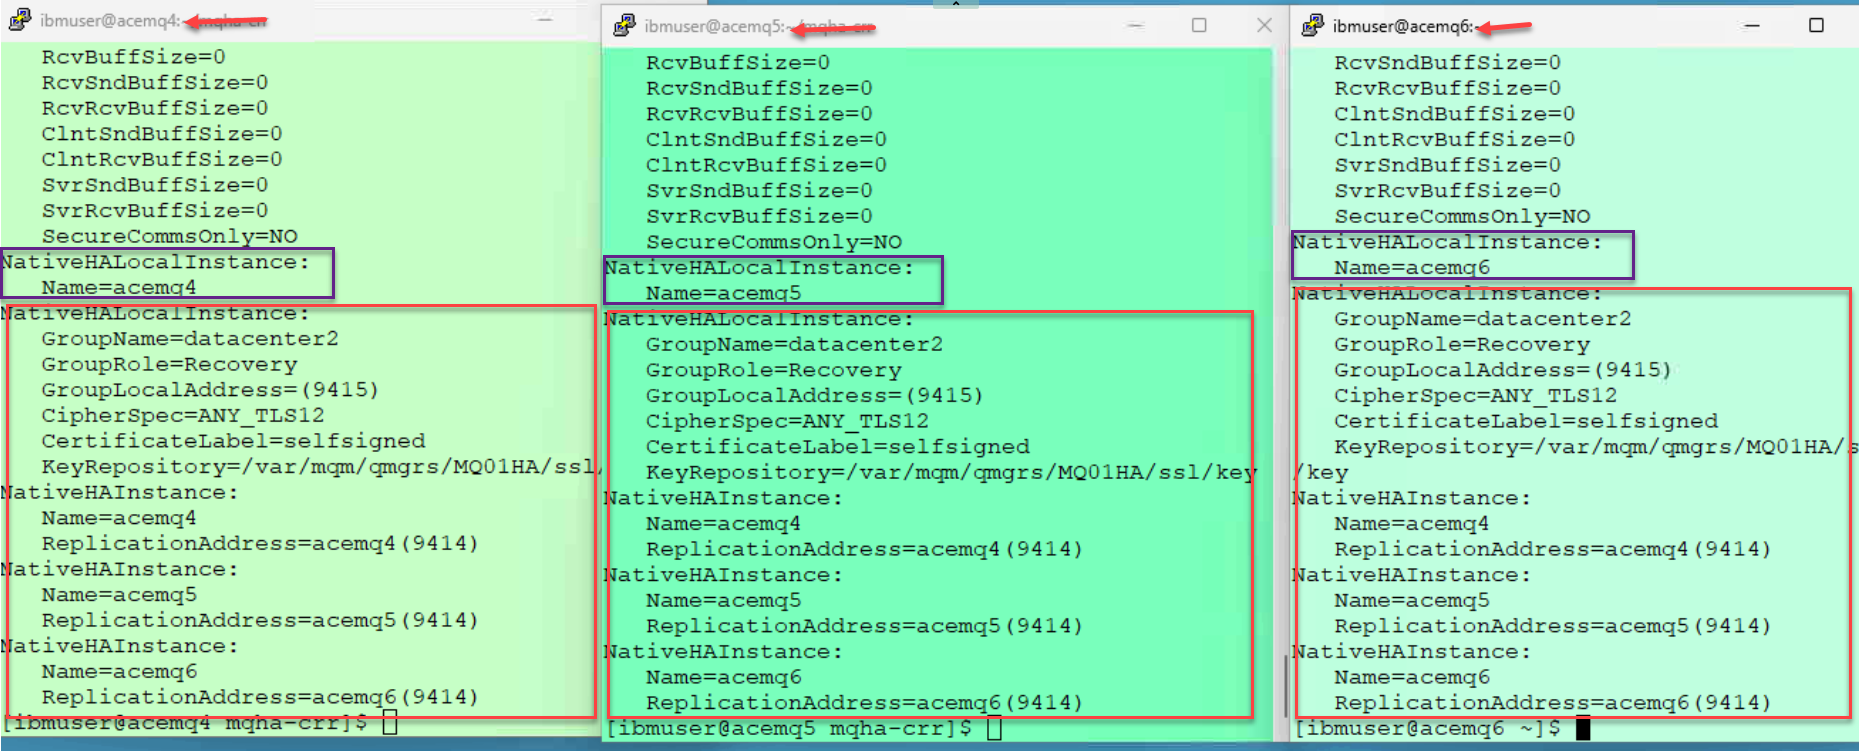
On each VM (acemq4,5,6), we will add the TLS parameters as well as all 3 NativeHAInstances to qm.ini.
You can run the following command on all 3 images to look at the current qm.ini files.
cat /var/mqm/qmgrs/MQ01HA/qm.ini
-
We will now from the acemq4 putty session we will run the update script that will update all 3 qm.ini files on the 3 instances.
The output will show that you have updated all 3 instances. This will also start the QMgr on all 3 instances.
cd mqha-crr./2-qm-CRR.sh
-
When done run the following command on all 3 instances to verify that the qm.ini was updated correctly.
cat /var/mqm/qmgrs/MQ01HA/qm.ini
3d. Check Queue Managers
-
The QMgr should be running now and you can run the following command to check the status of the queue manager on for (acemq4,5,6).
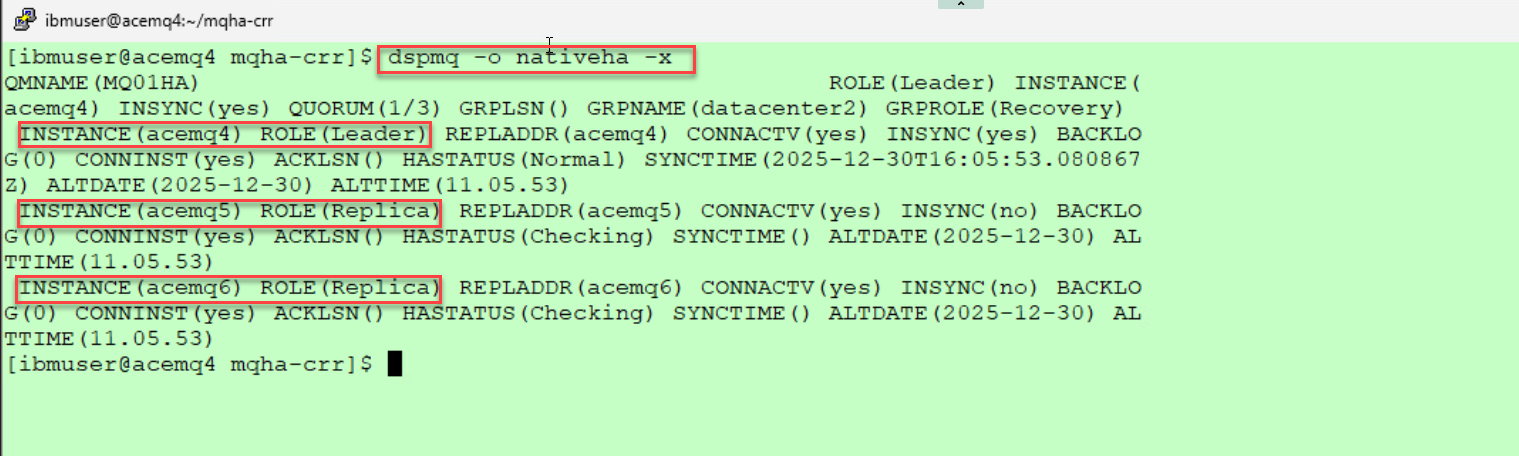
dspmq -o nativeha -x -
The Queue Manager should be active in one of Virtual Machines. When you run the dspmq commands you will see a leader and the other 2 will be Replica’s
Note: In this screen shot acemq4 is the Leader
3e. Enable systemd Monitoring
Run the following commands on each RHEL VM.
sudo ln -s /opt/mqm/samp/mqmonitor@.service /etc/systemd/system
sudo systemctl enable mqmonitor@MQ01HA
sudo systemctl start mqmonitor@MQ01HA
4. Enable Cross Region Replication
4a. Live Environment
-
Update qm.ini on all acemq1,2,3 VMs.
We will run the following script to update the qm.ini file on the live images.
This will also restart each QMgr instance../3-qm-live-CRR.sh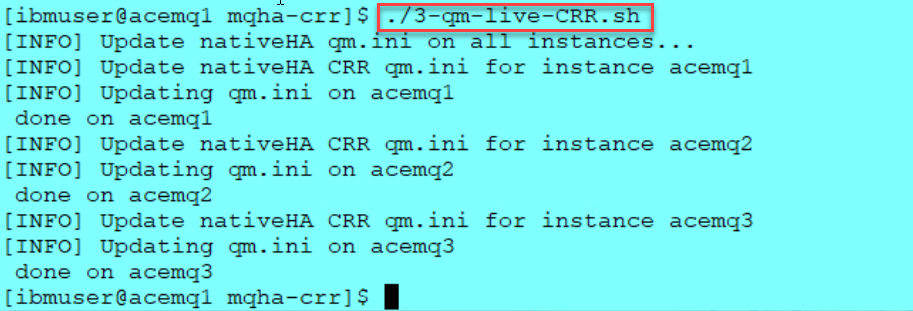
-
Run the following command on one of the Live instances to see what was added to the qm.ini file for the CRR replication.
cat /var/mqm/qmgrs/MQ01HA/qm.ini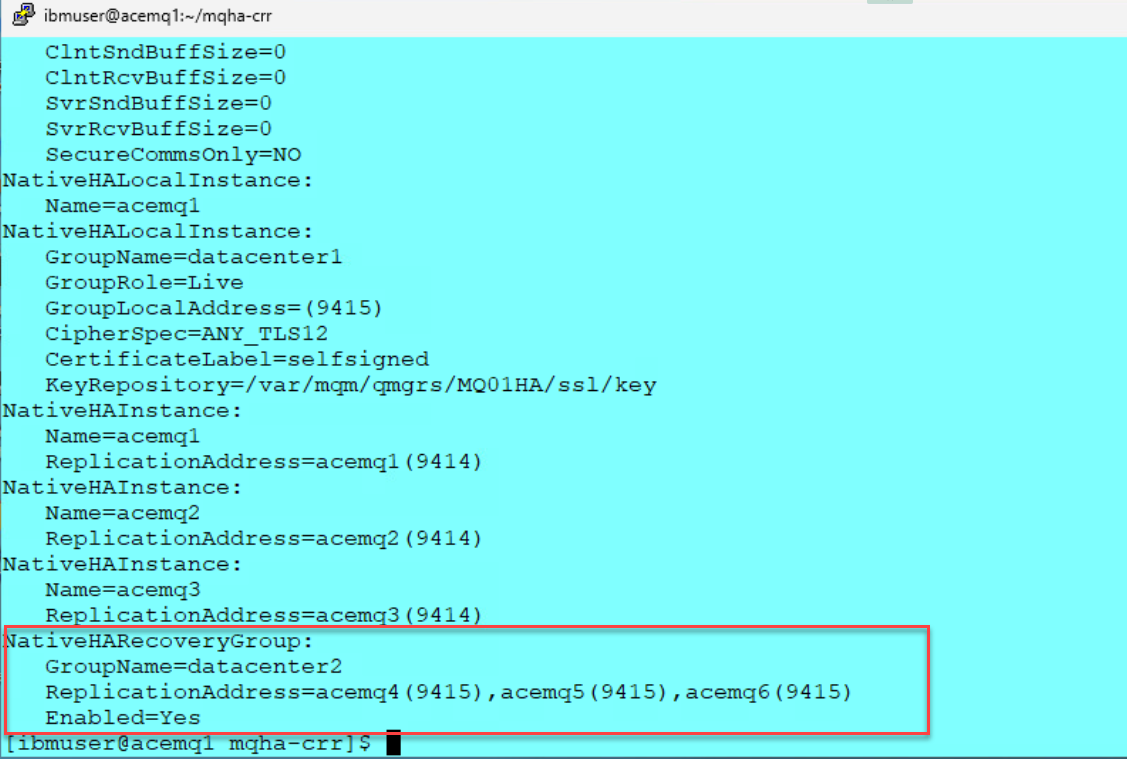
-
Run the following command to check the status of the queue managers.
Note: This shows acemq2 is the active instance.dspmq -o nativeha -x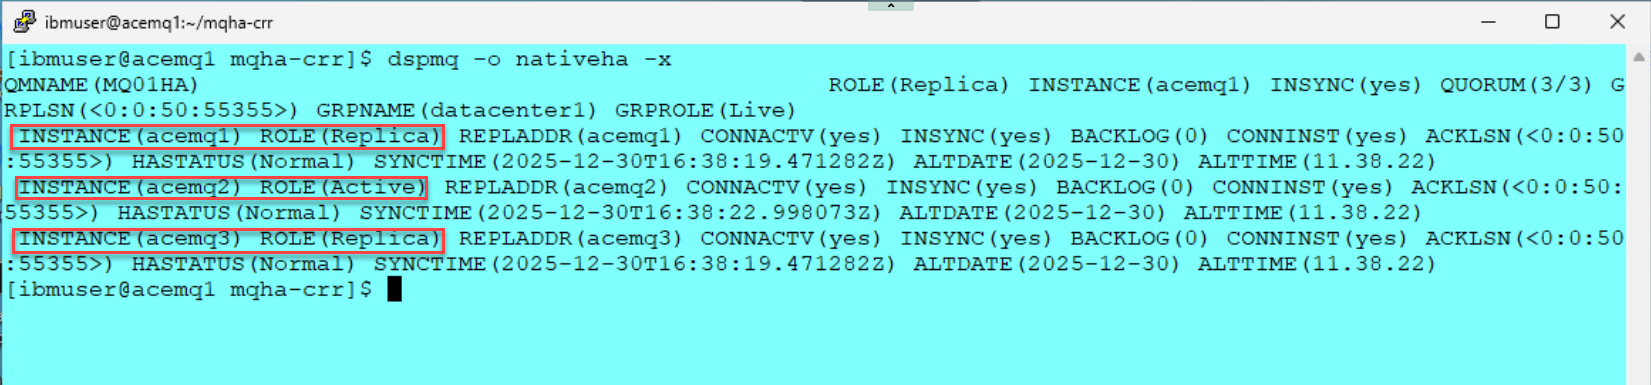
4b. Recovery Environment
-
Update qm.ini on all acemq4,5,6 VMs.
We will run the following script to update the qm.ini file on the Recovery images.
This will also restart each QMgr instance../4-qm-recovery-CRR.sh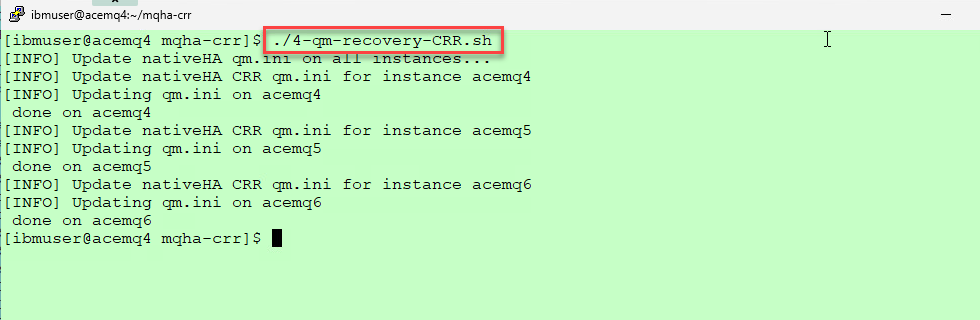
-
Run the following command on one of the Recovery instances to see what was added to the qm.ini file for the CRR replication.
Note: This is example shows acemq4 instance.cat /var/mqm/qmgrs/MQ01HA/qm.ini
-
Run the following command to check the status of the Recovery queue managers (acemq4,acemq5,acemq6)
Note: This shows acemq4 is the active instance. Also this is currently showing the GRPROLE as Recovery.dspmq -o nativeha -x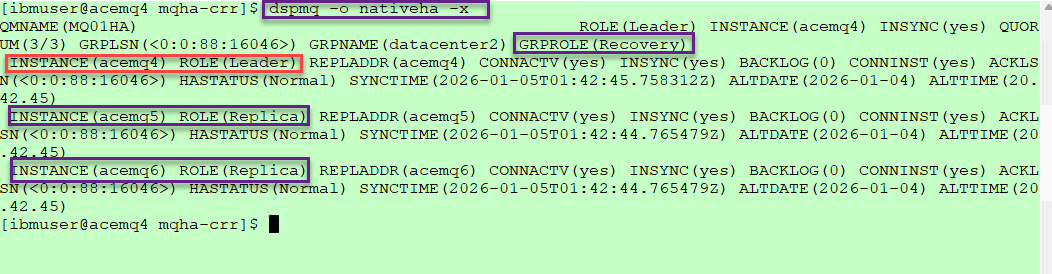
5. Switching Roles
-
We will now check the status of both are Datacenter deployments. If this is the first time you should see Datacenter1 - Live and Datacenter2 - Recovery
You can run the script in either Datacenter. In this example we are showing the command running in both Datacenters but you only need to run it on one of the putty instances.
./get-status.sh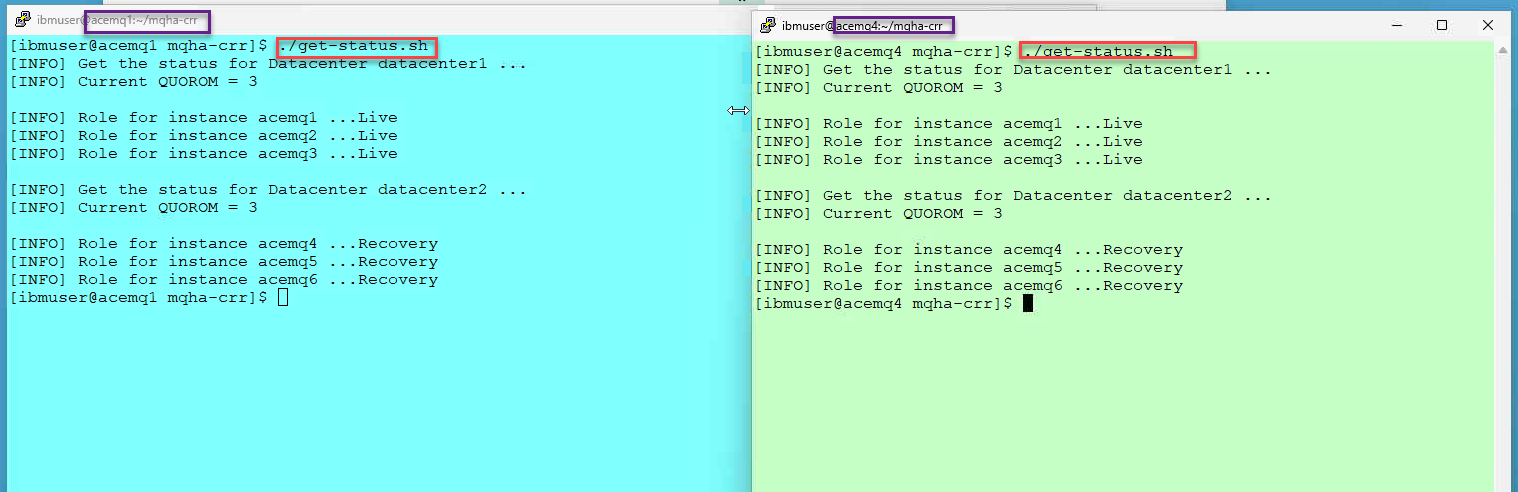
-
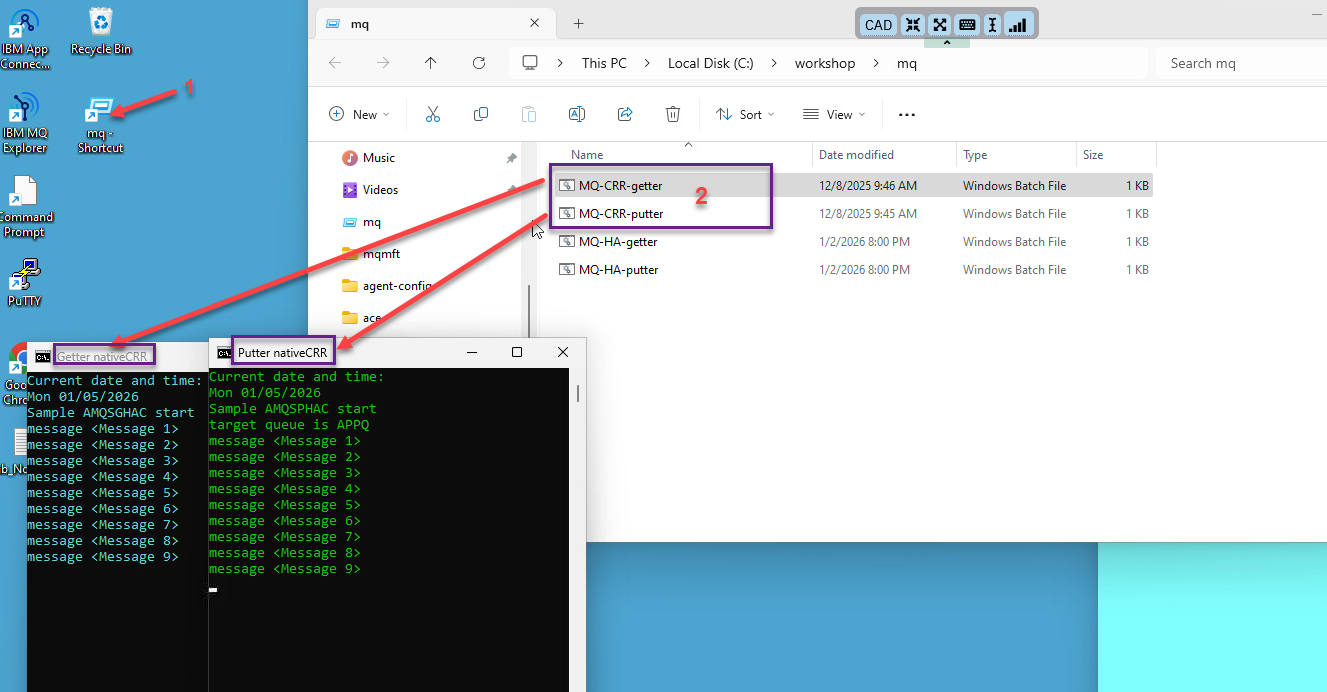
Before we switch the Recovery Datacenter to be Live and Live Datacenter to be Recovery.
First we will start the sample getter and putter for CRR.
1) Open the mq shortcut on the windows desktop. 2) Double click on the MQ-CRR-getter and MQ-CRR-putter
You will now see messages being put and get to the APPQ on the active QMgr.
- Run the following command from one of the putty instances and it will determine the current status and do the switch for each Datacenter as well as restart the QMgr on each instance.
./5-switch-crr.sh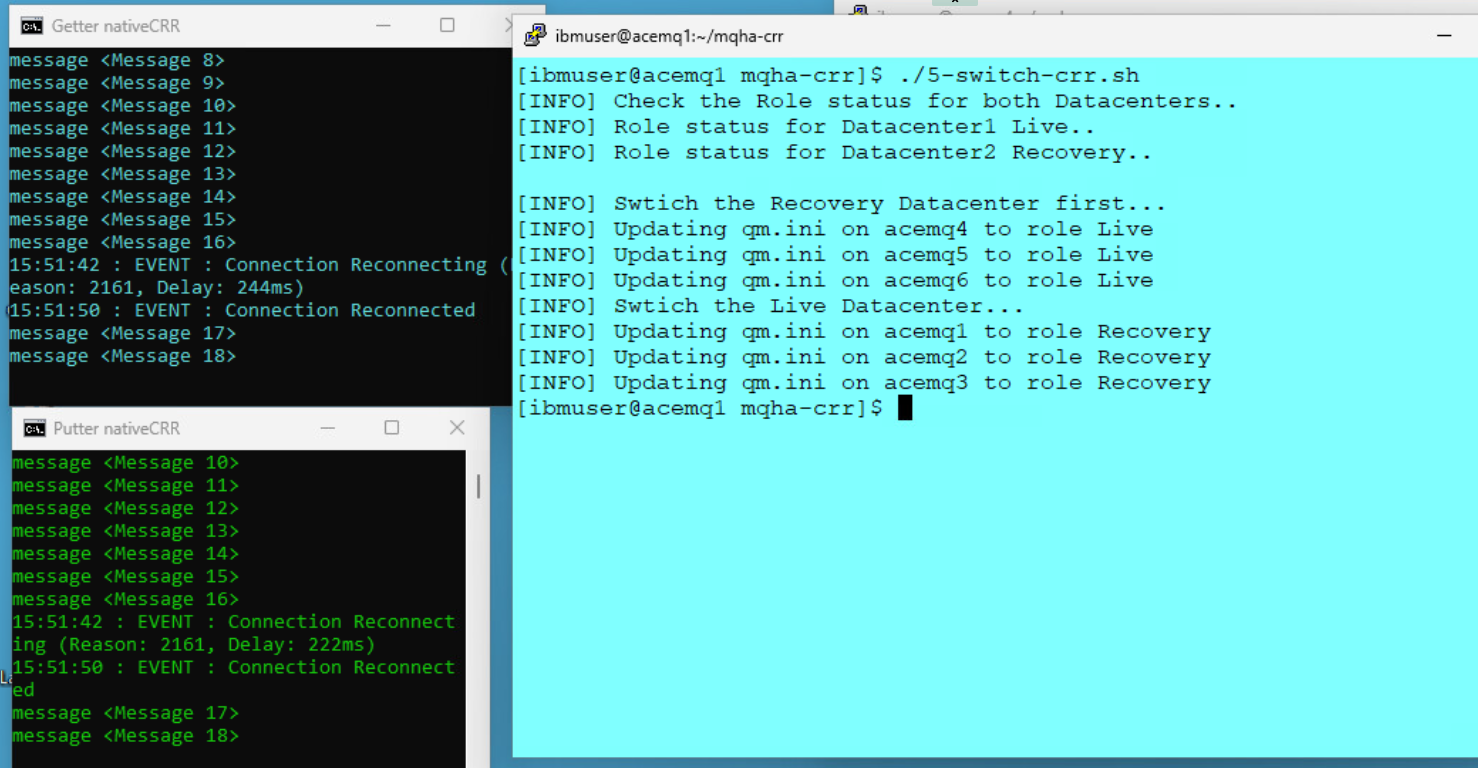
Note: Here you will see the switch script will determine which is Live and which is Recovery. It will then switch the Roles and restart the QMgr.
You will also observe that the putter and getter programs will reconnect to the new active instance of the QMgr. -
You can now run the ./get-status.sh again to see current status and then the ./5-switch-crr.sh to switch roles back.
./get-status.sh./5-switch-crr.sh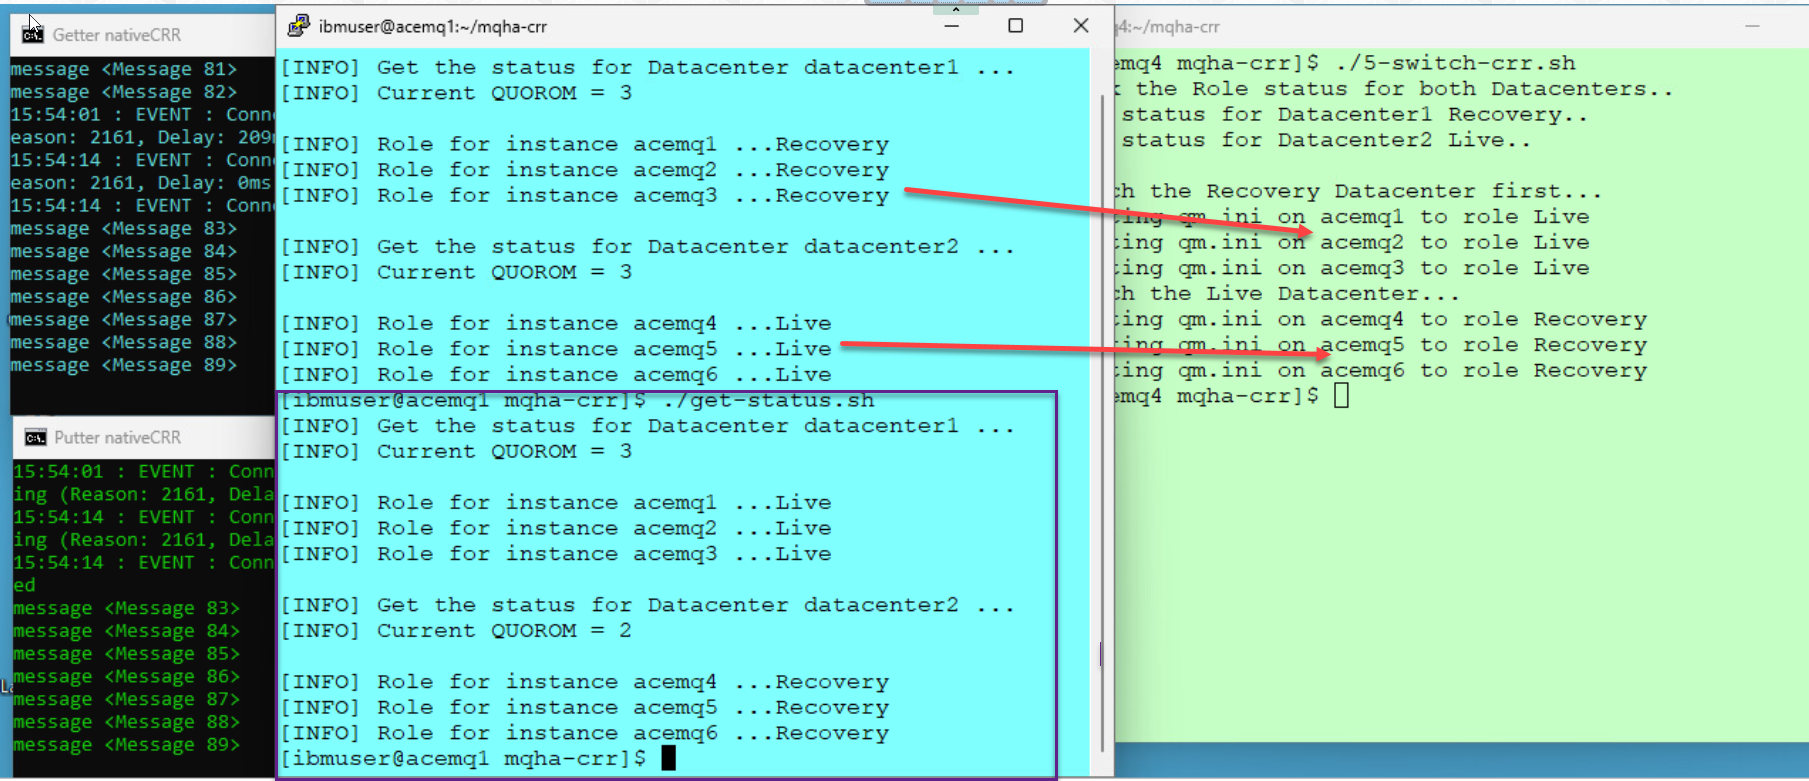
6. Summary
Congratulations! At this point, you ought to be familiar with the process of configuring IBM MQ Cross Region Replication between a Primary region and a Secondary region.